Loading…


KnowledgeBase
Knowledge Base FAQ: Answers to Common Questions About Articles, Collections, Publishing and Your Help Center
Introduction#
The Knowledge Base lets you build your own public help center inside AiEngage CRM. You write articles, group them into collections and publish them for your customers.
This FAQ answers the questions people ask most often. Each answer has a screenshot that shows exactly where to click, followed by a What this screenshot shows section that explains the screen. Where a topic has its own step-by-step guide, a Learn more link takes you there.
The questions are grouped into five sections:
Getting started
Writing articles
Organising and managing articles
Importing and measuring
Your public help center
The screenshots use a sample help center called YourCompany Help Center with sample articles.
Section 1: Getting started#
Where do I find the Knowledge Base?#
Click the open-book icon in the left rail of AiEngage CRM. The Knowledge Base side panel opens next to it, and the Articles page opens on the right.
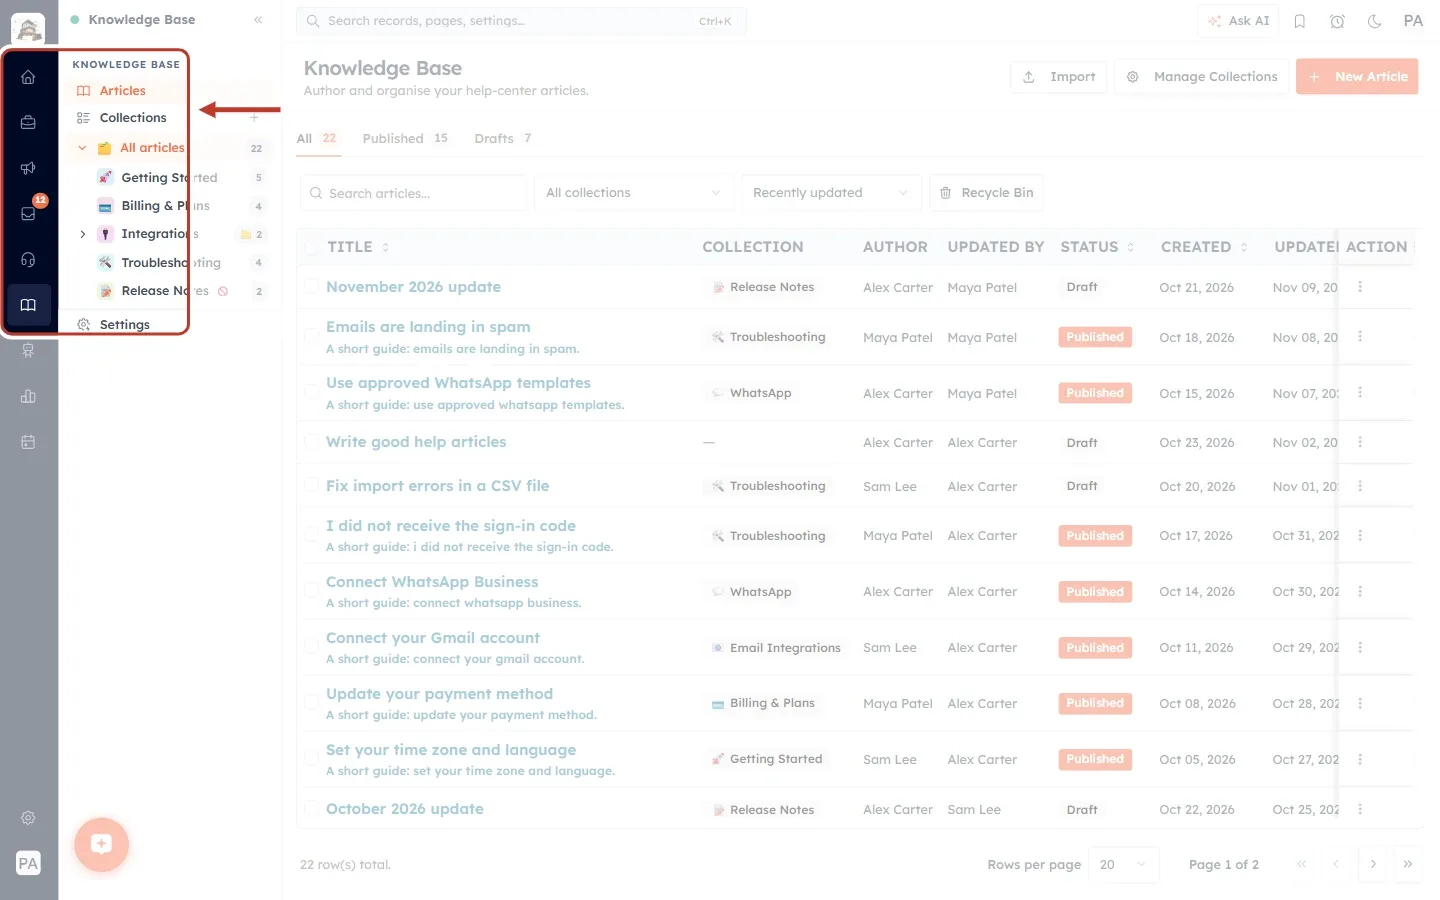
What this screenshot shows. The left rail and the top of the Knowledge Base side panel, ringed.
The highlighted open-book icon in the dark left rail opens the Knowledge Base.
The side panel is titled Knowledge Base. It lists Articles, Collections, your collection tree under All articles, and Settings at the bottom.
On the right is the Articles page with the list of all your help articles.
Who can use the Knowledge Base?#
Administrators always have access. Other users need the Knowledge Base permission, which is off by default. An administrator turns it on in Setup → Profiles: open the user’s profile, go to Feature Permissions → Marketing and switch on Knowledge Base.
If you can’t see the open-book icon, ask your administrator to give your profile this permission.
What is the difference between a draft and a published article?#
A draft is visible only inside the CRM, to your team. A published article appears on your public help center. New articles start as drafts, so you can write and review them before customers see them.
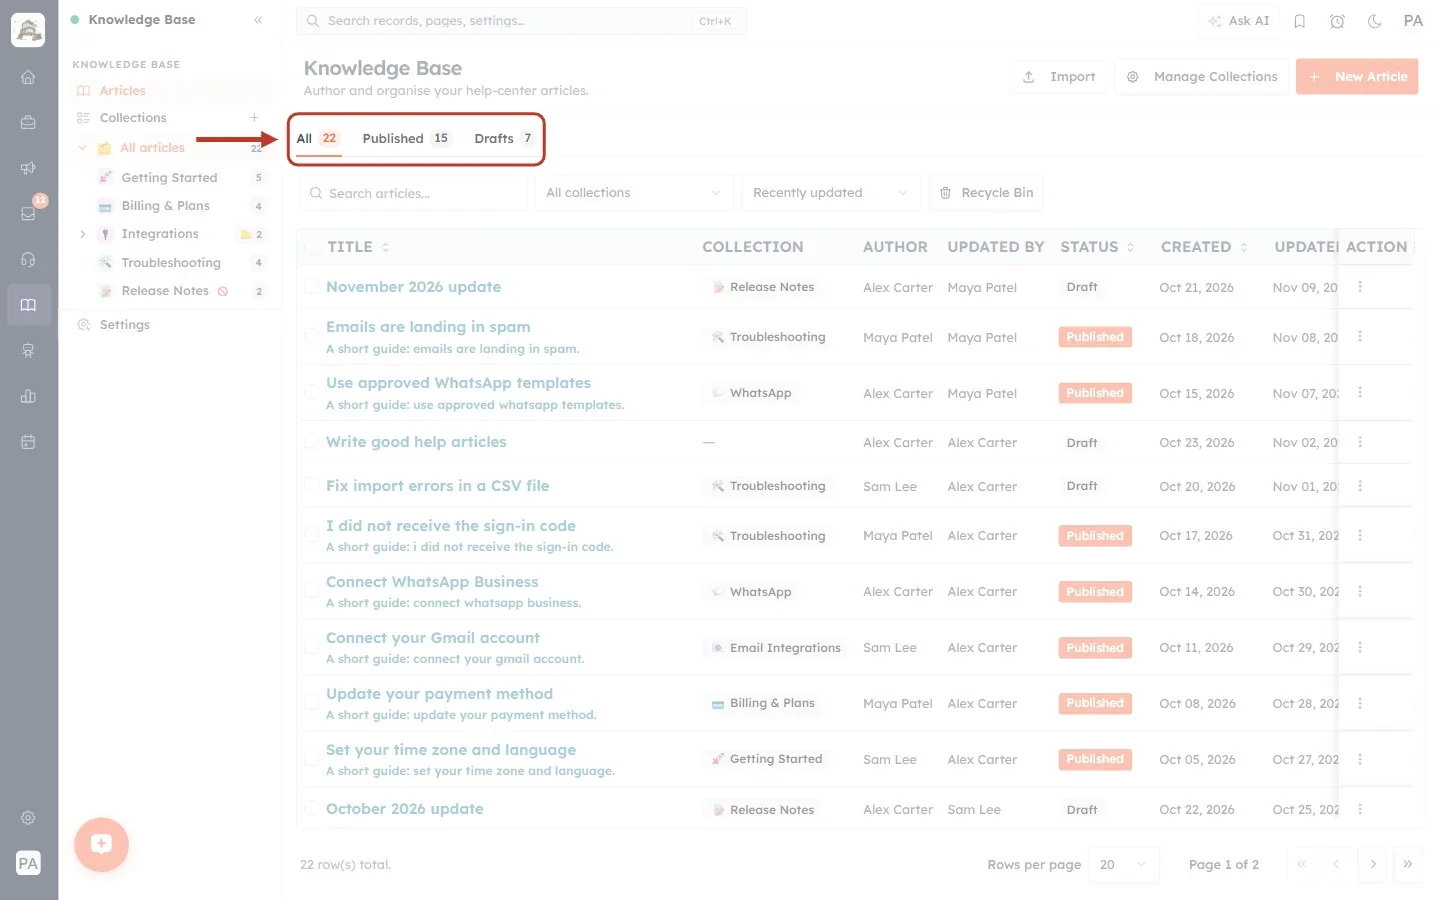
What this screenshot shows. The status tabs at the top of the article list, ringed.
All shows every article. The number next to it is the total (22 in the sample).
Published shows only the articles customers can see (15).
Drafts shows only the articles still in progress (7).
In the list below, each row’s Status column shows an orange Published badge or a grey Draft badge.
ℹ️
Drafts are not shown in the help-center preview either. Publish an article to see it there.
Section 2: Writing articles#
How do I write a new article?#
On the Articles page, click + New Article in the top-right corner. Fill in the details, write the content and click Create Article.
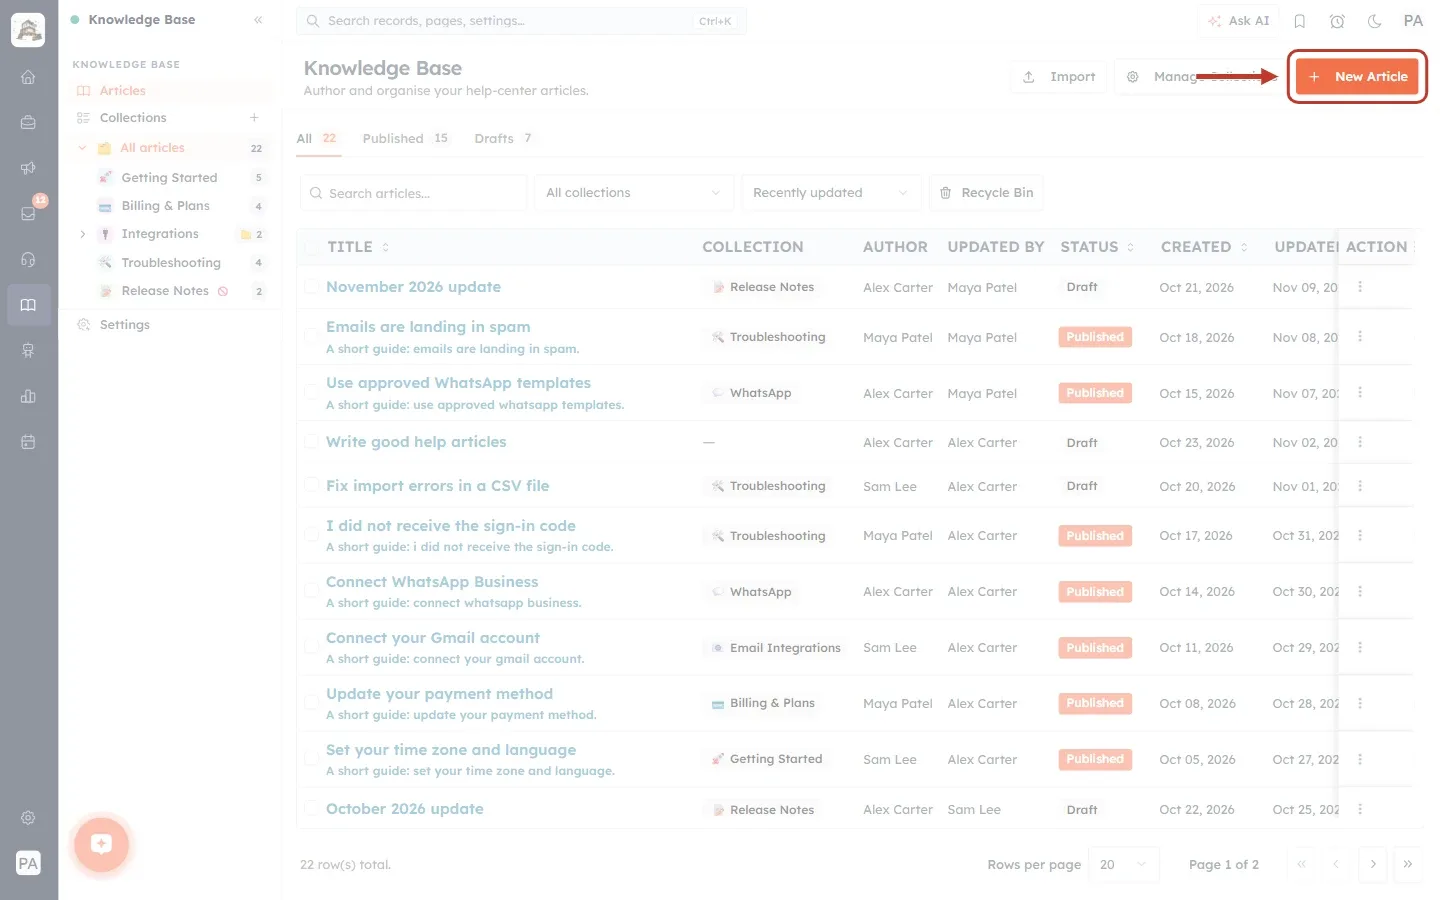
What this screenshot shows. The + New Article button ringed in the top-right corner.
Next to it are Import (bring in existing articles) and Manage Collections.
Clicking + New Article opens the New Article page.
Learn more: Create and Publish a Help-Center Article
Which fields do I have to fill in?#
Only the Title. Everything else is optional:
The Slug (the end of the article’s web address) is created from the title automatically.
The Excerpt (a short summary, up to 280 characters) appears in article listings.
Collection and Author are optional; the author defaults to you.
Status starts as Draft.
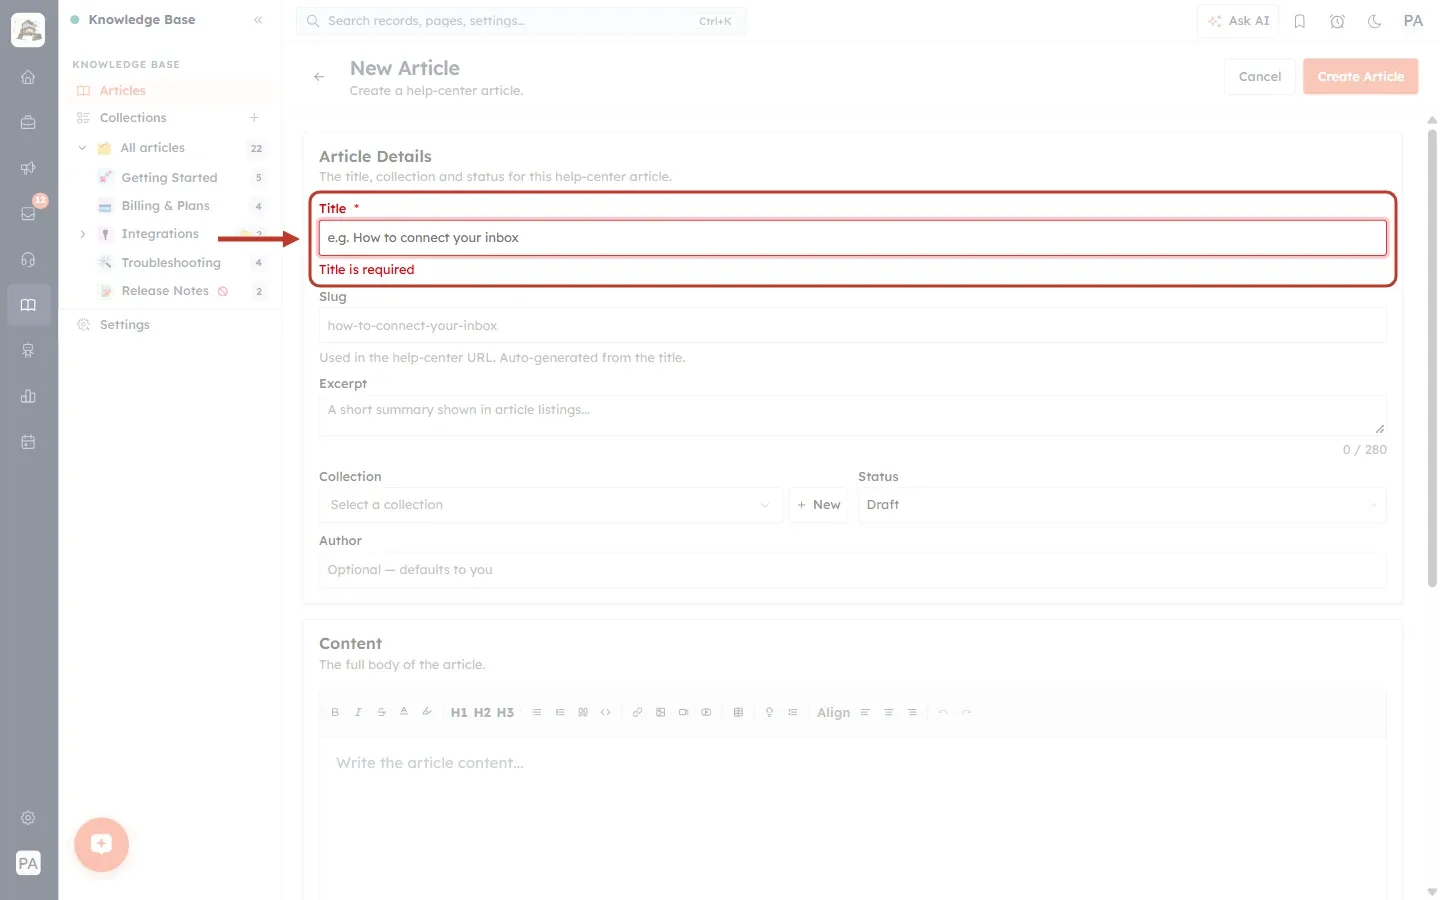
What this screenshot shows. The New Article page after clicking Create Article with an empty title, with the Title field ringed.
The Title * label and the box turn red, and “Title is required” appears under the box.
The grey text e.g. How to connect your inbox is only an example.
Below are Slug (“Used in the help-center URL. Auto-generated from the title.”), Excerpt with its 0 / 280 counter, Collection with + New, Status (Draft) and Author (“Optional — defaults to you”).
The Content box with its formatting toolbar starts at the bottom.
Can I add images, videos, tables and tips to an article?#
Yes. The editor toolbar has buttons for headings, bold and coloured text, lists, links, images, videos, YouTube embeds, tables, coloured callout boxes (like the blue box on this page) and collapsible sections.
Learn more: Format Article Content with the Rich Editor
How do I link articles together with Previous and Next?#
Open the article and use its navigation settings to choose the previous and next articles, or let the help center follow the order of the collection. The same page also has the article’s own SEO settings: meta title, meta description and share image.
Learn more: Article SEO and Navigation
Section 3: Organising and managing articles#
How do I organise articles into groups?#
Use collections. A collection is a topic group, such as Getting Started or Billing & Plans. Collections can contain sub-collections, and each one can have its own icon, colour and description.
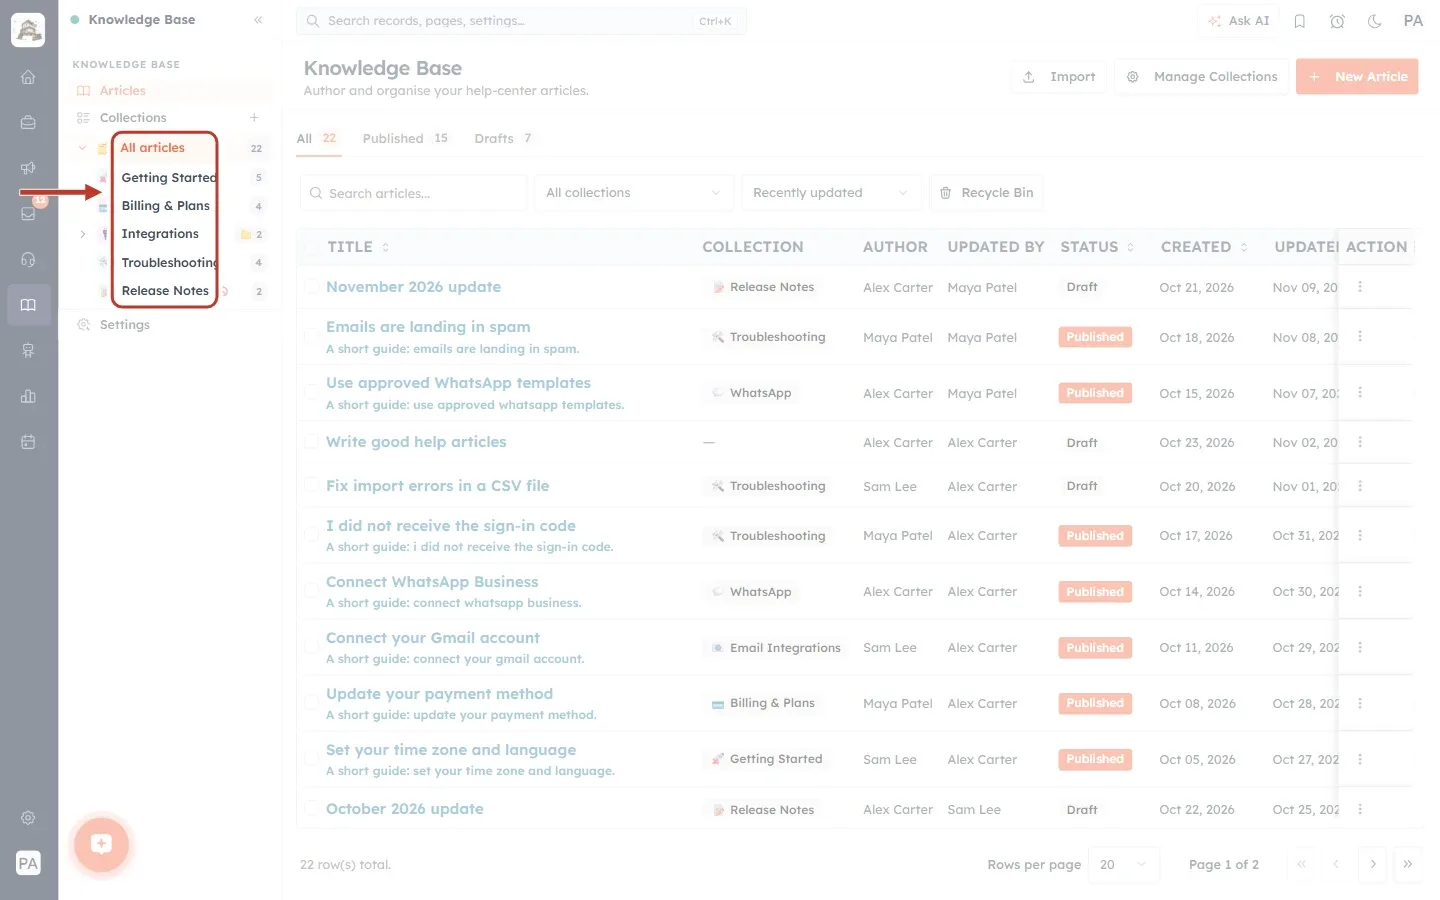
What this screenshot shows. The collection tree in the Knowledge Base side panel, ringed.
All articles (22) is at the top. Click it to see every article.
Under it are the sample collections, each with its icon and article count: Getting Started, Billing & Plans, Integrations, Troubleshooting and Release Notes.
Integrations has an arrow because it contains sub-collections.
The red ⊘ next to Release Notes means that collection is a draft and hidden from customers.
Click any collection to show only its articles. Use + next to Collections to add a new one.
Learn more: Organize Articles into Collections
How do I find a particular article quickly?#
Type part of its title in Search articles…. You can also narrow the list with the All collections filter, and change the order with the sort box.
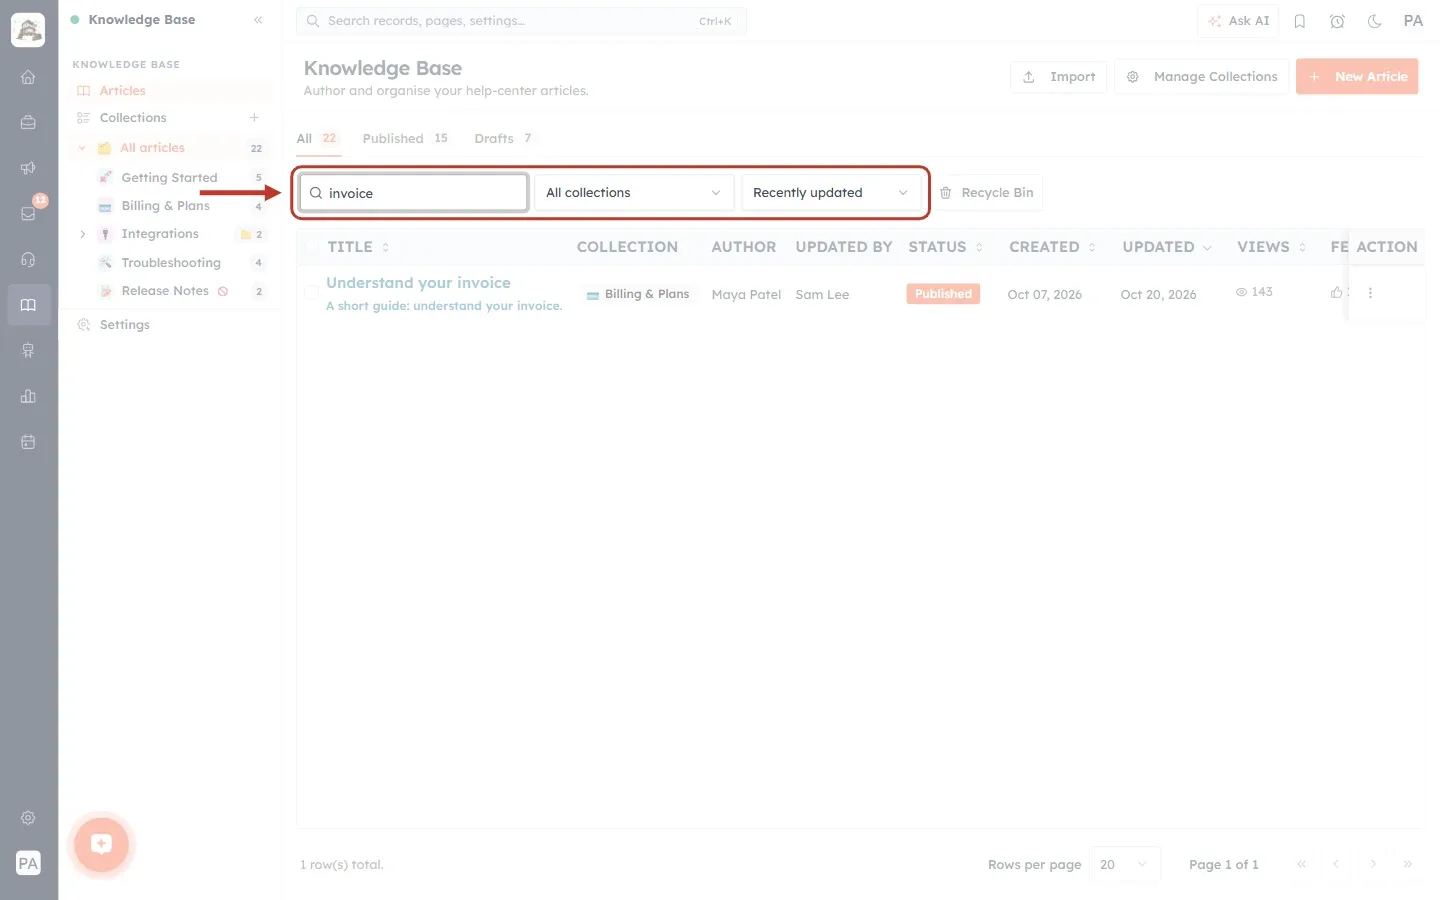
What this screenshot shows. The tool row above the article list, ringed, with invoice typed in the search box.
The list now shows only the matching article, Understand your invoice, and the footer reads “1 row(s) total”.
All collections limits the list to one collection.
The sort box (Recently updated) also offers Recently created, Title A–Z, Title Z–A and Most viewed.
To the right is the Recycle Bin button.
Can I publish or delete several articles at once?#
Yes. Tick the checkbox at the start of each row. A bar appears above the list with Publish, Unpublish and Delete.
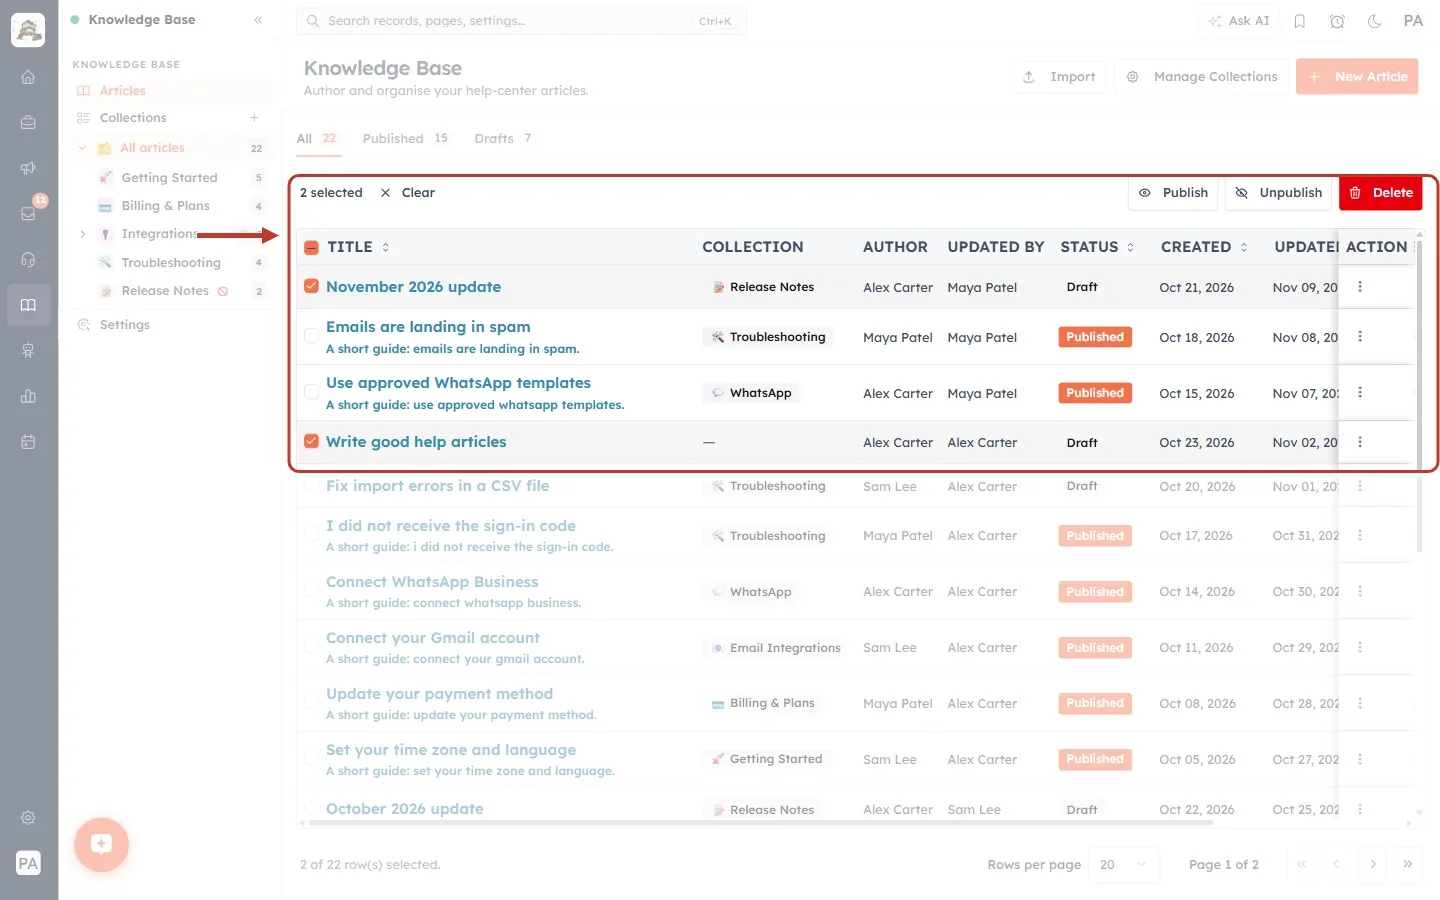
What this screenshot shows. The article list with two rows ticked, and the bulk-action bar that replaced the tool row, ringed.
The bar reads 2 selected, with × Clear to untick everything.
On the right are Publish, Unpublish and the red Delete button.
The ticked rows are November 2026 update and Write good help articles.
The checkbox in the header row ticks every article on the current page only.
How do I copy an article?#
Click the ⋮ button at the end of the article’s row and choose Clone. The copy is added as a draft named “title (Copy)”.
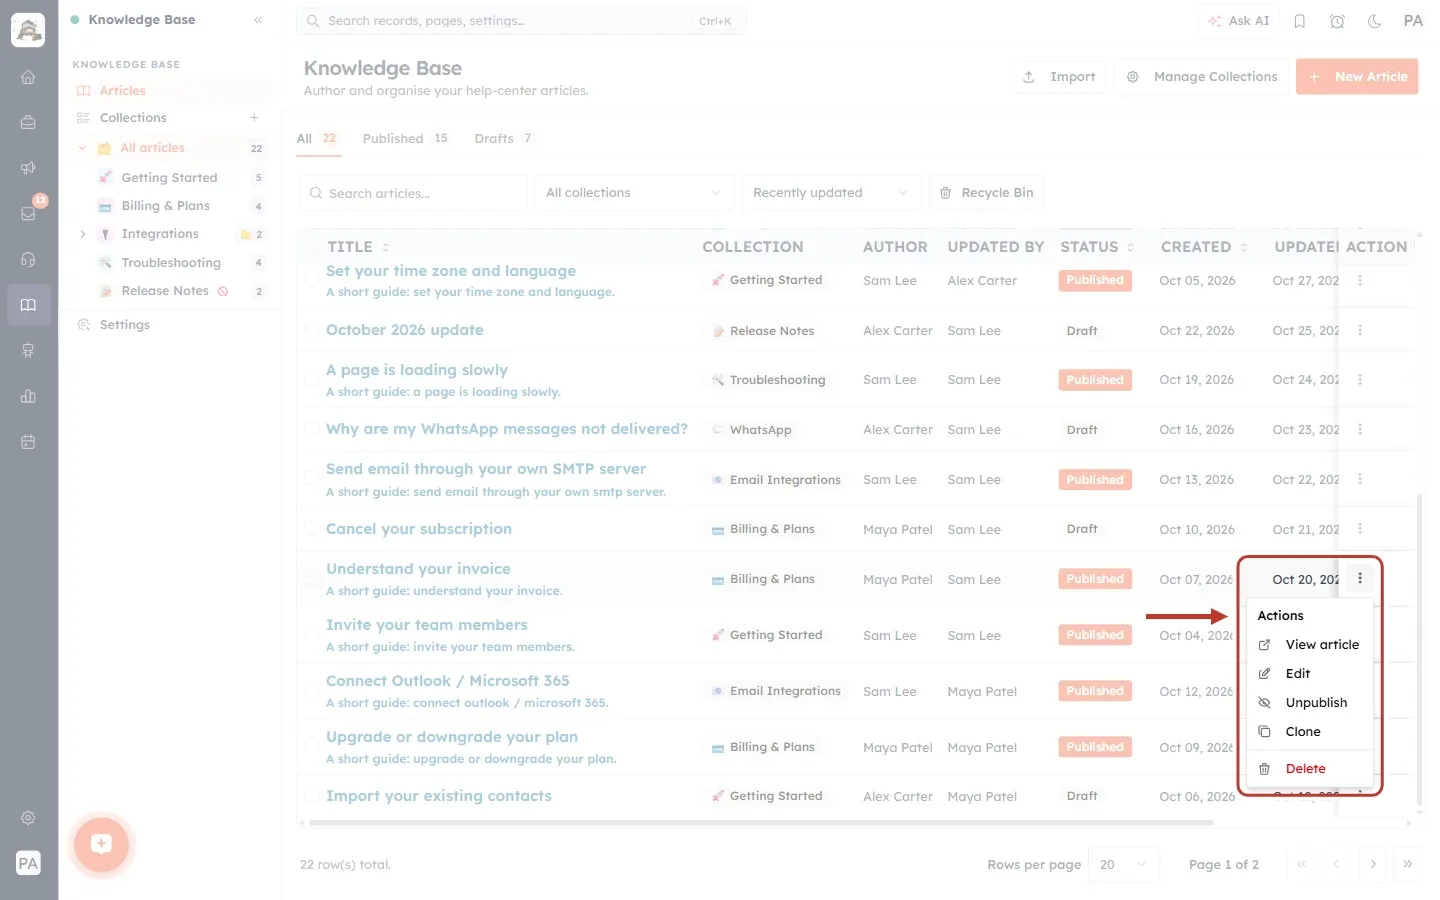
What this screenshot shows. The Actions menu opened from a published article’s ⋮ button, ringed.
View article opens the article on your help center in a new tab. It appears only for published articles.
Edit opens the article editor.
Unpublish turns the article back into a draft. For a draft, this item reads Publish instead.
Clone makes a draft copy.
Delete (red) moves the article to the Recycle Bin.
Learn more: Manage the Article List
I deleted an article by mistake. Can I get it back?#
Yes. Deleted articles go to the Recycle Bin. Click Recycle Bin, open the article’s ⋮ menu and choose Restore. The article comes back with the status it had before.
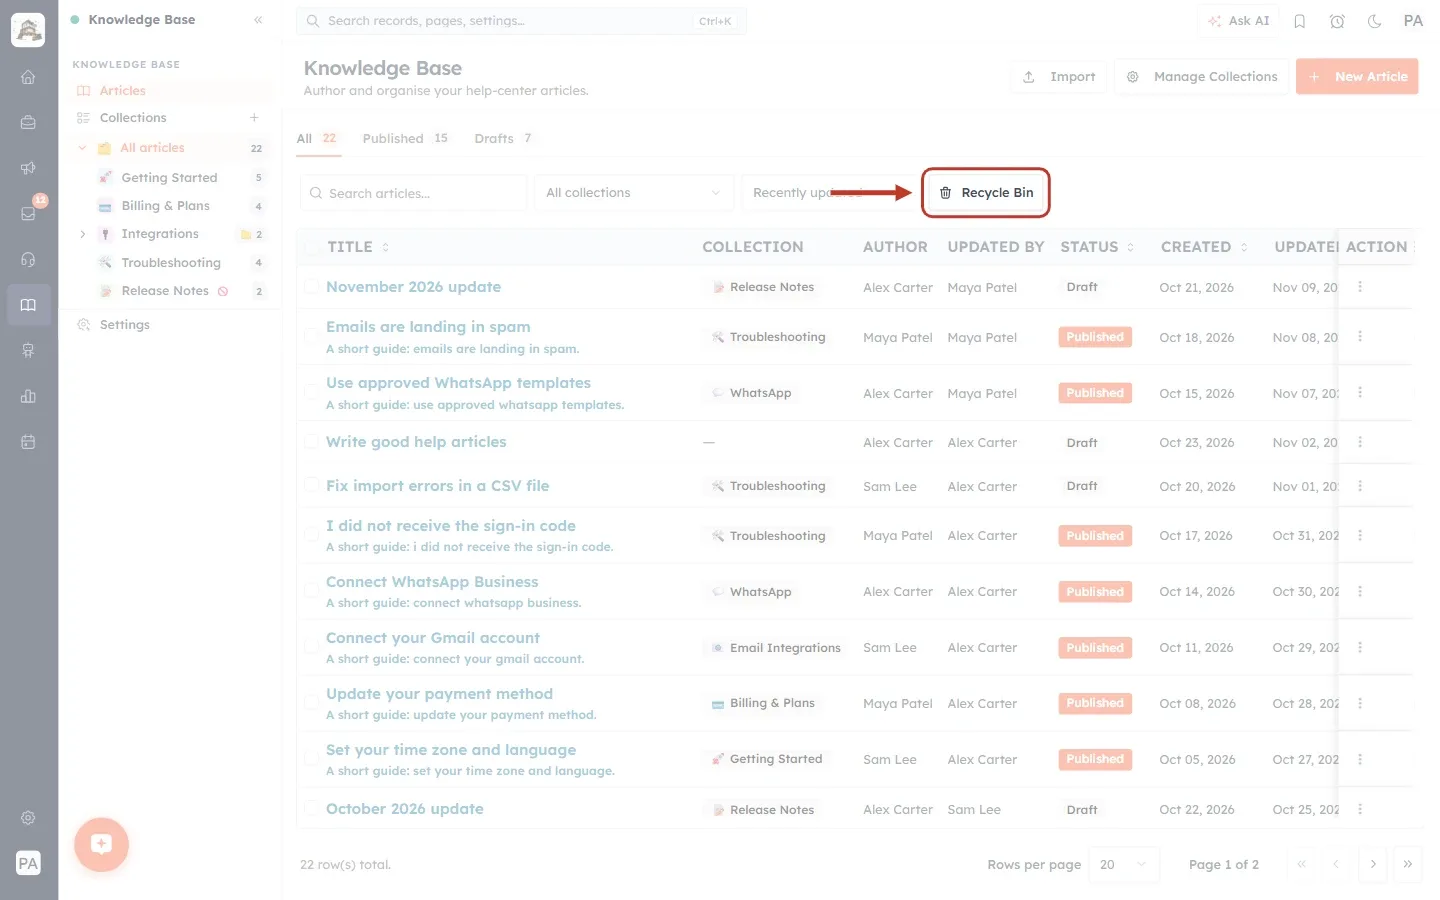
What this screenshot shows. The Recycle Bin button ringed at the right end of the tool row.
Click it once to show deleted articles. It turns orange while you are in the bin, and the status tabs are hidden.
Click it again to go back to your normal list.
In the bin, each row’s ⋮ menu has Restore and Delete forever.
⚠️
Delete forever cannot be undone. The article is removed permanently.
Learn more: Recycle Bin: Delete, Restore or Permanently Delete Knowledge Base Articles
Section 4: Importing and measuring#
Can I bring in articles I already have?#
Yes, in two ways. Click Import at the top of the Articles page:
Import from file: upload a CSV or Excel file, match its columns to article fields and import.
Import from website: give the address of your current help site. The web crawler finds the pages, you choose which ones to bring in, and they are created as drafts.
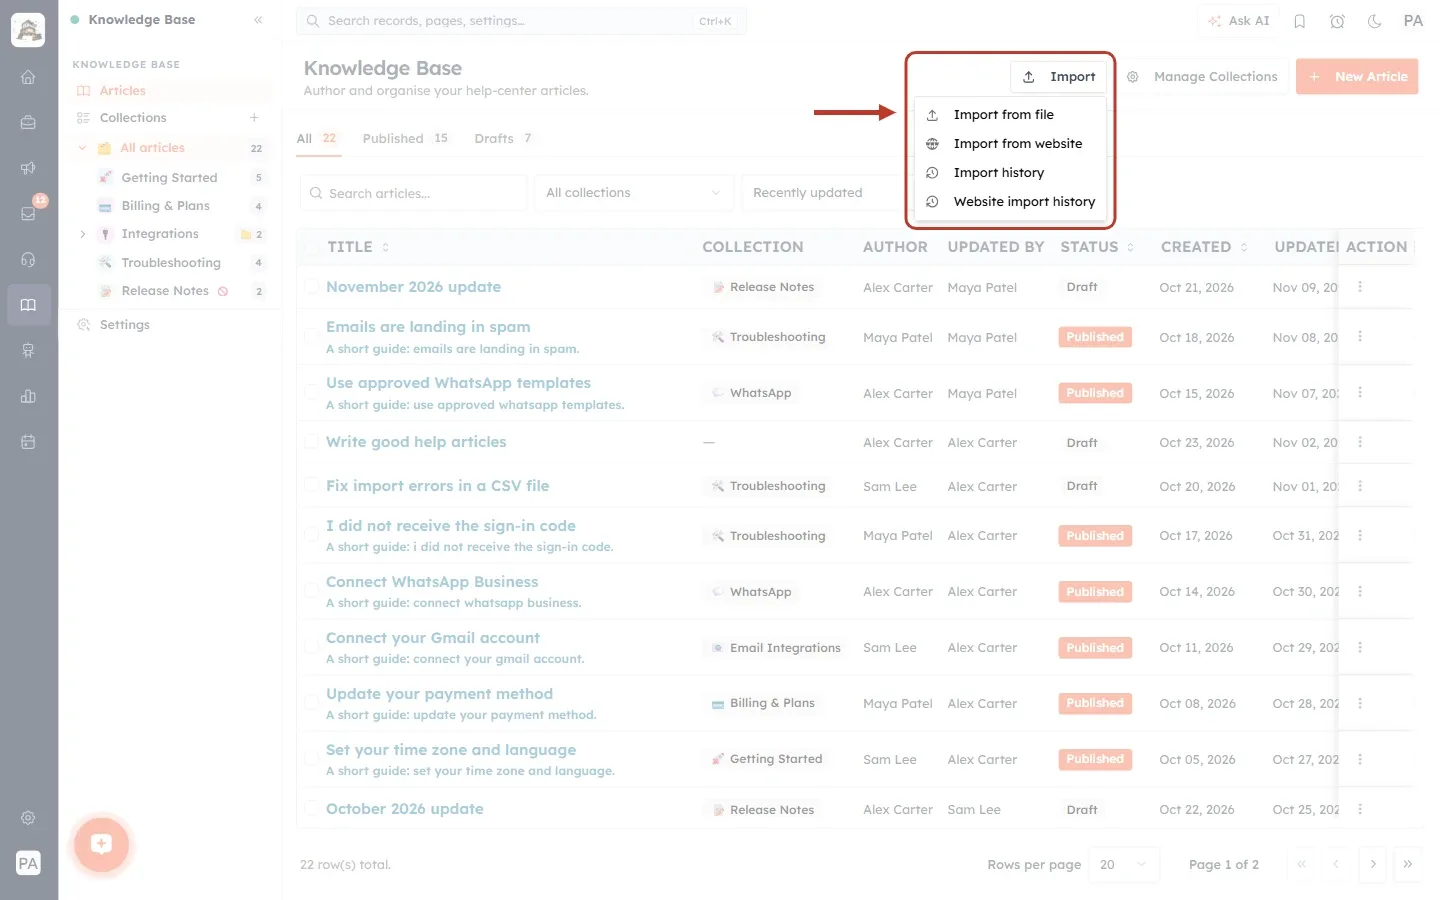
What this screenshot shows. The Import menu, ringed.
Import from file opens the file-import wizard.
Import from website opens the web crawler.
Import history lists your past file imports and their results.
Website import history lists your past website crawls.
Learn more: Import Help Articles from a CSV or Excel File
Learn more: Import Articles from Your Existing Website (Web Crawler)
How do I know which articles customers read and find helpful?#
Look at the Views and Feedback columns at the right of the article list. Customers can answer “Was this article helpful?” at the end of every article, and their answers are counted here.
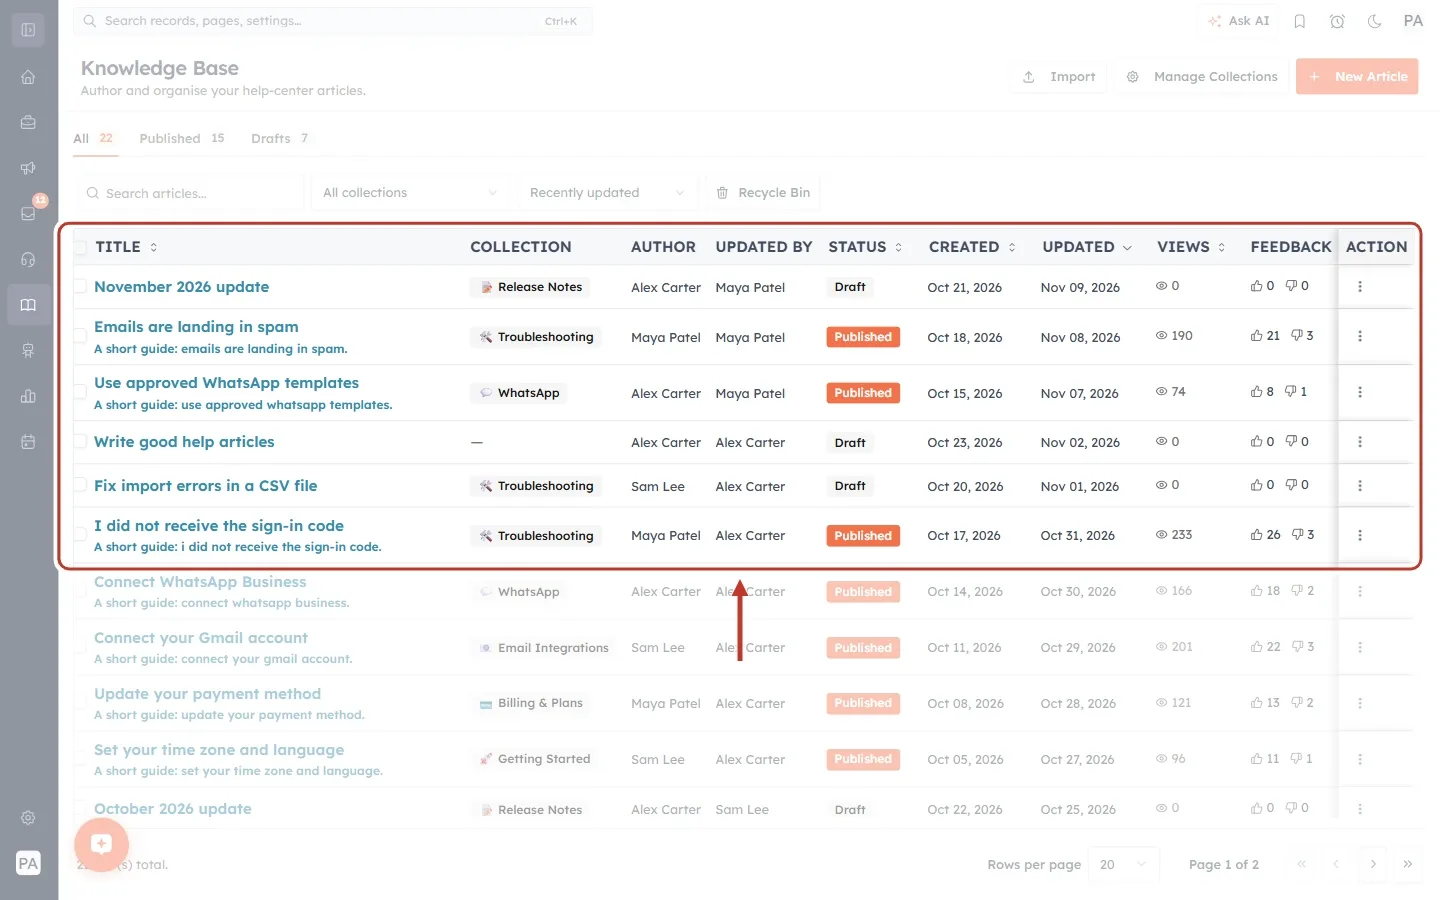
What this screenshot shows. The right-hand side of the article list, with the Views and Feedback columns ringed. The side panel is collapsed to make room.
Views (eye icon) is how many times the article has been opened, for example 190 for Emails are landing in spam.
Feedback shows thumbs-up and thumbs-down counts, for example 21 and 3.
Drafts show 0 because customers can’t see them yet.
To list your most-read articles first, choose Most viewed in the sort box.
💡
An article with many thumbs-down votes is a good one to improve first.
Section 5: Your public help center#
Why can’t my customers see my help center?#
Check two things:
Make my help center public is switched on: Knowledge Base → Settings → Preview tab. Click Save Settings after changing it.
The articles are published, not drafts, and their collection isn’t a draft.
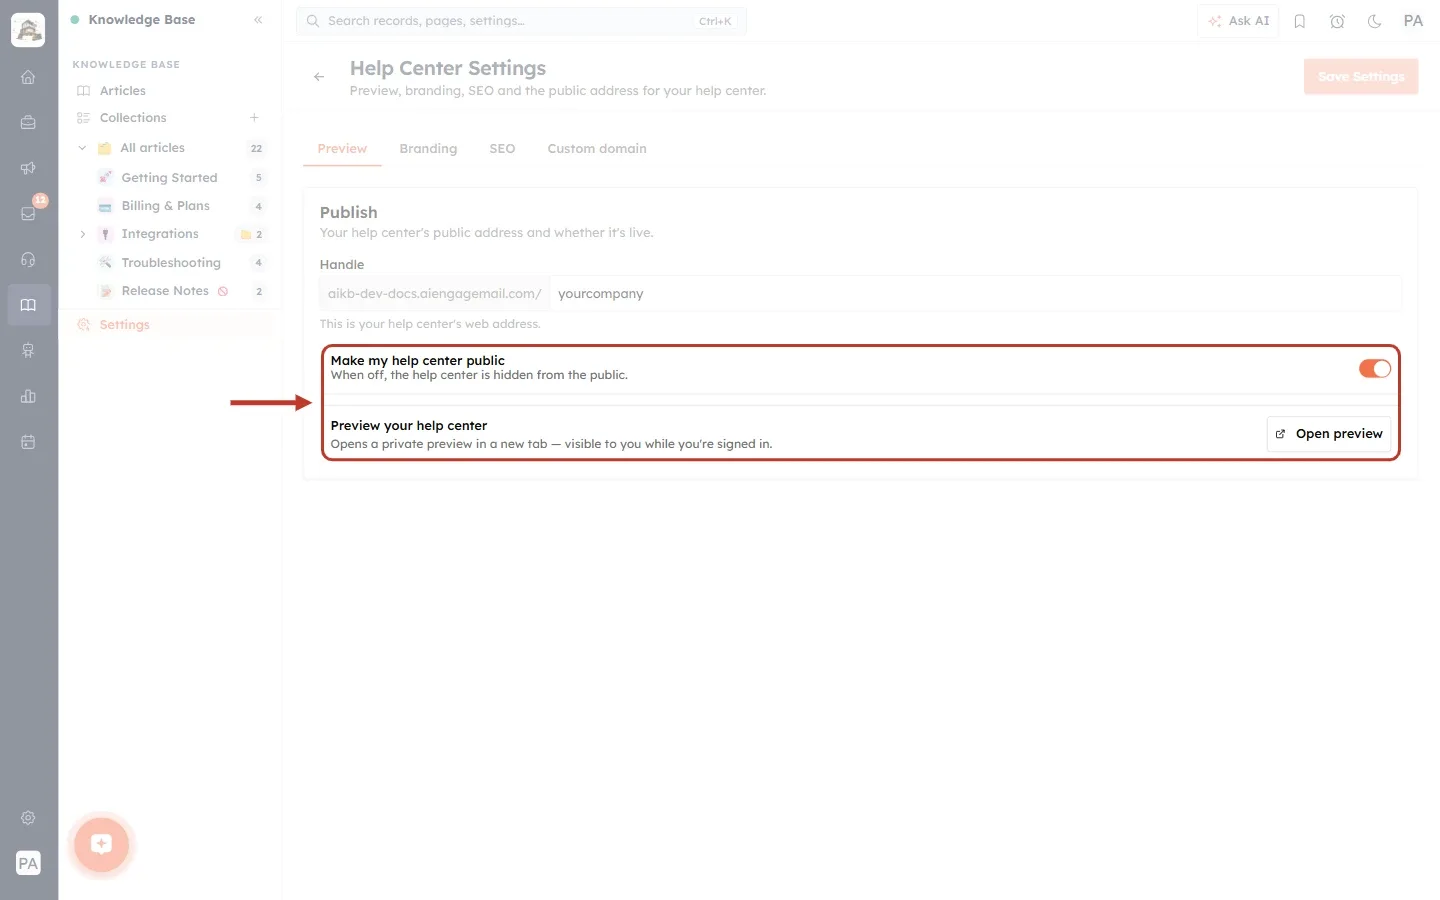
What this screenshot shows. The Preview tab of Help Center Settings, with the public switch and the preview row ringed.
Make my help center public: “When off, the help center is hidden from the public.” The orange switch shows it is on.
Preview your help center: “Opens a private preview in a new tab — visible to you while you’re signed in.”
Open preview (right) opens that private preview.
Above, the Publish card shows your Handle, the last part of your help center’s preview address.
Can I check the help center before customers see it?#
Yes. Click Open preview (shown above). The preview shows your published articles with your current branding, and only you can see it while you are signed in. Save your settings first, because unsaved changes don’t appear in the preview.
Learn more: Preview Your Help Center Privately Before Customers See It
How do I change the look of my help center?#
Go to Knowledge Base → Settings:
The Branding tab sets the brand name, tagline, logo, accent colour, light or dark theme, the search banner (hero), the footer and the call-to-action banner under articles.
The SEO tab sets the favicon, the meta description and the social share image.
Click Save Settings when you are done.
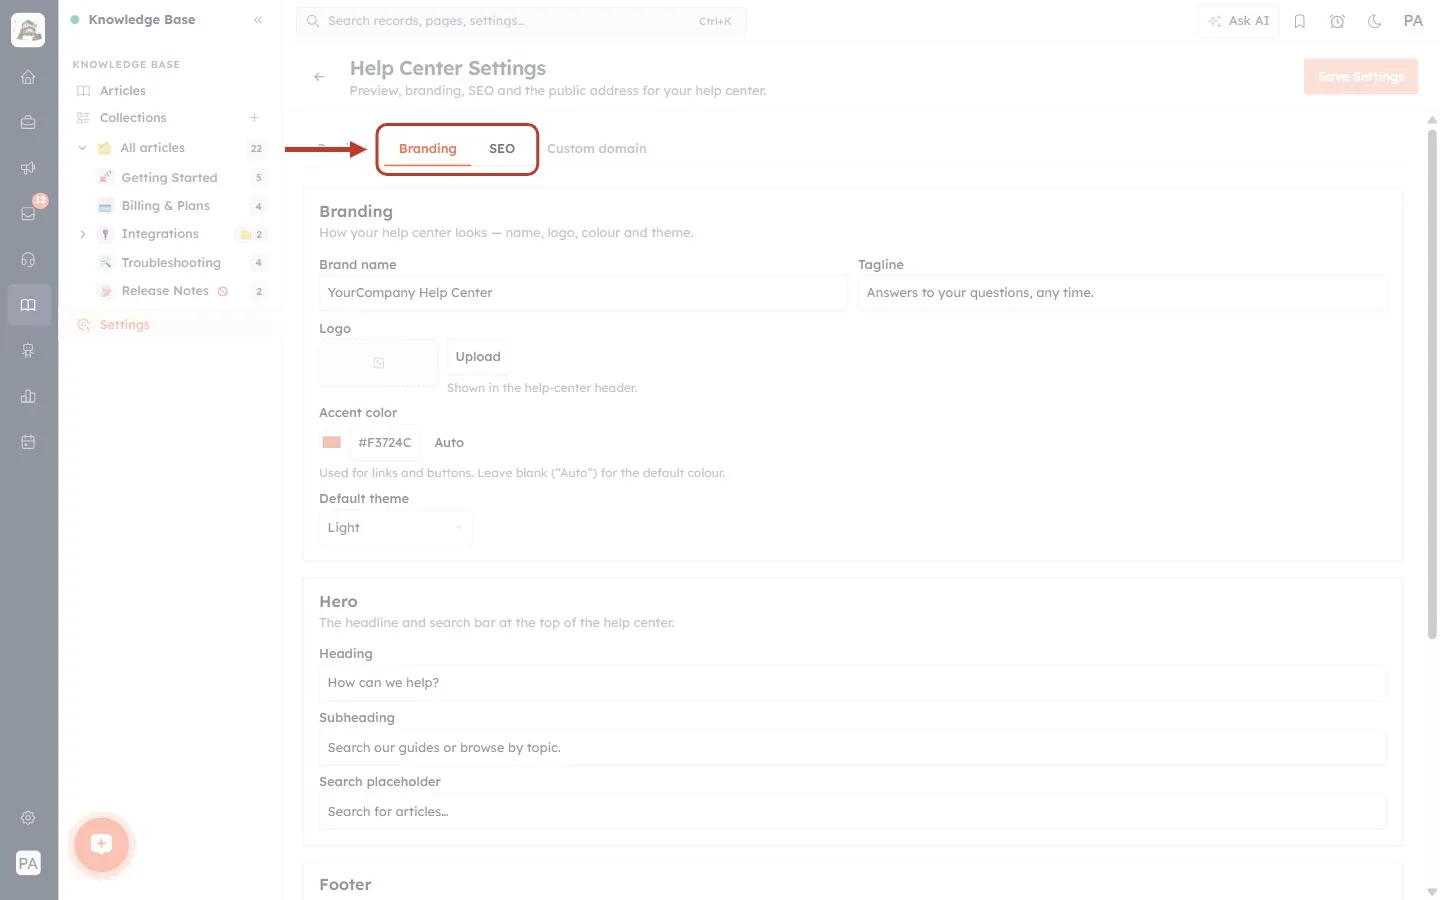
What this screenshot shows. Help Center Settings open on the Branding tab, with the Branding and SEO tabs ringed.
The Branding card shows Brand name (YourCompany Help Center), Tagline, Logo with Upload, Accent color (#F3724C, with Auto) and Default theme (Light).
The Hero card below sets the heading, subheading and search placeholder at the top of the help center.
Scroll down for the Footer and the article call-to-action.
Save Settings (top right) is pale until you change something.
Learn more: Brand and Publish Your Help Center
Learn more: Footer, Call-to-Action and SEO for Your Help Center
Can my help center use my own web address?#
Yes. On the Custom domain tab, enter a sub-domain such as help.yourcompany.com and click Connect domain. Add the CNAME record shown at your DNS provider, then click Verify. When the badge reads Live, customers can use your address. Your preview address keeps working either way.
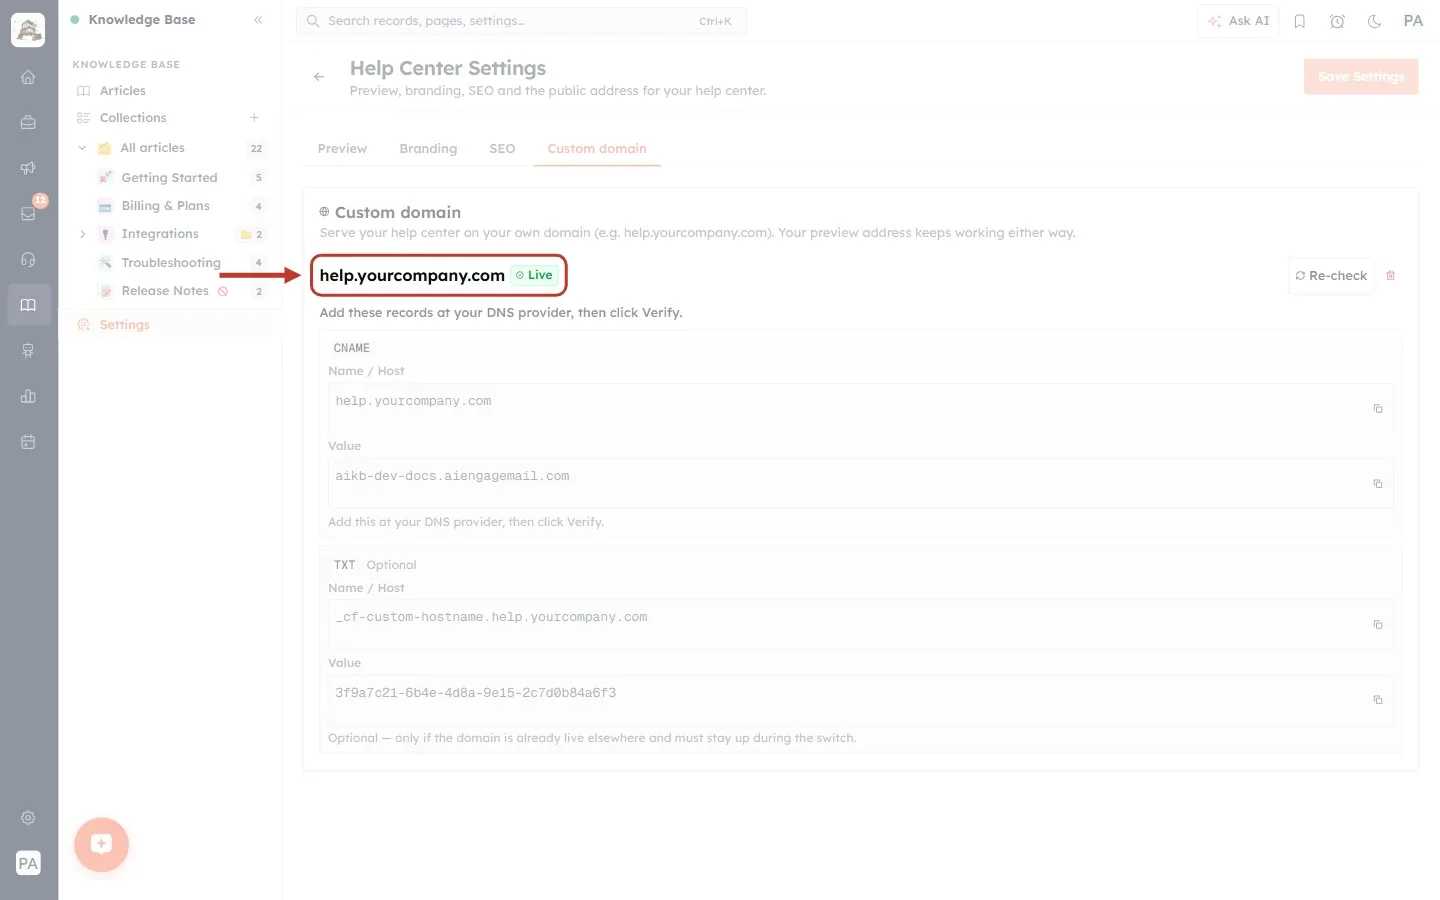
What this screenshot shows. The Custom domain tab with a working domain, ringed.
help.yourcompany.com is the connected domain.
The green Live badge means it is working.
On the right, Re-check checks the domain again, and the red bin icon removes it.
Below are the DNS records (CNAME, and an optional TXT) to keep at your DNS provider.
Learn more: Connect a Custom Domain to Your Help Center
More quick answers#
Do I need to click Save after every change in Settings?
Yes, on the Preview, Branding and SEO tabs: click Save Settings. The Custom domain tab is different: its buttons take effect immediately.
Can I unpublish an article without deleting it?
Yes. Choose Unpublish in its ⋮ menu. It becomes a draft and disappears from the help center, but stays in your list.
Can I hide a whole collection?
Yes. Set the collection’s status to Draft. It is marked with ⊘ in the side panel and hidden from customers.
How many articles are shown per page in the list?
20 by default. Change it with Rows per page (10, 20, 30, 40 or 50) at the bottom of the list.
Can I use a bare domain like yourcompany.com?
No. Use a sub-domain such as help.yourcompany.com.
Previous and next#
Related#
Was this article helpful?
Ready to implement this?
OpenAI Engage and apply what you just learned to your own workspace.
Open AI Engage CRM