Loading…


KnowledgeBase
Manage the Article List: Find, Sort, Publish, Clone, Delete and Restore Help-Center Articles
Introduction#
Once your help center grows past a handful of articles, you need a quick way to find, check and tidy them. The Articles page of the Knowledge Base is that place. It lists every article in one table, with its collection, author, status, dates, views and customer feedback, and it lets you act on one article or many at once.
In this article we go through the Articles page one part at a time:
The page layout, the buttons at the top and the status tabs.
Finding articles with search, the collection filter and sorting.
Reading the columns, including views and feedback, and sorting or hiding a column.
The actions for a single article: view, edit, publish or unpublish, clone and delete.
Selecting several articles to publish, unpublish or delete them in one go.
The Recycle Bin: restoring an article or deleting it forever.
Moving between pages and choosing how many rows to show.
Every screenshot is followed by a What this screenshot shows section that explains the whole screen, so you can compare it with what you see in your own account.
ℹ️
The screenshots use sample articles (Getting Started, Billing & Plans, Troubleshooting and so on). Your own titles, numbers and dates will be different, but every button is in the same place.
Before you begin#
You need access to the Knowledge Base. Administrators always have it. Other users need the Knowledge Base permission in their profile (Setup → Profiles → Feature Permissions → Marketing → Knowledge Base).
Open the Articles page. Click the Knowledge Base icon (the open book) in the left rail. The Knowledge Base always opens on the Articles page. You can also click Articles in the Knowledge Base side panel.
Part 1: The Articles page at a glance#
Step 1: Look at the whole page#
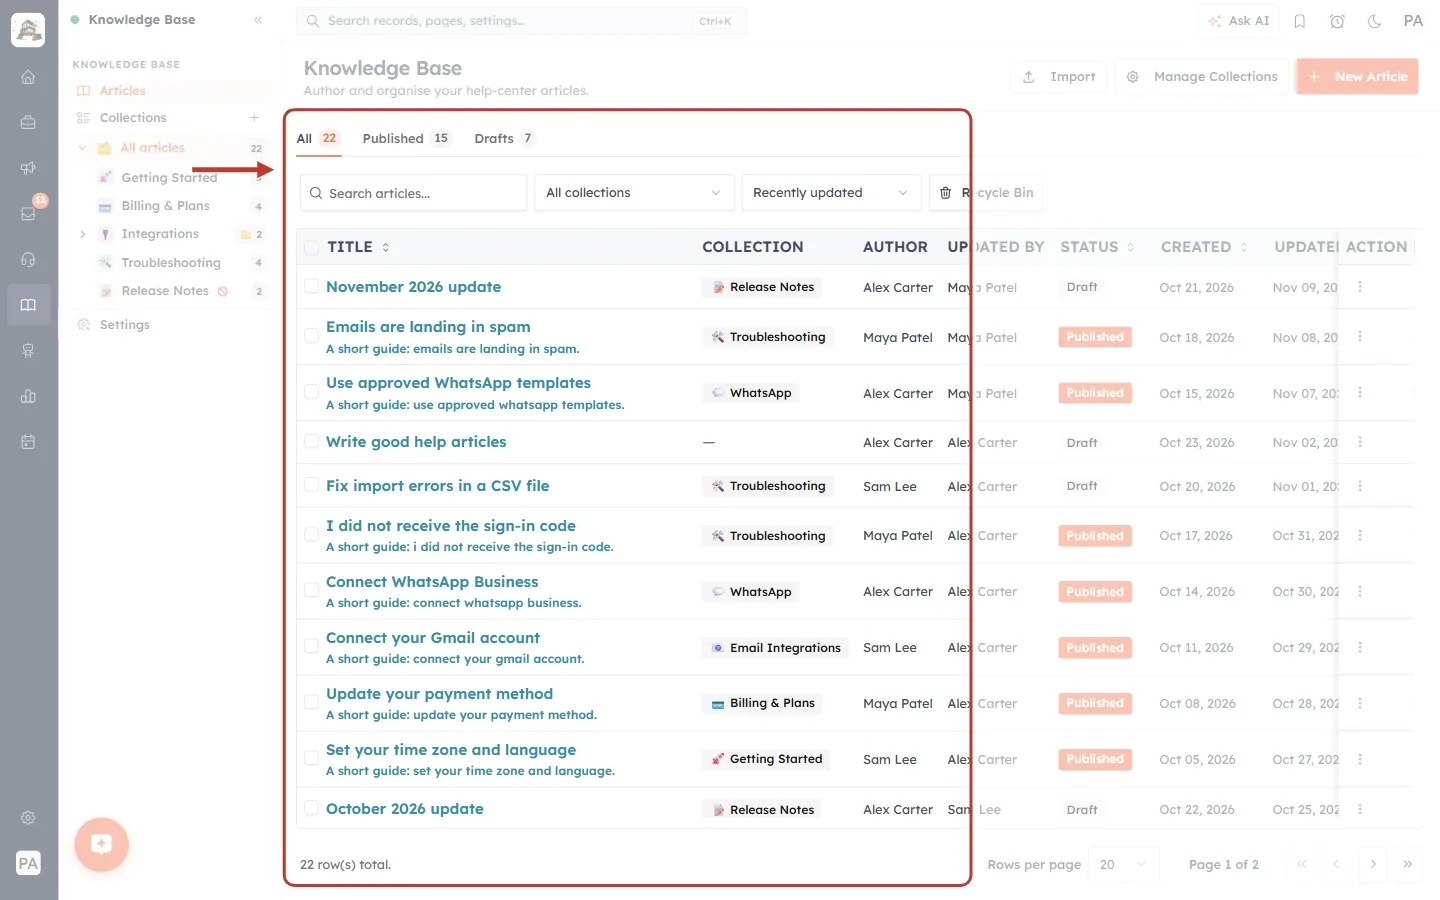
What this screenshot shows. The Knowledge Base Articles page, with the tabs, the tools and the article table ringed.
At the top: the heading Knowledge Base, “Author and organise your help-center articles.”
The tabs: All, Published and Drafts, each with a count.
The tool bar: Search articles…, All collections, Recently updated and Recycle Bin.
The article table: one row per article, with the title (and its short summary underneath), collection, author, who last updated it, status, dates and an action menu.
At the bottom left: the total, for example “22 row(s) total”. At the bottom right: the page controls (Part 7).
On the left, the Knowledge Base side panel with Articles (highlighted), Collections, the collection tree and Settings.
Step 2: The buttons at the top right#
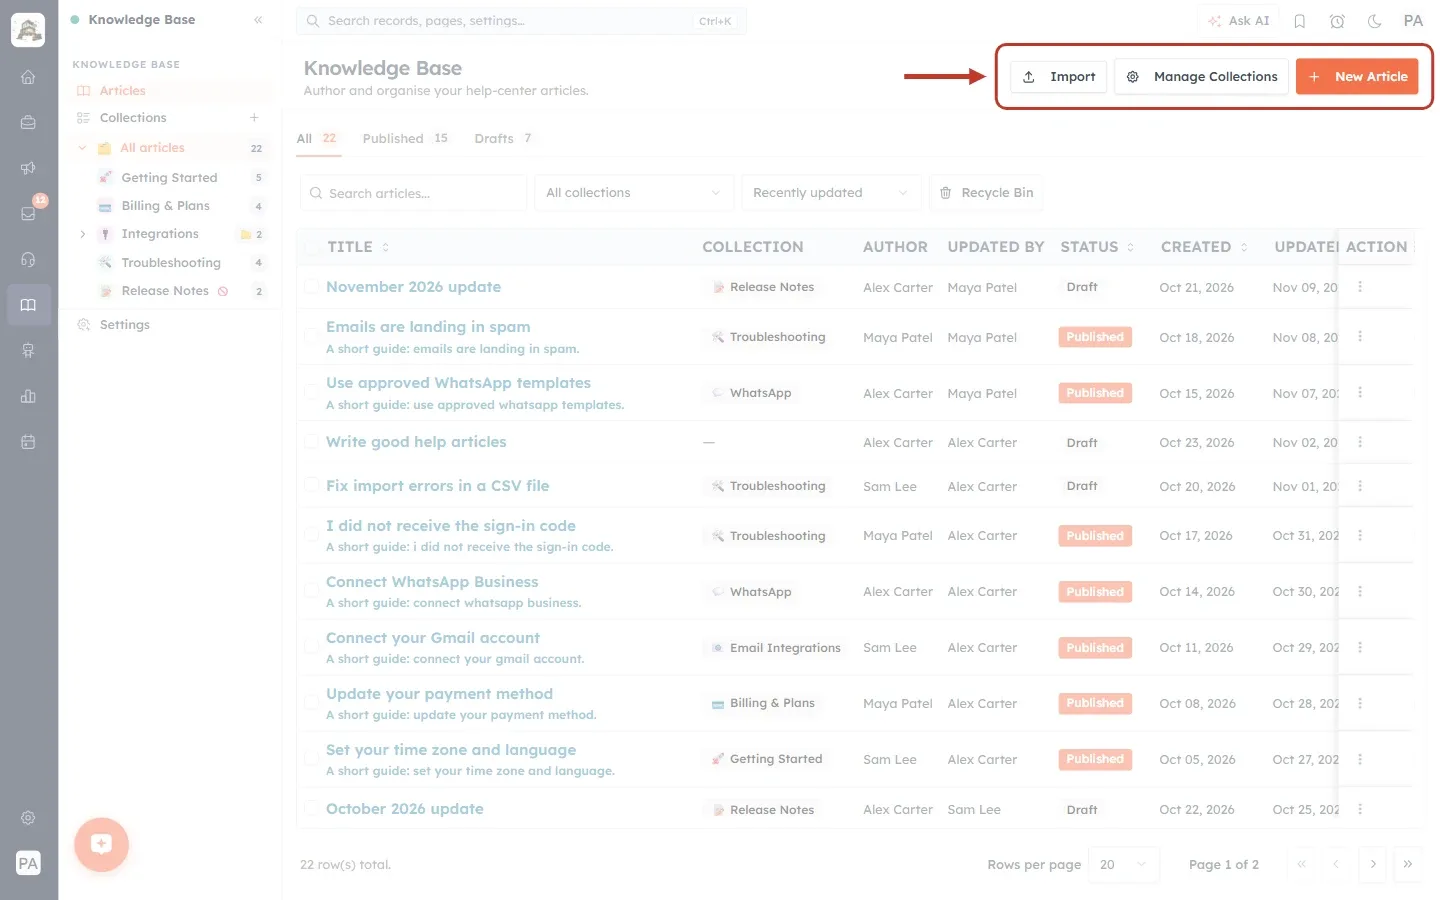
What this screenshot shows. The three buttons at the top right of the page, ringed together.
Import: brings articles in from an existing website or from a file. Imported articles arrive as drafts.
Manage Collections: opens the Collections page, where you create and order collections. See Organize Articles into Collections.
New Article (orange): starts a new article. See Create and Publish a Help-Center Article.
Step 3: Switch between All, Published and Drafts#
The tabs above the table show the number of articles in each group. Click a tab to show only that group.
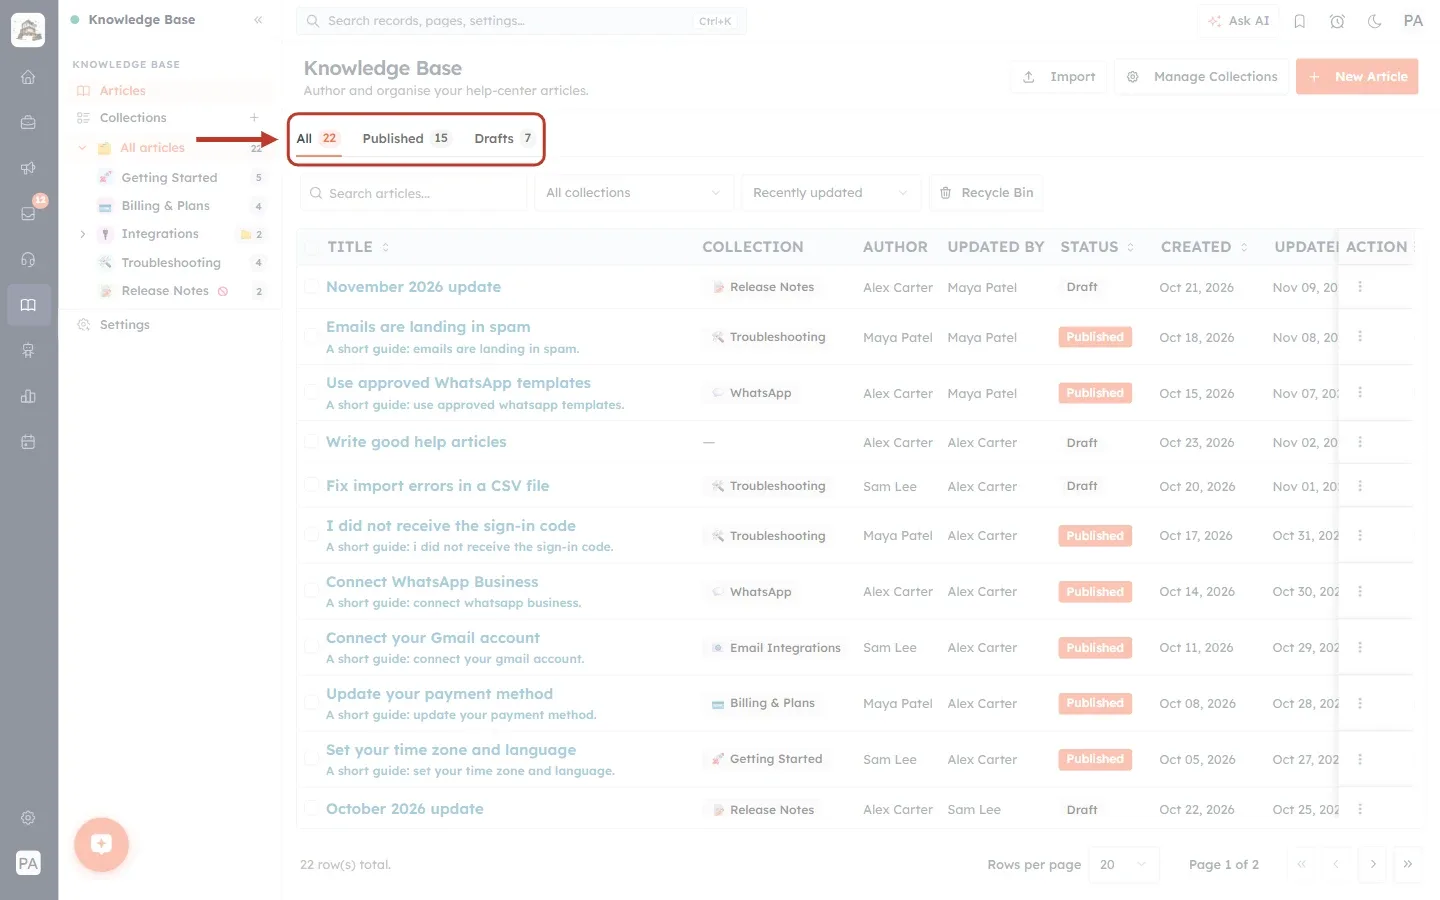
What this screenshot shows. The three status tabs ringed.
All 22: every article that is not in the Recycle Bin. It is underlined in orange because it is the tab in use.
Published 15: articles customers can see on your help center.
Drafts 7: articles that are saved but hidden from customers.
The counts update straight away when you publish, unpublish or delete articles.
Step 4: See only your drafts#
Click Drafts to list only the articles that are not live yet. This is a good place to check what still needs finishing.
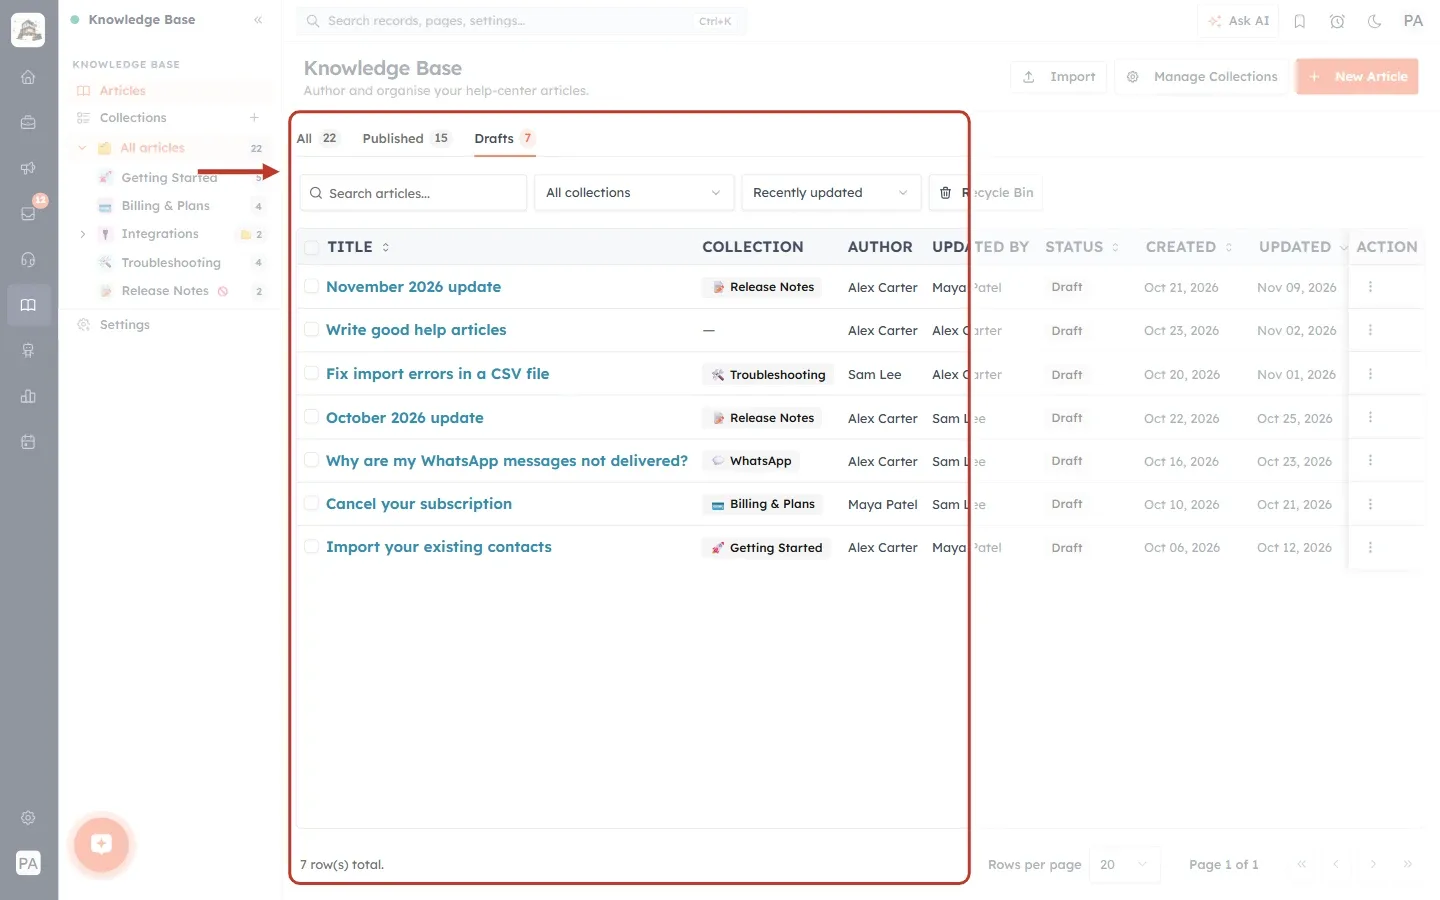
What this screenshot shows. The Drafts tab selected, with the shorter list ringed.
Drafts is now underlined in orange.
Every row shows the grey Draft status.
The total at the bottom now reads 7 row(s) total, the same as the count on the tab.
The search box, collection filter and sorting still work inside this tab.
Part 2: Find articles#
Step 5: Search by title#
Click Search articles… and type a word from the title. The list filters as you type.
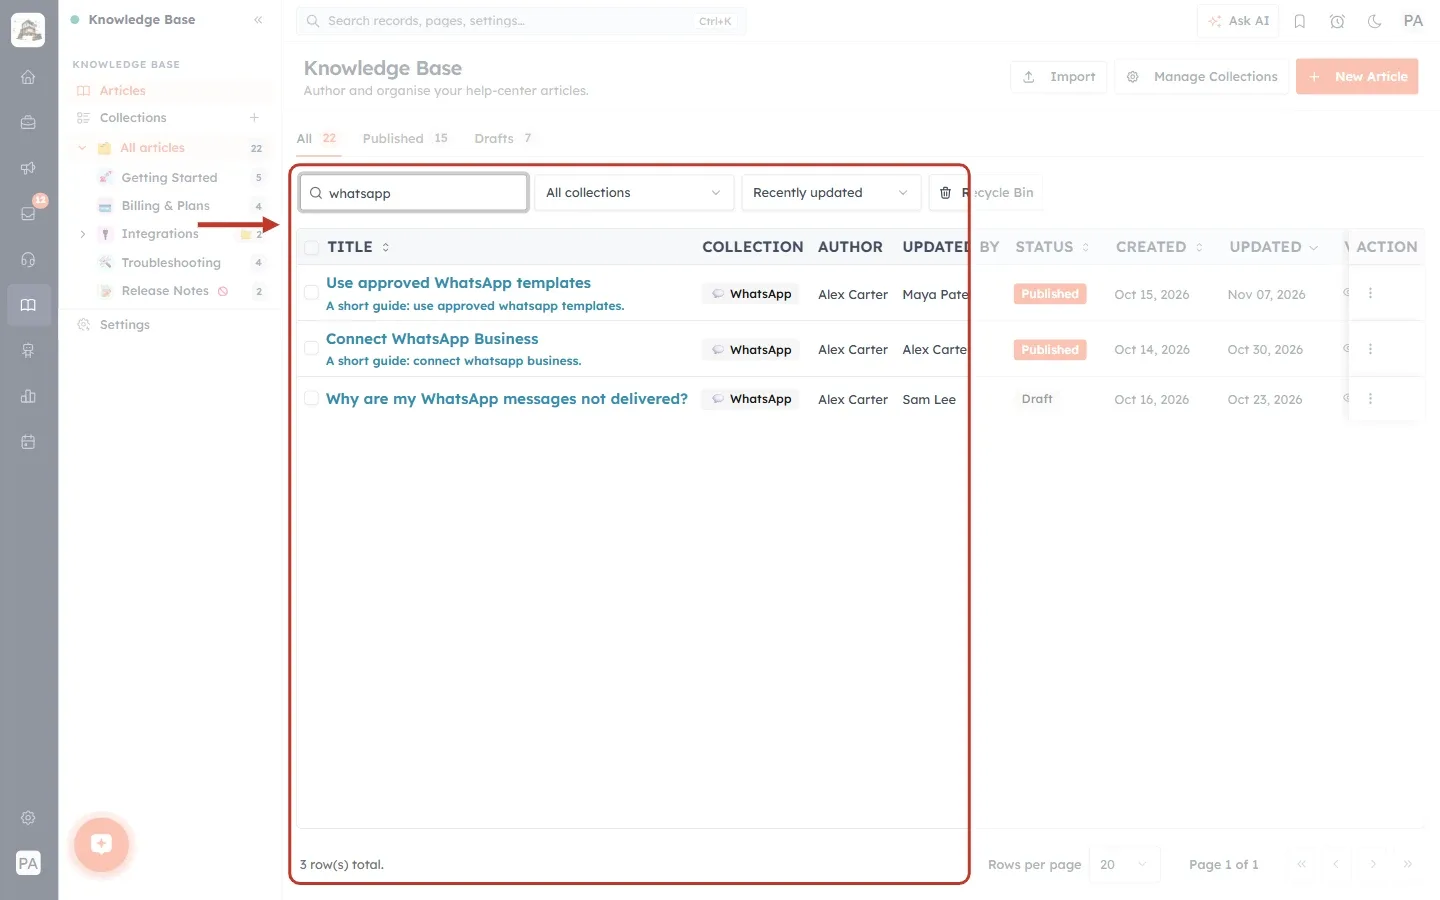
What this screenshot shows. The search box and the filtered list ringed after typing “whatsapp”.
Only three articles are left, all with “WhatsApp” in the title.
The bottom left now reads 3 row(s) total.
Clear the search box to see every article again.
Search works together with the tab you are on and the collection filter.
Step 6: Filter by collection#
Click All collections and pick a collection to see only its articles. Choose Uncategorized to find articles that are not in any collection yet. When you pick one collection, the list switches to a simple list where you can drag articles into order. This is explained in Organize Articles into Collections, Part 6.
Step 7: Change the sort order#
Click the sort box (it says Recently updated at first) to choose how the list is ordered.
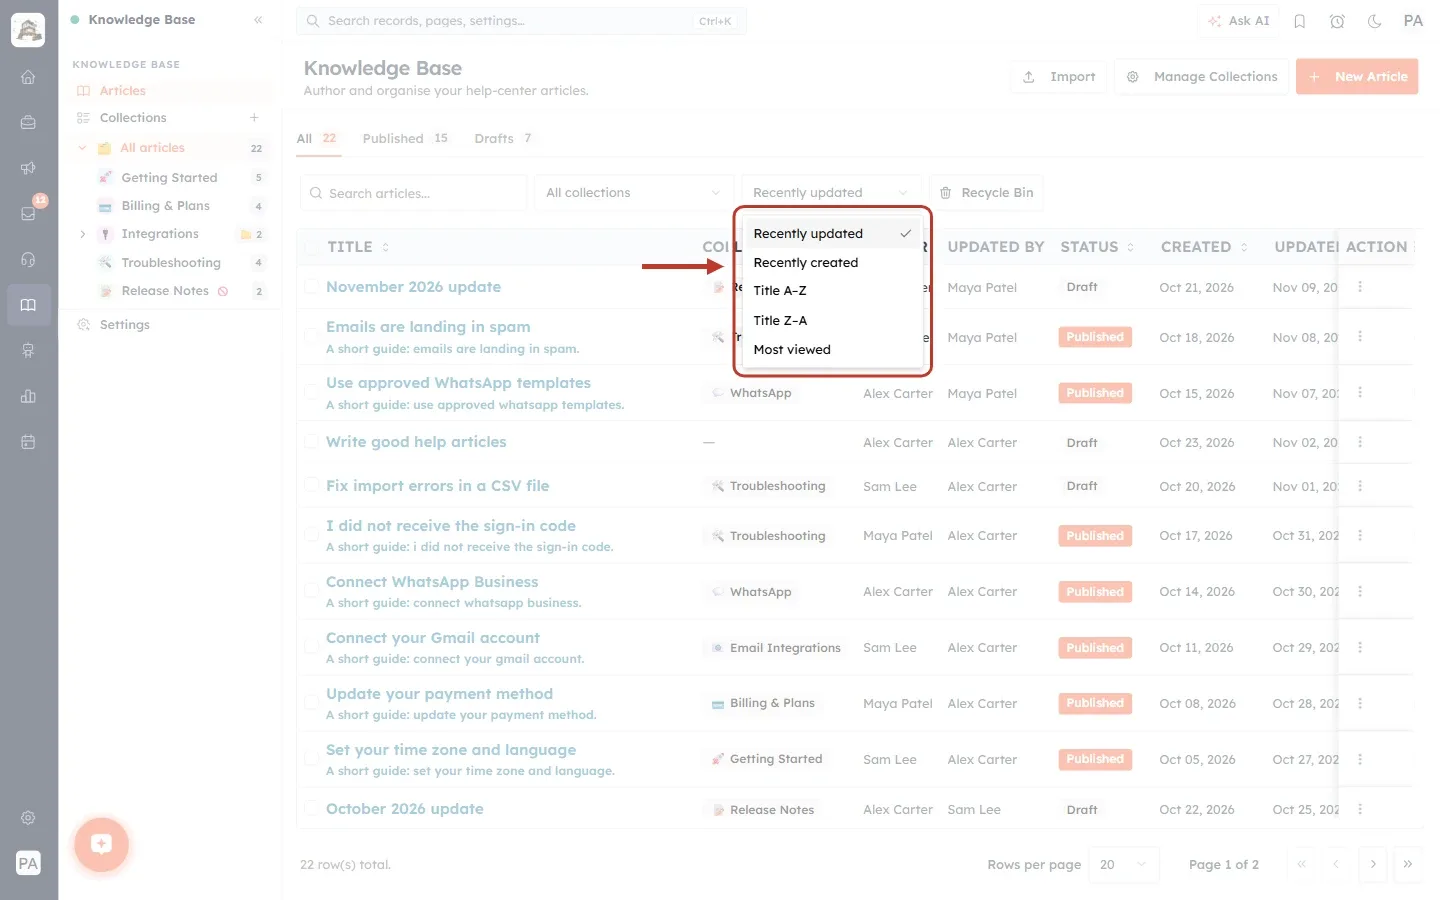
What this screenshot shows. The sort list open and ringed.
Recently updated (ticked, the default): the articles changed most recently come first.
Recently created: the newest articles come first.
Title A–Z and Title Z–A: alphabetical order.
Most viewed: the articles customers open most come first.
Step 8: See your most popular articles#
We picked Most viewed.
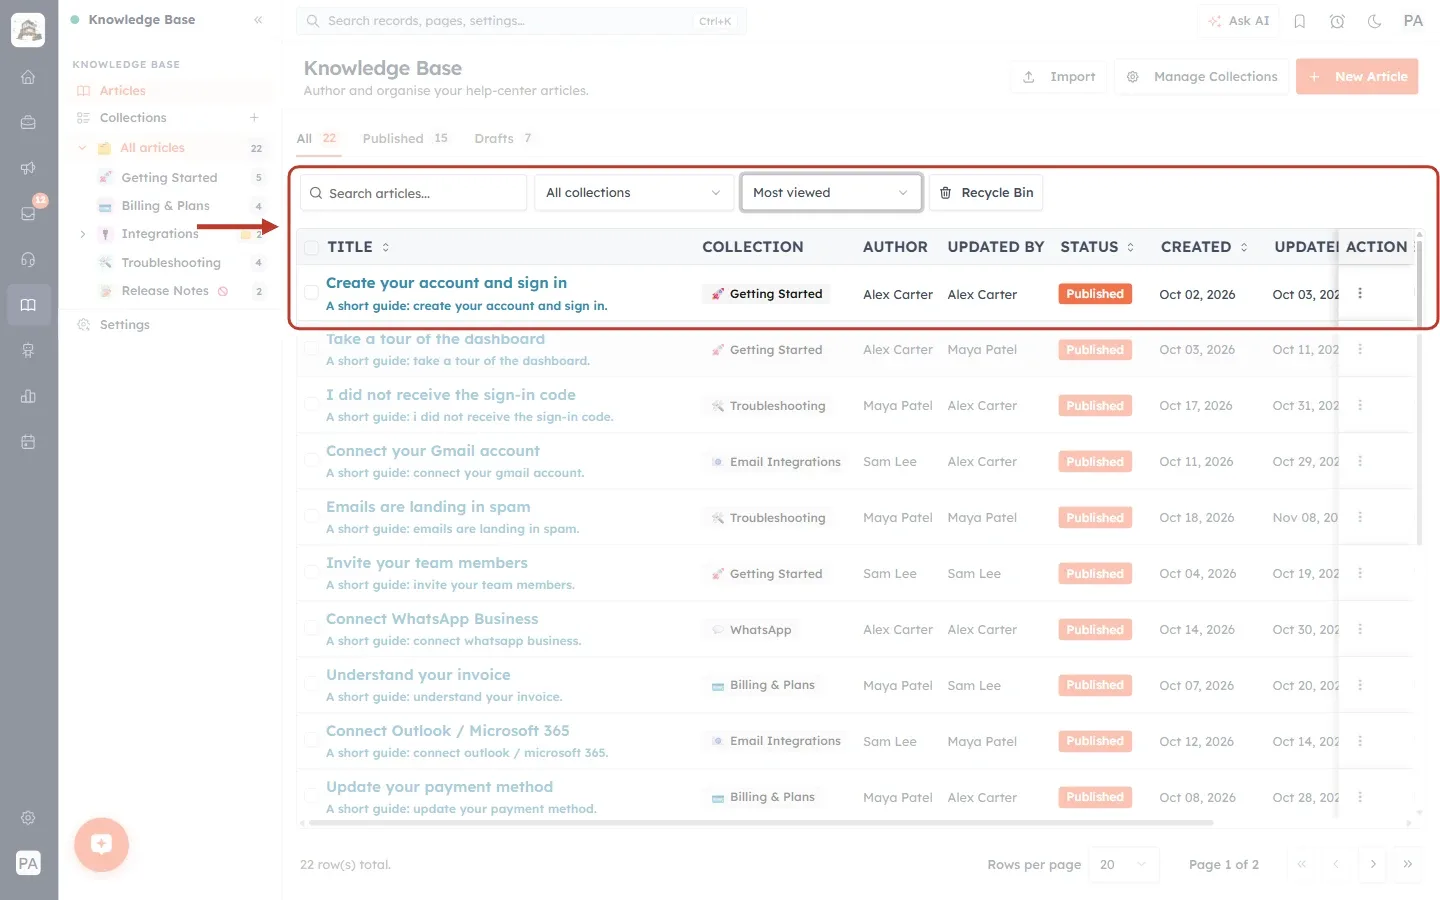
What this screenshot shows. The sort box and the first row ringed after choosing Most viewed.
The sort box now says Most viewed.
The top article is “Create your account and sign in”, the article customers open most.
Keep your most-viewed articles accurate and up to date. They are the ones most customers rely on.
Part 3: Read and arrange the columns#
Step 9: The columns on the left#
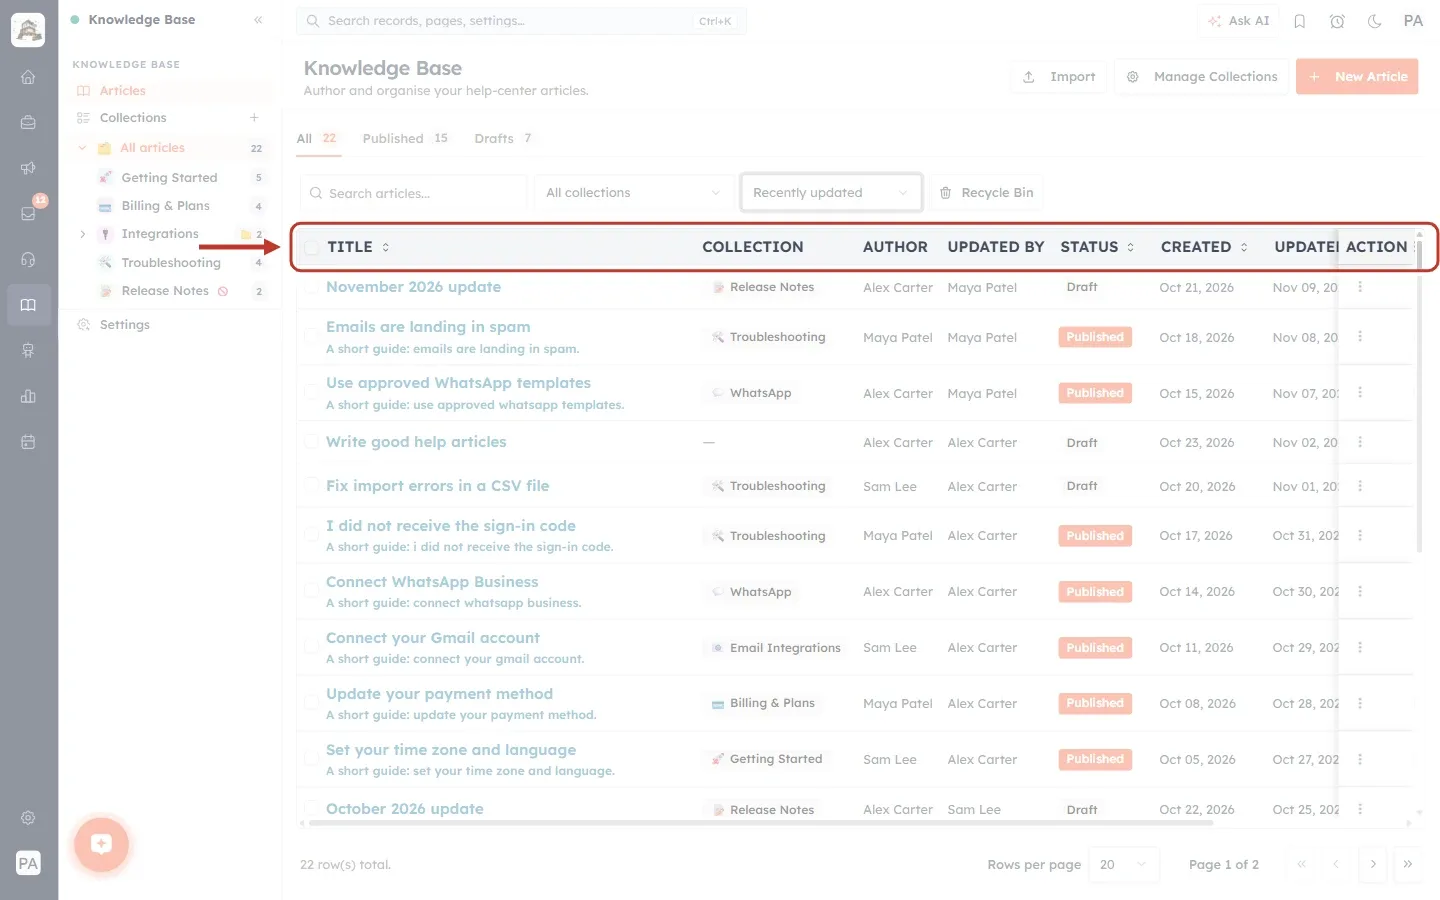
What this screenshot shows. The heading row of the table ringed.
The tick box at the far left selects every row on the page (Part 5).
Title: the article title. Click it to open the article in the editor. The short summary (the excerpt) is shown underneath.
Collection: the collection the article belongs to, with its icon. A dash (—) means it is not in a collection.
Author: the name shown as the article’s author.
Updated by: the team member who changed the article last.
Status: orange Published or grey Draft.
Created and Updated: the dates the article was created and last changed.
Action: the ⋮ menu for each article (Part 4). It stays fixed on the right while you scroll the table sideways.
Step 10: Views and feedback#
Two more columns sit to the right of Updated. On a smaller screen, scroll the table to the right (or close the side panel with the « button) to see them.
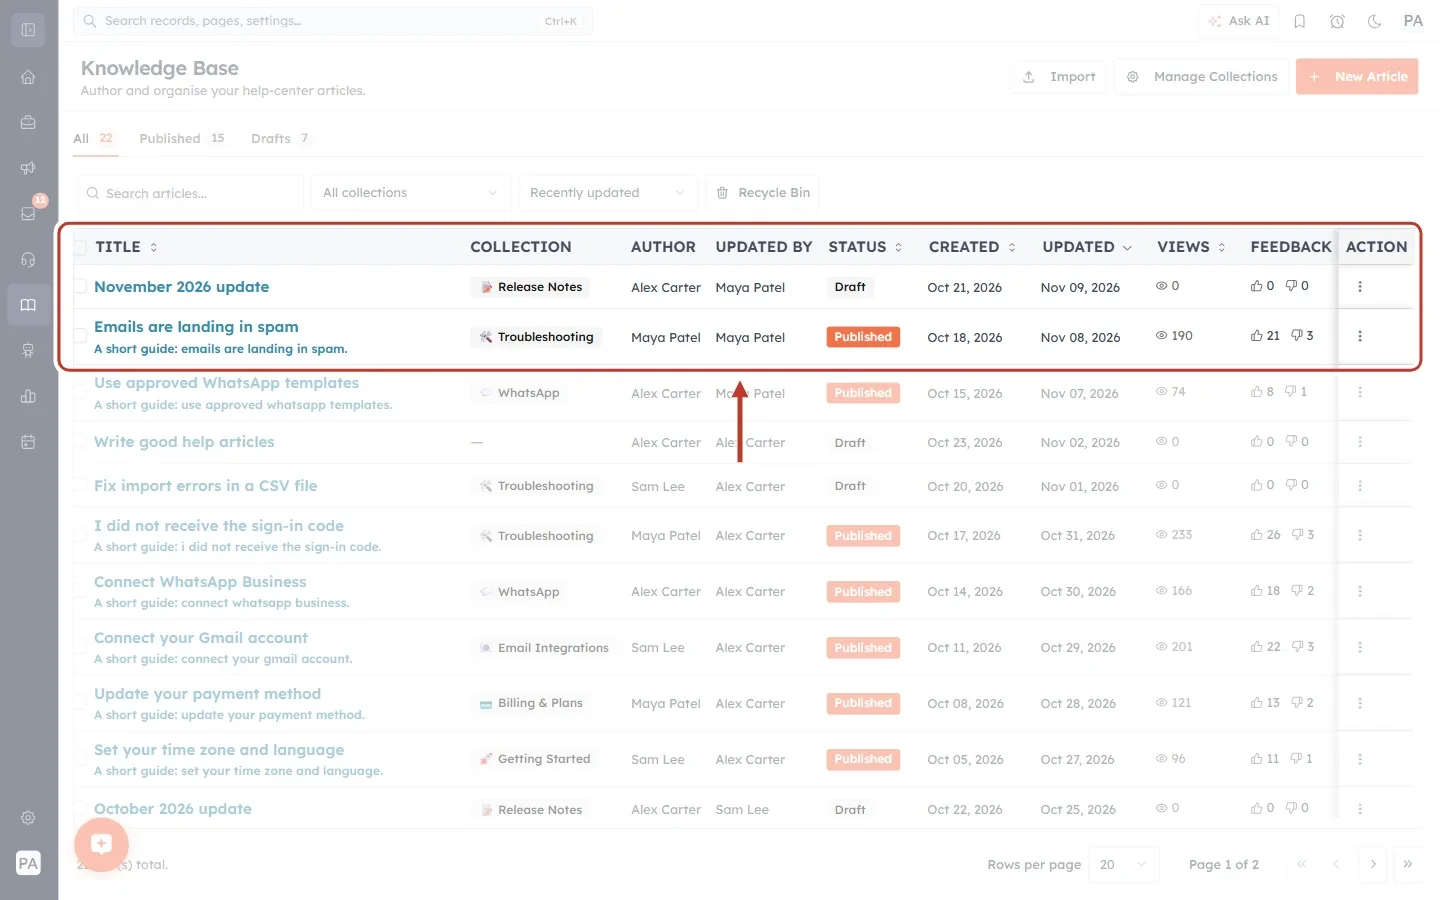
What this screenshot shows. The full width of the table, with the side panel closed, ringed together with the first two rows.
Views (the eye icon): how many times customers opened the article. “Emails are landing in spam” has been viewed 190 times.
Feedback: the thumbs-up and thumbs-down votes from the “Was this article helpful?” buttons on your help center. Here, 21 helpful and 3 not helpful.
Drafts show 0 views and 0 feedback, because customers can’t see them.
An article with many thumbs-down votes is a good one to improve first.
Step 11: Sort or hide a column#
Click a column heading that has the small ⇅ arrows (Title, Status, Created, Updated or Views). A small menu opens.
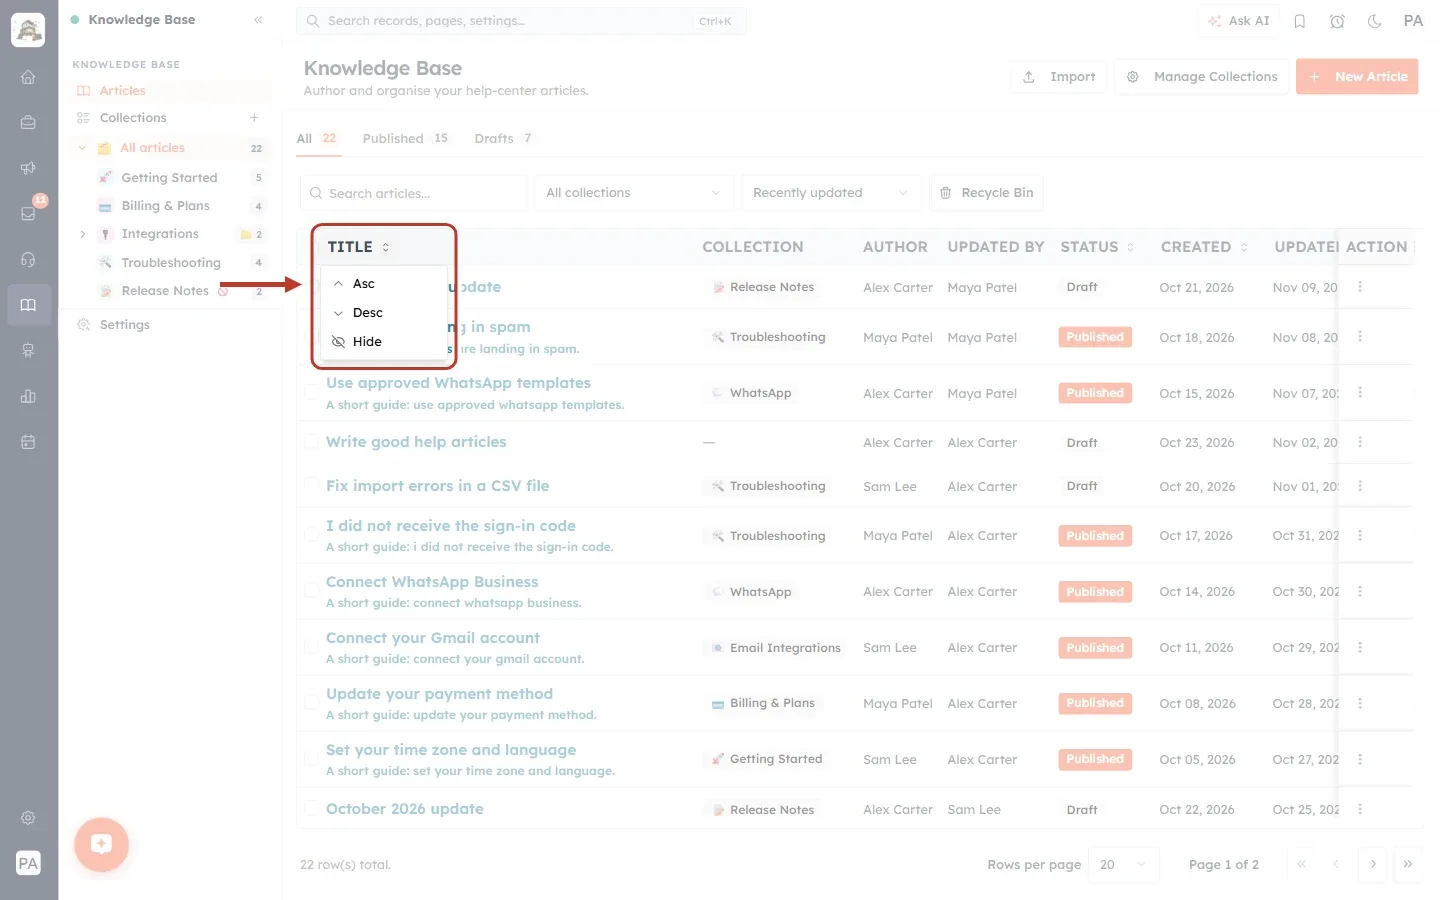
What this screenshot shows. The Title heading and its menu ringed.
Asc: sorts from smallest to largest (A to Z, oldest to newest, fewest to most views).
Desc: sorts the other way (Z to A, newest first, most views first).
Hide: removes the column from the table so you can focus on the others. Columns come back when you reload the page.
Step 12: Check the sorted list#
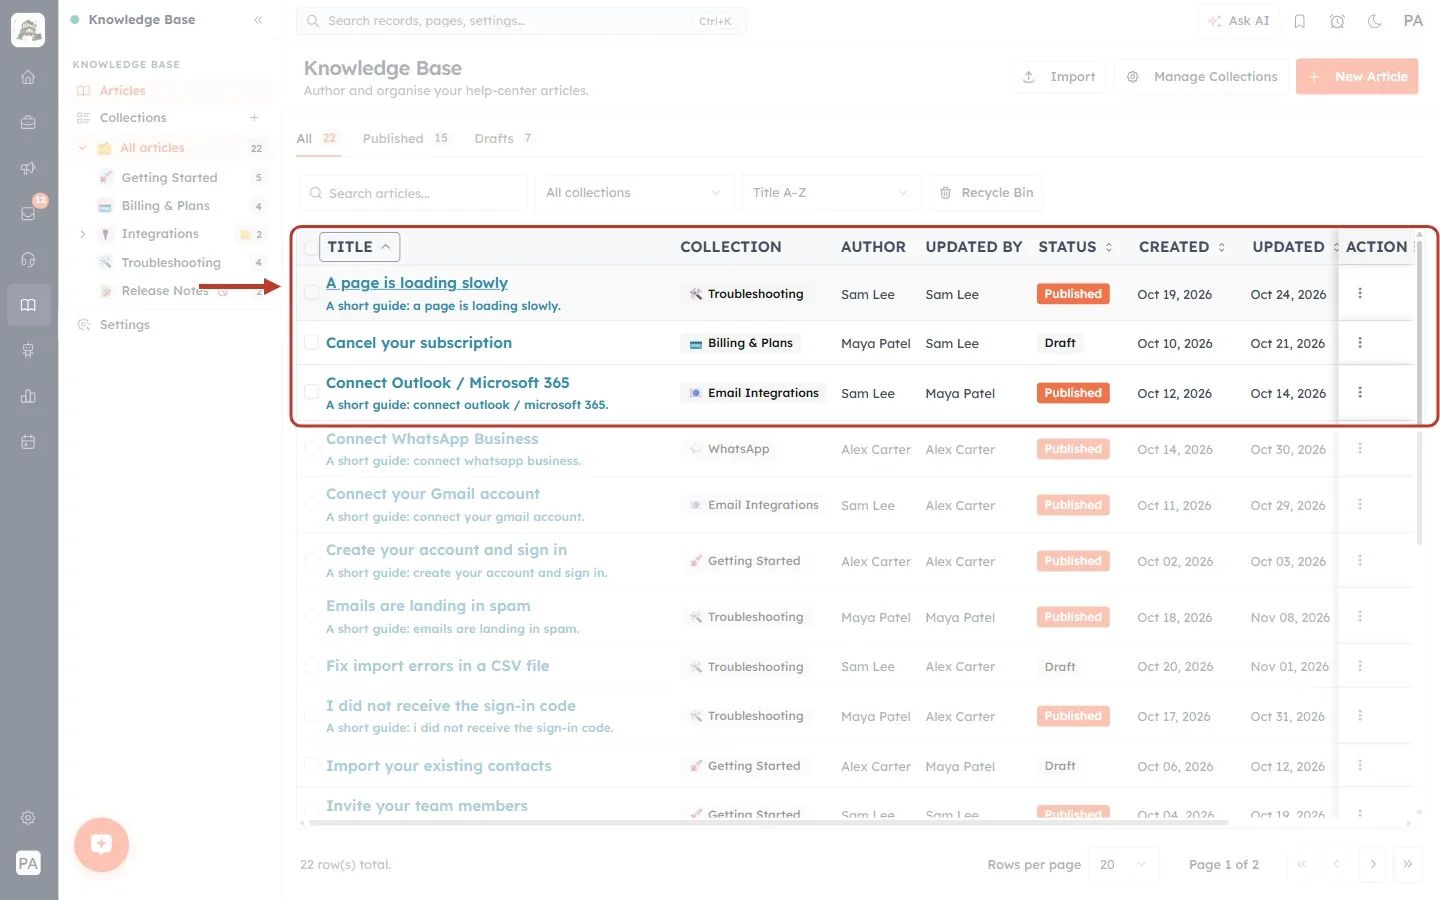
What this screenshot shows. The Title heading and the first rows ringed after choosing Asc.
A small arrow next to Title shows the column is sorted, A to Z.
The list now starts with “A page is loading slowly”, then “Cancel your subscription” and “Connect Outlook / Microsoft 365”.
The sort box above the table switches to match (Title A–Z).
Part 4: Actions for one article#
Step 13: Open the menu of a published article#
Click the ⋮ button at the end of a row.
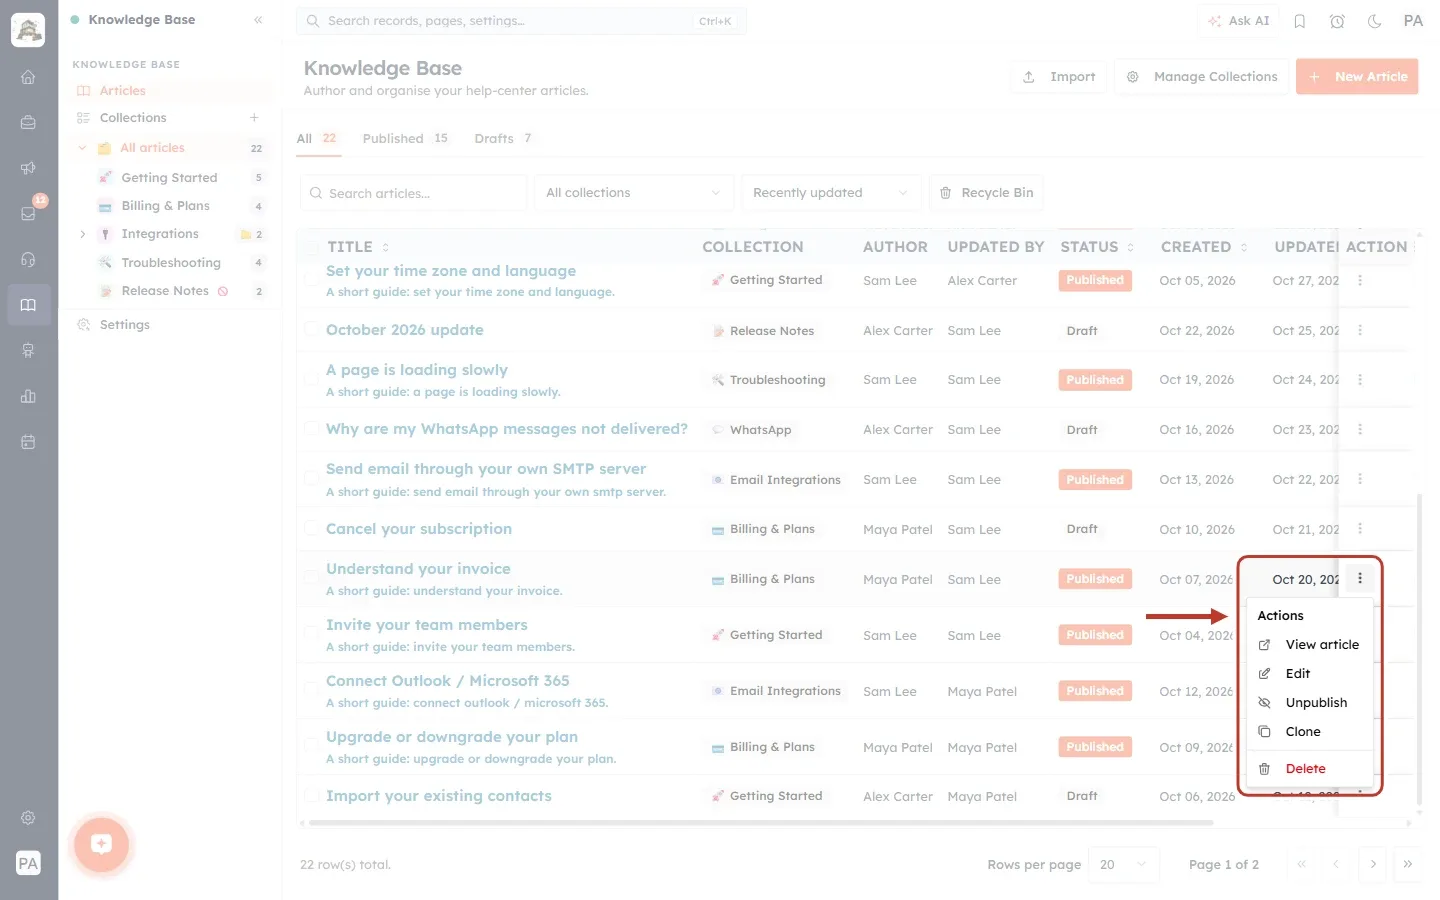
What this screenshot shows. The ⋮ button and the Actions menu of the published article “Understand your invoice” ringed.
View article: opens the article on your public help center in a new tab, exactly as customers see it.
Edit: opens the article in the editor.
Unpublish: hides the article from customers and turns it back into a draft.
Clone: makes a copy of the article (Step 16).
Delete (in red): moves the article to the Recycle Bin (Part 6).
Step 14: Open the menu of a draft#
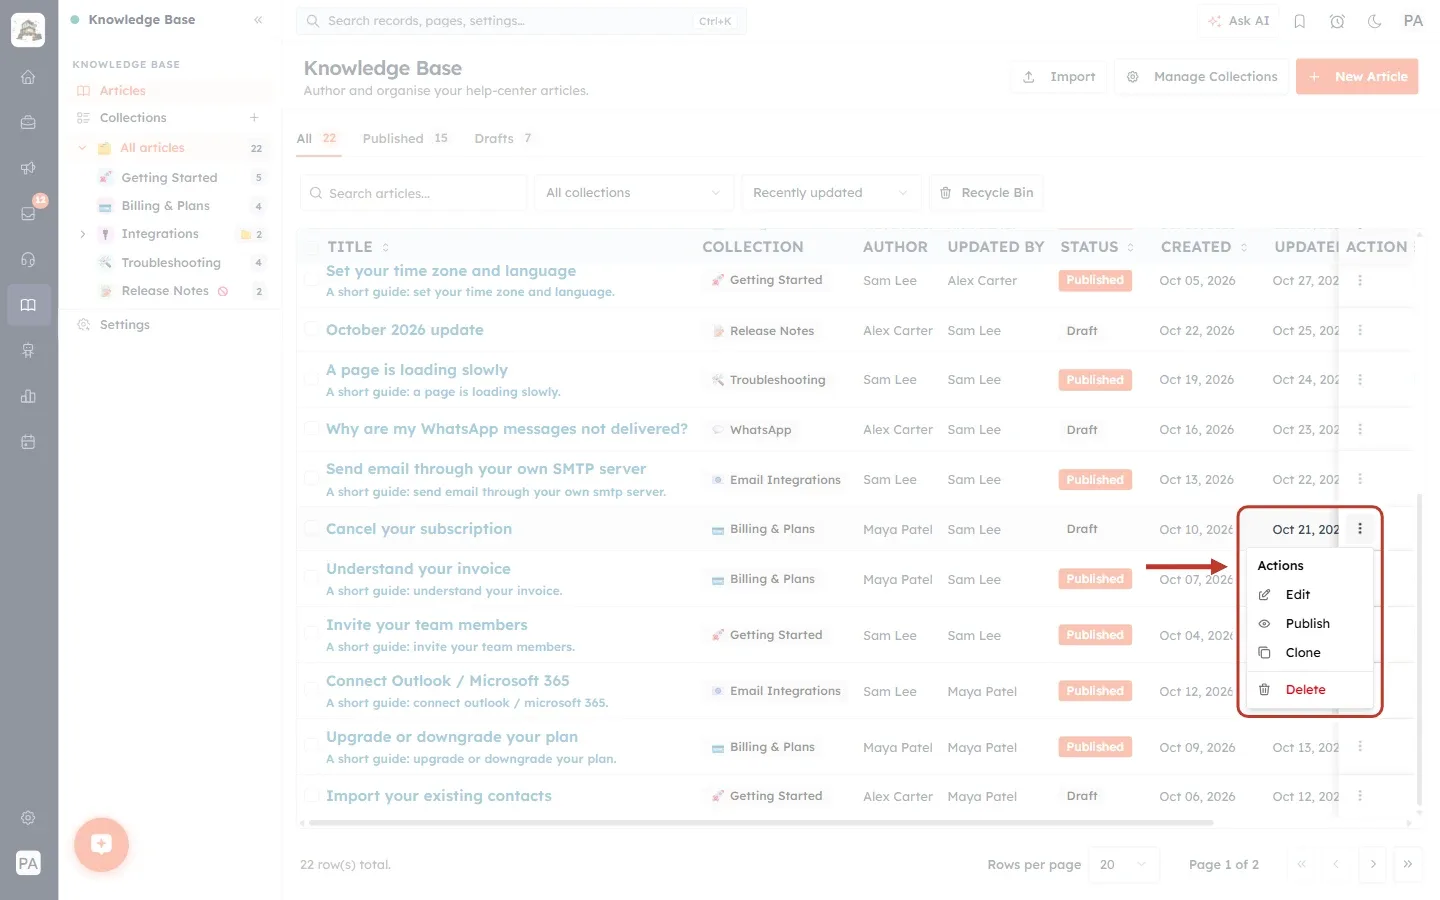
What this screenshot shows. The Actions menu of the draft “Cancel your subscription” ringed.
A draft’s menu has Edit, Publish, Clone and Delete.
There is no View article, because a draft is not on the help center yet.
Publish replaces Unpublish. We clicked it.
Step 15: Check that the article is published#
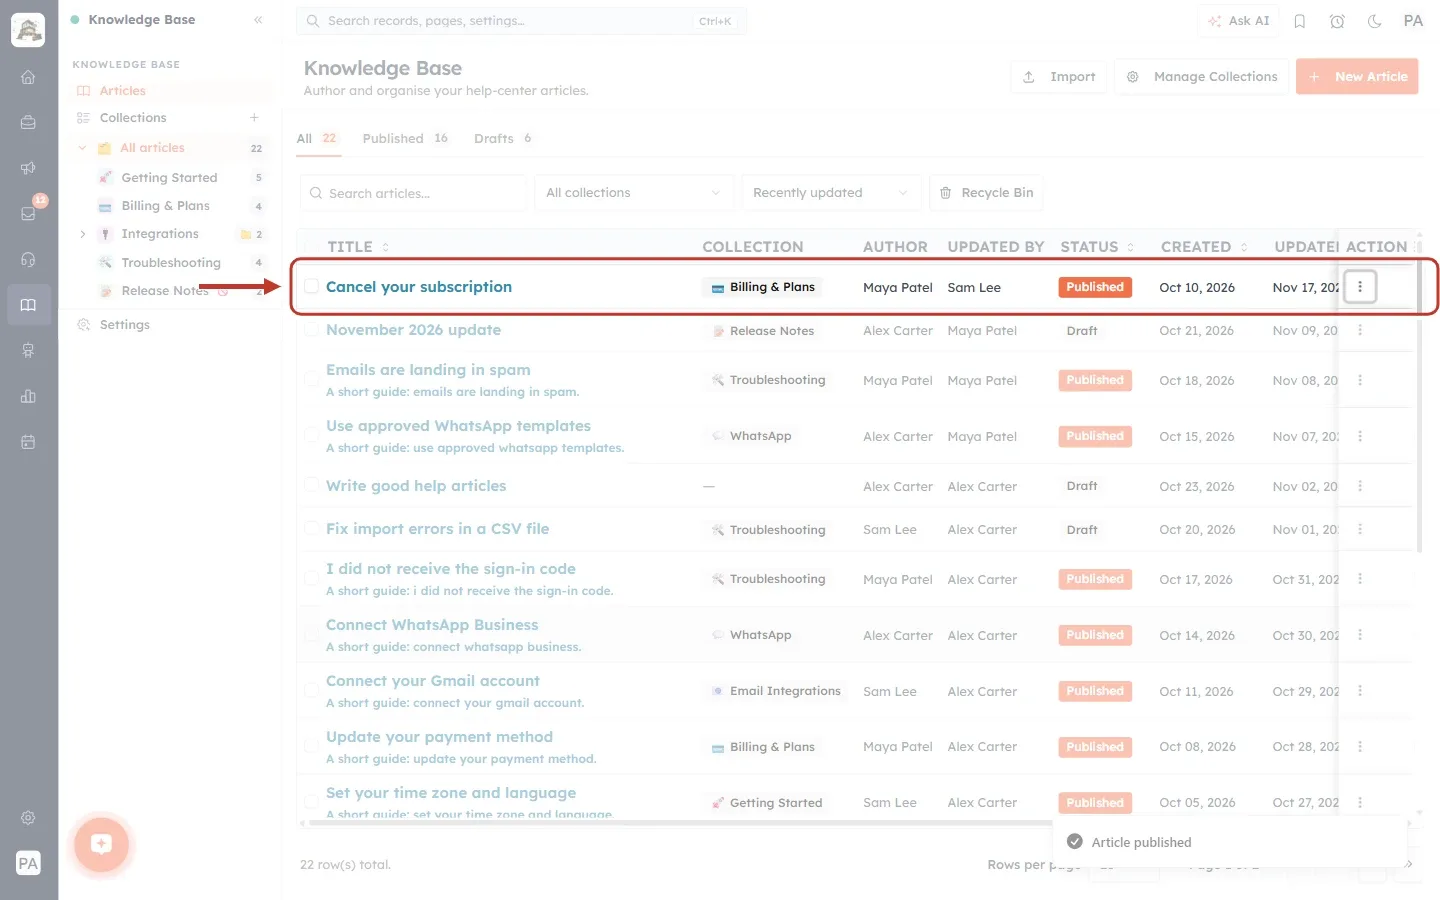
What this screenshot shows. The row “Cancel your subscription” ringed after publishing it.
Its status is now orange Published, and customers can see it on your help center.
It has moved to the top of the list, because the list is sorted by Recently updated.
A message at the bottom right confirms: “Article published”.
The tab counts at the top also change: Published goes up by one and Drafts goes down by one.
Step 16: Clone an article#
Cloning is handy when a new article will be similar to an existing one. Open the ⋮ menu of the article you want to copy and click Clone. We cloned “Connect your Gmail account”.
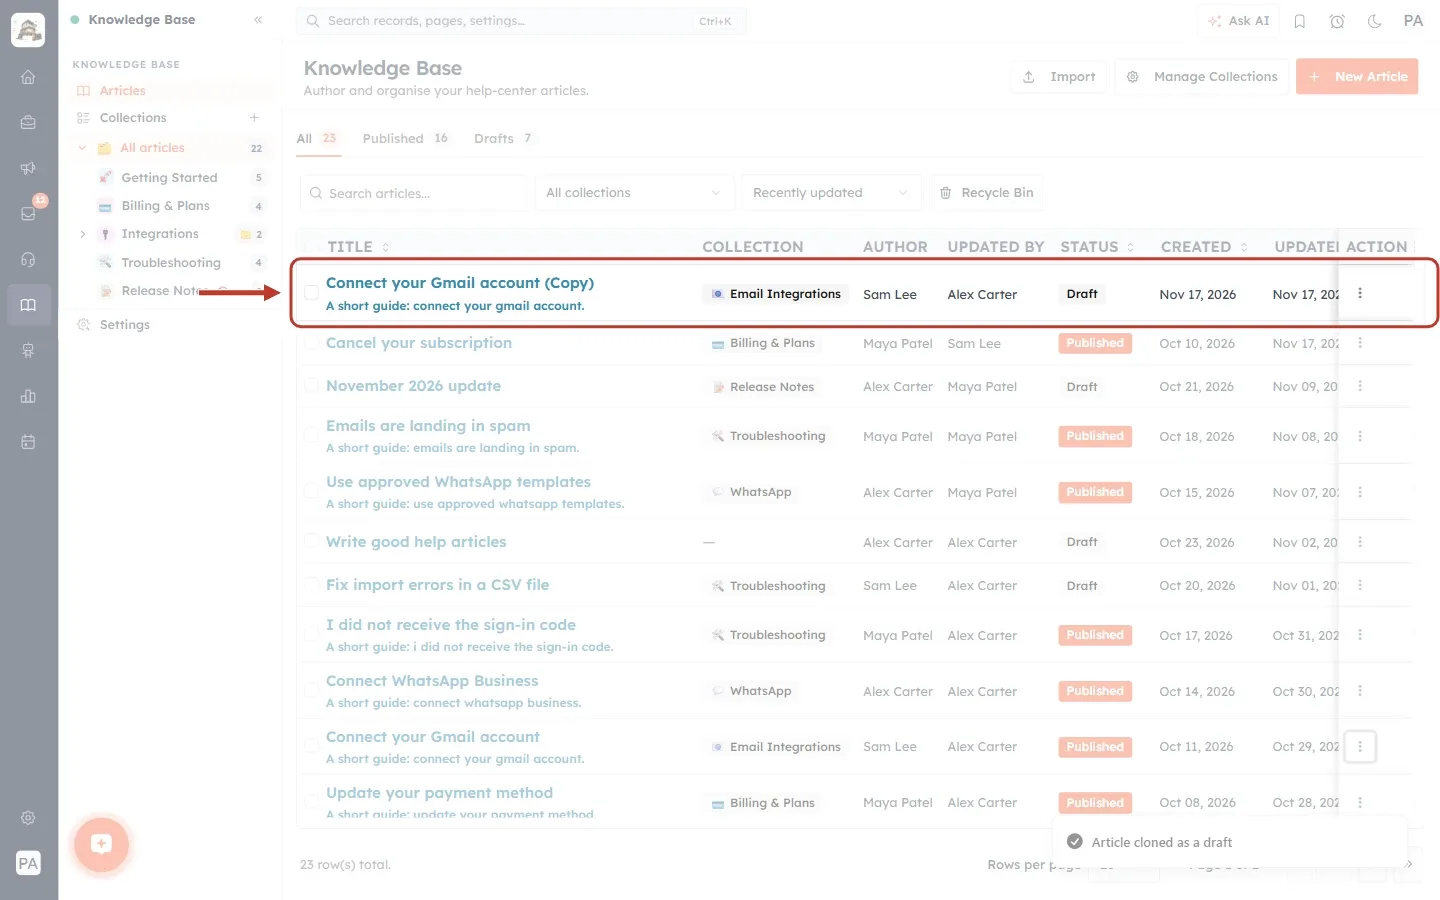
What this screenshot shows. The new copy ringed at the top of the list.
The copy is called “Connect your Gmail account (Copy)”. It has the same collection, content and summary as the original.
The copy is always a Draft, so customers don’t see it until you are ready.
The message at the bottom right reads “Article cloned as a draft”.
Open the copy with Edit, change its title and content, then publish it.
💡
After cloning, rename the copy right away. Two articles with nearly the same title confuse customers who search your help center.
Part 5: Work on several articles at once#
Step 17: Select articles#
Tick the box at the start of each row you want to change. To select every article on the page, tick the box in the heading row. When at least one row is selected, the tool bar changes to show the bulk actions.
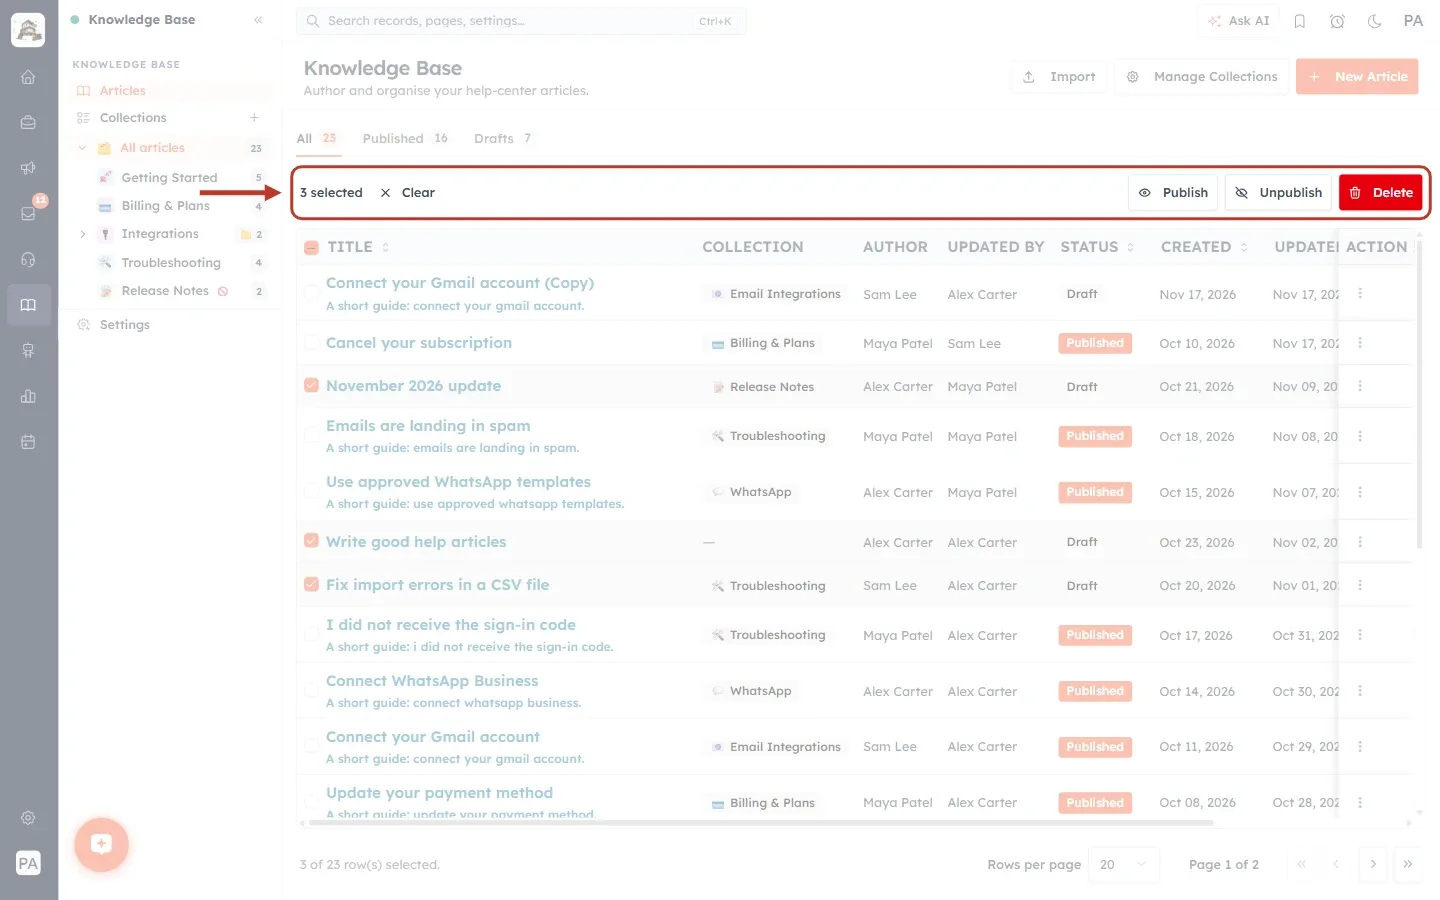
What this screenshot shows. The bulk action bar ringed, with three draft articles ticked in the table below.
3 selected: how many rows you have ticked.
× Clear: unticks every row and brings back the normal tool bar.
Publish: publishes every selected article.
Unpublish: turns every selected article back into a draft.
Delete (red): moves every selected article to the Recycle Bin.
The ticked rows are “November 2026 update”, “Write good help articles” and “Fix import errors in a CSV file”, all drafts.
Step 18: Check how many rows are selected#
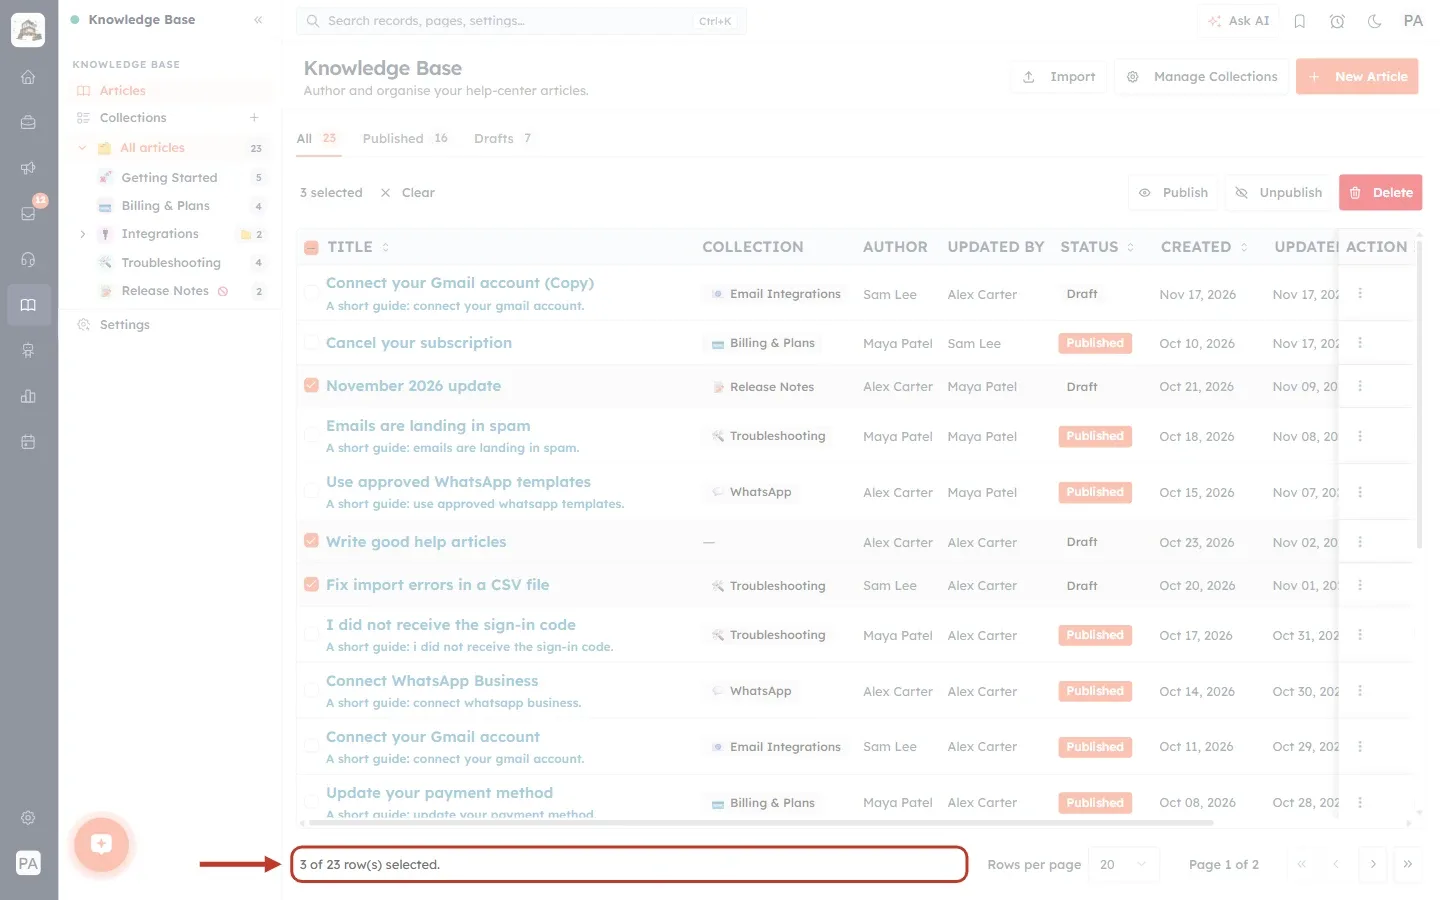
What this screenshot shows. The text at the bottom left of the table ringed: “3 of 23 row(s) selected.”
This confirms how many of all the listed articles you have selected.
Ticking the box in the heading row selects only the rows on the page you are looking at. Change the rows per page (Part 7) to select more at once.
Step 19: Publish the selected articles#
Click Publish in the bulk action bar. The articles are published straight away.
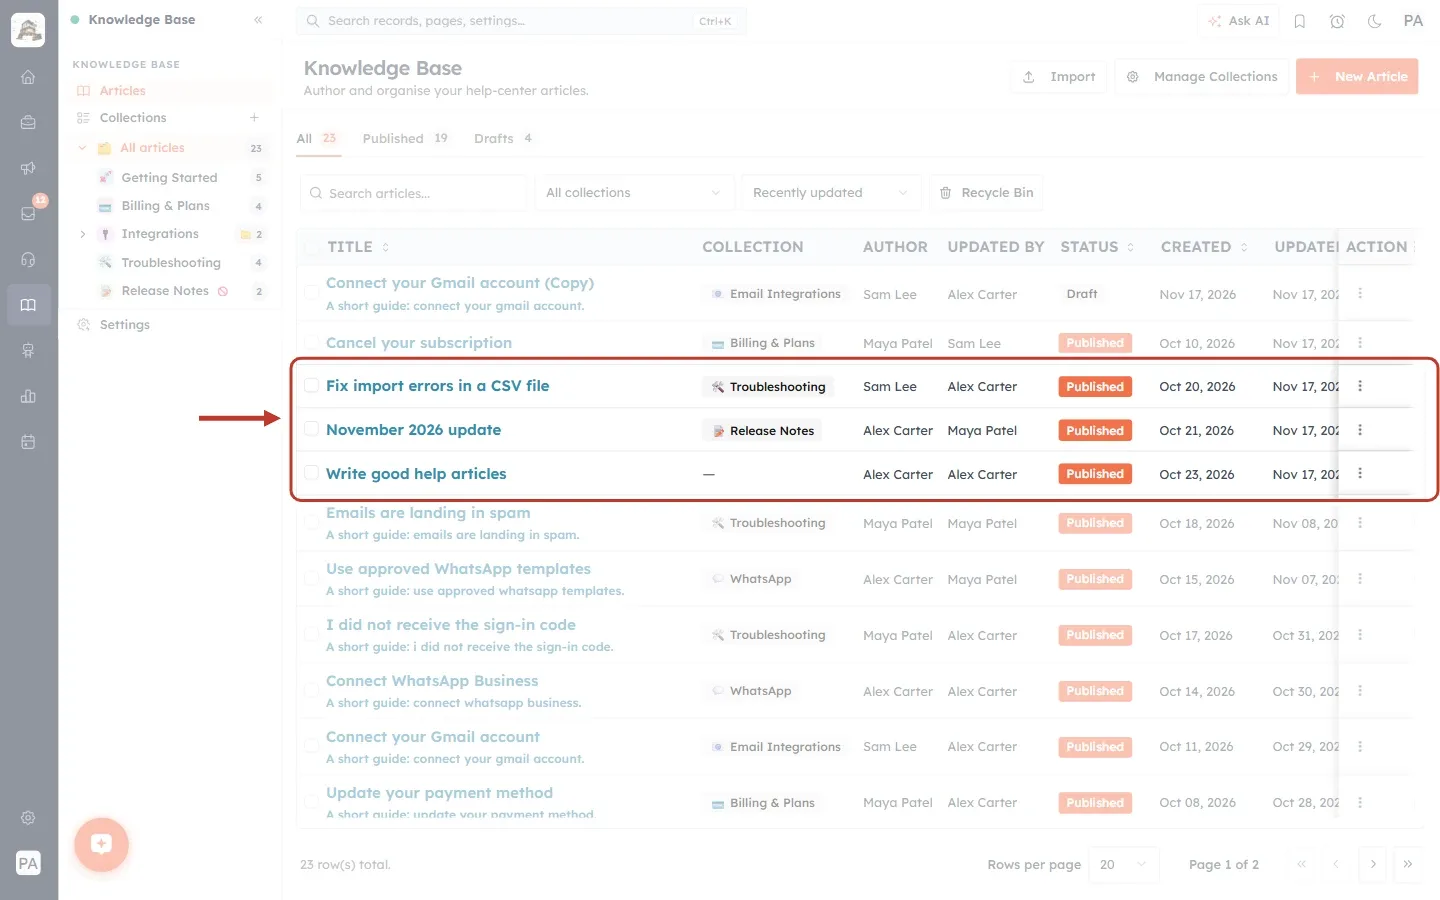
What this screenshot shows. The three articles ringed after the bulk publish.
“Fix import errors in a CSV file”, “November 2026 update” and “Write good help articles” now all show Published.
They have moved near the top because they were just updated.
The selection is cleared and the normal tool bar is back.
Bulk Unpublish works the same way in reverse. Articles that already have the chosen status are simply left as they are.
ℹ️
There is no bulk “move to collection”. To move an article to another collection, open it with Edit and change its Collection field.
Part 6: Delete, restore or remove for good#
Step 20: Delete an article#
Open the article’s ⋮ menu and click Delete. A confirmation box opens.
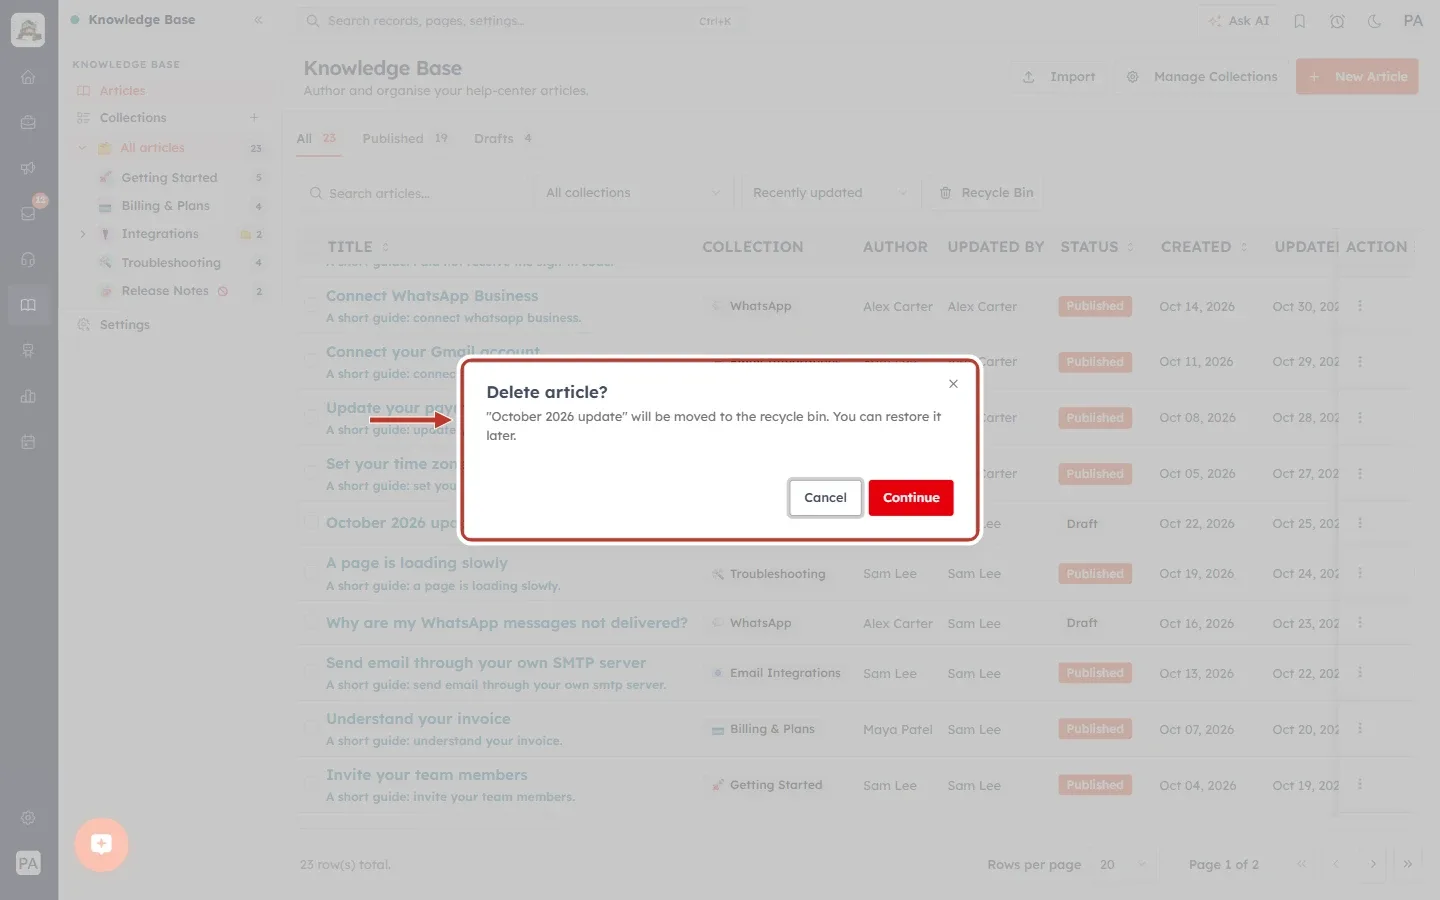
What this screenshot shows. The Delete article? box ringed.
The message: ““October 2026 update” will be moved to the recycle bin. You can restore it later.”
Continue (red) deletes the article. Cancel or the × keeps it.
A deleted article disappears from your help center at once.
Step 21: Open the Recycle Bin#
Click Recycle Bin in the tool bar to see deleted articles.
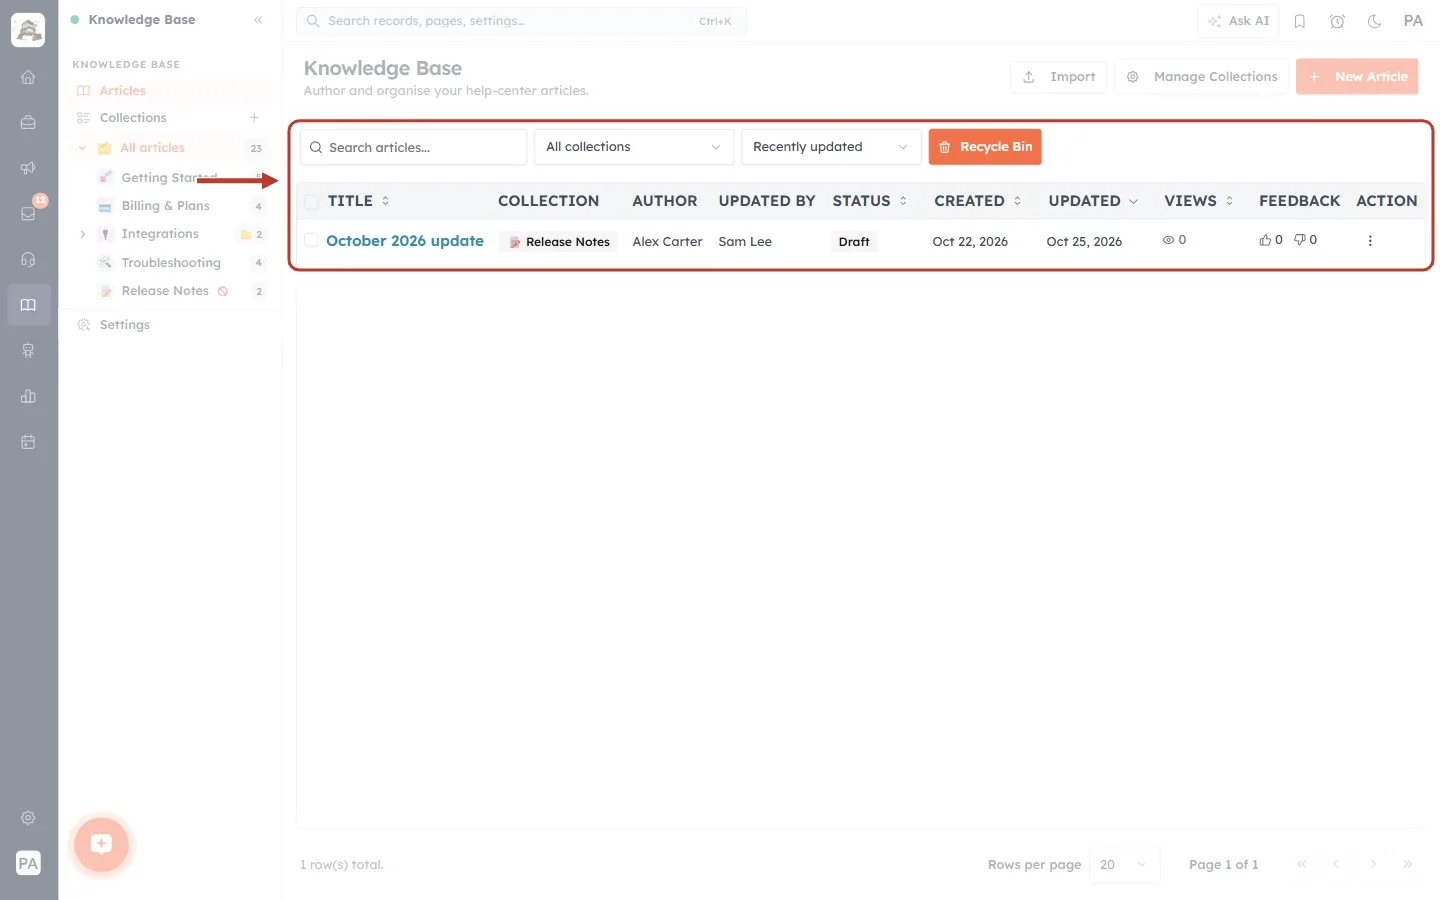
What this screenshot shows. The Recycle Bin view ringed.
The Recycle Bin button is now orange, which shows you are looking at deleted articles.
The table lists only deleted articles, here “October 2026 update”, with the same columns as before.
The status tabs are hidden while the Recycle Bin is open. Click Recycle Bin again to return to the normal list.
Step 22: Restore or delete forever#
Click the ⋮ button of a deleted article.
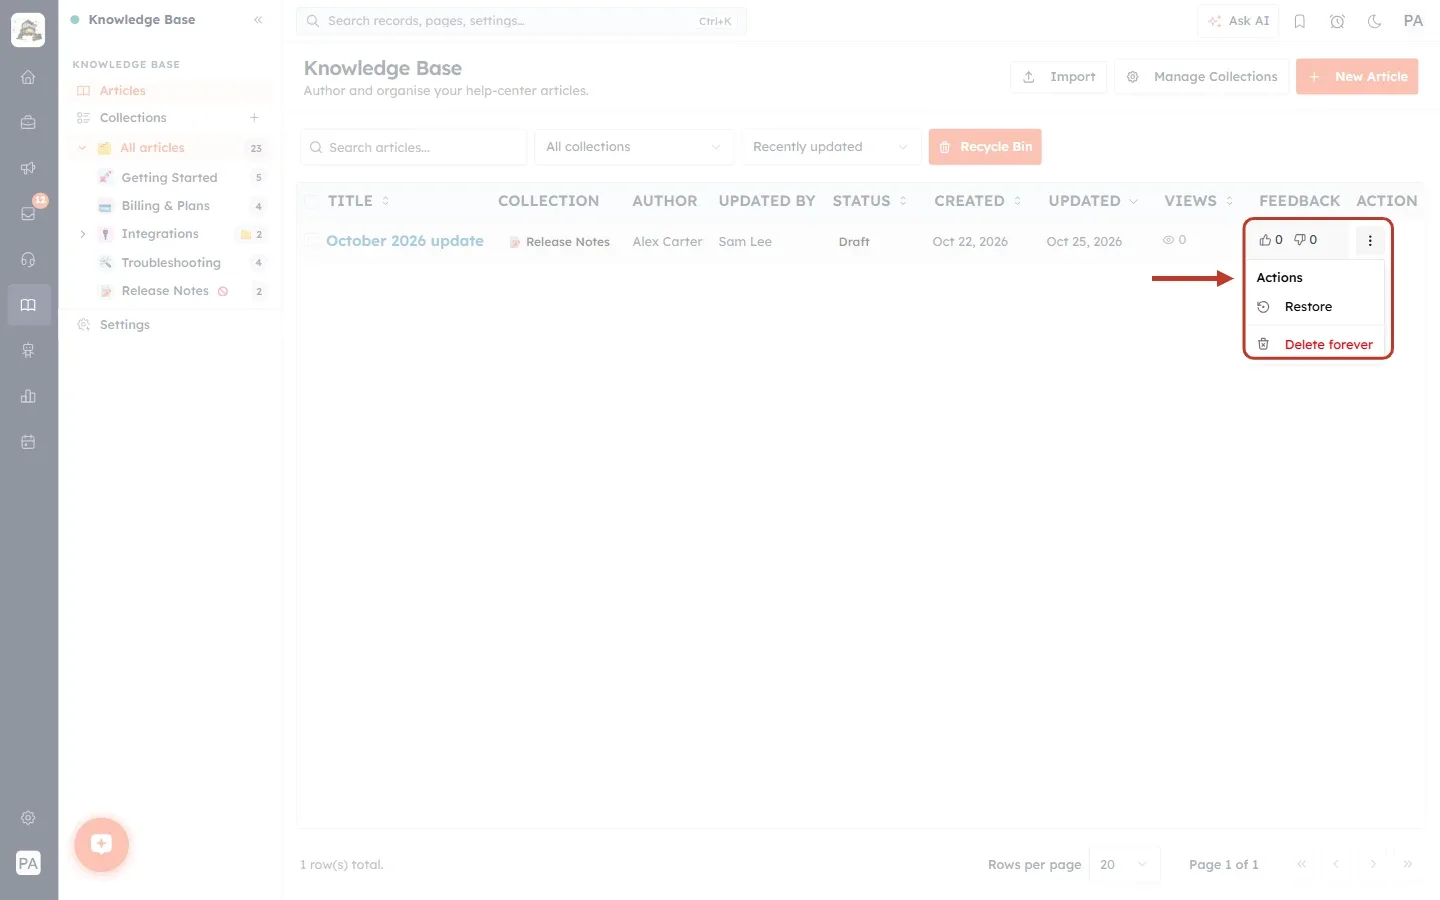
What this screenshot shows. The Actions menu of a deleted article ringed.
Restore: puts the article back in the list with the same status, collection and content it had before.
Delete forever (red): removes the article completely.
Step 23: Delete forever (only if you are sure)#
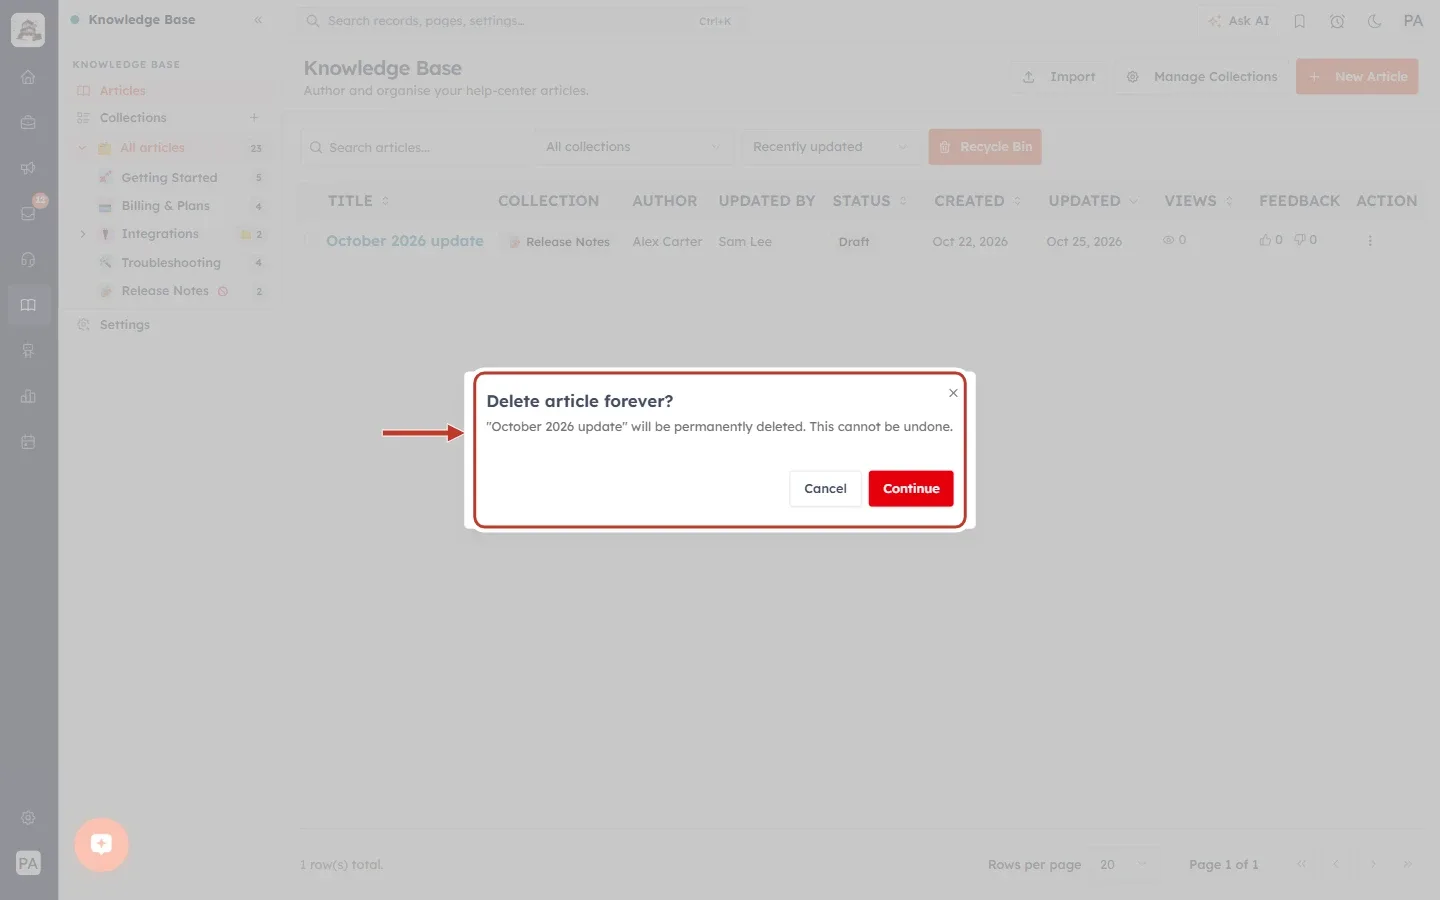
What this screenshot shows. The Delete article forever? box ringed.
The message: ““October 2026 update” will be permanently deleted. This cannot be undone.”
Continue removes it for good. Cancel keeps it in the Recycle Bin.
We clicked Cancel, because we want to restore it.
⚠️
An article deleted forever cannot be brought back, and any links to it from other articles or websites will stop working. If you are not sure, leave it in the Recycle Bin, where customers can’t see it anyway.
Step 24: Check the restored article#
Click Restore in the menu. A “restored” message appears, and the article leaves the Recycle Bin. Click Recycle Bin again to go back to the normal list.
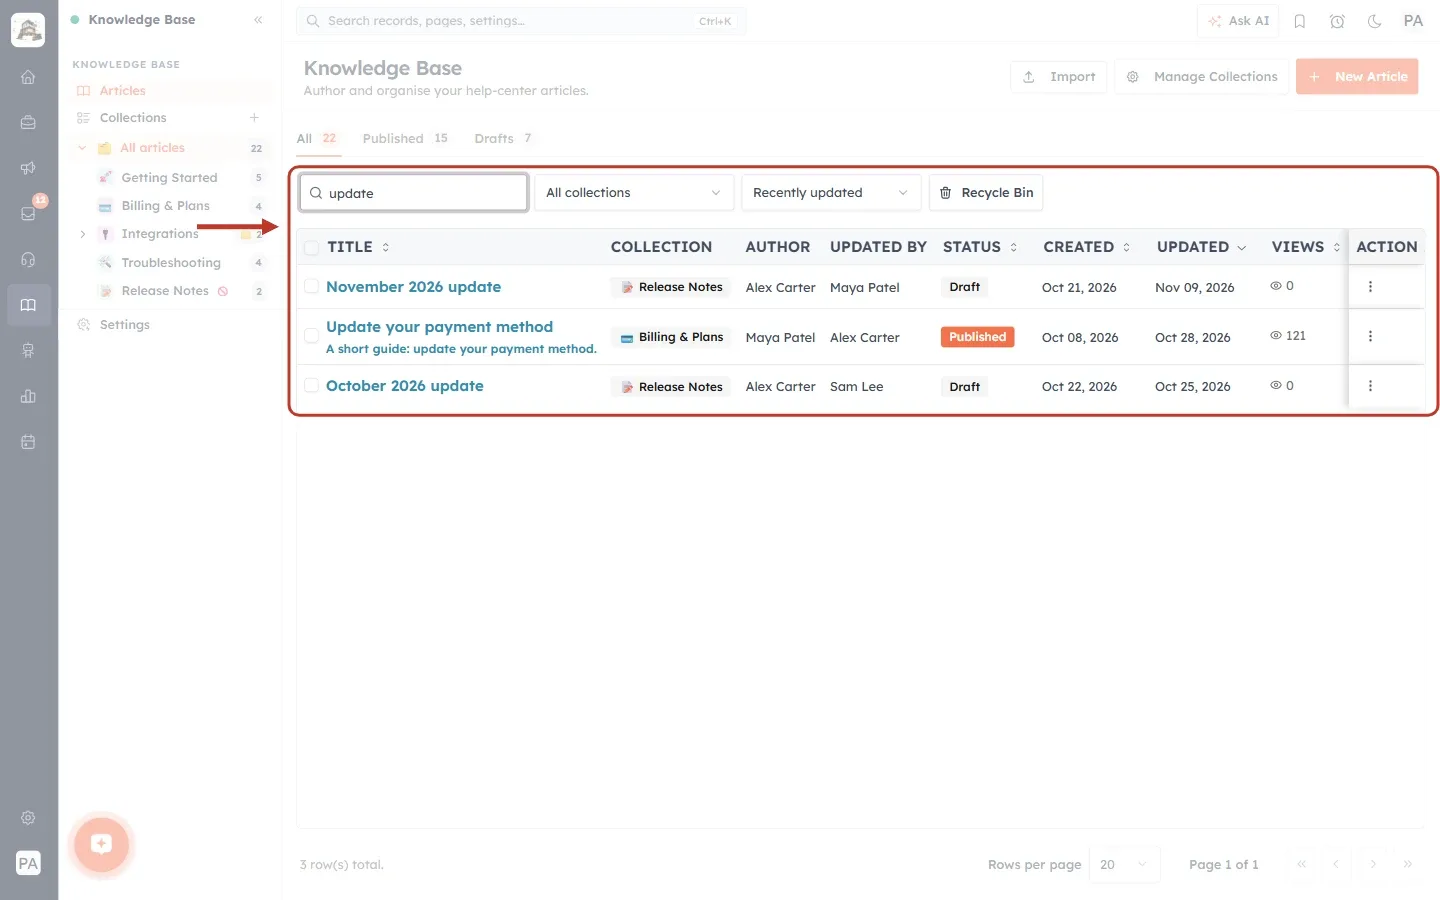
What this screenshot shows. The search box and the results ringed after restoring the article and searching for “update”.
“October 2026 update” is back in the normal list, with its Release Notes collection and its Draft status, exactly as before it was deleted.
The Recycle Bin button is white again, so this is the normal list.
Part 7: Move between pages#
Step 25: Use the page controls#
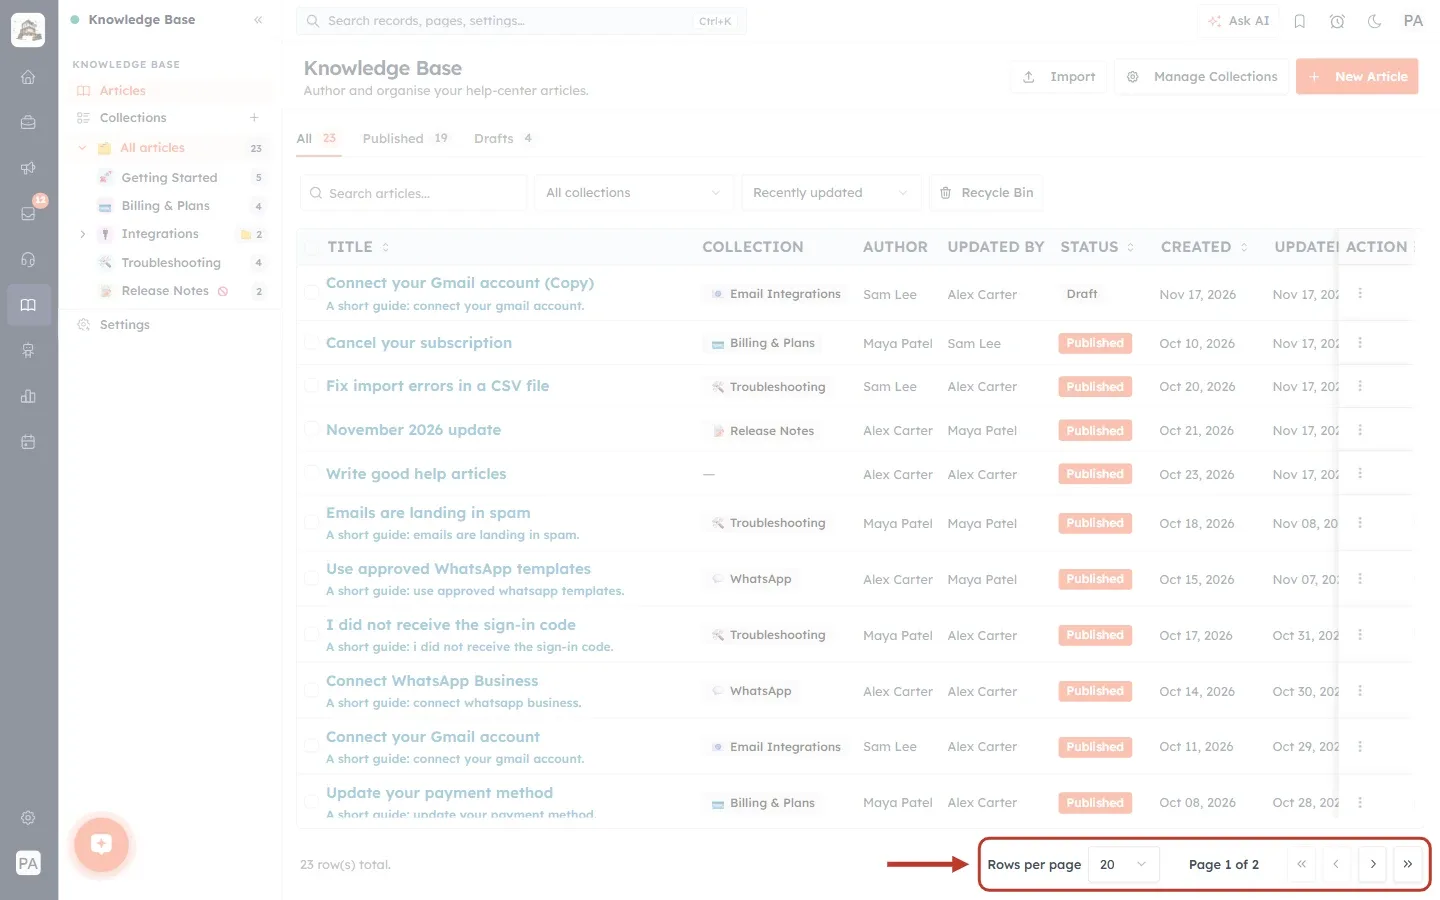
What this screenshot shows. The page controls at the bottom right of the table ringed.
Rows per page: how many articles are shown on one page (20 at first).
Page 1 of 2: which page you are on, and how many pages there are.
The four arrow buttons: « first page, ‹ previous page, › next page and » last page. A button is greyed out when you can’t go further that way.
Step 26: Show more rows on one page#
Click the Rows per page box and choose a bigger number.
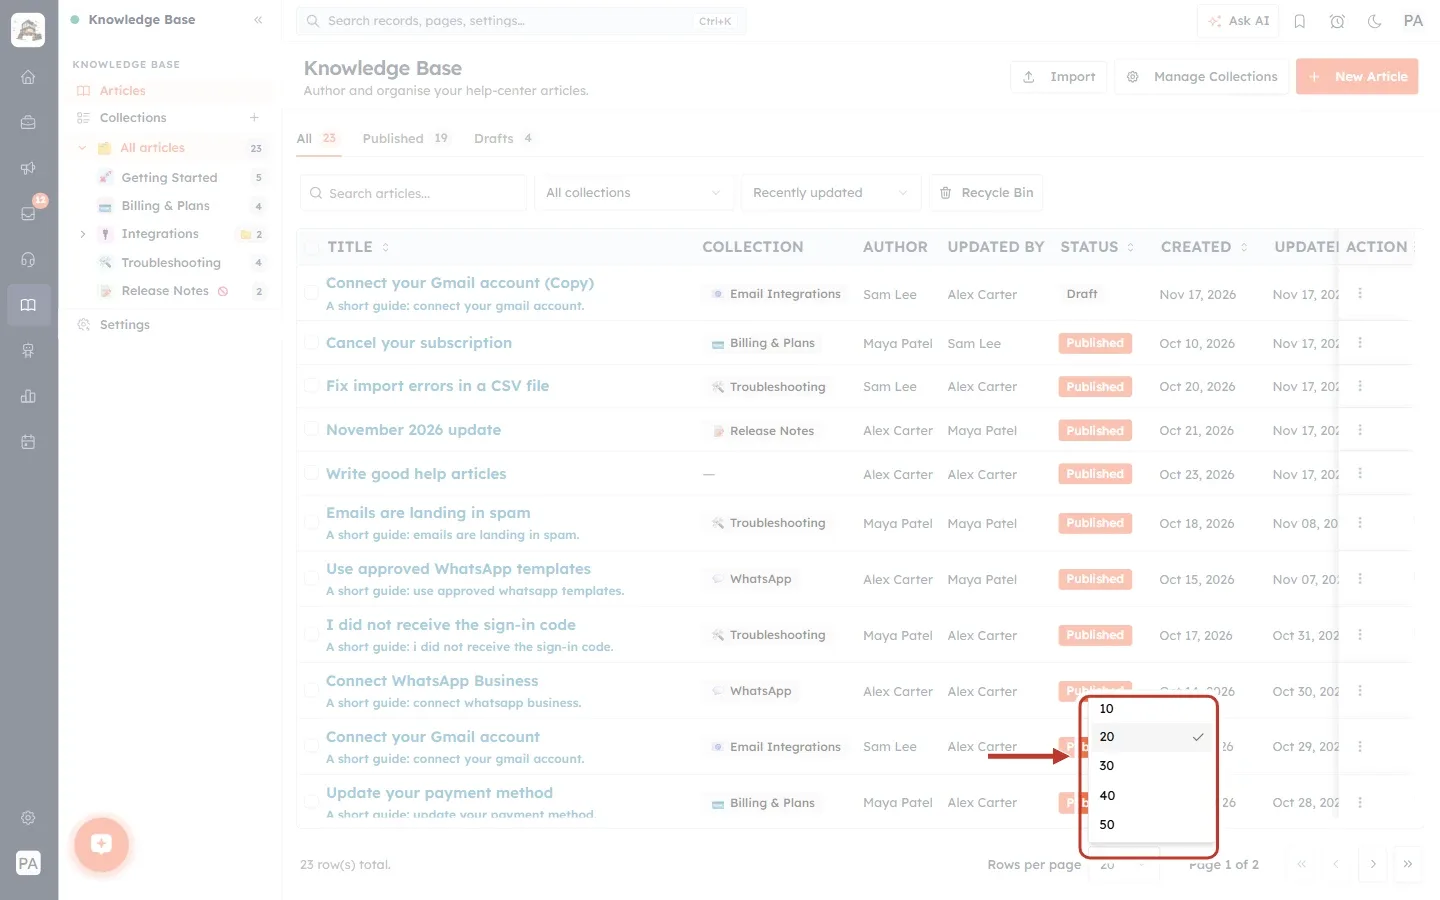
What this screenshot shows. The Rows per page list open and ringed.
The choices are 10, 20, 30, 40 and 50. 20 is ticked.
Pick 50 to see more articles without changing pages. This also lets you select more articles at once for bulk actions.
Tips for keeping your help center tidy#
Review your drafts every week with the Drafts tab. Publish what is ready and delete what is no longer needed.
Check Most viewed every month. Your most popular articles should always match the current product.
Watch the Feedback column. Rewrite articles that collect thumbs-down votes.
Use Uncategorized in the collection filter to find articles you forgot to put in a collection.
Clone instead of starting from scratch when a new article follows the same pattern as an existing one.
Empty the Recycle Bin carefully. Only use Delete forever when you are sure the article is not needed.
Troubleshooting#
I can’t find an article. Check the tab (All, not Drafts or Published), clear the search box, set the collection filter to All collections, and check the other pages. If it is still missing, look in the Recycle Bin.
The Recycle Bin button has disappeared. Some rows are still selected, so the bulk action bar is showing. Click × Clear.
I can’t see the Views and Feedback columns. Scroll the table to the right, or close the side panel with the « button to make room.
A column is missing. You may have hidden it with Hide. Reload the page to bring it back.
There is no View article in the menu. The article is a draft. Publish it first.
Frequently asked questions#
Does unpublishing an article delete it?
No. Unpublish only hides it from customers and turns it into a draft. You can publish it again at any time.
Does a cloned article keep the views and feedback of the original?
No. The copy starts with 0 views and 0 feedback, as a new draft.
Can I undo a bulk delete?
Yes. Bulk Delete moves the articles to the Recycle Bin, where you can restore each one.
How long do articles stay in the Recycle Bin?
They stay there until you restore them or click Delete forever.
Previous and next#
Previous: Format Article Content with the Rich Editor: Headings, Lists, Links, Images, Tables and Callouts
Related#
Was this article helpful?
Ready to implement this?
OpenAI Engage and apply what you just learned to your own workspace.
Open AI Engage CRM