Loading…


KnowledgeBase
Import Articles from Your Existing Website (Web Crawler): Crawl, Review and Import Help Pages as Drafts
Introduction#
If you already have a help center somewhere else, for example on another help-desk tool or on your own website, you don’t need to copy every article by hand. The Knowledge Base web crawler visits your existing help center, finds its article pages, and imports the ones you choose as draft articles in AiEngage CRM.
The import happens in four stages, and this article walks through each one with screenshots:
Start: paste the address of your help center and, if needed, set the advanced options.
Discover: the crawler explores the site and collects the pages it finds.
Review & select: you choose which pages to import and how.
Import: the pages become draft articles, and you get a summary of what was created and what was skipped.
At the end we look at the Website import history, where every past import is listed.
Every screenshot is followed by a What this screenshot shows section that explains the whole screen, so you can compare it with what you see in your own account.
ℹ️
Everything the crawler imports arrives as a draft. Nothing appears on your help center until you check the articles and publish them yourself.
Before you begin#
You need access to the Knowledge Base. Administrators always have it. Other users need the Knowledge Base permission in their profile (Setup → Profiles → Feature Permissions → Marketing → Knowledge Base).
Your old help center must be public. The crawler visits it like a normal visitor would, so pages that need a password or a sign-in can’t be imported.
Have the full address ready, including https://, for example https://help.yourcompany.com.
Optional: create your collections first (see Organize Articles into Collections), so you can file the imported articles straight away.
The screenshots use a sample help center at help.yourcompany.com. Your own page titles and numbers will be different.
Part 1: Start the import#
Step 1: Click Import on the Articles page#
Open the Knowledge Base (the open-book icon in the left rail). It opens on the Articles page. Click Import at the top right.
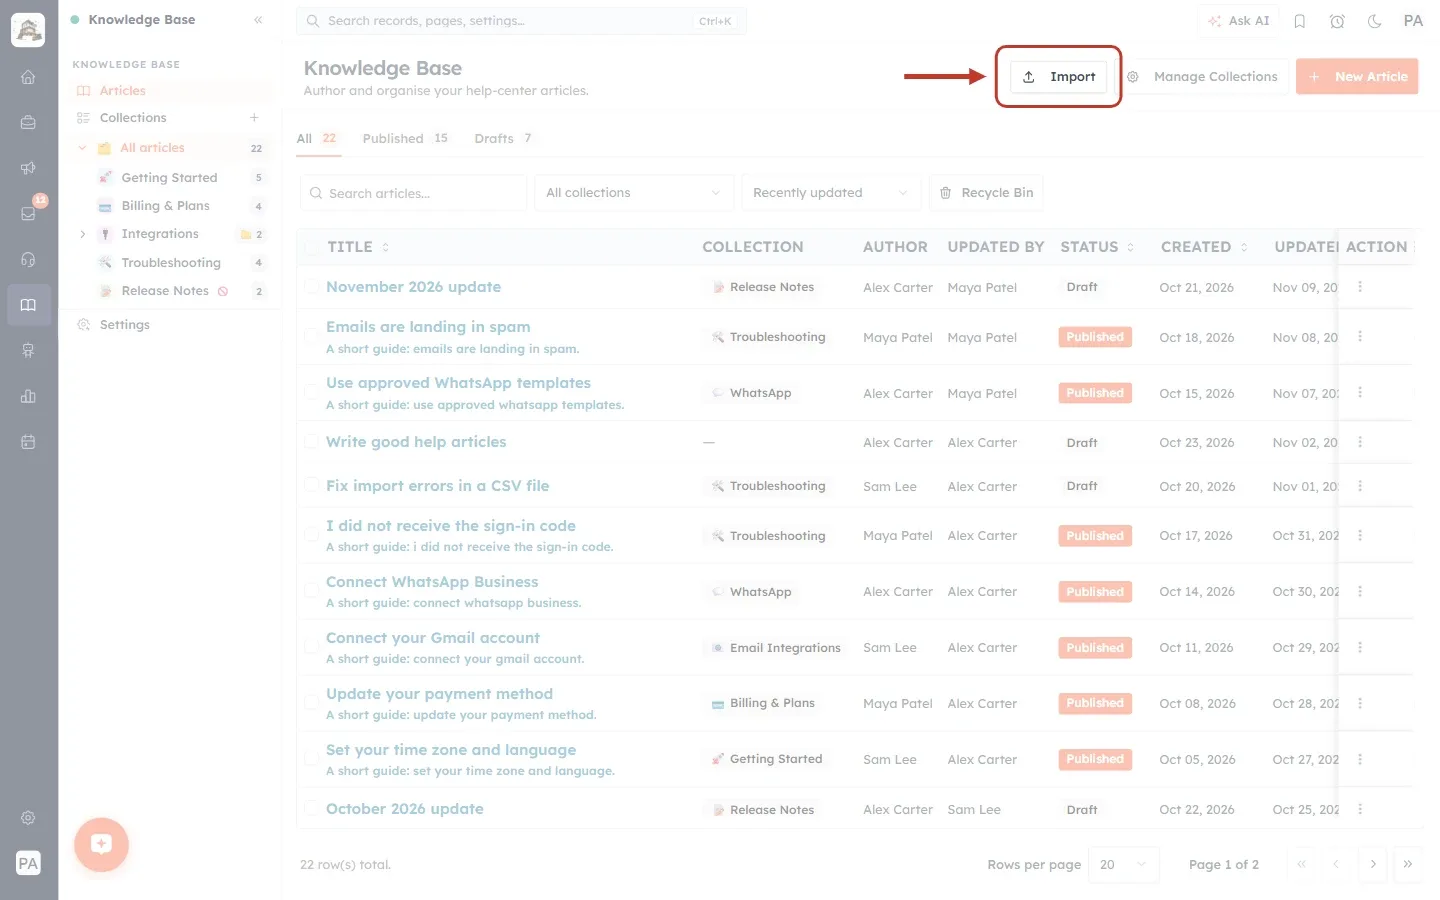
What this screenshot shows. The Knowledge Base Articles page, with the Import button ringed.
Import is the first of the three buttons at the top right, next to Manage Collections and New Article.
Below is your current list of articles, with the All, Published and Drafts tabs.
Step 2: Choose Import from website#
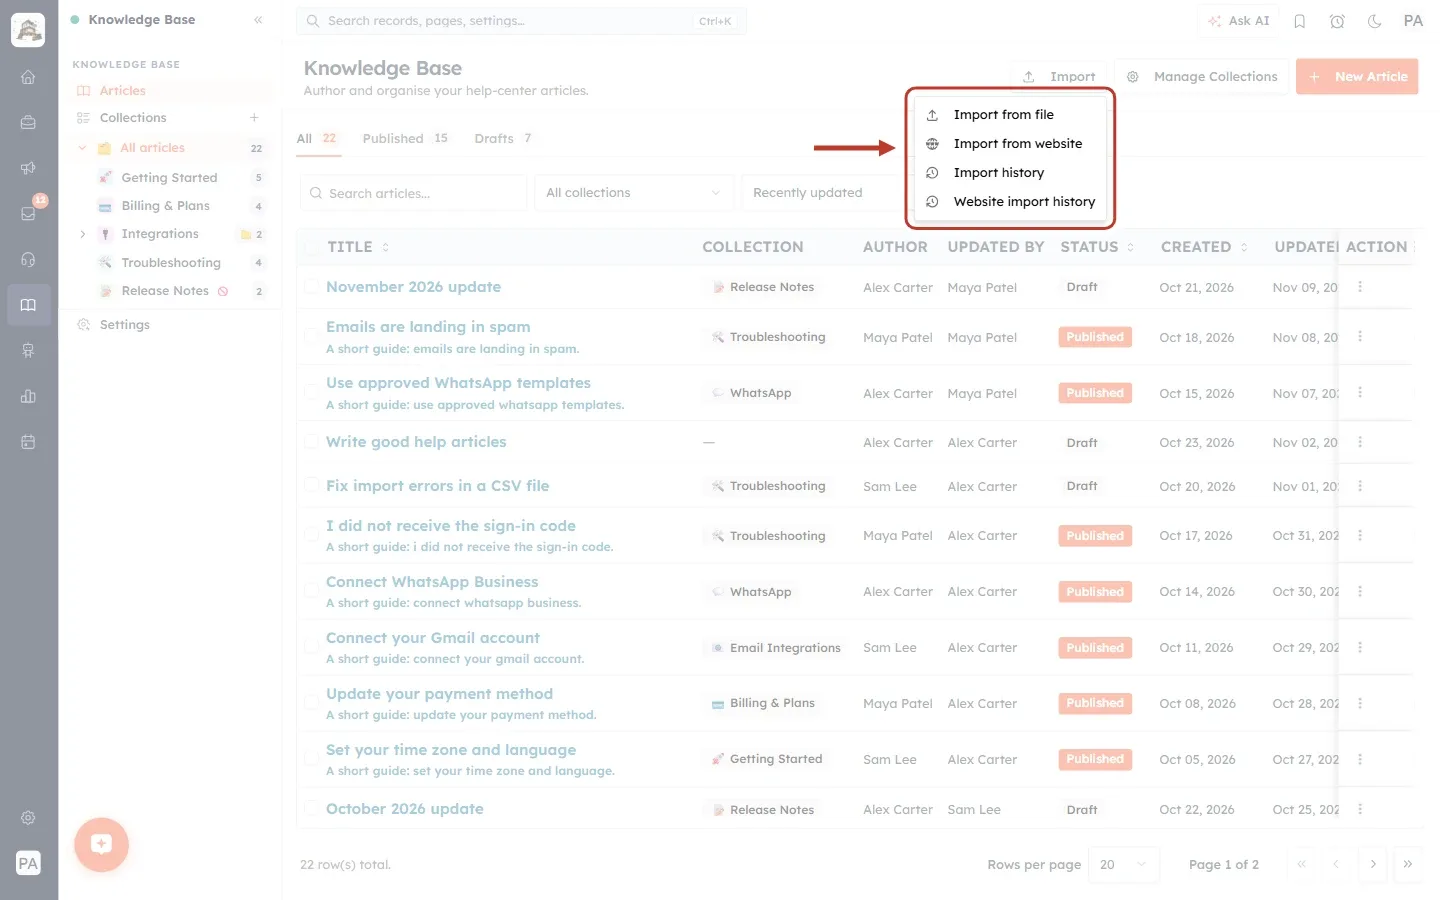
What this screenshot shows. The Import menu open and ringed.
Import from file: imports articles from a file instead of a website.
Import from website: starts the web crawler. Click this one.
Import history: your past file imports.
Website import history: your past website imports (Part 6).
Step 3: Look at the Import from website page#
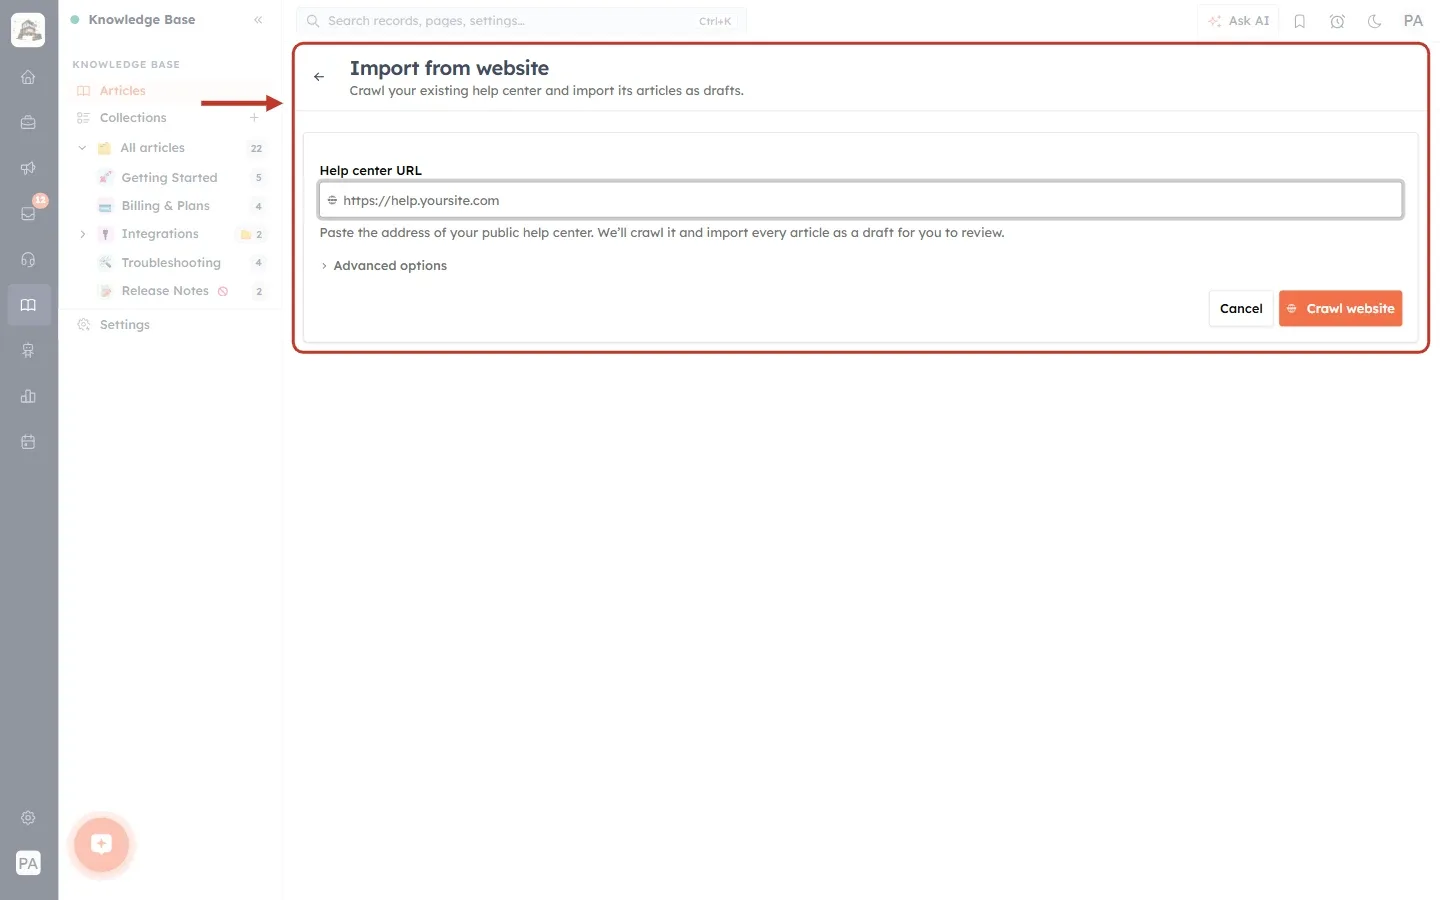
What this screenshot shows. The Import from website page ringed.
The heading and the line under it: “Crawl your existing help center and import its articles as drafts.”
Help center URL: the box where you paste the address. Its grey hint shows the format: https://help.yoursite.com.
The note: “Paste the address of your public help center. We’ll crawl it and import every article as a draft for you to review.”
Advanced options: extra settings, hidden until you click it (Step 6).
Cancel takes you back to the Articles page. Crawl website starts the crawl.
The back arrow (←) next to the heading also returns to the Articles page.
Step 4: Type the full address (with https://)#
The box only accepts a complete web address. If you type just part of it, your browser stops you before anything starts.
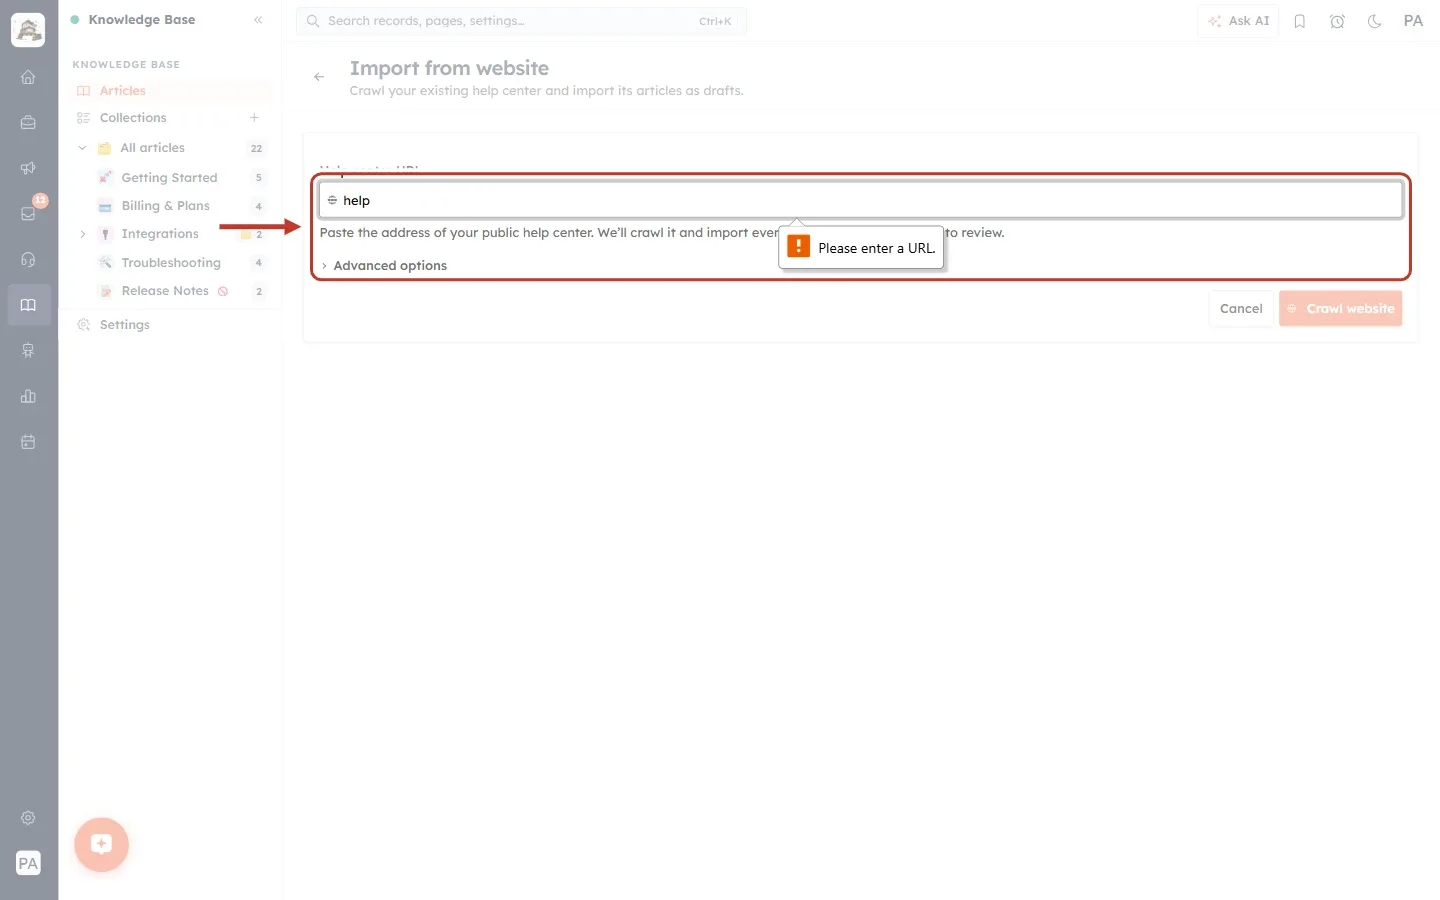
What this screenshot shows. The Help center URL box ringed, with a browser message under it.
We typed only “help” and clicked Crawl website.
The browser shows “Please enter a URL.” and nothing is started.
Other messages you may see under the box: “Enter the address of your help center.” (the box is empty), “Only http and https addresses are supported.” and “That doesn’t look like a valid website address.”
Fix: type the whole address, starting with https://.
Step 5: Enter your help center’s address#
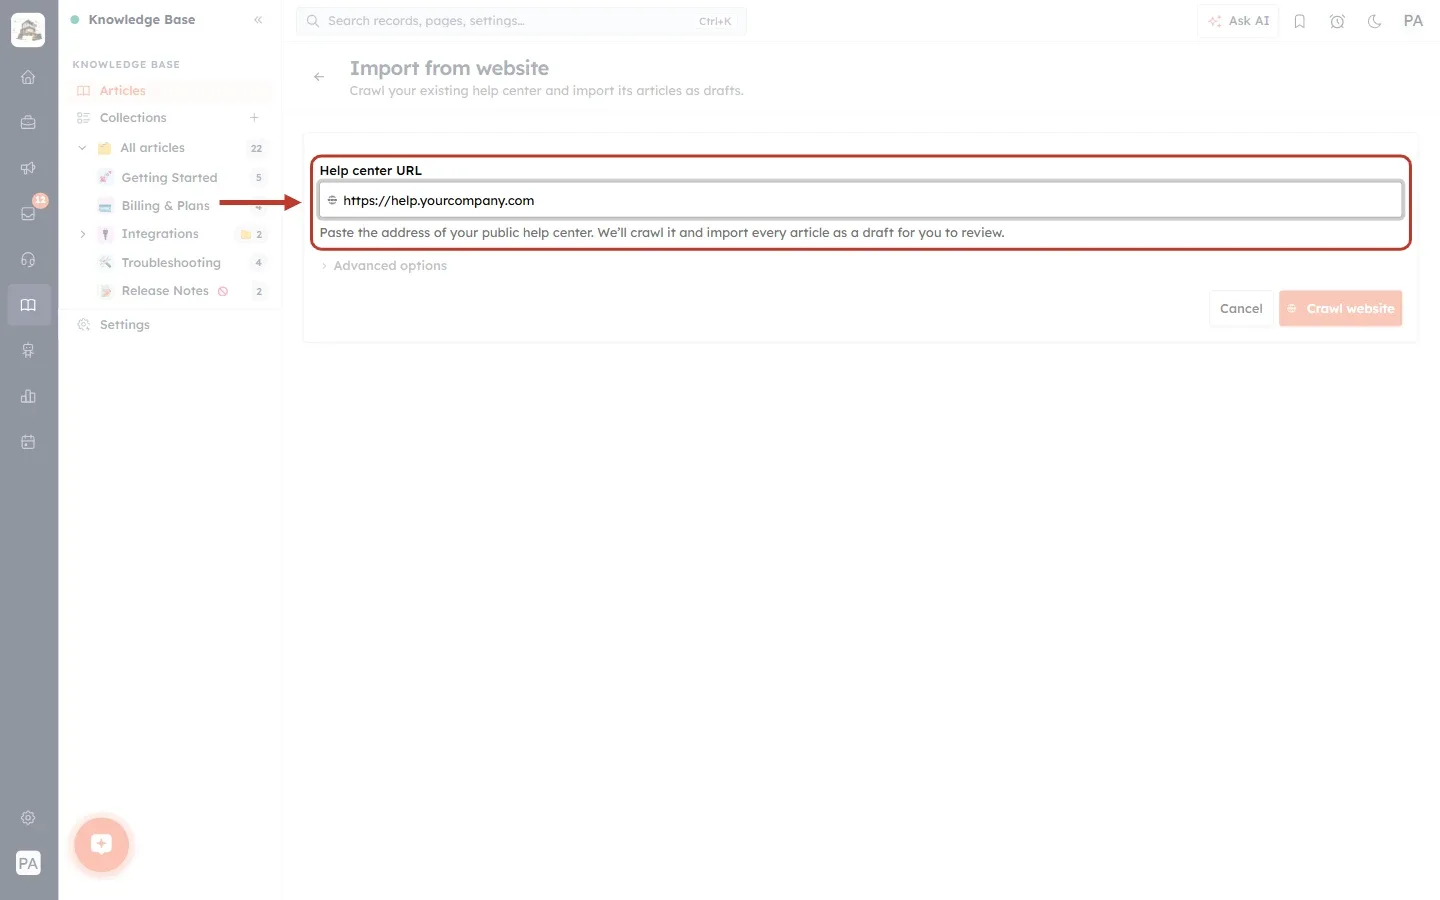
What this screenshot shows. The Help center URL box ringed, now filled in correctly.
The address is https://help.yourcompany.com: the home page of the old help center.
Use the top level of your help center, not a single article. The crawler starts from this page and follows the links it finds.
Step 6: Check the advanced options (optional)#
Click Advanced options to see two extra settings. Most people can leave them as they are.
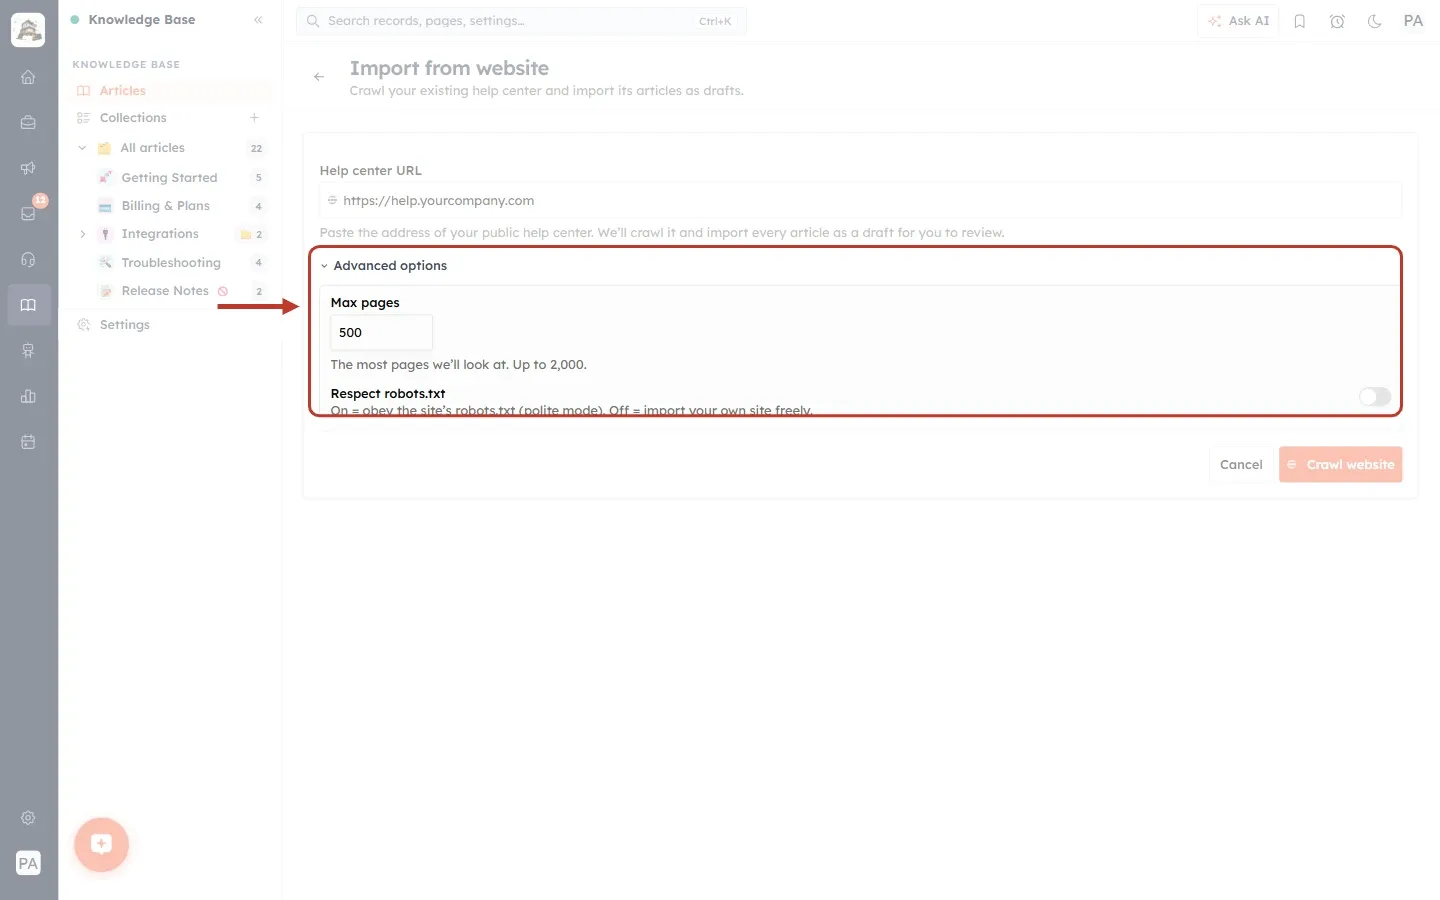
What this screenshot shows. The Advanced options section opened and ringed.
Max pages: the most pages the crawler will look at. It is 500 at first, and you can set any number from 1 to 2,000. Lower it for a quick test run. Raise it for a very large help center.
Respect robots.txt: a switch, off at first. A website’s robots.txt file tells crawlers which pages to stay away from. On obeys it (“polite mode”). Off lets you import your own site freely.
💡
Only import help centers that you own or have permission to copy. If you are importing a site you don’t control, turn Respect robots.txt on.
Step 7: Start the crawl#
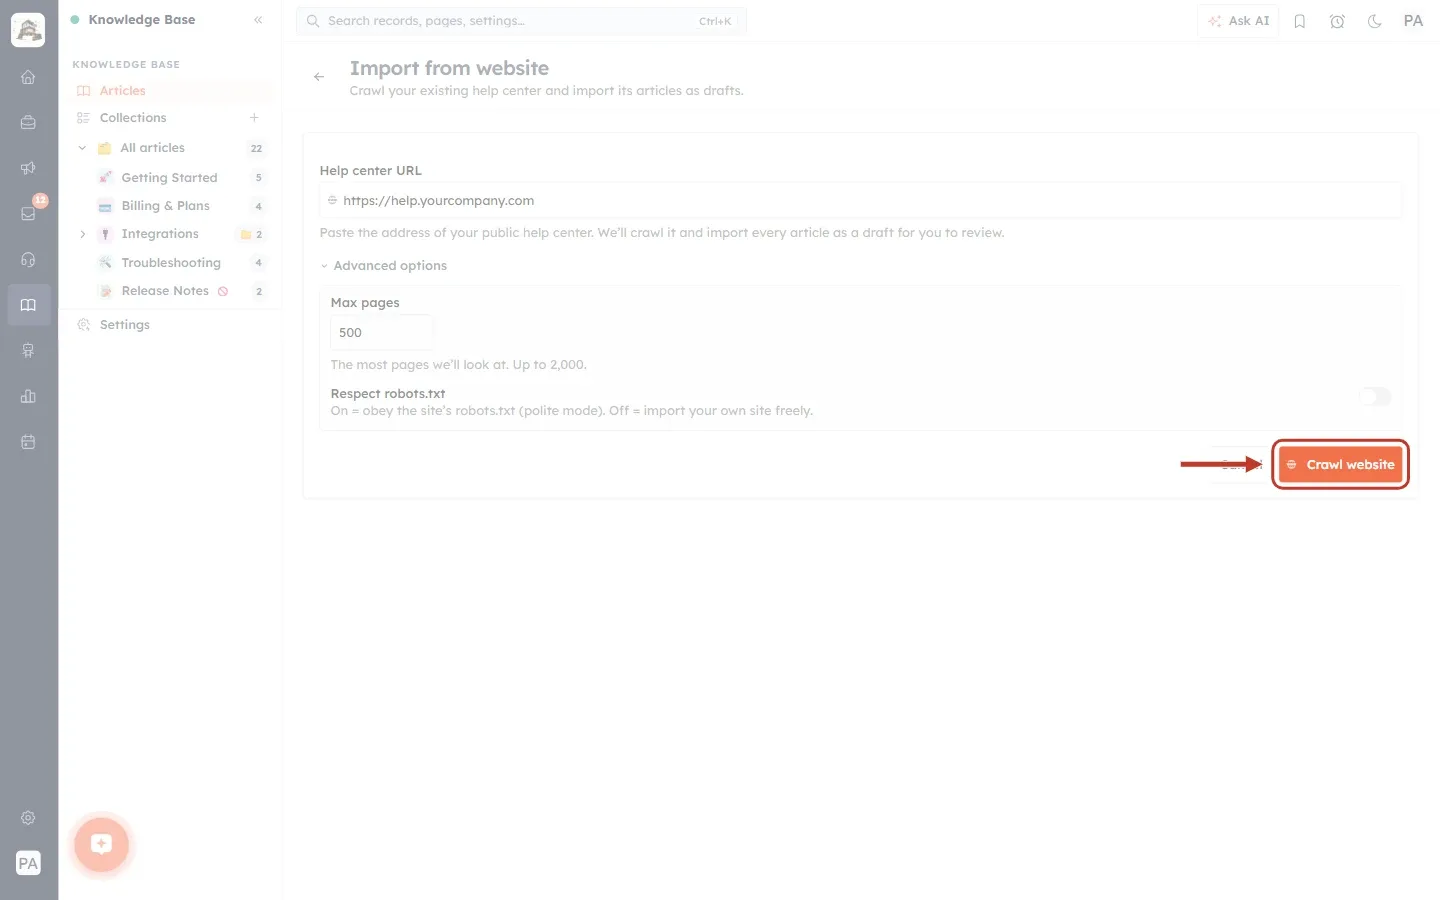
What this screenshot shows. The orange Crawl website button ringed at the bottom right of the form.
Click it to start. The button briefly shows “Starting…”.
Clicking Cancel instead returns to the Articles page without starting anything.
Part 2: Let the crawler discover your pages#
Step 8: Wait while pages are discovered#
A message confirms “Crawl started — discovering pages…” and the page changes to Discovering pages. The screen updates by itself every few seconds. You don’t need to refresh it.
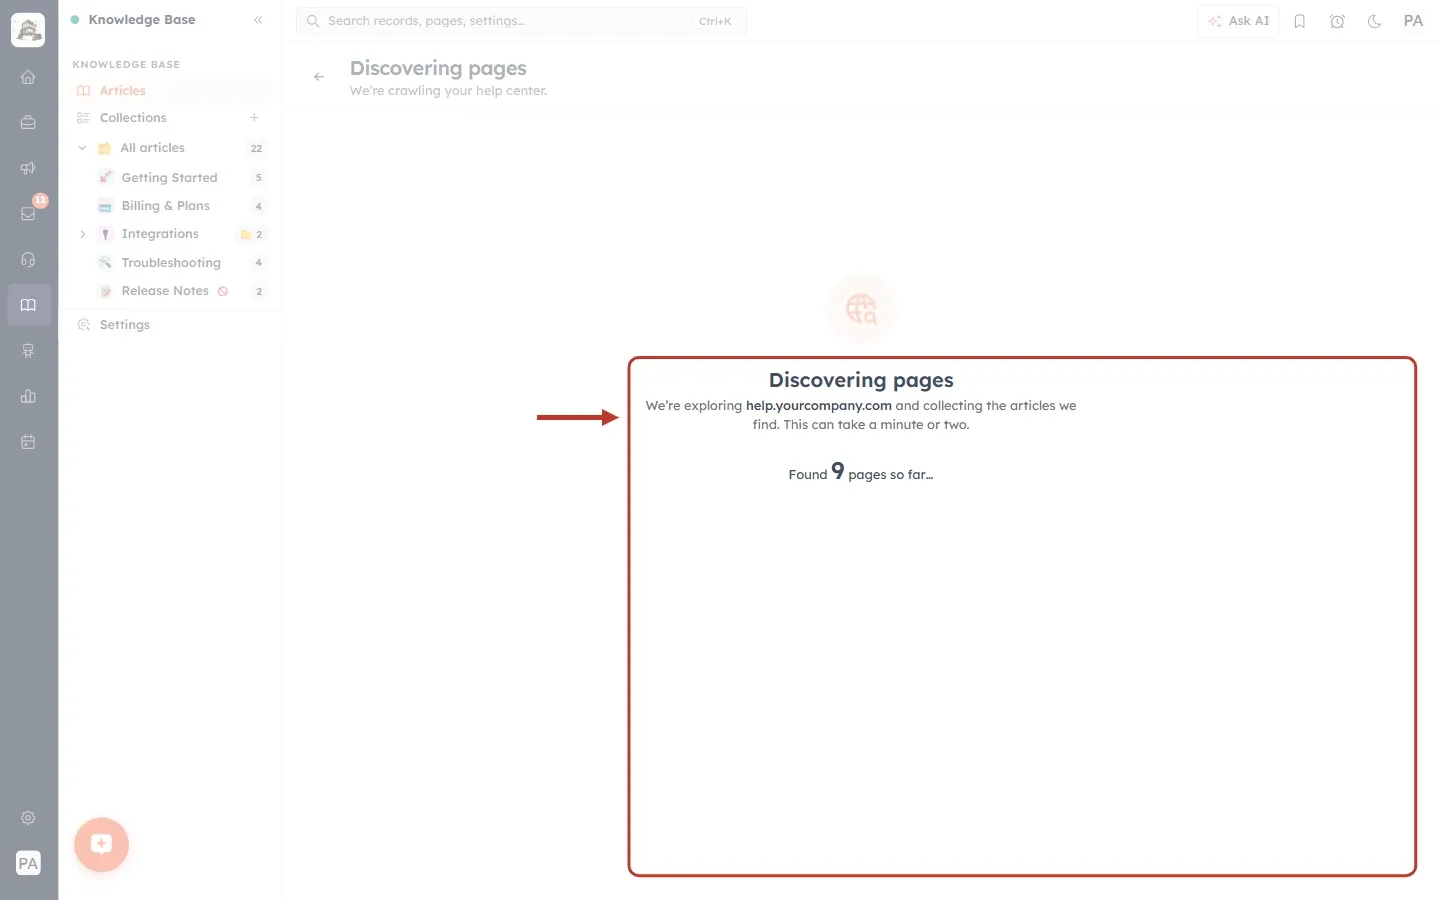
What this screenshot shows. The Discovering pages card ringed.
The globe-and-magnifier icon at the top shows the crawler is working.
The text: “We’re exploring help.yourcompany.com and collecting the articles we find. This can take a minute or two.”
“Found 9 pages so far…”: the count goes up as more pages are found.
The heading at the top of the page also reads “Discovering pages, We’re crawling your help center.”
Step 9: Watch the progress#
Once the crawler knows roughly how many pages there are, a progress bar appears.
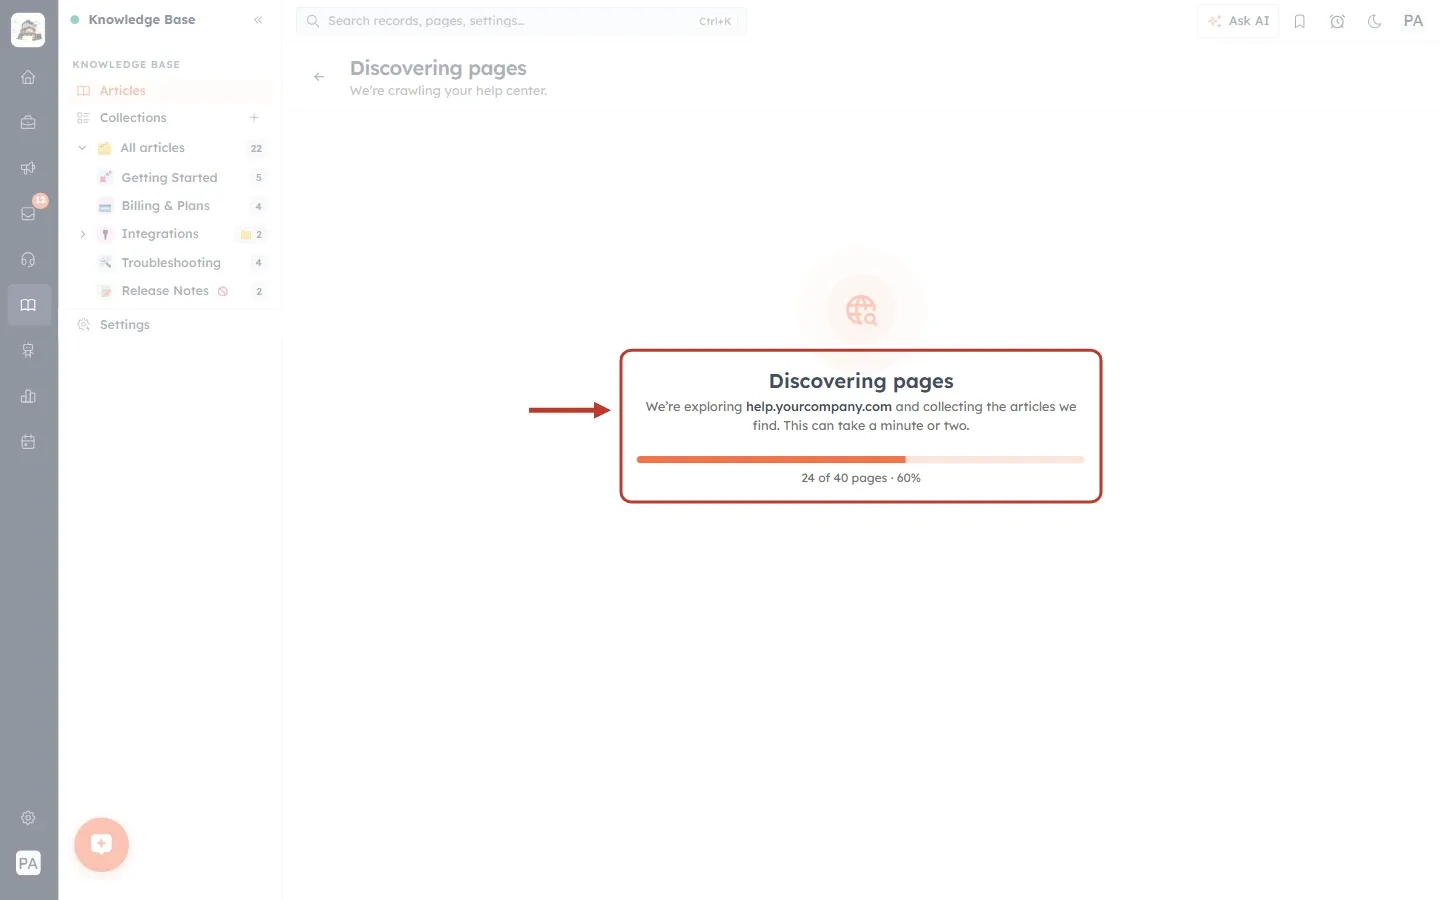
What this screenshot shows. The same card ringed, now with a progress bar.
“24 of 40 pages · 60%”: 24 pages checked out of about 40 found.
The orange bar fills up as the crawl goes on.
When discovery finishes, the page moves on to Review & select by itself.
ℹ️
If the crawler can’t find any pages, you see No pages found: “We couldn’t find any pages to import at …”. Check the address, or use Import from file instead. Two buttons, Try another URL and Import from file, take you there.
Part 3: Review and choose the pages#
Step 10: The Review & select page#
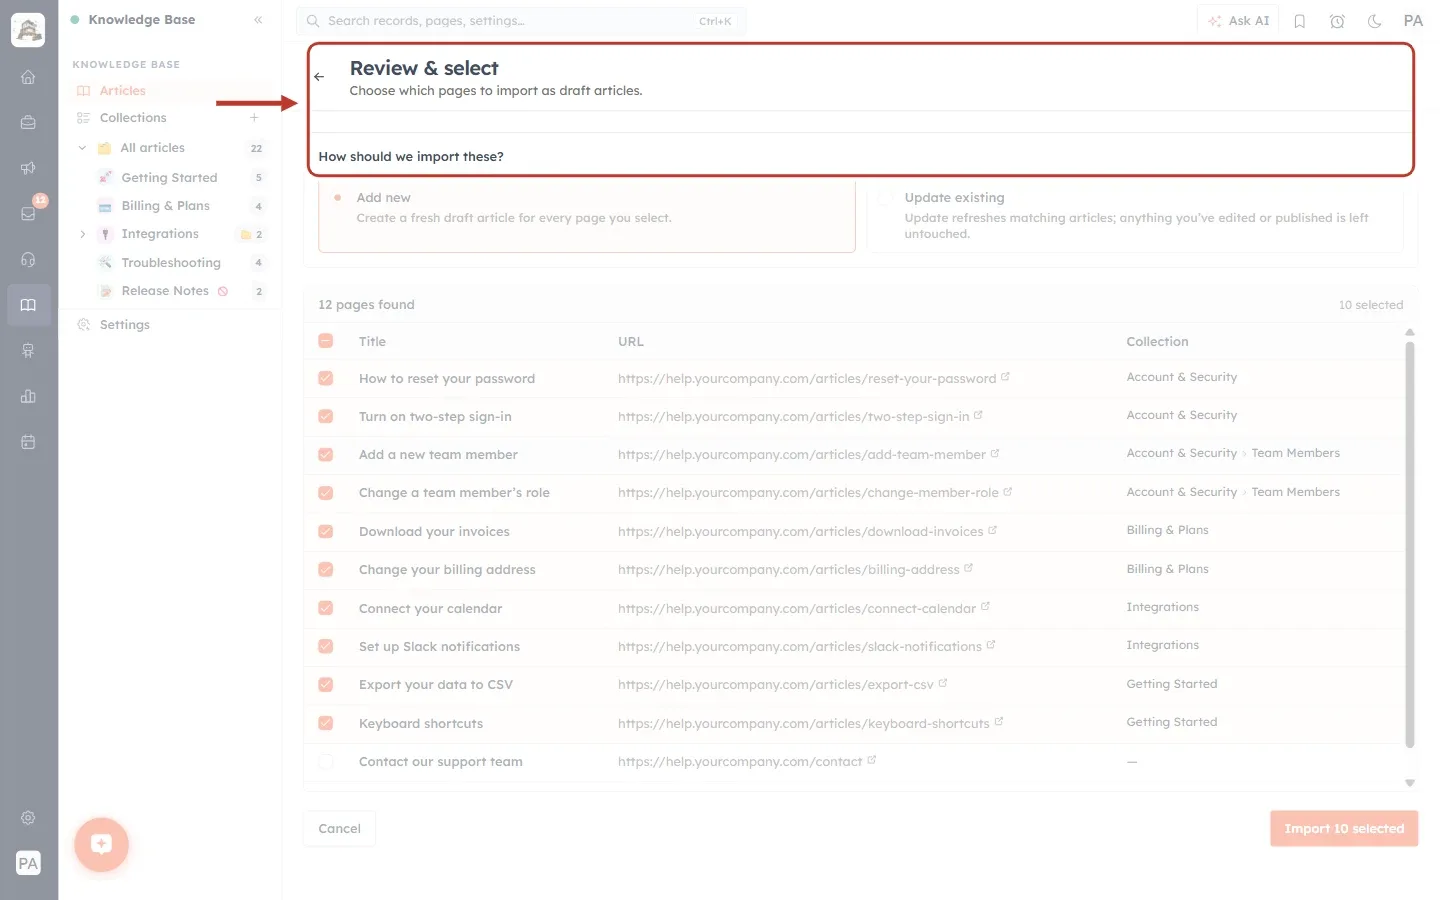
What this screenshot shows. The top of the Review & select page ringed.
The heading Review & select, “Choose which pages to import as draft articles.”
The question How should we import these?, with two choices (Step 11).
Below them, the list of every page the crawler found (Step 12).
Step 11: Choose Add new or Update existing#
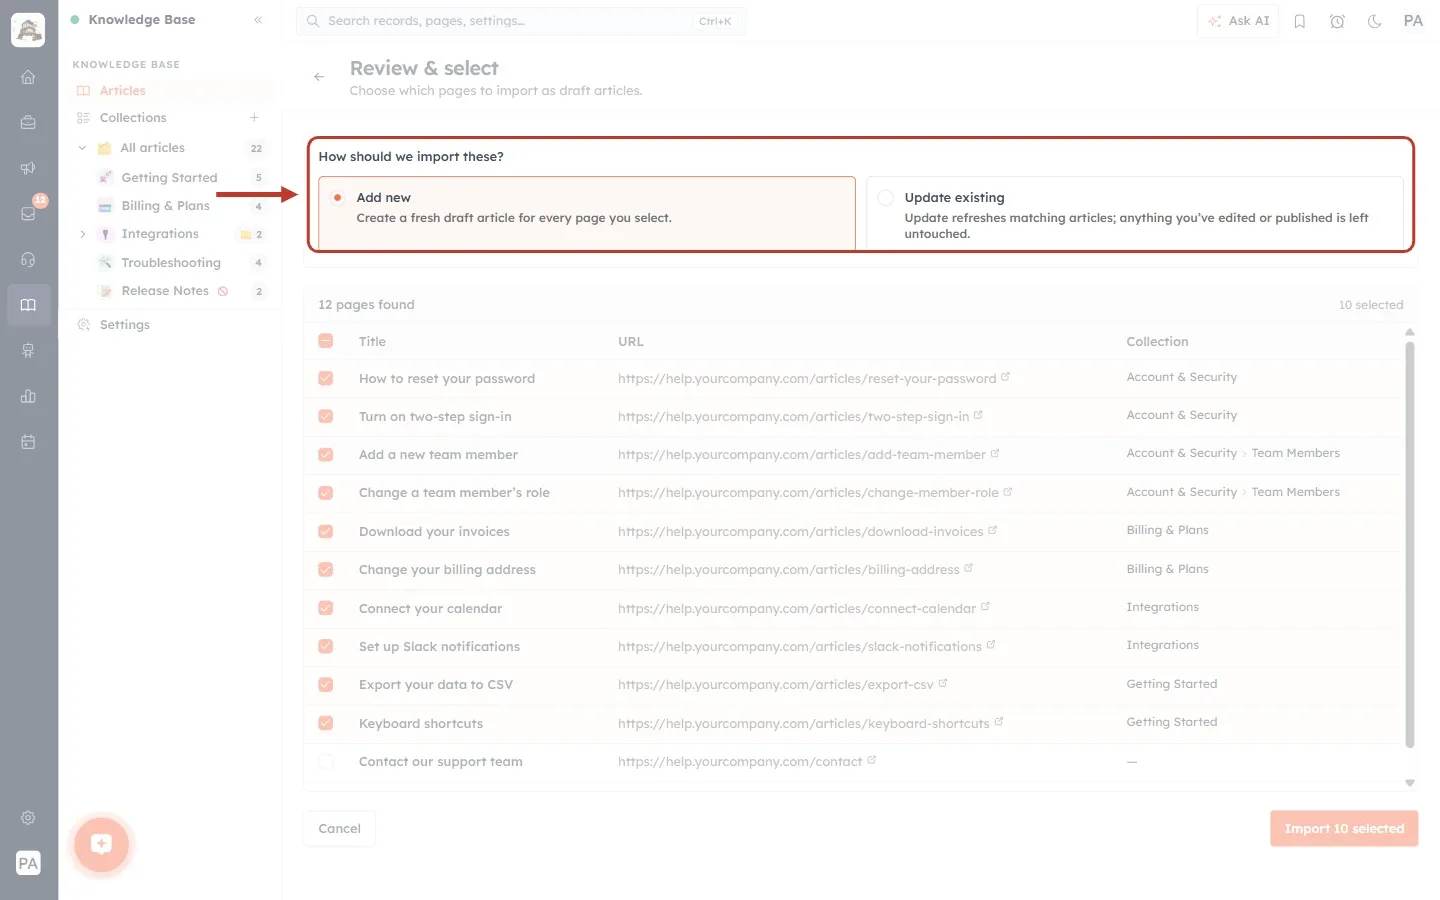
What this screenshot shows. The two import choices ringed.
Add new (selected at first): “Create a fresh draft article for every page you select.” Use this for your first import.
Update existing: “Update refreshes matching articles; anything you’ve edited or published is left untouched.” Use this when you import the same site again after it has changed. Articles you have already edited or published in AiEngage CRM are never overwritten.
The selected choice has an orange border and a filled circle.
Step 12: Check the list of pages found#
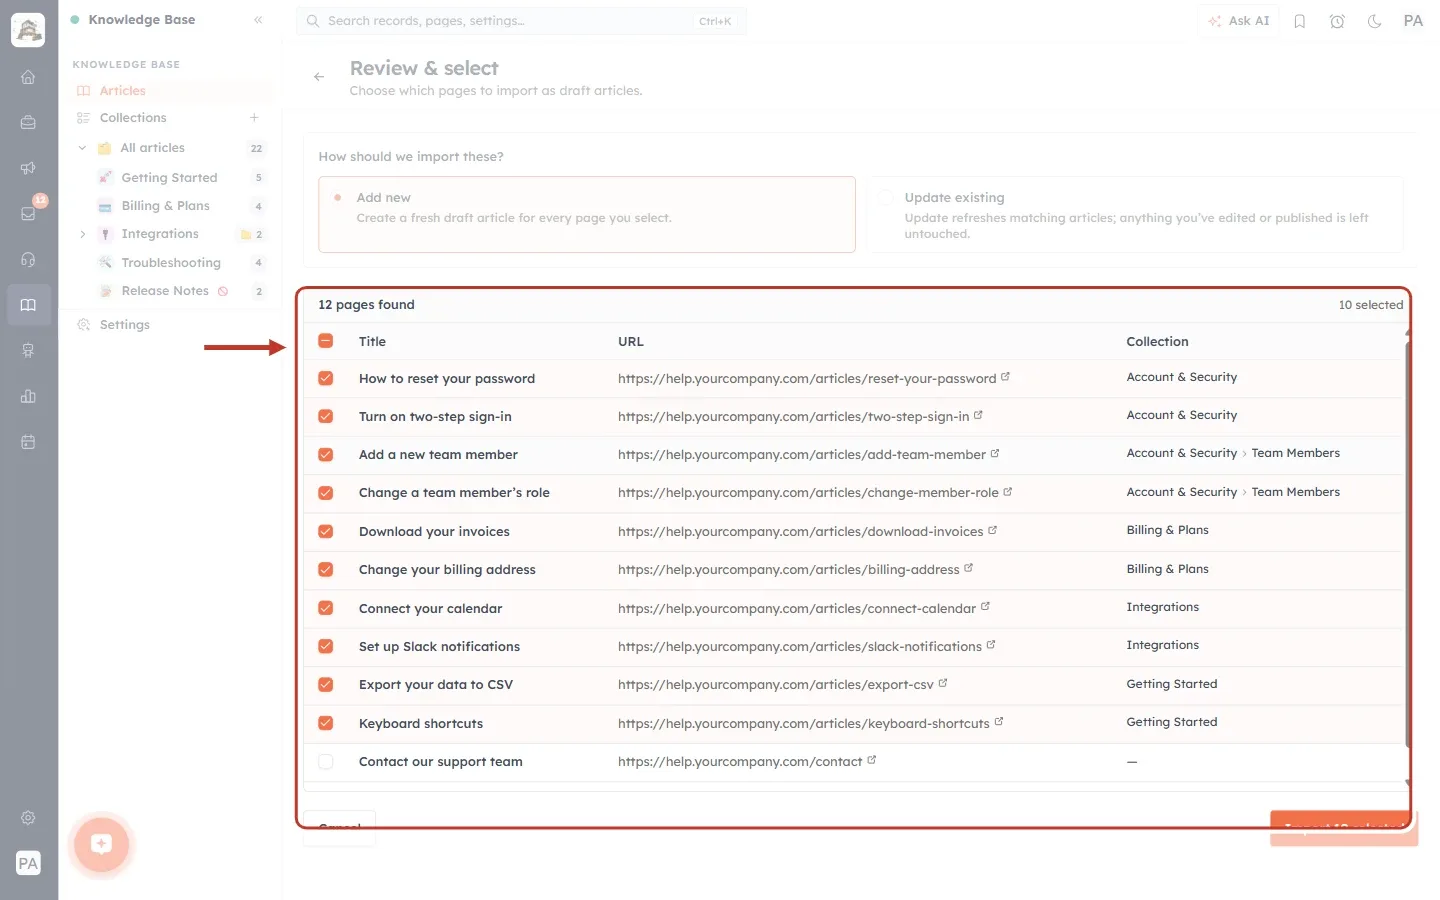
What this screenshot shows. The list of pages ringed.
At the top: 12 pages found on the left and 10 selected on the right.
The tick box in the heading row selects or clears every page at once.
Title: the page title on the old site. This becomes the article title.
URL: the page address. Click the small arrow icon after it to open the original page in a new tab and check it.
Collection: the section the page sits in on the old site. A small › separates a section from its sub-section, for example “Account & Security › Team Members”.
Pages the crawler recognises as articles are ticked for you. The list scrolls if there are more pages than fit.
Step 13: Leave out pages that are not articles#
Some pages, such as a contact page or the help center’s home page, are not real articles. The crawler leaves these unticked. Tick or untick any row to change what will be imported.
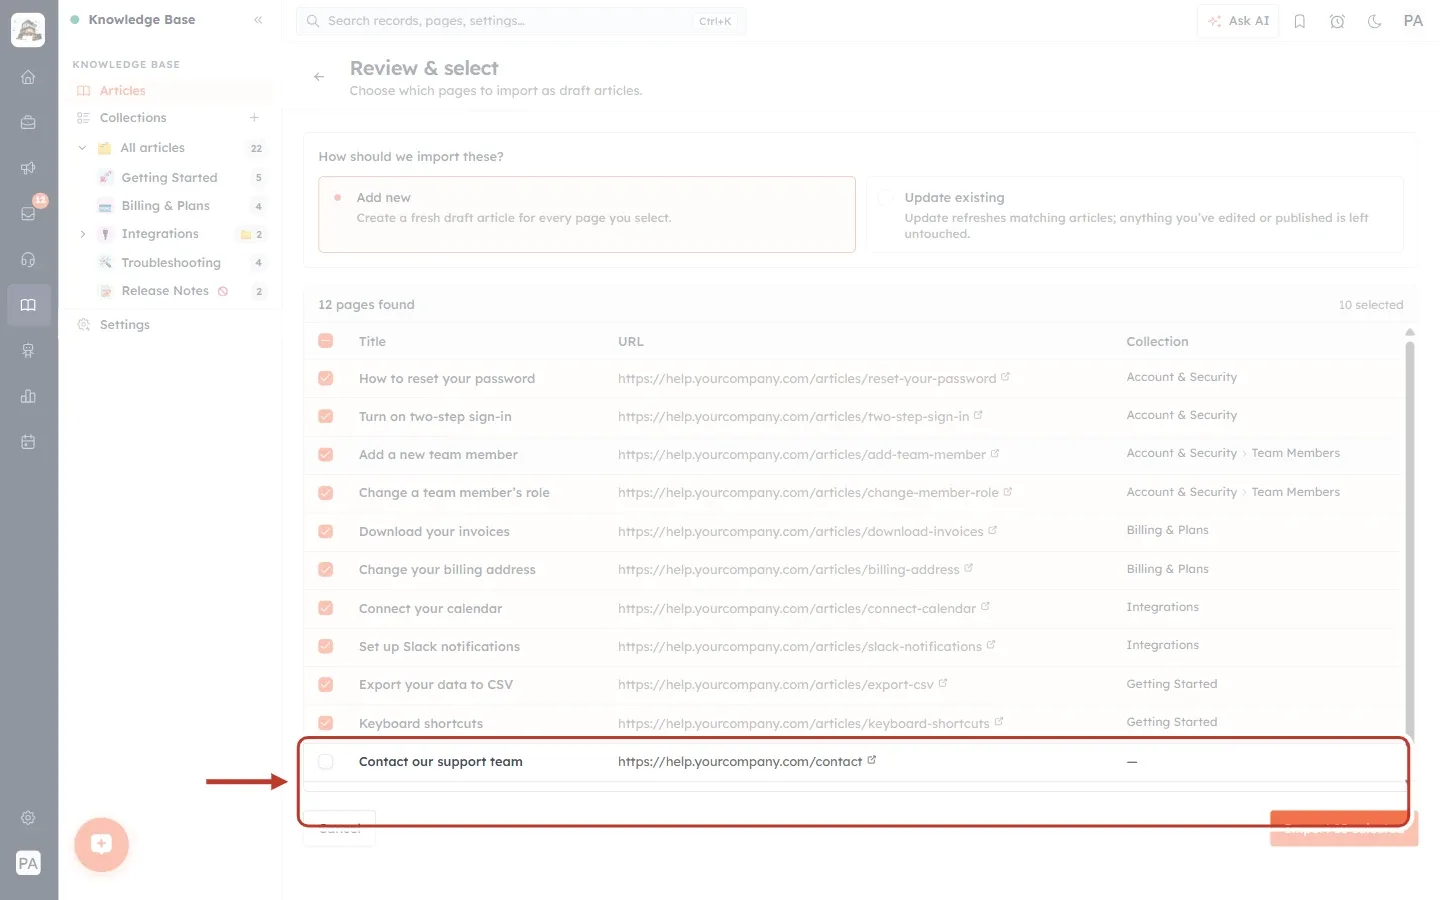
What this screenshot shows. The row “Contact our support team” ringed. Its tick box is empty.
Its Collection shows “—” because it isn’t inside any section of the old help center.
The “Help Center home” page further down the list is also unticked.
Each time you tick or untick a row, the selected count at the top of the list changes.
Step 14: Check the collection names#
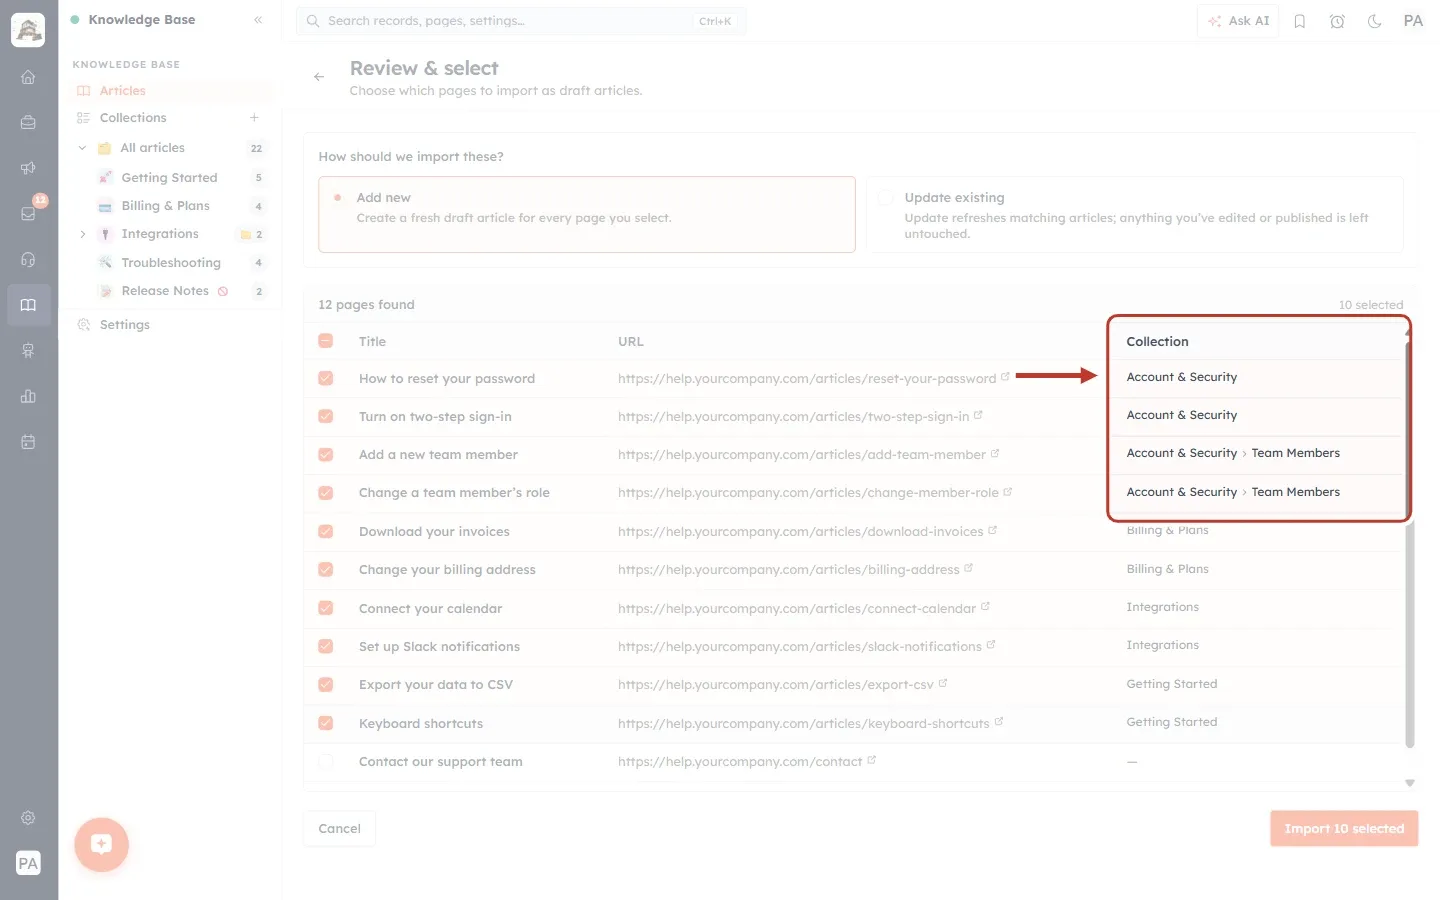
What this screenshot shows. The Collection column ringed for the first four pages.
“How to reset your password” and “Turn on two-step sign-in” sit in Account & Security.
“Add a new team member” and “Change a team member’s role” sit in Account & Security › Team Members, a sub-section.
This shows how your old help center was organised. Use it to decide which AiEngage collection each imported article should go into.
Step 15: Start the import#
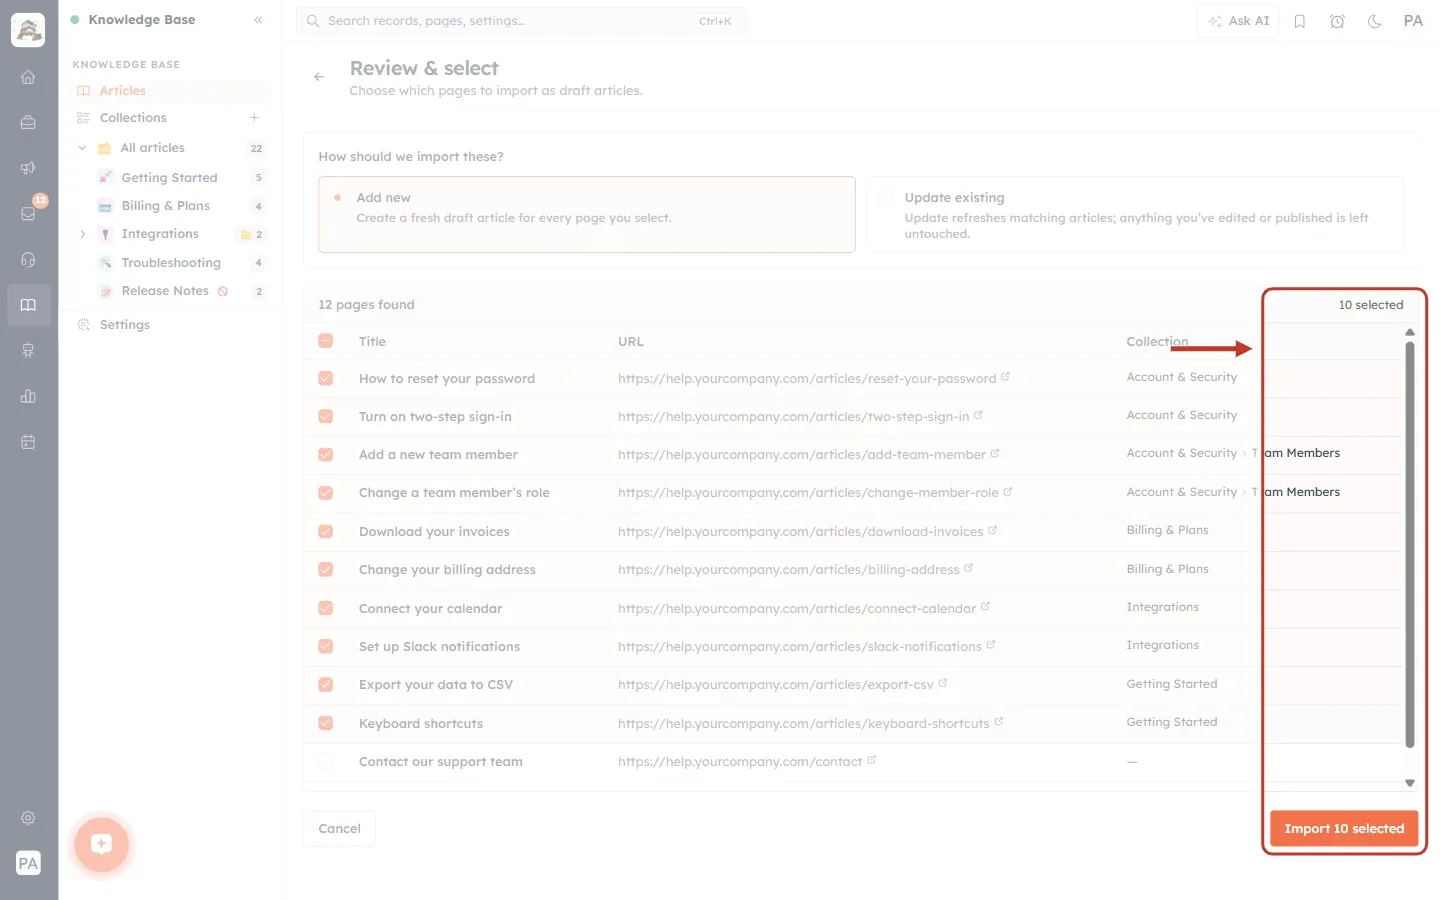
What this screenshot shows. The 10 selected count and the orange Import 10 selected button ringed.
The button always shows how many pages will be imported. It changes as you tick and untick rows.
The button is greyed out when nothing is selected.
Cancel (bottom left) leaves without importing anything.
Click Import 10 selected to start.
Part 4: Import the pages#
Step 16: Wait while the articles are created#
A message confirms “Import started” and the page shows Importing articles.
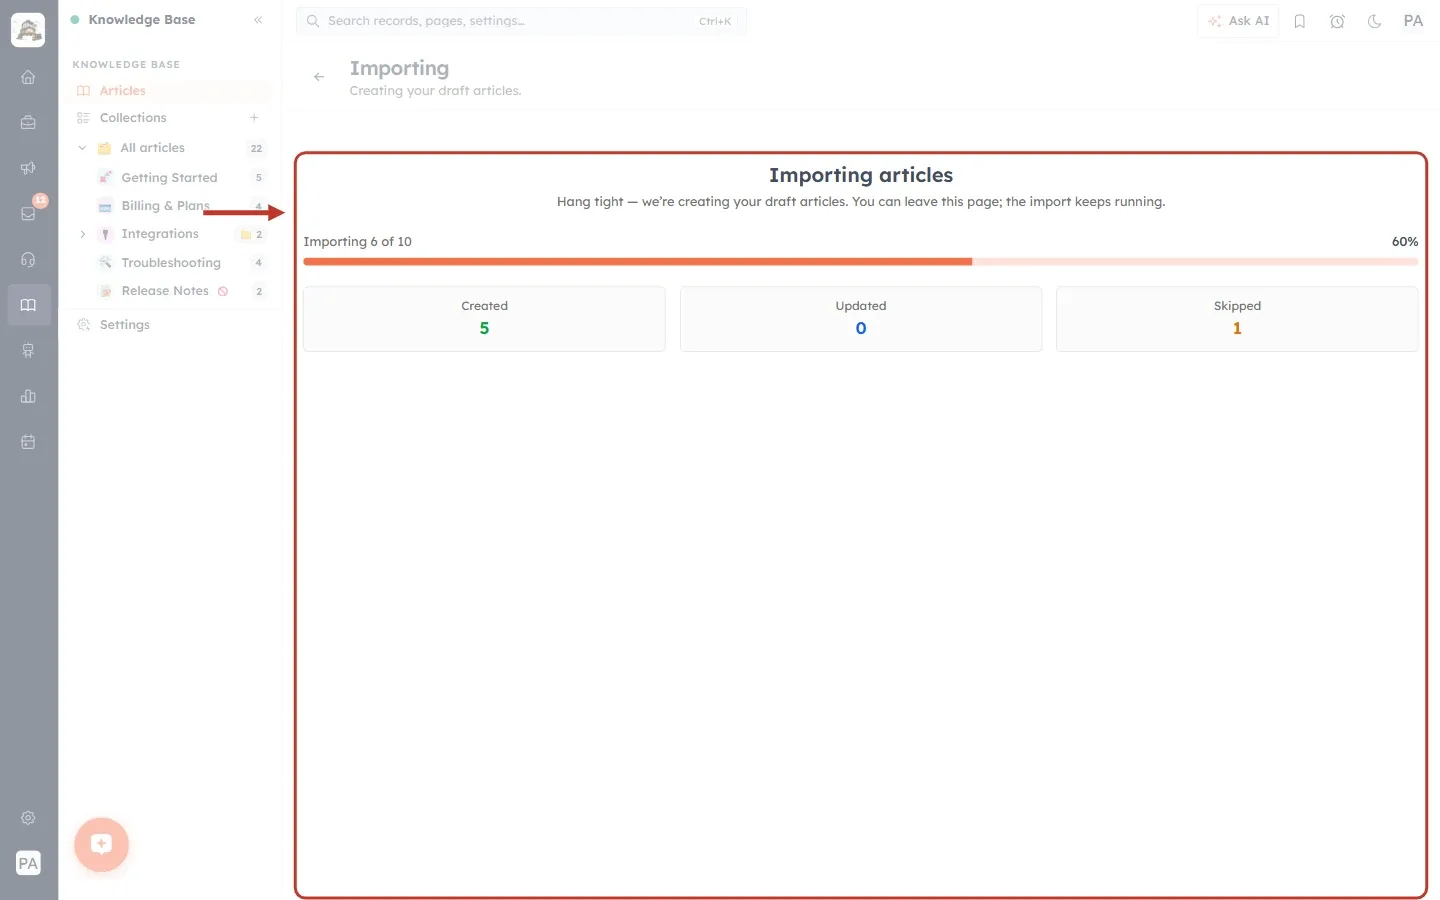
What this screenshot shows. The Importing articles card ringed.
“Hang tight — we’re creating your draft articles. You can leave this page; the import keeps running.”
“Importing 6 of 10” with a progress bar at 60%.
Three running totals: Created 5 (new draft articles), Updated 0 (existing articles refreshed, with Update existing) and Skipped 1 (shown in amber when above zero).
Part 5: Check the results#
Step 17: Read the summary#
When the import ends, the page shows a summary. There are three possible results:
Import complete (green tick): every selected page was imported.
Import finished with some issues (amber warning): most pages were imported, but some were skipped or failed.
Import failed (red): “We couldn’t finish the import”. Click Start over to try again.
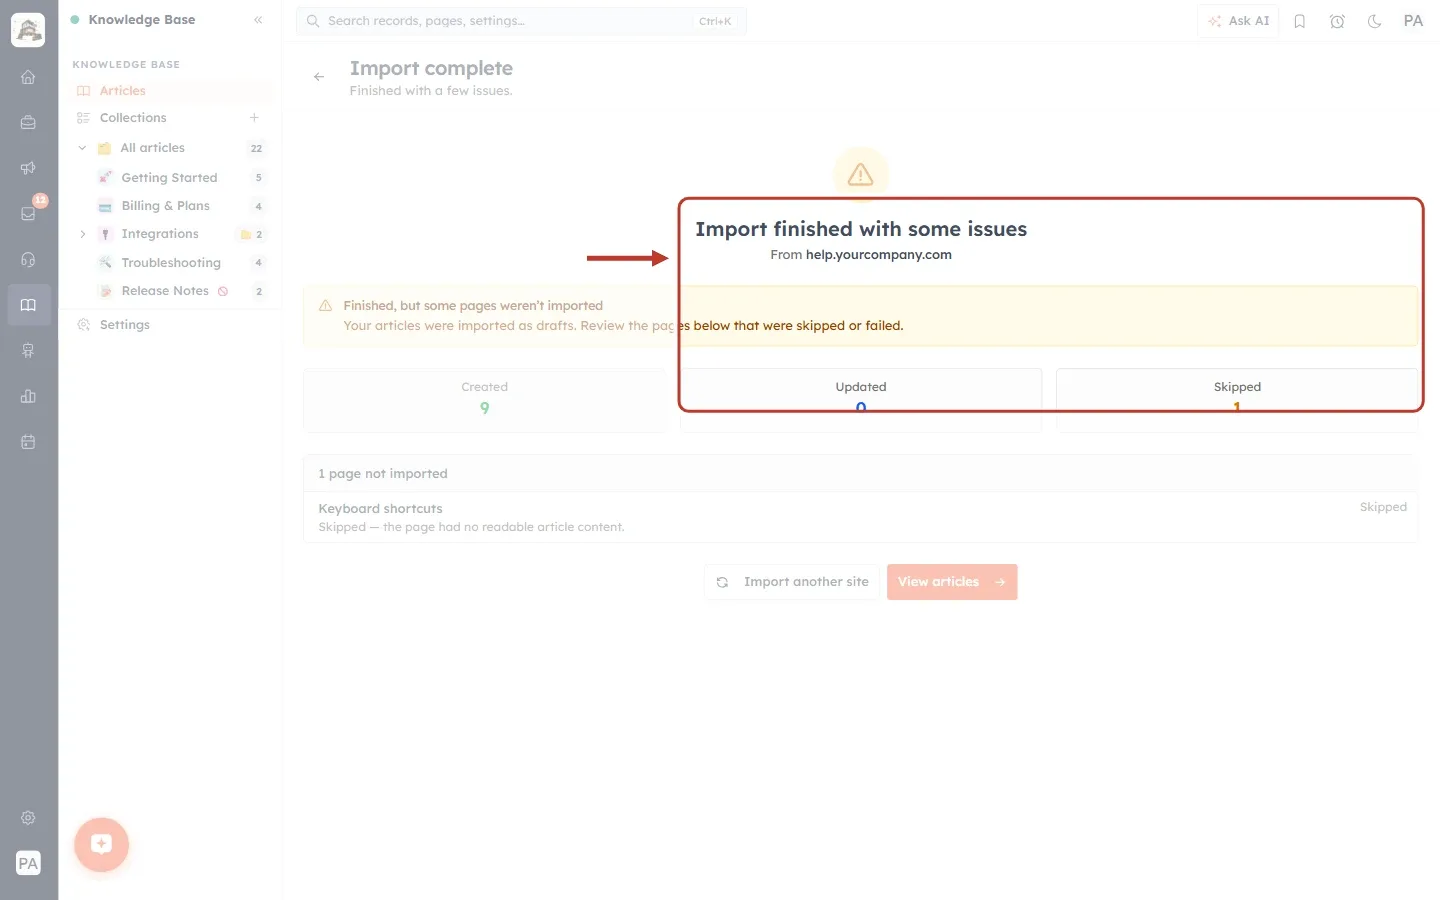
What this screenshot shows. The summary ringed. Our sample import finished with one issue.
The amber warning icon and the heading “Import finished with some issues”, “From help.yourcompany.com”.
The amber note: “Finished, but some pages weren’t imported. Your articles were imported as drafts. Review the pages below that were skipped or failed.”
The final totals: Created 9, Updated 0, Skipped 1.
If there were warnings during the crawl, they are listed here too. With more than four, click Show all warnings to see them all.
Step 18: See which pages were not imported#
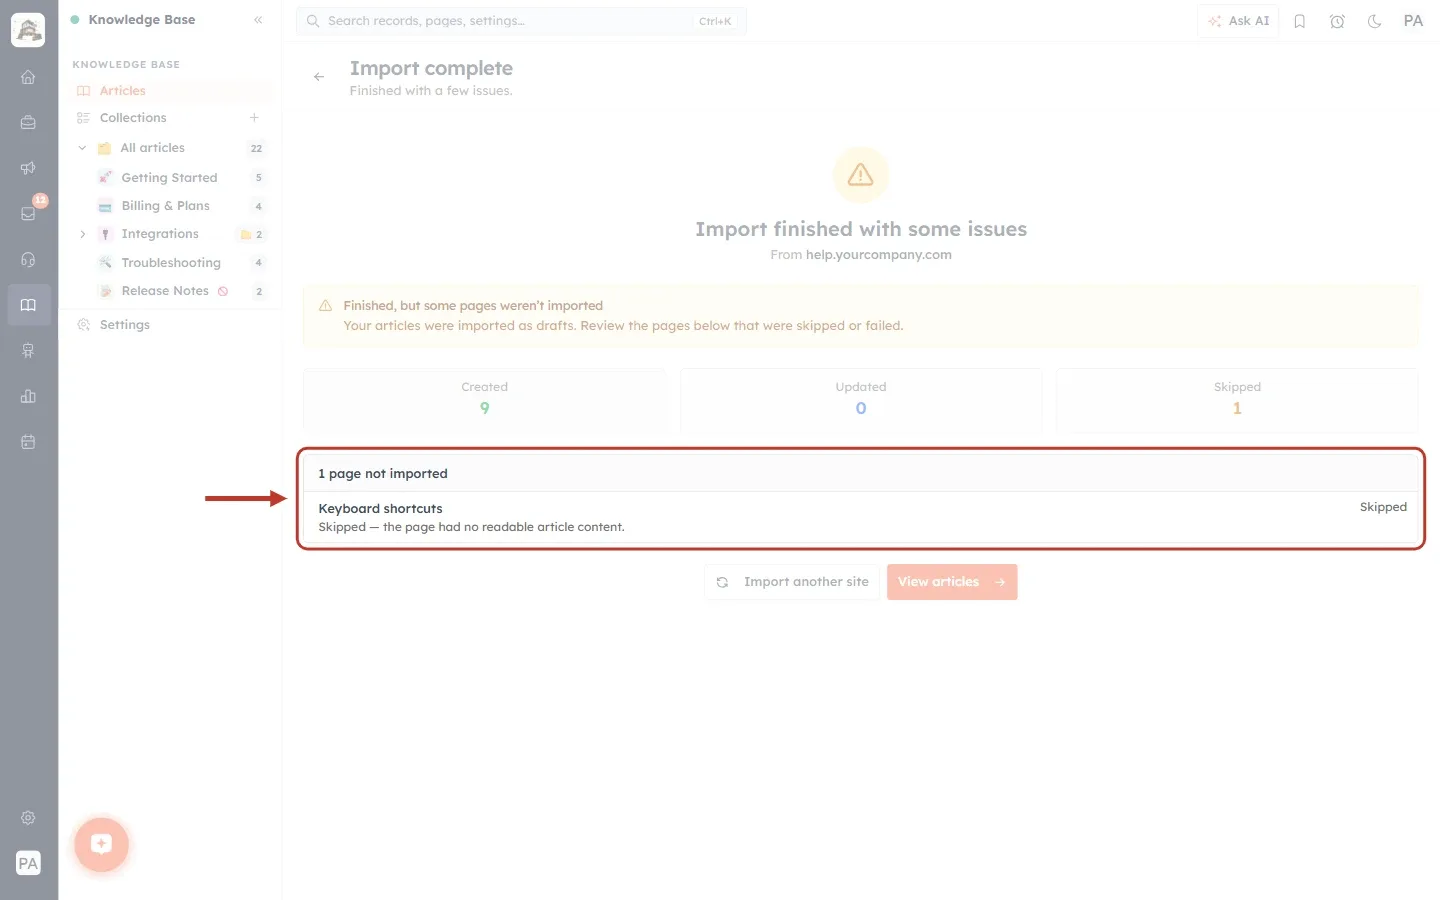
What this screenshot shows. The “1 page not imported” list ringed.
Each row shows the page title (“Keyboard shortcuts”), the reason underneath (“Skipped — the page had no readable article content.”) and the result on the right (Skipped or Failed).
Open the original page to check it. If it is needed, create that article by hand with New Article, or fix the page on the old site and import it again.
Step 19: Go to your new drafts#
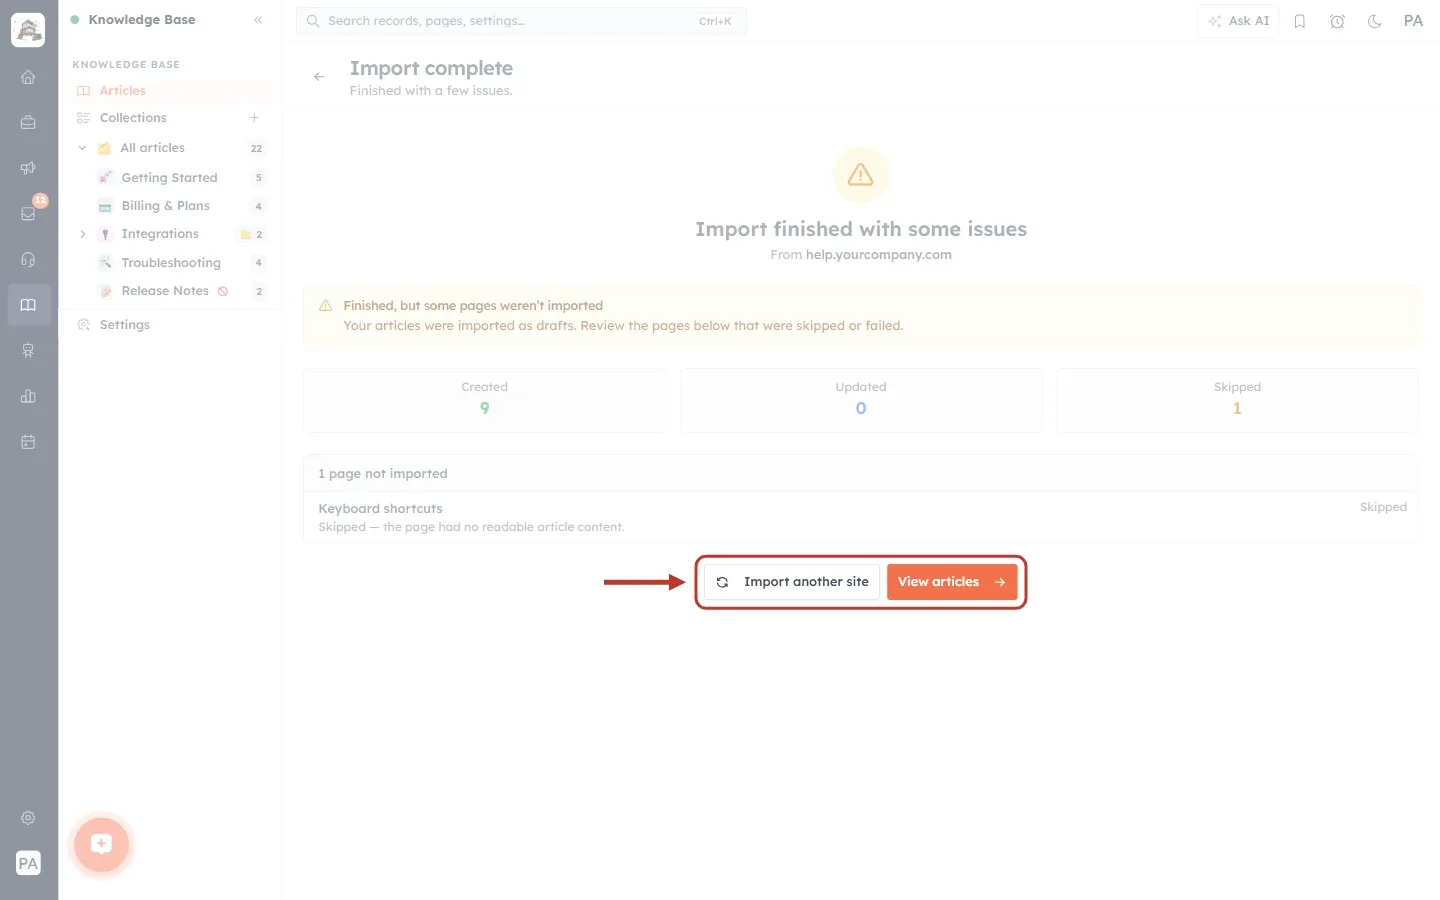
What this screenshot shows. The two buttons under the summary ringed.
Import another site: goes back to the Import from website page to crawl a different address.
View articles (orange): opens the Articles page so you can check the new drafts. Click it.
Step 20: Review and publish the imported articles#
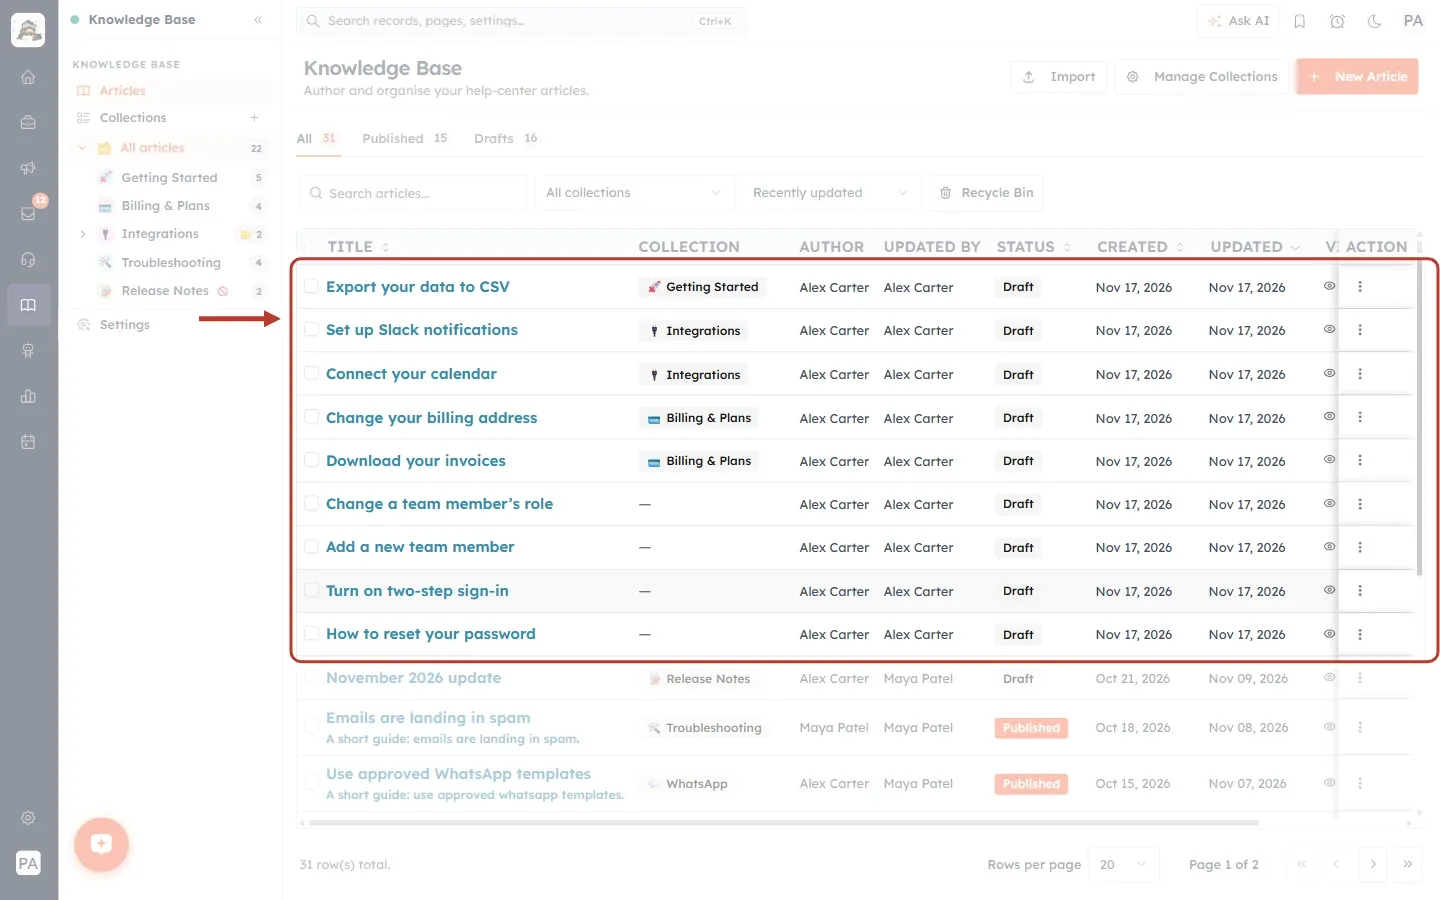
What this screenshot shows. The newly imported articles ringed at the top of the Articles list.
All nine imported pages are listed, newest first, each with the grey Draft status.
The Drafts tab count has gone up by nine.
The Collection column shows where each article has been filed. Where it shows “—”, open the article and choose a collection.
Open each article with its title, check the text, images and links, then publish it, or select several and use the bulk Publish button. See Manage the Article List.
💡
Read every imported article before you publish it. Things that often need a quick fix: links that still point to your old help center, images that didn’t come across, and leftover text such as “Was this article helpful?” from the old site.
Part 6: See your past imports#
Step 21: Open the Website import history#
Click Import on the Articles page again and choose Website import history.
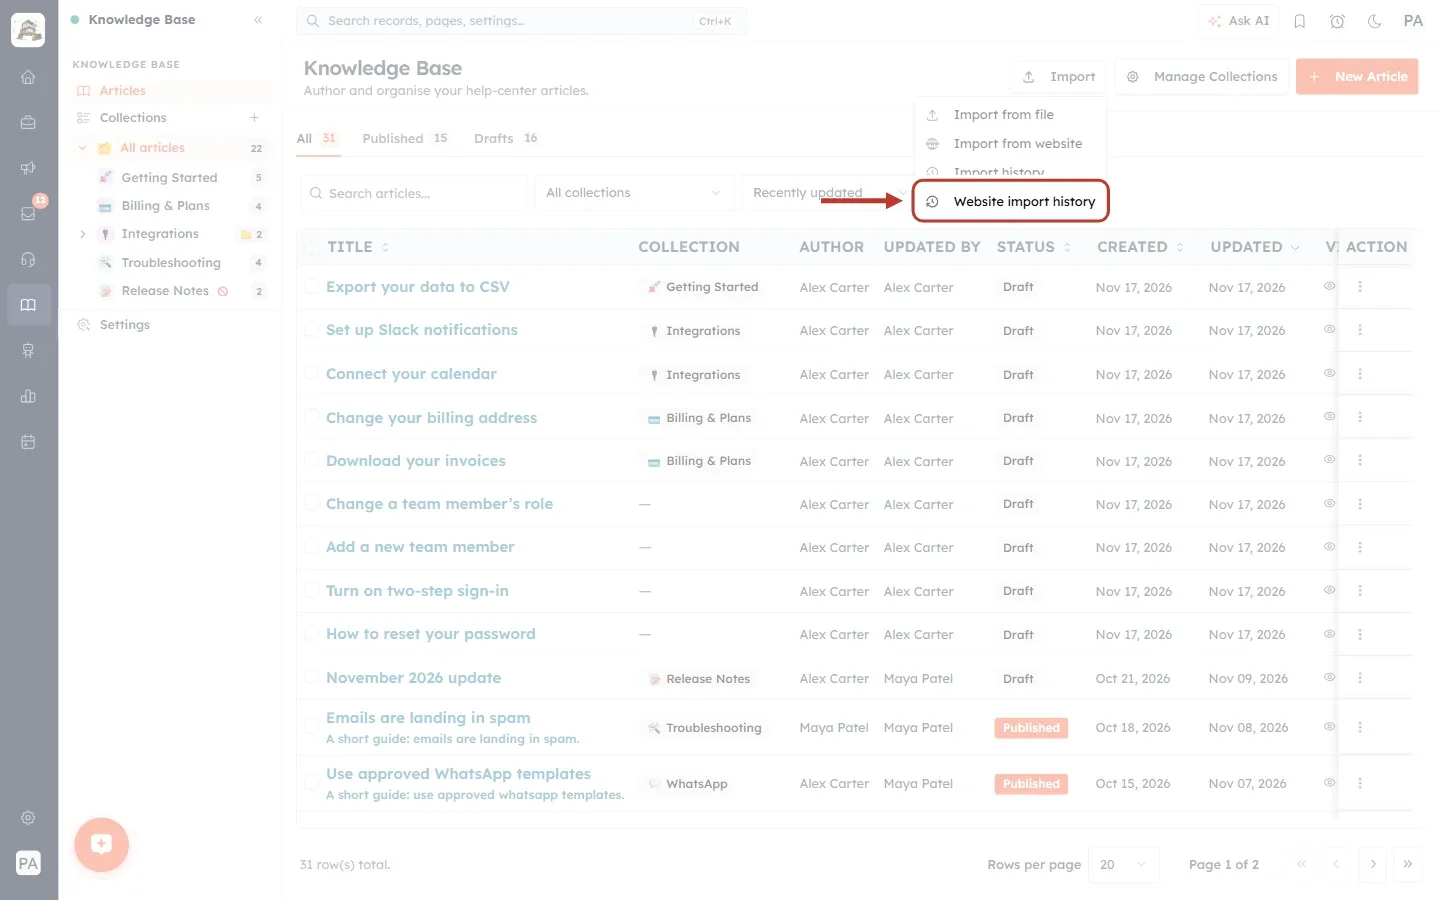
What this screenshot shows. The Website import history option ringed in the Import menu.
This is the last option in the menu, under Import from file, Import from website and Import history.
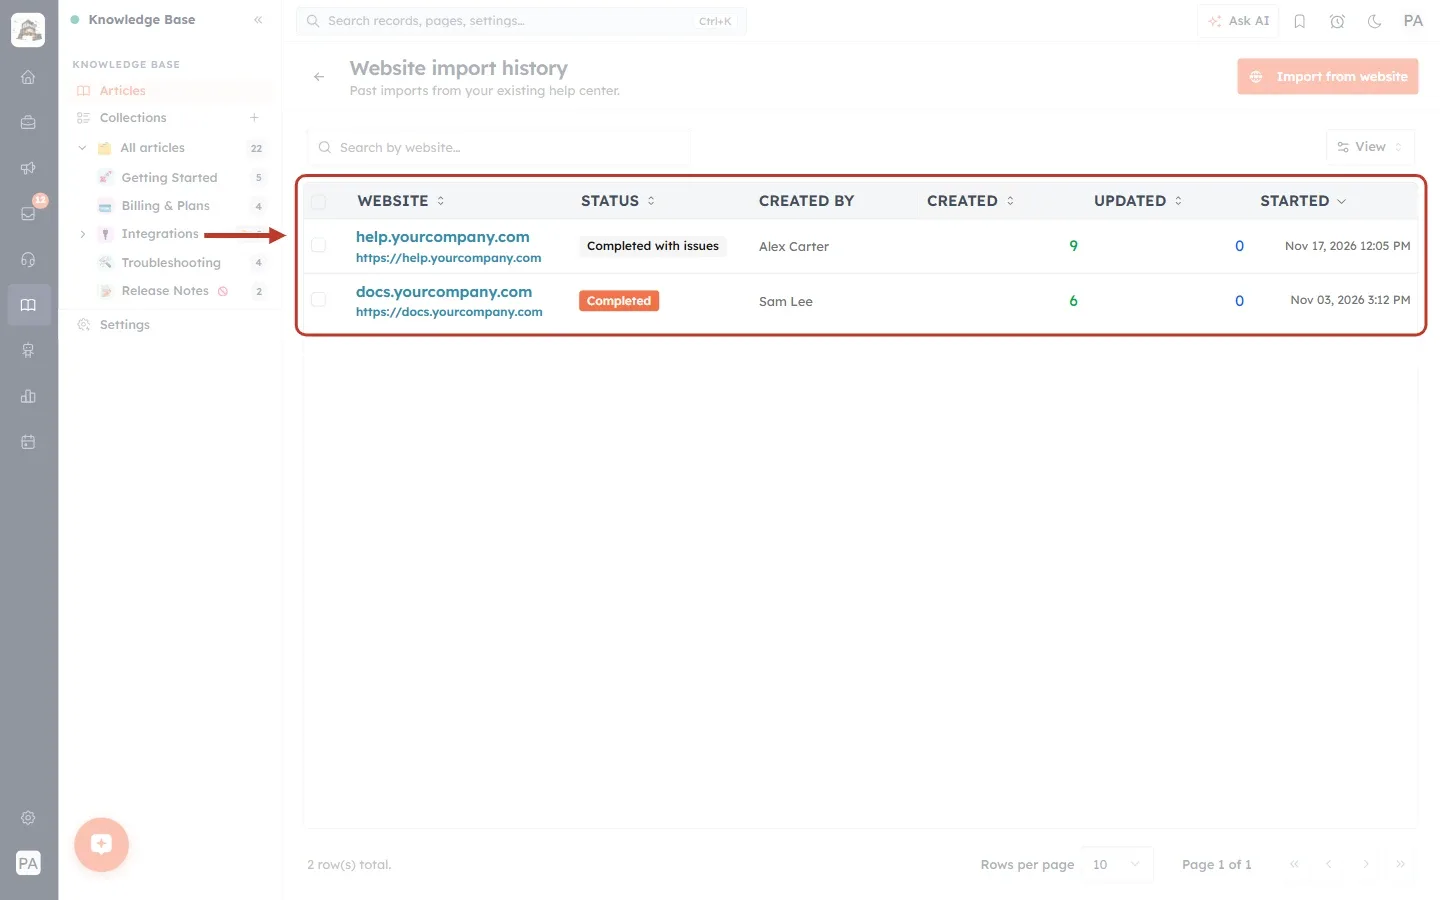
What this screenshot shows. The Website import history table ringed.
Website: the site that was crawled (here help.yourcompany.com and docs.yourcompany.com) with its full address underneath. Click anywhere on a row to open that import again.
Status: for example Completed with issues or Completed. Other statuses are Discovering, Awaiting review, Importing and Failed.
Created by: the team member who ran the import.
The number columns show how many articles were created and updated, and Started shows the date and time the import began.
At the top: a Search by website… box, a View button to choose which columns to show, and Import from website to start a new import.
ℹ️
An import that is still Awaiting review is waiting for you. Open it from the history to finish choosing your pages and start the import.
Tips for a smooth import#
Do a small test first. Set Max pages to 20 or so, check the result, then run the full import.
Start from the help center’s home page, not from your main company website, so the crawler finds articles and not marketing pages.
Untick anything that isn’t an article, such as contact pages, search pages and category overview pages.
Create your collections first, so you can file the drafts quickly afterwards.
Re-import with Update existing when the old site changes. Articles you already edited or published are left alone.
Troubleshooting#
“Please enter a URL.” or “That doesn’t look like a valid website address.” Type the full address, starting with https://.
No pages found. The address may be wrong, the site may need a sign-in, or its pages may be blocked. Check the address in your browser, try turning Respect robots.txt off for your own site, or use Import from file.
Fewer pages than expected. Raise Max pages (up to 2,000), or start from a page that links to every article.
A page was skipped. The reason is shown in the “not imported” list. Pages with little or no article text are usually skipped. Create that article by hand if you need it.
I closed the page during the import. That’s fine, the import keeps running. Open it again from Website import history.
Frequently asked questions#
Will imported articles go live straight away?
No. They are always imported as drafts. You publish them when you are ready.
Can I import from any website?
The crawler works with public pages on http or https addresses. Only import content you own or have permission to use.
What happens if I import the same site twice?
With Add new, you get a second set of drafts. With Update existing, matching articles are refreshed instead, and anything you have edited or published is left untouched.
How many pages can one import handle?
Up to 2,000 pages, set with Max pages in Advanced options (500 by default).
Can I import from a file instead?
Yes. Choose Import → Import from file on the Articles page.
Previous and next#
Previous: Manage the Article List: Find, Sort, Publish, Clone, Delete and Restore Help-Center Articles
Related#
Was this article helpful?
Ready to implement this?
OpenAI Engage and apply what you just learned to your own workspace.
Open AI Engage CRM