Loading…


KnowledgeBase
Footer, Call-to-Action and SEO for Your Help Center: Footer Links, a Contact Banner, Favicon and Share Image
Introduction#
Your help center is more than its articles. A few site-wide settings make it look finished and help customers who can’t find an answer:
Footer: a line of text (such as your copyright) and up to six links (Contact us, Privacy policy and so on) at the bottom of every page.
Article call-to-action: a banner under every article, for example “Still need help? Contact support”, so customers always have a next step.
SEO: the favicon in the browser tab, the meta description search engines show, and the social share image shown when someone shares a link to your help center.
All three are in the help center’s Settings. This article walks through each one, screen by screen. Every screenshot is followed by a What this screenshot shows section that explains the whole screen.
ℹ️
These settings apply to your whole help center. Each article also has its own SEO settings (meta title, meta description and share image). See Article SEO and Navigation.
Before you begin#
You need access to the Knowledge Base. Administrators always have it. Other users need the Knowledge Base permission in their profile (Setup → Profiles → Feature Permissions → Marketing → Knowledge Base).
Have your links ready: the addresses of your contact page, privacy policy, terms of service or main website.
For SEO, prepare two images: a small square icon for the favicon, and a wide image of 1200 × 630 pixels for social sharing.
The screenshots use a sample help center called YourCompany Help Center.
Part 1: Open the help-center settings#
Step 1: Click Settings in the Knowledge Base side panel#
Open the Knowledge Base (the open-book icon in the left rail). In the Knowledge Base side panel, click Settings at the bottom.
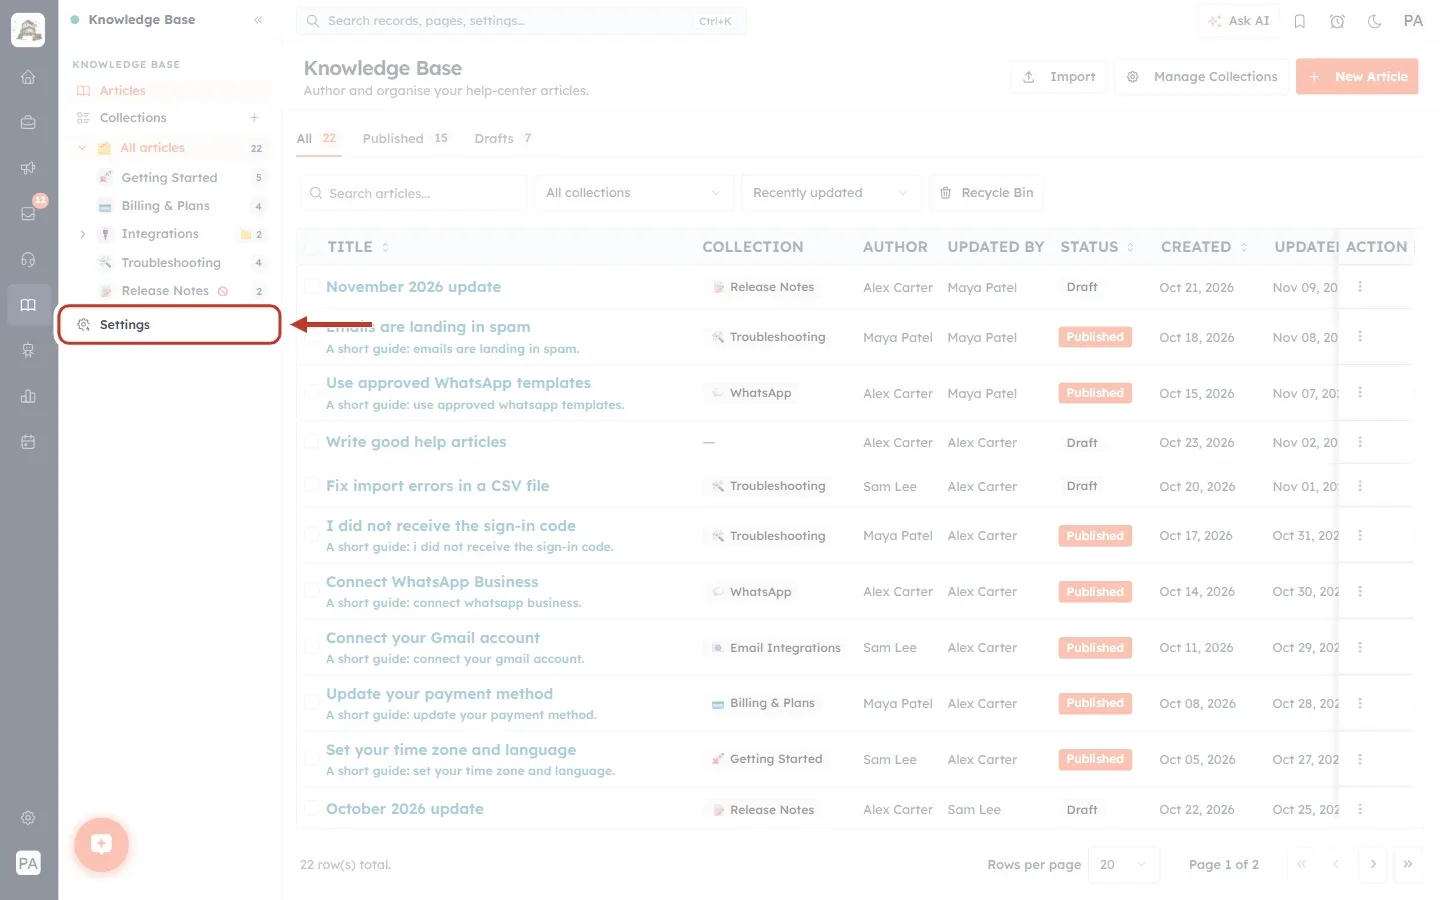
What this screenshot shows. The Knowledge Base Articles page, with Settings ringed in the side panel.
Settings sits under the collection tree, below Articles, Collections and All articles.
It opens the Help Center Settings page.
Step 2: Get to know the settings page#
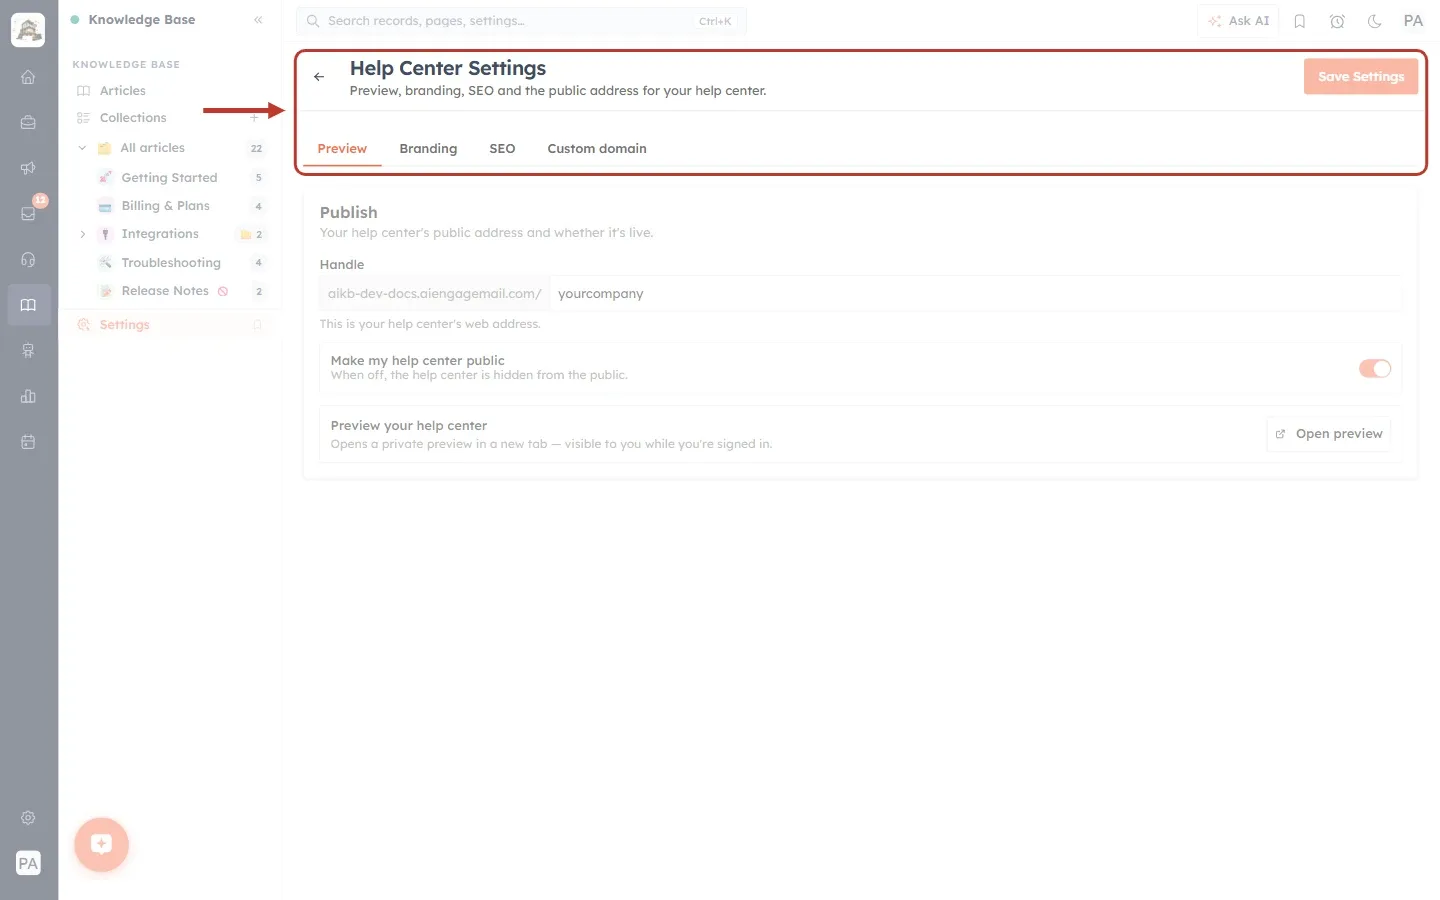
What this screenshot shows. The top of the Help Center Settings page ringed.
The heading and the line “Preview, branding, SEO and the public address for your help center.”
Four tabs: Preview (your public address and the preview button), Branding (name, logo, colours, hero, footer and call-to-action), SEO and Custom domain.
Save Settings (top right) saves the changes on all tabs at once. It stays greyed out until you change something.
💡
You can make changes on several tabs and then click Save Settings once. Don’t leave the page before saving, or your changes are lost.
Part 2: Set up the footer#
Step 3: Find the Footer section#
Click the Branding tab and scroll down past the Hero section to Footer.
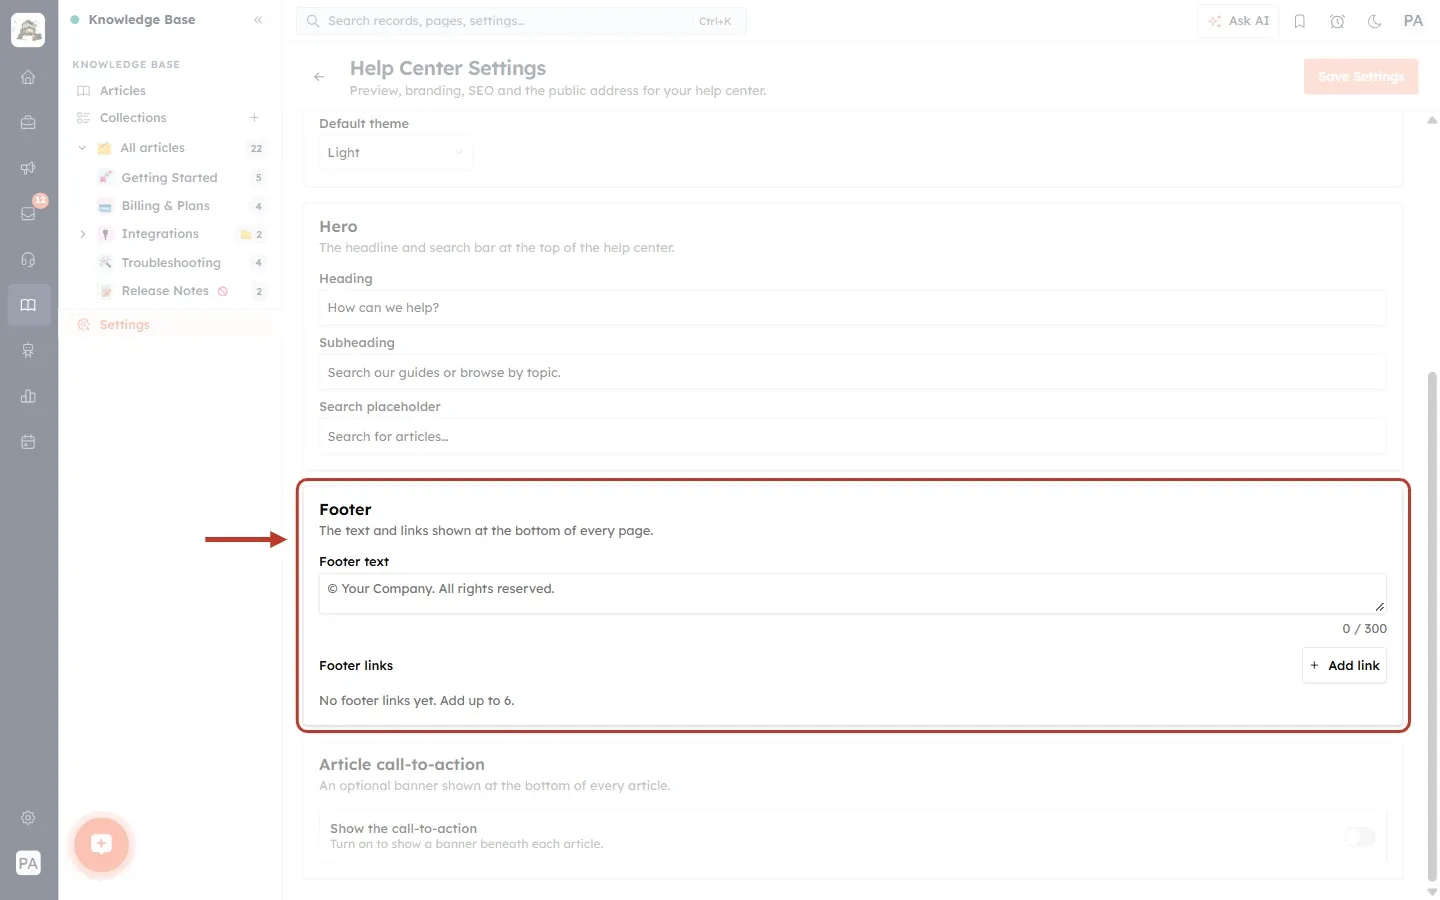
What this screenshot shows. The Footer section ringed, still empty.
The heading Footer and its description: “The text and links shown at the bottom of every page.”
Footer text: a text box. The grey hint shows an example, “© Your Company. All rights reserved.” The counter below reads 0 / 300.
Footer links, with an + Add link button on the right, and the note “No footer links yet. Add up to 6.”
Above it is the Hero section, and below it the Article call-to-action section (Part 3).
Step 4: Write the footer text#
Type the line that should appear at the bottom of every page. Most help centers use a copyright line, sometimes with a support email address.
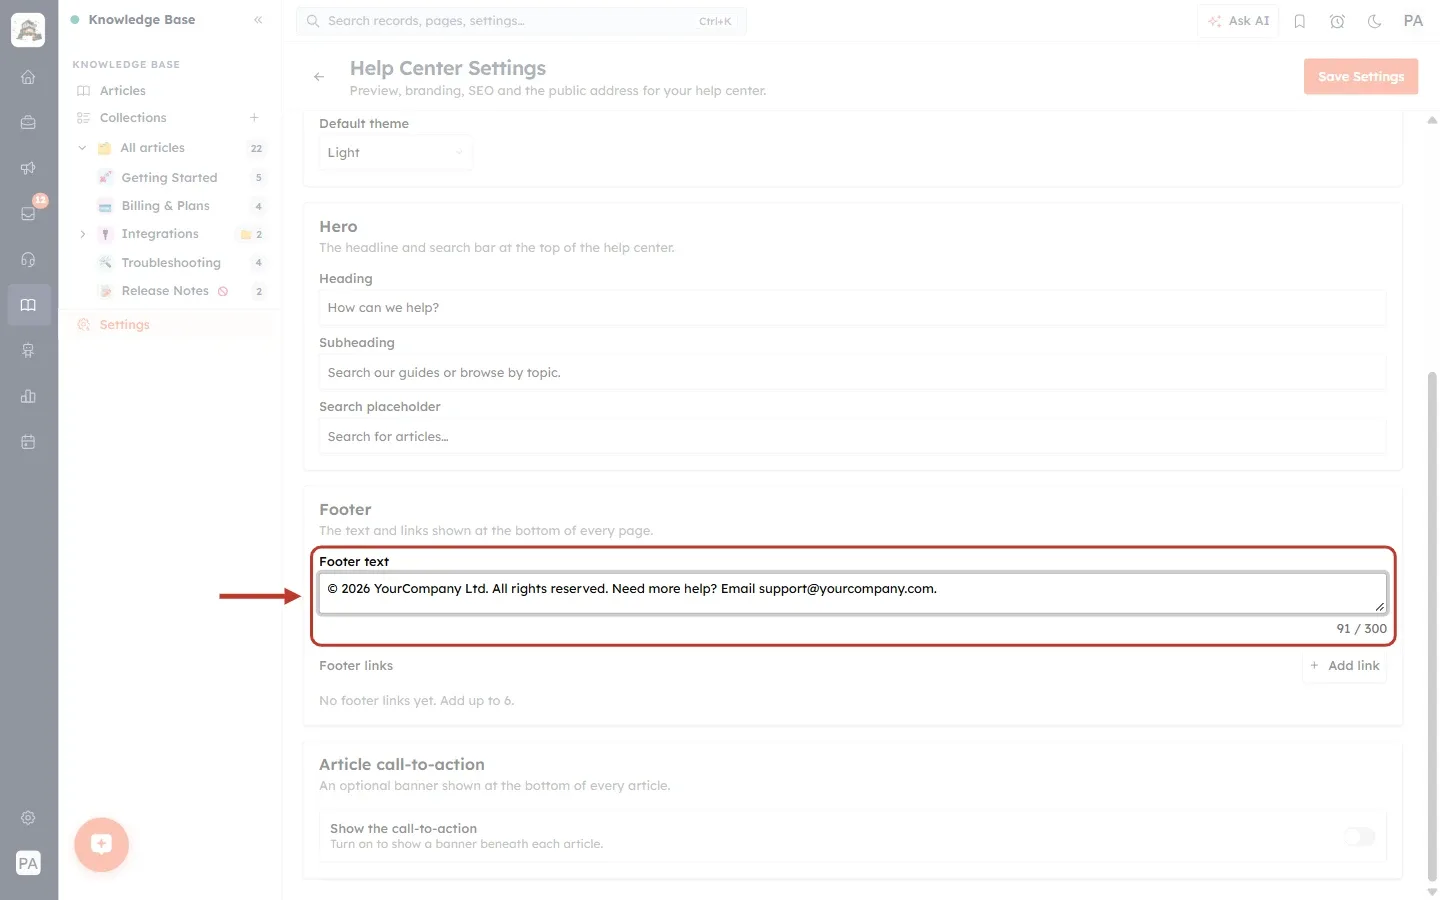
What this screenshot shows. The Footer text box ringed, filled in.
Our text: “© 2026 YourCompany Ltd. All rights reserved. Need more help? Email support@yourcompany.com.”
The counter on the right now shows how many characters are used, out of a maximum of 300.
Drag the small handle at the bottom-right corner to make the box taller while you type.
Step 5: Add a footer link#
Click + Add link. A new row appears with two boxes.
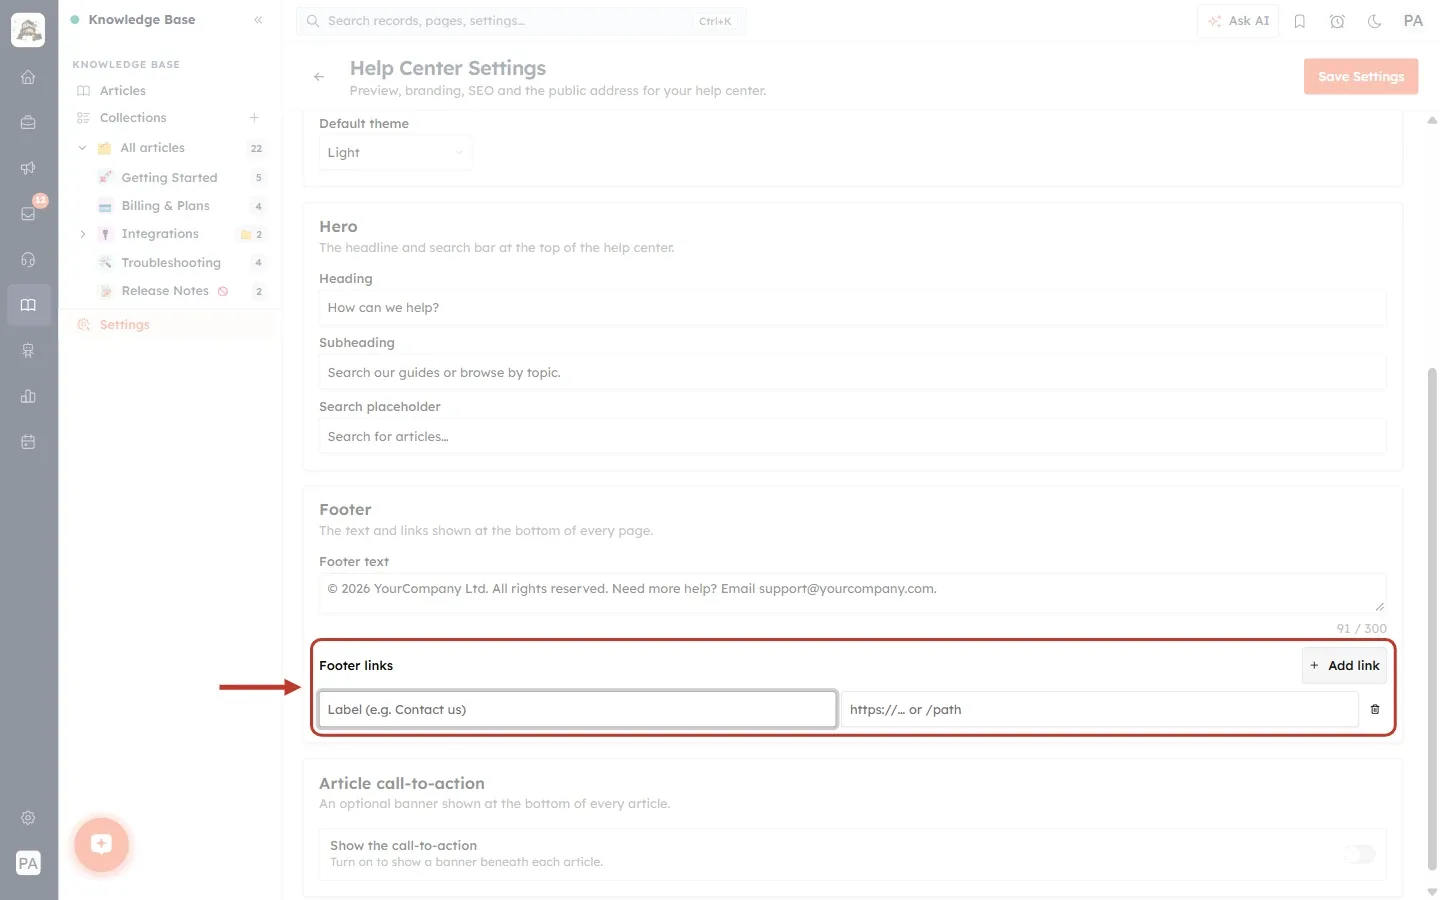
What this screenshot shows. The Footer links area ringed with one new, empty row.
Label (left), hint “Label (e.g. Contact us)”: the words customers will see. Up to 60 characters.
URL (right), hint “https://… or /path”: where the link goes.
The bin icon at the end of the row removes it.
+ Add link (top right) adds another row. You can have up to 6 links.
Step 6: Fill in the links (and fix any address errors)#
Type a label and an address for each link. An address must either be a full web address starting with https:// (or http://), or a path on your help center starting with /. We added three links and typed the third address without https:// to show what happens when you click Save Settings.
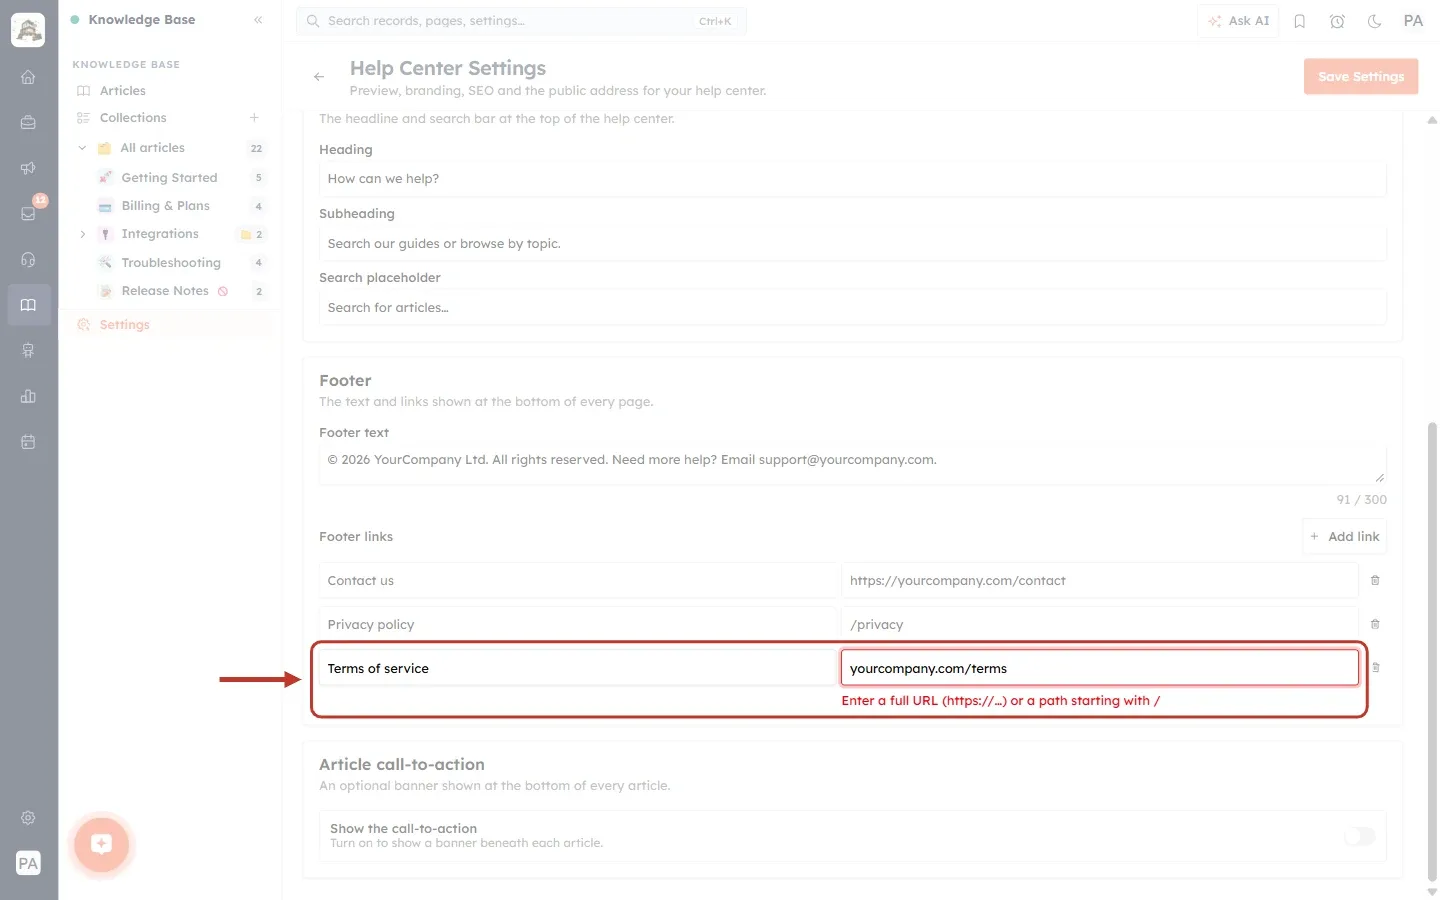
What this screenshot shows. The third link row ringed, with an error under its address.
Label “Terms of service”, address “yourcompany.com/terms” (missing https://).
The address box turns red with the message: “Enter a full URL (https://…) or a path starting with /”.
A message at the bottom right says “Please fix the highlighted fields”. Nothing is saved until the error is fixed.
Step 7: Check your finished links#
We corrected the address to https://yourcompany.com/terms.
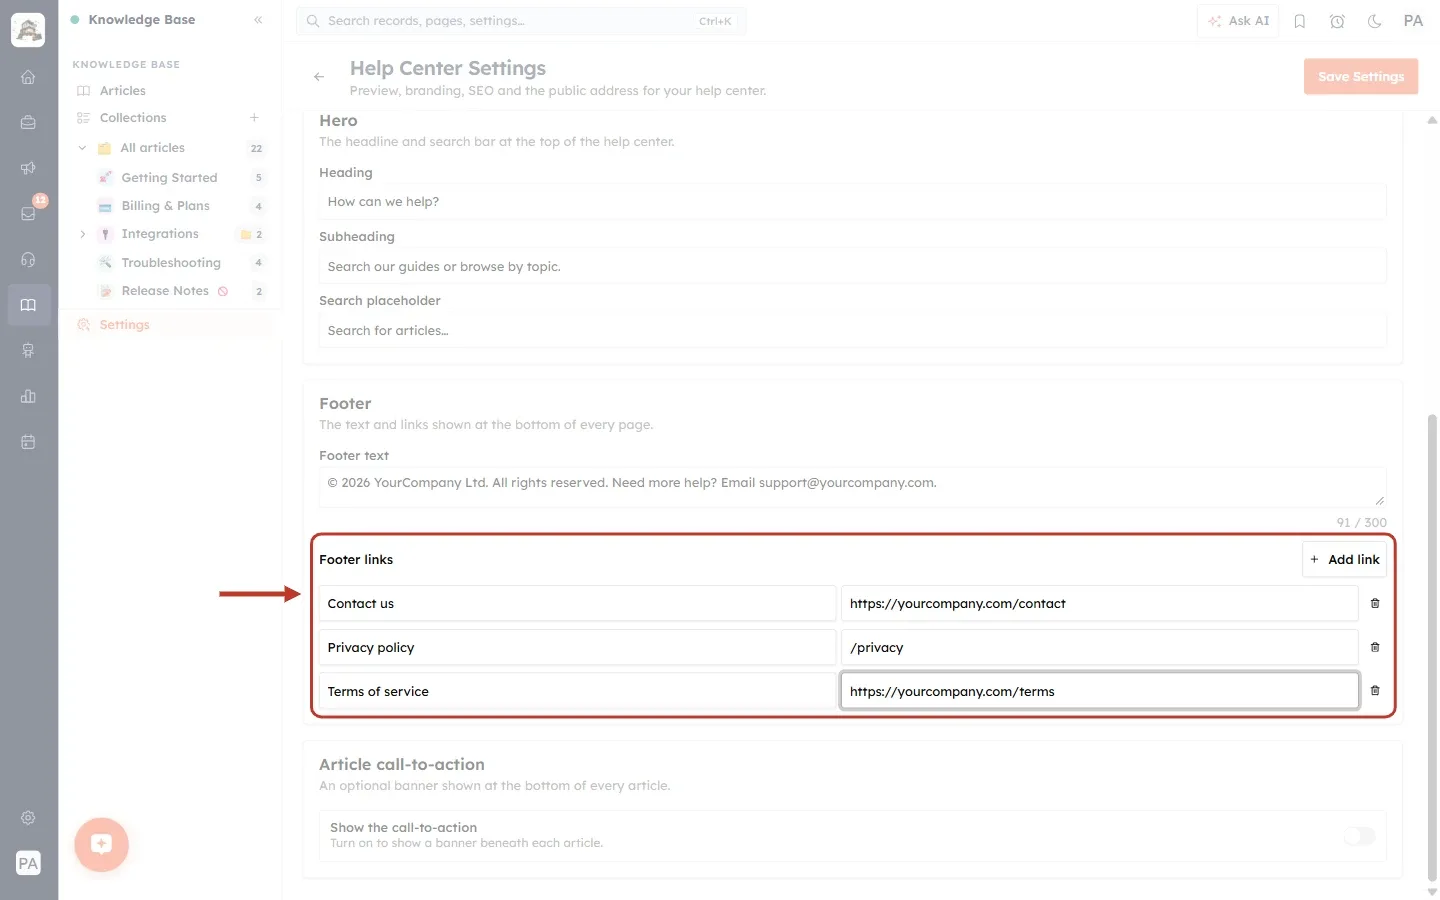
What this screenshot shows. The Footer links area ringed with three correct links.
Contact us → https://yourcompany.com/contact (a page on your main website).
Privacy policy → /privacy (a path, which opens a page on the same site as your help center).
Terms of service → https://yourcompany.com/terms.
The links are listed in the order you add them.
Step 8: Remove a link you don’t need#
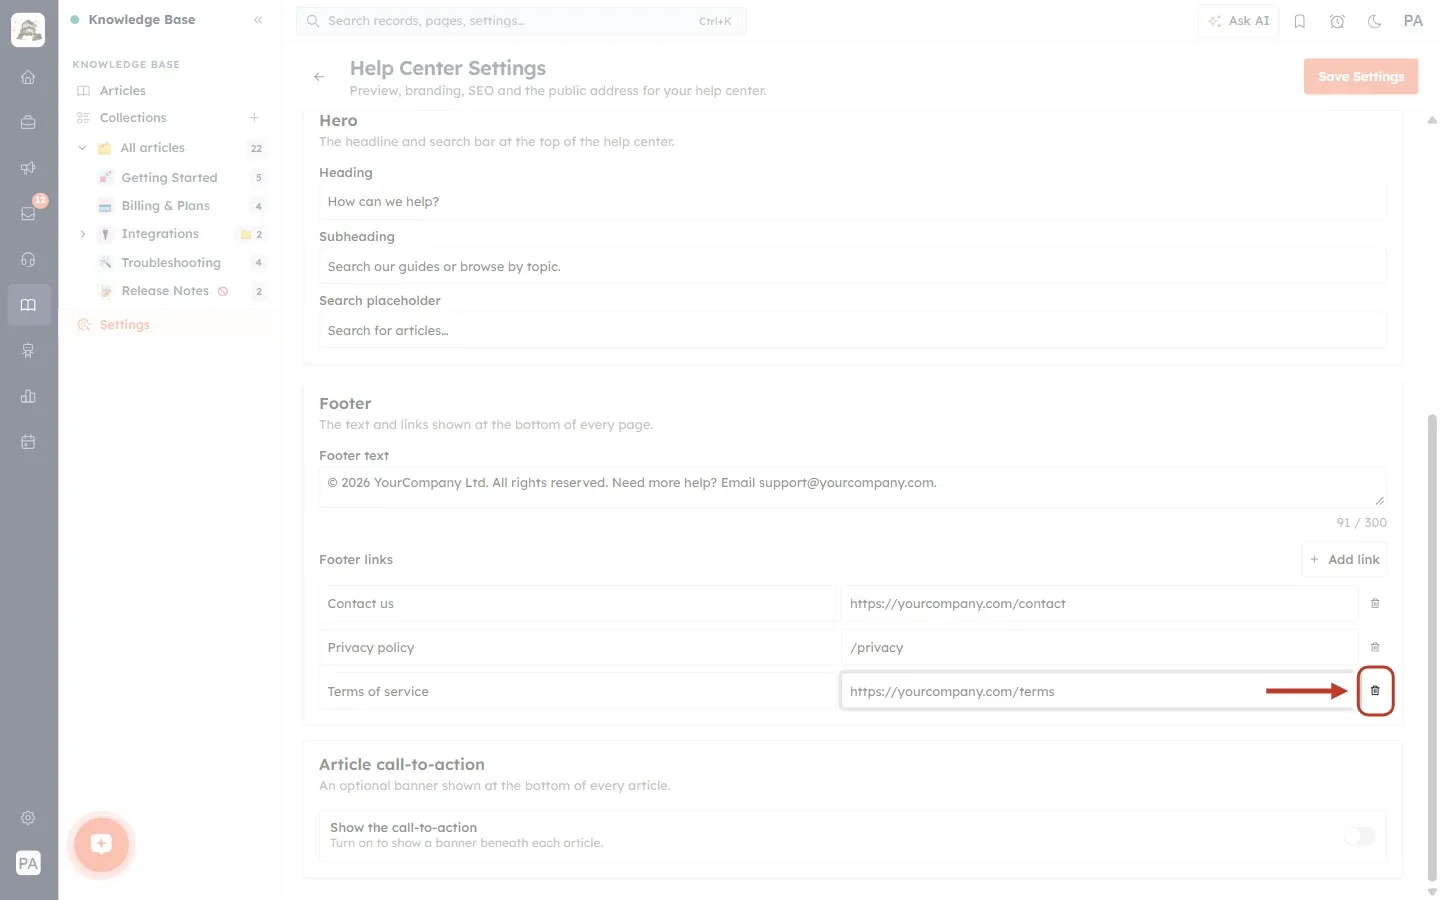
What this screenshot shows. The bin icon at the end of the “Terms of service” row ringed.
Click it to remove that link. The other links stay as they are.
Removing a link here only removes it from your help-center footer, not from your website.
The change is kept only after you click Save Settings.
Part 3: Add a call-to-action under every article#
Step 9: Find the Article call-to-action section#
Scroll down to Article call-to-action, just below the footer.
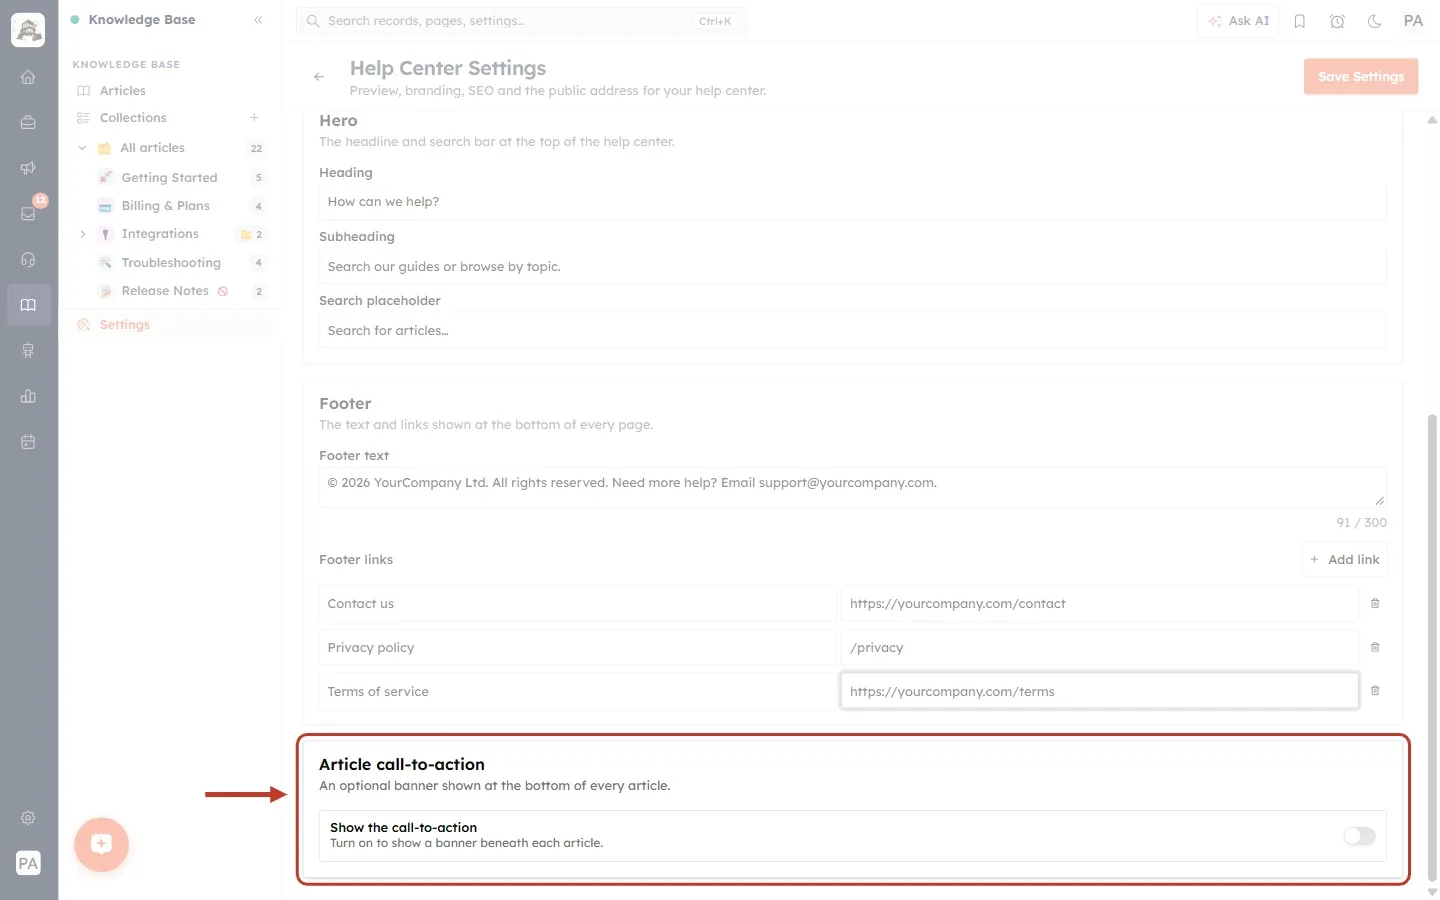
What this screenshot shows. The Article call-to-action section ringed, switched off.
The description: “An optional banner shown at the bottom of every article.”
Show the call-to-action, “Turn on to show a banner beneath each article.”, with a switch on the right. It is off at first, so no banner is shown.
Step 10: Turn it on#
Click the switch. Four boxes appear for the banner’s content.
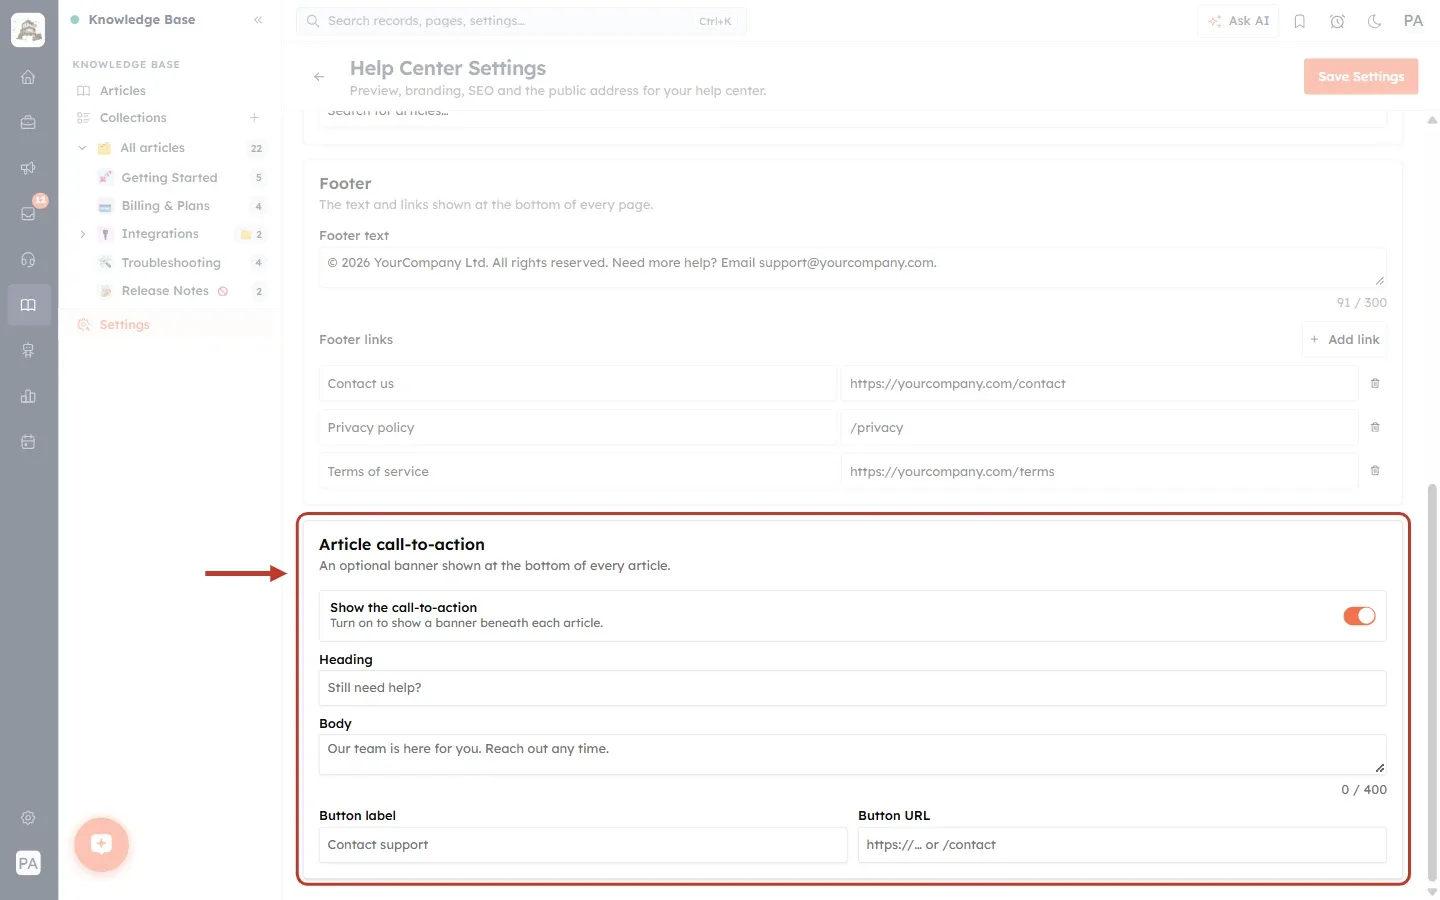
What this screenshot shows. The call-to-action section ringed, switched on (the switch is now orange).
Heading, hint “Still need help?”: the bold title of the banner. Up to 120 characters.
Body, hint “Our team is here for you. Reach out any time.”: one or two sentences under the heading. Up to 400 characters, with a counter.
Button label, hint “Contact support”: the words on the button. Up to 80 characters.
Button URL, hint “https://… or /contact”: where the button goes. This one is required while the banner is on.
Step 11: Fill it in (the button address is required)#
We typed a heading, a body and a button label, but left Button URL empty and clicked Save Settings.
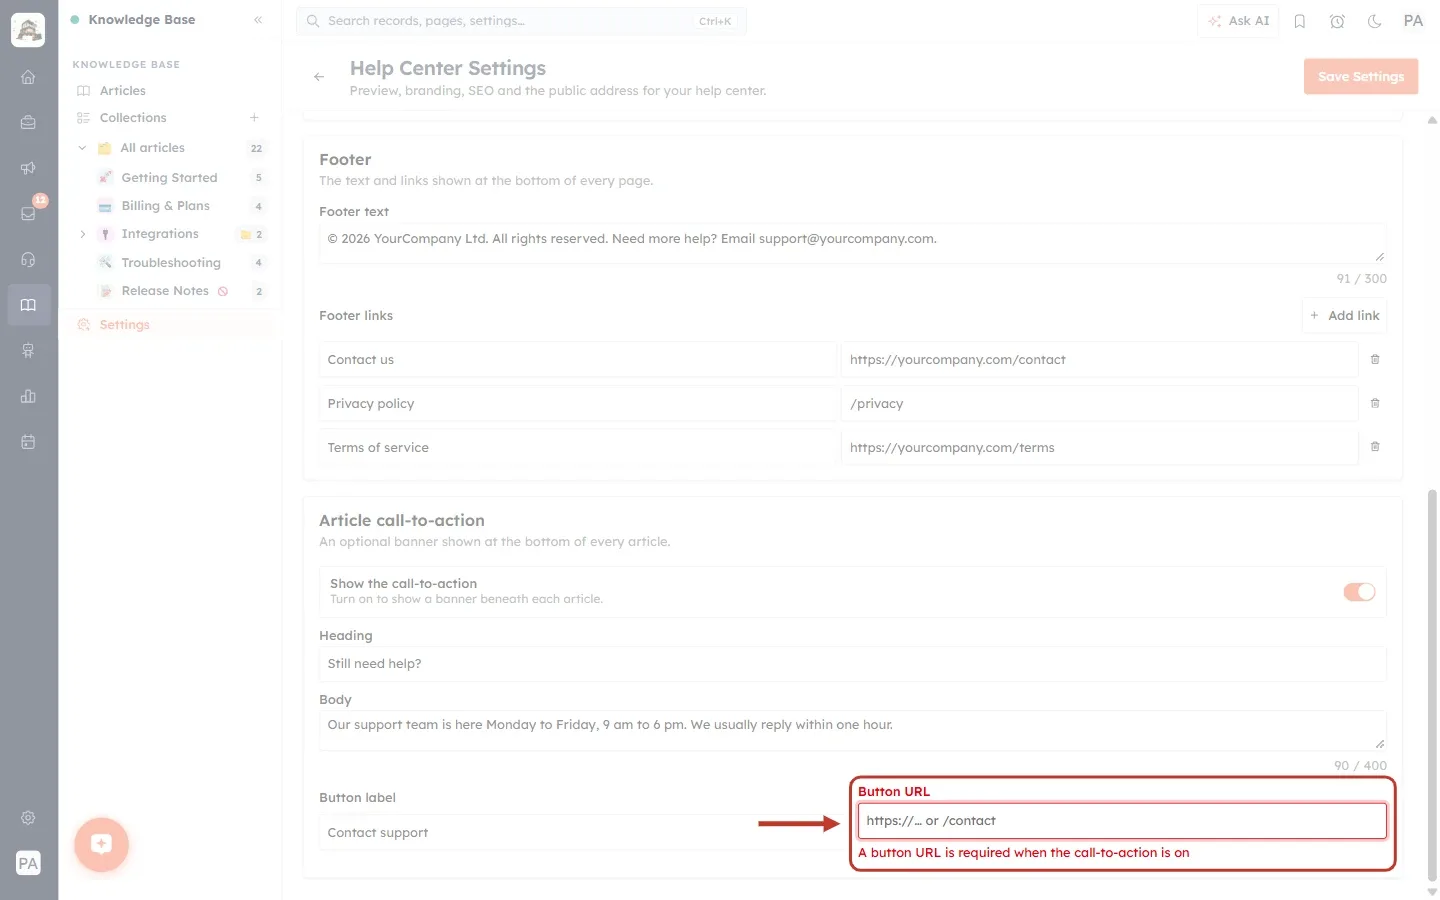
What this screenshot shows. The Button URL box ringed, with an error under it.
The message: “A button URL is required when the call-to-action is on”.
The settings are not saved until you add an address, or switch the call-to-action off.
The same address rule as the footer links applies: a full https:// address, or a path starting with /.
Step 12: Check the finished banner settings#
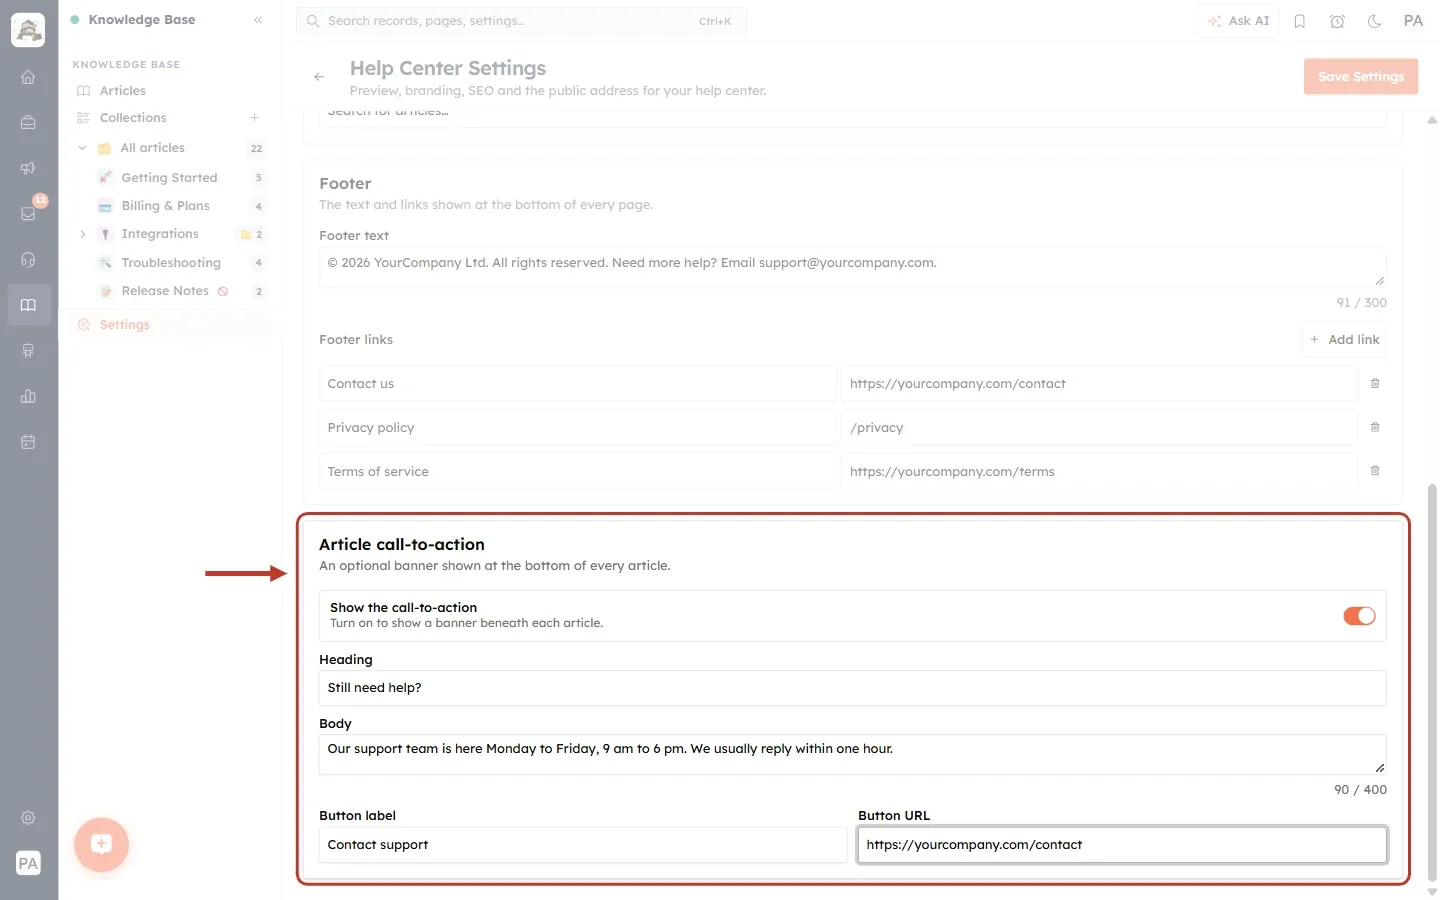
What this screenshot shows. The call-to-action section ringed, complete.
Heading: “Still need help?”
Body: “Our support team is here Monday to Friday, 9 am to 6 pm. We usually reply within one hour.” (90 / 400).
Button label: “Contact support”, and Button URL: https://yourcompany.com/contact.
Once saved, this banner appears at the bottom of every article on your help center.
💡
Point the button to the quickest way to reach you: your contact form, a support email page, or your live chat. Mention your support hours in the body so customers know when to expect a reply.
Step 13: Save your changes#
Click Save Settings.
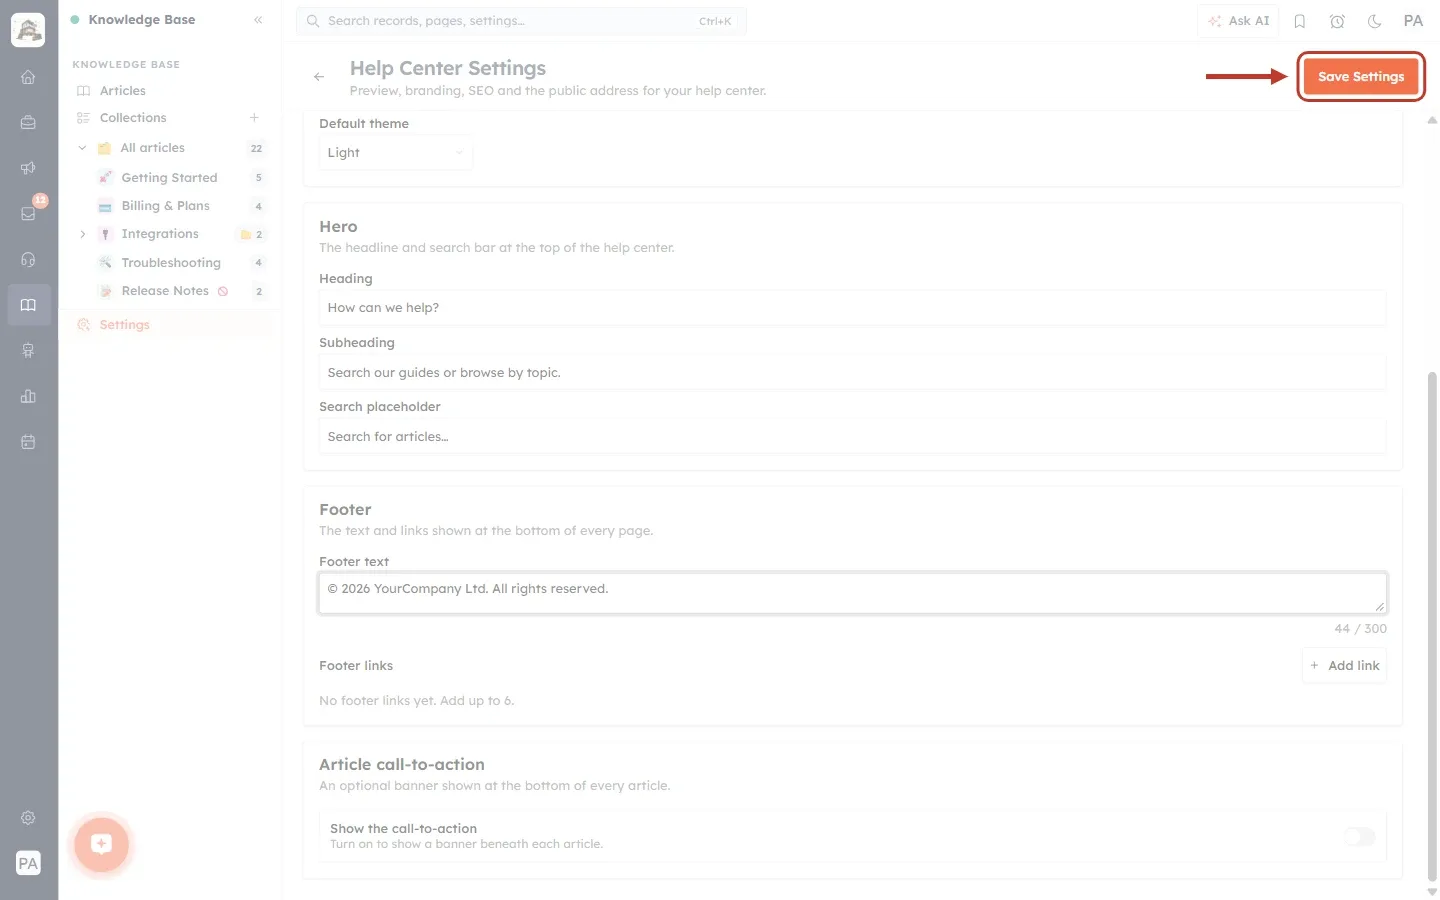
What this screenshot shows. The orange Save Settings button ringed at the top right.
The button is orange and clickable because there are unsaved changes.
After you click it, a message at the bottom right confirms “Settings saved”, and the button turns pale again until your next change.
If any field has a problem, you see “Please fix the highlighted fields” instead, and the field is marked in red.
Part 4: Set up SEO and sharing#
Step 14: Open the SEO tab#
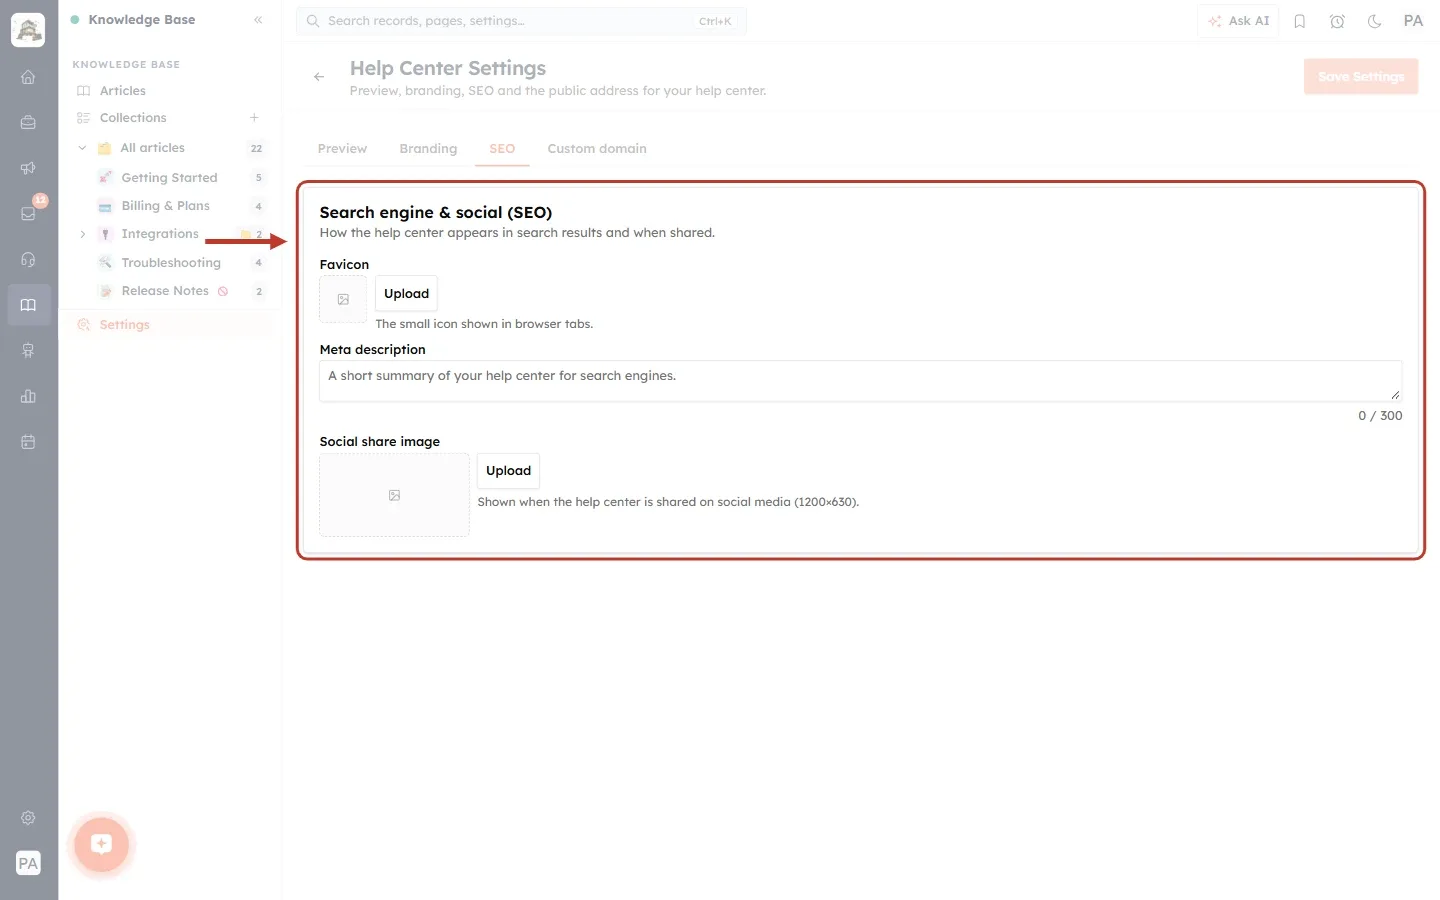
What this screenshot shows. The Search engine & social (SEO) section ringed, still empty.
The description: “How the help center appears in search results and when shared.”
Favicon: an empty square and an Upload button. “The small icon shown in browser tabs.”
Meta description: a text box, hint “A short summary of your help center for search engines.”, with a 0 / 300 counter.
Social share image: an empty box and an Upload button. “Shown when the help center is shared on social media (1200×630).”
Step 15: Write the meta description#
Write one or two sentences that describe your help center. Search engines such as Google often show this text under your help center’s name in search results.
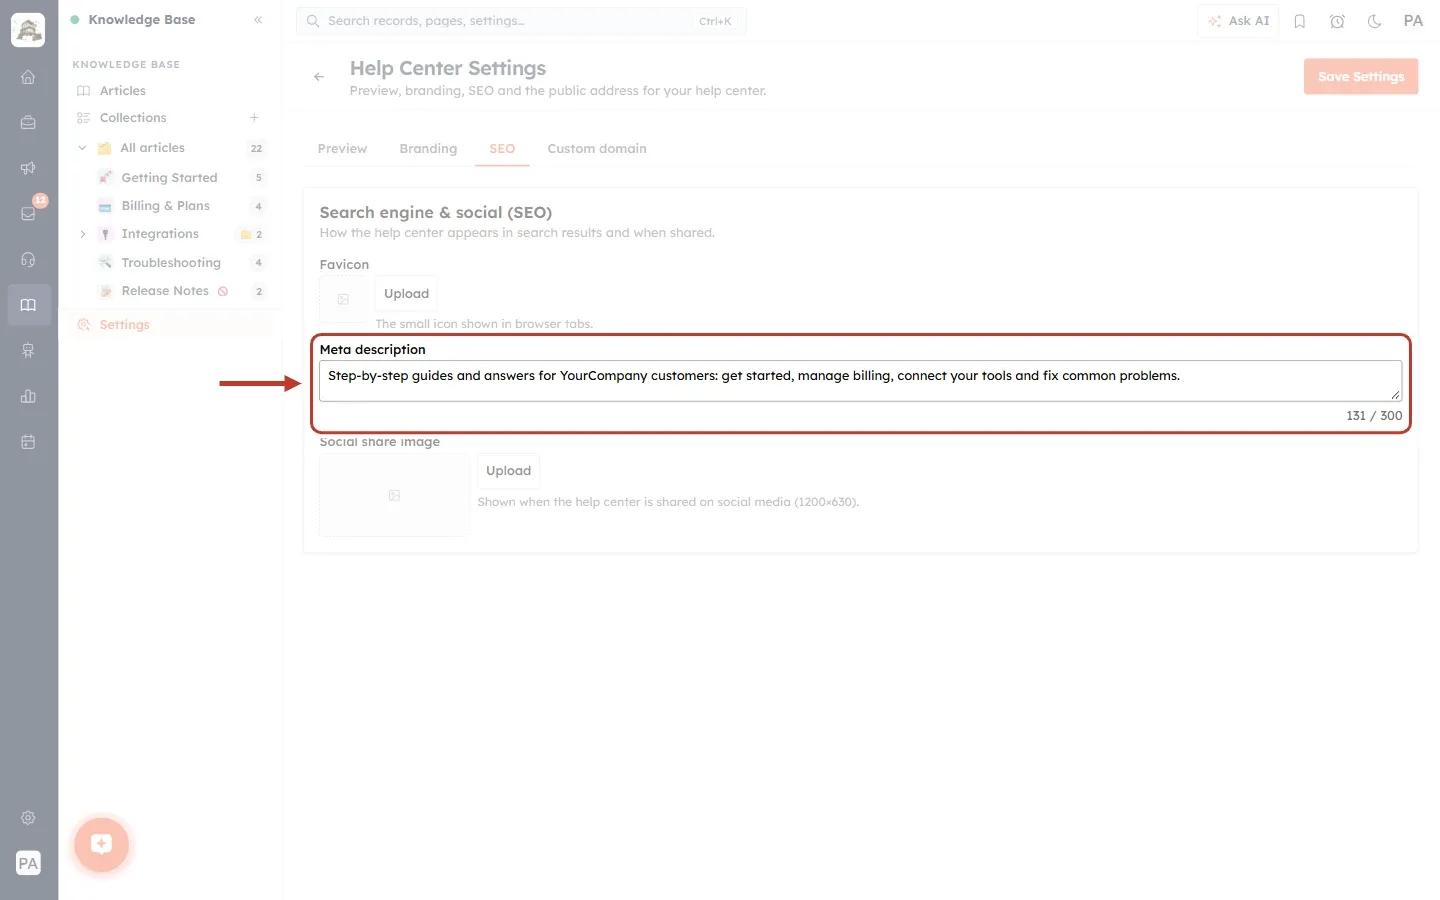
What this screenshot shows. The Meta description box ringed, filled in.
Our text: “Step-by-step guides and answers for YourCompany customers: get started, manage billing, connect your tools and fix common problems.”
The counter shows 131 / 300. Around 150 characters is a good length, because search engines usually cut off longer descriptions.
Step 16: Upload a favicon#
Click Upload next to Favicon and choose a small, square image from your computer, such as your logo icon.
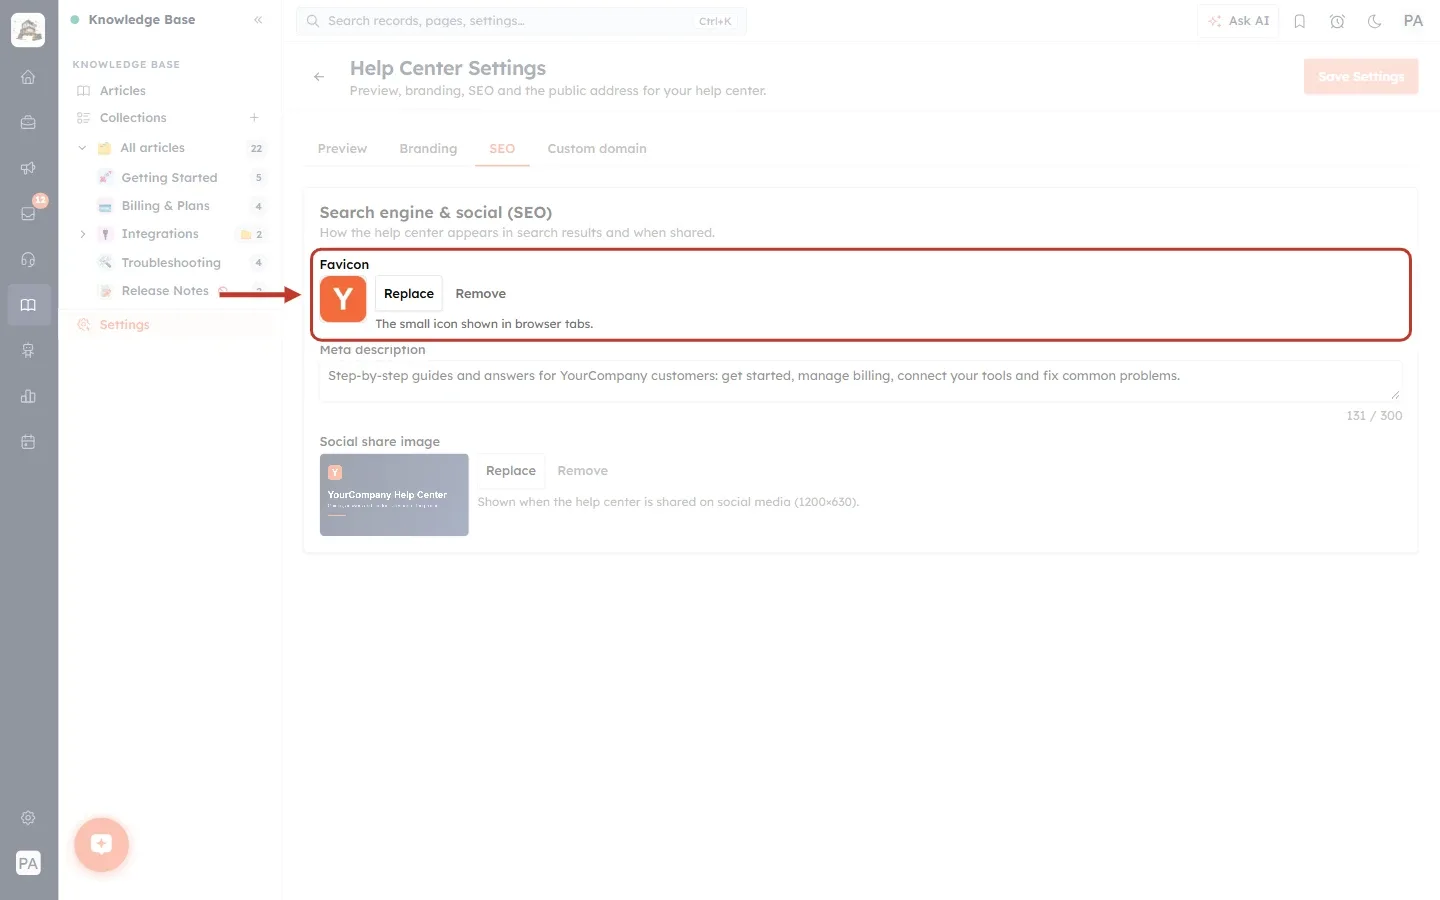
What this screenshot shows. The Favicon row ringed after uploading an icon.
The square now shows the icon, an orange square with a white “Y”.
The buttons have changed to Replace (choose a different image) and Remove (go back to no favicon).
This icon appears in the browser tab next to your help center’s name, and in bookmarks.
Step 17: Upload a social share image#
Click Upload next to Social share image and choose a wide image, ideally 1200 × 630 pixels.
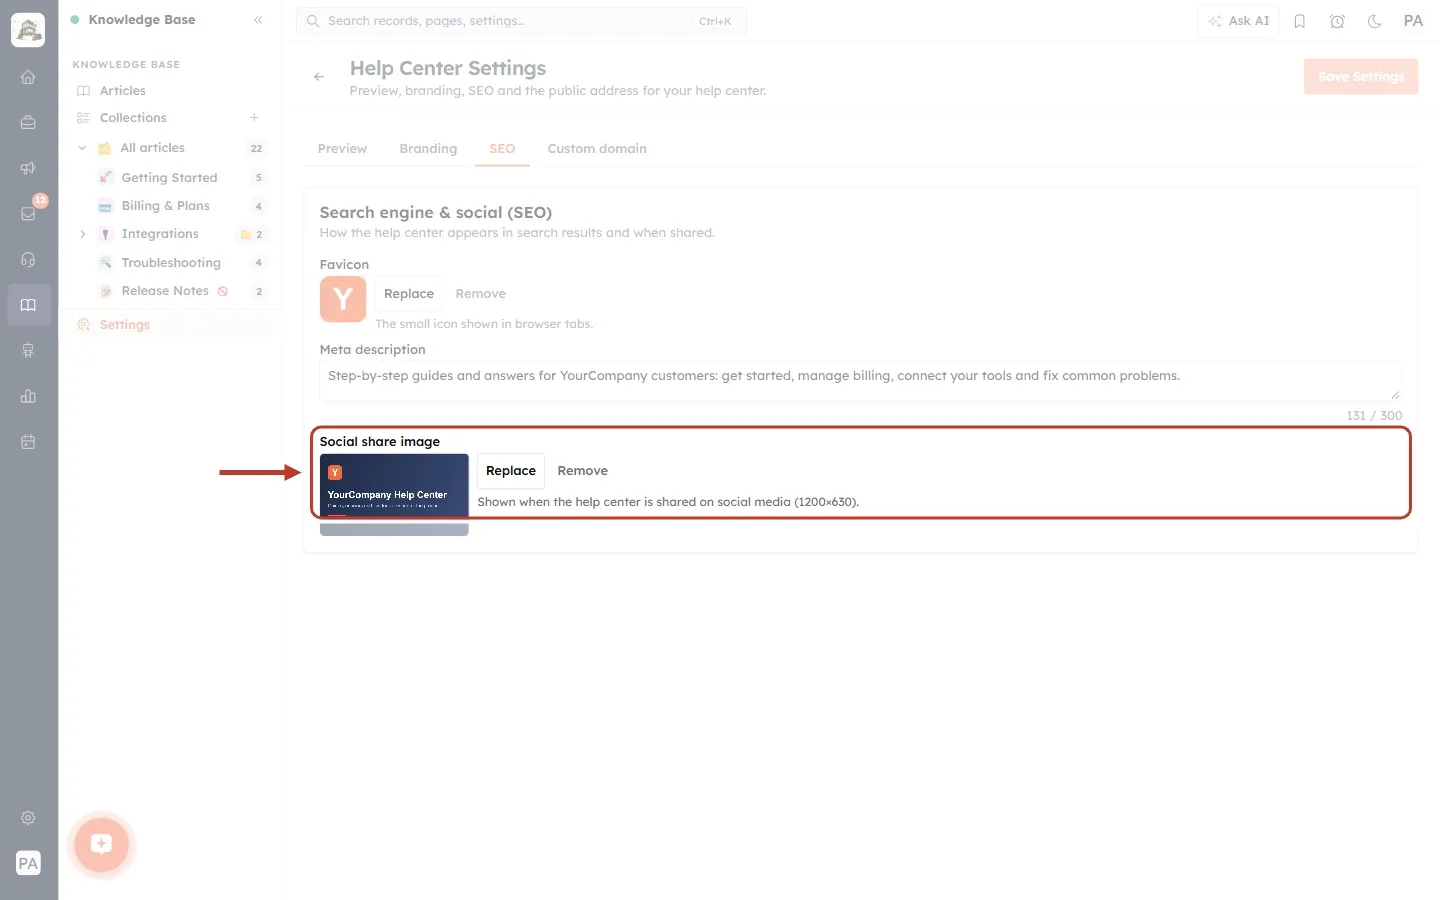
What this screenshot shows. The Social share image row ringed after uploading an image.
A small preview of the image: a dark card with the logo and “YourCompany Help Center”.
Replace and Remove work the same way as for the favicon.
This image is shown as the preview card when someone shares a link to your help center on social media or in a chat app.
ℹ️
Keep the important text in the middle of the share image. Some apps crop the edges or show it smaller.
Click Save Settings again to save the SEO changes.
Part 5: Check the result#
Step 18: Preview your help center#
Click the Preview tab and use Open preview to see your help center with the new footer and call-to-action.
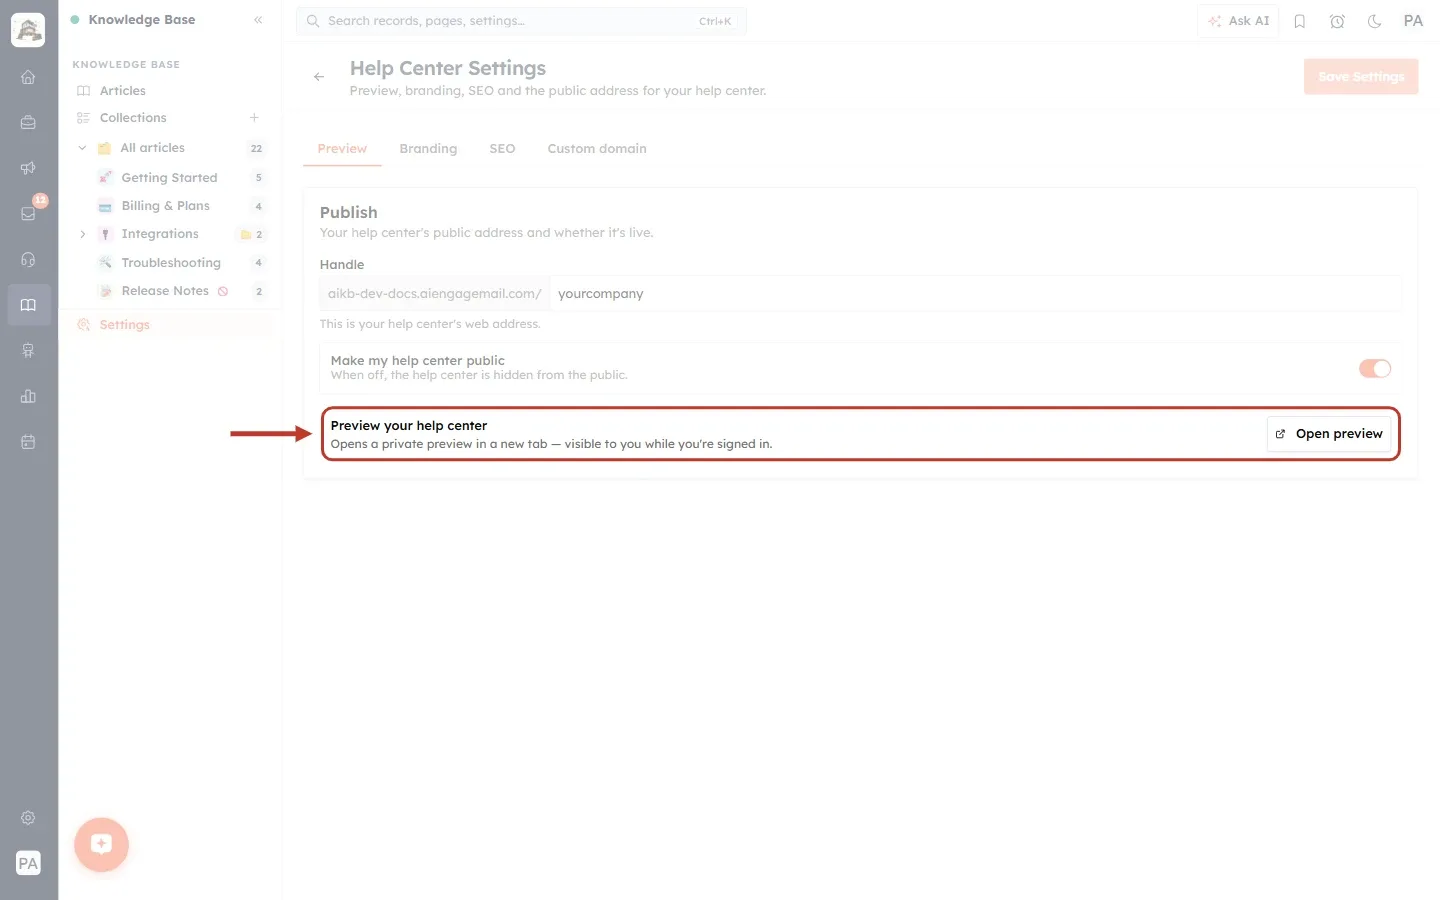
What this screenshot shows. The Preview your help center row ringed on the Preview tab.
“Opens a private preview in a new tab — visible to you while you’re signed in.”
Open preview (right) opens the preview.
Scroll to the bottom of any page to see your footer text and links. Open any article and scroll to the end to see the call-to-action banner.
Above, Make my help center public controls whether everyone can see the help center.
Tips#
Keep the footer short. One line of text and three or four links is plenty.
Always include a way to reach you, either as a footer link or as the call-to-action button.
Use paths for pages on the same site (such as /privacy) and full addresses for pages elsewhere.
Write the meta description for people, not just for search engines. It is often the first thing a customer reads about your help center.
Check after saving. Open the preview to confirm the footer, banner and favicon look right.
Troubleshooting#
“Enter a full URL (https://…) or a path starting with /”. Add https:// to the start of the address, or start a path with /.
“A button URL is required when the call-to-action is on”. Add the button address, or switch the call-to-action off.
“Please fix the highlighted fields”. One of the fields on the page has a problem. Look for the red message under it, which may be on another tab.
Save Settings is greyed out. There are no unsaved changes. Change something first.
I can’t add another footer link. The maximum is six. Remove one to add a new one.
The new favicon or share image doesn’t show yet. Browsers and social apps keep old copies for a while. Refresh the page, or try again later.
Frequently asked questions#
Does the call-to-action appear on every article?
Yes. When it is switched on, the same banner is shown under every article on your help center.
How do I hide the banner again?
Switch Show the call-to-action off and click Save Settings. The banner is no longer shown under your articles, and the button URL is no longer required.
How long can the footer text be?
Up to 300 characters. Footer link labels can be up to 60 characters.
What size should the favicon be?
A small square image works best. The help center shows it at a small size in the browser tab.
Where do I set the meta description for one article?
In that article’s editor, in the Search engine & social (SEO) section. See Article SEO and Navigation.
Previous and next#
Related#
Was this article helpful?
Ready to implement this?
OpenAI Engage and apply what you just learned to your own workspace.
Open AI Engage CRM