Loading…


KnowledgeBase
Recycle Bin: Delete, Restore or Permanently Delete Knowledge Base Articles (Step-by-Step)
Introduction#
Help centers change all the time: an old guide is replaced, a feature is renamed, a draft is no longer needed. When you delete a Knowledge Base article in AiEngage CRM, it is not gone straight away. It moves to the Recycle Bin, a safe holding area where you can bring it back with one click if you change your mind or deleted the wrong one.
Only when you choose Delete forever inside the Recycle Bin is an article removed for good.
This guide walks through the whole cycle: deleting one article, deleting several at once, opening and searching the Recycle Bin, restoring articles, deleting them forever, and going back to your article list.
ℹ️
The screenshots use a sample help center for a business called YourCompany, with sample collections, articles and authors. Your screen shows your own content.
Action | Where | What happens | Can you undo it? |
|---|---|---|---|
Delete | Article list: ⋮ menu, or select rows → Delete | The article moves to the Recycle Bin and disappears from your help center | Yes: Restore it from the bin |
Restore | Recycle Bin: ⋮ menu, or select rows → Restore | The article returns to your article list | Yes: delete it again |
Delete forever | Recycle Bin: ⋮ menu, or select rows → Delete forever | The article is removed permanently | No: this cannot be undone |
Before you begin#
Permission: you need the Knowledge Base permission. Admins always have it. Others get it from an admin in Setup → Profiles → Feature Permissions → Marketing.
Think about links. If other articles, emails or your website link to an article, those links stop working while the article is deleted.
Prefer Unpublish for “temporary” removals. If you only want to hide an article for a while, use ⋮ → Unpublish instead. It keeps the article in your list as a draft.
Part 1: Delete articles#
Step 1: Delete one article#
Go to Knowledge Base → Articles. Find the article and click the ⋮ button in its ACTION column.
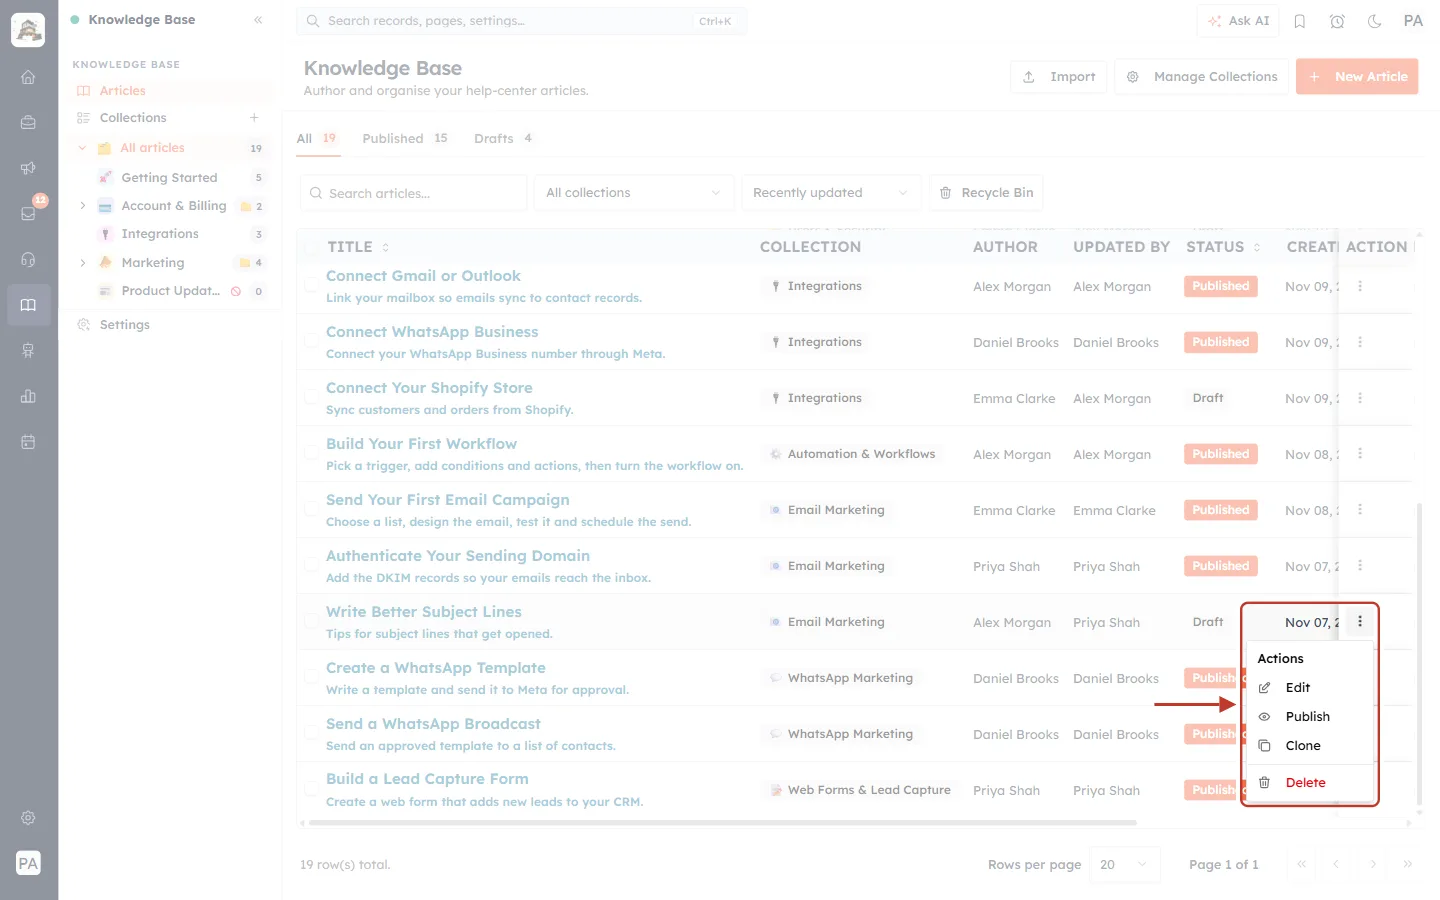
What this screenshot shows. The ⋮ menu of the article “Write Better Subject Lines”, ringed.
Actions: Edit, Publish, Clone and Delete. This article is a draft, so the menu offers Publish. A published article shows View article and Unpublish instead.
Delete is the last item, in red, with a bin icon. Click it.
A confirmation window opens, so an article is never deleted by a single accidental click:
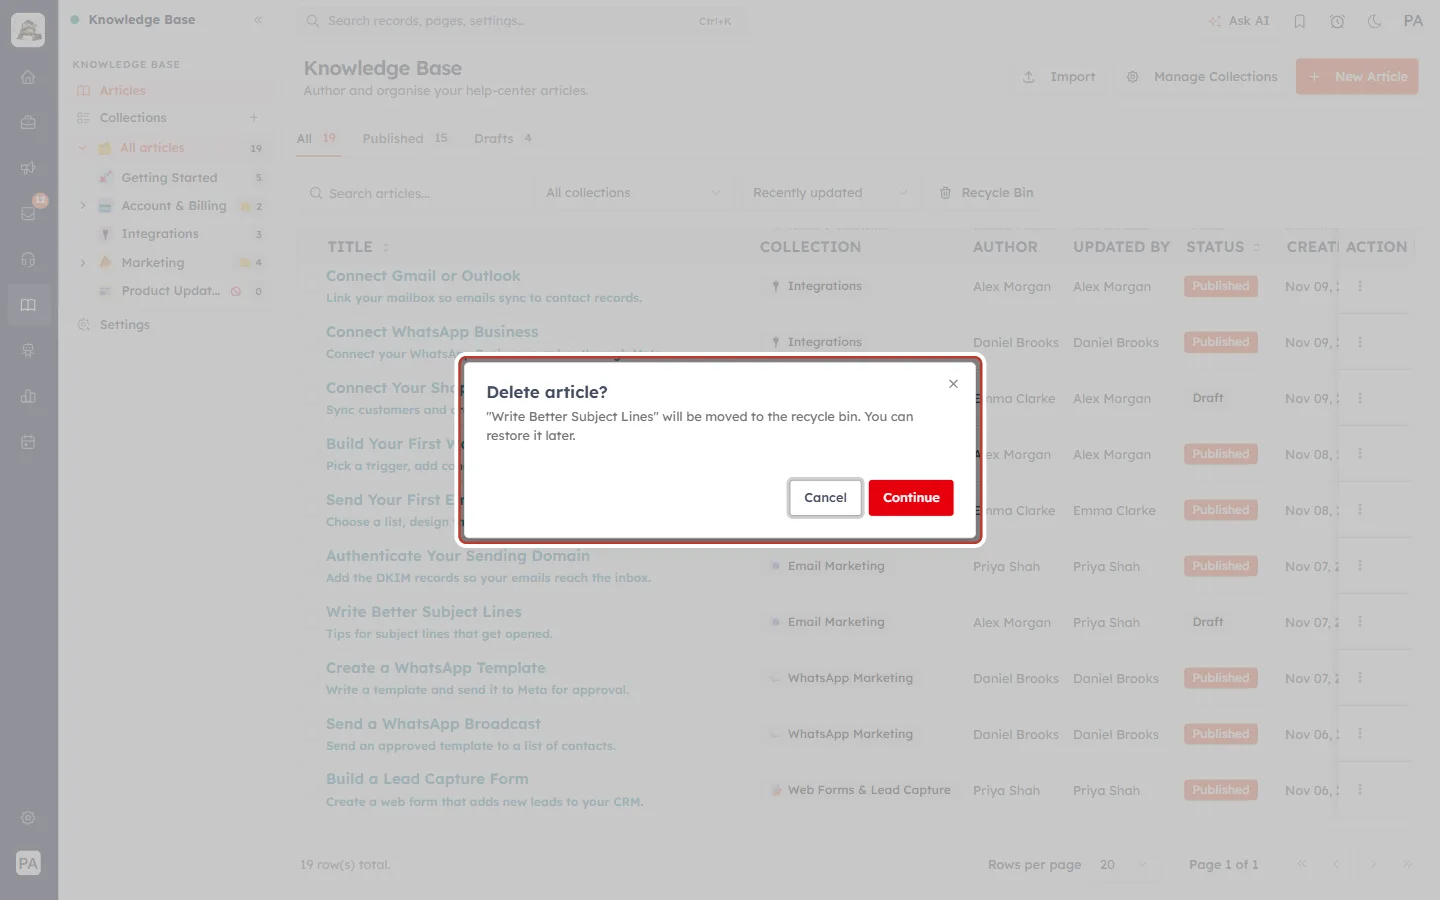
What this screenshot shows. The Delete article? window.
Delete article?: the title of the window.
““Write Better Subject Lines” will be moved to the recycle bin. You can restore it later.” The message names the article, so you can check you picked the right one.
Continue: moves the article to the Recycle Bin.
Cancel or the × at the top right: closes the window and keeps the article.
Click Continue. A message confirms “Article moved to recycle bin”, the article disappears from the list, and the counts update:
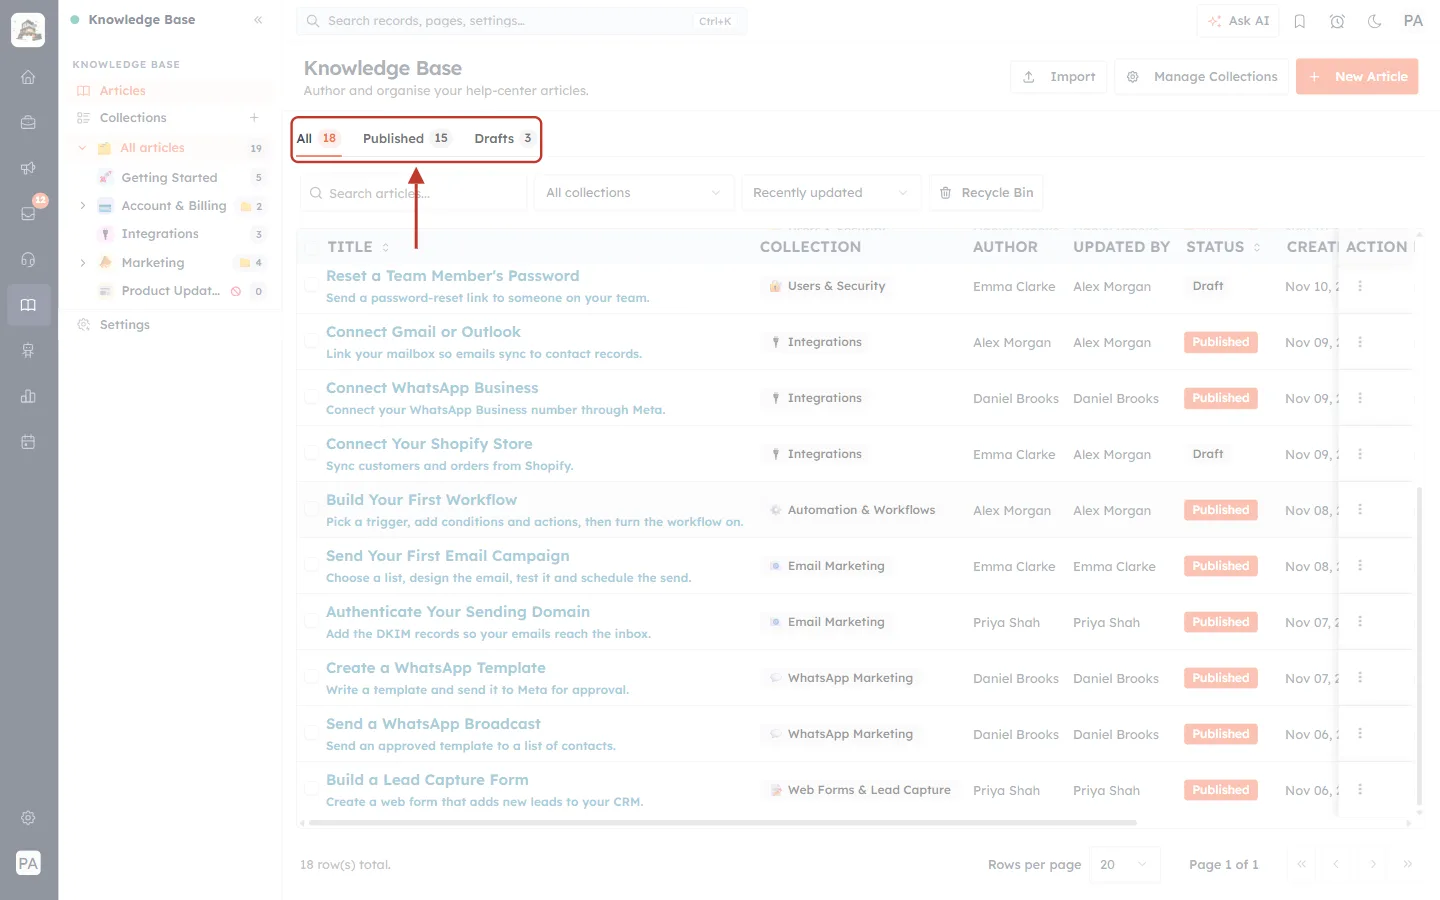
What this screenshot shows. The All, Published and Drafts tabs, ringed, after the delete.
All 18 and Drafts 3: one fewer than before, because the deleted draft is no longer counted.
Published 15 stays the same, because the deleted article was a draft.
Deleted articles are never counted in these tabs and never shown in the normal list.
⚠️
If you delete a published article, it disappears from your public help center straight away, together with its Previous/Next links. Readers who open its address will no longer find it.
Step 2: Delete several articles at once#
To clean up many articles, tick the box at the start of each row you want to delete. A bar appears above the list:
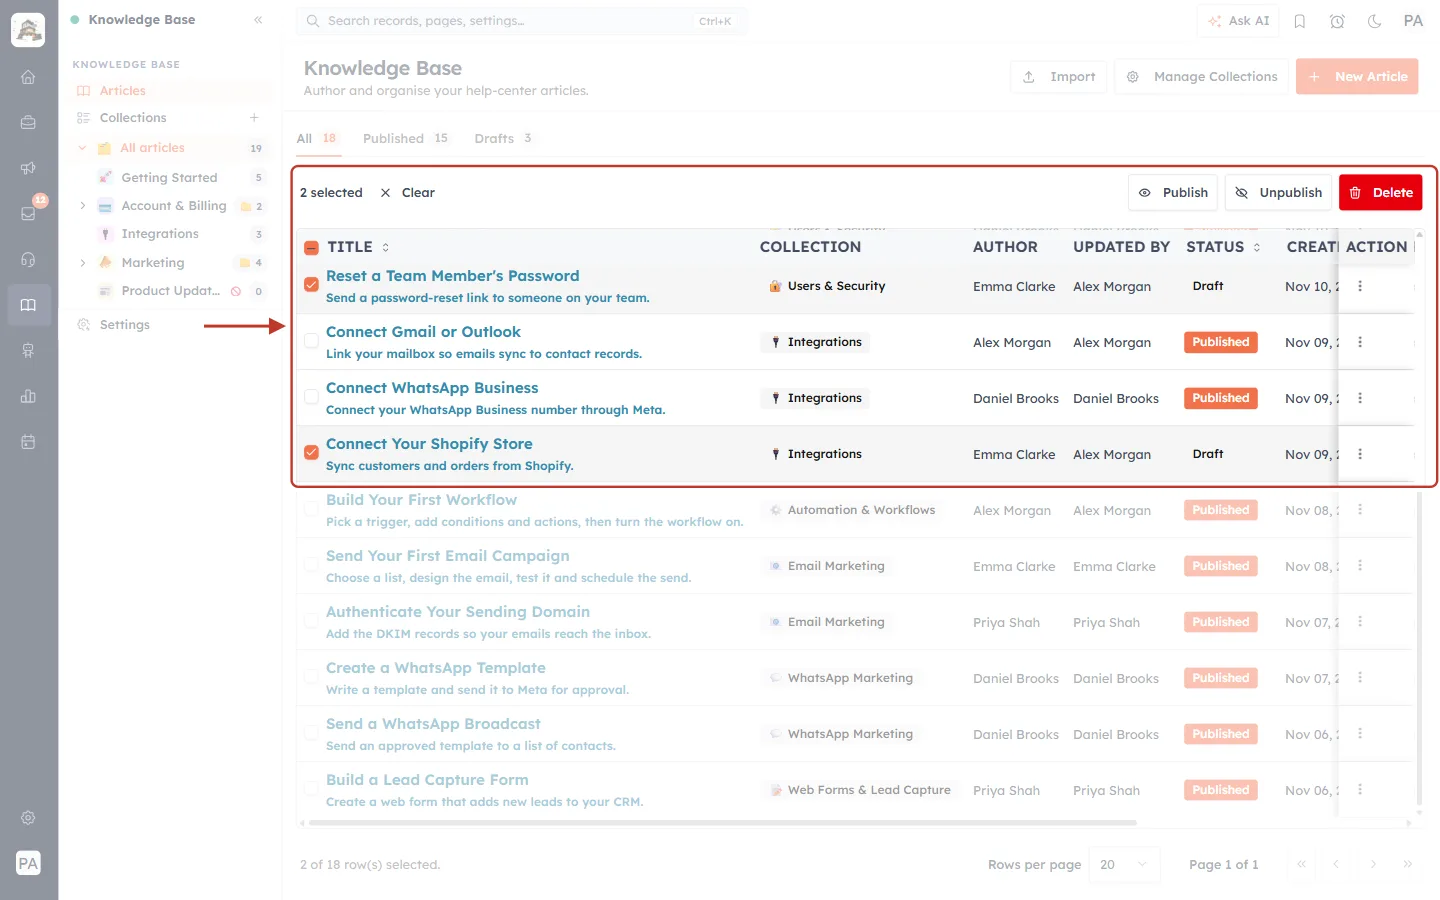
What this screenshot shows. The bulk action bar and the two selected rows, ringed.
2 selected: how many rows are ticked. × Clear unticks them all.
The ticked rows: Reset a Team Member’s Password and Connect Your Shopify Store.
The buttons on the right act on all selected articles: Publish, Unpublish and the red Delete.
The box in the TITLE header selects every row on the page at once.
At the bottom of the page: “2 of 18 row(s) selected.”
Click the red Delete button:
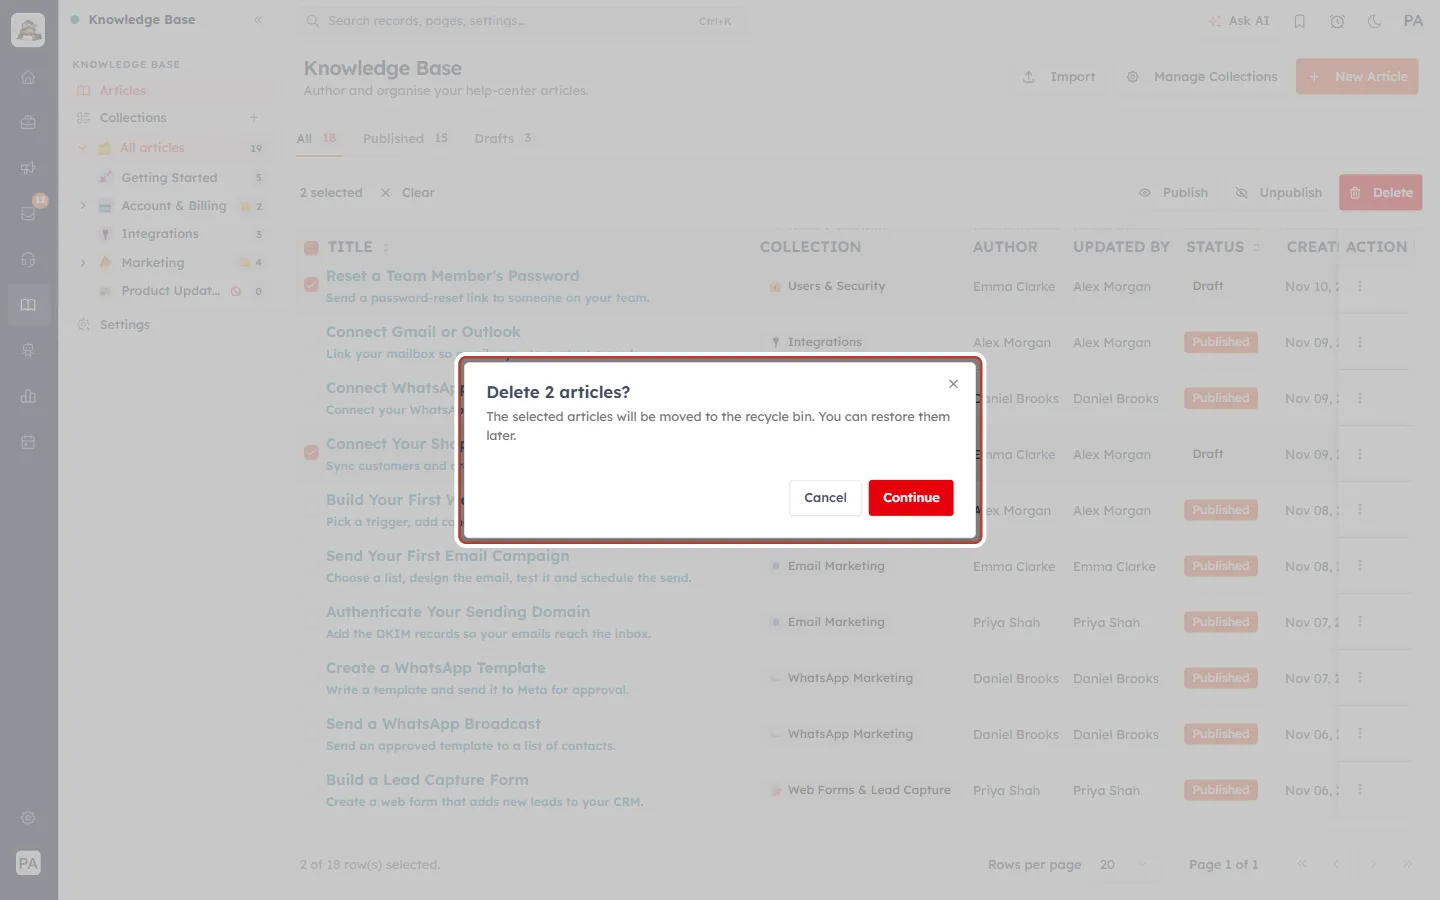
What this screenshot shows. The Delete 2 articles? window.
The title shows how many articles will be deleted.
“The selected articles will be moved to the recycle bin. You can restore them later.”
Click Continue to delete them, or Cancel to keep them.
After Continue, a message confirms “2 articles moved to recycle bin”, and the counts drop again:
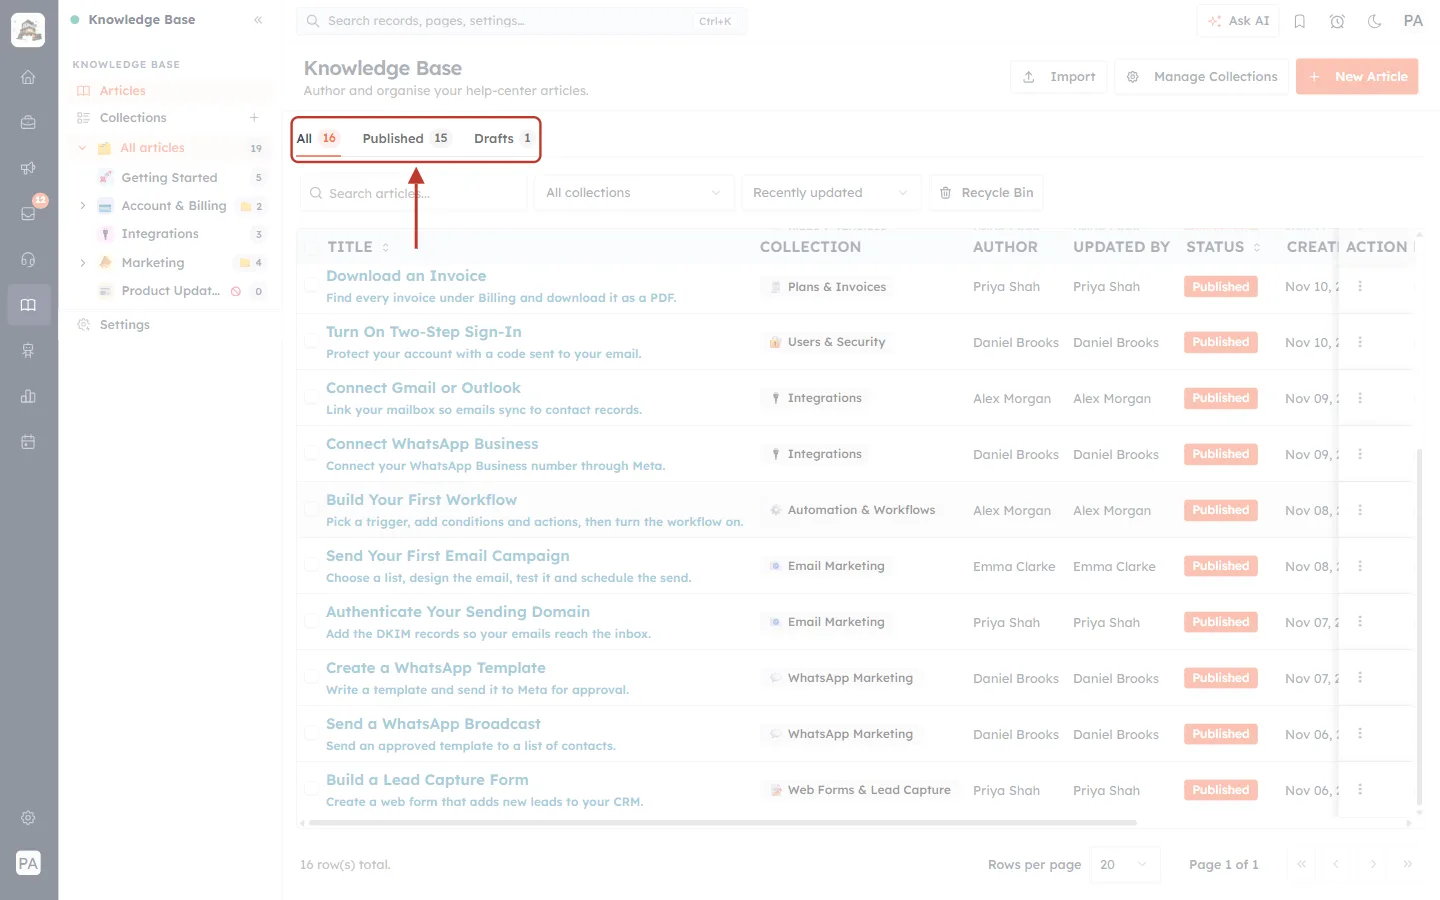
What this screenshot shows. The tabs, ringed, after the bulk delete.
All 16 and Drafts 1: two fewer, because both deleted articles were drafts.
If an article can’t be deleted, a separate red message says how many could not be deleted. The others are still moved.
Part 2: Use the Recycle Bin#
Step 3: Open the Recycle Bin#
On the Articles page, click Recycle Bin, next to the sort menu.
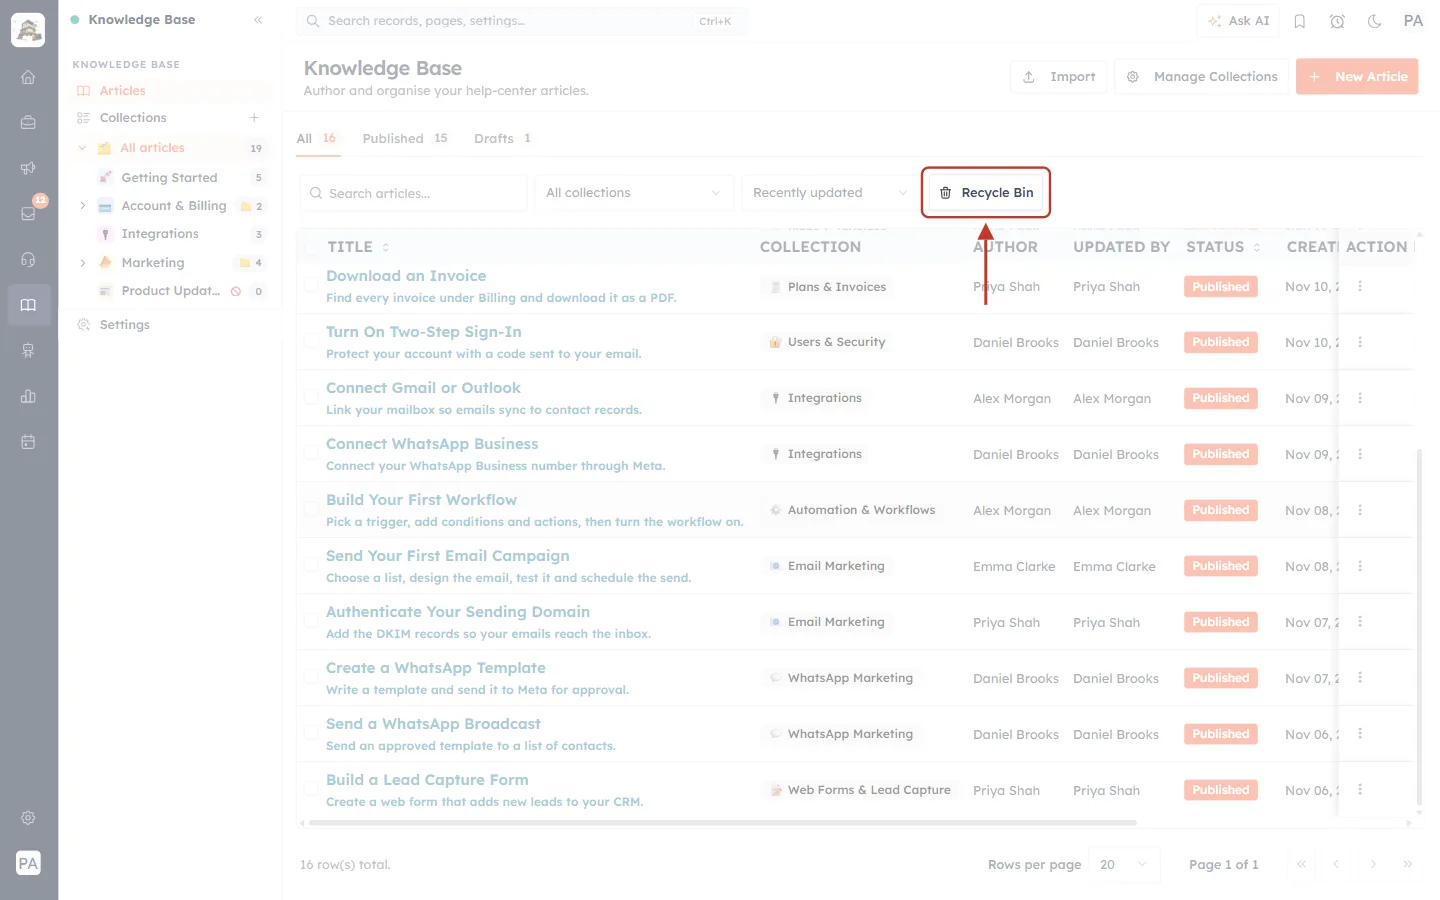
What this screenshot shows. The Recycle Bin button, ringed.
It sits in the toolbar with Search articles…, the All collections filter and the Recently updated sort.
The button works like a switch: click it once to show the bin, and again to go back to your articles (Step 8).
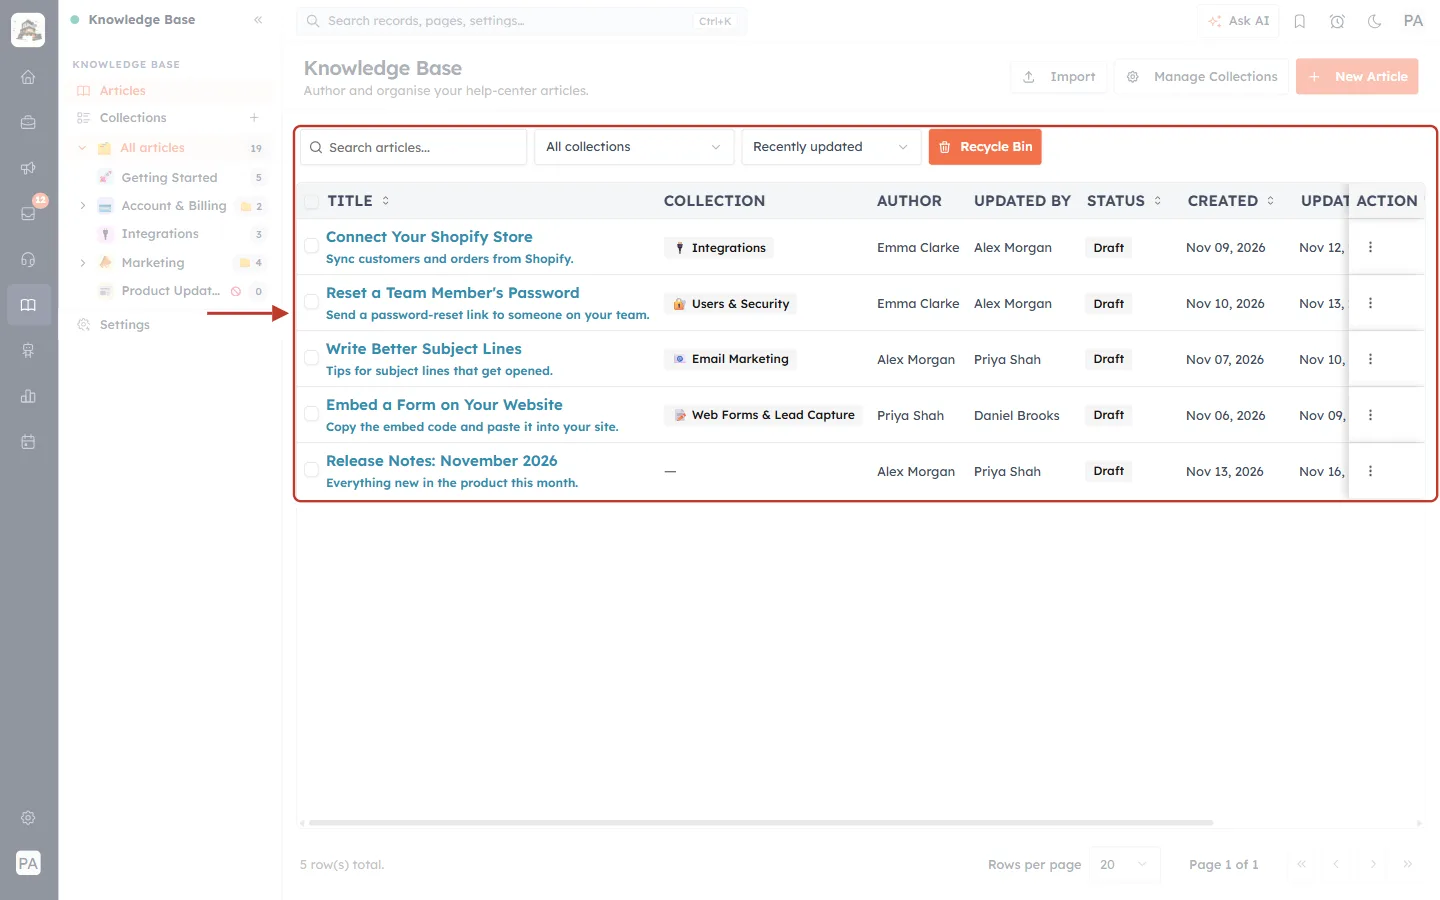
What this screenshot shows. The Recycle Bin, ringed: the orange Recycle Bin button and the list of deleted articles.
Recycle Bin is now orange: you are looking at deleted articles, not your live list.
The All / Published / Drafts tabs are hidden while the bin is open.
The list shows every deleted article: the three we just deleted, plus Embed a Form on Your Website and Release Notes: November 2026, which were deleted earlier.
Each row keeps its details: TITLE and excerpt, COLLECTION, AUTHOR, UPDATED BY, STATUS and dates, so you can recognise it.
At the bottom: “5 row(s) total.”
ℹ️
Articles stay in the Recycle Bin until you restore them or delete them forever. Nothing is emptied automatically.
Step 4: Find an article in the bin#
If the bin holds many articles, use the same tools as on the normal list: type in Search articles…, choose a collection, or change the sort.
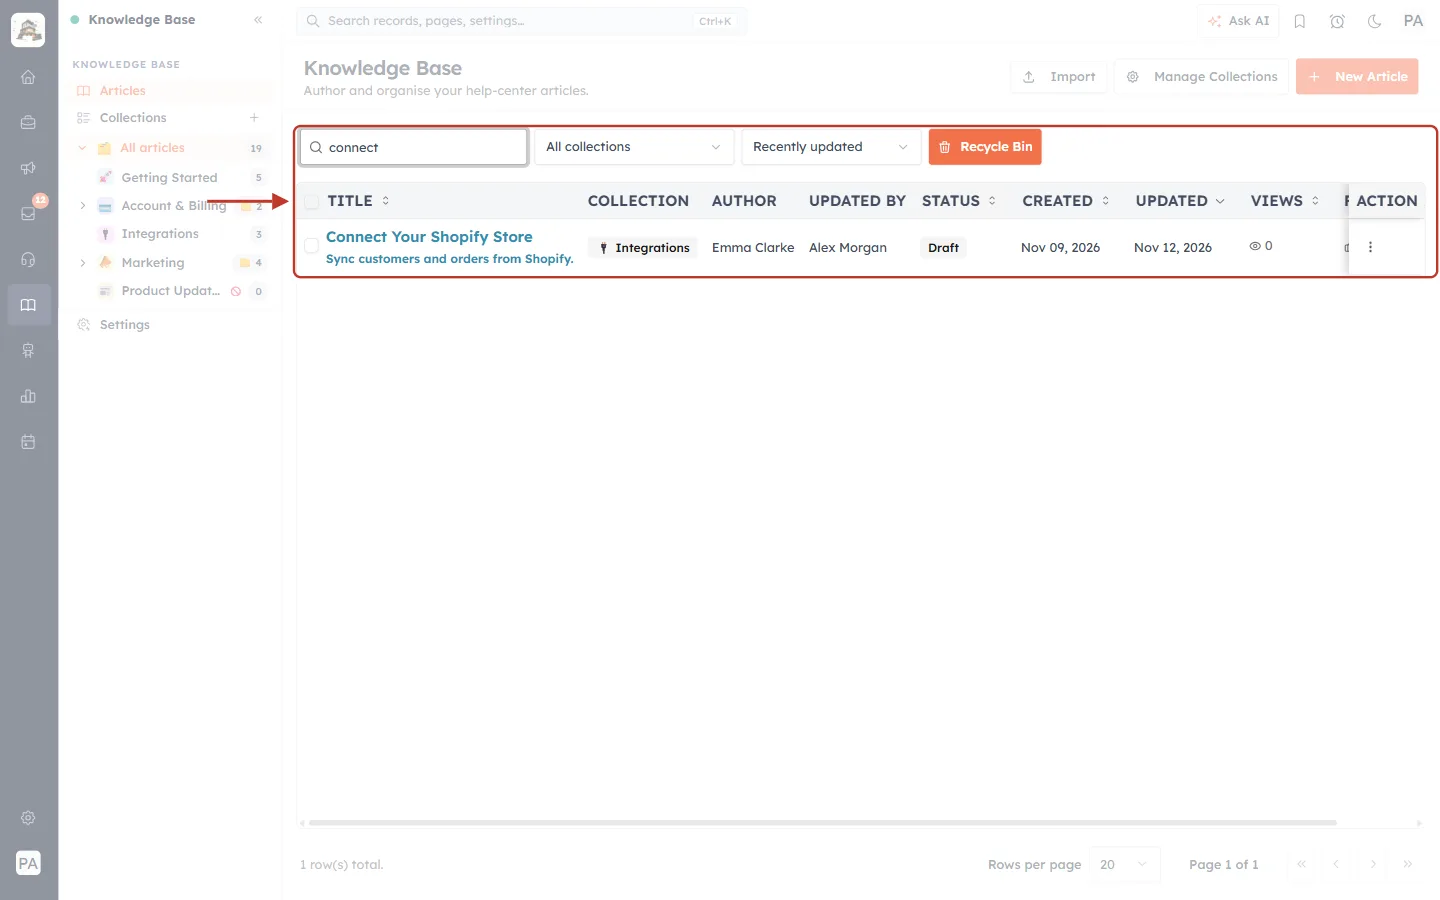
What this screenshot shows. The search box and the result, ringed, after typing “connect”.
Search articles…: we typed connect.
Only matching deleted articles are shown: Connect Your Shopify Store. The search looks only inside the bin while the bin is open.
Clear the search box to see all deleted articles again.
Step 5: Restore an article#
Click the ⋮ button of the article you want back:
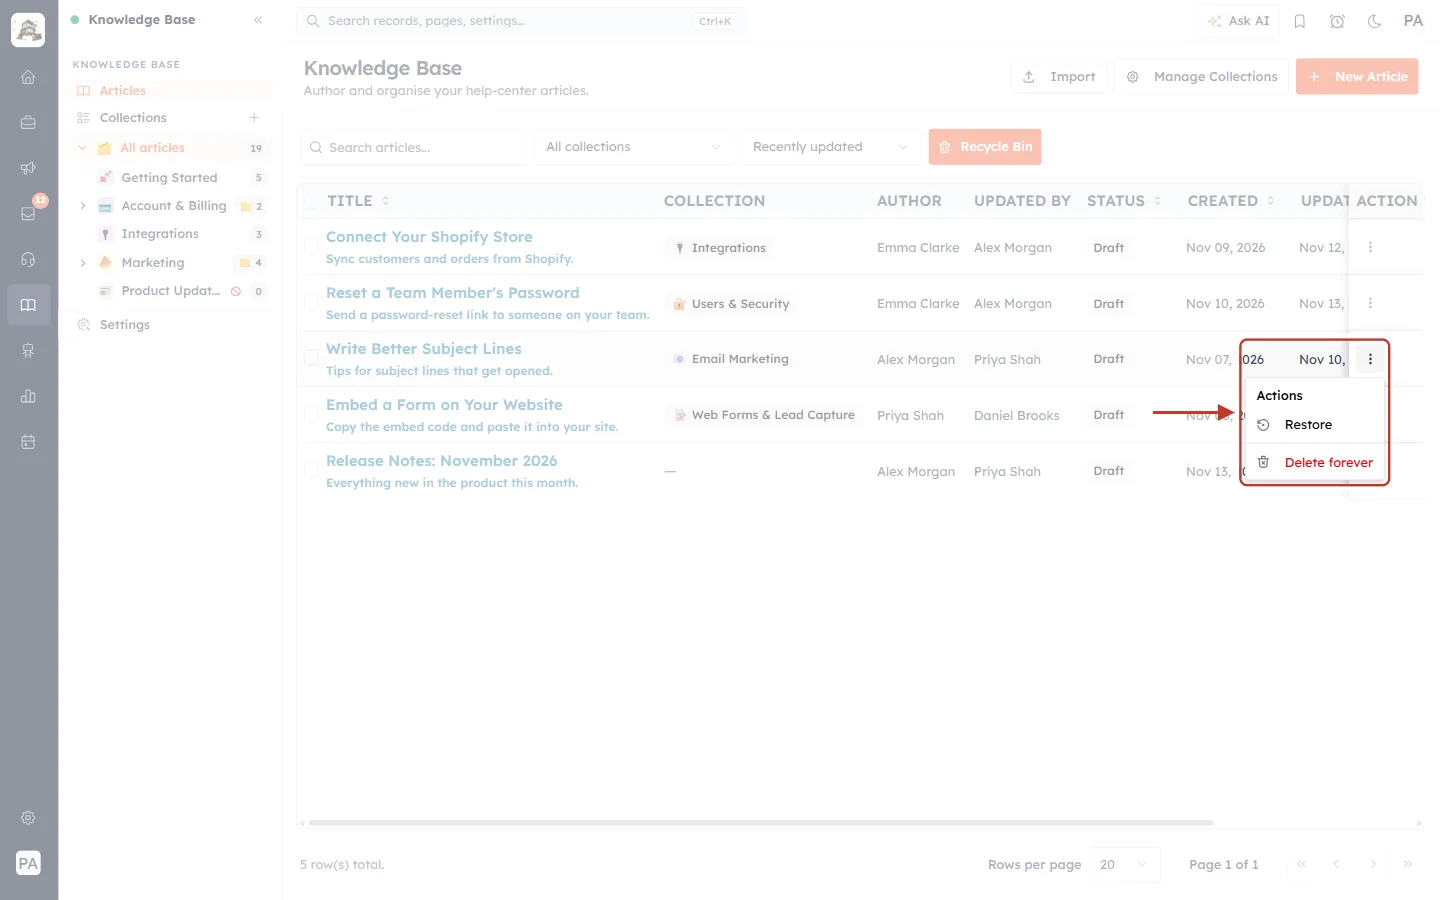
What this screenshot shows. The ⋮ menu of a deleted article, ringed.
Actions has only two items inside the bin:
Restore: puts the article back in your article list.
Delete forever (red): removes it permanently (Step 6).
Edit, Publish and Clone are not available for deleted articles. Restore the article first.
Click Restore. There is no confirmation, because nothing is lost. A message confirms “Article restored”, and the article leaves the bin:
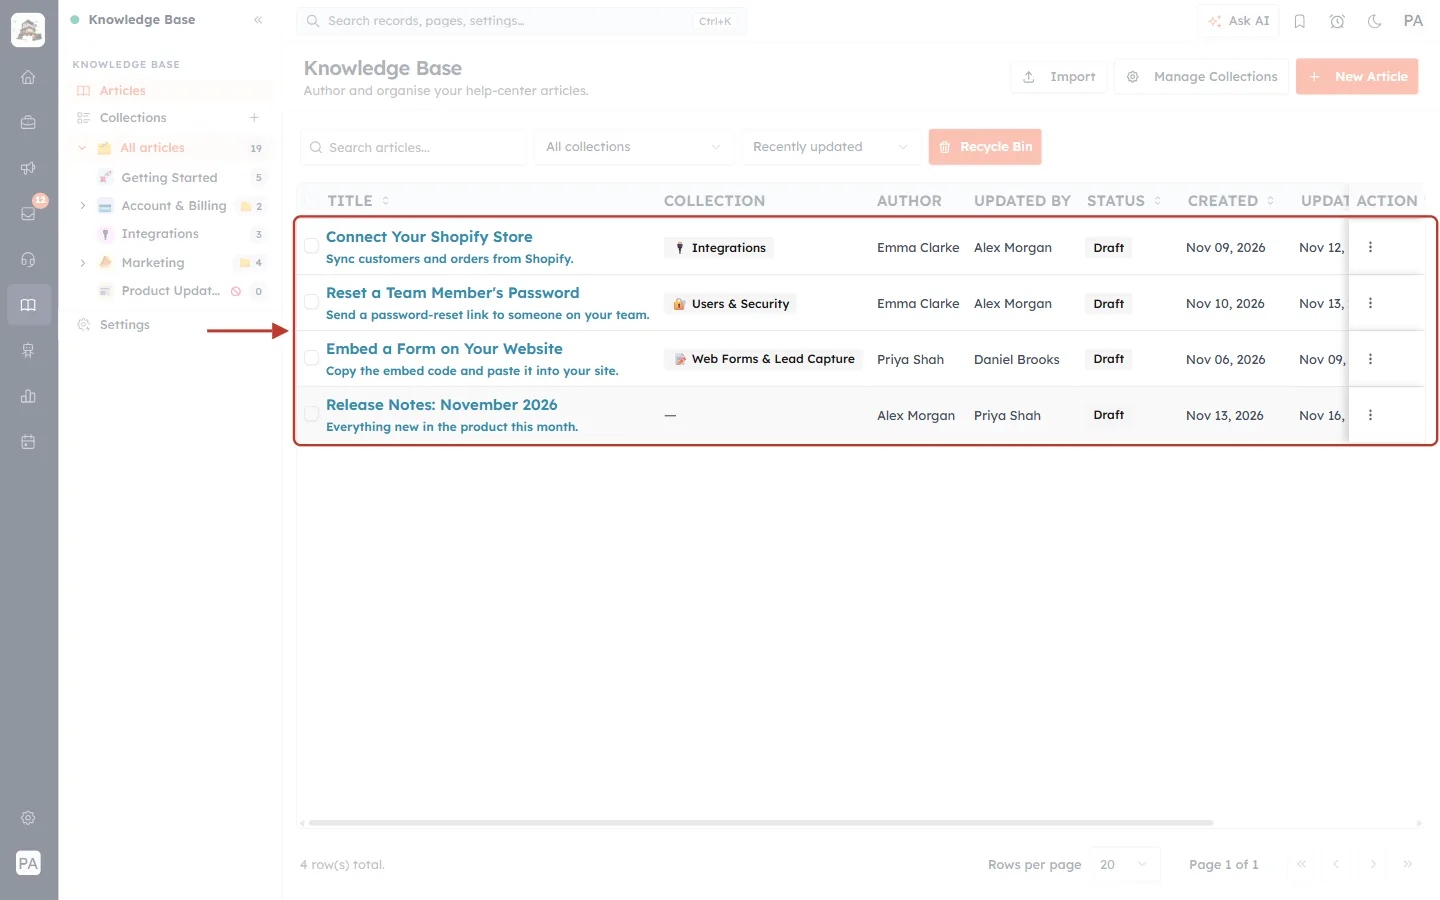
What this screenshot shows. The remaining deleted articles, ringed, after the restore.
Write Better Subject Lines is no longer in the bin. Four articles remain.
The restored article is back in the normal list with its collection and status. You’ll see it when you leave the bin (Step 8).
✅
After restoring, check the article’s STATUS in the list. If it should be live on your help center, make sure it says Published; if not, use ⋮ → Publish.
Step 6: Delete an article forever#
When you are sure an article is no longer needed, remove it permanently. Inside the bin, click its ⋮ button and choose Delete forever.
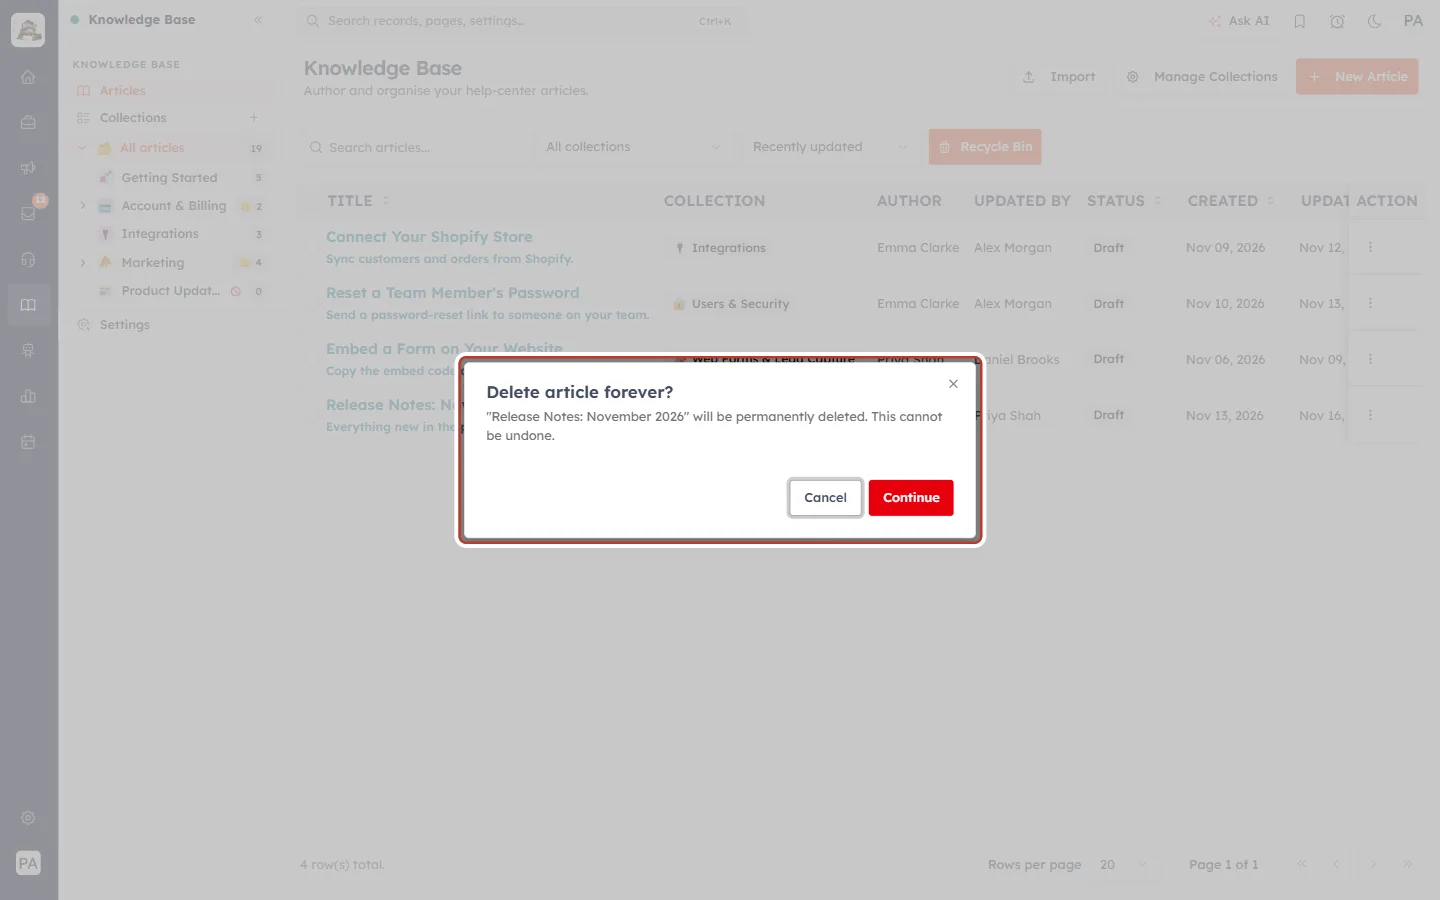
What this screenshot shows. The Delete article forever? window.
Delete article forever?
““Release Notes: November 2026” will be permanently deleted. This cannot be undone.”
Continue: deletes the article permanently.
Cancel or ×: keeps it in the bin.
⚠️
Delete forever cannot be undone. The article and everything saved with it, including its content and its view and feedback counts, are gone, and there is no way to restore them. If you might need the text later, restore the article and keep it as a draft instead.
After Continue, a message confirms “Article permanently deleted”:
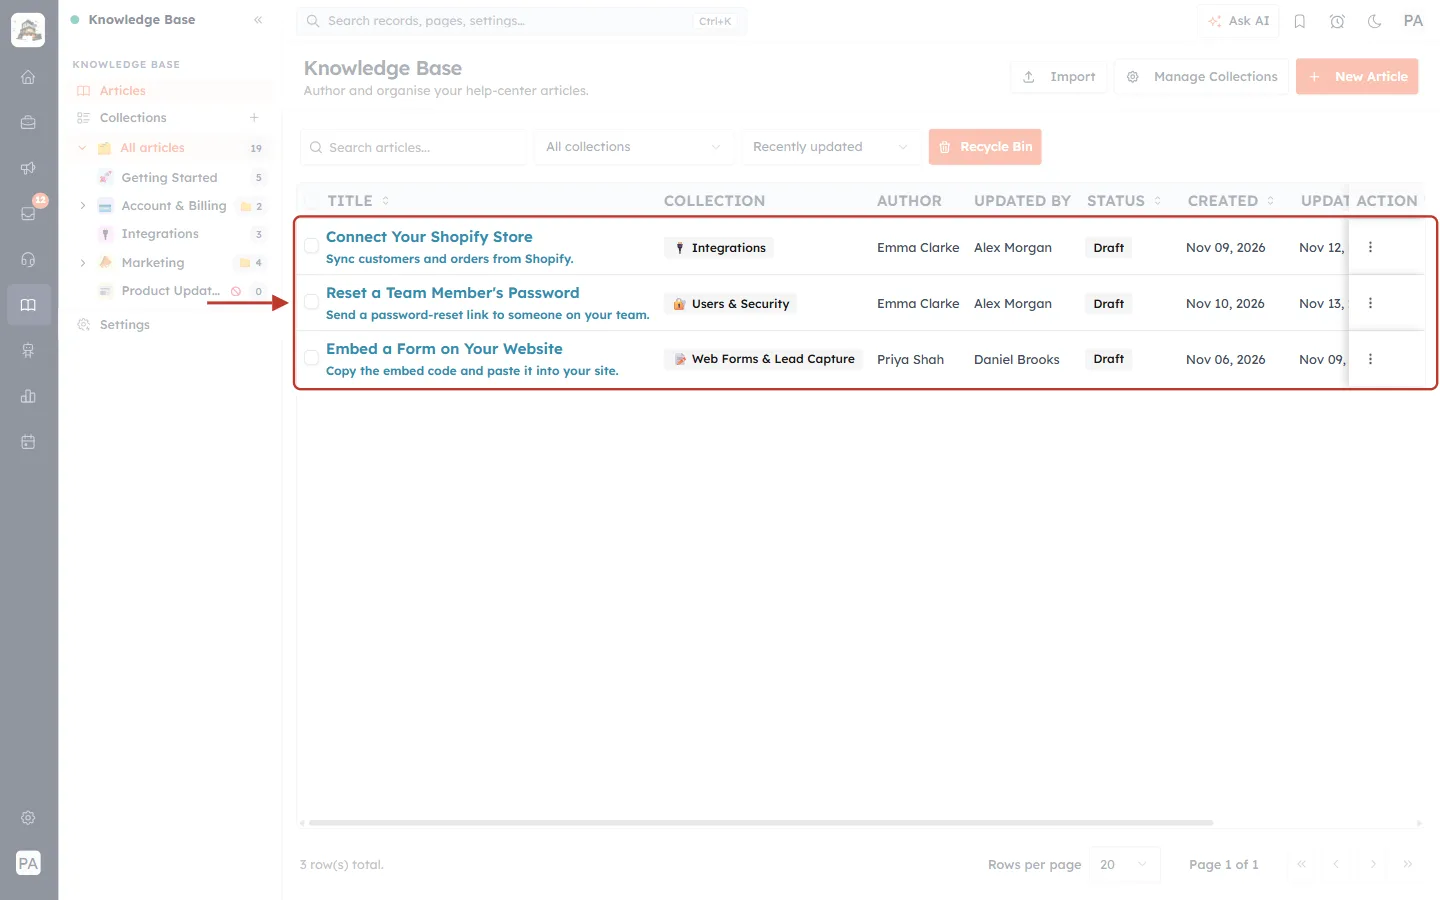
What this screenshot shows. The remaining deleted articles, ringed.
Release Notes: November 2026 is gone from the bin for good.
Three articles remain: Connect Your Shopify Store, Reset a Team Member’s Password and Embed a Form on Your Website.
Step 7: Restore or delete many articles at once#
Inside the bin you can also select several rows, or tick the box in the TITLE header to select them all:
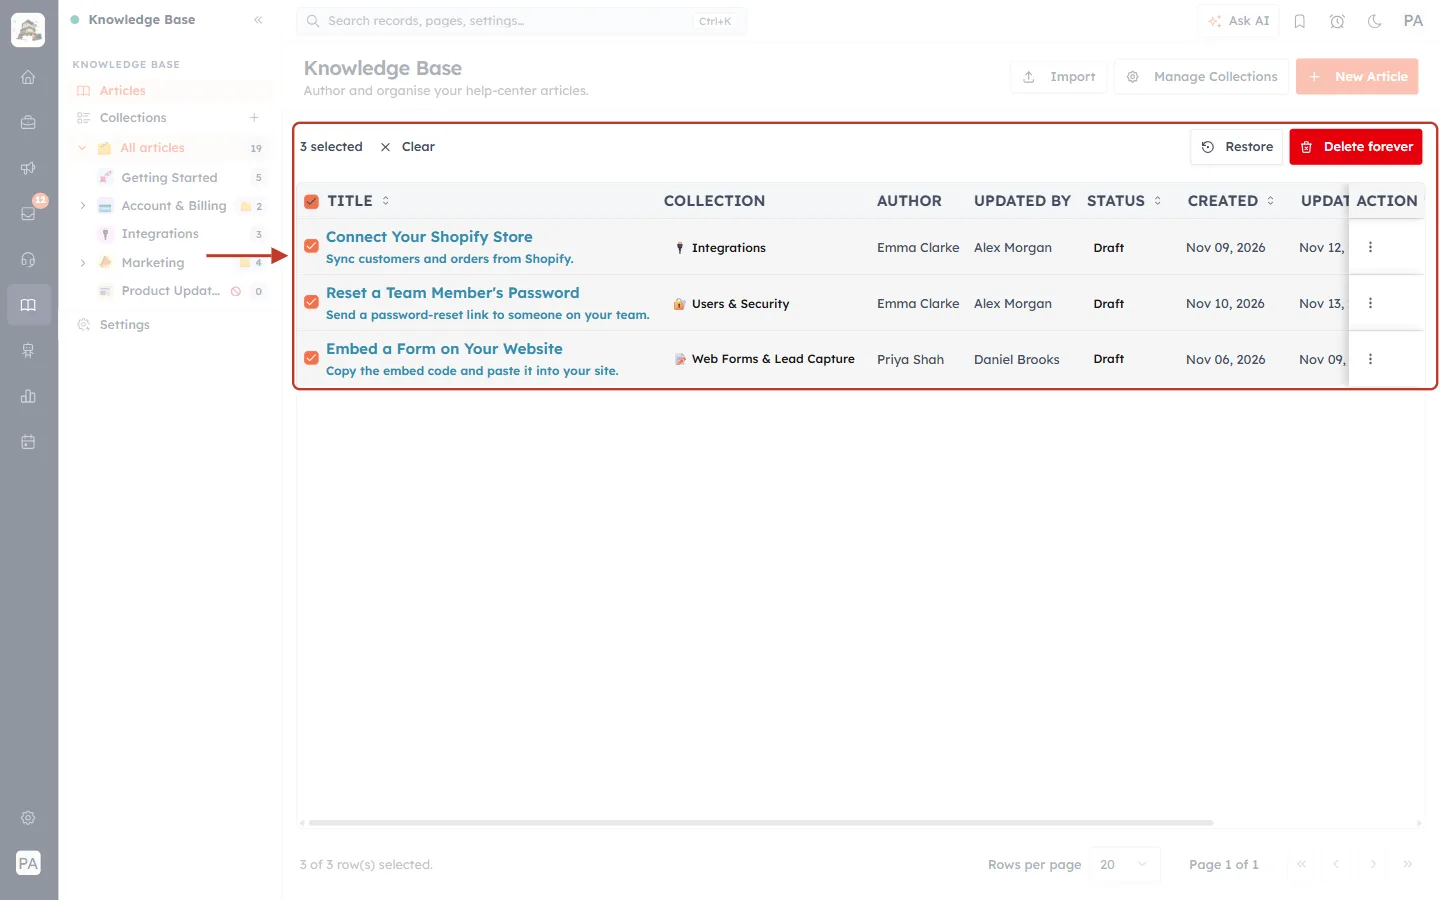
What this screenshot shows. The bulk action bar and the selected rows, ringed.
3 selected and × Clear on the left.
In the bin, the bar offers Restore and the red Delete forever, instead of Publish, Unpublish and Delete.
All three rows are ticked, and so is the header box.
If you click Delete forever, you are asked once more:
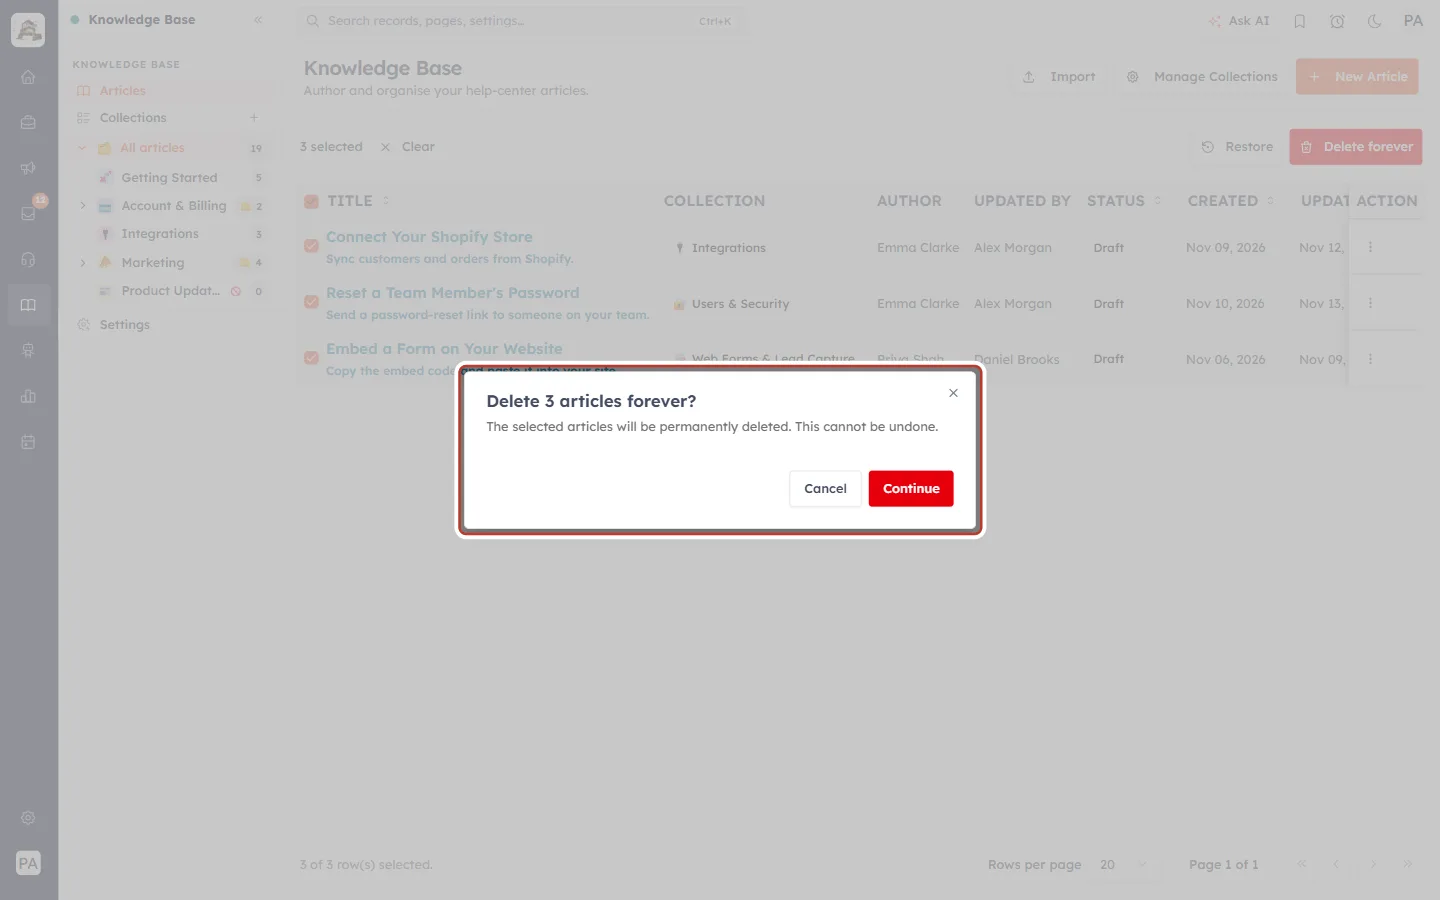
What this screenshot shows. The Delete 3 articles forever? window.
“The selected articles will be permanently deleted. This cannot be undone.”
Continue deletes all of them permanently, and a message confirms “3 articles permanently deleted”.
Here we click Cancel instead, and then Restore in the bar to bring all three back. The message reads “3 articles restored”.
When the bin has nothing left in it, you see:
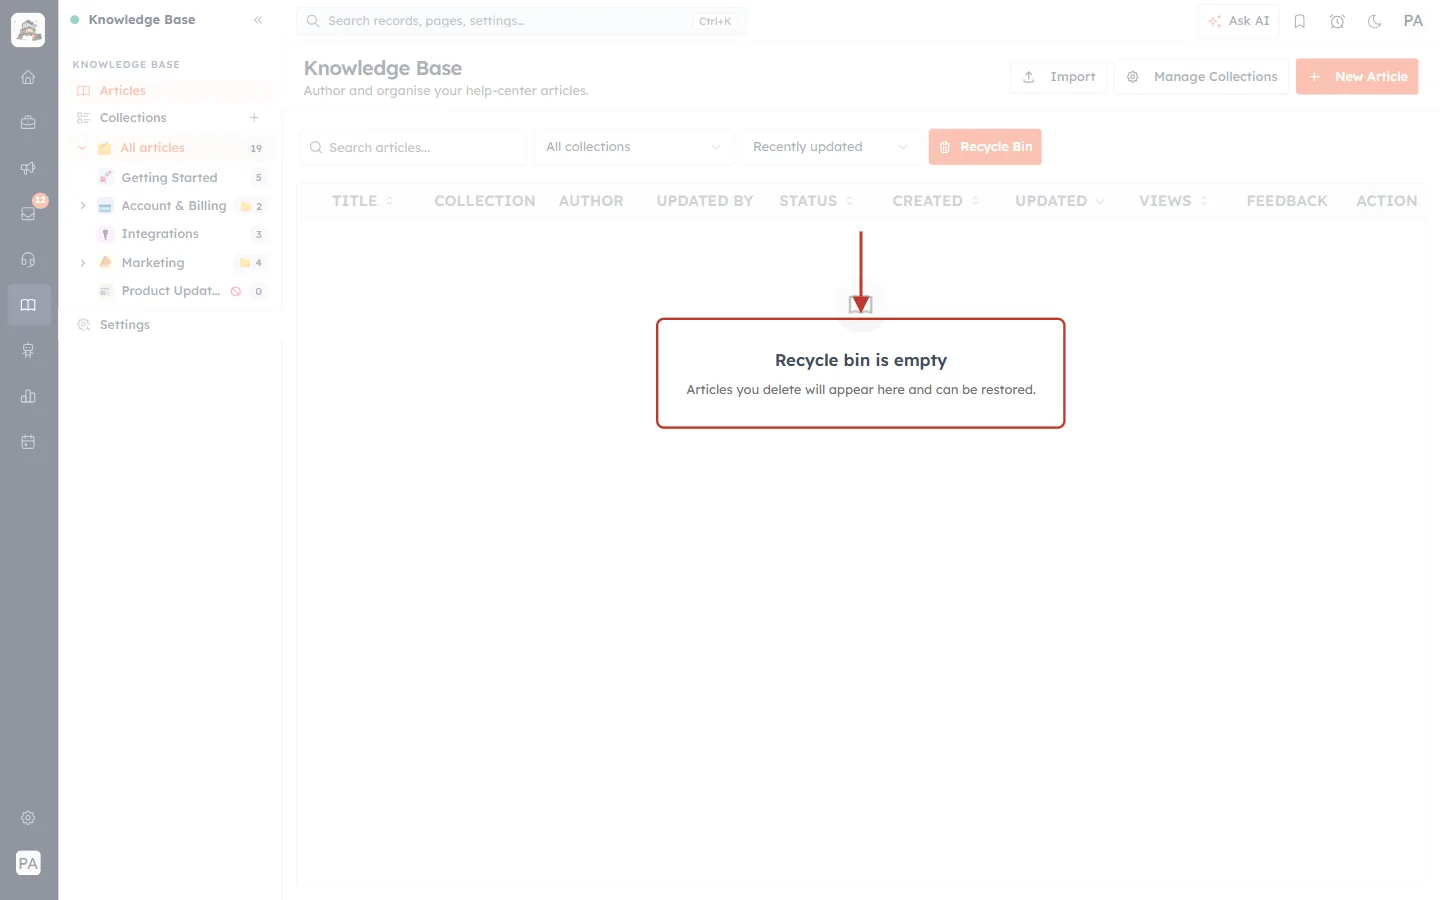
What this screenshot shows. The empty-bin message, ringed.
Recycle bin is empty
“Articles you delete will appear here and can be restored.”
The Recycle Bin button is still orange, because you are still inside the bin.
Step 8: Go back to your articles#
Click the orange Recycle Bin button again. It turns white, and your normal article list comes back:
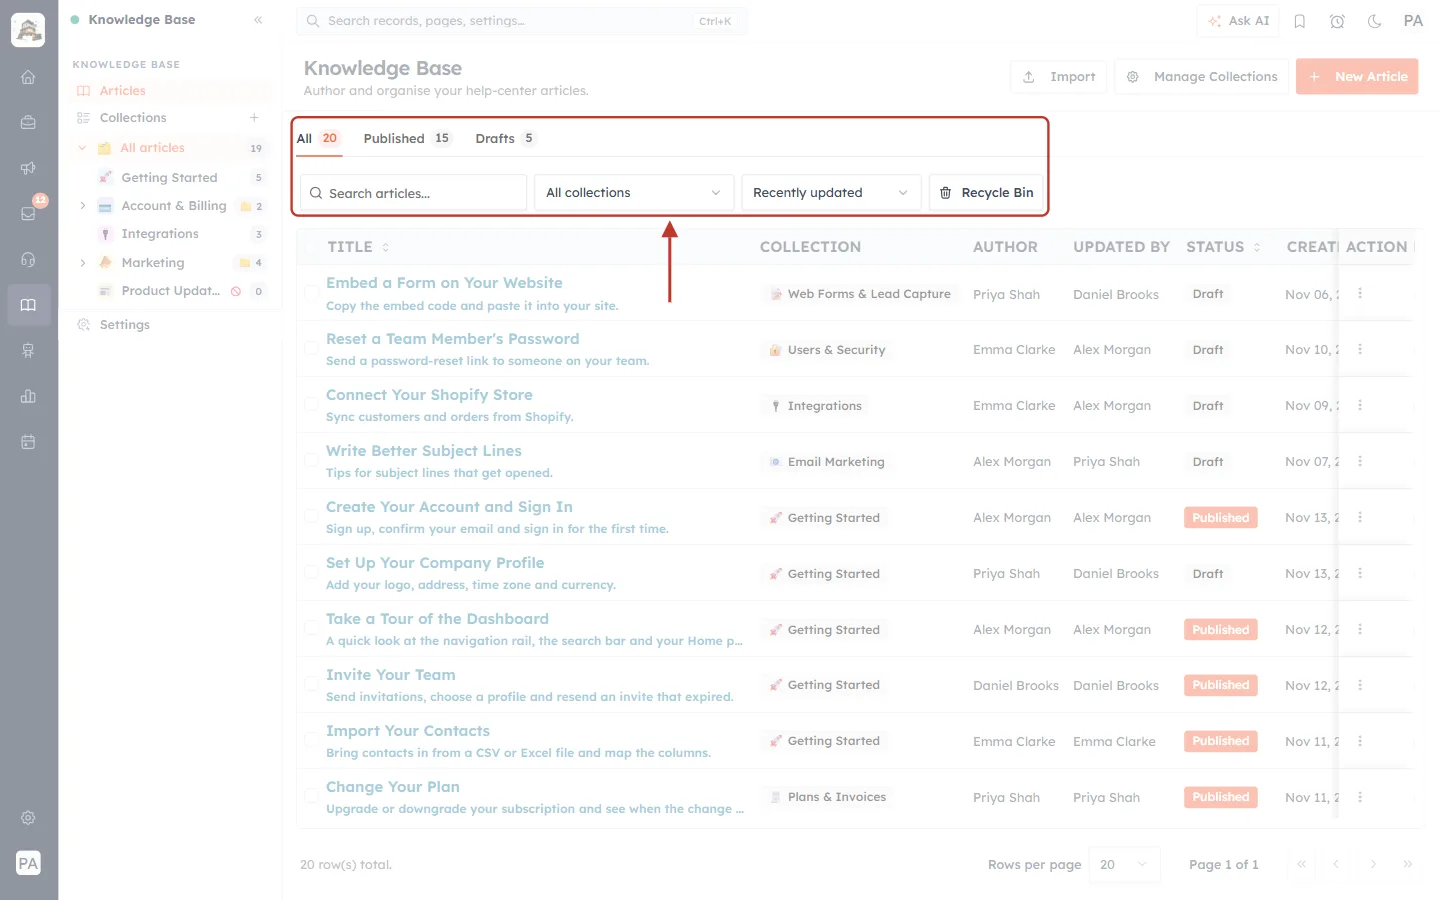
What this screenshot shows. The tabs and the toolbar, ringed, after leaving the bin.
The tabs are back with the new counts: All 20, Published 15 and Drafts 5. The four restored articles are counted again.
Recycle Bin is white again: you are looking at your live articles.
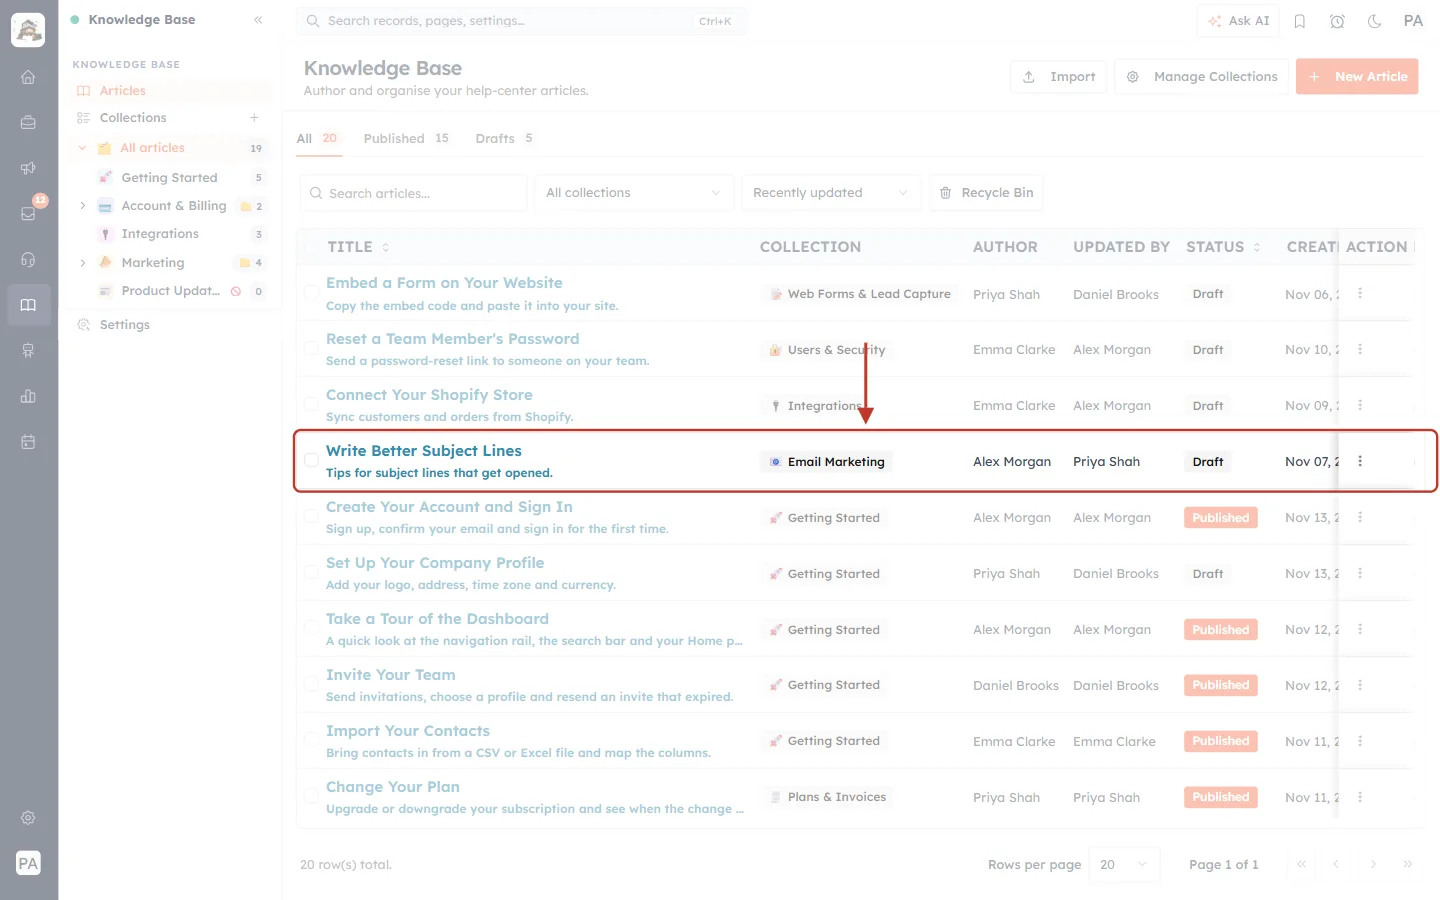
What this screenshot shows. The restored article Write Better Subject Lines, ringed, in the article list.
It is back with its collection (Email Marketing), author, UPDATED BY and Draft status.
Edit it, publish it or move it to another collection as usual.
The articles restored in Step 7 are back in the list too.
Good to know#
Delete is always two-step. Deleting moves an article to the bin; only Delete forever from inside the bin removes it permanently.
Deleted articles are hidden everywhere: in the normal list and tabs, on the public help center, in its search, and in collection pages.
Restoring is instant and needs no confirmation.
Nothing is emptied automatically. Articles wait in the bin until someone restores them or deletes them forever.
Collections have their own Recycle Bin. Deleting a collection on the Collections page moves it, its sub-collections and their articles to the Collections recycle bin, where you can restore or delete them forever in the same way.
Unpublish vs Delete: Unpublish keeps the article in your list as a draft; Delete moves it to the bin. Use Unpublish for anything you plan to bring back soon.
Troubleshooting#
I deleted the wrong article#
How to fix it: click Recycle Bin, find the article (use the search box), click ⋮ → Restore, then click Recycle Bin again to go back. If it was published before, check that its status is still Published.
I can’t find a deleted article in the Recycle Bin#
Clear the Search articles… box and set the collection filter to All collections.
Check the other pages of the list with the arrows at the bottom right.
If someone used Delete forever, the article cannot be recovered.
If it belonged to a deleted collection, look in the Collections recycle bin instead.
The Delete forever button is missing#
Why it happens: you are looking at the normal article list. How to fix it: click Recycle Bin first. Delete forever only exists inside the bin, for articles that are already deleted.
A message says some articles could not be deleted or restored#
Why it happens: one or more articles failed, for example because of a connection problem. The others were processed. How to fix it: refresh the page and try again with the remaining articles.
An old link to a restored article doesn’t work#
Why it happens: the article is restored but not published, or its slug was changed. How to fix it: publish the article and check its Slug in the article form.
Frequently asked questions#
Does deleting an article remove it from my public help center?
Yes, immediately. Restore it (and make sure it is published) to bring it back.
How long do deleted articles stay in the Recycle Bin?
Until you restore them or delete them forever. They are not emptied automatically.
Can I edit an article while it is in the Recycle Bin?
No. Restore it first, then edit it.
Can I undo Delete forever?
No. Permanently deleted articles cannot be recovered.
Can I restore many articles at once?
Yes. In the bin, tick the rows (or the header box) and click Restore.
Previous and next#
Related#
Was this article helpful?
Ready to implement this?
OpenAI Engage and apply what you just learned to your own workspace.
Open AI Engage CRM