Loading…


KnowledgeBase
Import Help Articles from a CSV or Excel File: Upload, Map Fields, Review and Track Results (Step-by-Step)
Introduction#
If your help articles already exist somewhere else, for example in another help-center tool, a spreadsheet or an export from your old website, you don’t have to copy them into the Knowledge Base one by one. With Import from file you upload a CSV or Excel file and every row becomes an article.
The import also files your articles: it matches each row’s collection by name and creates any collection that doesn’t exist yet. Articles come in as drafts unless the file says Published, so you can check them before your customers see them.
In this guide we import a sample file, help-articles.csv, with 10 articles. We prepare the file, upload it, map its columns, review and start the import, and then read the results, including one row that failed.
ℹ️
The screenshots use a sample help center for a business called YourCompany, with sample collections, articles and authors. Your screen shows your own content.
Step of the wizard | What you do |
|---|---|
1 · Upload & Settings | Choose the file and confirm that its first row holds the column names |
2 · Map Fields | Tell the CRM which column is the title, the content, the collection and so on |
3 · Review | Check the summary and click Finish Import |
Afterwards | Follow the progress, read the results and fix any failed rows |
Before you begin#
Permission: you need the Knowledge Base permission (admins always have it). It is set in Setup → Profiles → Feature Permissions → Marketing.
File type and size: CSV, XLSX or XLS, up to 50 MB.
One row per article, with the column names in the first row.
Every article needs a Title and Content. Rows without them can’t be imported.
Already have a public help center? You can also use Import → Import from website to crawl it. This guide covers file imports.
Step 1: Prepare your file#
Your file can have up to 13 columns. Only Title and Content are required; fill in the others when you have the information. The column names below are the ones in the sample file (Step 3), and the import recognises them automatically.
Column | Required? | What to put in it |
|---|---|---|
Title | Yes | The article title, for example “Reset Your Password”. |
Content | Yes | The article body. Plain text or HTML. HTML is kept and cleaned on save: formatting, links, tables and images stay, and images are copied into your own storage. |
Excerpt | No | A one- or two-sentence summary shown in lists and search. |
Collection | No | The collection name, for example “Users & Security”. Matched to an existing collection by name; if none exists, it is created. Empty leaves the article uncategorised. |
Parent collection | No | The collection the Collection sits inside, for example “Account & Billing”. |
Status | No | Published makes the article live on your help center. Empty or anything else is imported as Draft. |
Slug / Permalink | No | The article’s address, for example reset-your-password. A full URL from your old help center also works: its last part is used. Empty creates the slug from the title. The slug is also how duplicates are recognised. |
Author | No | The author name shown on the article. |
SEO Title / SEO Description | No | The meta title and meta description for search engines. |
View count, Helpful count, Not-helpful count | No | Numbers you want to carry over from your old help center. |
✅
Exporting from another tool? Save the export as CSV (UTF-8) or keep it as an Excel file, then rename the column headers to the names above. It saves you mapping work in Step 6.
Step 2: Open Import from file#
Go to Knowledge Base → Articles and click Import at the top right.
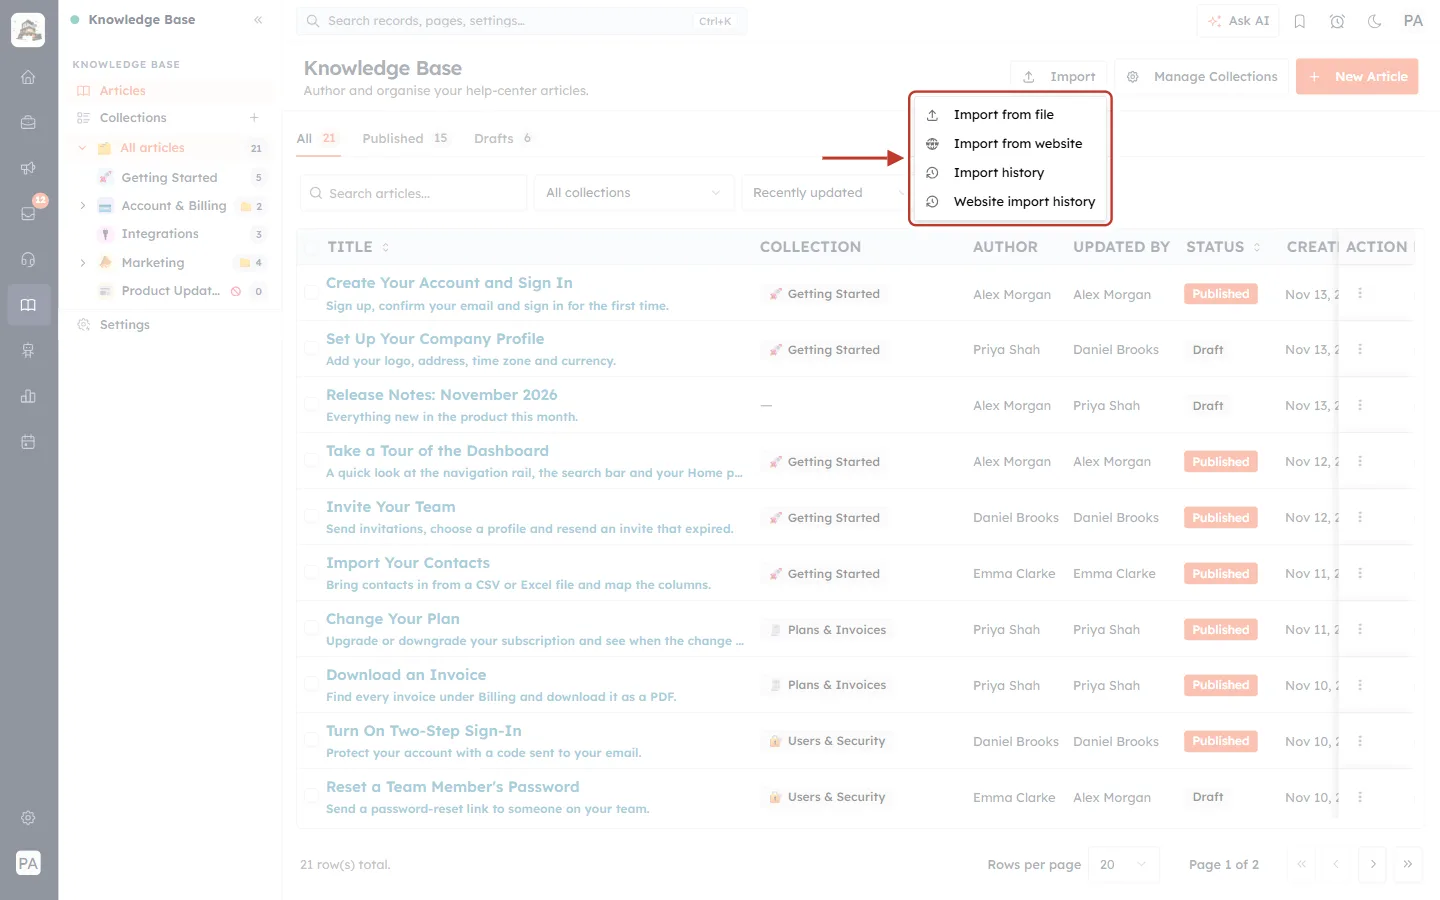
What this screenshot shows. The Import menu open, ringed.
Import from file: upload a CSV or Excel file. This is the one we use.
Import from website: crawl your existing public help center instead.
Import history: all your past file imports and their results (Step 11).
Website import history: your past website crawls.
Click Import from file. The Import Articles page opens.
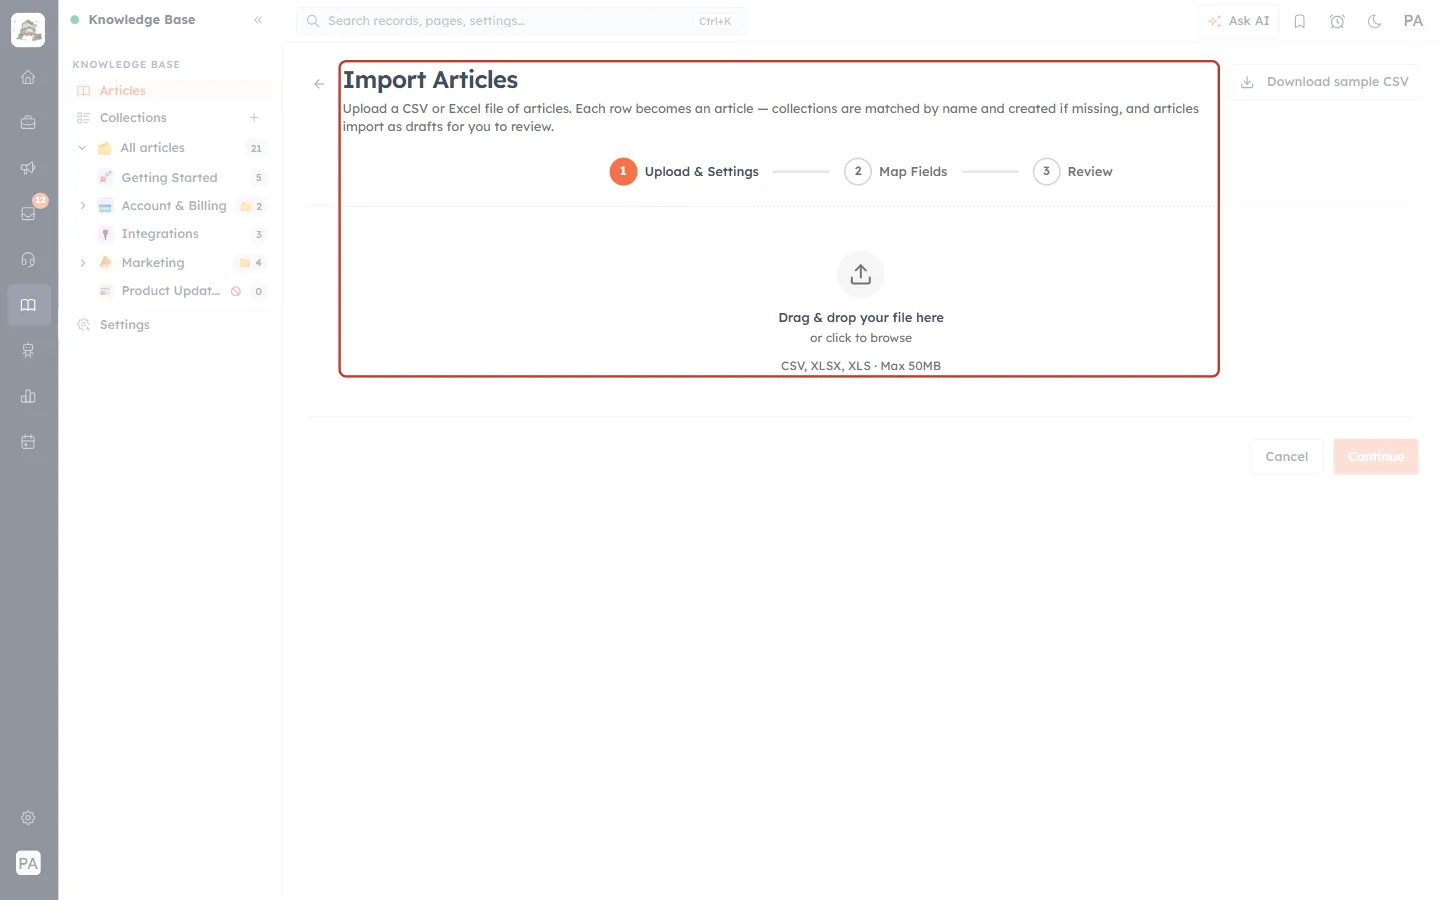
What this screenshot shows. The Import Articles page, ringed.
Import Articles — “Upload a CSV or Excel file of articles. Each row becomes an article — collections are matched by name and created if missing, and articles import as drafts for you to review.”
The three steps: 1 Upload & Settings (orange, the current step), 2 Map Fields and 3 Review. Finished steps get a tick.
The upload area: “Drag & drop your file here or click to browse. CSV, XLSX, XLS · Max 50MB.”
Cancel and Continue at the bottom. Continue stays pale until you add a file.
Step 3: Download the sample file (optional)#
Not sure how to lay out your file? Click Download sample CSV at the top right.
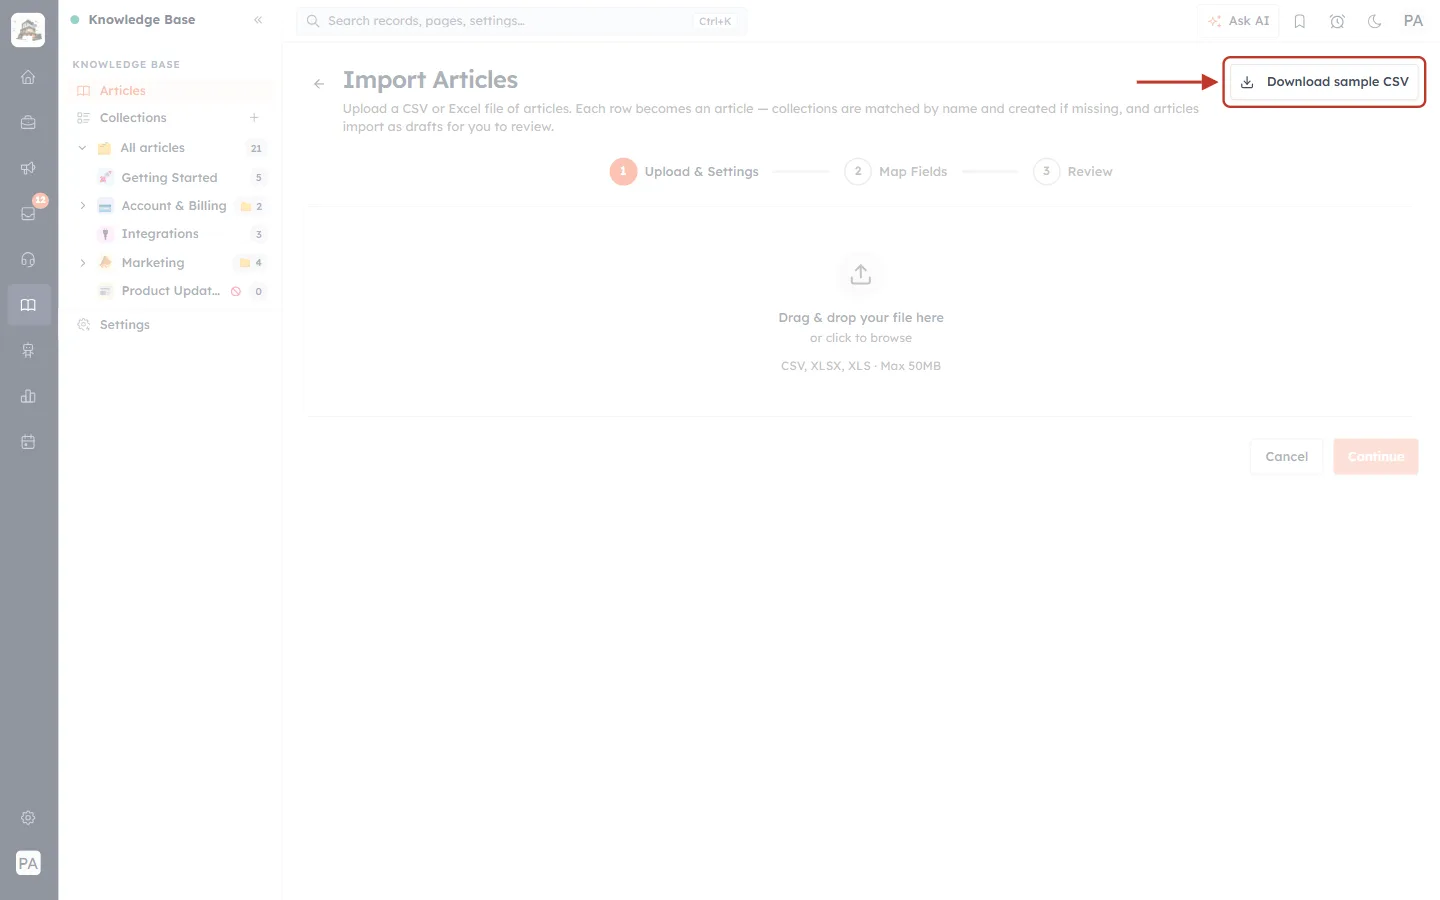
What this screenshot shows. The Download sample CSV button, ringed.
It downloads a small CSV with every column the import understands: Title, Content, Excerpt, Collection, Parent collection, Status, Slug / Permalink, Author, SEO Title, SEO Description, View count, Helpful count and Not-helpful count.
It has one example row. Replace it with your own articles, one per row, and keep the first row as it is.
Step 4: Upload your file#
Drag your file onto the upload area, or click the area and choose the file.
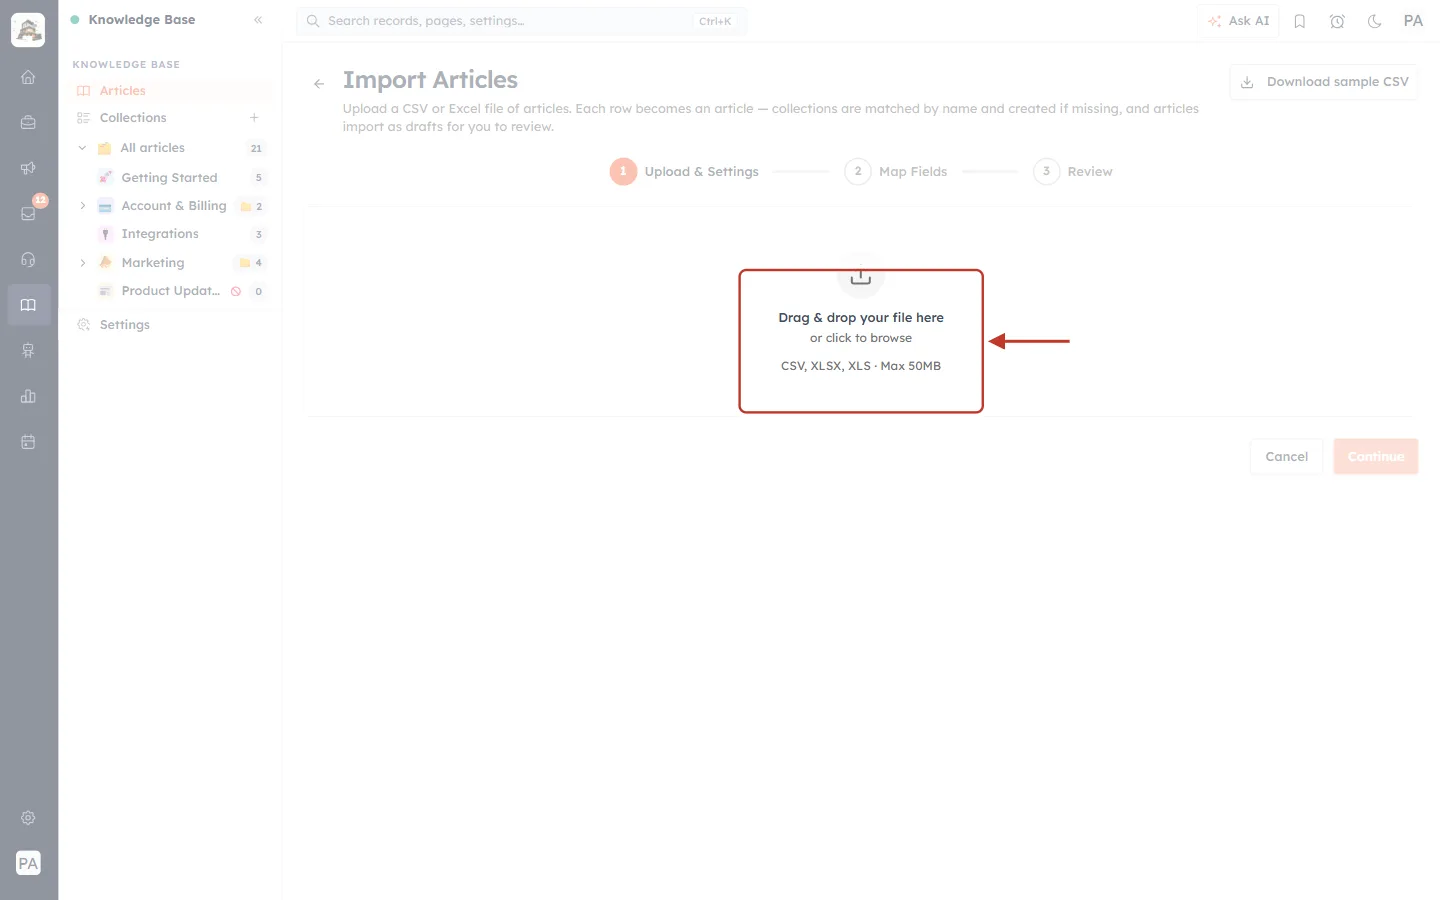
What this screenshot shows. The upload area, ringed.
“Drag & drop your file here” — drop a file from your computer here.
“or click to browse” — opens your computer’s file picker.
“CSV, XLSX, XLS · Max 50MB” — the file types and size you can use. Other file types are refused.
The file is read straight away, and a summary appears under the upload area:
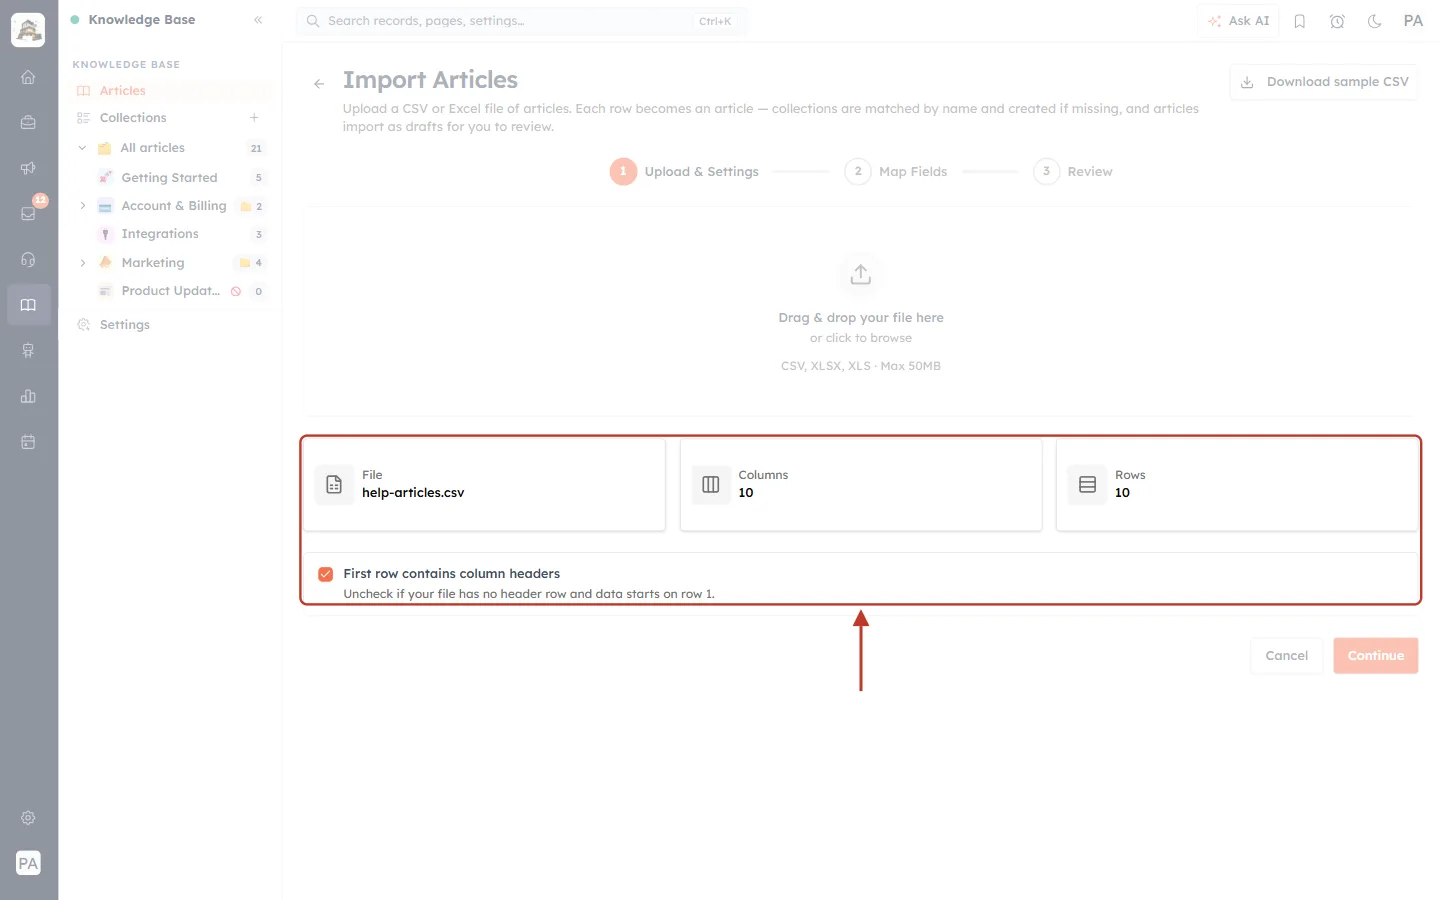
What this screenshot shows. The file summary and the header option, ringed.
File: help-articles.csv, the file you chose.
Columns: 10, the number of columns found.
Rows: 10, the number of articles in the file (the header row isn’t counted).
First row contains column headers (ticked): “Uncheck if your file has no header row and data starts on row 1.” Leave it ticked when the first row holds column names such as Title and Content.
Check the numbers. If Rows is much higher or lower than you expect, the file may have empty rows or text split over several lines; fix it before you continue.
Click Continue.
Step 5: Check the field mapping#
In Map Fields you tell the CRM what each column of your file contains. Columns whose names match a field are mapped for you automatically.
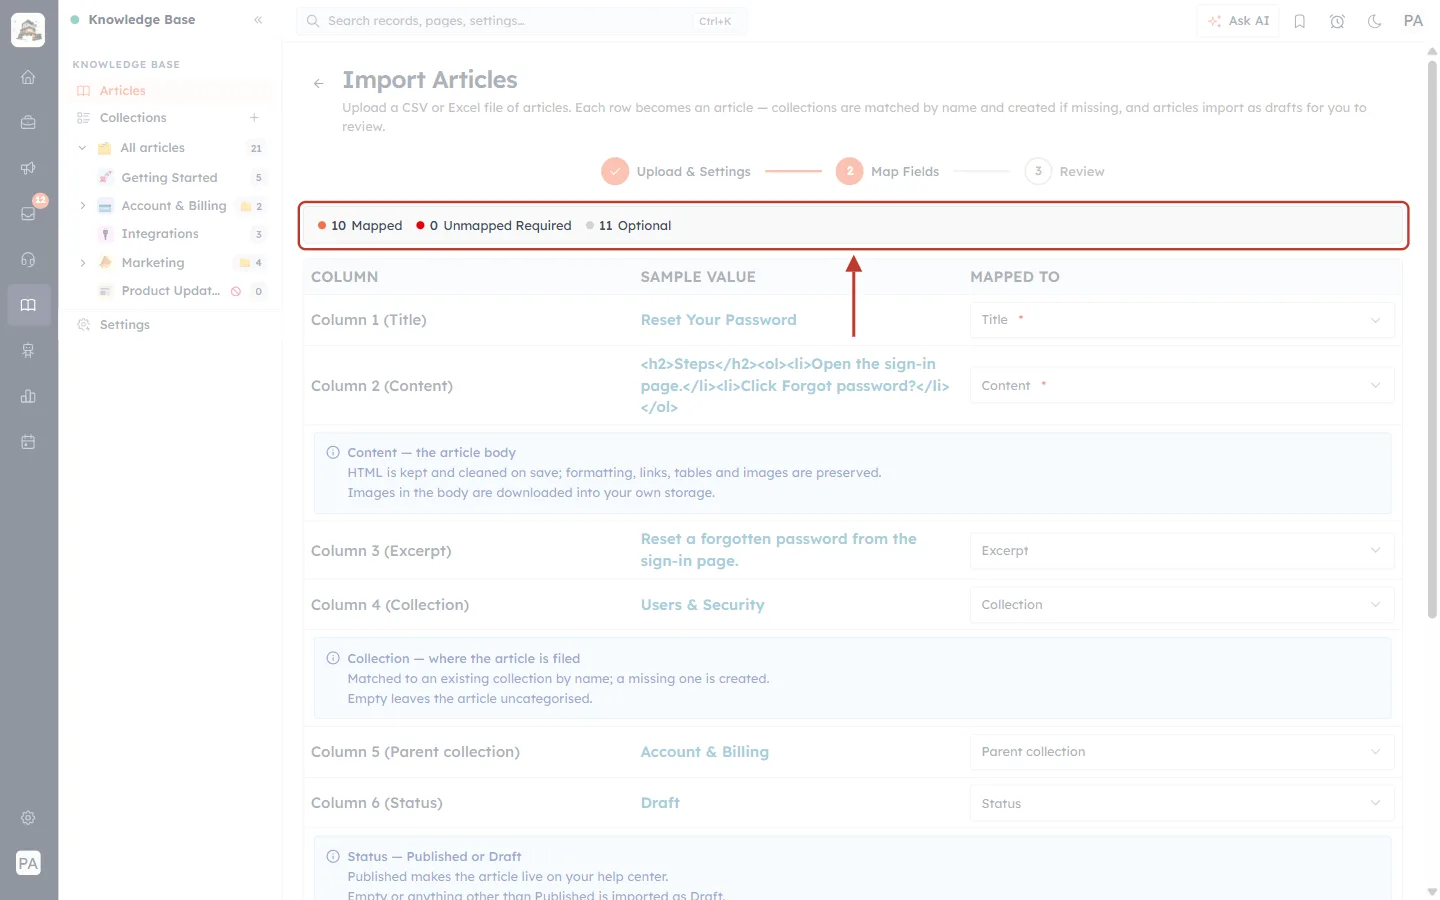
What this screenshot shows. The counters at the top of the Map Fields step, ringed.
10 Mapped: columns that are linked to an article field.
0 Unmapped Required: required fields (Title, Content) that no column is linked to yet. This must be 0 before you can continue.
11 Optional: optional fields of the article.
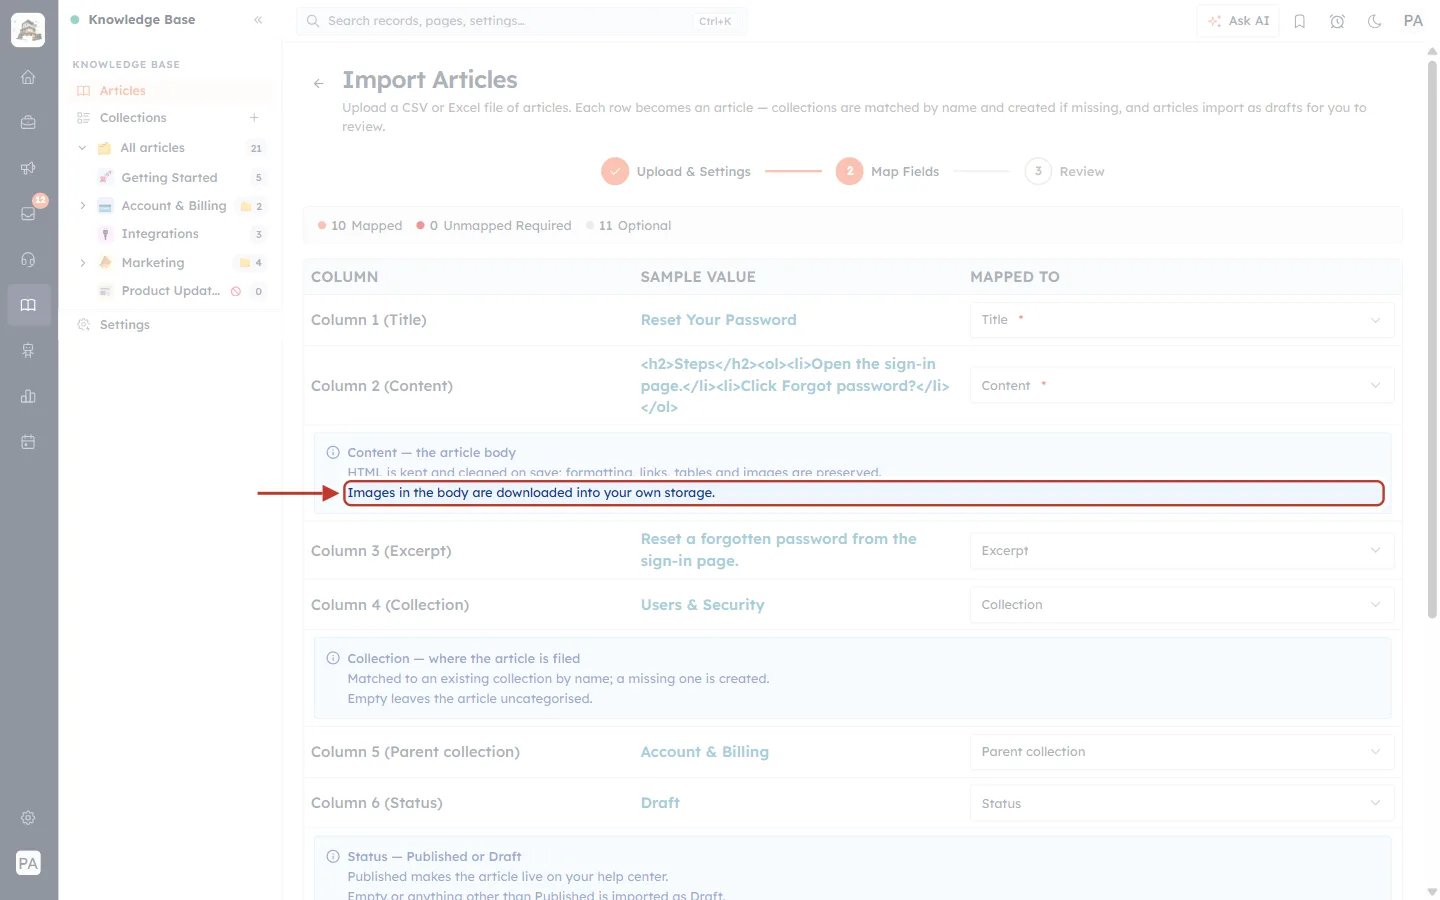
What this screenshot shows. The top of the mapping table, ringed.
COLUMN: each column of your file, with its header, for example Column 1 (Title) and Column 2 (Content).
SAMPLE VALUE: the value in the first article row, so you can see what the column holds. Here the Content column contains HTML.
MAPPED TO: the article field the column goes into. Title * and Content * have a red star because they are required.
The blue hint box under some fields explains how they are imported. For Content: “HTML is kept and cleaned on save; formatting, links, tables and images are preserved. Images in the body are downloaded into your own storage.”
The Collection hint reads: “Matched to an existing collection by name; a missing one is created. Empty leaves the article uncategorised.”
What this screenshot shows. The Slug / Permalink row and its hint, ringed.
Column 7 (Slug / Permalink) with the sample value reset-your-password.
“A full URL (permalink) is accepted; its last path segment is used. Empty derives the slug from the title. Also the key used to match duplicates.”
Keeping your old slugs means your articles keep the same last part of their address after the move.
Step 6: Change a mapping (if needed)#
If a column was mapped to the wrong field, or not mapped at all, click its box in MAPPED TO:
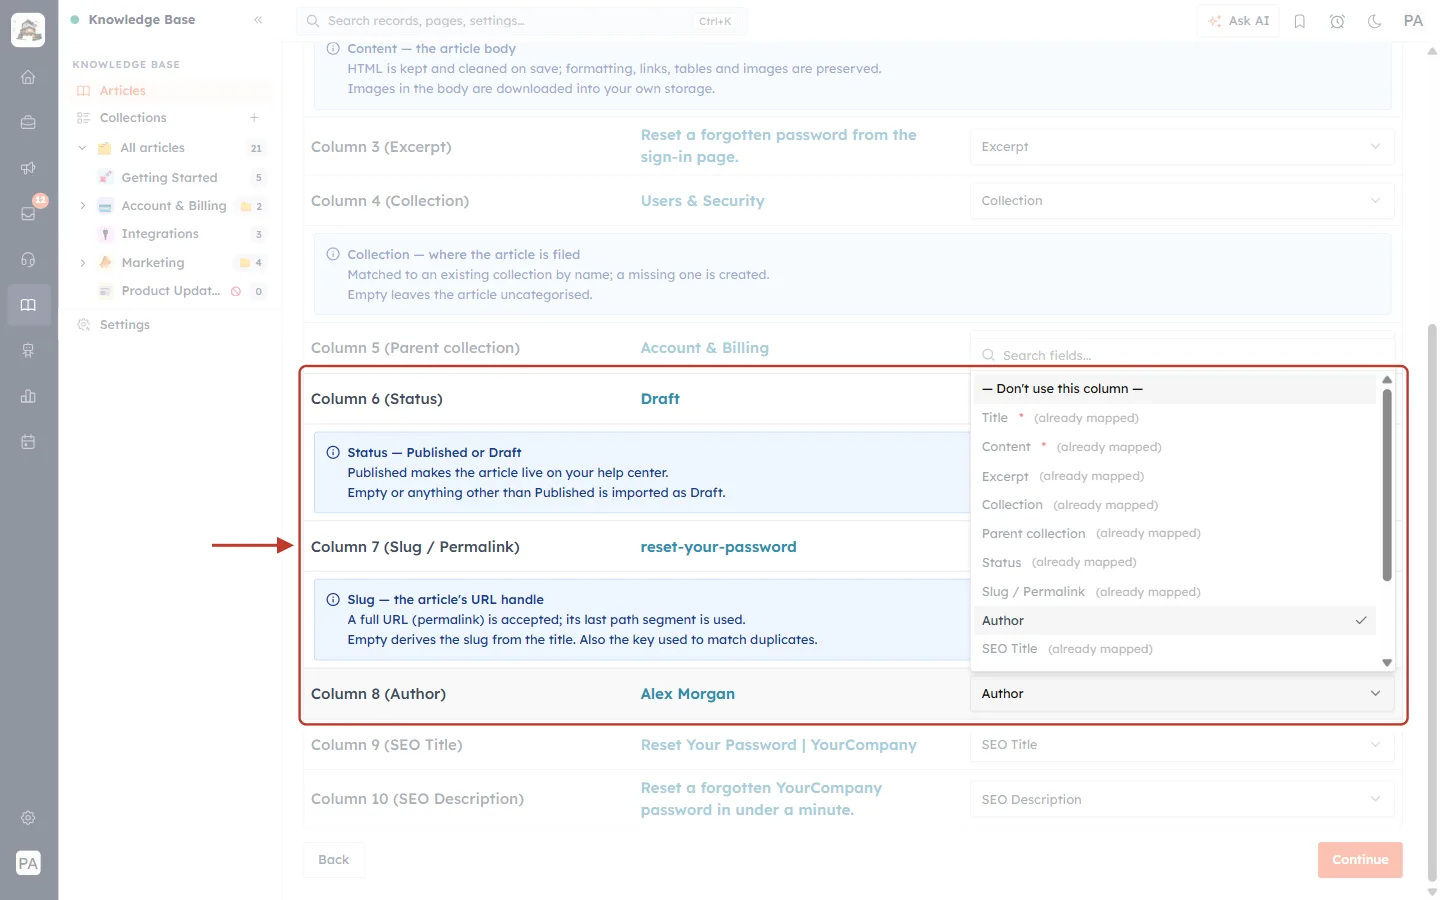
What this screenshot shows. The field list of Column 8 (Author), ringed.
Search fields… at the top: type to find a field quickly.
— Don’t use this column —: skip the column. Its data is not imported.
Every article field is listed. Fields already used by another column say (already mapped), because each field can take only one column.
Author is ticked: it is the field this column is mapped to.
⚠️
You can’t continue until Title and Content each have a column. If either is missing, the page says “Map a column to the required fields: Title, Content.” and Continue stays pale.
When the mapping is right, click Continue at the bottom of the page.
Step 7: Review and start the import#
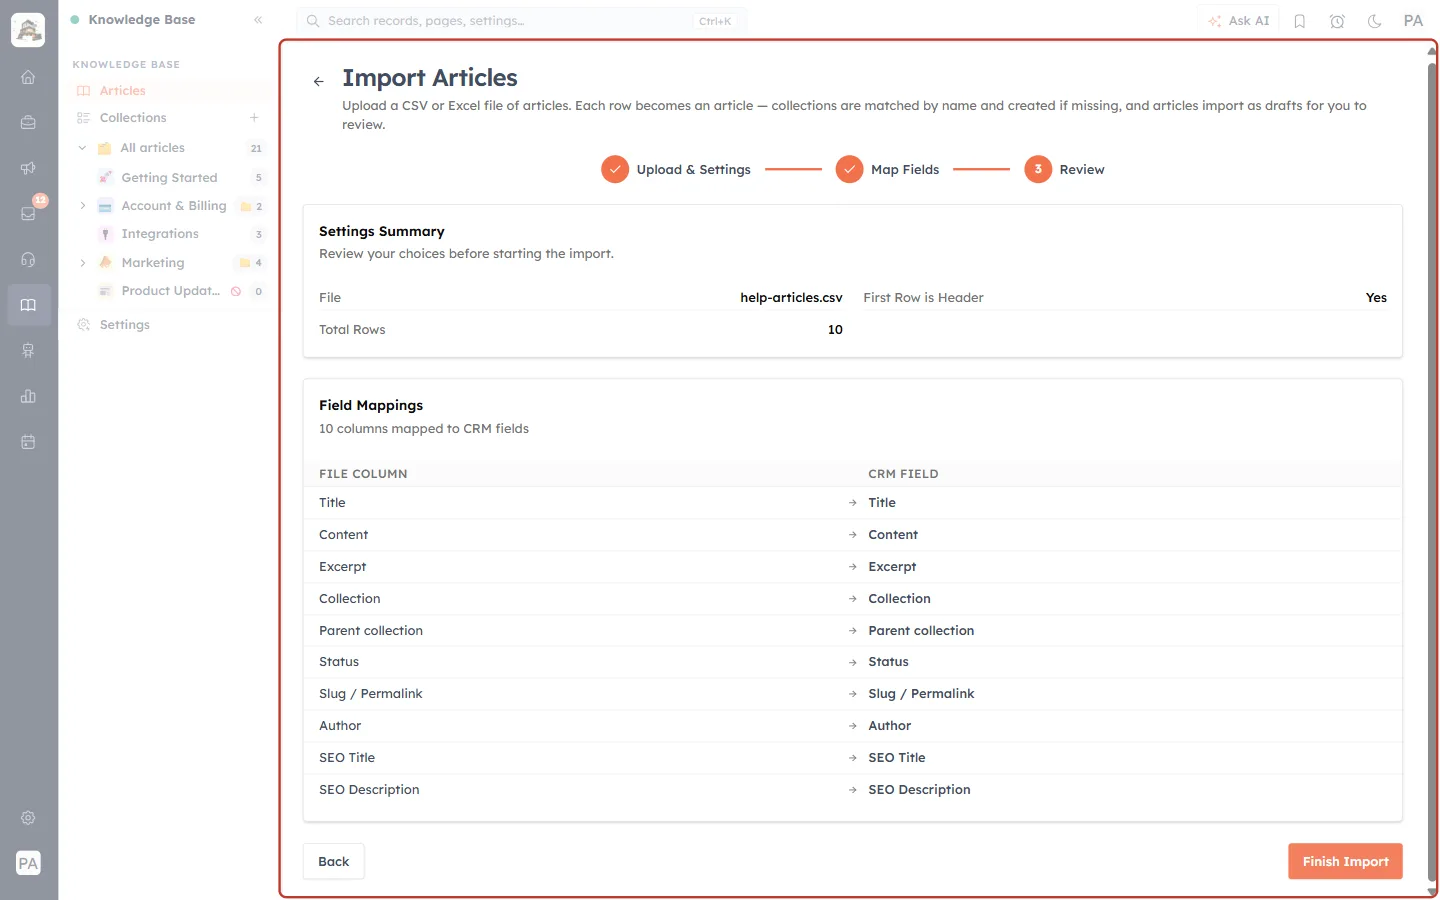
What this screenshot shows. The Review step, ringed.
All three steps now have a tick or number in orange; you are on 3 Review.
Settings Summary — “Review your choices before starting the import.” File: help-articles.csv; First Row is Header: Yes; Total Rows: 10.
Field Mappings — “10 columns mapped to CRM fields”: each FILE COLUMN with an arrow to its CRM FIELD.
Back returns to Map Fields if you want to change something.
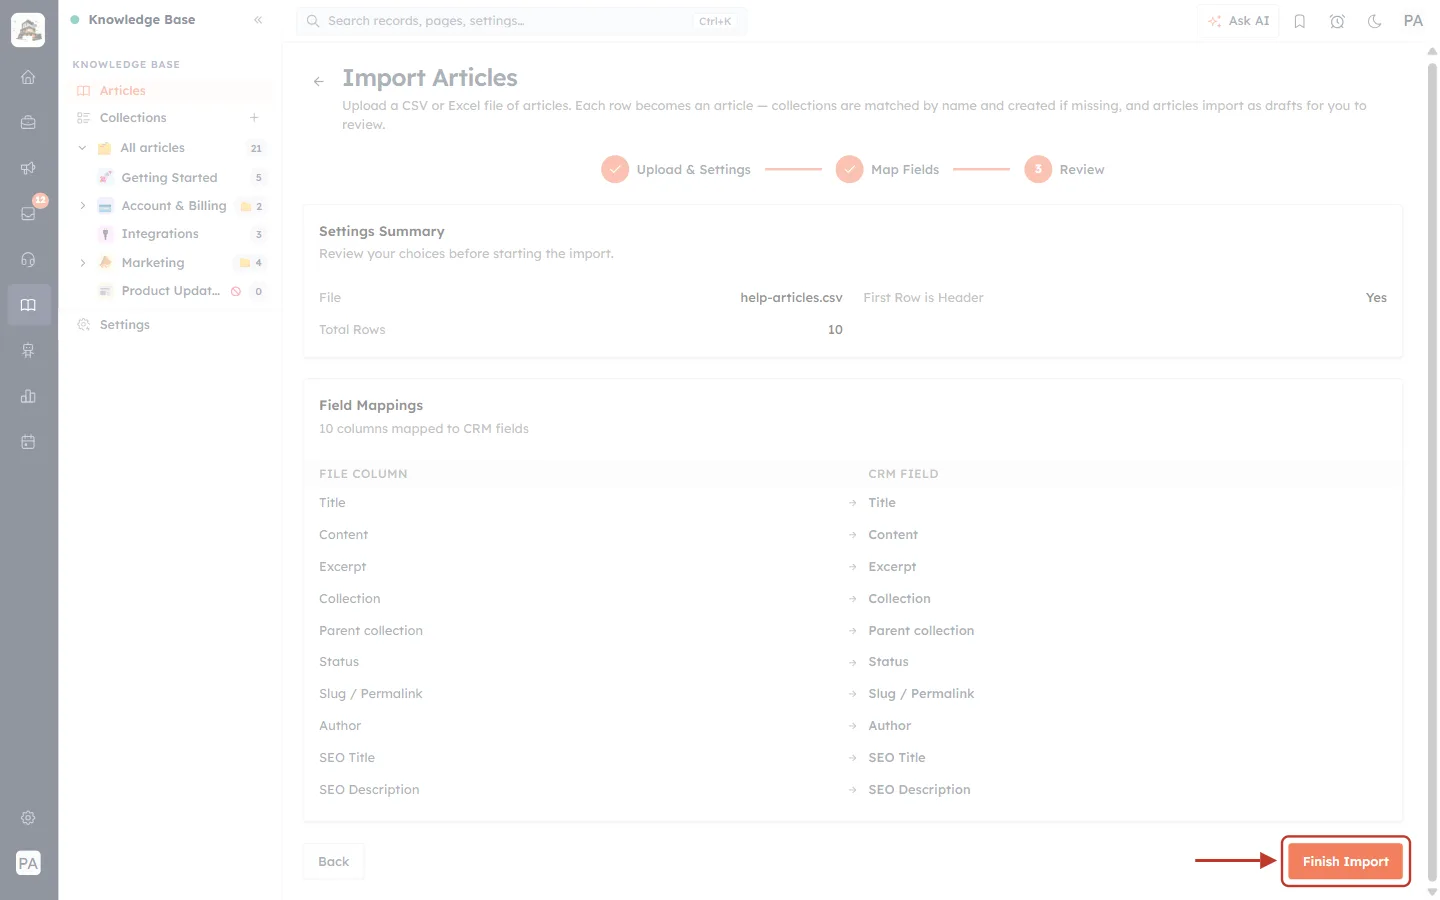
What this screenshot shows. Finish Import, ringed, at the bottom right.
Click it to start the import.
Nothing is imported until you click it, so you can still go Back or leave the page.
Step 8: Follow the progress#
You return to the Articles page and a message confirms “Import started! You can track progress from any page.” The import runs in the background, so you can keep working while it runs. A small progress card stays at the bottom right of the screen:
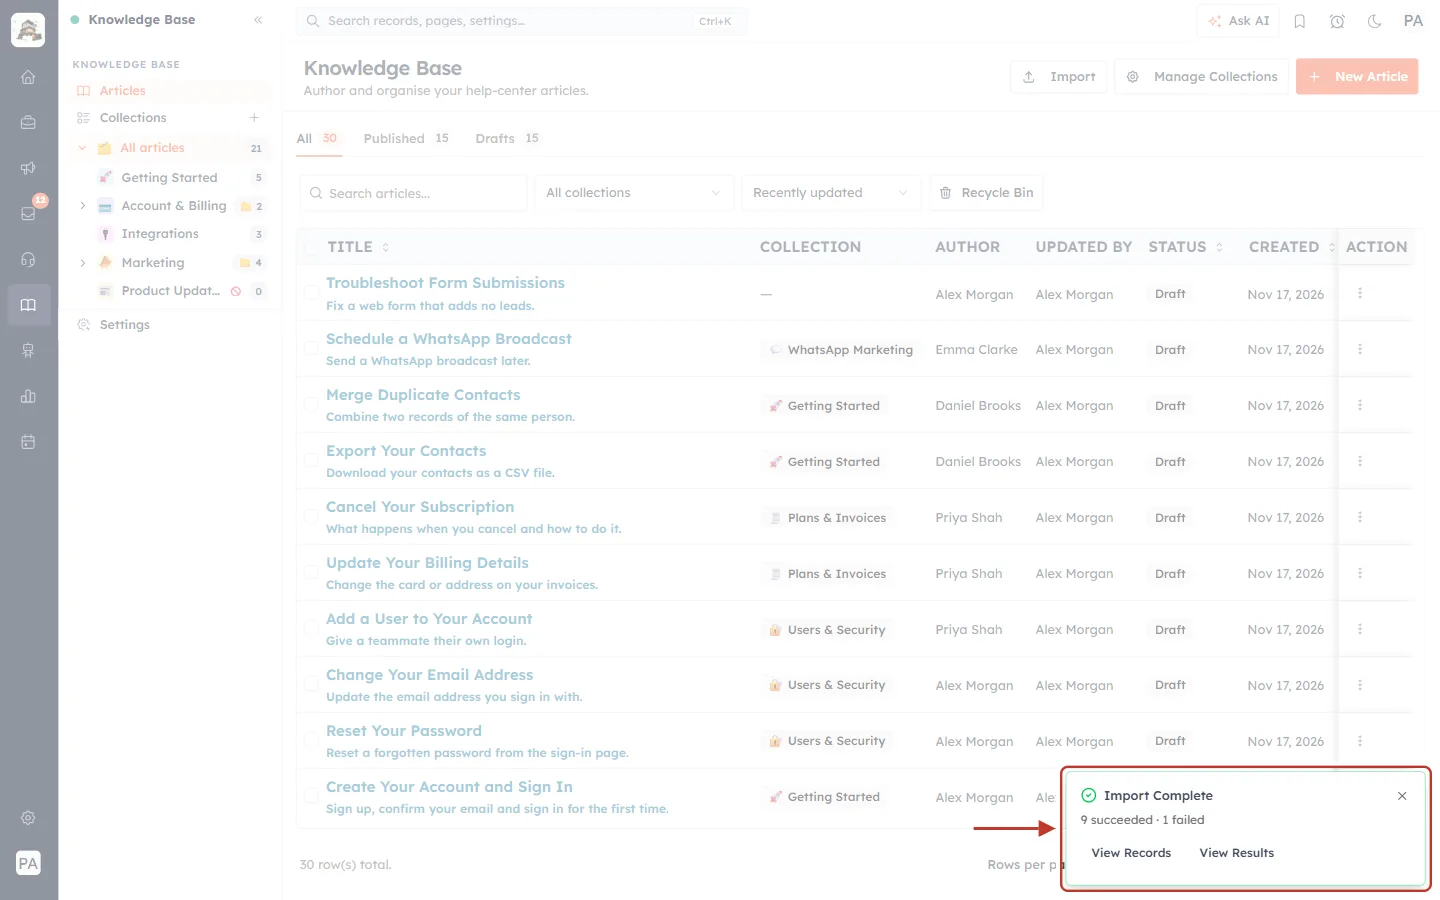
What this screenshot shows. The progress card, ringed, after the import has finished.
While the import runs, the card shows a spinner and the progress. When it is done it reads Import Complete with a green tick.
9 succeeded · 1 failed: nine articles were created; one row could not be imported (Step 10 shows why).
View Records: opens the article list.
View Results: opens the import’s details page (Step 10).
The × closes the card. The results stay in the Import history.
Step 9: Find your imported articles#
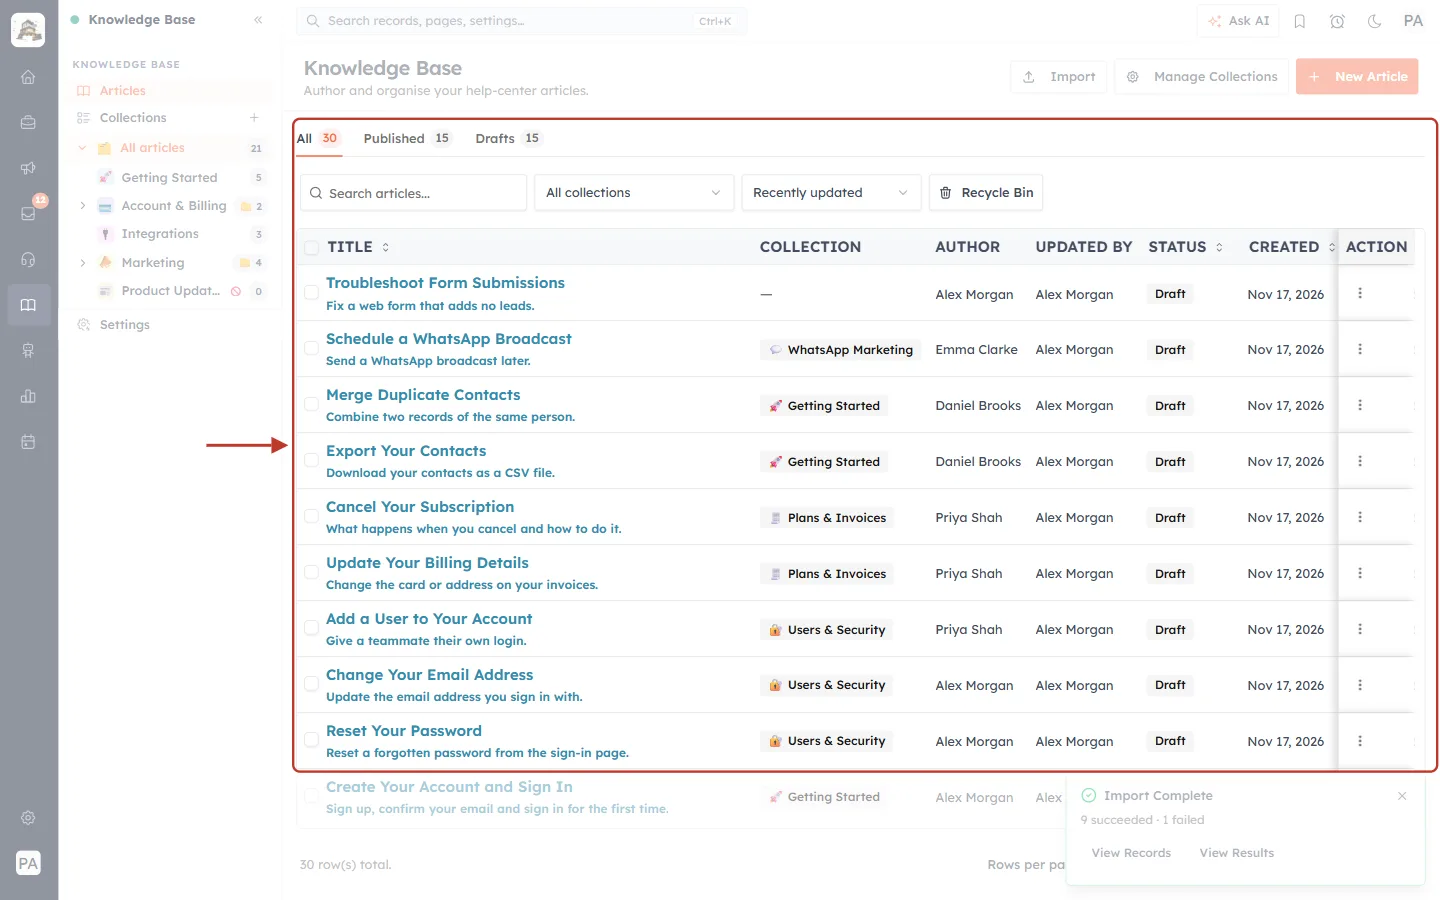
What this screenshot shows. The tabs and the new articles, ringed.
The nine imported articles are at the top: Troubleshoot Form Submissions, Schedule a WhatsApp Broadcast, Merge Duplicate Contacts and so on, down to Reset Your Password.
Each one is in the collection from the file (Users & Security, Plans & Invoices, Getting Started…) with the author from the file.
Their STATUS is Draft, because the file’s Status column said Draft. They are not on your help center yet.
The counts went up: All 30 and Drafts 15.
✅
Open a few imported articles and check them: headings, links, images and tables. When you are happy, publish them one by one with ⋮ → Publish, or tick several rows and click Publish in the selection bar.
Step 10: Read the import results#
Click View Results on the progress card, or open the import from the Import history (Step 11). The Import Details page shows exactly what happened:
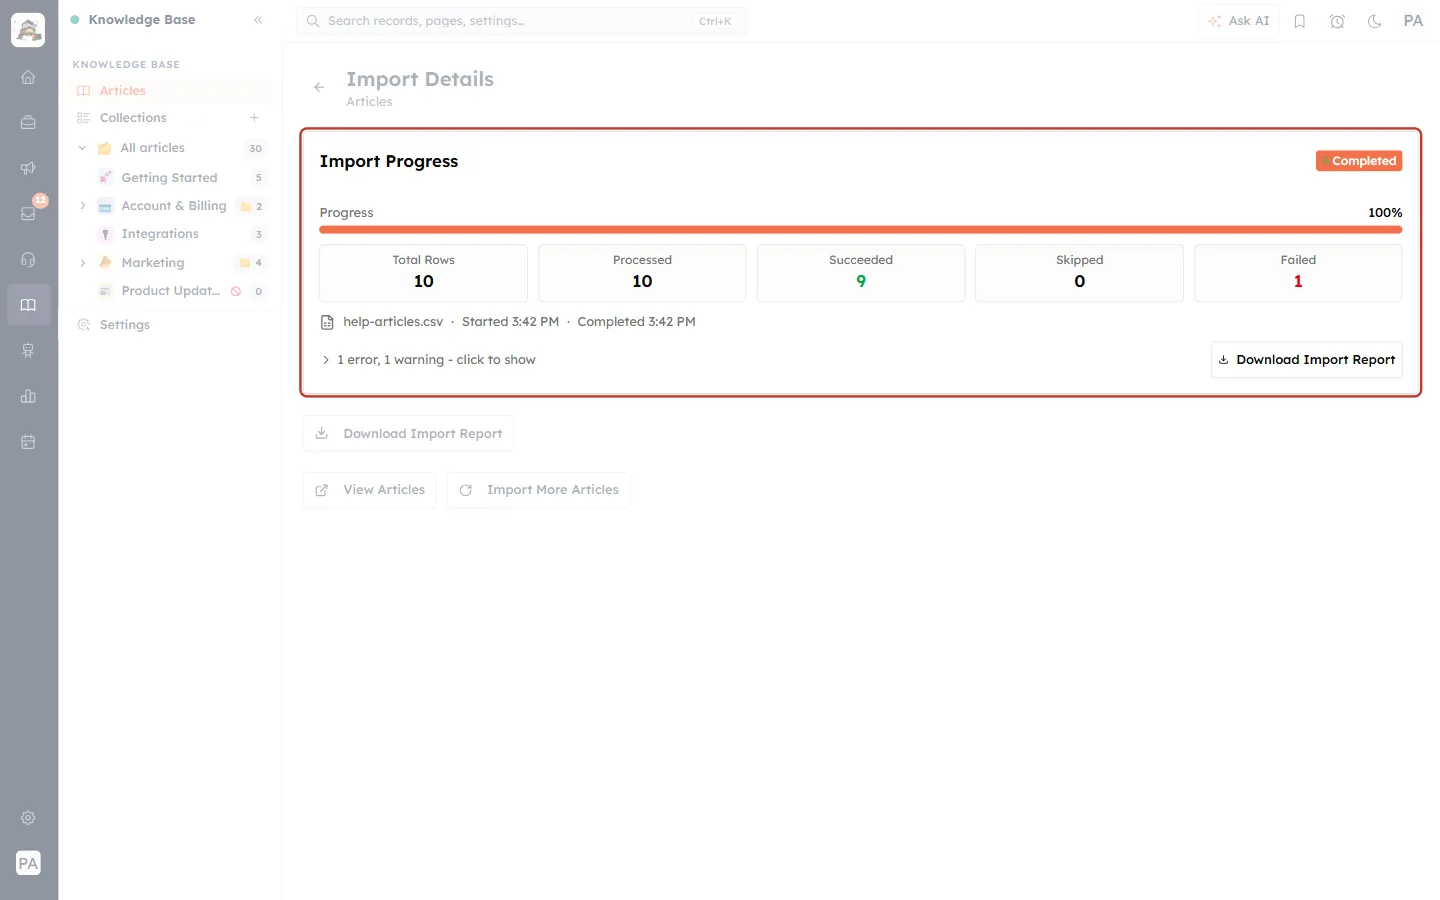
What this screenshot shows. The Import Progress card, ringed.
Completed badge at the top right. Other states you may see: Queued, Validated, Processing, Failed and Mapping Failed.
Progress 100% with a full bar.
Total Rows 10, Processed 10, Succeeded 9 (green), Skipped 0 and Failed 1 (red).
The file name with the start and finish times: help-articles.csv · Started 3:42 PM · Completed 3:42 PM.
“1 error, 1 warning - click to show” and the Download Import Report button.
Click “click to show” to see each problem:
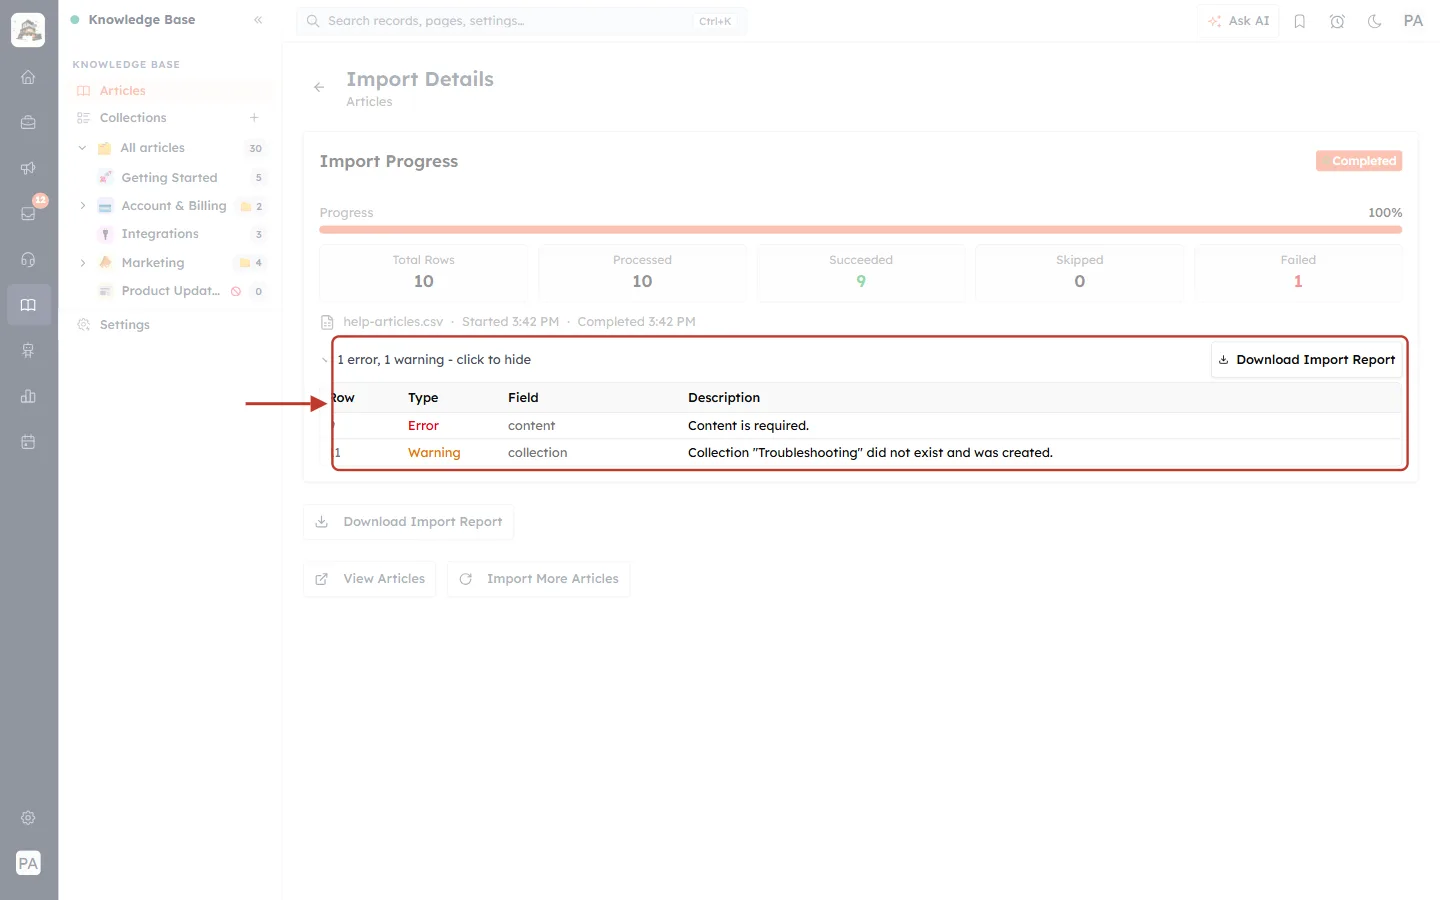
What this screenshot shows. The error and warning list, ringed.
Each line has the Row of your file, the Type, the Field and a Description.
Error (red): the row was not imported. Here: content — Content is required. The row has a title but an empty Content cell.
Warning (orange): the row was imported, but something is worth checking. Here: collection — Collection “Troubleshooting” did not exist and was created.
Download Import Report: saves a CSV report (named after your file, for example help-articles_import_report.csv) with these details, so you can fix the rows in your spreadsheet.
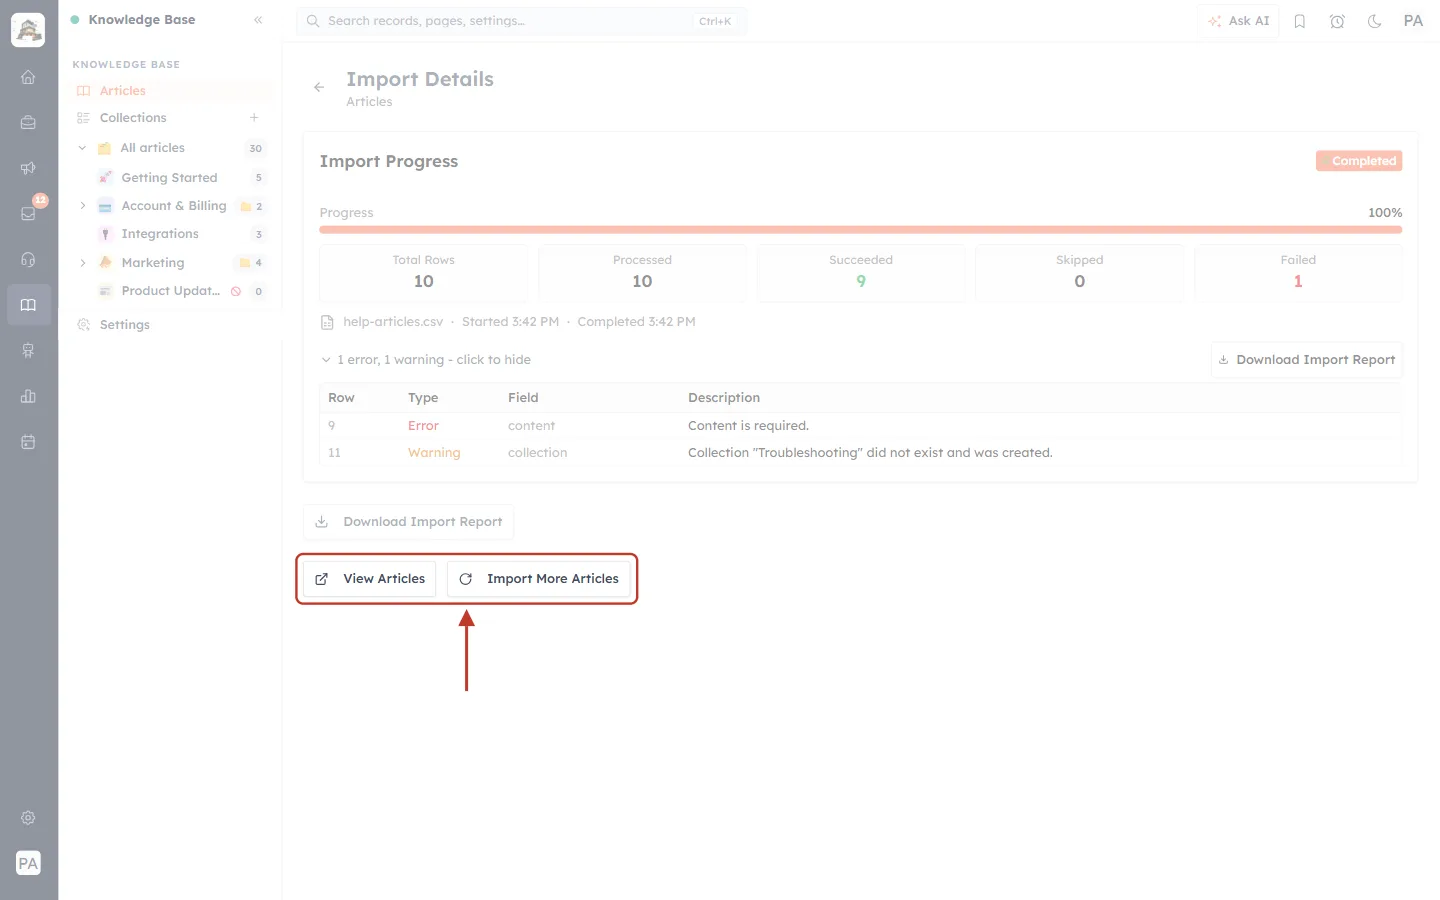
What this screenshot shows. The buttons below the results, ringed.
View Articles: opens the article list.
Import More Articles: starts a new import, for example with the corrected rows.
✅
To fix failed rows: download the report, correct those rows in your file (for example add the missing content), delete the rows that were already imported, and import the corrected file with Import More Articles.
Step 11: See all your imports#
Every file import is kept. Click Import → Import history on the Articles page:
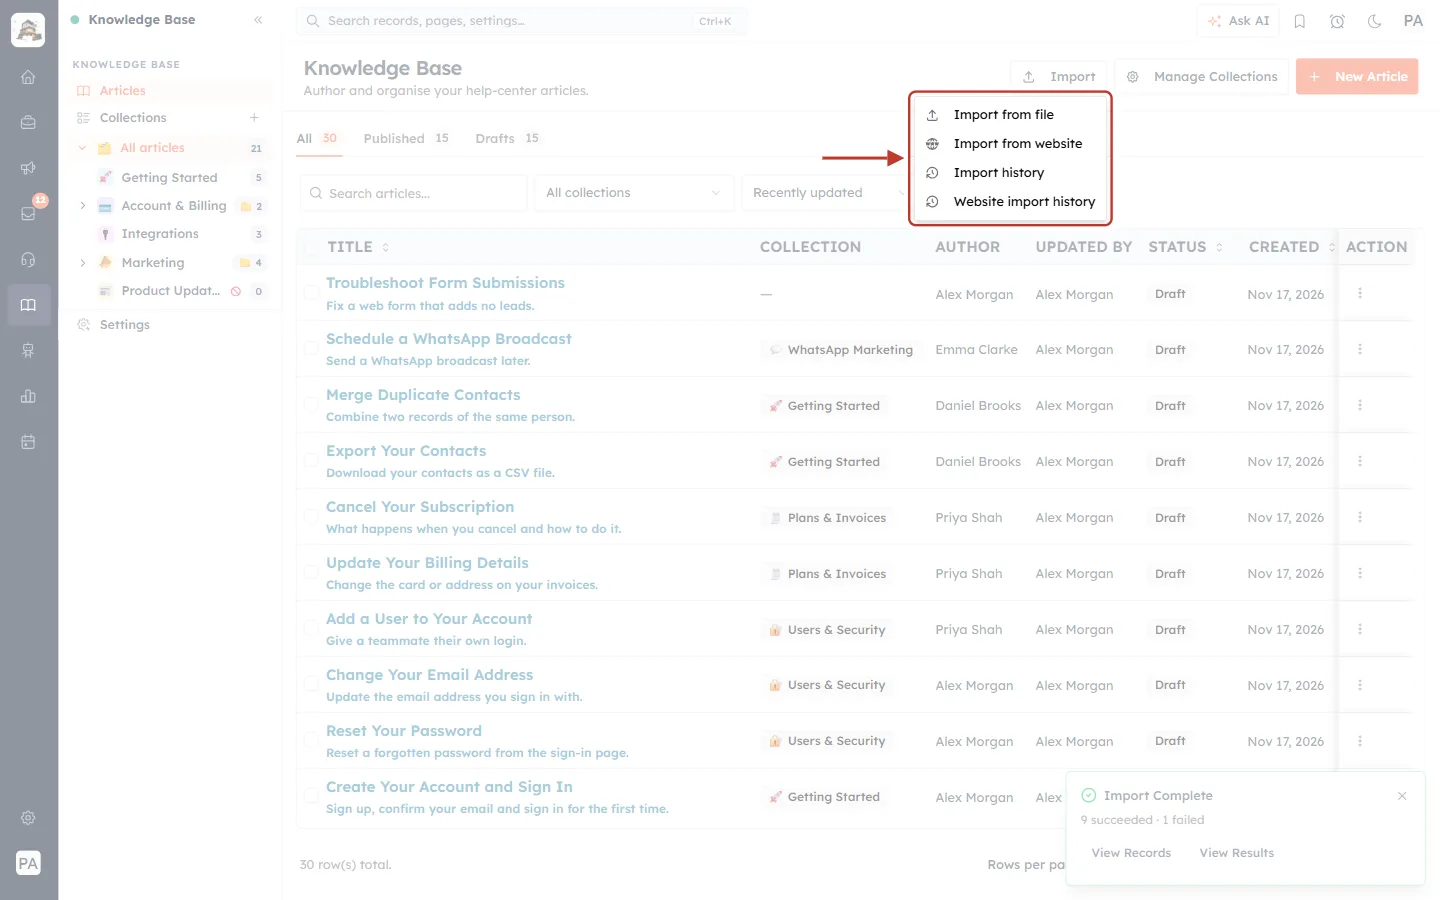
What this screenshot shows. The Import menu, ringed, with Import history.
Import history lists your file imports.
Website import history lists website crawls separately.
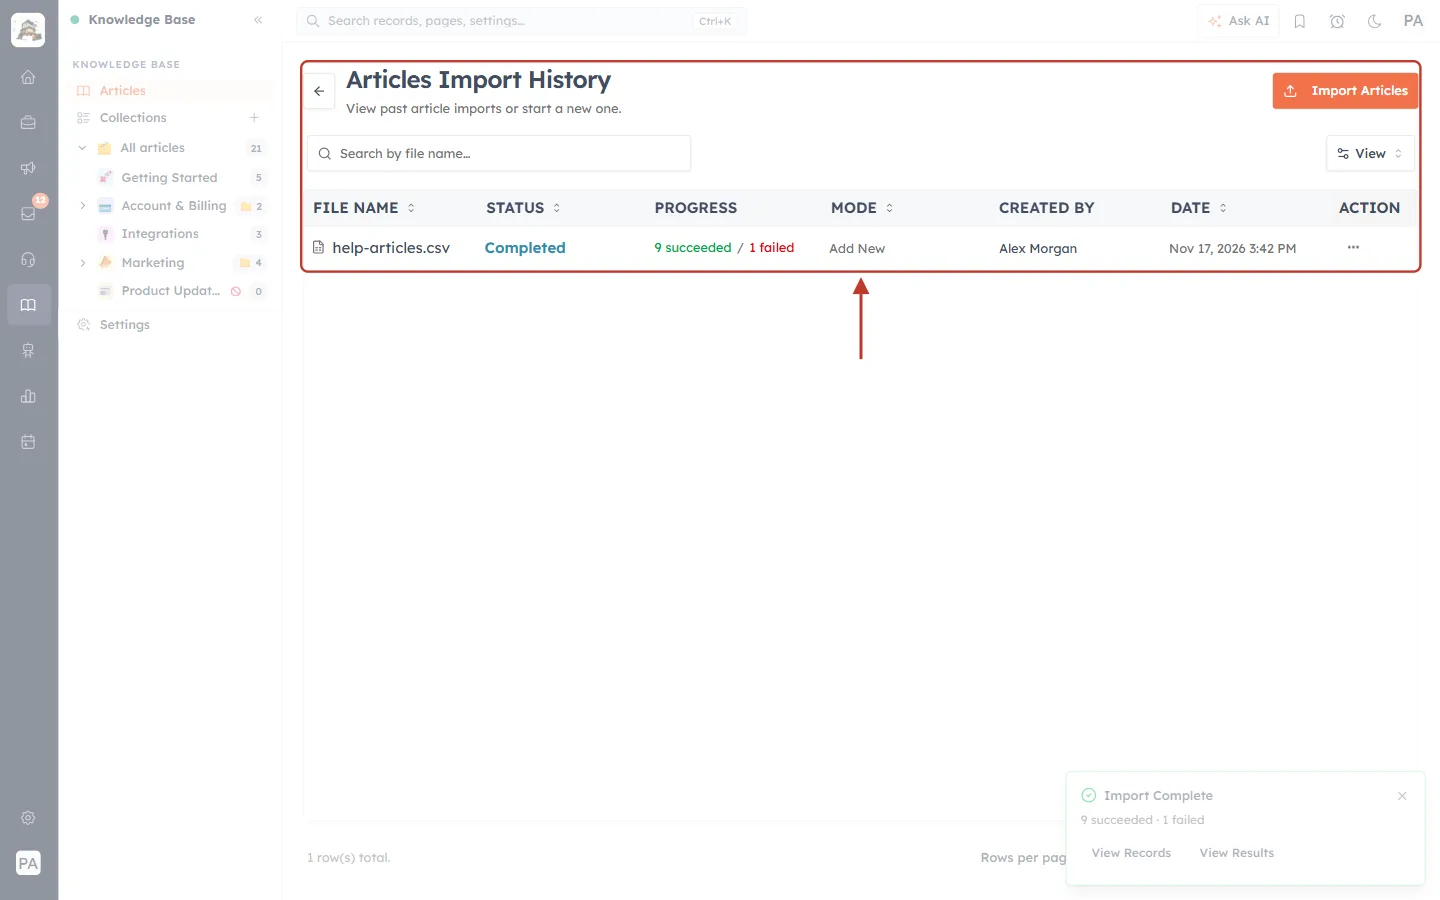
What this screenshot shows. The Articles Import History page, ringed.
“View past article imports or start a new one.” Import Articles (orange) starts a new import; the ← arrow goes back to the articles.
Search by file name… finds an import quickly, and View chooses which columns to show.
FILE NAME: help-articles.csv. STATUS: Completed.
PROGRESS: 9 succeeded / 1 failed (and “skipped” when rows were skipped).
MODE: Add New — every import creates new articles. CREATED BY: who ran it. DATE: when.
The ⋯ in the ACTION column opens the import’s options.
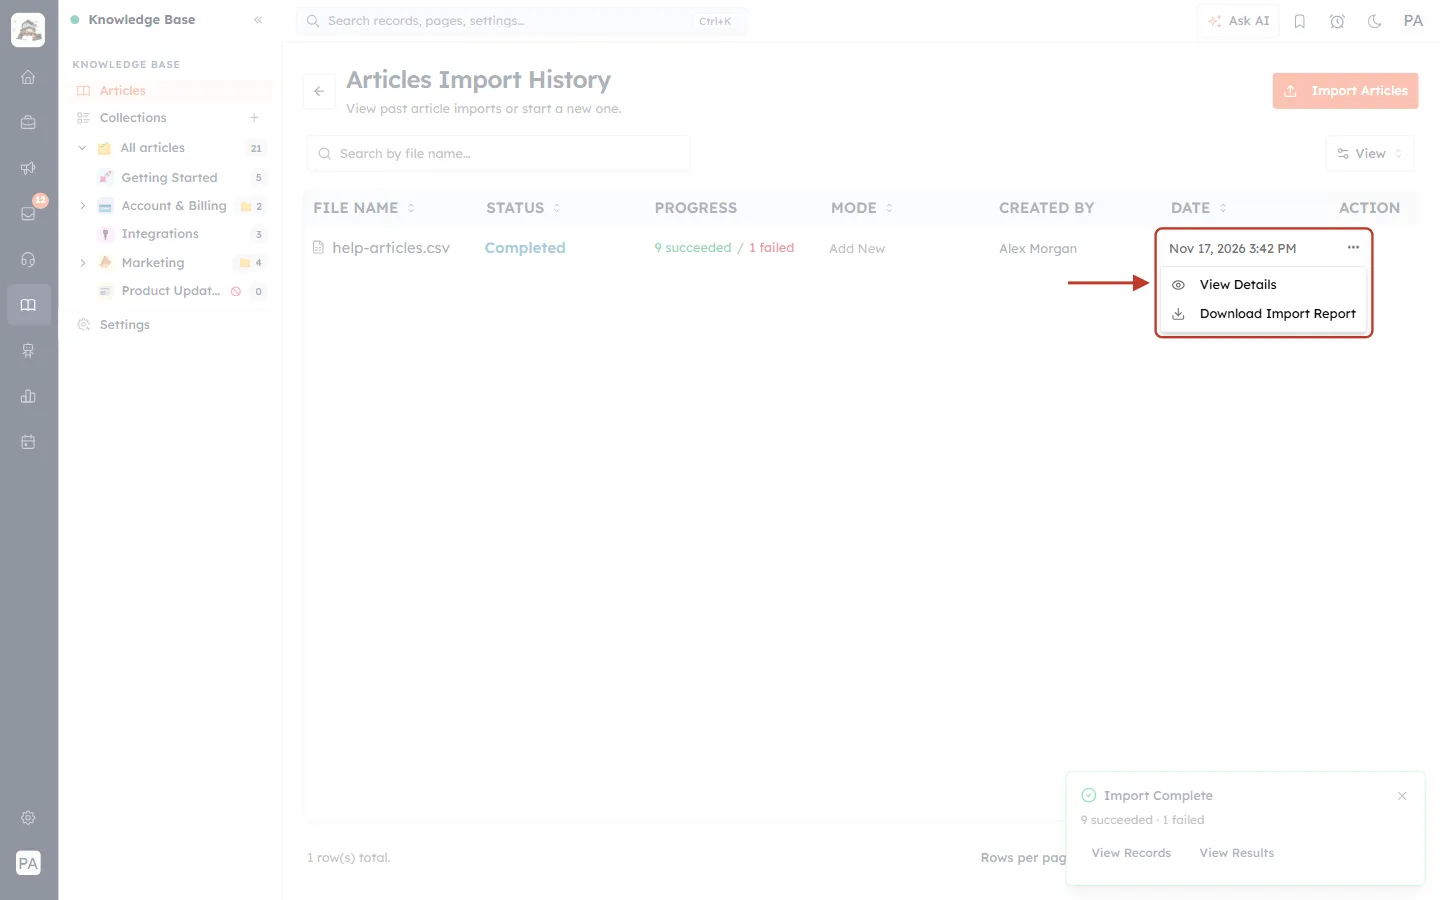
What this screenshot shows. The ⋯ menu of the import, ringed.
View Details: opens the Import Details page from Step 10.
Download Import Report: downloads the CSV report of errors and warnings. If the import had no problems, a message says there is no report to download.
Good to know#
Drafts first. Rows import as drafts unless their Status is exactly Published. Importing as drafts and publishing after a check is the safest way.
Collections are created for you. A collection name that doesn’t exist yet becomes a new collection. Watch for spelling: “Getting started” and “Getting Started” could end up as two collections.
Images come with the content. Images in the HTML are downloaded into your own storage, so your articles don’t depend on the old site staying online.
The import runs in the background. You can leave the page; the progress card and Import history keep you informed.
Large help centers: split very large files into several smaller ones (by collection, for example). They are easier to check and to fix.
Troubleshooting#
Continue stays pale on the Map Fields step#
Why it happens: Title or Content isn’t mapped. How to fix it: find the columns that hold the title and the article body and choose Title and Content in their MAPPED TO boxes. “Unmapped Required” must show 0.
My file is refused#
Why it happens: it isn’t a CSV, XLSX or XLS file, or it is larger than 50 MB. How to fix it: save it as CSV or Excel, or split it into smaller files.
The Rows or Columns count looks wrong#
Check First row contains column headers: tick it if your first row has column names, untick it if the data starts on row 1.
Make sure each article is on one row. Line breaks inside a cell must be inside quotes in a CSV file; saving from Excel or Google Sheets handles this for you.
Remove empty rows and columns at the end of the sheet.
Some rows failed#
How to fix it: open the import’s details, click “click to show” or Download Import Report, and fix the rows listed as Error (for example add the missing Content). Then import only those rows again.
Imported articles don’t appear on my help center#
Why it happens: they were imported as drafts. How to fix it: publish them from the article list. Also check that their collection is published and that Make my help center public is on in Settings.
Text shows odd characters (é, ’…)#
Why it happens: the CSV wasn’t saved as UTF-8. How to fix it: save it again as “CSV UTF-8”, or upload the Excel file instead.
Frequently asked questions#
Can I import from Excel directly?
Yes. XLSX and XLS files work as well as CSV.
Do I need every column?
No. Only Title and Content are required. Map the other columns when you have the data, or choose “— Don’t use this column —”.
Can I publish articles straight away?
Yes. Put Published in the Status column. We recommend importing as drafts and checking them first.
Will my old article addresses keep working?
Your articles keep their slug if you import it in the Slug / Permalink column, but they now live on your new help-center address. Update links that point to the old help center.
Can I undo an import?
There is no single undo button. Imported articles are normal articles: select them in the list and delete them (they go to the Recycle Bin).
Previous and next#
Related#
Was this article helpful?
Ready to implement this?
OpenAI Engage and apply what you just learned to your own workspace.
Open AI Engage CRM