Loading…


KnowledgeBase
Overdue Invoices and Payment Reminders: Find Late Invoices, Mark Them Overdue and Send Automatic Reminders (Step-by-Step)
Introduction#
An invoice is overdue when its Due Date has passed and the customer still owes money. This guide shows you how to see those invoices at a glance, mark them, remind the customer once by hand, and set up a workflow that does the marking and the reminding for you.
⚠️
Two things to know first. AiEngage CRM does not change an invoice to Overdue on its own when the due date passes, and there is no ready-made “payment reminders” setting. An invoice stays Sent until someone changes it. You get the same result with the filter in Part 1 and the workflow in Part 5.
This guide has six parts. Parts 1 to 3 work today with nothing to set up. Parts 4 and 5 take about 15 minutes once, then run by themselves.
Part | What you do | Use it when |
|---|---|---|
Part 1 | Find overdue invoices with a filter | You want a list of who owes you, right now |
Part 2 | Mark an invoice Overdue | You want the status on the record to be correct |
Part 3 | Send a reminder by hand | You want a personal message with a pay button |
Part 4 | Write a reminder email template | Before you automate reminders |
Part 5 | Build the automatic reminder workflow | You want reminders to go out without anyone remembering |
Part 6 | Stop reminders when the invoice is paid | So that nobody is chased after paying |
In this guide we use a sample furniture business with six invoices in Indian rupees, and we treat 3 November 2026 as today. Your names and amounts will be different.
ℹ️
Before you start: you need permission to view and edit Invoices. Parts 4 and 5 also need access to email templates and Workflow Automation, and a connected sending address. See Quotes, Invoices & Payments Permissions and Plan Limits. To let customers pay online from a reminder, connect a gateway first: Set Up Online Payments with Stripe or Razorpay.
Part 1: Find your overdue invoices#
Step 1: Open Invoices and choose the useful columns#
Click the CRM (briefcase) icon in the left rail, then click Invoices in the Sales menu. On the right of the toolbar, click View to open Manage Columns.
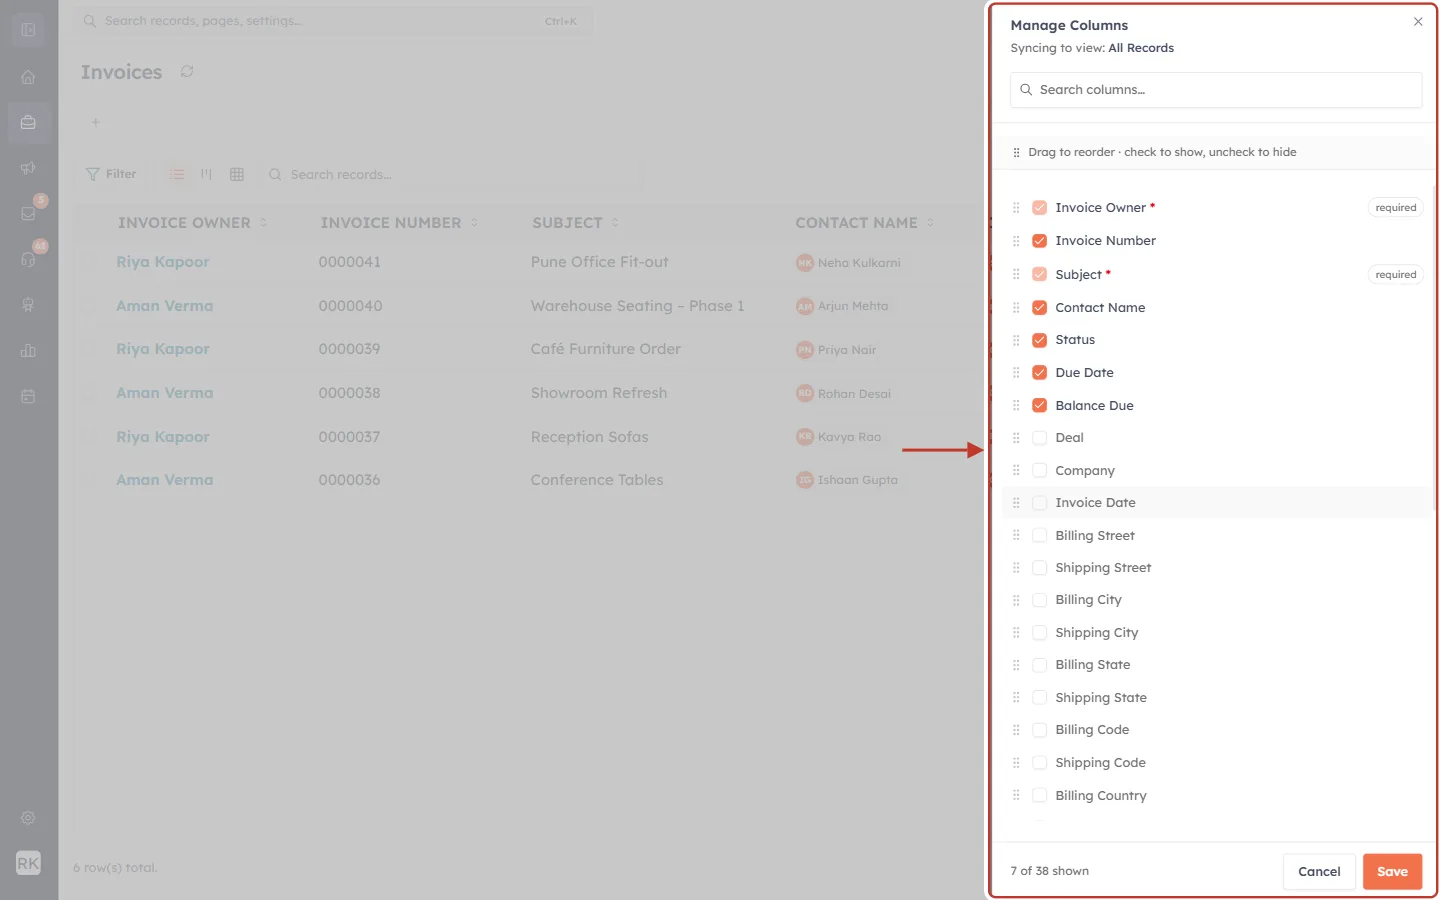
What this screenshot shows. The Manage Columns panel, ringed, open over the Invoices list.
Syncing to view: All Records: the choice applies to the view you have open.
Search columns…: type a field name to find it in the long list.
Tick Status, Due Date and Balance Due. These three tell you whether an invoice is late and how much is still owed.
Invoice Owner and Subject are marked required and can’t be hidden.
Drag the dots on the left of a row to change the column order. We unticked Deal and Company to make room.
7 of 38 shown at the bottom counts your columns. Click Save to apply.
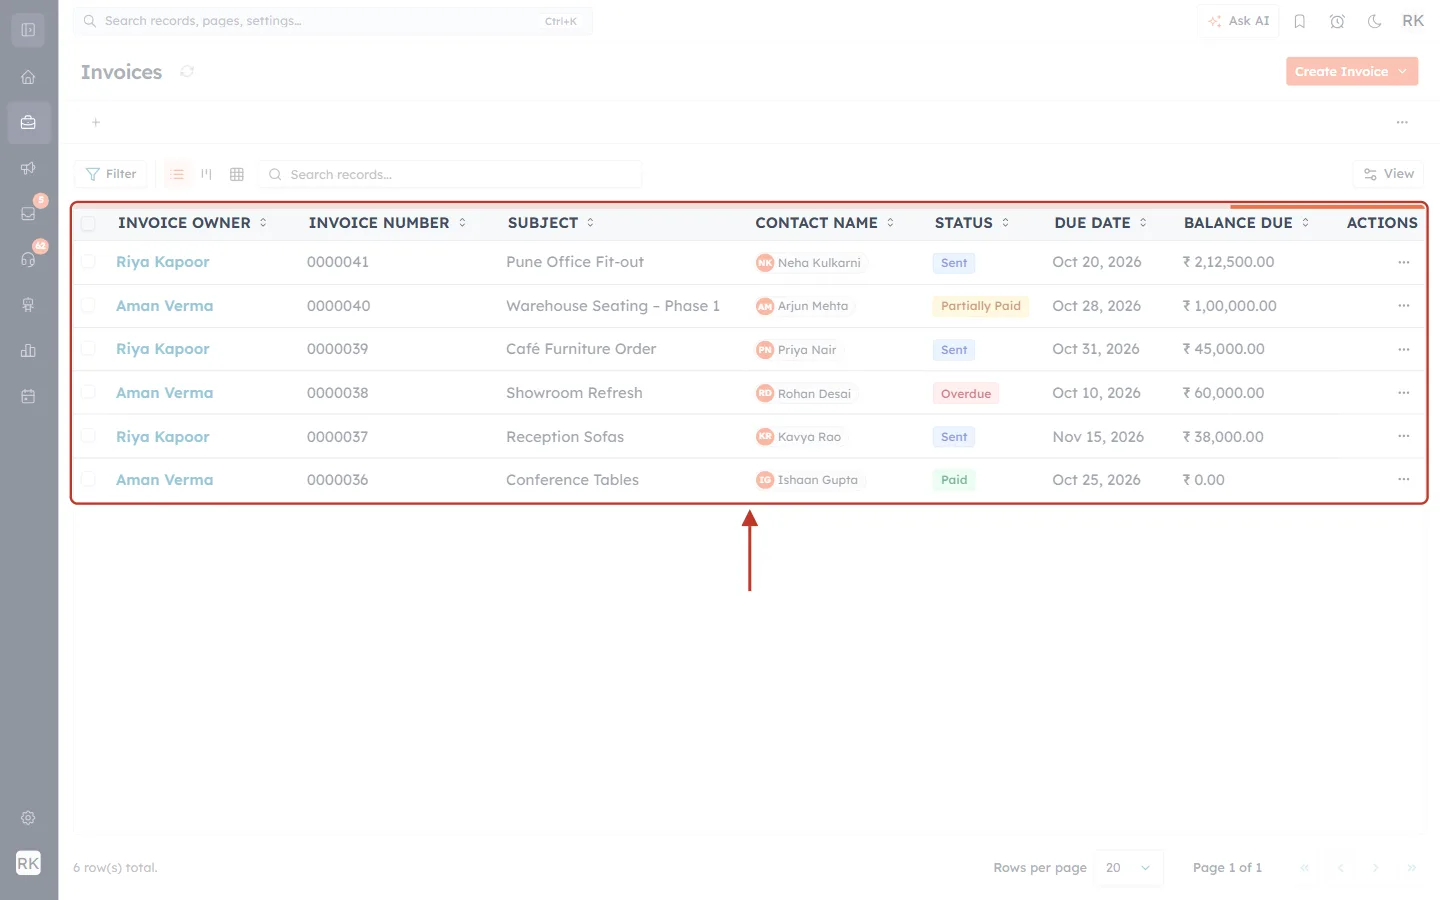
What this screenshot shows. The invoices table, ringed, with the new columns in place.
Each row is one invoice. INVOICE NUMBER and SUBJECT tell you which one it is, and CONTACT NAME tells you who to chase.
STATUS is the badge someone set on the invoice. Notice 0000041: its due date was 20 October but it still reads Sent, because the status doesn’t change by itself.
DUE DATE is the date the money was expected.
BALANCE DUE is what is still unpaid. 0000040 is part-paid, with ₹ 1,00,000.00 left. 0000036 is paid, with ₹ 0.00 left.
ACTIONS (⋯) at the end of each row opens the row menu.
Step 2: Filter by Due Date#
Click Filter on the left of the toolbar. In the Filter Invoices panel, tick Due Date and open the condition list under it.
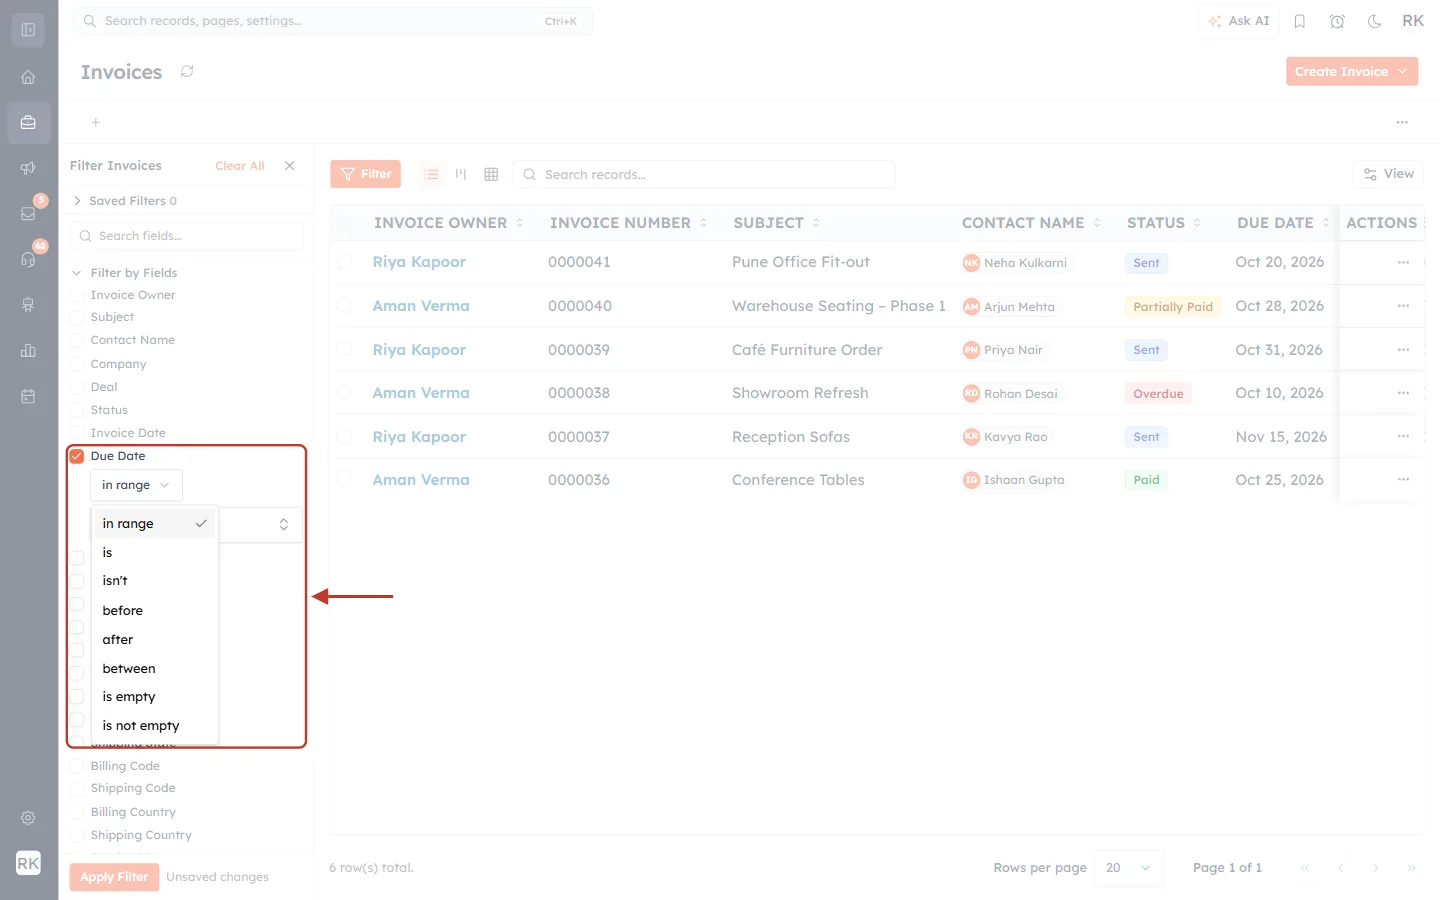
What this screenshot shows. The Due Date filter, ringed, with its list of conditions open.
in range is the default, and has a tick beside it.
is and isn’t match one exact date.
before finds dates earlier than the one you pick. This is the one you need.
after and between are handy for invoices falling due soon.
is empty finds invoices with no due date at all. These can never be picked up as overdue, so it is worth checking them.
The other fields stay in the panel behind the list, and Apply Filter is at the bottom.
Choose before, then pick today’s date.
Step 3: Leave out invoices that are finished#
A paid invoice has an old due date too, so add a second filter. Tick Status, choose is none of, and select Paid, Cancelled and Refunded.
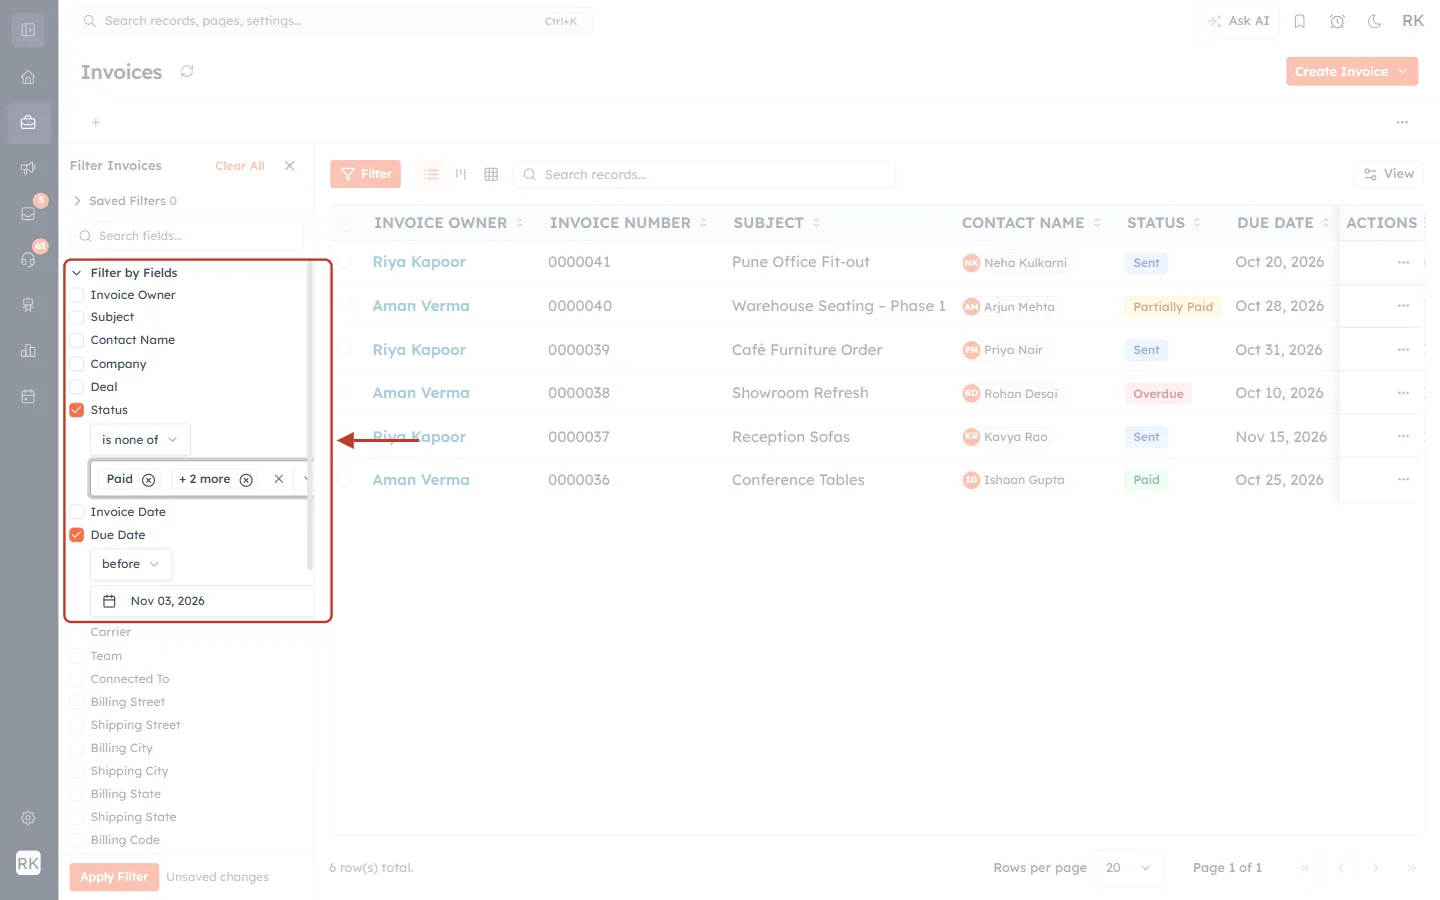
What this screenshot shows. The two finished filters, ringed.
Status · is none of · Paid + 2 more: this hides invoices marked Paid, Cancelled or Refunded. The chip shows the first value and counts the rest.
Due Date · before · Nov 03, 2026: only invoices whose due date is earlier than today.
The ticked boxes show which filters are on.
Apply Filter at the bottom of the panel runs them. Unsaved changes beside it means you haven’t applied them yet.
Step 4: Read your overdue list#
Click Apply Filter. To see every column, close the filter panel with the × at its top right. The filter stays on.
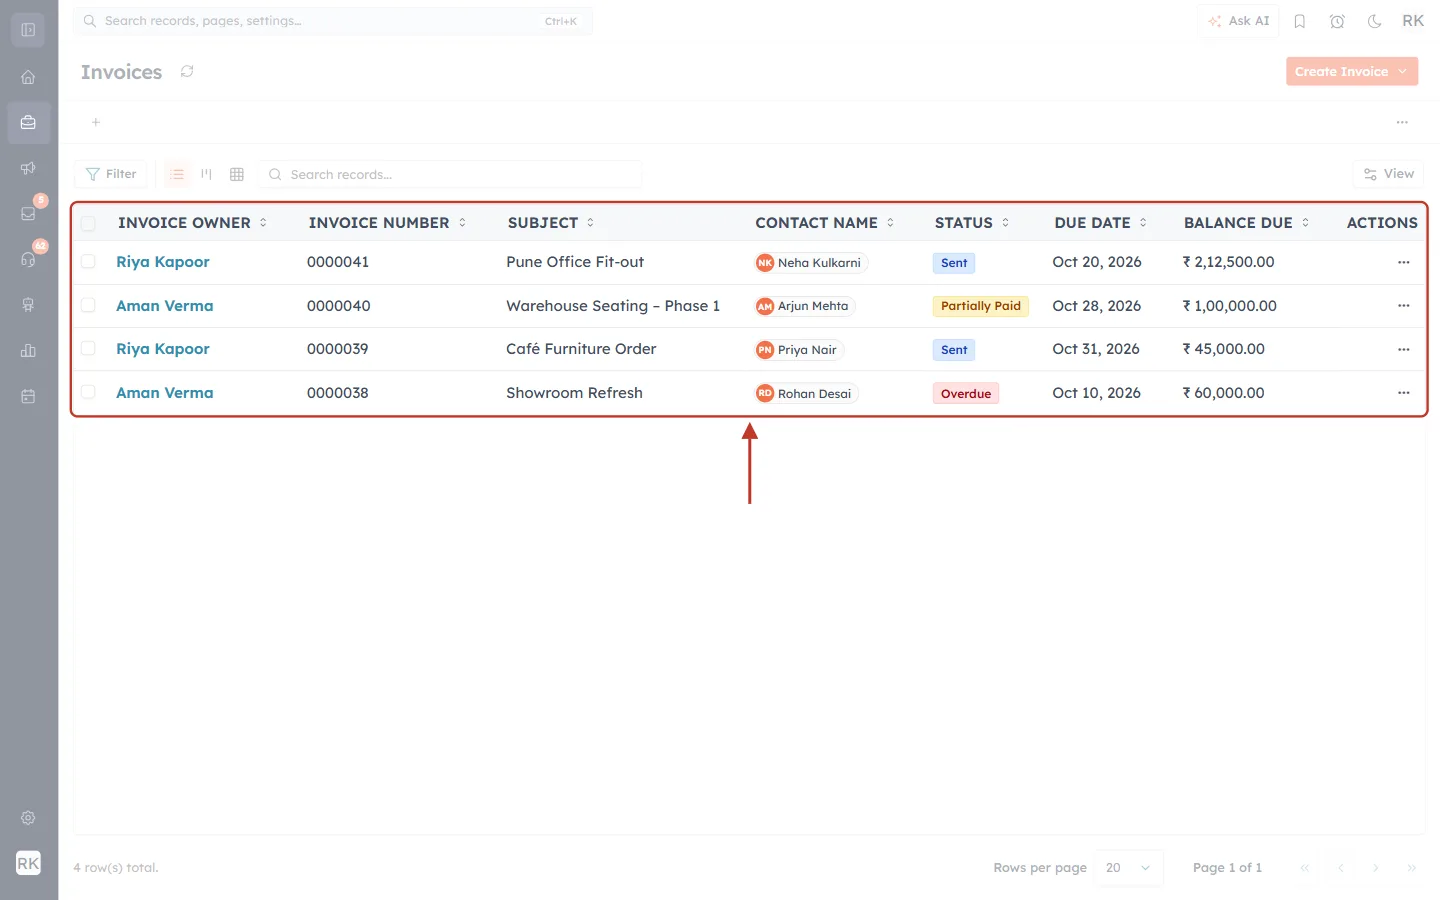
What this screenshot shows. The filtered list, ringed: the four invoices that are overdue today.
4 row(s) total at the bottom is the number of overdue invoices.
0000041 and 0000039 still read Sent, and 0000040 reads Partially Paid. All three are late, so the filter finds them whatever their status says.
0000038 was already marked Overdue by hand.
BALANCE DUE gives you the amount to ask for on each one.
0000037 (due 15 November) and 0000036 (paid) have dropped off the list, which is what you want.
✅
Keep this list for next time. While the filter panel is open, a Save button appears beside Saved Filters once the filter is applied. Save it and call it “Overdue invoices”. Saved filters use a date you pick, so change the Due Date to today each time you use it.
Part 2: Mark an invoice as Overdue#
This step is optional, because the filter already finds late invoices. Marking them is still worth doing: the red badge is obvious to your whole team, and it shows on the record and in the list.
Step 5: Open the invoice and check it#
Click the invoice in the list to open it.
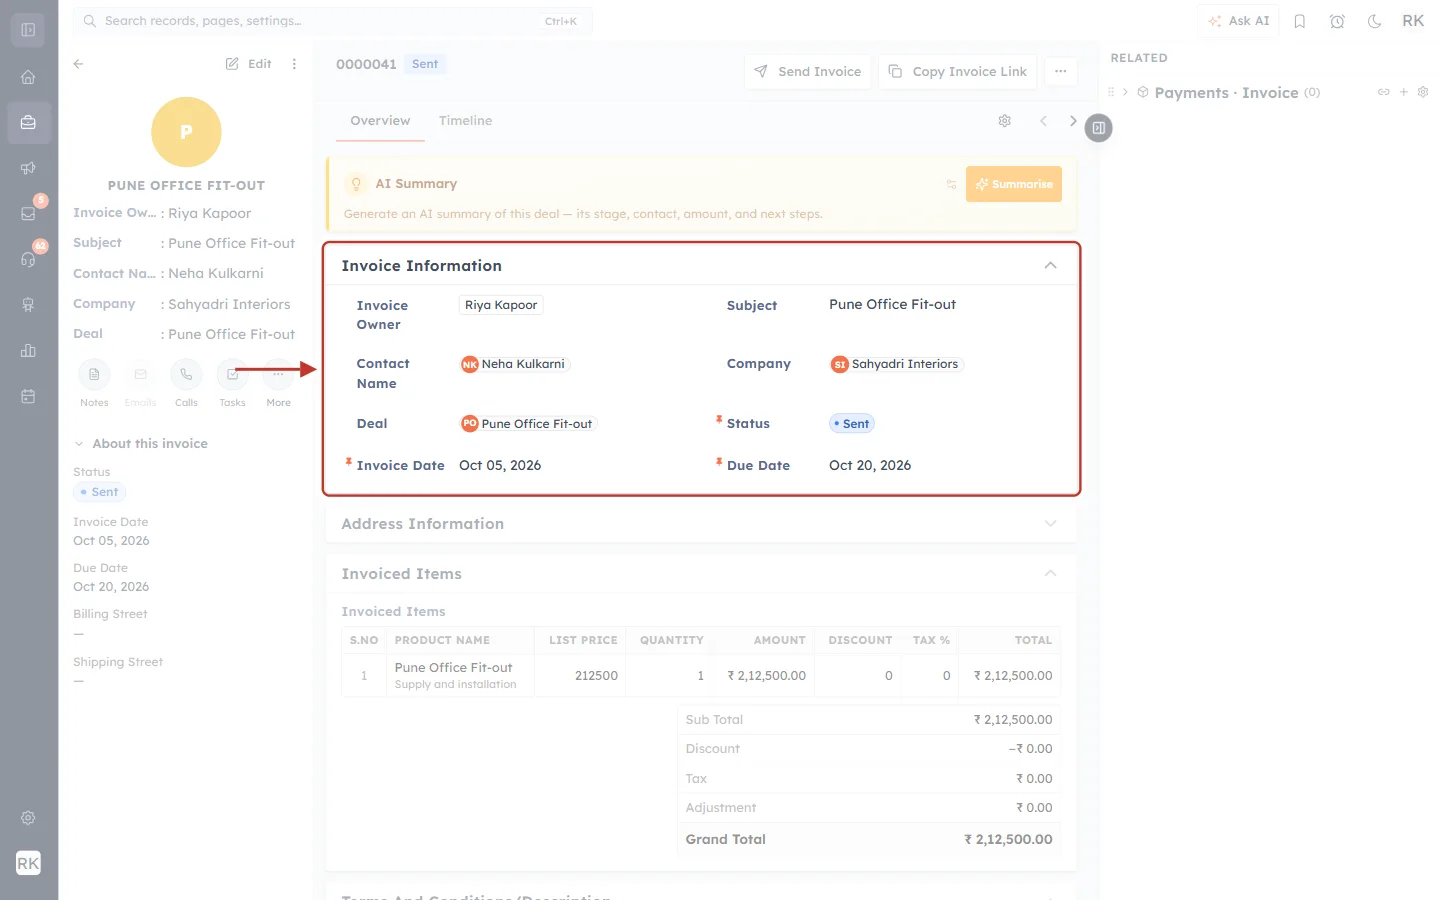
What this screenshot shows. The Invoice Information section of invoice 0000041, ringed.
Invoice Owner: the team member responsible. They are the natural person to chase the payment.
Contact Name and Company: who you are chasing.
Status: still Sent here, as the badge beside the number at the top also shows.
Due Date: Oct 20, 2026, so this invoice is 14 days late.
Further down, Invoiced Items shows what you billed, with the totals below it.
⚠️
Check before you chase. A customer may have paid by bank transfer that nobody has recorded yet. Check your bank first. If the money has arrived, use Record Payment instead. See Getting Paid on Invoices.
Step 6: Change the Status to Overdue#
Click Edit at the top of the left panel. In Edit Invoice, open the Status list.
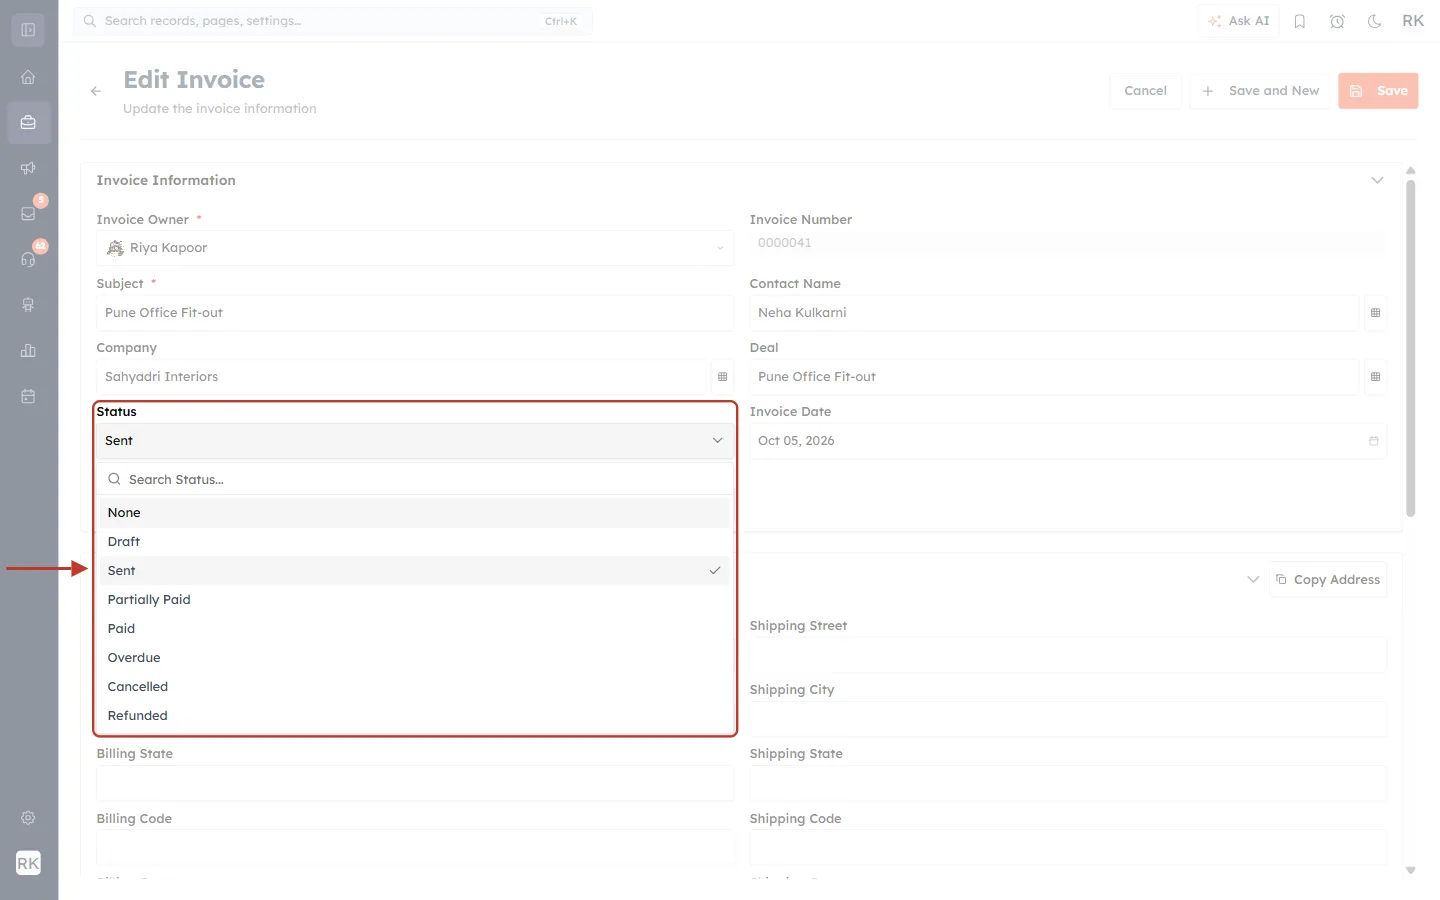
What this screenshot shows. The Status field, ringed, with its list open.
Search Status… finds an option by typing.
Sent has a tick because it is the current value.
The options are None, Draft, Sent, Partially Paid, Paid, Overdue, Cancelled and Refunded.
Choose Overdue.
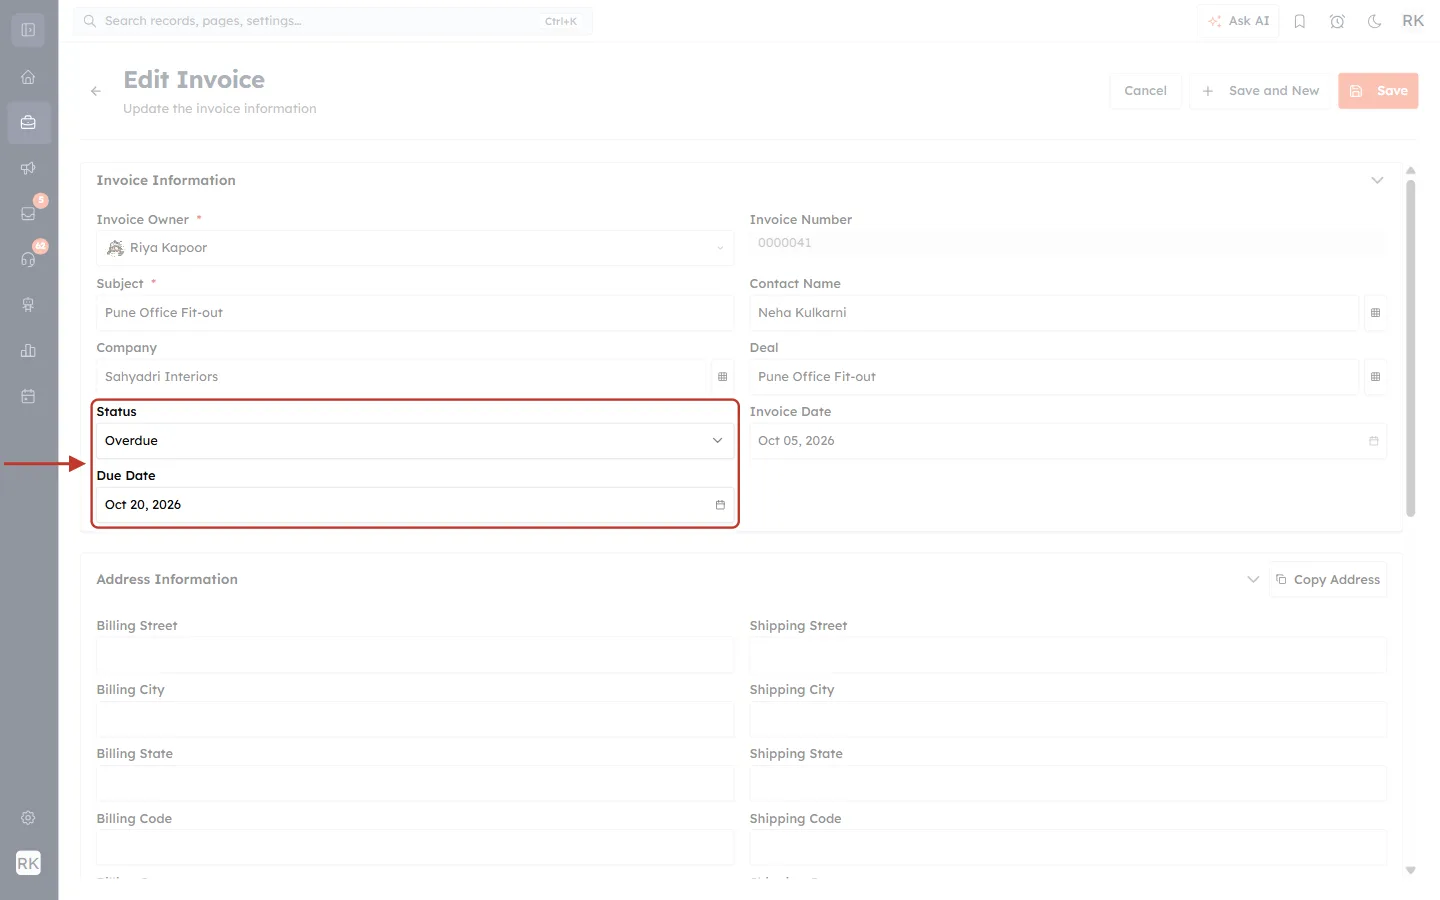
What this screenshot shows. The form after choosing, with Status and Due Date ringed.
Status now reads Overdue.
Due Date sits directly under it. Leave it alone: moving it would hide how late the invoice is, unless you have agreed a new date with the customer.
Save at the top right (orange) keeps the change. Cancel discards it.
Click Save. The badge on the invoice and in the list turns red.
Part 3: Send a reminder by hand#
A hand-sent reminder is the best way to chase one important invoice, and it is the only reminder that includes the customer’s own View & Pay Invoice button.
Step 7: Open Send Invoice#
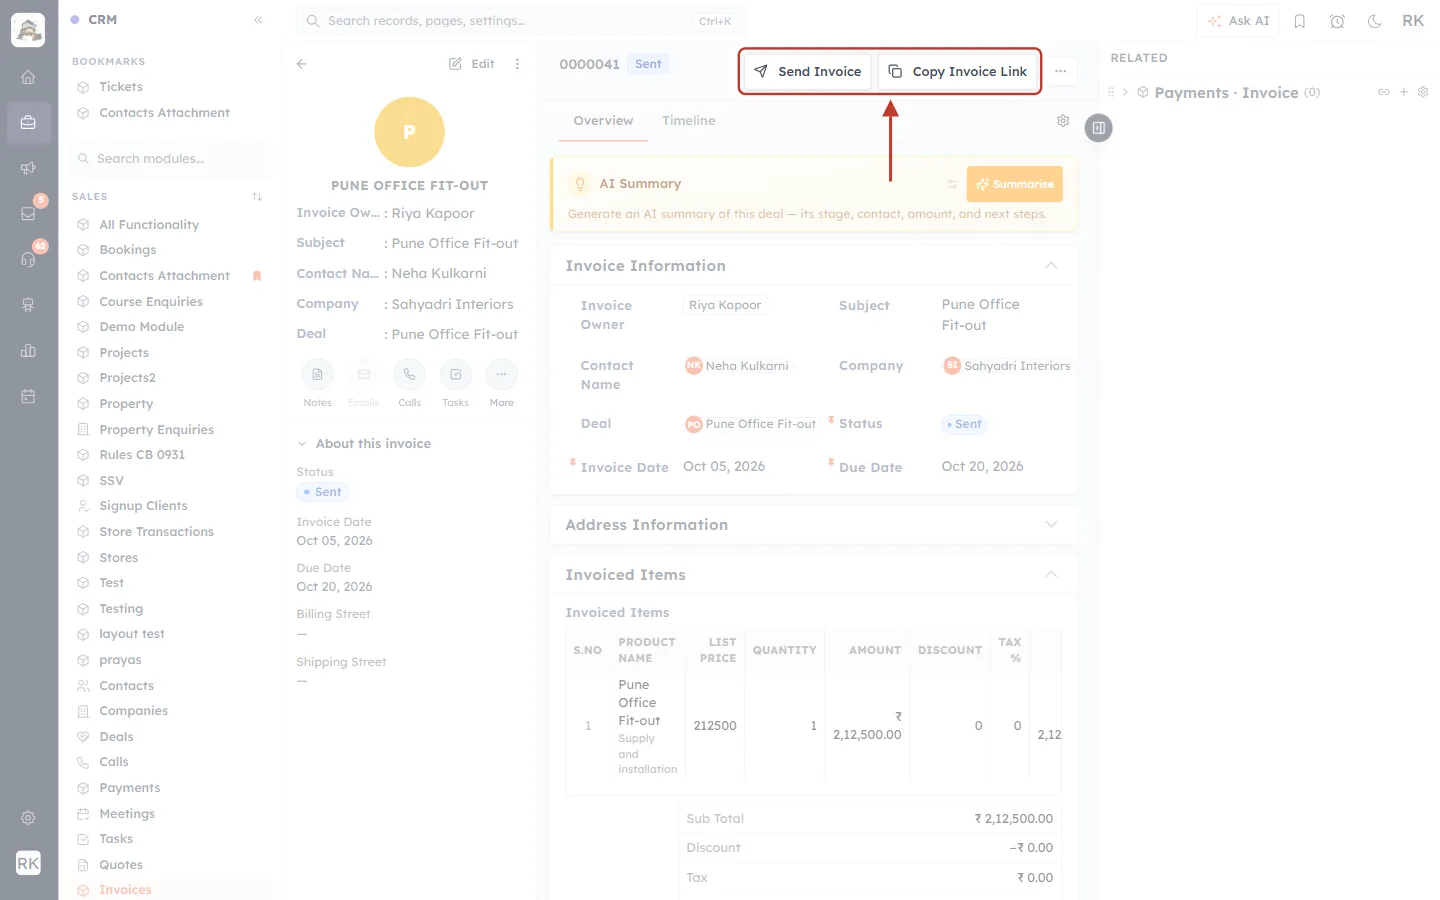
What this screenshot shows. The top of the invoice, with the two buttons ringed.
Send Invoice opens an email to the customer, with the invoice attached. Use it for this reminder.
Copy Invoice Link copies the customer’s payment page address, so you can paste it into WhatsApp or a personal email instead.
⋯ beside them holds Record Payment, Pay Now, Download PDF and Mark Paid.
The badge beside 0000041 shows the current status.
Step 8: Turn the email into a reminder#
The email opens with your normal invoice message. Change the subject and add a line saying that the invoice is late, then click Send.
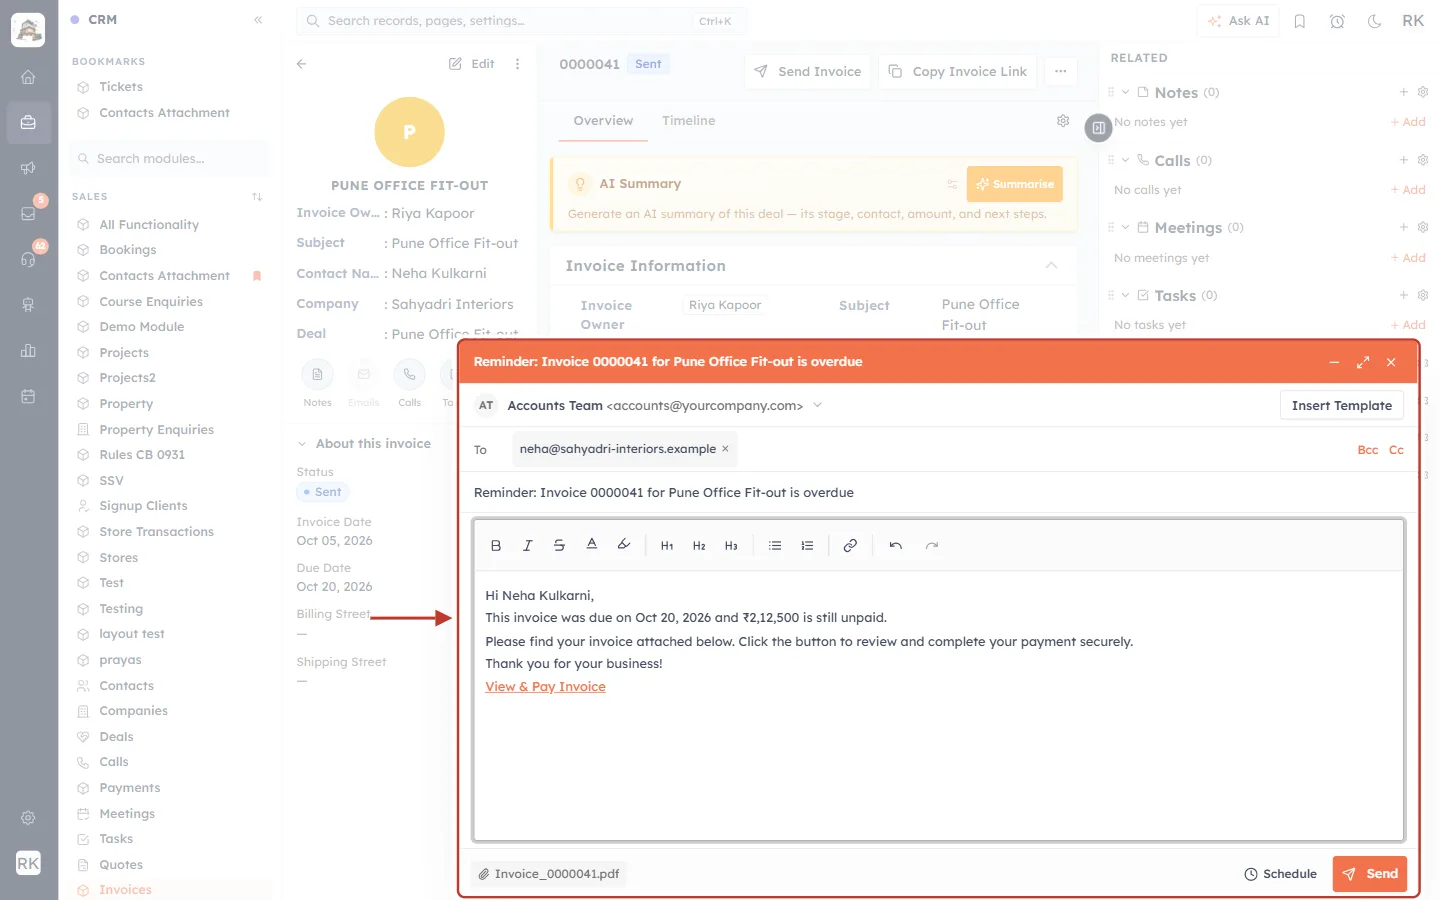
What this screenshot shows. The email window, ringed, edited into a reminder.
Sender (Accounts Team): the address it goes from. Click the arrow to pick another.
To: the invoice’s contact, filled in for you. Cc and Bcc are on the right.
Subject: we replaced “Invoice 0000041” with a clear reminder.
Message: we typed the line with the due date and the amount. The rest is your normal invoice text.
View & Pay Invoice: takes the customer to their payment page. Leave this in. If you have no gateway connected, the page says that online payment isn’t available.
Invoice_0000041.pdf: the invoice, attached automatically.
Insert Template (top right) fills in a saved template. Schedule (bottom right) sends it later, for example at 9 AM tomorrow.
✅
Keep it friendly and short: name the invoice, the date, the amount and how to pay. Most late invoices are simply forgotten.
Part 4: Write a reminder email template#
An automatic reminder sends a saved template, so write that first. The template must be built on the Invoices module, or the workflow won’t offer it.
Step 9: Start a new template#
Click the Marketing icon in the left rail, then Templates → Email.
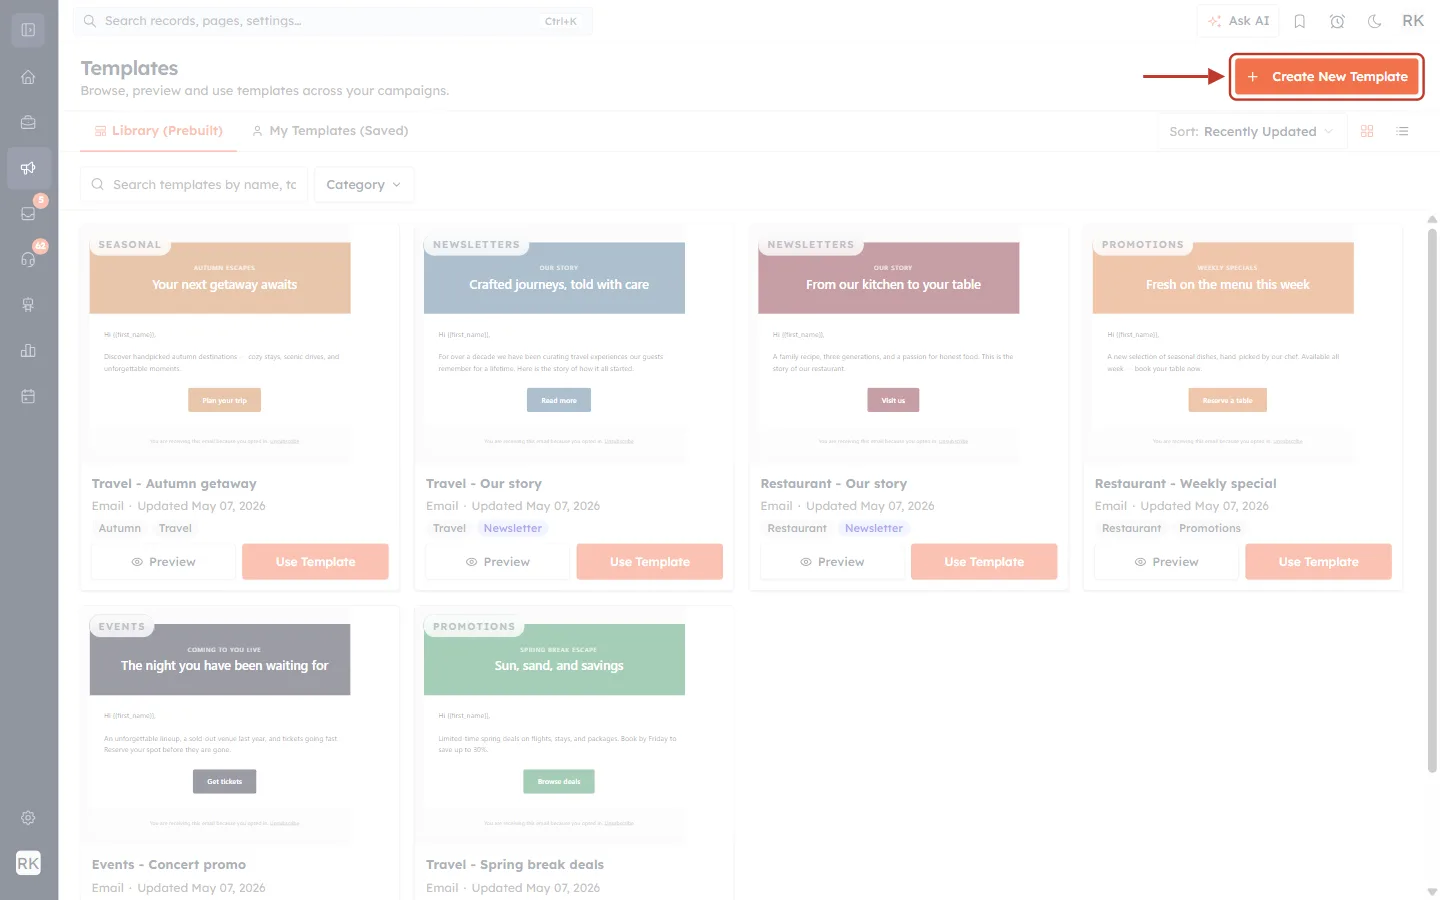
What this screenshot shows. The Templates page, with Create New Template ringed.
Create New Template (top right) starts a blank template. Click it.
Library (Prebuilt) holds ready-made designs. My Templates (Saved) holds your own, and that is where your reminder will appear.
The search box and Category list help you find an existing template.
Step 10: Choose Invoices as the module#
Open the Module list, type Invoices and select it.
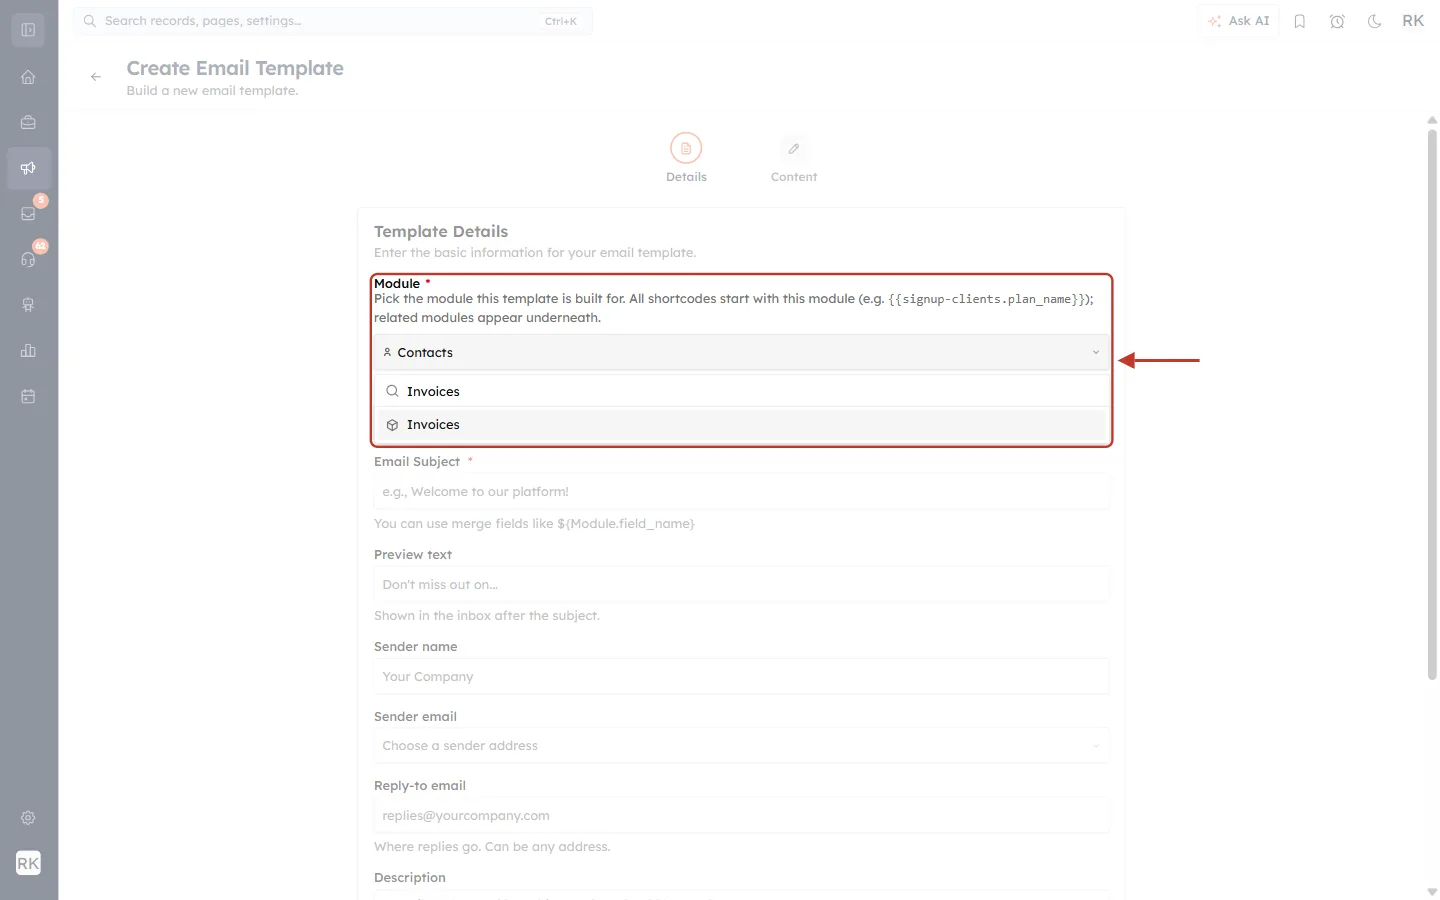
What this screenshot shows. The Module field, ringed, with Invoices found by searching.
Module * is required, and it starts on Contacts.
The note under it explains why this matters: all the shortcodes start with this module, for example
{{invoices.balance_due}}.If you leave it on Contacts, the invoice shortcodes won’t be available and the workflow in Part 5 won’t list this template.
Step 11: Fill in the details#
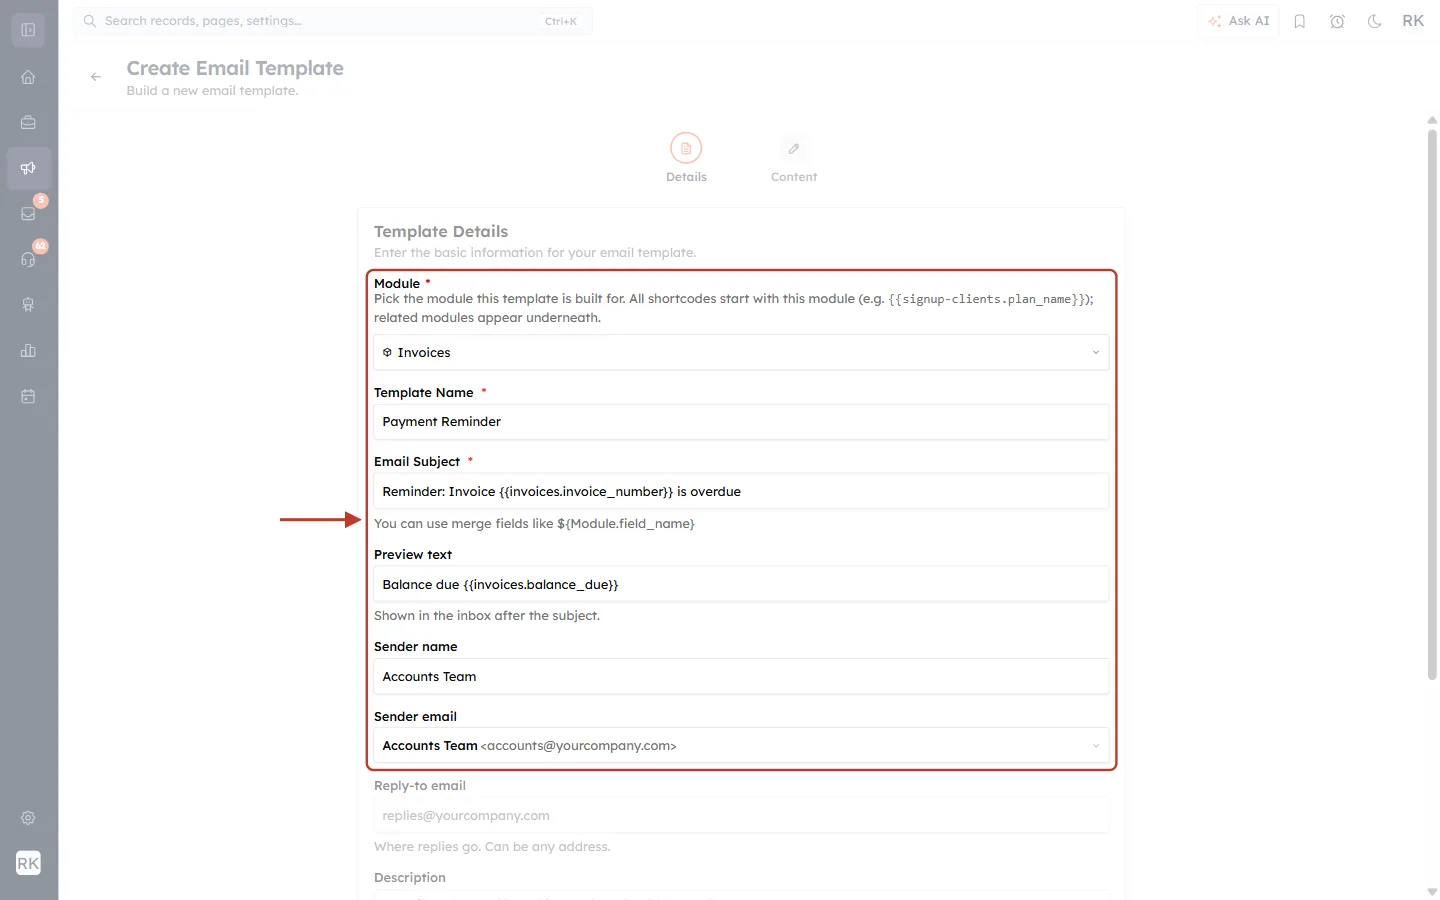
What this screenshot shows. The Template Details form, ringed, filled in.
Template Name *: your own label, here Payment Reminder. Customers don’t see it.
Email Subject *: what customers see in their inbox. Here:
Reminder: Invoice {{invoices.invoice_number}} is overdue.Preview text: the grey line shown after the subject in the inbox.
Sender name and Sender email: who it comes from. Choose one of your connected addresses.
Reply-to email (below the ring) is optional: where replies go, if that isn’t the sender.
Scroll down and click Next. The page moves to step 2, Content.
Step 12: Write the reminder#
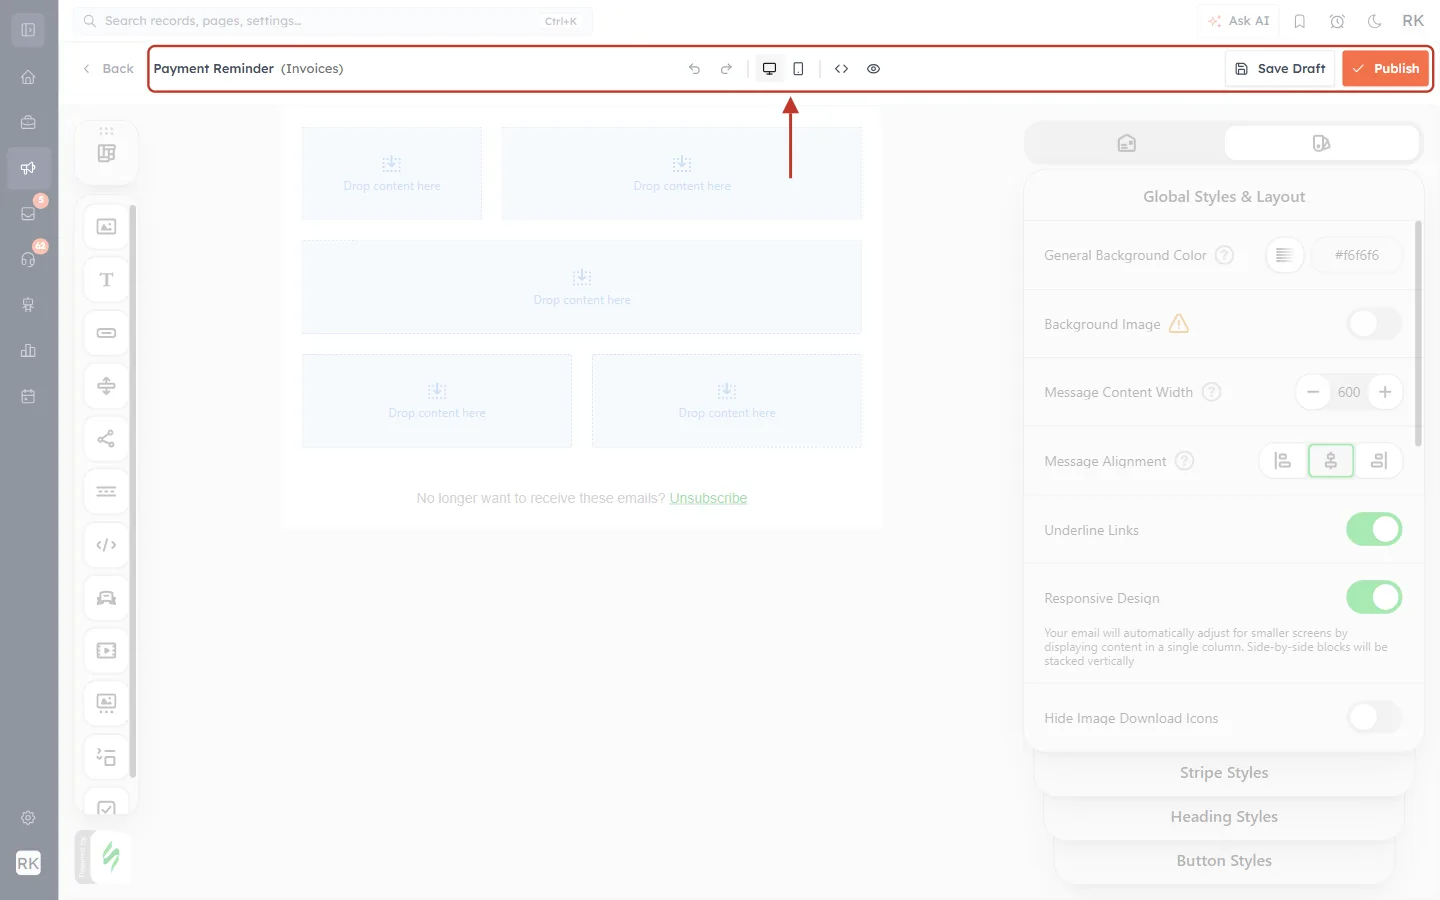
What this screenshot shows. The bar along the top of the email editor, ringed.
Payment Reminder (Invoices): the template name and its module. Check that this says Invoices.
The arrows undo and redo. The two screen icons preview desktop and mobile, </> shows the code, and the eye previews the email.
Save Draft keeps your work. Publish finishes the template.
Below the bar, drag blocks such as Text and Button from the left into the empty Drop content here areas.
Drag a Text block into the email and write your message, using shortcodes for the details that change.
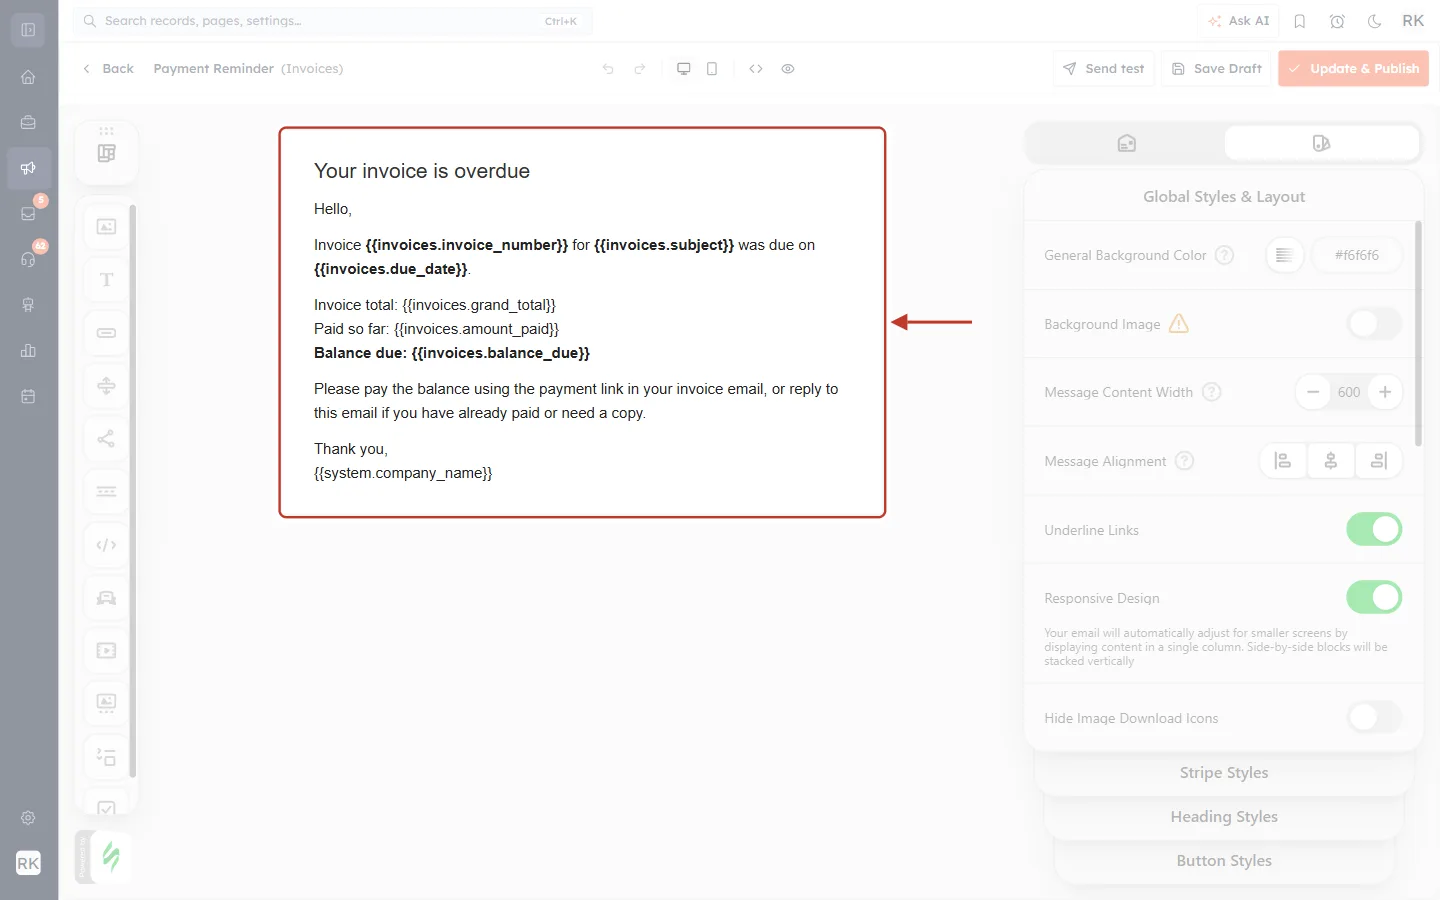
What this screenshot shows. The finished reminder, ringed. The curly-bracket codes become real values for each invoice when the email is sent.
Your invoice is overdue: a heading that says what this is about.
Hello,: a plain greeting, for the reason explained in the note below.
{{invoices.invoice_number}},{{invoices.subject}}and{{invoices.due_date}}: which invoice, and when it was due.{{invoices.grand_total}},{{invoices.amount_paid}}and{{invoices.balance_due}}: the total, what has been paid and what is left.Please pay the balance…: tells the customer what to do next.
{{system.company_name}}: your organisation’s name from your settings.
⚠️
Two shortcodes you won’t find. An Invoices template has no shortcode for the customer’s name and none for the payment link. So greet with “Hello,” and don’t promise a pay button. Point customers to the link in their original invoice email, or to your bank details. To send a personal pay link, use Part 3.
Step 13: Test and publish#
Save the template once, then open it again from My Templates (Saved) with ⋯ → Edit if you need to change it. The buttons at the top right are then Send test, Save Draft and Update & Publish.
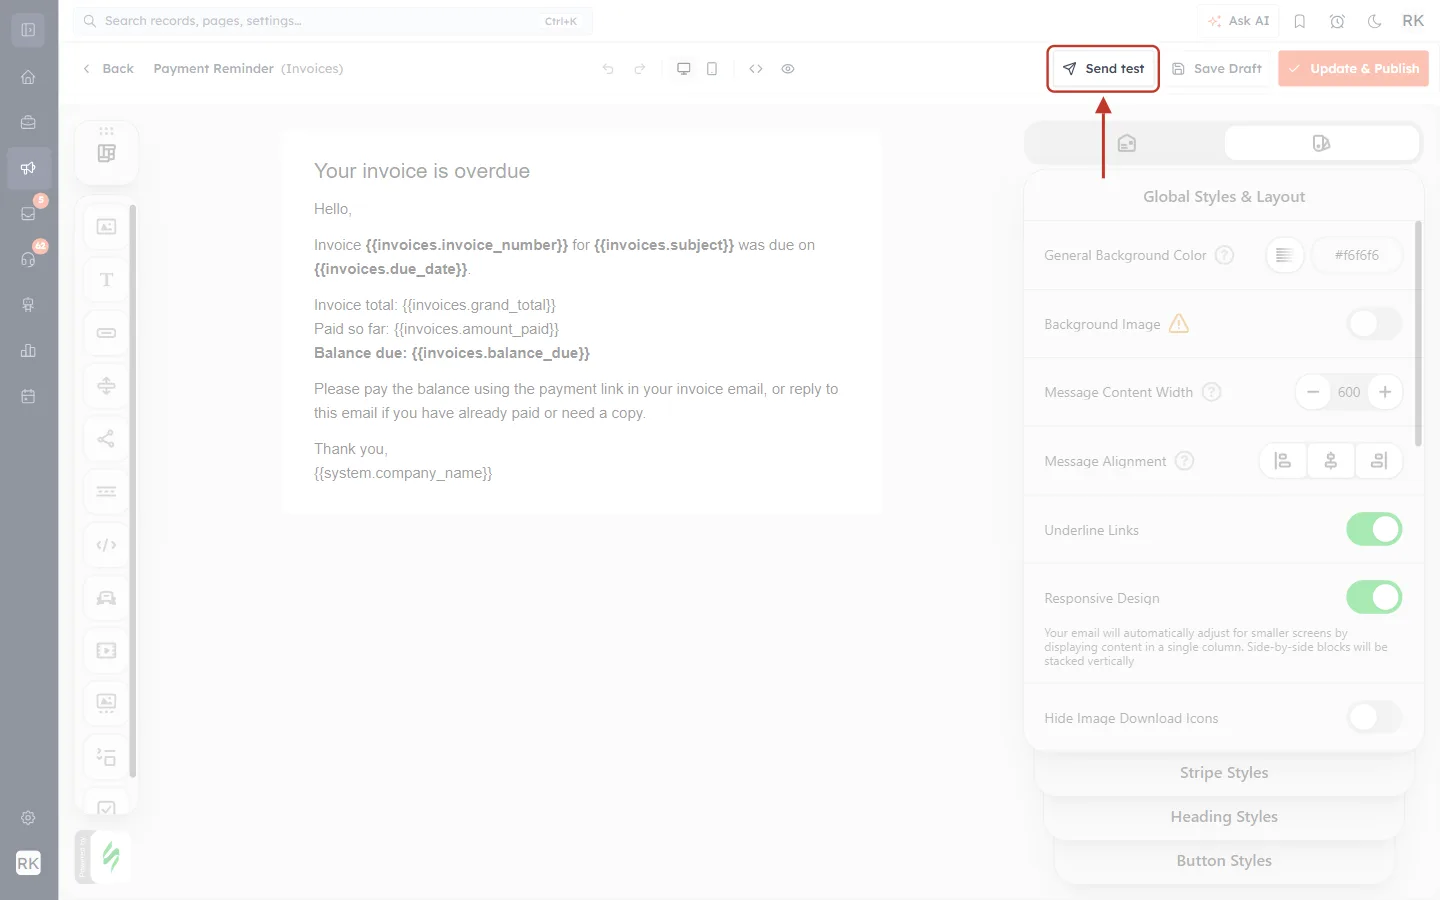
What this screenshot shows. The top bar of a saved template, with Send test ringed.
Send test sends a test copy of the email, so you can check how it looks in a real inbox. Do this before you automate anything.
The same button is also in the template’s ⋯ menu, as Send Test.
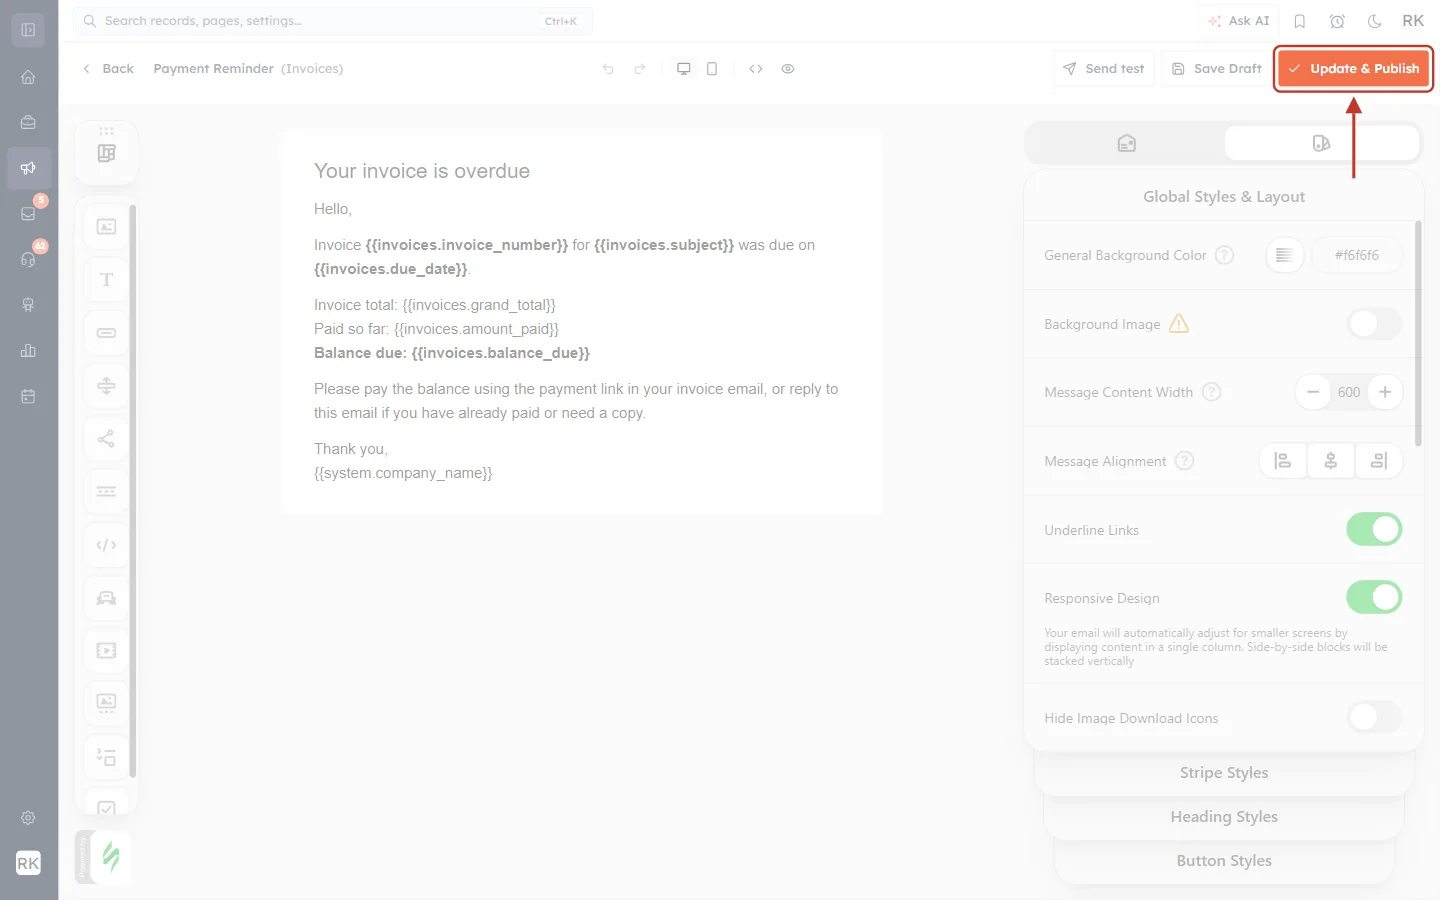
What this screenshot shows. The same bar, with Update & Publish ringed.
Update & Publish saves your changes to the published template. On a brand-new template the same button reads Publish.
Save Draft beside it keeps your changes without publishing them.
Part 5: Build the automatic reminder workflow#
This workflow runs the day after each invoice’s due date. It marks the invoice Overdue and emails the customer, then repeats every week, up to four times, until the invoice is paid.
Step 14: Create a new workflow on Invoices#
In the Marketing menu, click Workflow Automation, then New Workflow.
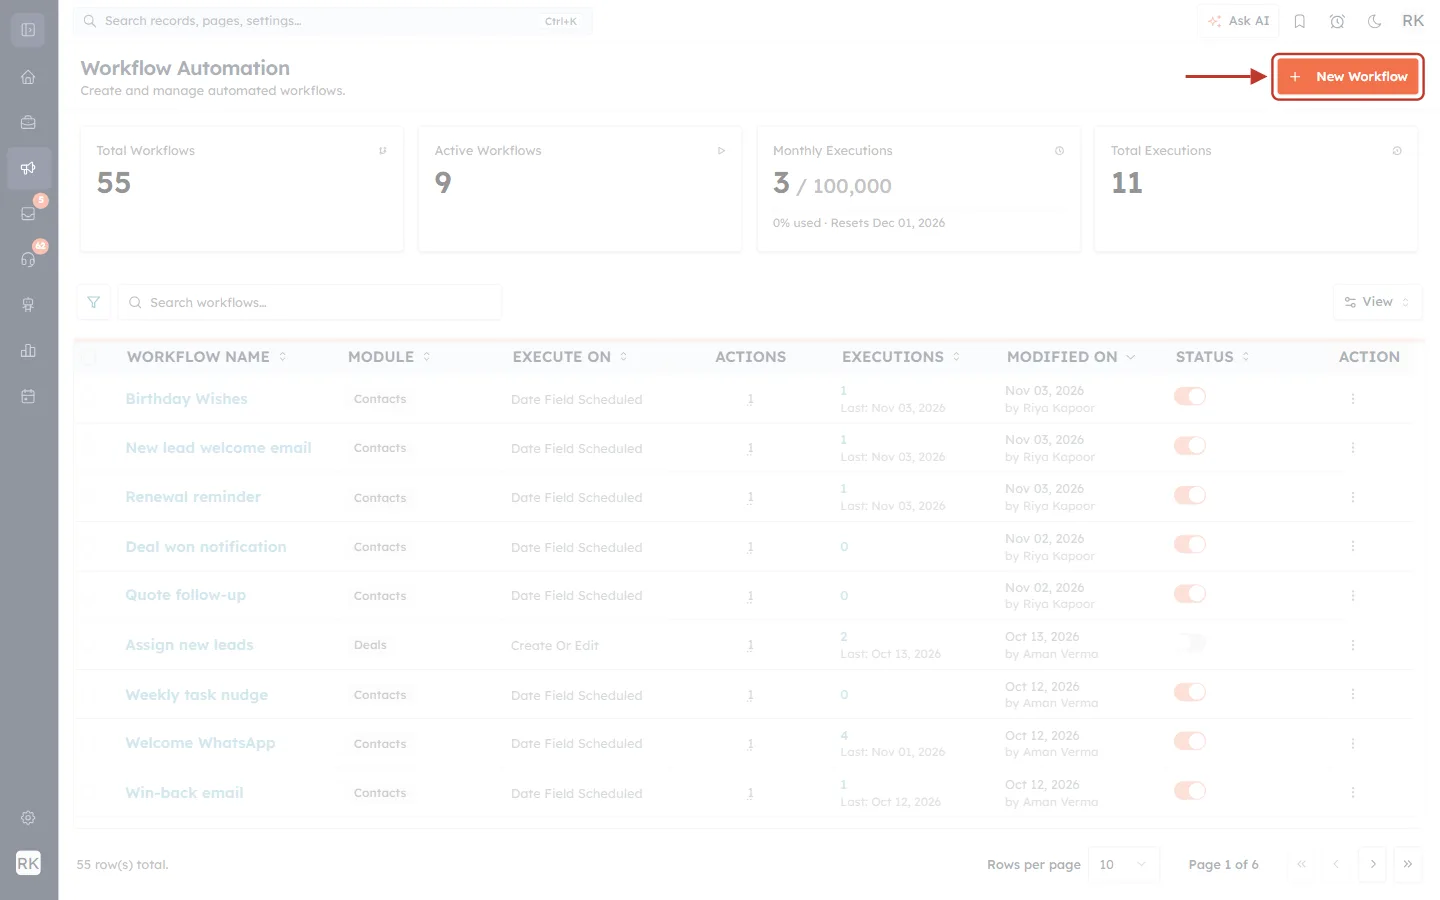
What this screenshot shows. The Workflow Automation page, with New Workflow ringed.
New Workflow (top right) starts a new automation.
The cards show Total Workflows, Active Workflows, Monthly Executions against your plan’s allowance, and Total Executions.
Your existing workflows are listed below, each with a Status switch.
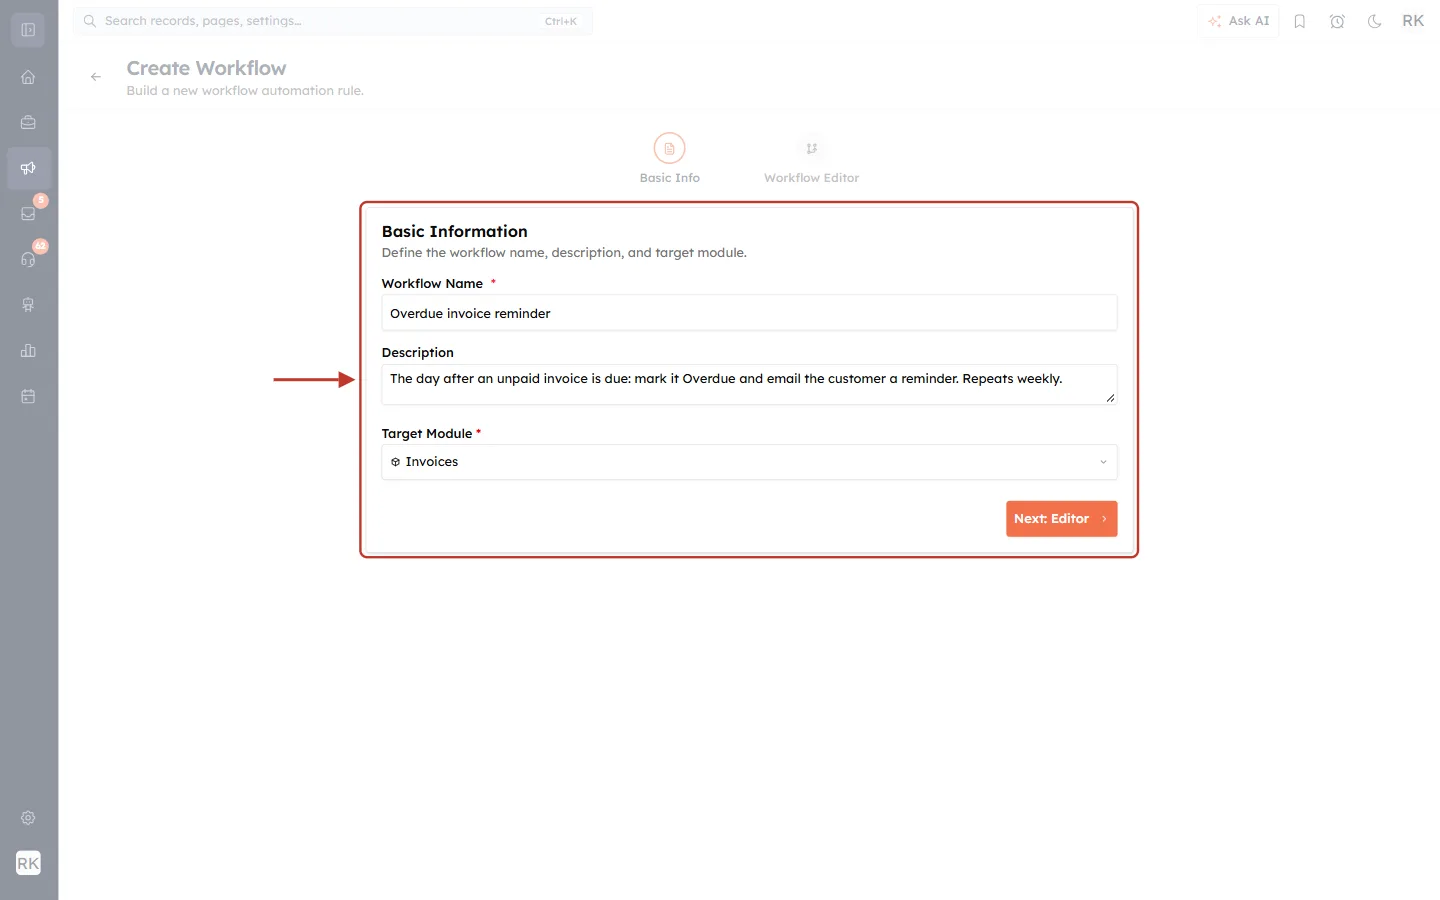
What this screenshot shows. The Basic Information form, ringed, filled in.
Workflow Name *: a name your team will recognise.
Description: optional, but useful later. Say what it does and when.
Target Module *: choose Invoices. This is what makes the invoice’s Due Date, Status and Balance Due available below.
Next: Editor opens the builder. Click it.
Step 15: Add the Date-Based Trigger#
From TRIGGERS in the Node Palette on the left, drag Date-Based Trigger onto the canvas. Its settings open in the Configure Node panel on the right. Open Run based on.
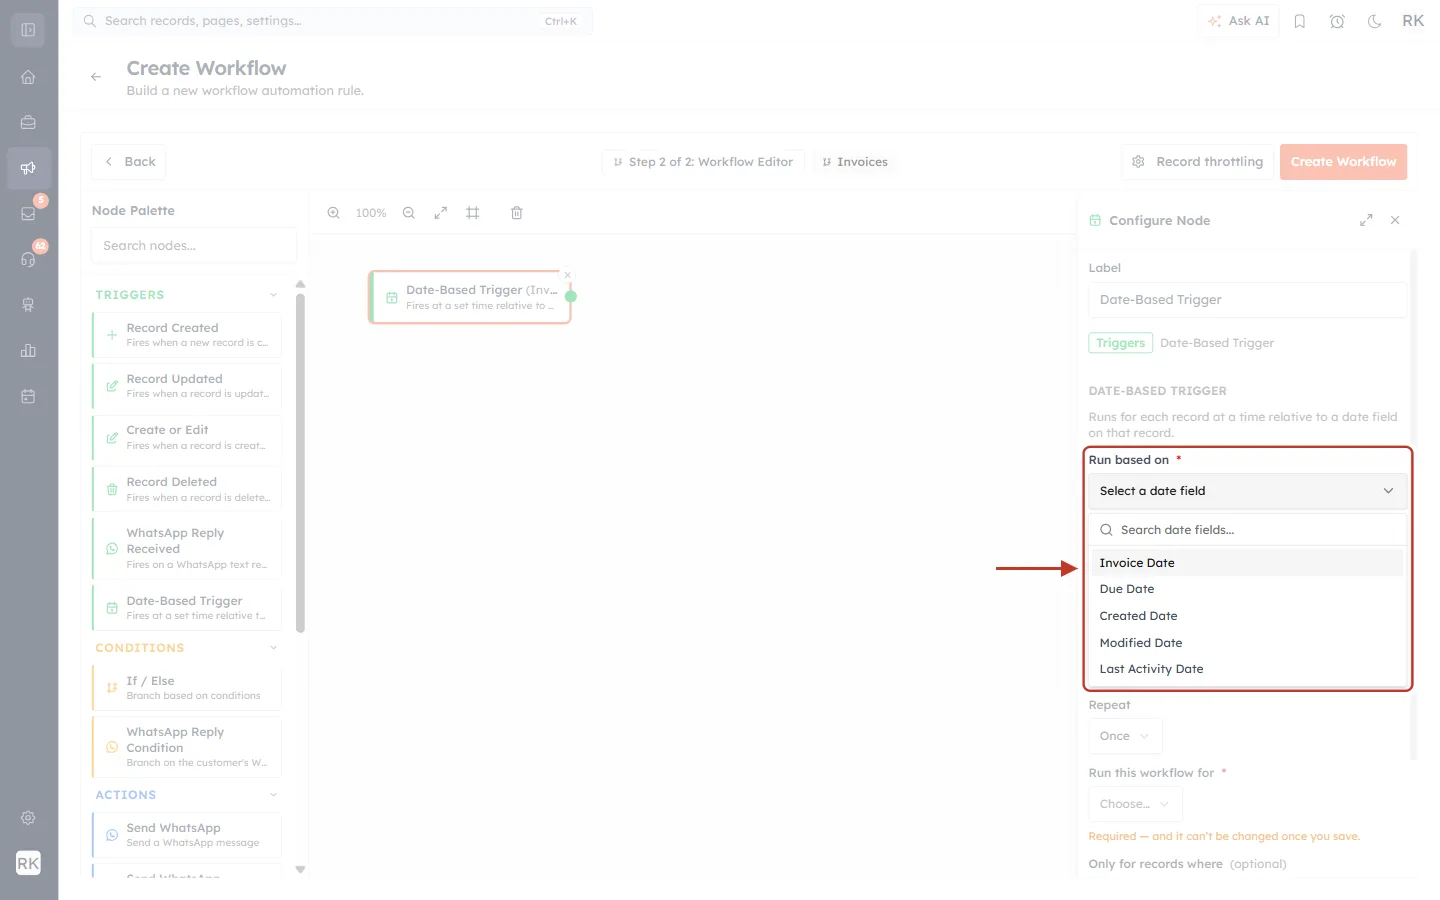
What this screenshot shows. The Run based on list, ringed.
The list shows the Invoices date fields: Invoice Date, Due Date, Created Date, Modified Date and Last Activity Date.
Choose Due Date.
The trigger node on the canvas shows a summary of your settings as you go.
Create Workflow at the top right stays faded until the workflow is complete.
Step 16: Set when it runs#
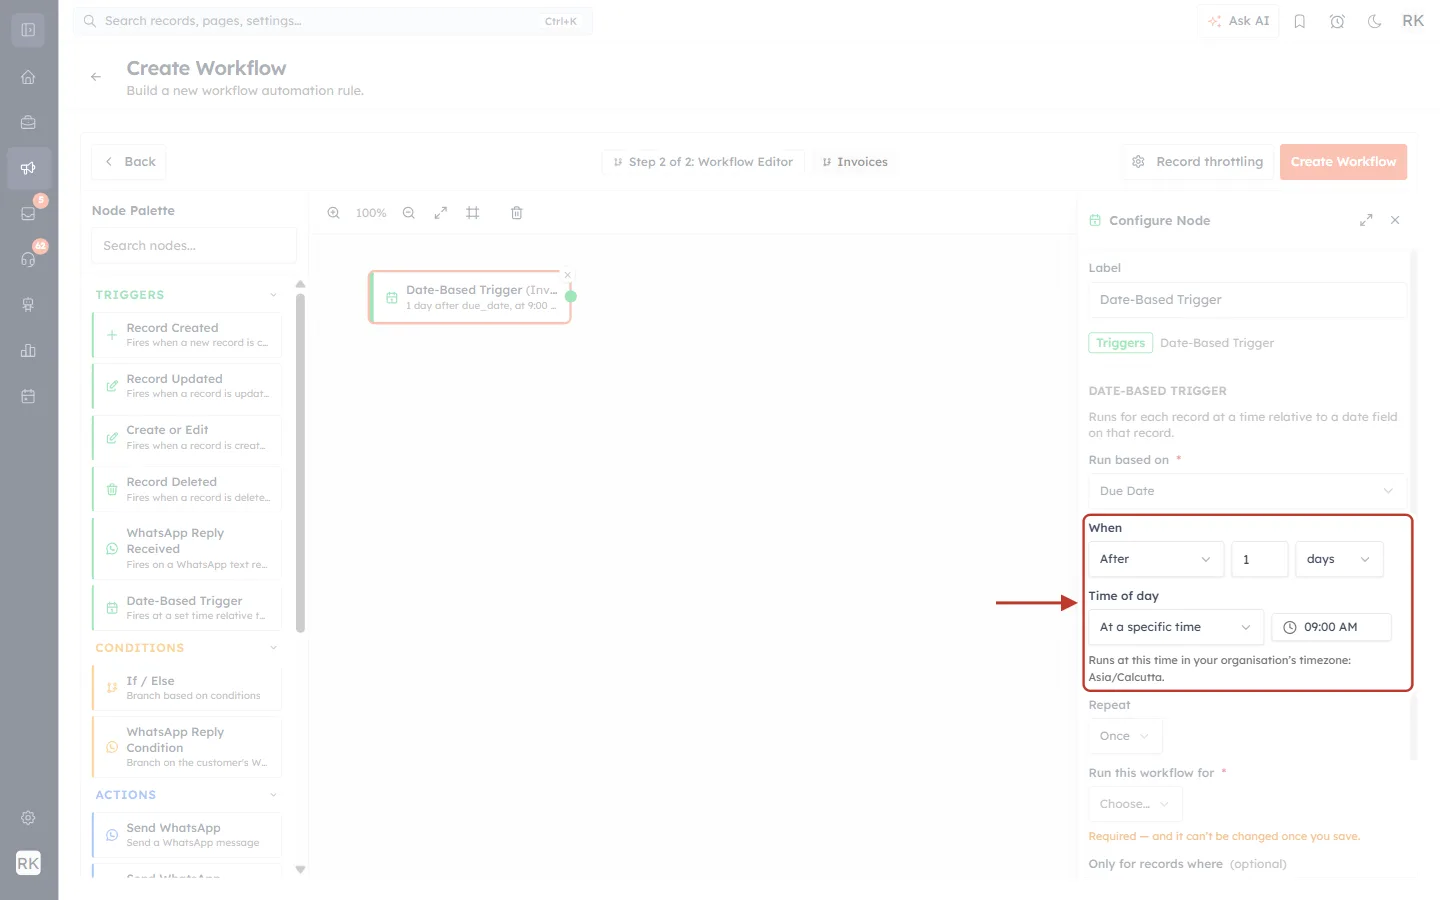
What this screenshot shows. The When and Time of day settings, ringed.
When · After · 1 · days: one day after the due date, so a customer who pays on the day isn’t reminded.
Time of day · At a specific time · 09:00 AM: send it during working hours.
The note gives your organisation’s timezone, here Asia/Calcutta. The time follows that timezone, not the customer’s.
The trigger node now reads “1 day after due_date, at 9:00…”.
Step 17: Repeat until it stops#
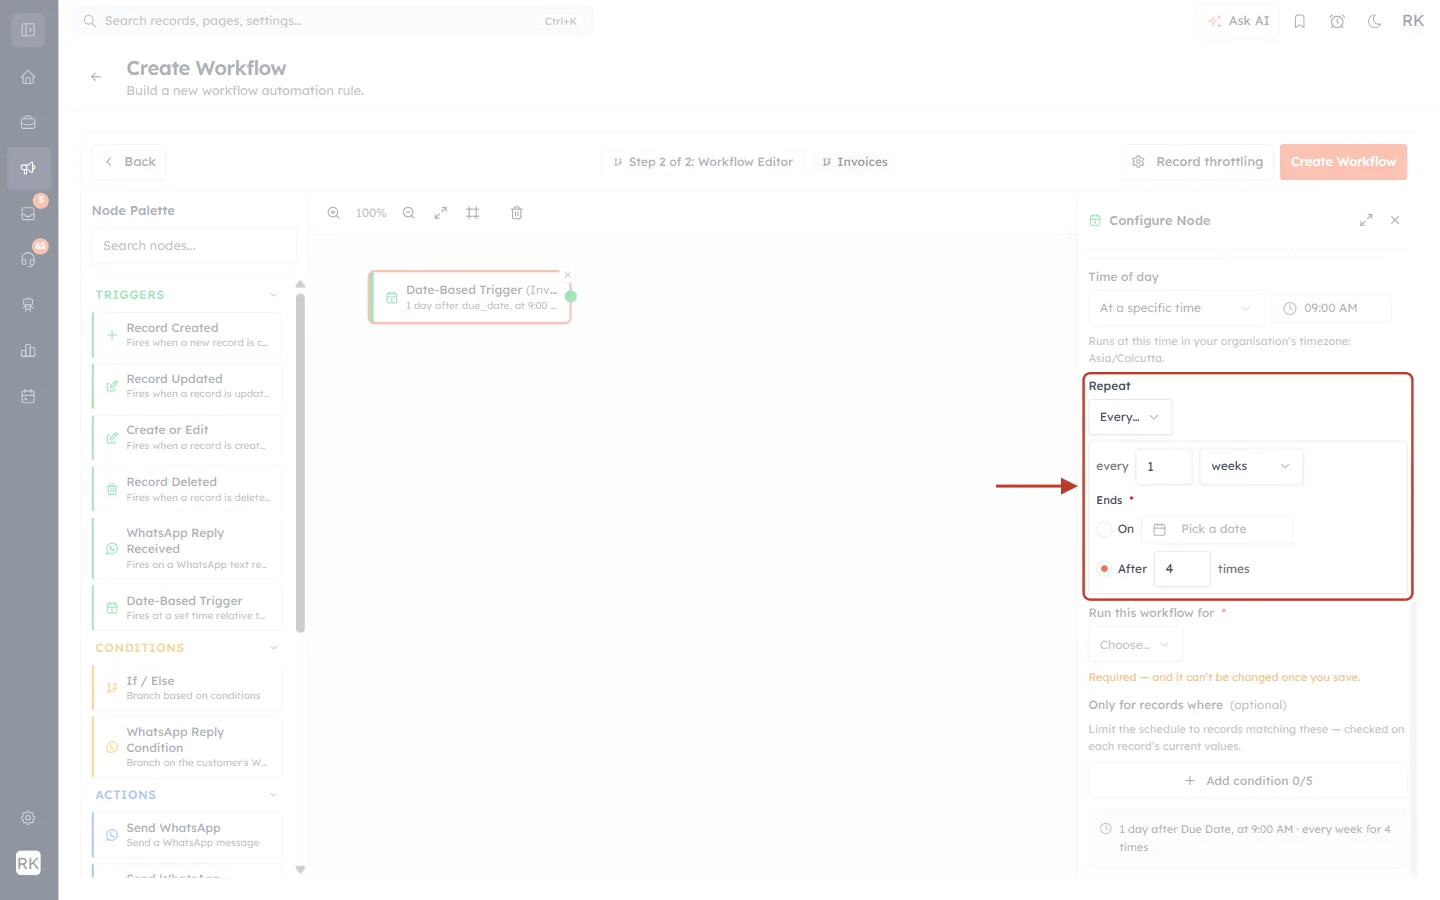
What this screenshot shows. The Repeat setting, ringed.
Repeat · Every…: the choices are Once and Every….
every 1 weeks: a weekly reminder. You can also choose months or years.
Ends * is required. A repeating schedule must have an end.
After 4 times: the schedule stops after four times, so nobody is emailed forever. On stops it on a date you pick instead.
Step 18: Choose which invoices it covers#
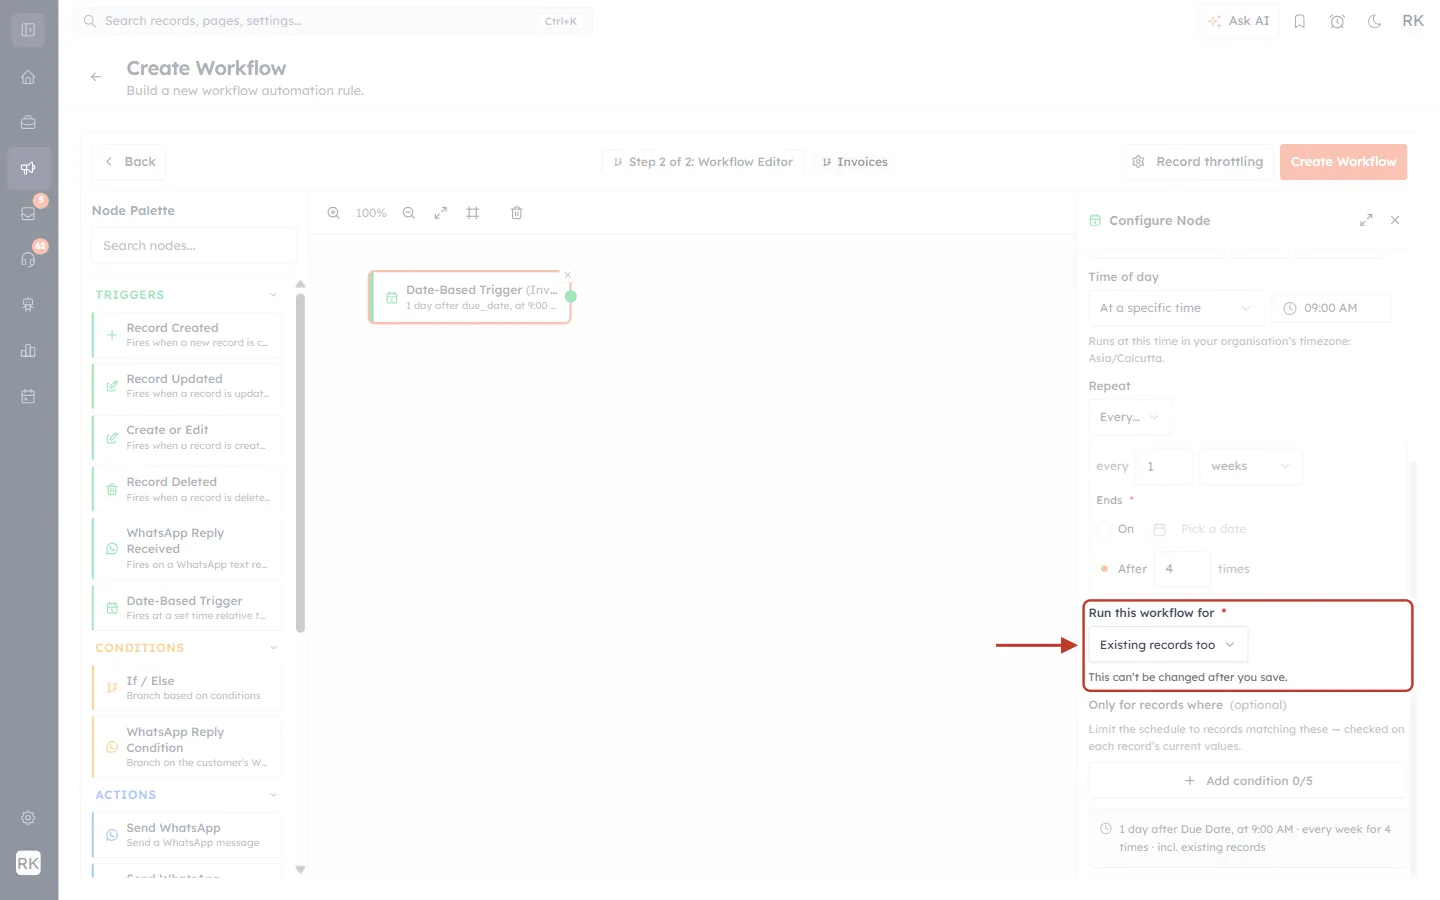
What this screenshot shows. The Run this workflow for * setting, ringed.
Only new records from now on covers invoices created after you save the workflow.
Existing records too also covers invoices already in your CRM. We chose this one.
The note warns: This can’t be changed after you save. To switch later, you need a new workflow.
⚠️
The schedule is worked out from each invoice’s due date. Don’t rely on it for invoices that are already late when you switch it on: chase those by hand with Part 3, and check the workflow’s report to see what it picked up.
Step 19: Limit it to unpaid invoices#
This is the most important setting, because it is what stops the reminders. Under Only for records where, click Add condition twice and set both conditions.
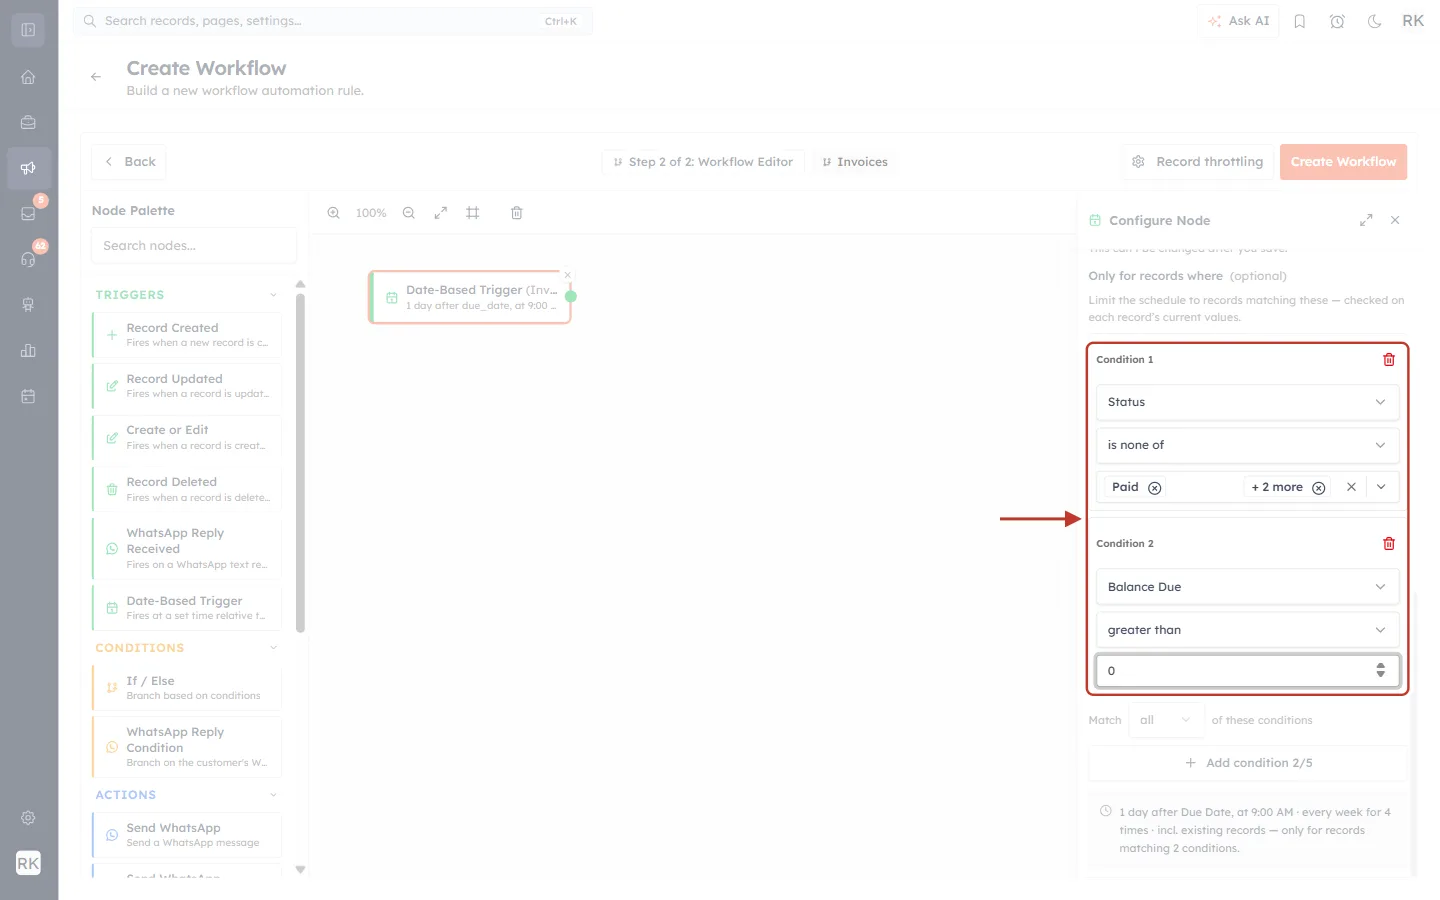
What this screenshot shows. The two conditions, ringed.
Condition 1 · Status · is none of · Paid + 2 more: leaves out Paid, Cancelled and Refunded invoices.
Condition 2 · Balance Due · greater than · 0: leaves out invoices with nothing left to pay, even if nobody updated the status.
The red bin deletes a condition.
Below the ring, Match all of these conditions means both must be true. Keep it on all.
Add condition 2/5: you can have up to five.
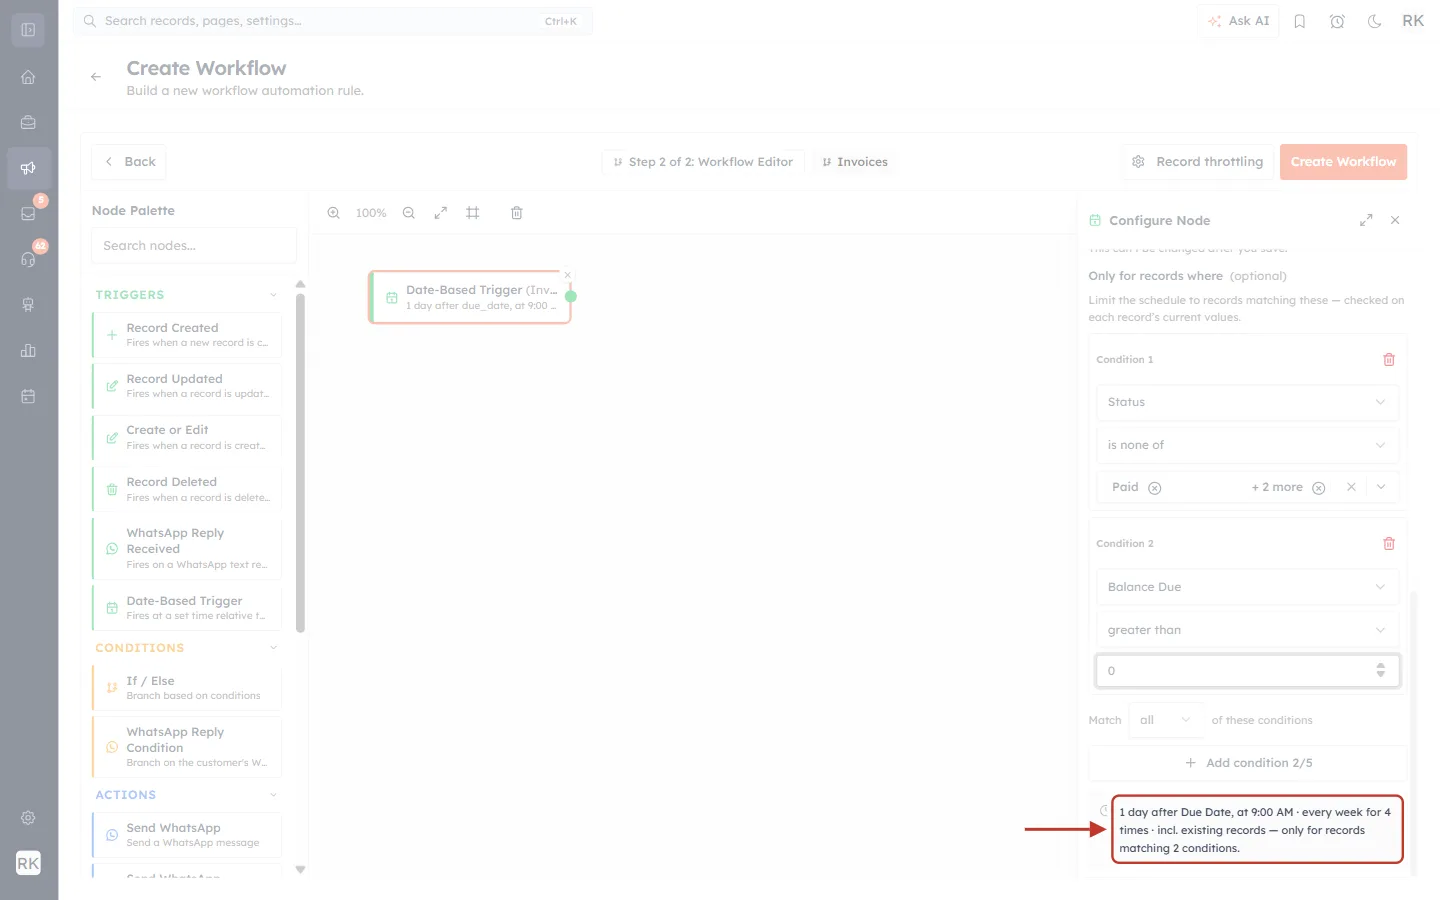
What this screenshot shows. The summary at the bottom of the panel, ringed.
It repeats your settings in plain words: 1 day after Due Date, at 9:00 AM · every week for 4 times · incl. existing records — only for records matching 2 conditions.
Read it before you go on. If it doesn’t say what you meant, change the setting above it.
Step 20: Add the action that marks it Overdue#
From ACTIONS in the palette, drag Update Field onto the canvas and click it. Click Add Field Update and fill it in.
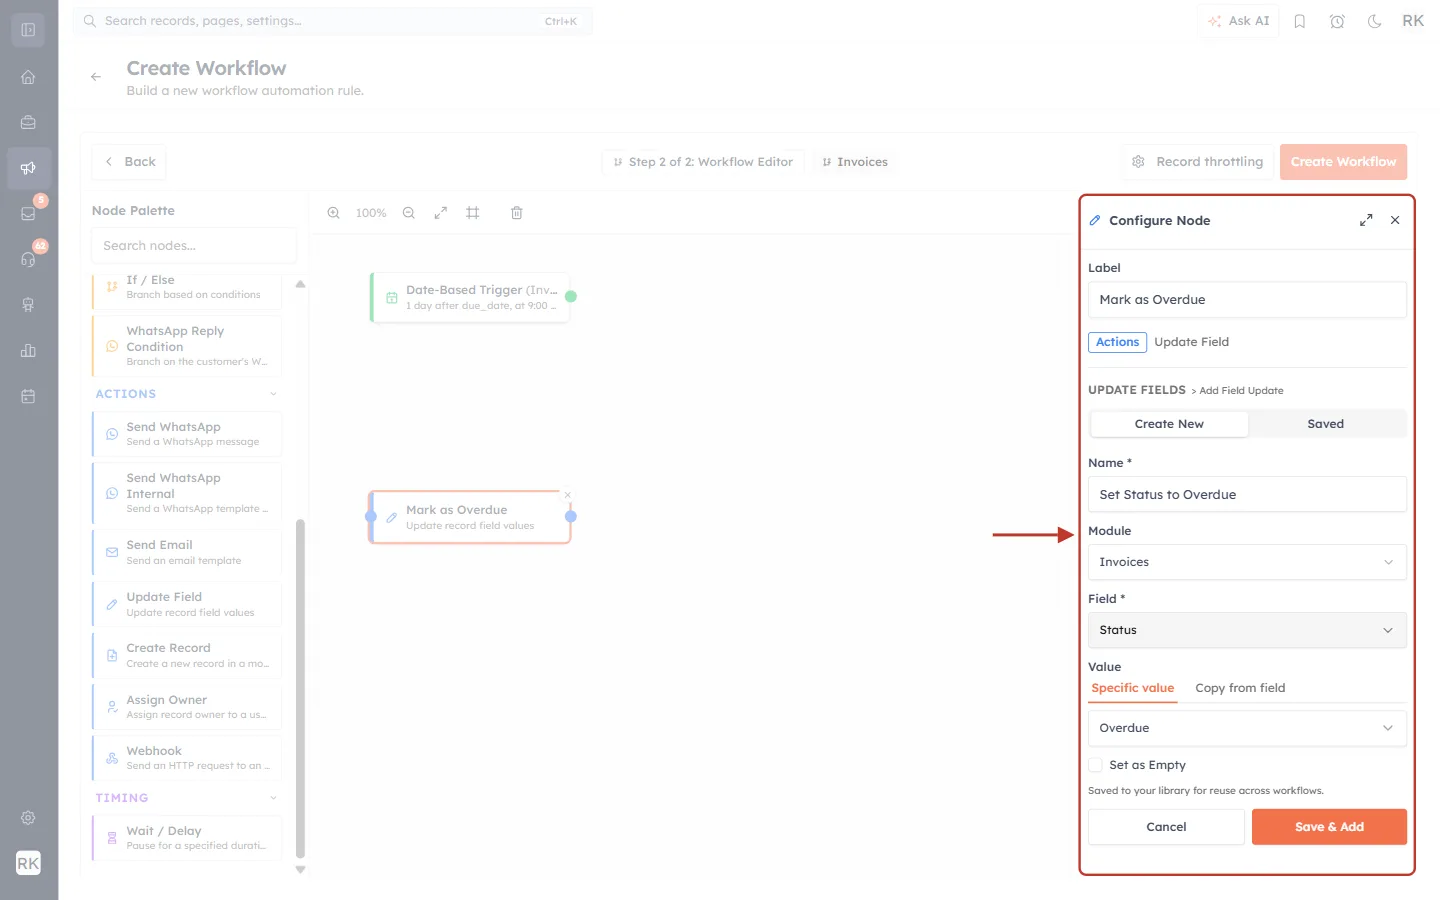
What this screenshot shows. The Configure Node panel for this action, ringed.
Label: the name on the canvas, here Mark as Overdue.
Name *: a name for this saved update, here Set Status to Overdue. It is kept in your library, under Saved, for use in other workflows.
Module · Invoices: change the invoice itself. The list also offers the linked Contact, Company and Deal.
Field · Status and Value · Specific value · Overdue: what to change, and to what.
Save & Add adds it to the action. Click it.
ℹ️
This action also replaces Partially Paid with Overdue on a part-paid invoice. Its Balance Due is still correct, so you can still see what is left. If you’d rather keep Partially Paid, add Partially Paid to Condition 1. Those invoices then get no reminders, so chase them by hand.
Step 21: Add the action that sends the email#
Drag Send Email onto the canvas and click it.
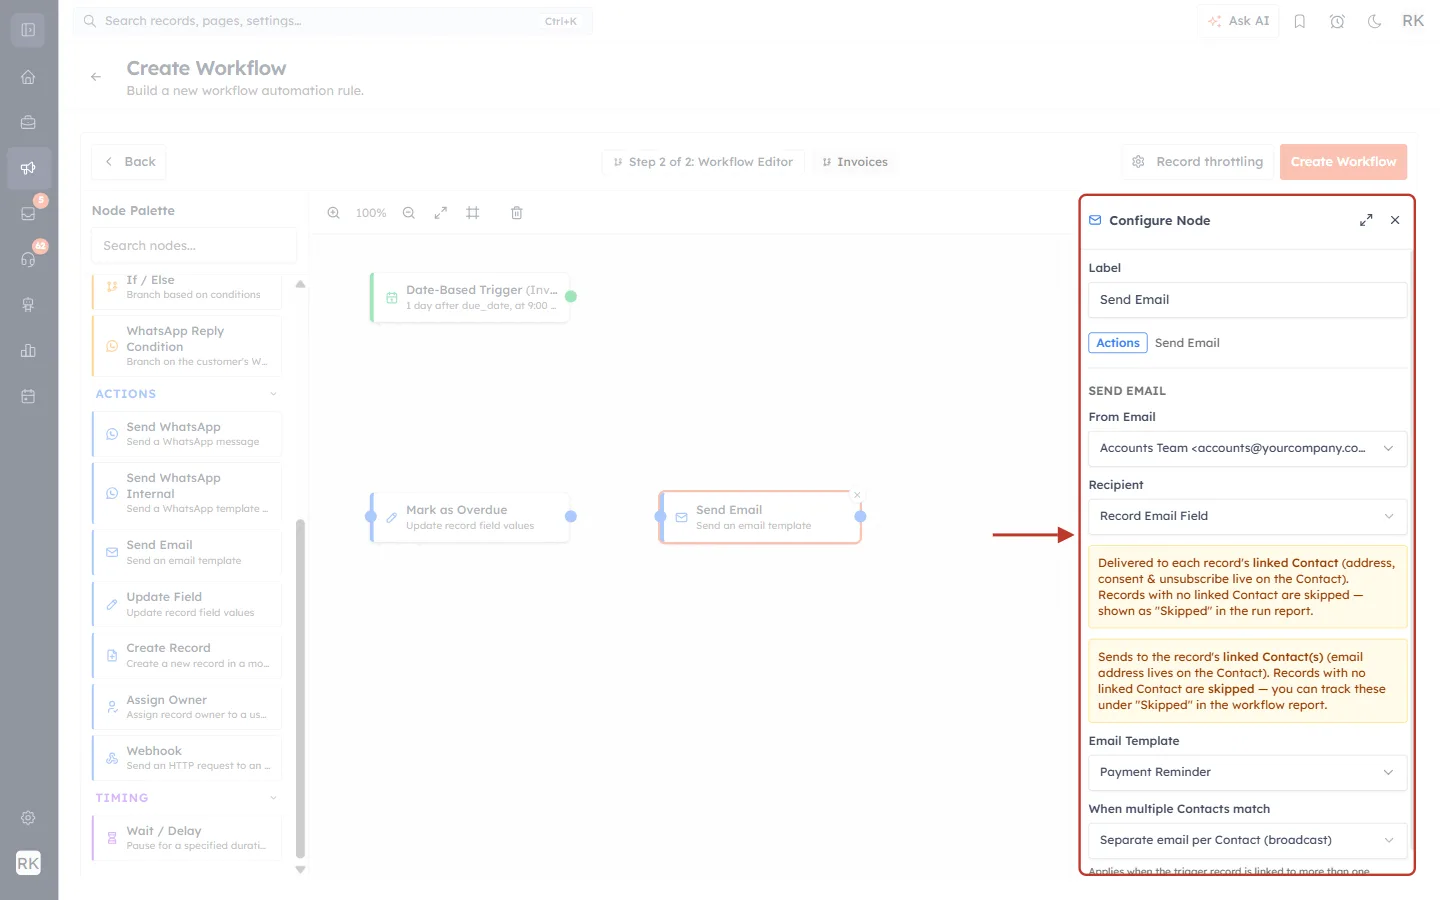
What this screenshot shows. The Configure Node panel for Send Email, ringed.
From Email: the connected address it is sent from.
Recipient · Record Email Field: sends it to the customer. The other choices are Record Owner, Custom Email and Internal Team Members.
The two yellow notes matter: an invoice has no email address of its own, so the email goes to the invoice’s linked Contact. An invoice with no Contact is skipped, and is shown as Skipped in the workflow report.
Email Template: choose Payment Reminder. If you see “No email templates built for the invoices module”, go back to Step 10.
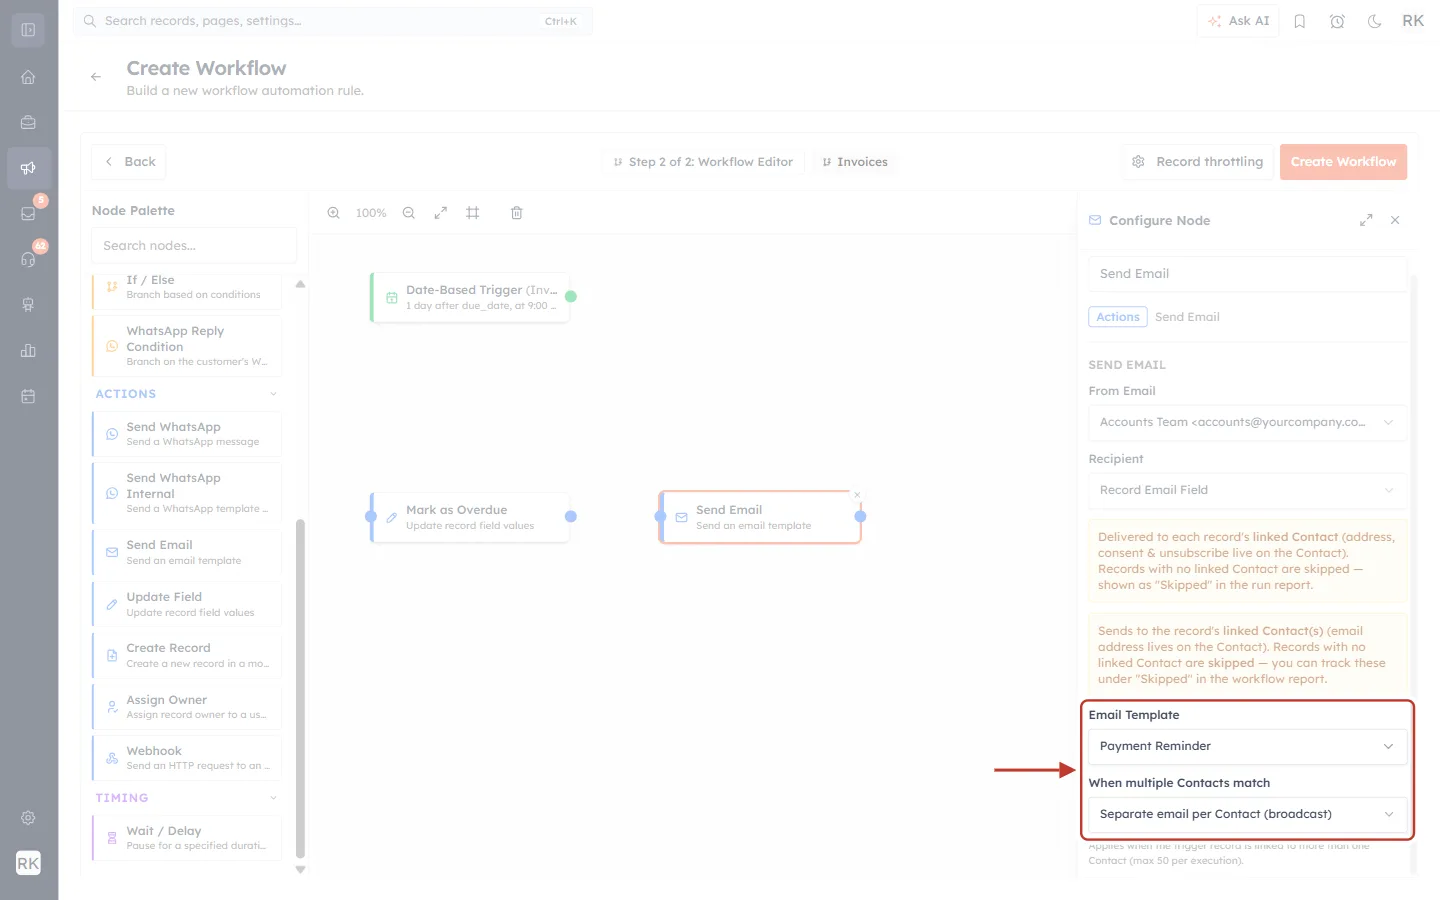
What this screenshot shows. The bottom of the same panel, ringed.
Email Template · Payment Reminder: the template you wrote in Part 4.
When multiple Contacts match · Separate email per Contact (broadcast): everyone gets their own copy. The other choice is One combined email to all.
The note below explains that this only applies when an invoice is linked to more than one Contact, up to 50 per execution.
Step 22: Connect the nodes#
Drag from the green dot on the trigger’s right edge to the blue dot on the left of Mark as Overdue. Then drag from the blue dot on its right edge to the left of Send Email.
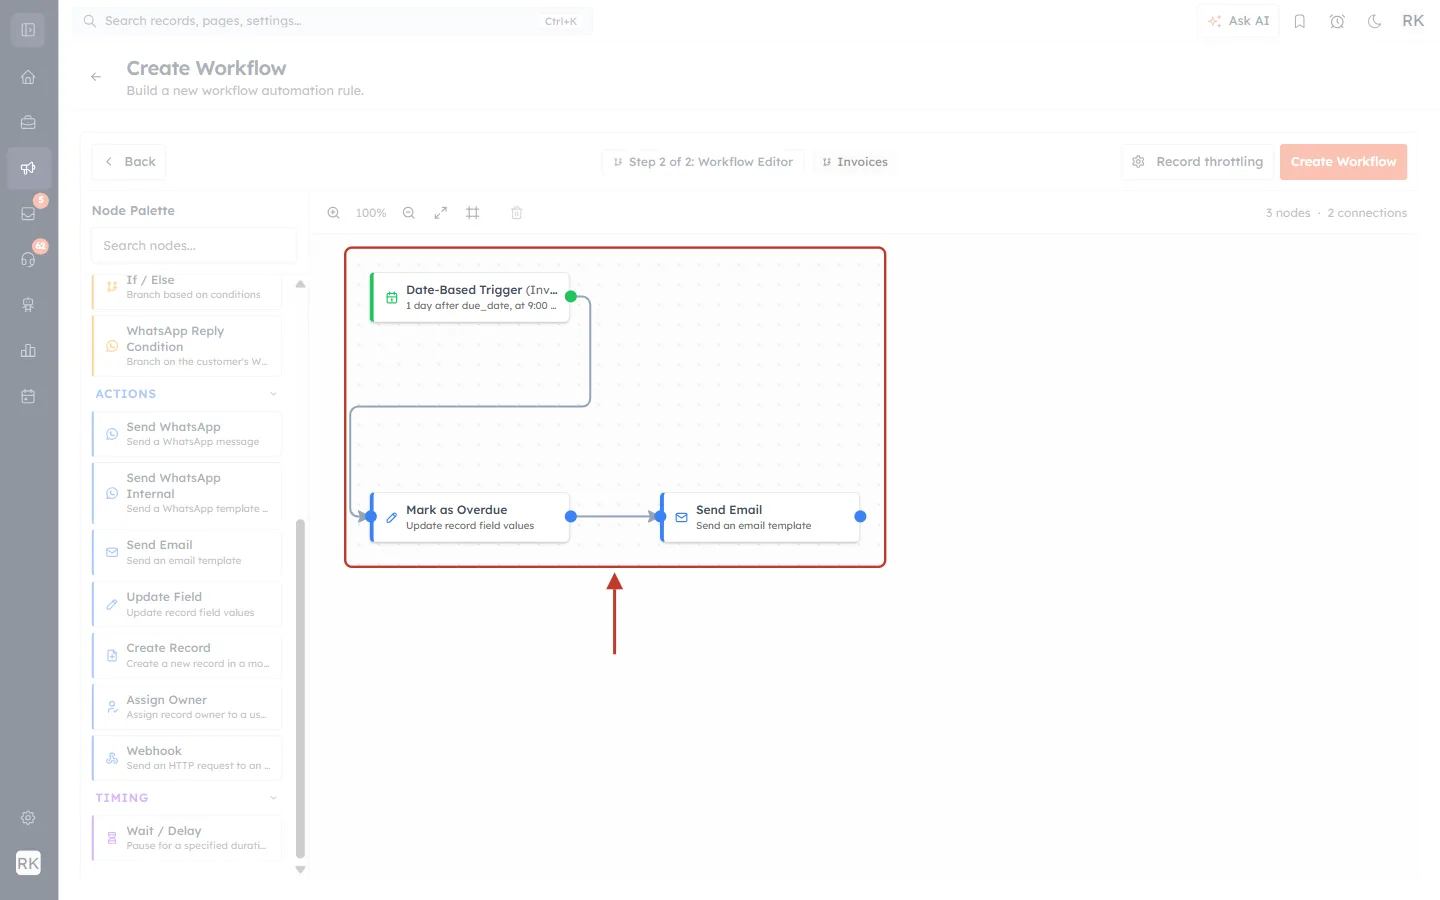
What this screenshot shows. The finished workflow on the canvas, ringed.
Date-Based Trigger (green edge): when it runs.
Mark as Overdue (blue edge): the first thing that happens.
Send Email (blue edge): the second thing that happens.
The lines set the order. Every node must be connected, or the workflow can’t be saved.
3 nodes · 2 connections at the top right of the canvas confirms this.
✅
To alert your team as well, add another Send Email with Recipient · Record Owner, so the invoice owner knows to follow up.
Step 23: Save it and switch it on#
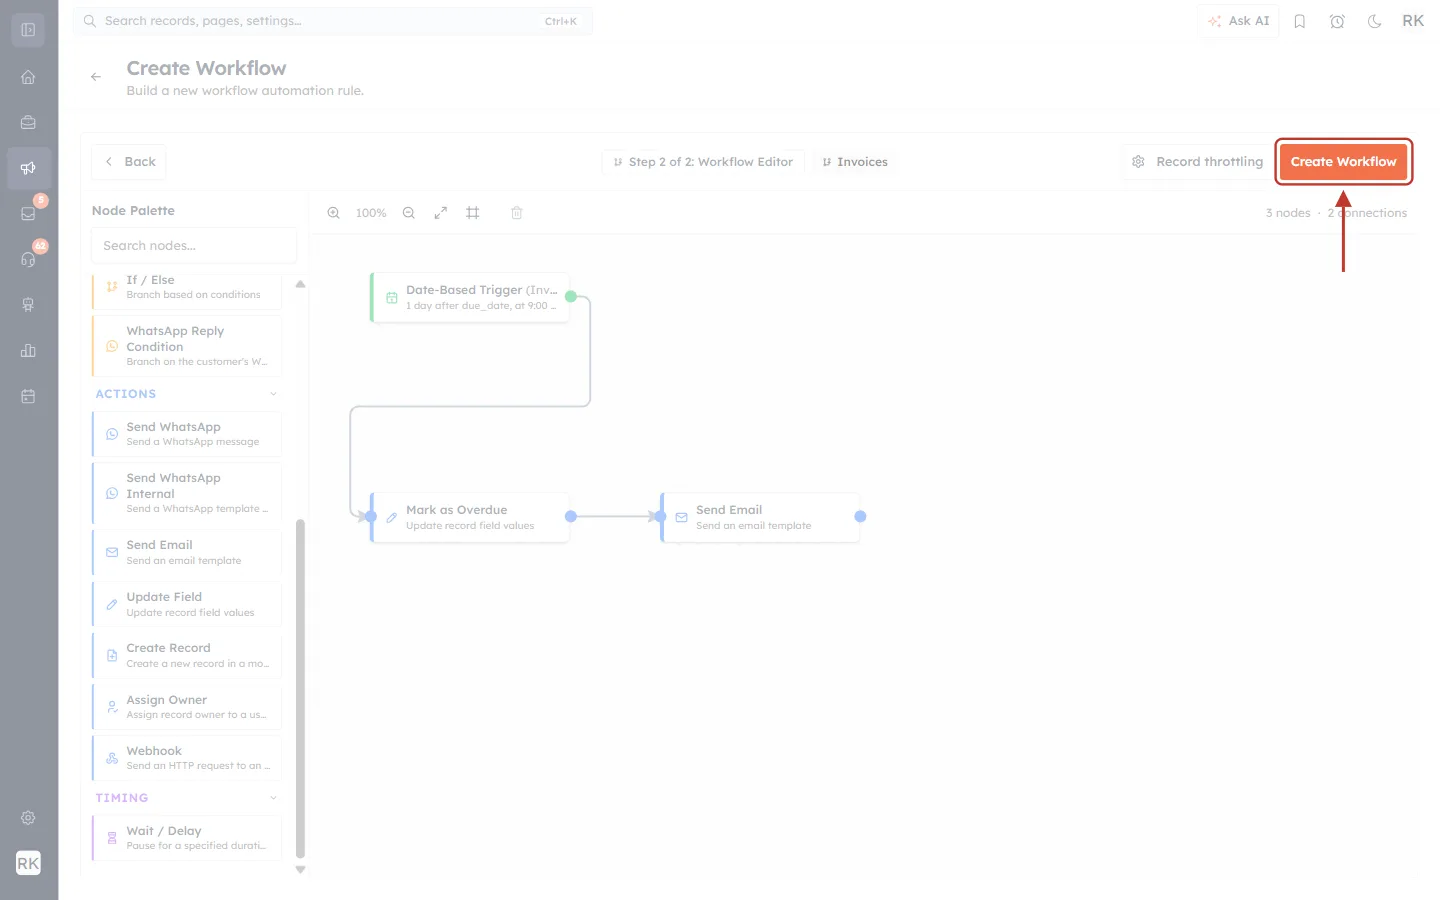
What this screenshot shows. The builder ready to save, with Create Workflow ringed.
Create Workflow checks the workflow and saves it. If something is missing, a message names the node and the problem.
Record throttling beside it optionally limits how many records are handled at a time.
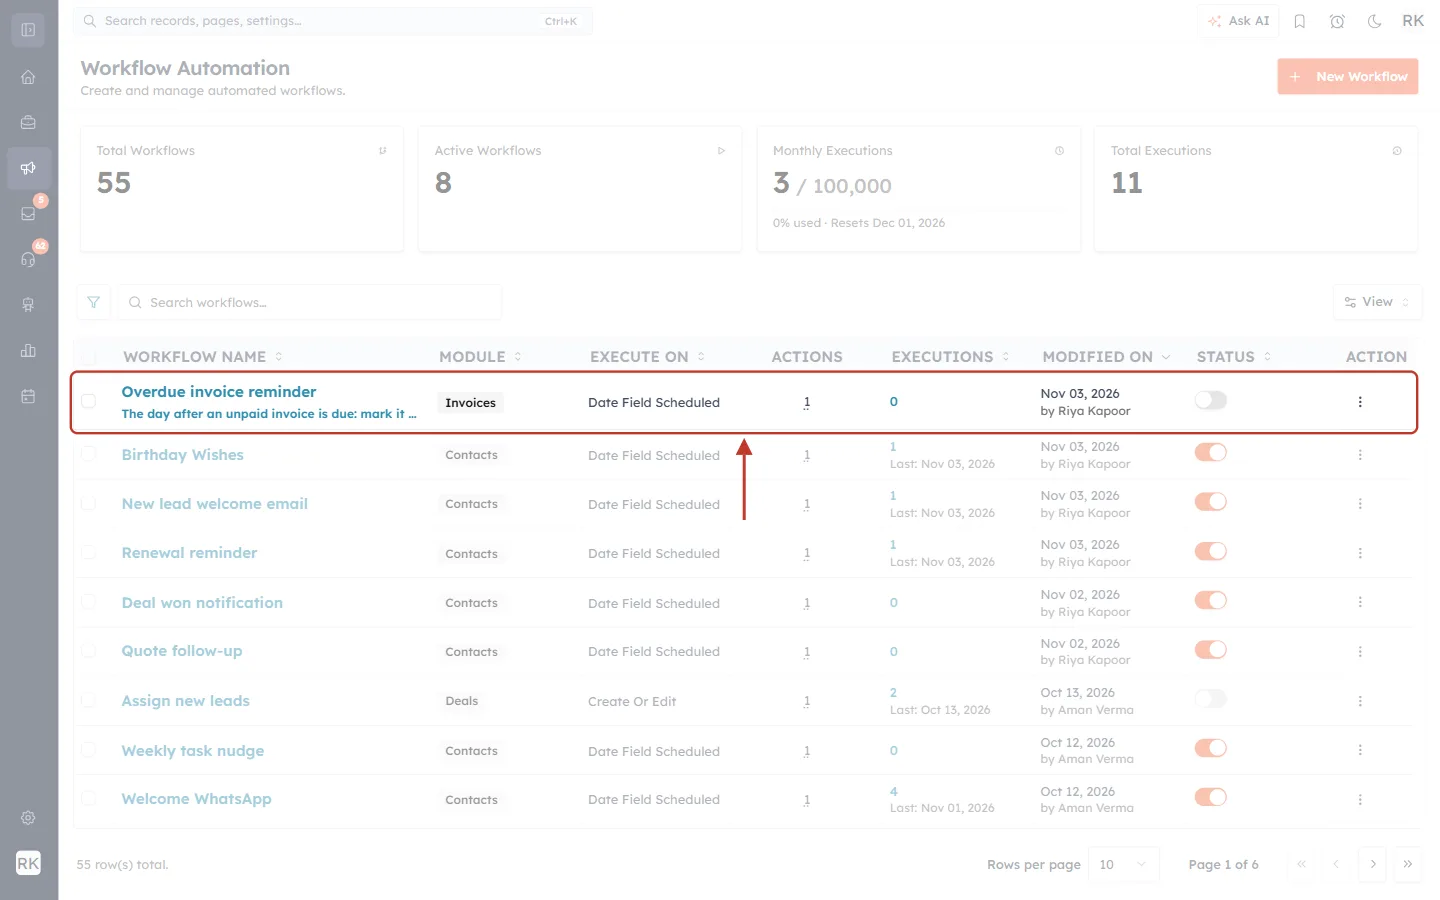
What this screenshot shows. The saved workflow in the list, ringed.
Overdue invoice reminder and its description are at the top of the list.
Module · Invoices and Execute On · Date Field Scheduled confirm the setup.
Executions · 0: it hasn’t run yet. To see how it has run later, click its name and then View Report.
Status: the switch is off. A new workflow is saved switched off, so nothing is sent until you are ready.
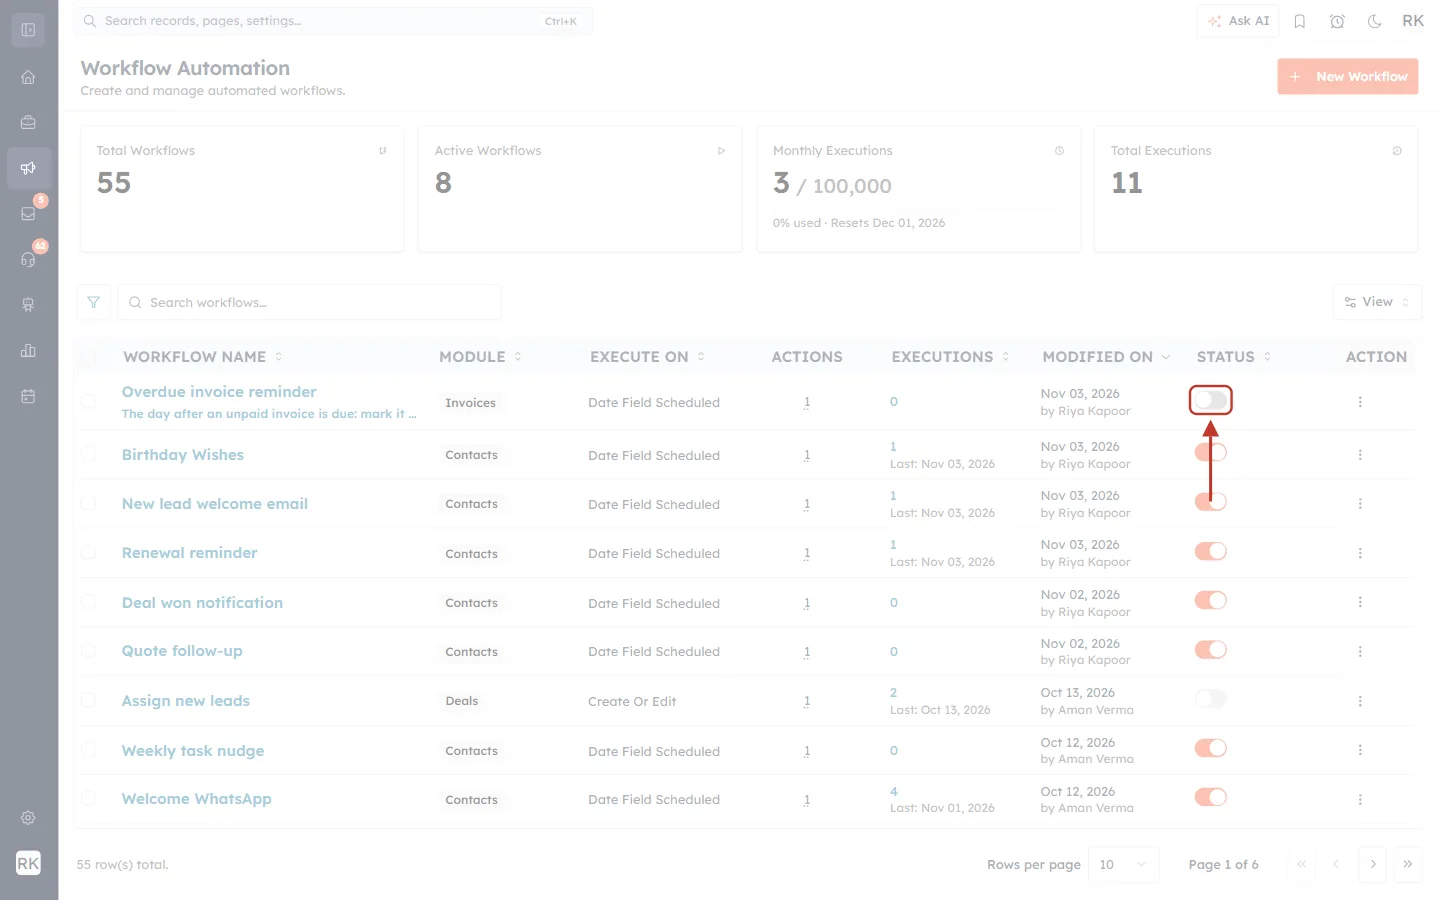
What this screenshot shows. The same row, with its Status switch ringed.
Click the switch to turn the workflow on. It turns orange, like the ones below it.
To pause all reminders, for example during a holiday, click it again.
⚠️
Test it first. With Existing records too, real customers can receive this email once the switch is on. Add the condition Subject is the name of a test invoice, create that invoice with today’s Due Date and a contact that has your own email address, and switch the workflow on. Check your inbox after your chosen time tomorrow. Then remove the condition.
Part 6: Stop reminders when an invoice is paid#
The conditions in Step 19 are “checked on each record’s current values”, in the words on the screen. So reminders stop as soon as an invoice no longer matches. For that to work, the invoice must be up to date:
What happened | What to do | Result |
|---|---|---|
The customer paid online | Nothing. The gateway confirms the payment and the balance updates | Balance Due is 0, so the invoice no longer matches |
The customer paid by bank or cash | ⋯ → Record Payment on the invoice | Balance Due goes down. At 0, the invoice no longer matches |
You want to close it in full | ⋯ → Mark Paid on the invoice | The invoice is finished and no longer matches |
You agreed a new date | Edit the Due Date, and set Status back to Sent if you wish | Check the workflow report after the change |
The invoice is no longer owed | Set Status to Cancelled | The invoice no longer matches |
Details of recording a payment are in Getting Paid on Invoices. If the Status still reads Overdue after the invoice is fully paid, update it to Paid so that your list is correct.
A suggested reminder schedule#
One Date-Based Trigger has one starting point, so use a separate workflow for each stage. Copy the steps in Part 5 and change only what’s shown here.
Stage | When | Repeat | Tone of the email |
|---|---|---|---|
Friendly nudge | Before · 3 days | Once | “Your invoice falls due on…” |
First reminder | After · 1 day | Once | “Your invoice is now overdue” |
Follow-ups | After · 8 days | Every 1 week, after 3 times | “This is still unpaid, please contact us” |
Only the workflows that run after the due date need the Mark as Overdue action. All the options are explained in Date-Based Trigger in Workflow Automation.
Troubleshooting#
Problem | What to check |
|---|---|
An invoice is late but still says Sent. | That is normal. The status only changes when someone edits it, or a workflow like the one in Part 5 changes it. |
A late invoice doesn’t appear in my filter. | It has no Due Date, or its Status is Paid, Cancelled or Refunded. To check, filter Due Date by is empty. |
My saved filter misses recent invoices. | The Due Date in the filter is a fixed date. Change it to today each time. |
The Payment Reminder template isn’t in the workflow. | The template’s Module isn’t Invoices, and it can’t be used until it is rebuilt on Invoices (Step 10). |
The workflow ran but no email arrived. | Open the workflow’s report. An invoice shown as Skipped has no linked Contact. Otherwise, check that the Contact has an email address and hasn’t unsubscribed. |
A customer got a reminder after paying. | The payment wasn’t recorded before the send time. Use Record Payment, and see Part 6. |
The email went out at the wrong hour. | The time follows your organisation’s timezone, shown under Time of day (Step 16). |
The email shows curly brackets instead of values. | Copy the shortcode exactly as in Step 12, for example |
I can’t change “Run this workflow for”. | It is locked after saving. Create a new workflow to change it, and switch the old one off. |
Frequently asked questions#
Does AiEngage CRM mark invoices Overdue by itself?
Not by default. Use the workflow in Part 5 to do it automatically, or change the Status yourself as in Part 2.
Can the automatic reminder include the customer’s pay button?
No. There is no shortcode for the payment link in templates. Send the pay button with Send Invoice (Part 3), or paste the address from Copy Invoice Link.
Can I greet the customer by name in the automatic email?
Not from an Invoices template, as the shortcode list has no contact name. Use “Hello,” or name the invoice in the first line instead.
Can I add late fees or interest?
There is no automatic late fee on invoices. If you agree one with the customer, add it to the invoice by hand.
Can reminders go by WhatsApp?
The same palette has a Send WhatsApp action, which needs WhatsApp connected. An invoice has no phone number of its own, so send a test to your own number first and check that it arrives.
Do reminders count against my plan?
Each run counts towards Monthly Executions, shown on the Workflow Automation page.
Previous and next#
Previous: Getting Paid on Invoices
Related#
Was this article helpful?
Ready to implement this?
OpenAI Engage and apply what you just learned to your own workspace.
Open AI Engage CRM