Loading…


KnowledgeBase
The Payments Module: Track Every Payment, Read a Payment Record, Download Receipts and Record Refunds (Step-by-Step)
Introduction#
When a customer pays an invoice, AiEngage CRM saves that money as a payment record in the Payments module. One invoice can have several payments (for example an advance and a final payment), and each one keeps its own amount, date, method, status and reference number.
The Payments module is your payment ledger: one place to see every amount received, check what is still pending, find a transaction ID when a customer calls, download a receipt and keep refunds on record.
A payment record is created in any of these ways:
How the money arrives | What creates the payment record |
|---|---|
The customer pays online with the invoice’s pay link (Stripe or Razorpay) | Created automatically when the gateway confirms the payment |
You receive a bank transfer, cash or cheque | Record Payment (or Mark Paid) on the invoice |
You need to add a payment by hand, for example an old one | Create Payment in the Payments module (Part 3) |
You have many past payments in a spreadsheet | Create Payment ▾ → Import Bulk (CSV, Excel) |
In this guide we use a sample furniture business with five payments in Indian rupees: online, bank-transfer, pending, part-paid and refunded.
ℹ️
Before you start: you need permission to view the Payments module. Creating, editing, deleting, importing and exporting payments each need their own permission in your profile. See Quotes, Invoices & Payments Permissions and Plan Limits. Online payments need a connected gateway: Set Up Online Payments with Stripe or Razorpay.
Part 1: Find and browse your payments#
Step 1: Open Payments from the left menu#
Click the CRM (briefcase) icon in the left rail to open the Sales menu, then click Payments.
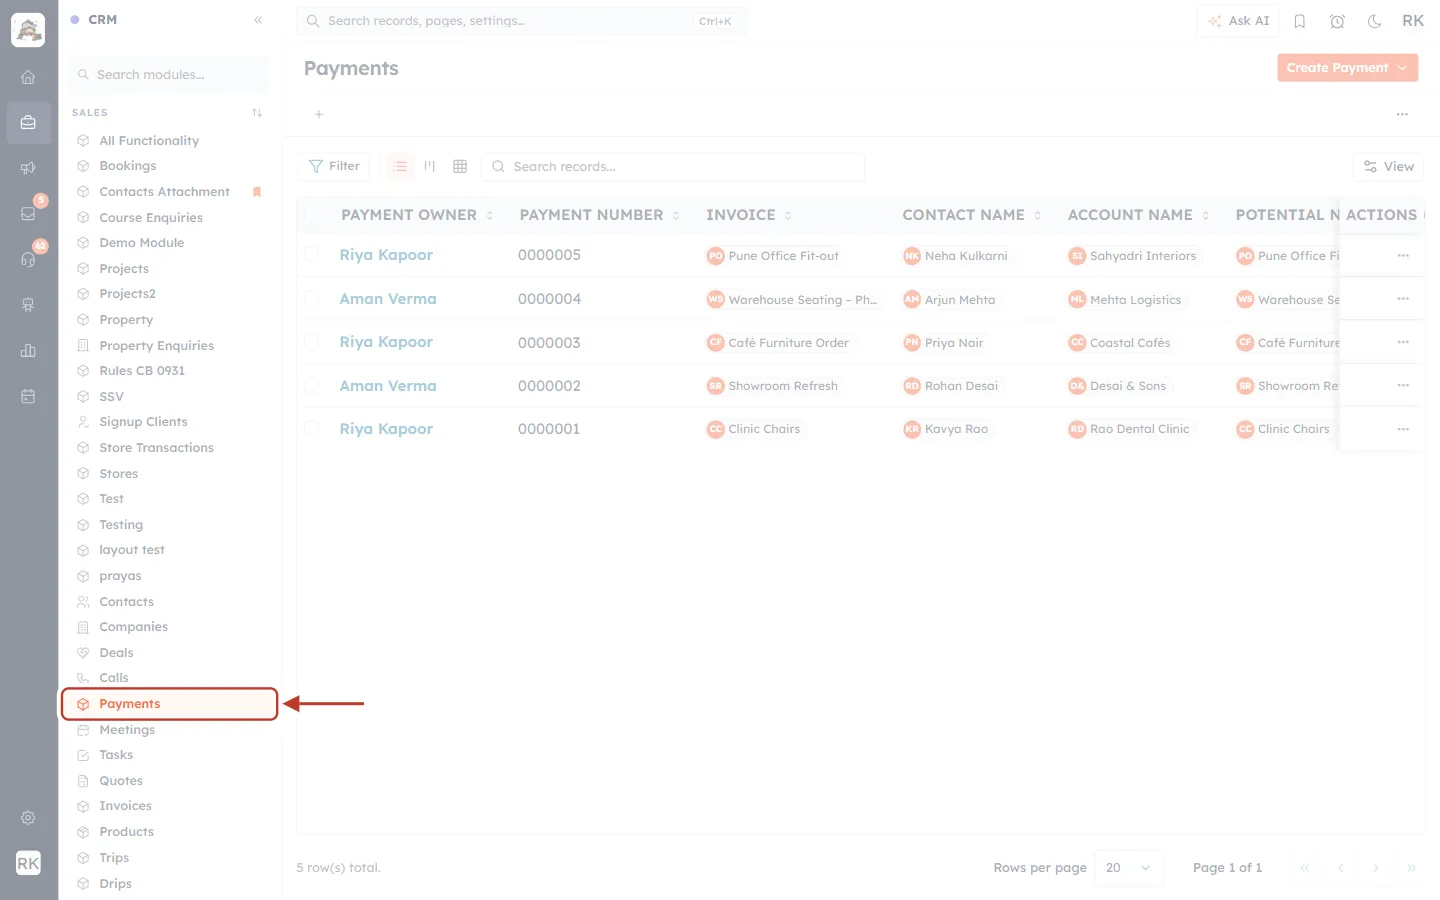
What this screenshot shows. The Sales menu, with Payments ringed.
The Sales menu lists your CRM modules, including Contacts, Companies, Deals, Quotes, Invoices, Products and Payments.
The highlighted item is the module that is open.
If Payments is missing, your profile has View: None for the module. Ask your admin.
Step 2: Read the payments list#
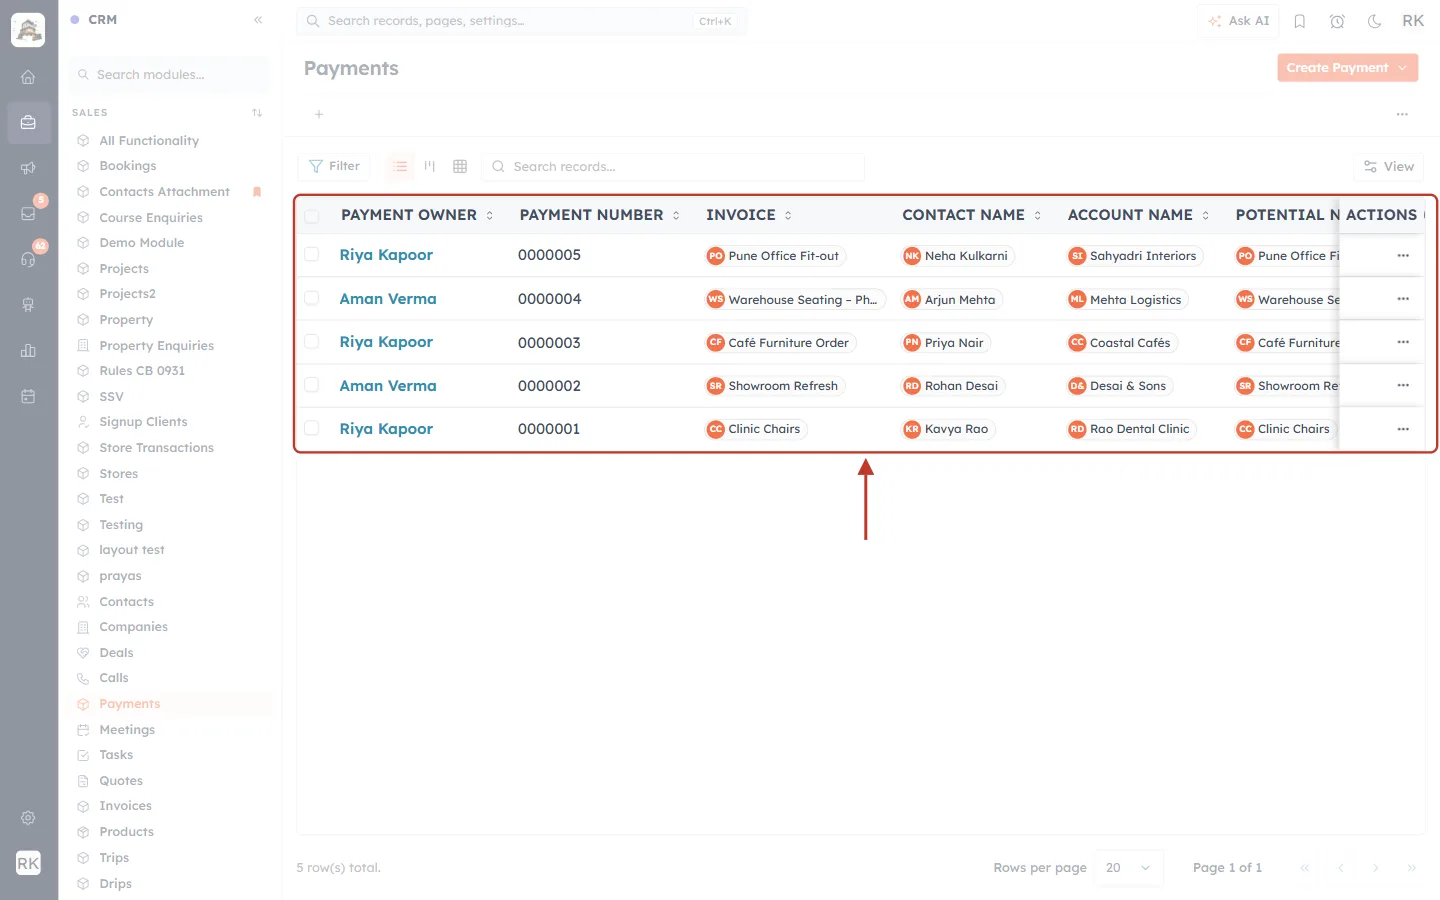
What this screenshot shows. The payments table, ringed.
Each row is one payment, newest first.
PAYMENT OWNER: the team member responsible for the payment (usually the invoice owner).
PAYMENT NUMBER: an automatic number, 0000001, 0000002… It is the payment’s name and is printed on its receipt.
INVOICE: the invoice this money pays. Click the chip to open the invoice.
CONTACT NAME: the person who paid. ACCOUNT NAME: their company. POTENTIAL NAME: the deal it belongs to.
AMOUNT is the next column to the right. Scroll the table sideways to see it, for example ₹ 1,00,000.00 for payment 0000004.
ACTIONS (⋯) at the end of each row opens the row menu (Step 5).
Click a payment number to open the payment (Part 2).
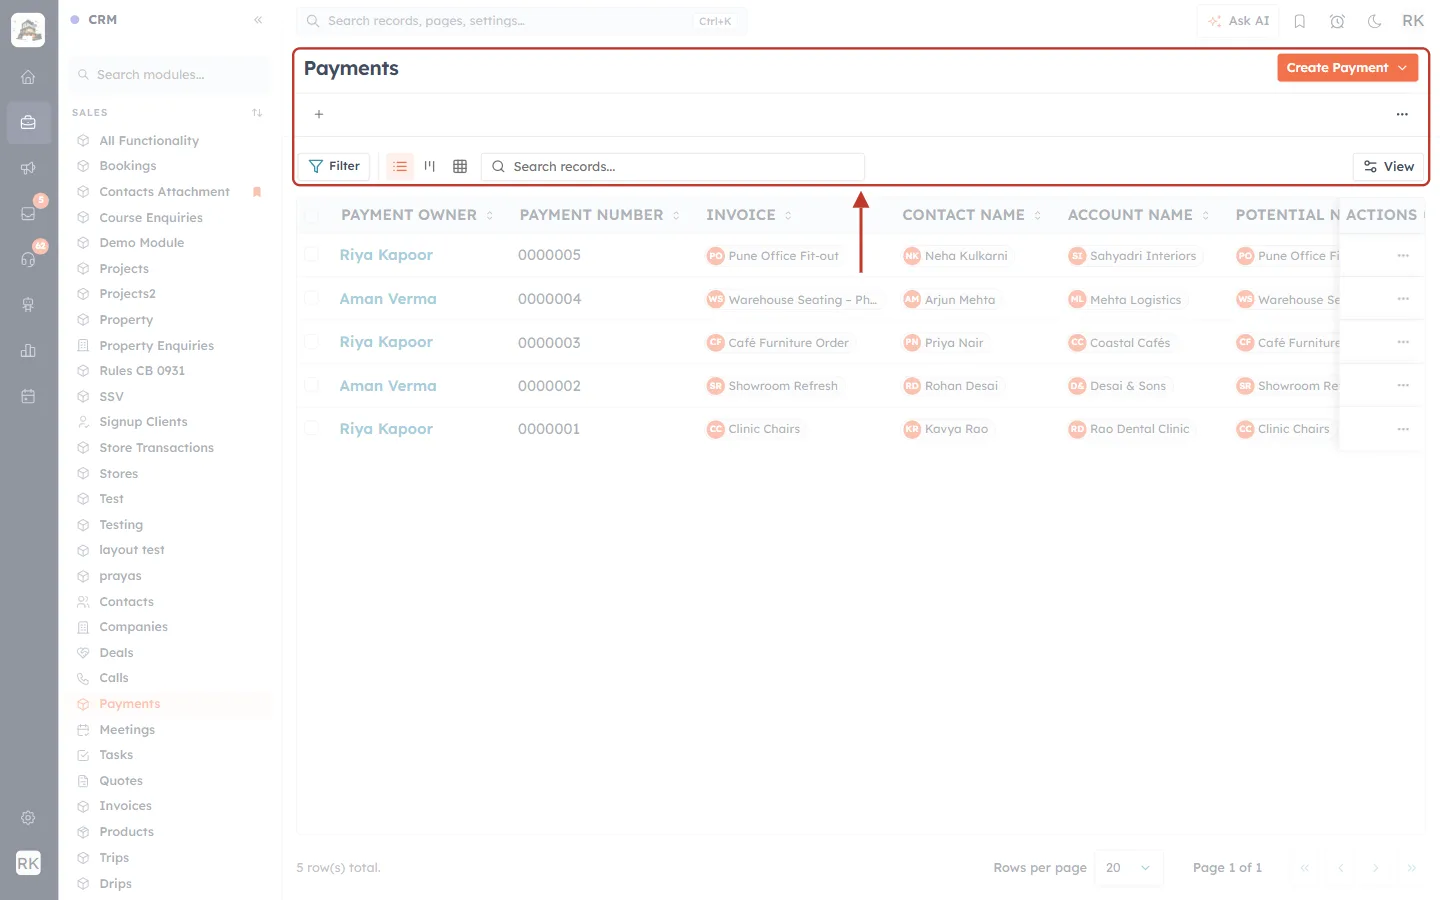
What this screenshot shows. The top of the page, ringed.
Payments is the page title. Create Payment ▾ (orange, top right) adds or imports payments (Part 3).
The + under the title adds a saved view as a tab, for example “Pending payments”. The ⋯ on the right holds more view options.
The toolbar row holds Filter, the layout switch, Search records… and View. See the next screenshot.
Step 3: Search, switch layout and choose columns#
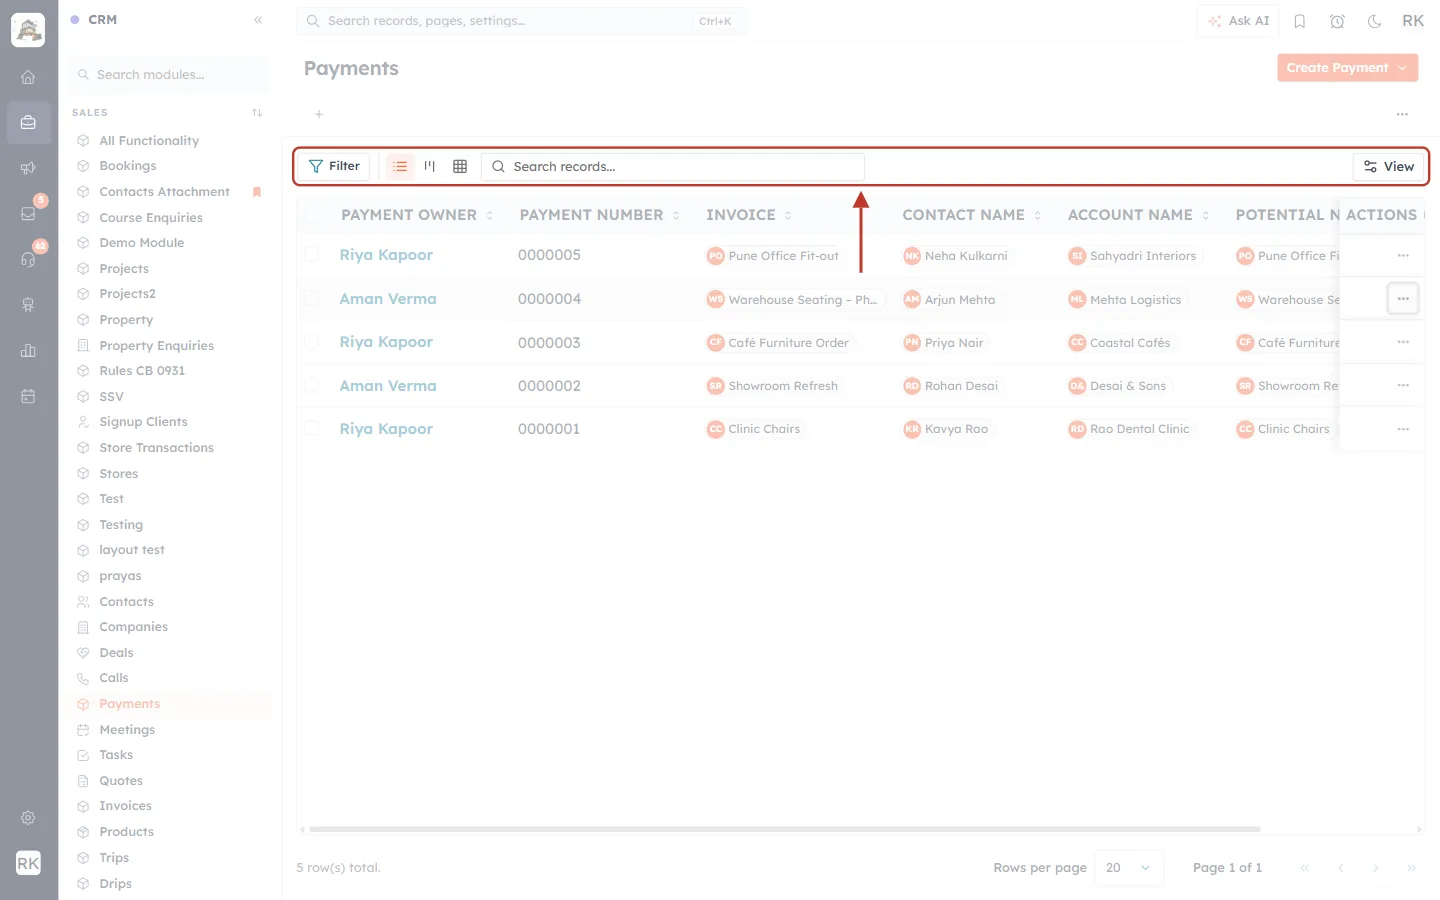
What this screenshot shows. The toolbar, ringed.
Filter: opens the filter panel (Step 4).
The three layout buttons switch between list, kanban (for example one column per status) and grid views.
Search records…: type a payment number, a transaction ID or a name.
View (right): choose which columns show and in what order. Add Status, Payment Date and Payment Method to see them in the list.
Step 4: Filter the list#
Click Filter. The Filter Payments panel opens on the left of the list.
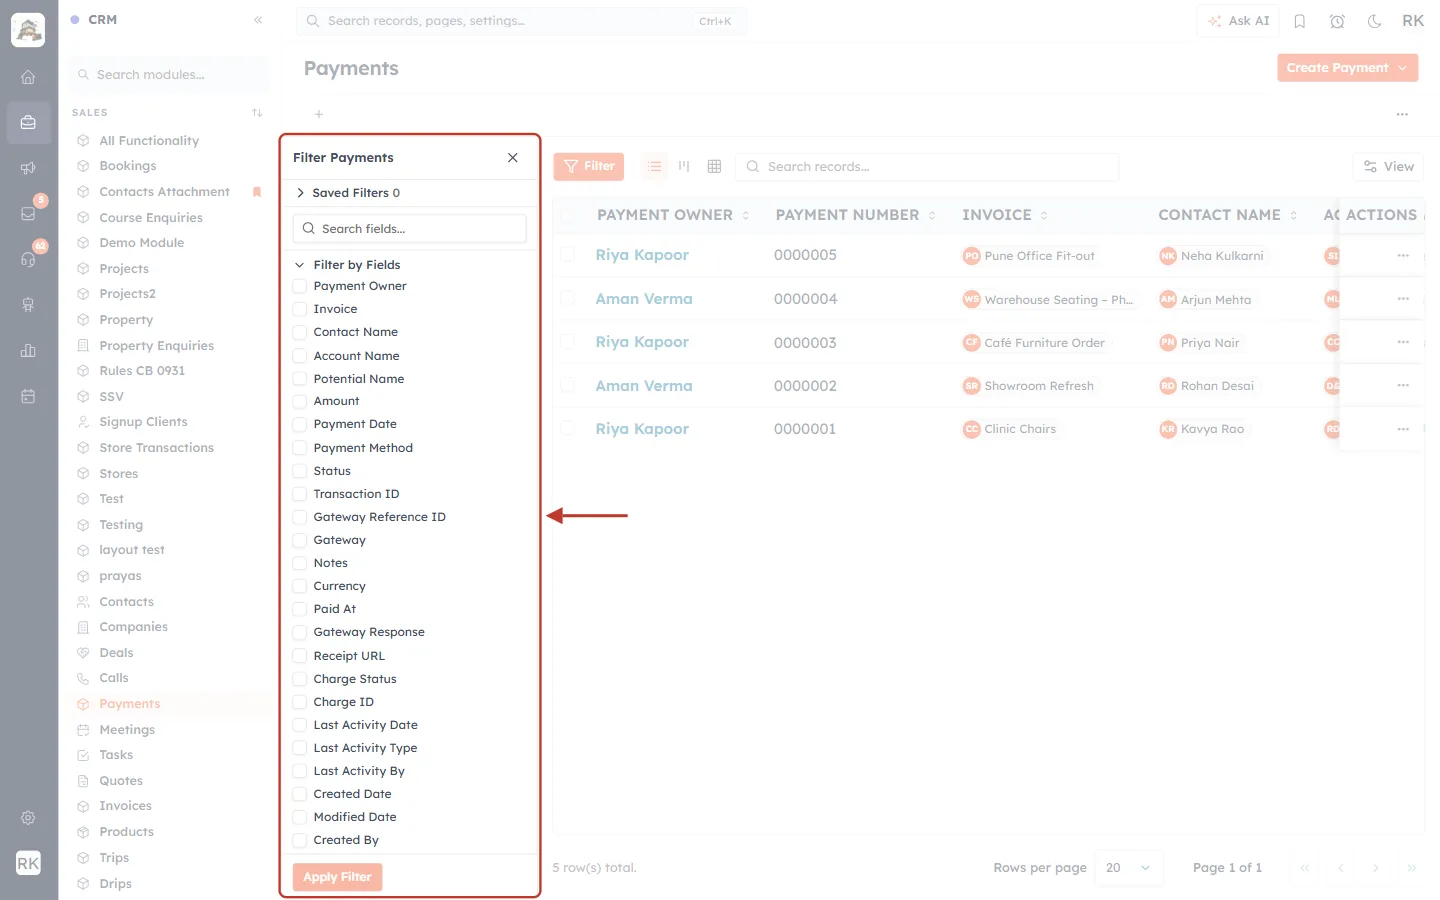
What this screenshot shows. The Filter Payments panel, ringed.
Saved Filters: filters you saved before (0 here).
Search fields…: find a field quickly.
Filter by Fields: tick any field to filter on it, for example Status is Pending, Payment Method is Bank Transfer, or Payment Date is this month.
The list includes gateway fields (Gateway, Gateway Reference ID, Paid At, Charge Status, Charge ID) and system fields (Created Date, Modified Date, Created By).
Filter by Related Modules (at the bottom): filter by the linked invoice, contact, company or deal.
Click Apply Filter to run it. Close the panel with ✕.
✅
Useful filters to save: Status is Pending (money not confirmed yet), Payment Date is this month (month-end reconciliation), Payment Method is Cash (cash to bank), and Status is Refunded.
Step 5: Use the row menu#
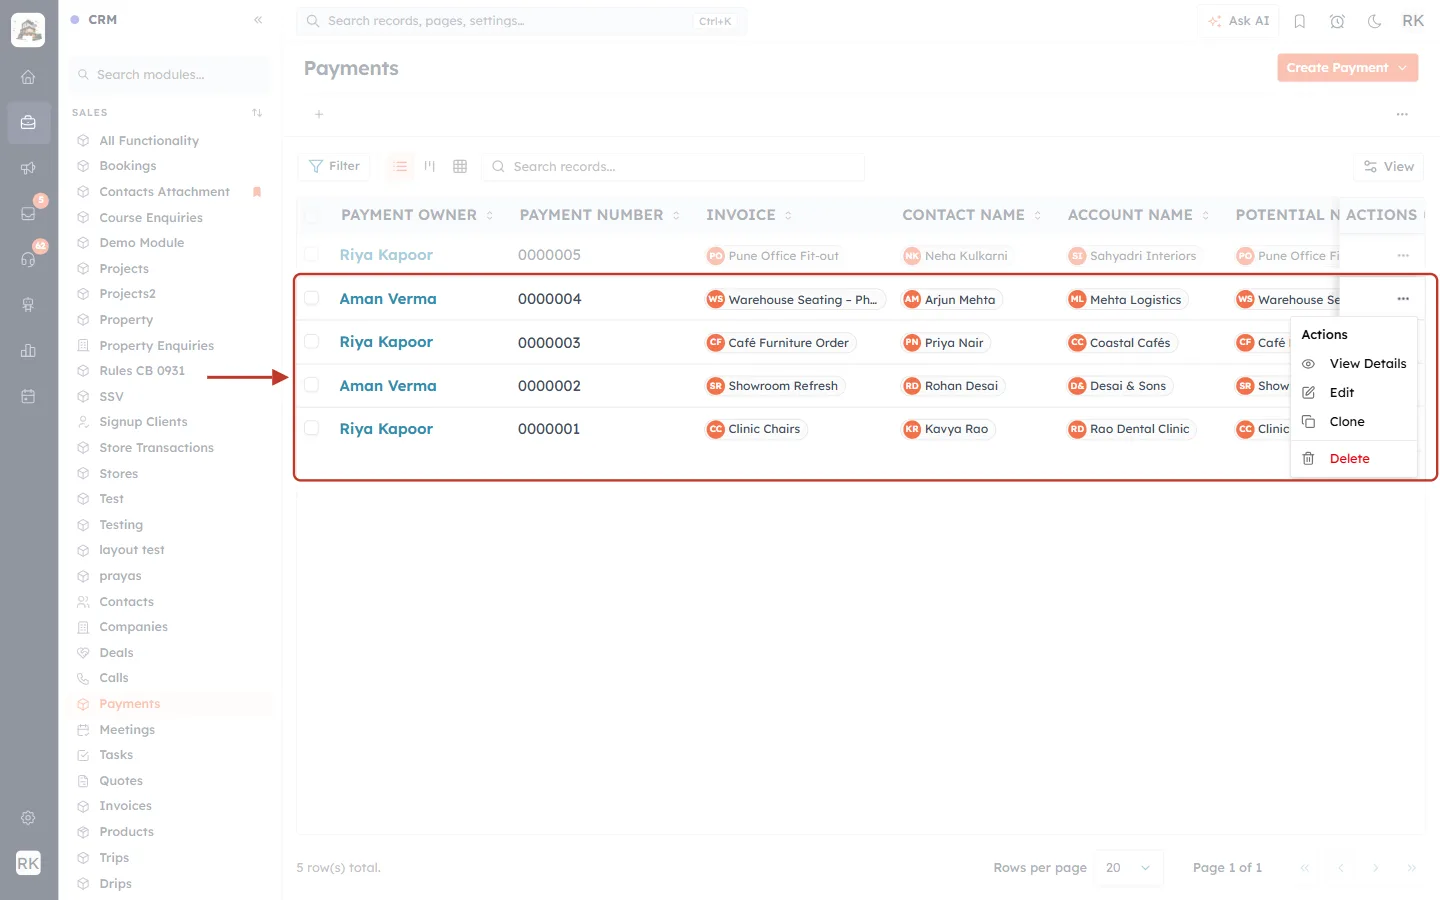
What this screenshot shows. The ⋯ menu of payment 0000004, with the row ringed.
View Details: opens the payment.
Edit: opens the edit form, for example to correct a date or set a refund (Part 5).
Clone: makes a copy to edit, handy for a second instalment with the same invoice and customer.
Delete: removes the payment (see the warning in Part 5).
Options you aren’t allowed to use don’t appear.
Part 2: Open and read a payment#
Step 6: Open a payment#
Click a payment number in the list. Here we open 0000004, a ₹1,00,000 advance paid by bank transfer.
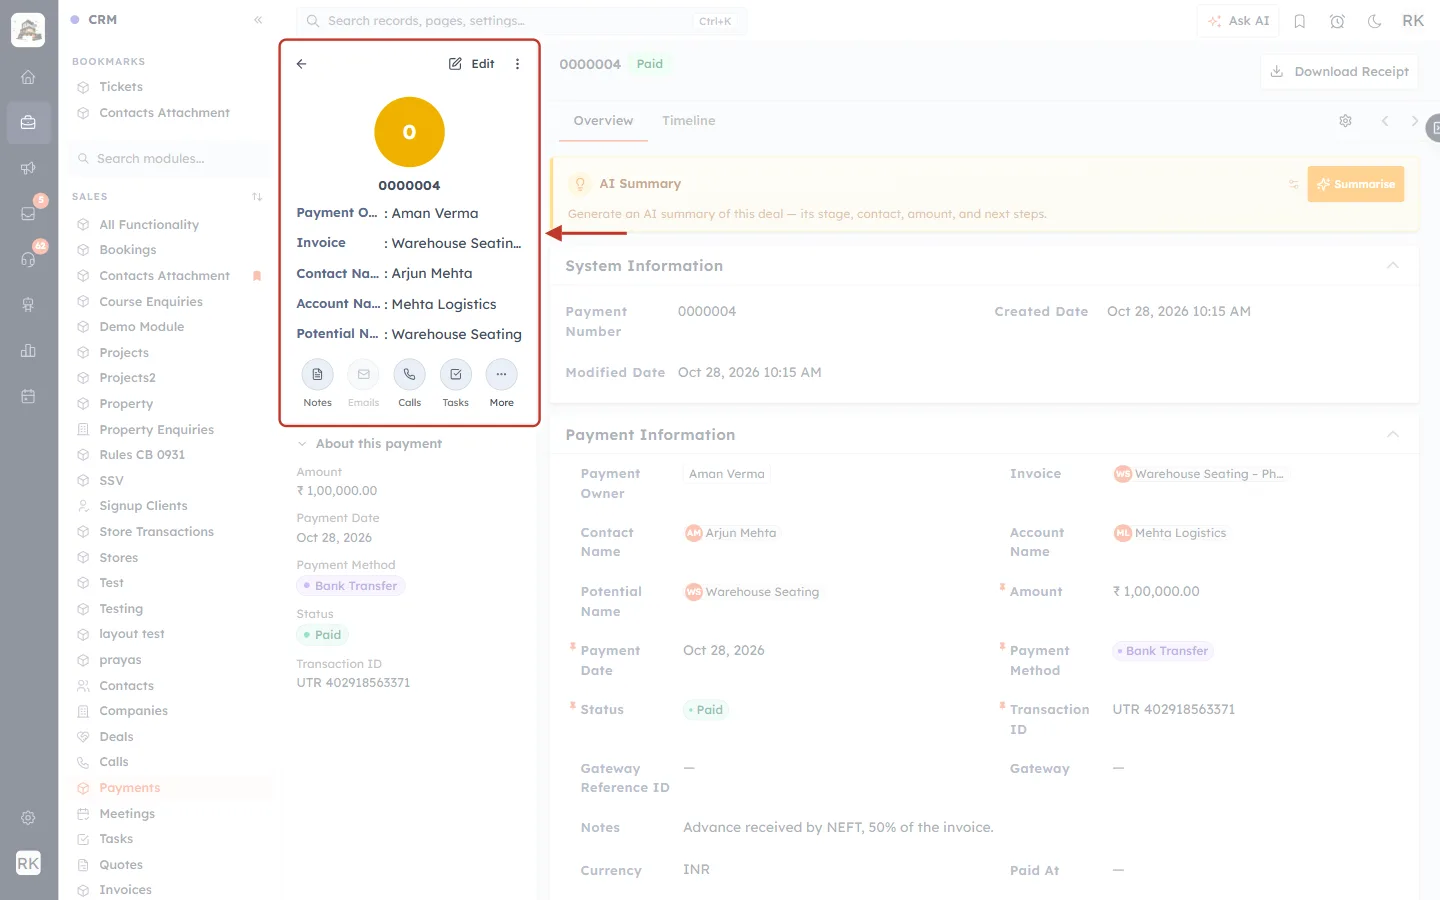
What this screenshot shows. The left summary panel, ringed.
The circle and 0000004 are the payment number. Edit and ⋮ (more) are at the top.
Payment Owner (Aman Verma), Invoice (Warehouse Seating – Phase 1), Contact Name (Arjun Mehta), Account Name (Mehta Logistics) and Potential Name (the deal).
The round buttons add a Note, send an Email, log a Call or a Task, or show More, all linked to this payment.
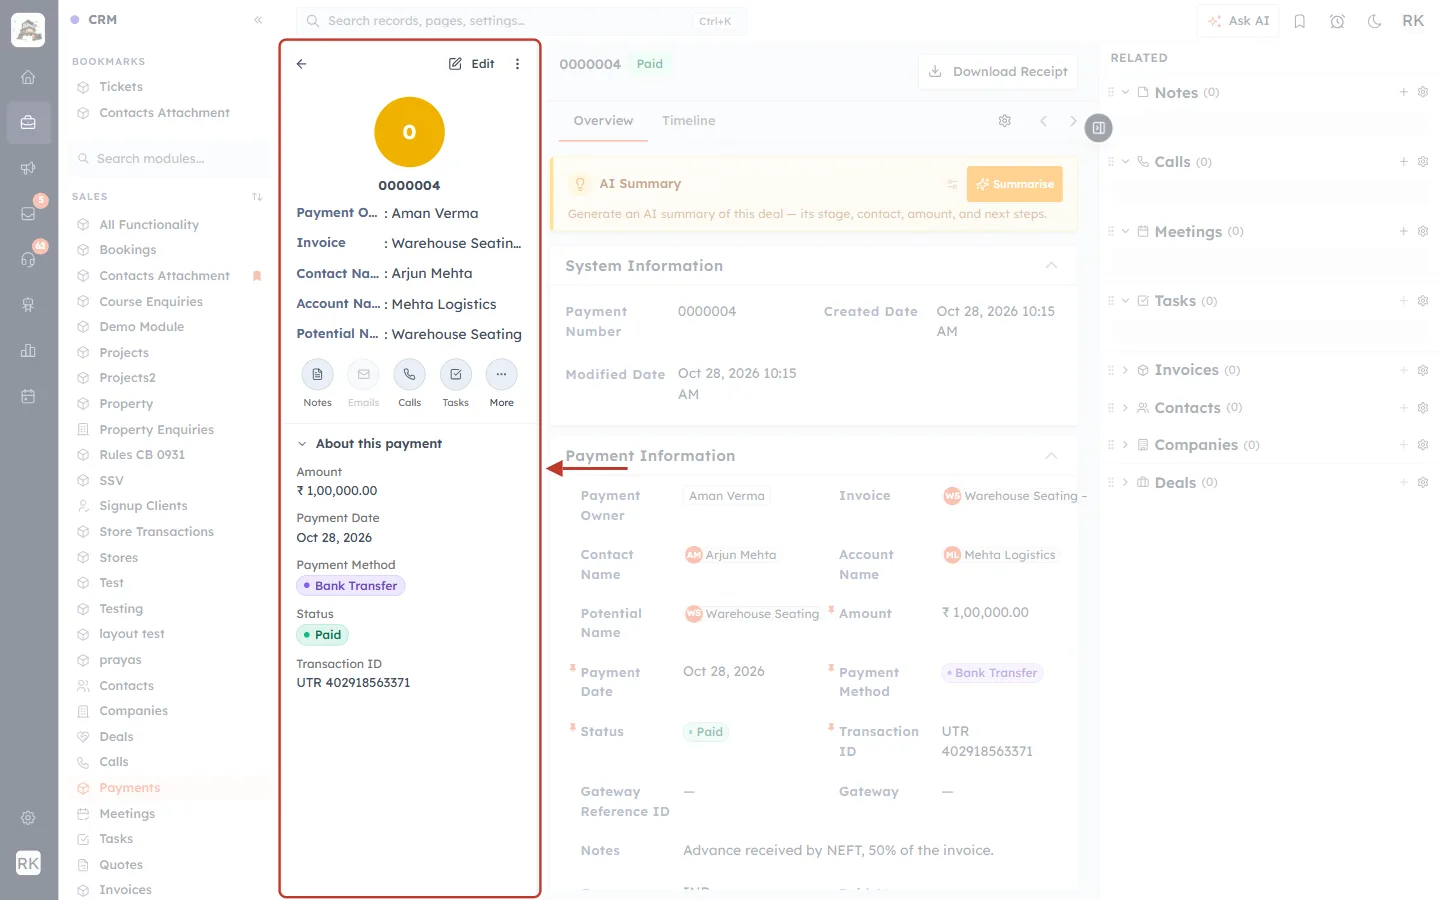
What this screenshot shows. The About this payment section of the left panel.
Amount: ₹1,00,000.00.
Payment Date: Oct 28, 2026, the day the money was received.
Payment Method: Bank Transfer.
Status: Paid (green).
Transaction ID: the bank’s UTR number, so anyone can match it with the bank statement.
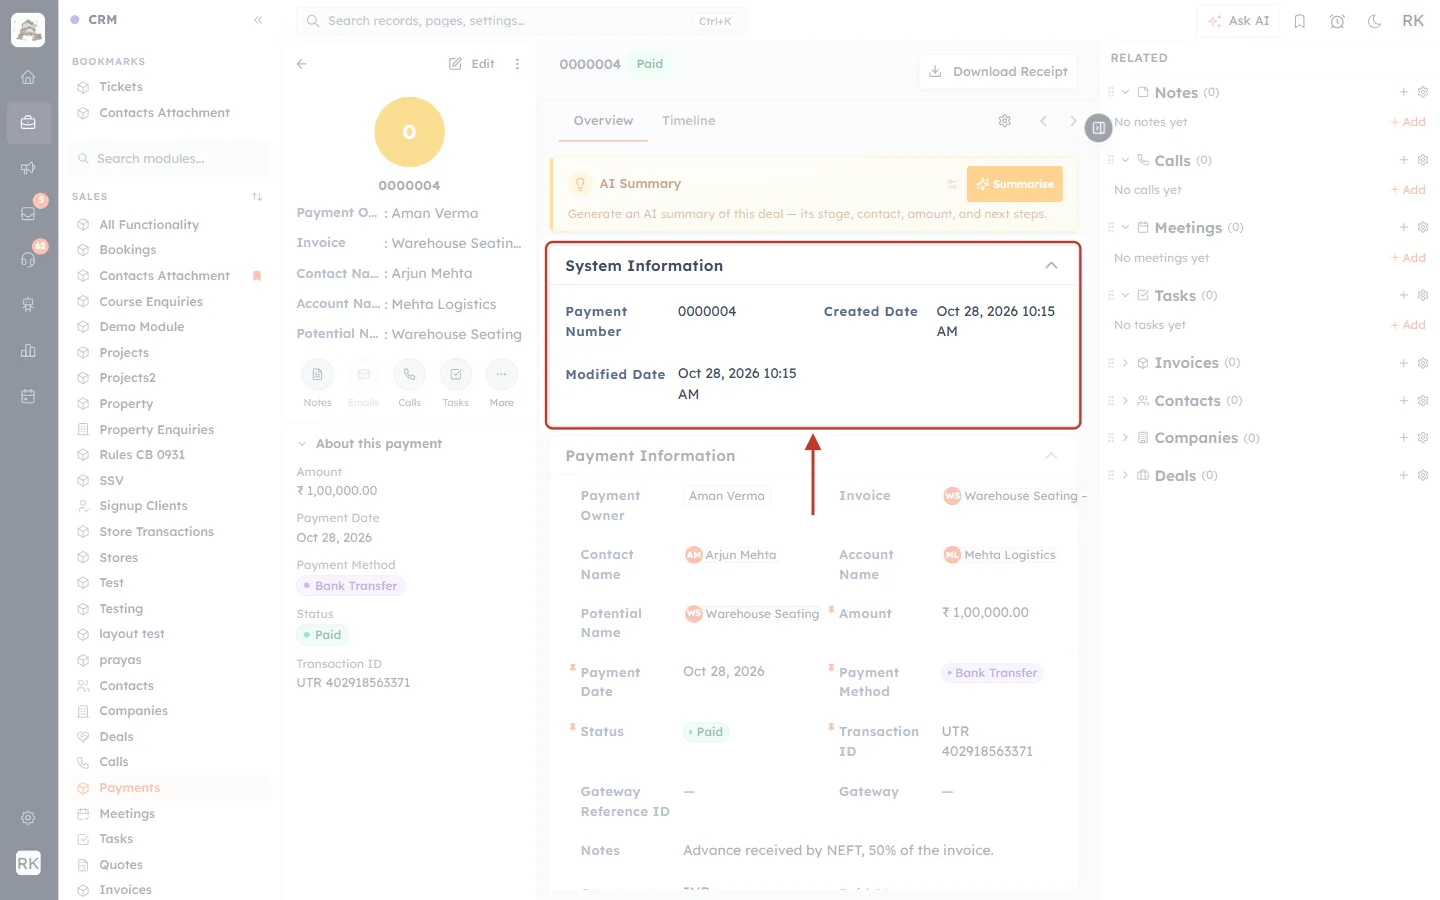
What this screenshot shows. The System Information card in the Overview tab.
Payment Number: 0000004 (set automatically, can’t be changed).
Created Date and Modified Date: when the record was added and last changed.
Above it, the header shows the number, a green Paid badge, and the Overview and Timeline tabs. Timeline lists every change made to the payment.
The AI Summary card can summarise the record for you.
On the right, Related shows the notes, calls, meetings, tasks, invoices, contacts, companies and deals linked to this payment.
Step 7: Understand every payment field#
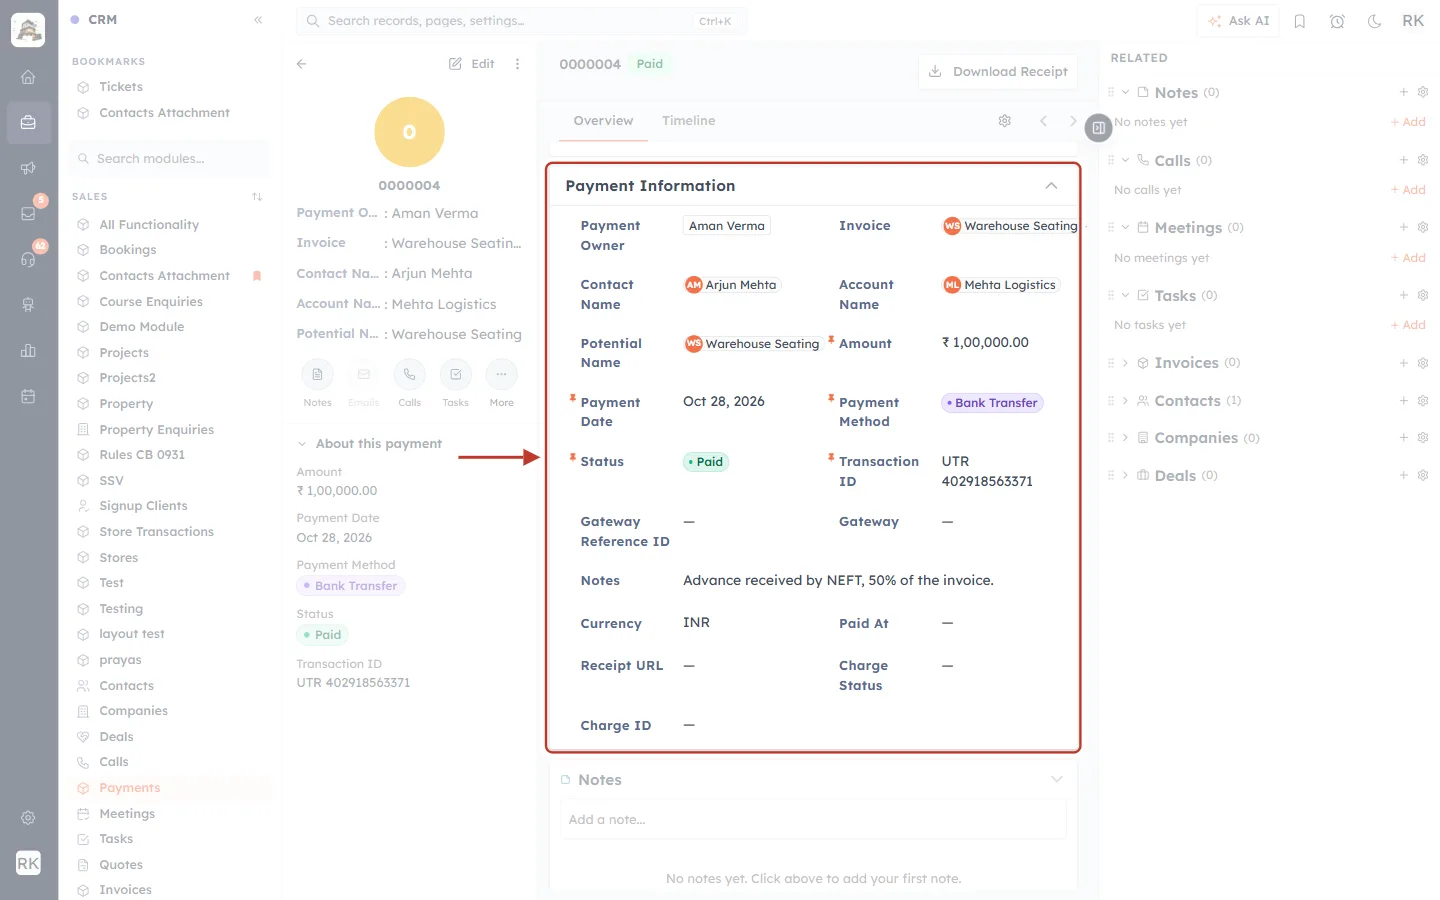
What this screenshot shows. The Payment Information card of payment 0000004, ringed.
Payment Owner, Invoice, Contact Name, Account Name, Potential Name: who owns it and what it is linked to.
Amount: ₹1,00,000.00. Payment Date: Oct 28, 2026. Payment Method: Bank Transfer. Status: Paid.
Transaction ID: the reference from the bank or gateway.
Gateway and Gateway Reference ID are empty, because this money didn’t come through Stripe or Razorpay.
Notes: “Advance received by NEFT, 50% of the invoice.”
Currency: INR, your organisation currency.
Paid At, Receipt URL, Charge Status, Charge ID: filled in by the gateway for online payments, empty here.
Now compare a payment the customer made online from the invoice pay page (payment 0000005):
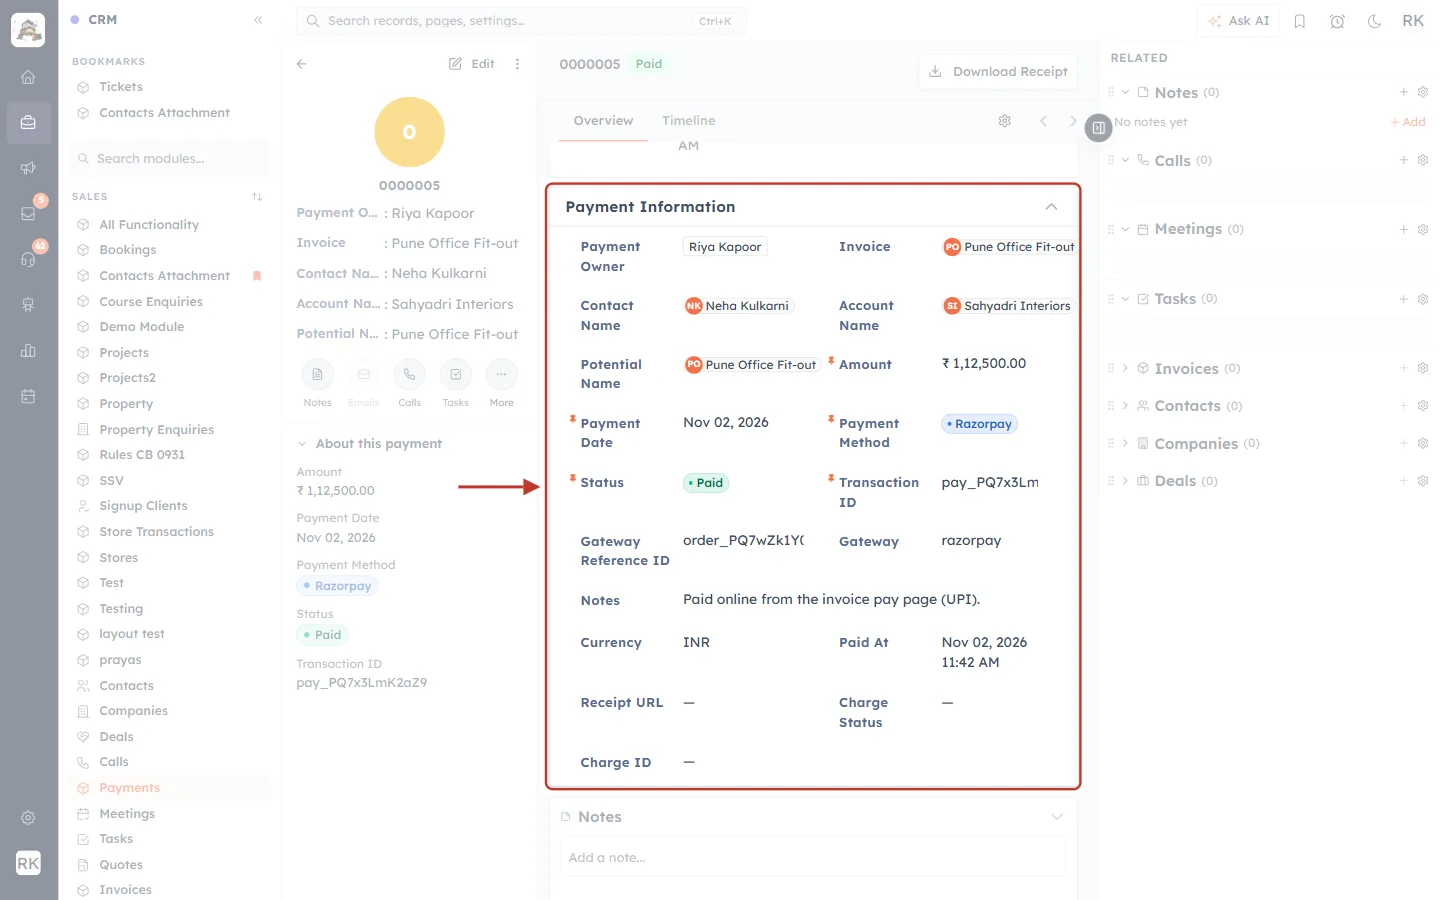
What this screenshot shows. The same card for an online payment through Razorpay.
Payment Method: Razorpay.
Transaction ID: Razorpay’s payment id (pay_…). Gateway Reference ID: its order id (order_…).
Gateway: razorpay.
Paid At: the exact date and time the gateway confirmed the payment (Nov 02, 2026 11:42 AM).
Use these ids to find the same payment in your Razorpay or Stripe dashboard, for example to check a settlement or make a refund.
Gateway fields such as Charge Status and Charge ID are read-only. They are written by the gateway, not by your team.
Field | What it means | Filled by |
|---|---|---|
Payment Owner | Team member responsible | You (required) |
Payment Number | Automatic running number | CRM |
Invoice / Contact Name / Account Name / Potential Name | The invoice, person, company and deal it belongs to | CRM or you |
Amount | Money received | Gateway or you (required) |
Payment Date | Day the money was received | Gateway or you |
Payment Method | Stripe, Razorpay, Bank Transfer, Cash, Manual or Other | Gateway or you |
Status | Pending, Processing, Paid, Partial, Failed, Cancelled or Refunded | Gateway or you |
Transaction ID | Bank UTR, cheque number or gateway payment id | Gateway or you |
Gateway / Gateway Reference ID | Which gateway, and its order or session id | Gateway |
Notes | Anything worth remembering | You |
Currency | Payment currency (your organisation currency) | CRM |
Paid At, Receipt URL, Charge Status, Charge ID | Gateway confirmation details | Gateway (read-only) |
Part 3: Add a payment#
Step 8: Prefer Record Payment for invoice payments#
For money received against an invoice, the quickest route is the invoice itself. Open the invoice, click ⋯ and choose Record Payment. It creates the payment record for you, already linked to the invoice, contact, company and deal, and updates the invoice’s balance.
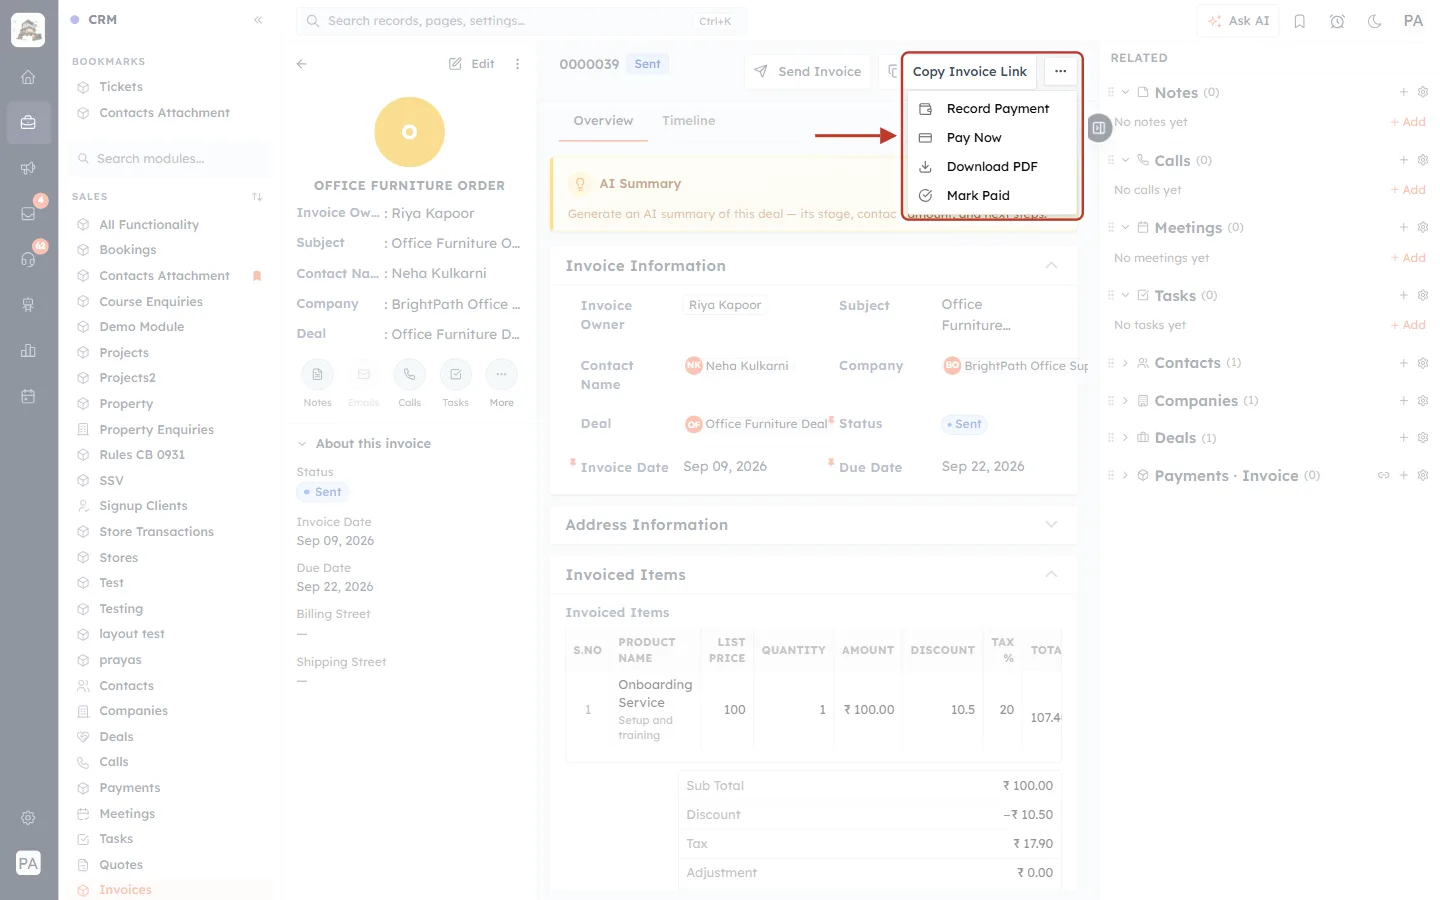
What this screenshot shows. An unpaid invoice with its ⋯ menu open.
Record Payment: log a bank transfer, cash or other payment. The new record appears in the Payments module.
Mark Paid: records the whole balance at once.
Pay Now: opens the online pay page. A payment made there is saved in Payments automatically.
Step by step: Getting Paid on Invoices.
Step 9: Create a payment by hand#
Use Create Payment when there is no invoice action to use, for example to enter a payment from before you used the CRM. Click the arrow on Create Payment to see all the options.
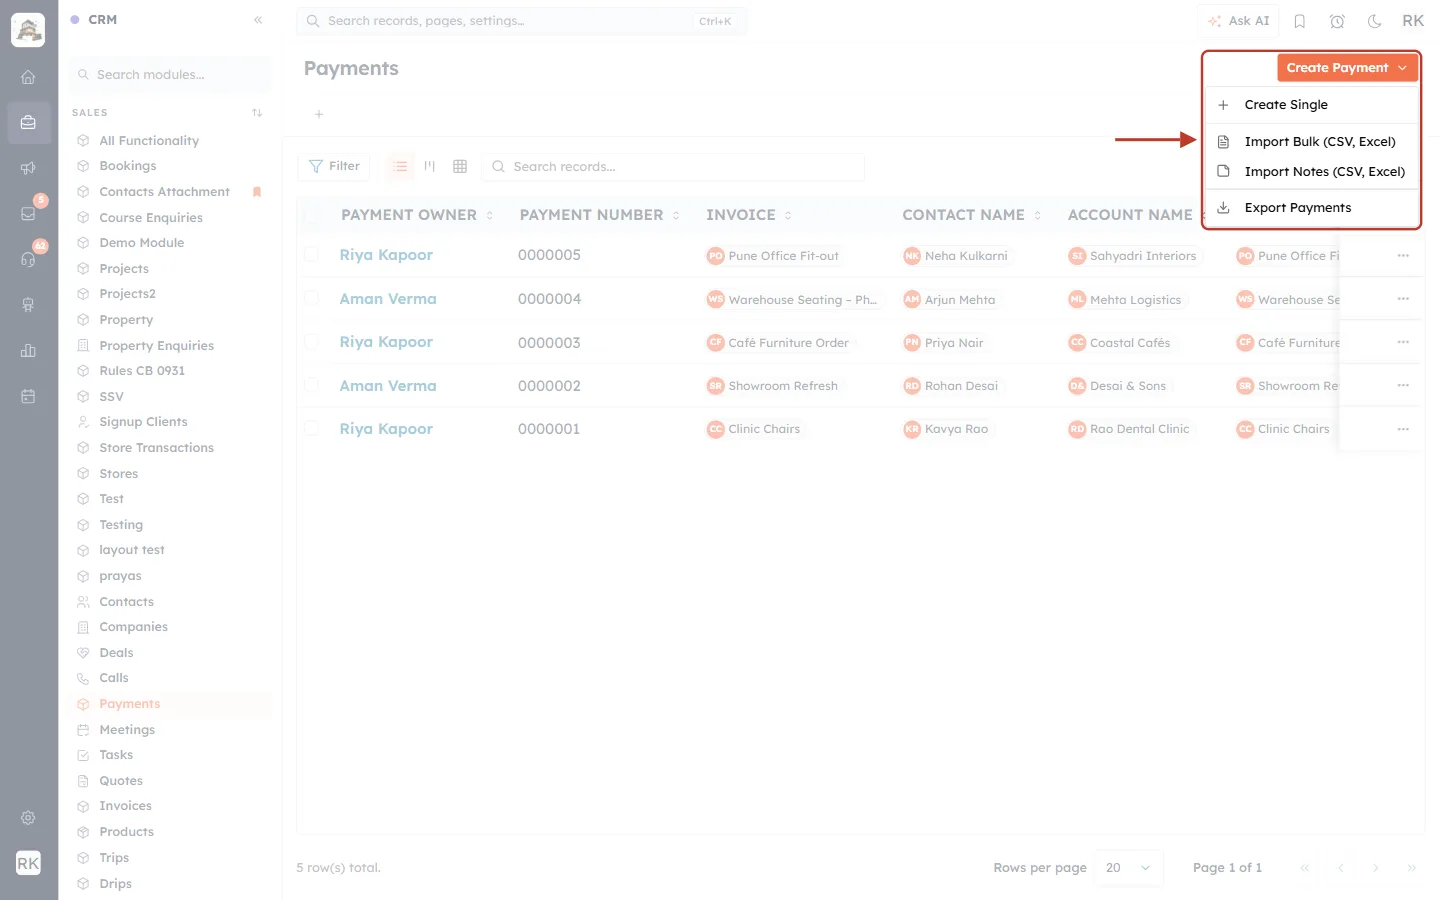
What this screenshot shows. The Create Payment ▾ menu.
Create Single: open the form for one payment (this step).
Import Bulk (CSV, Excel): bring in many payments from a spreadsheet.
Import Notes (CSV, Excel): add notes to existing payments from a file.
Export Payments: download the payments as a file for your accountant or bookkeeping software.
Click Create Single. The Create Payment form opens.
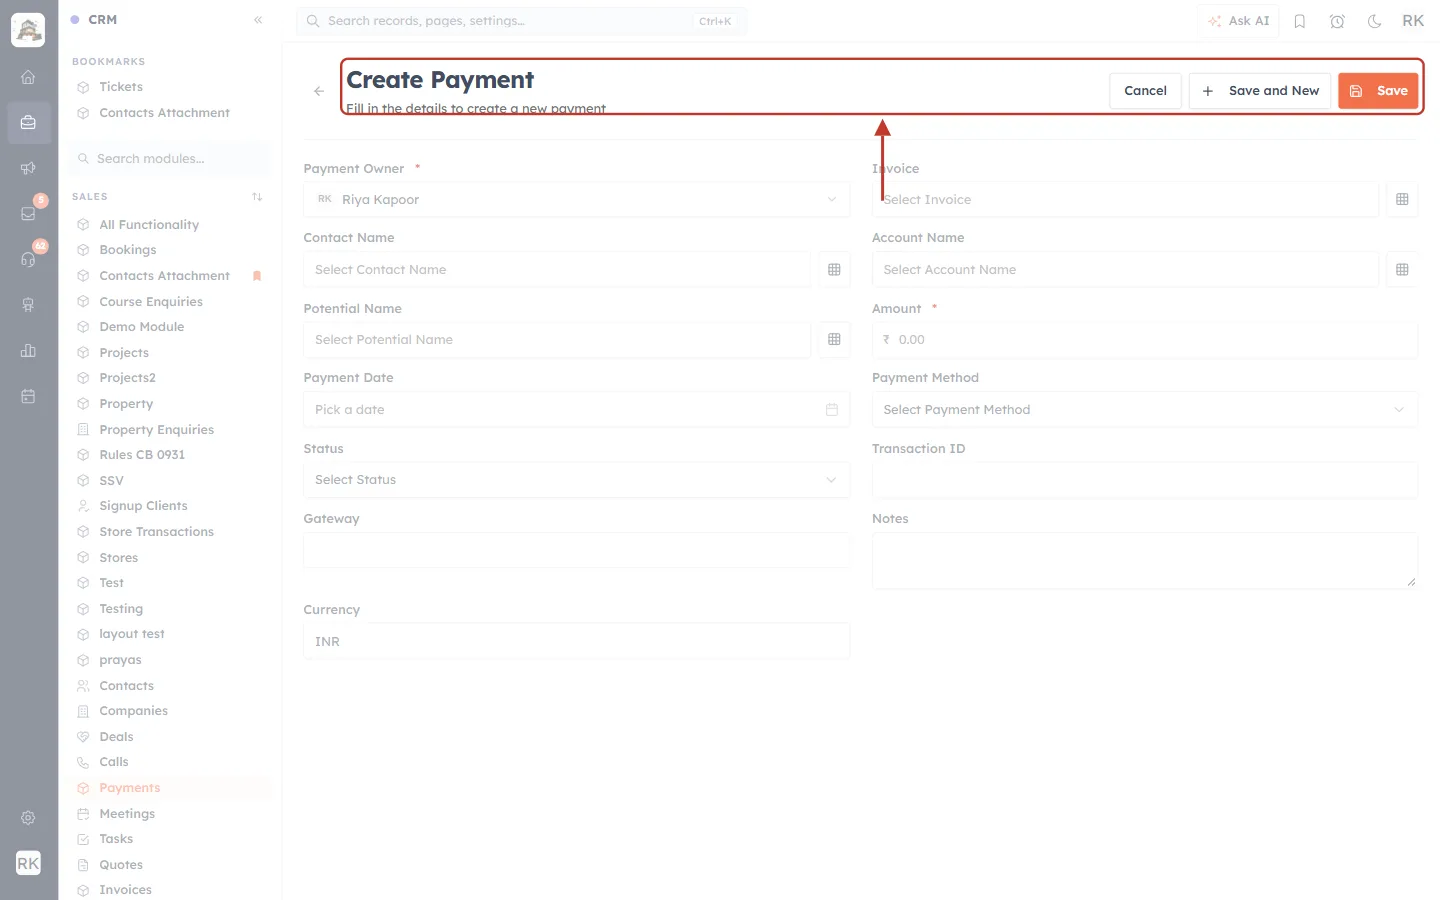
What this screenshot shows. The top of the form, ringed.
“Fill in the details to create a new payment.”
Cancel: leave without saving. Save and New: save and open an empty form for the next payment. Save: save this payment.
Below are the fields. Only Payment Owner and Amount (marked *) are required, but fill in as much as you can.
Fill in the form:
Payment Owner: you by default. Change it if someone else owns the payment.
Invoice: click the field or the grid icon and pick the invoice. Then pick the Contact Name, and the Account Name and Potential Name if you use them.
Amount: the amount received, here 25000.
Payment Date: pick the day the money arrived.
Payment Method and Status: choose from the lists (next screenshots).
Transaction ID: the bank reference, cheque number or receipt number.
Notes: anything useful, for example “Second instalment received by NEFT.”
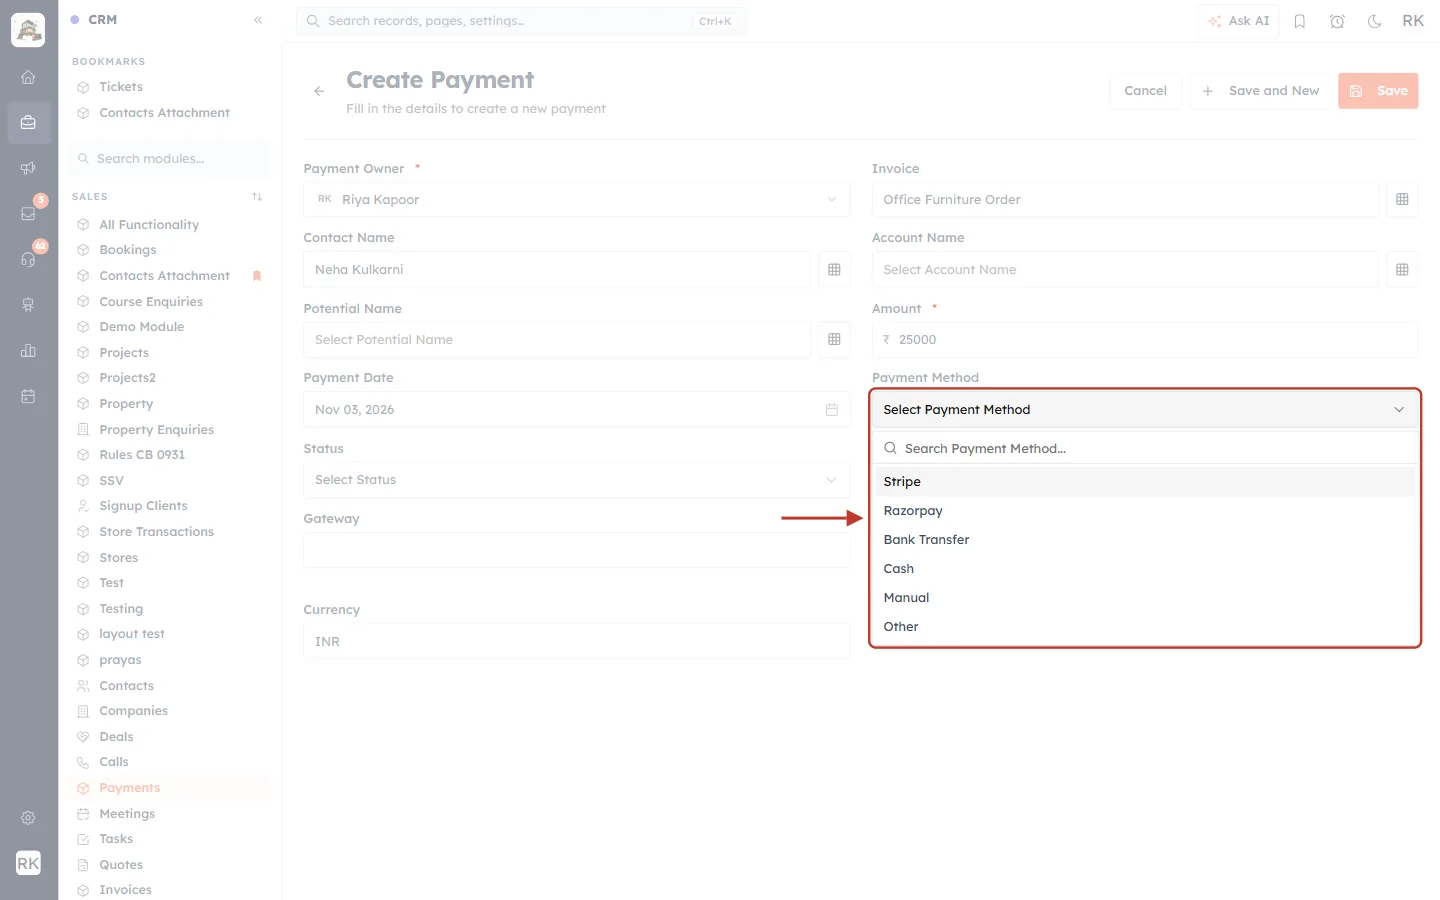
What this screenshot shows. The Payment Method list, open.
Stripe and Razorpay: online card, UPI or net-banking payments through your gateway.
Bank Transfer: NEFT, RTGS, IMPS or a wire.
Cash: money paid in person.
Manual and Other: for example a cheque, or a payment through another channel.
Type in Search Payment Method… to filter the list.
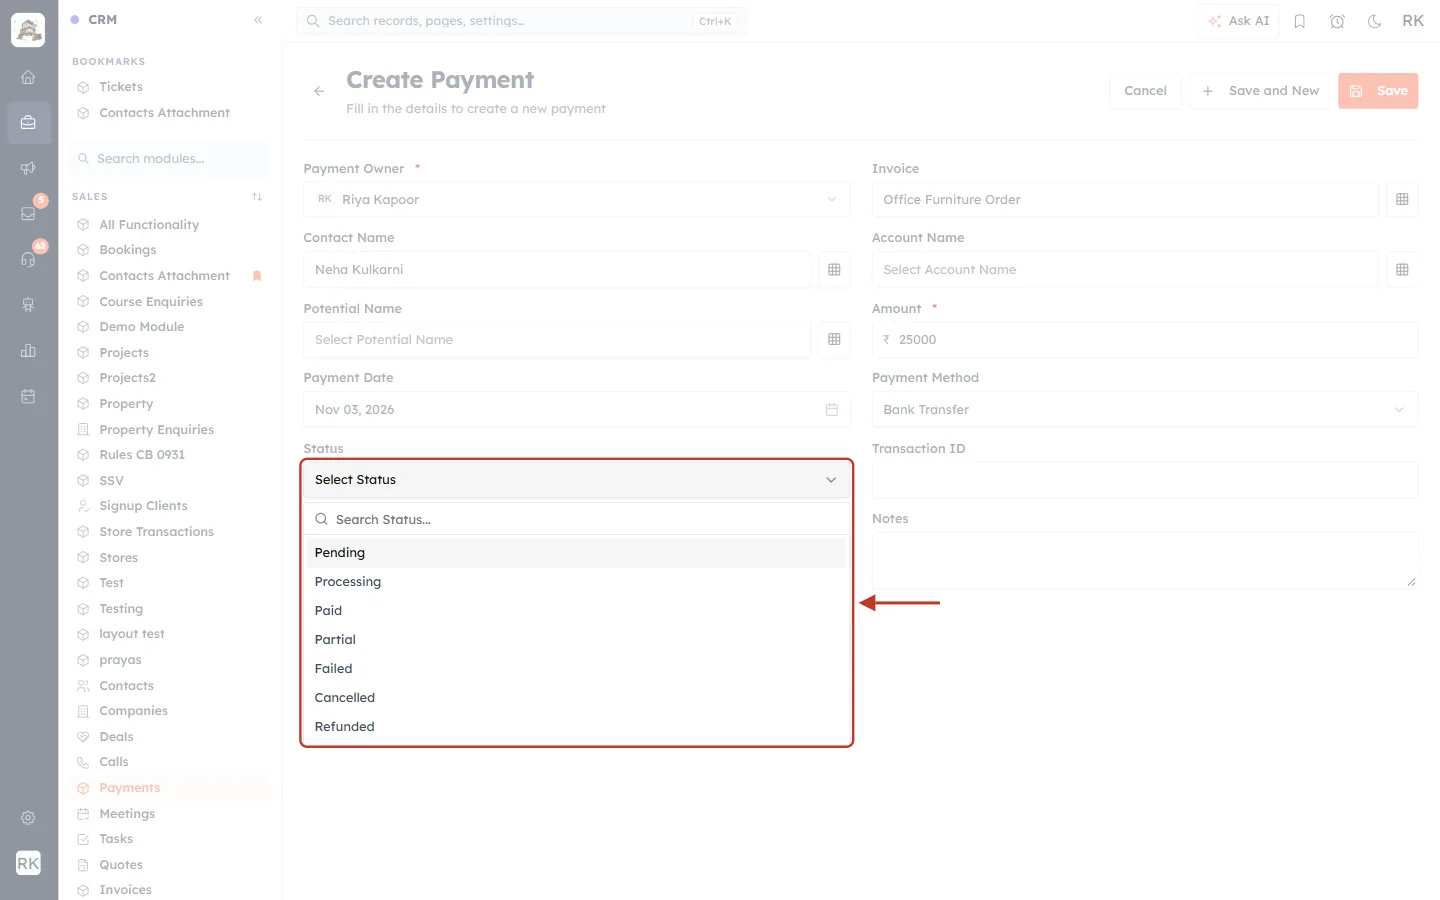
What this screenshot shows. The Status list, open.
Pending: expected but not confirmed. Processing: the gateway or bank is still working on it.
Paid: money received in full for this payment.
Partial: part of an agreed amount received.
Failed and Cancelled: the payment didn’t go through or was called off.
Refunded: the money was returned to the customer (Part 5).
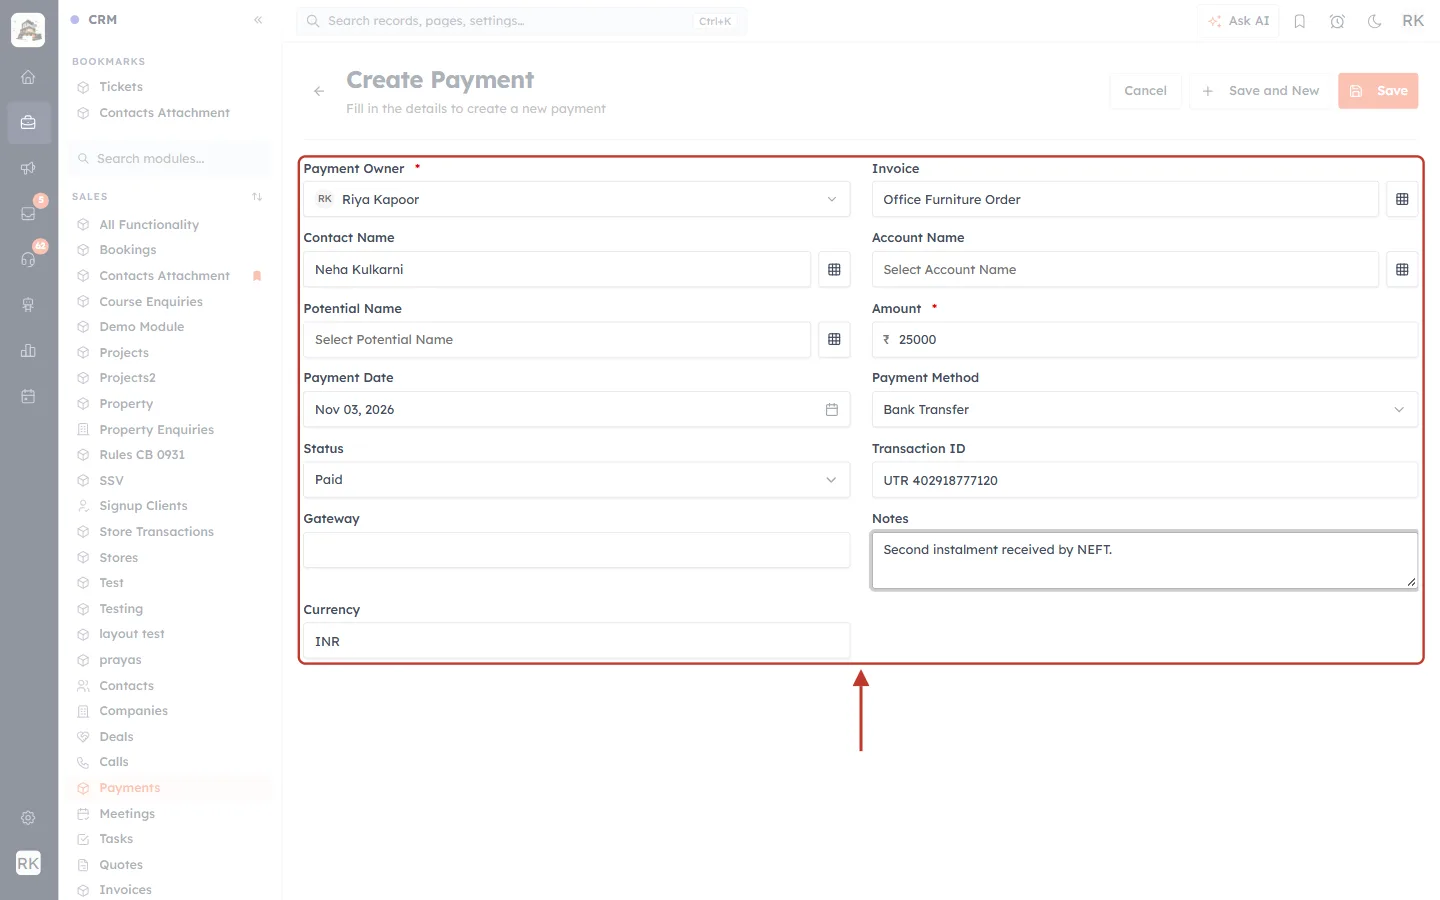
What this screenshot shows. The completed form, ringed.
Payment Owner Riya Kapoor, Invoice Office Furniture Order, Contact Neha Kulkarni.
Amount ₹ 25000, Payment Date Nov 03, 2026, Payment Method Bank Transfer, Status Paid.
Transaction ID UTR 402918777120 and a note.
Gateway stays empty for offline payments. Currency shows your organisation currency, INR.
Click Save.
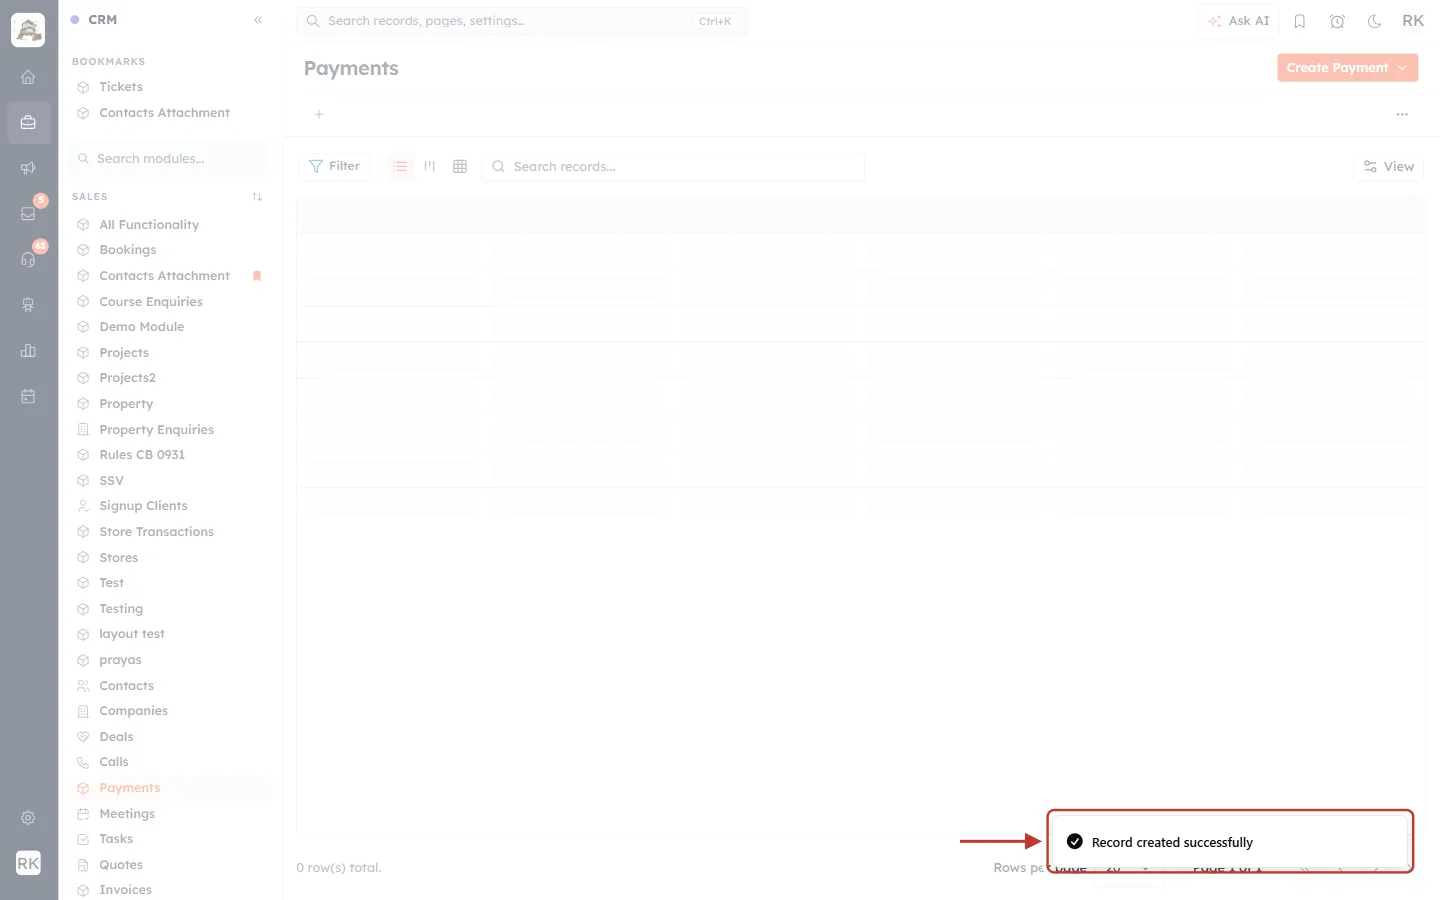
What this screenshot shows. The confirmation message after saving.
Record created successfully: the payment is saved and gets the next payment number.
You are taken back to the Payments list, where the new payment appears at the top.
⚠️
Check the invoice afterwards. When you link a hand-made payment to an invoice, open that invoice and check its Amount Paid and Balance Due. If they don’t reflect the payment, record it with Record Payment on the invoice instead, so the invoice and the payment always match.
Part 4: Download a payment receipt#
Step 10: Click Download Receipt#
Open the payment and click Download Receipt at the top right. A PDF named after the payment (for example Payment_0000004.pdf) is saved to your computer.
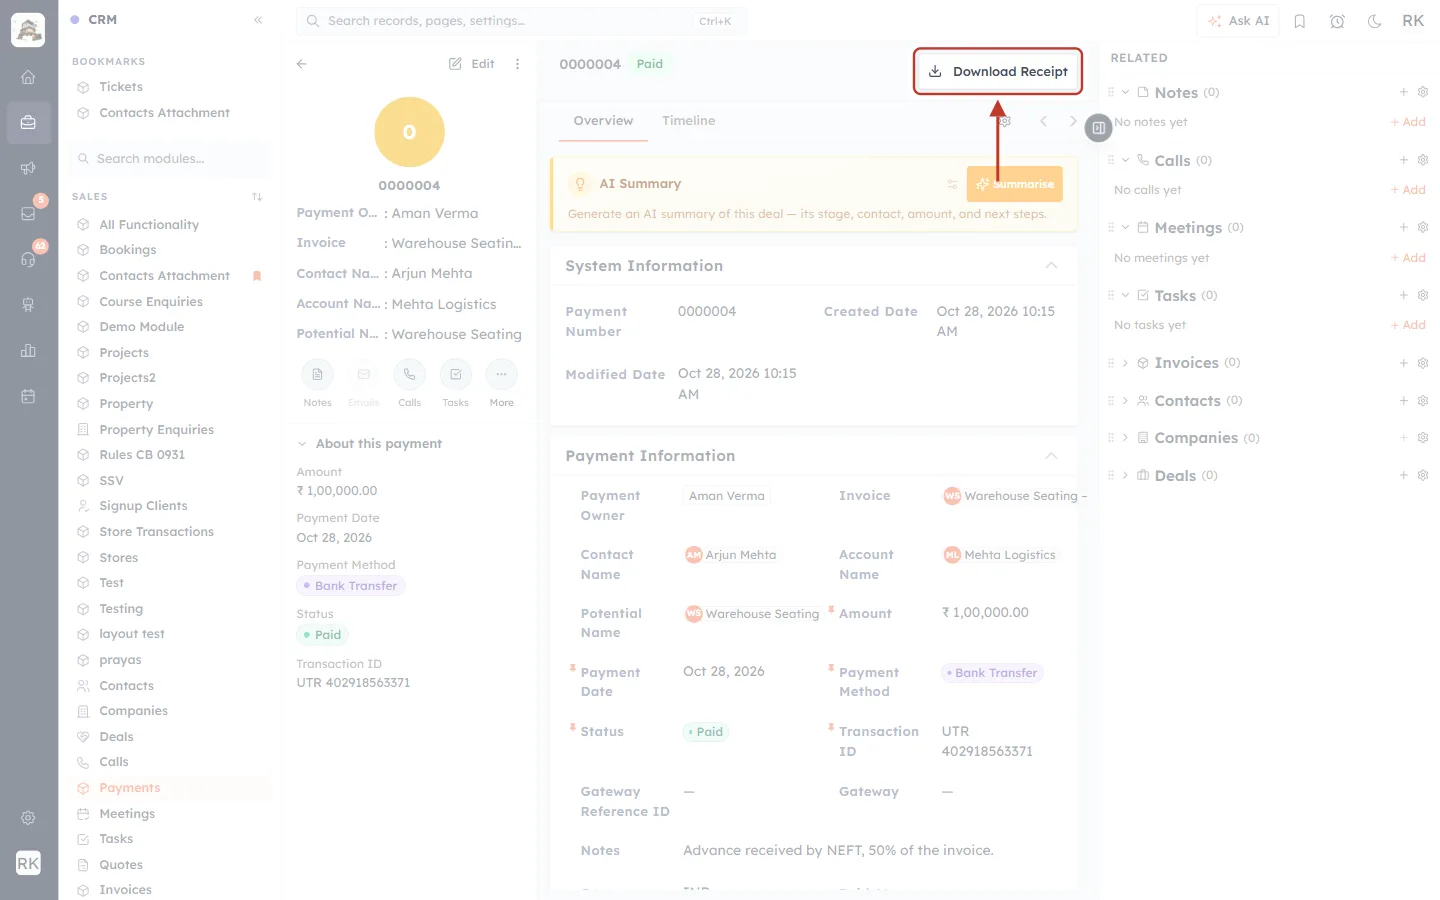
What this screenshot shows. The Download Receipt button, ringed.
It is on every payment record, next to the payment number and status badge.
Send the PDF to the customer as proof of payment, or keep it for your accounts.
Customers who pay online can also download a receipt from the pay page.
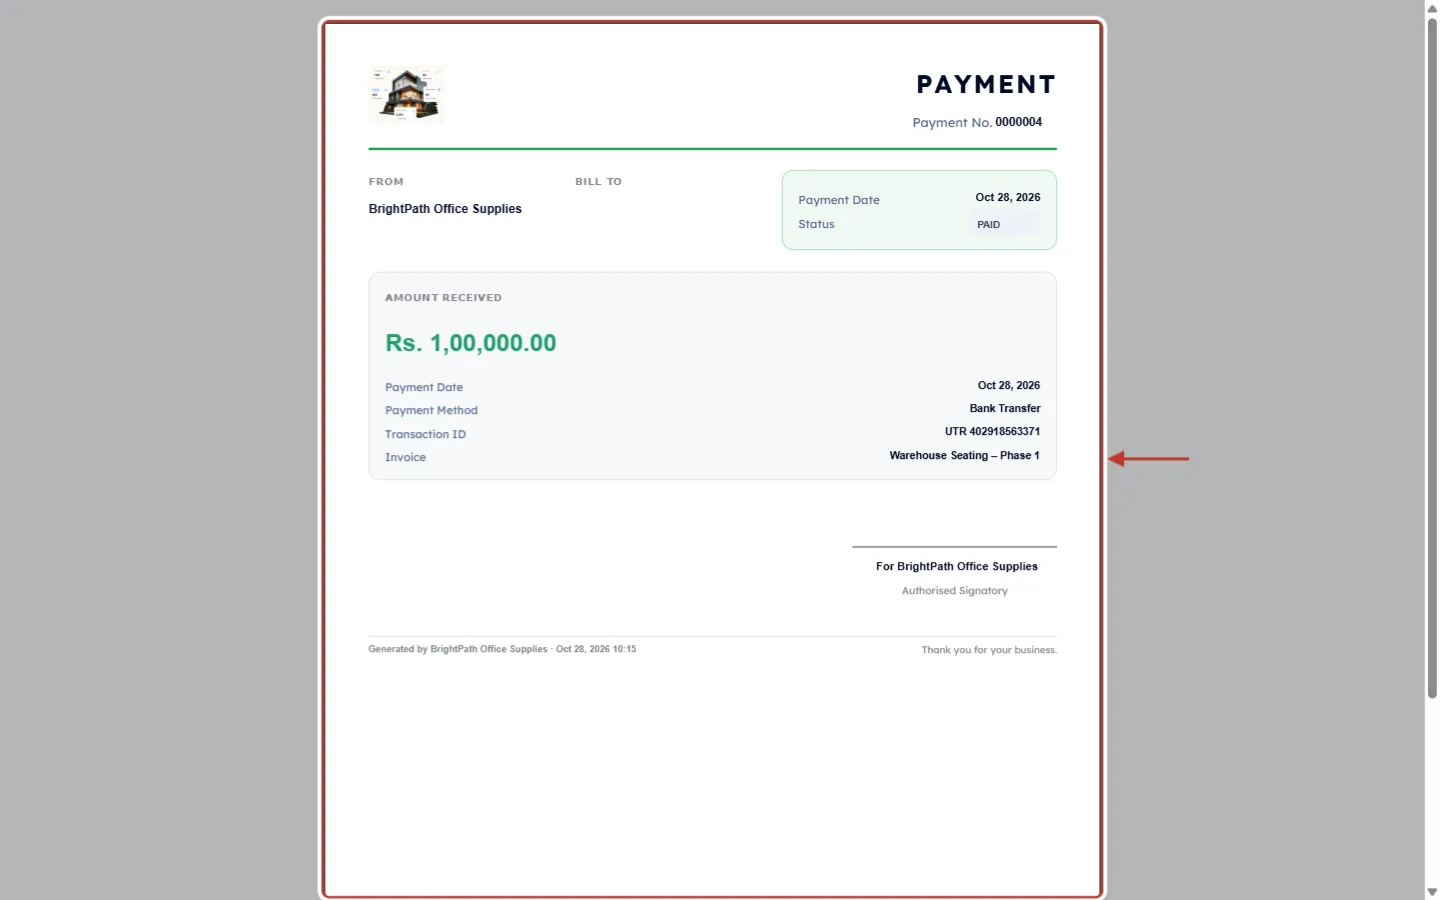
What this screenshot shows. The receipt PDF for payment 0000004.
Header: your logo, the title PAYMENT and Payment No. 0000004.
From: your organisation name. Bill To: the customer, when the payment is linked to one.
Payment Date and Status (PAID) in the green box.
Amount Received: Rs. 1,00,000.00, in large green figures.
Below it: Payment Date, Payment Method (Bank Transfer), Transaction ID and the Invoice it pays.
At the bottom: “For your organisation – Authorised Signatory”, when the receipt was generated, and “Thank you for your business.”
✅
Want your own receipt design? Create a template for the Payments module in Setup → Sales & Finance → Document Templates. See Customize Quote & Invoice PDF Templates.
Part 5: Correct, refund or remove a payment#
Step 11: Edit a payment#
Open the payment and click Edit (or use Edit in the row menu). Change what you need and click Save. Every change is listed on the payment’s Timeline tab.
Step 12: Record a refund#
There is no Refund button in the CRM. Money is refunded where it is held. Then you update the payment so your records match:
Refund the customer in your Stripe or Razorpay dashboard (online payments), or from your bank (transfers and cash).
In the CRM, open the payment and click Edit.
Set Status to Refunded and add the refund reference and date in Notes.
Click Save, then open the invoice and set its status to match (see Invoice Actions Explained).
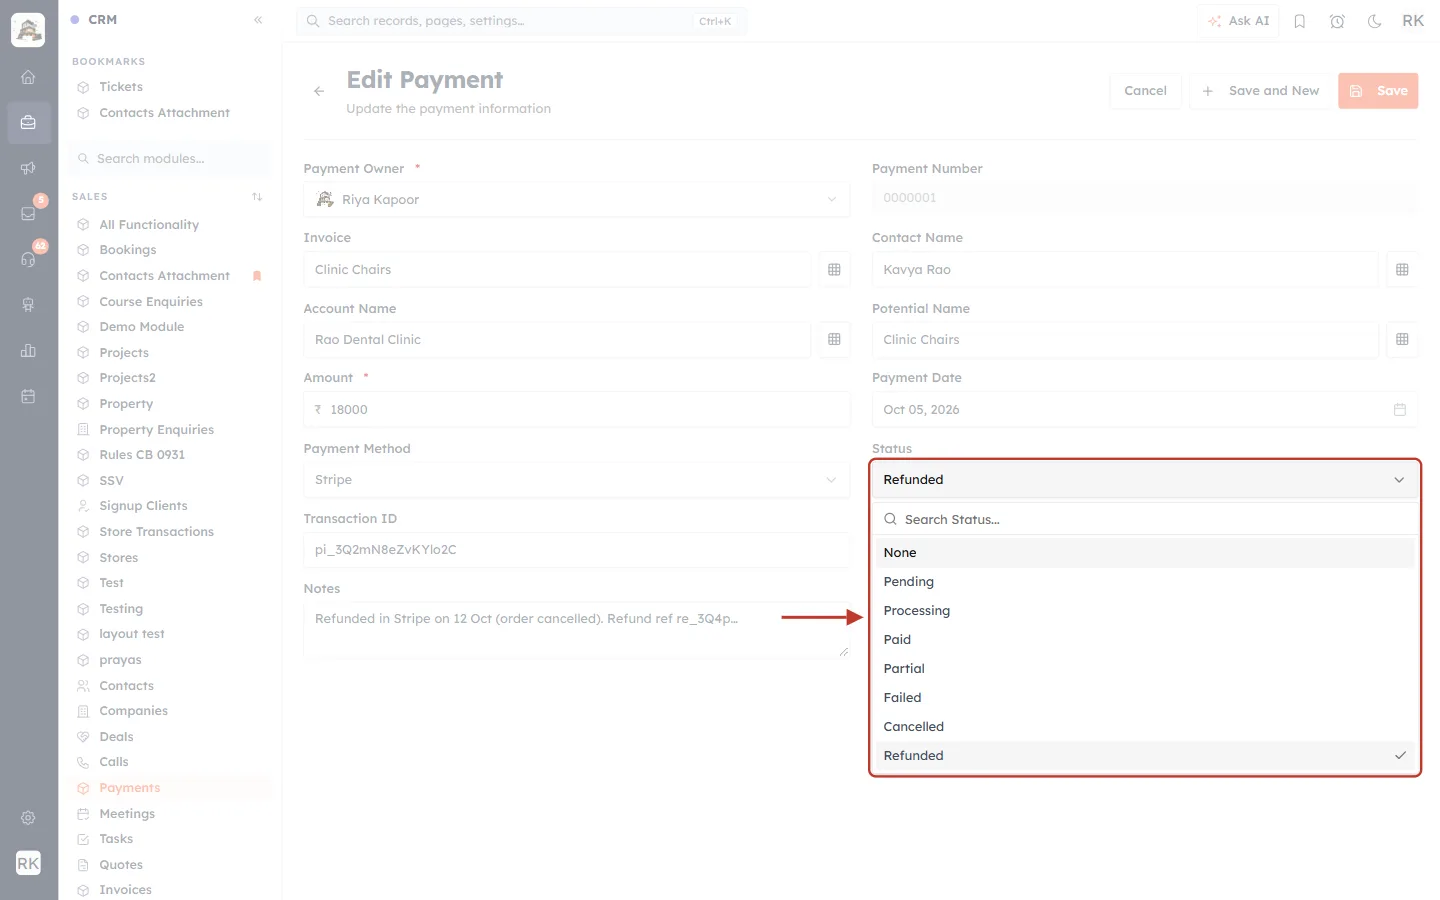
What this screenshot shows. The Edit Payment form of payment 0000001, with the Status list open.
Refunded is ticked: this ₹18,000 Stripe payment was returned when the order was cancelled.
The Edit form’s list also offers None, to clear the status.
The amount, date, method and transaction ID stay as they were, so you keep a full history of what was paid and what was returned.
Notes say where and when the refund was made.
Step 13: Delete a payment entered by mistake#
Use Delete in the row menu (or the record’s ⋮ menu) only for a payment that never happened, for example a duplicate. Deleting can’t be undone.
⚠️
Don’t delete real payments. For a payment that was returned, use the Refunded status instead, so your history stays complete. After deleting a payment that was linked to an invoice, open the invoice and check its Amount Paid and Balance Due.
Part 6: Export and import payments#
Export: Create Payment ▾ → Export Payments. Filter the list first to export only, for example, this month’s paid payments. You need the Export permission on Payments.
Import: Create Payment ▾ → Import Bulk (CSV, Excel). Include at least the Amount column. Map invoice, contact and company columns so each payment is linked. You need the Import permission.
Use Import Notes to attach notes to payments that already exist.
Troubleshooting#
Problem | What to check |
|---|---|
Payments isn’t in the Sales menu. | Your profile has View: None for Payments. Ask an admin to change it. |
A customer paid online but there is no payment. | Check the gateway connection and webhook in Set Up Online Payments with Stripe or Razorpay. Search the list by the gateway’s payment id (Transaction ID). |
The Amount column isn’t visible. | Scroll the table to the right, or move Amount earlier with View. |
Create Payment, Edit or Delete is missing. | Your profile doesn’t allow it for Payments. See Quotes, Invoices & Payments Permissions and Plan Limits. |
The invoice still shows a balance after I added a payment by hand. | Use Record Payment on the invoice instead; it links the payment and updates the balance. |
The receipt shows the wrong company name or logo. | Update them in Setup → Organization Settings, or design your own Payments template in Document Templates. |
Frequently asked questions#
Can one invoice have more than one payment?
Yes. Each instalment is its own payment record linked to the same invoice, for example an advance and a final payment.
Is the Payment Number the same as the invoice number?
No. Payments have their own running number. The invoice a payment belongs to is shown in its Invoice field.
Which currency is used?
Your organisation currency (Setup → Organization Settings), shown in the Currency field and on the receipt.
Can I see only my own payments?
That depends on your profile. With View set to Own, you see only payments where you are the Payment Owner.
Previous and next#
Previous: Getting Paid on Invoices
Related#
Was this article helpful?
Ready to implement this?
OpenAI Engage and apply what you just learned to your own workspace.
Open AI Engage CRM