Loading…


KnowledgeBase
Customize Quote & Invoice PDF Templates: Design Your Own Document Layout with Merge Fields (Step-by-Step)
Introduction#
Every quote, invoice and payment receipt in AiEngage CRM can be downloaded as a PDF. With Document Templates you decide exactly what that PDF looks like: your company name and address at the top, the fields you want to show (quote number, validity date, the customer’s name and billing address), the line-items table, totals, terms and a thank-you note.
A template is a page you type on, like a word processor. Wherever you want a value from the record, you insert a merge field by typing #. When the PDF is made, every merge field is replaced with the real value from that quote or invoice.
In this guide we build a quote template for a sample company, BrightPath Office Supplies, from a blank page to a finished, previewed layout. We then make it the default and show how to choose a different template on a single quote.
You want to… | Where to do it |
|---|---|
Create or edit a PDF template | Setup → Sales & Finance → Document Templates |
Show record values (quote number, customer name, totals) | In the editor, type # and pick a field |
List the products and prices | Toolbar → Insert line-items table |
See the real PDF before saving | The Preview tab above the page |
Use one template for all quotes | Set as default on the template |
Use another template for one quote | The template picker on that quote, beside Download PDF |
ℹ️
Before you start: Document Templates is shown to account owners and admins, and to users whose profile can view Quotes, Invoices or Payments. You can only edit templates for the modules you have access to. Your logo and company details used elsewhere in the CRM come from Setup → Organization Settings.
Part 1: Open Document Templates#
Step 1: Go to Setup → Sales & Finance → Document Templates#
Click the gear icon at the bottom of the left rail to open Setup. In the settings menu, scroll to the Sales & Finance group and click Document Templates.
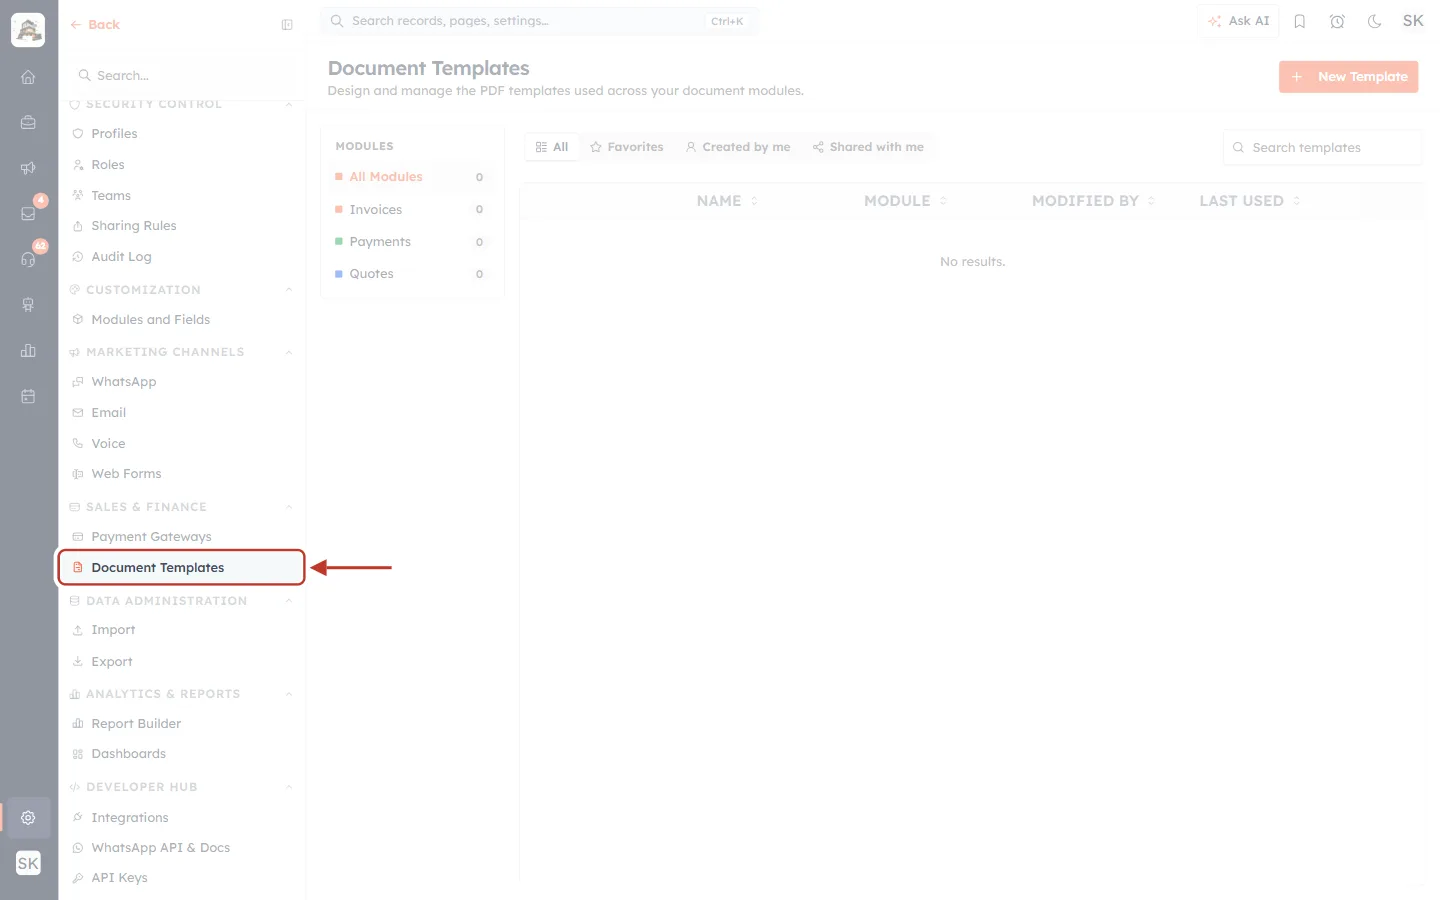
What this screenshot shows. The Setup menu on the left, with Document Templates ringed under Sales & Finance.
The settings menu is grouped: General, AI Centre Hub, Security Control, Customization, Marketing Channels, Sales & Finance, Data Administration, Analytics & Reports and Developer Hub.
Sales & Finance holds two items: Payment Gateways (Stripe / Razorpay) and Document Templates.
The selected item is highlighted, and the page opens on the right.
Tip: you can also type “Document Templates” in the search box at the top of the settings menu.
Step 2: Get to know the Document Templates page#
The page lists every PDF template in your organisation. When you start, the list is empty and every module shows 0.
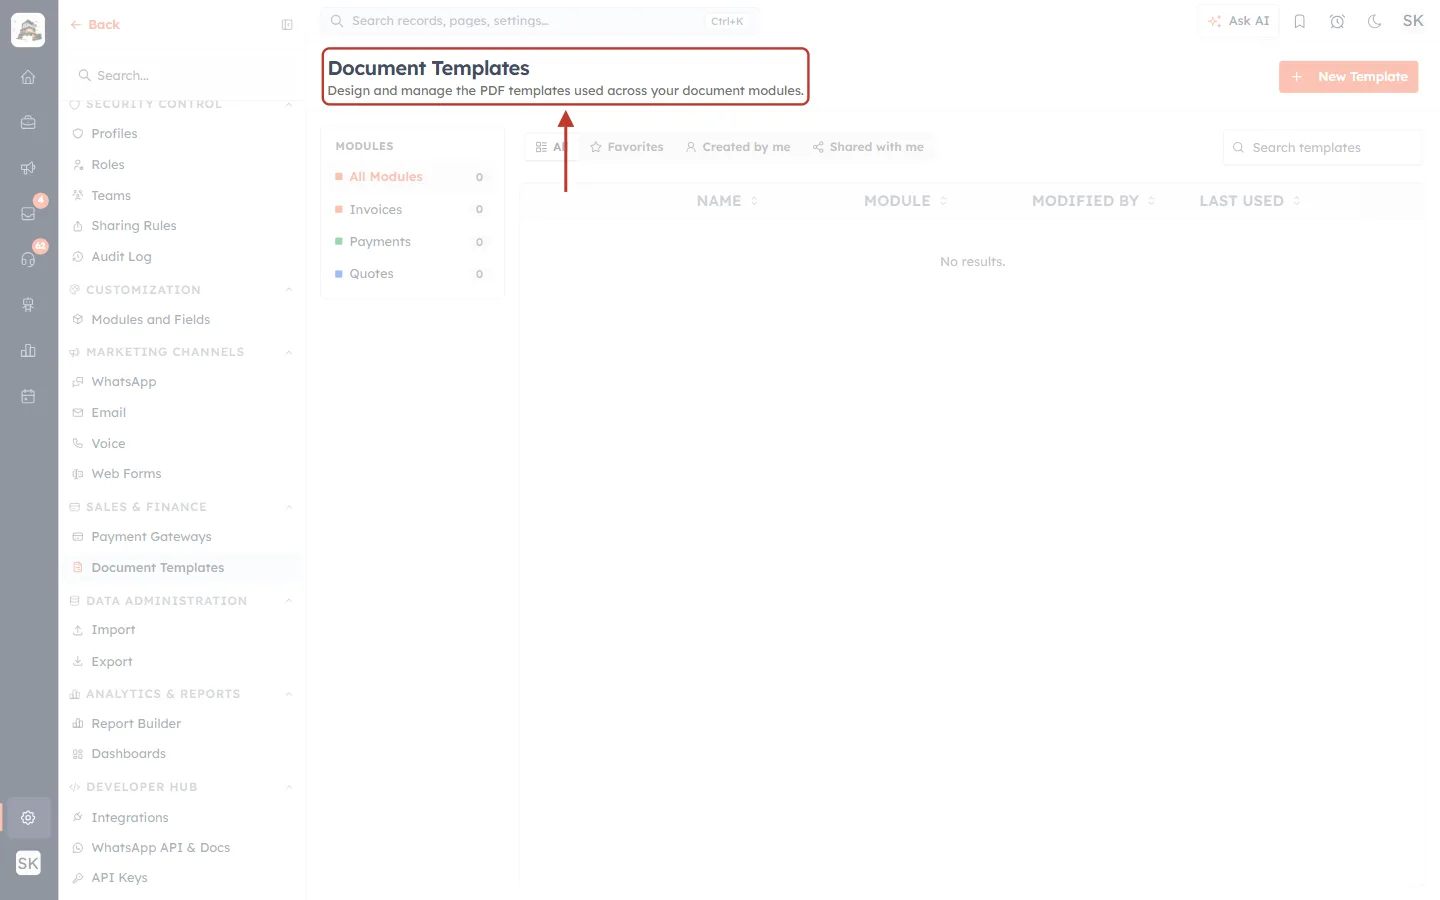
What this screenshot shows. The top of the page, with its title and description ringed.
Document Templates: “Design and manage the PDF templates used across your document modules.”
The orange New Template button sits on the right of the header.
Below are the Modules panel, the view tabs, the search box and the templates table. It says No results. until you create your first template.
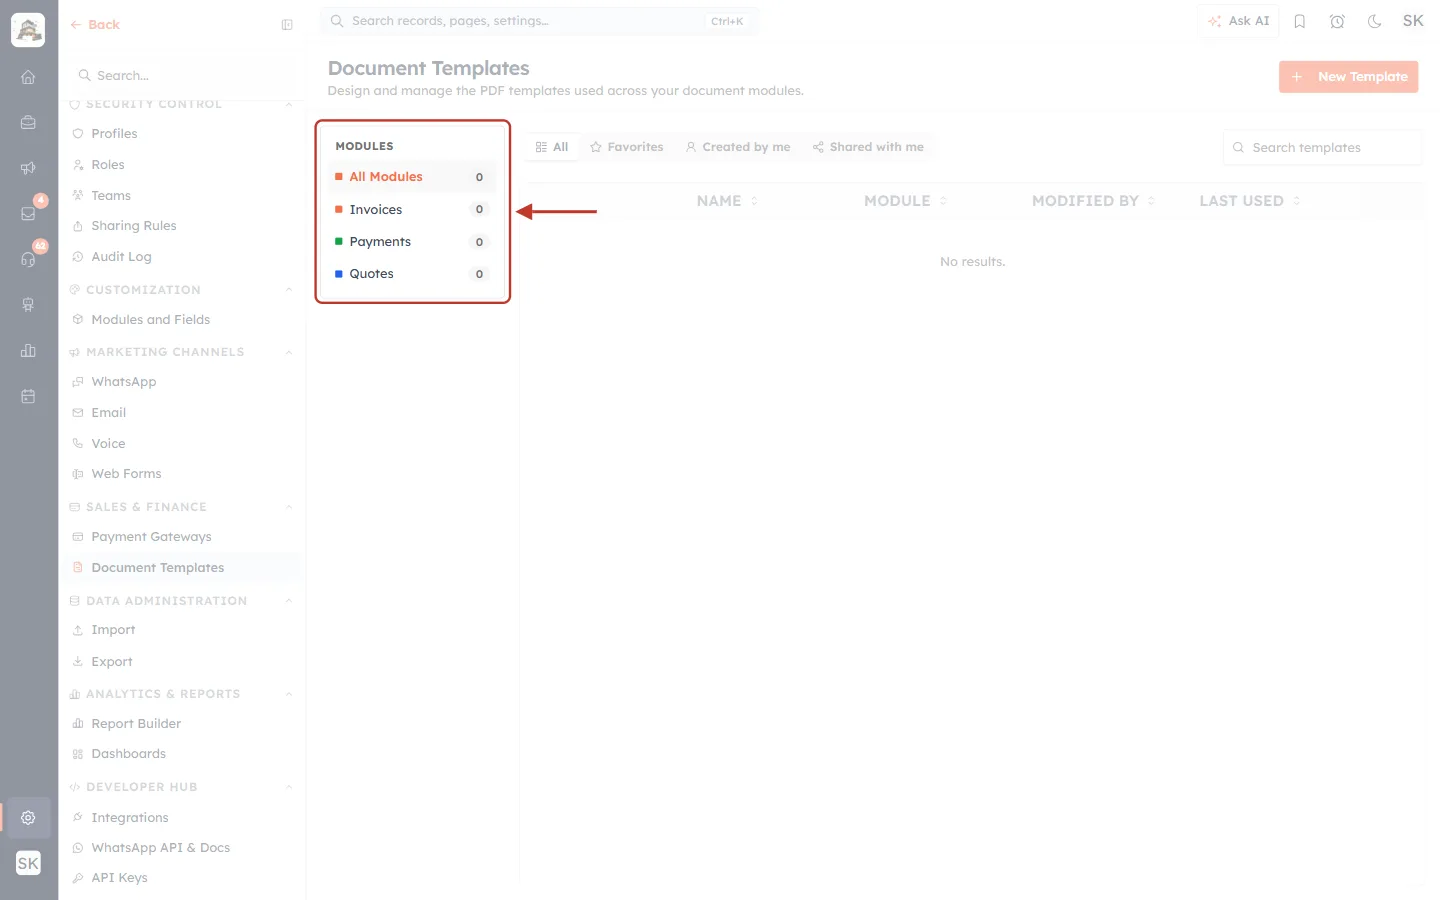
What this screenshot shows. The Modules panel on the left of the page.
All Modules shows every template. Click Invoices, Payments or Quotes to see only that module’s templates.
The number beside each module is how many templates it has (all 0 here).
These three are the “document modules”: the modules whose records can be printed as a PDF.
Above the table, the tabs All, Favorites, Created by me and Shared with me filter the list further, and Search templates finds a template by name.
Part 2: Create a new template#
Step 3: Click New Template and choose the module#
Click New Template in the top-right corner. A small menu, New template for…, asks which module the template is for. Choose Quotes. (For an invoice or payment receipt template, choose Invoices or Payments; the rest of the steps are the same.)
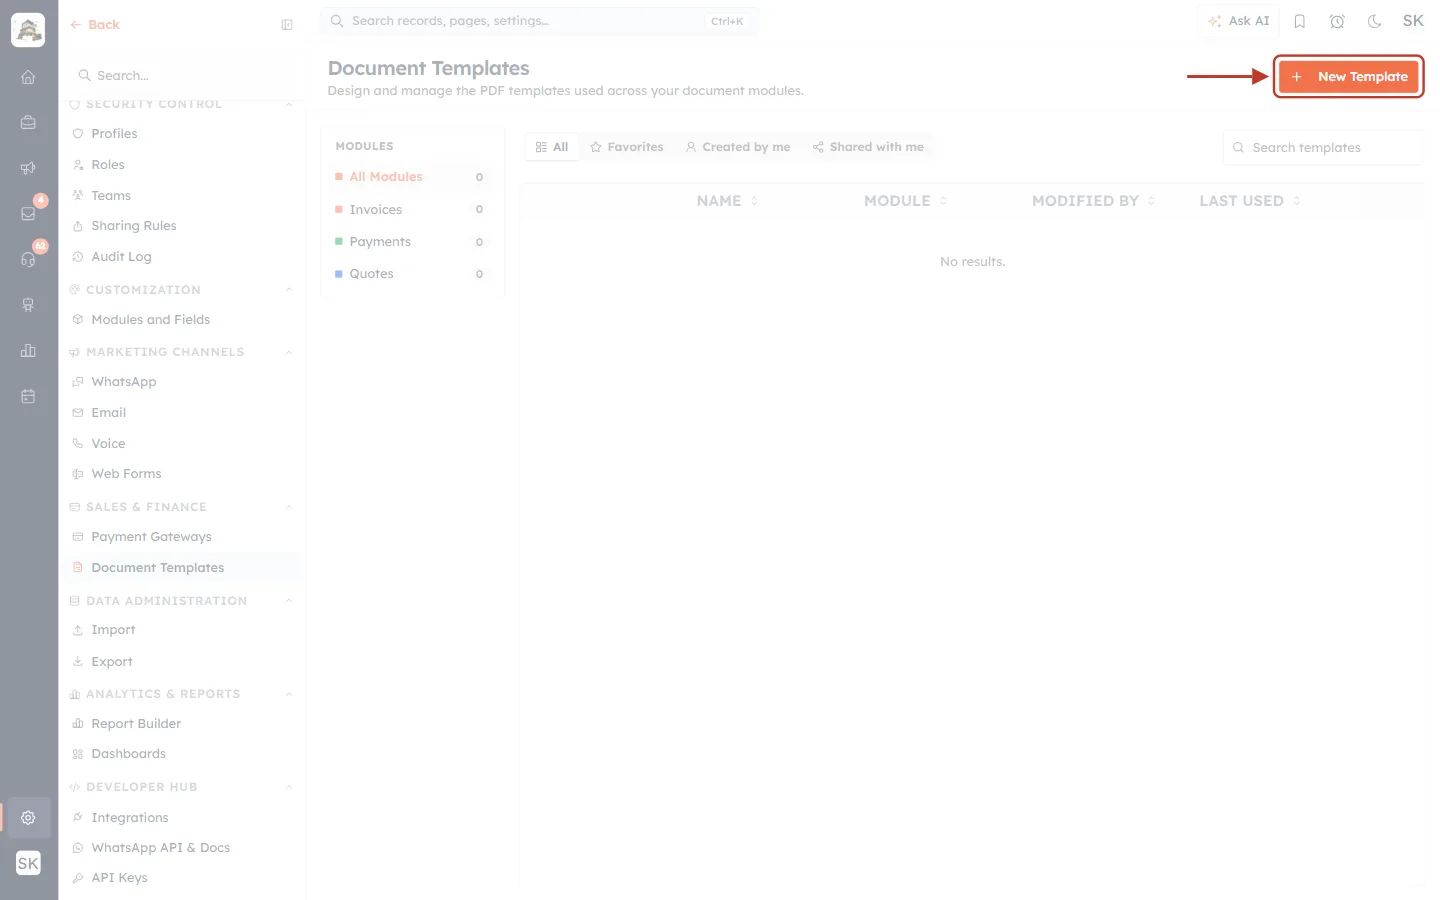
What this screenshot shows. The New Template button ringed in the page header.
It is always in the top-right corner of the Document Templates page.
The button is available for any module you are allowed to edit.
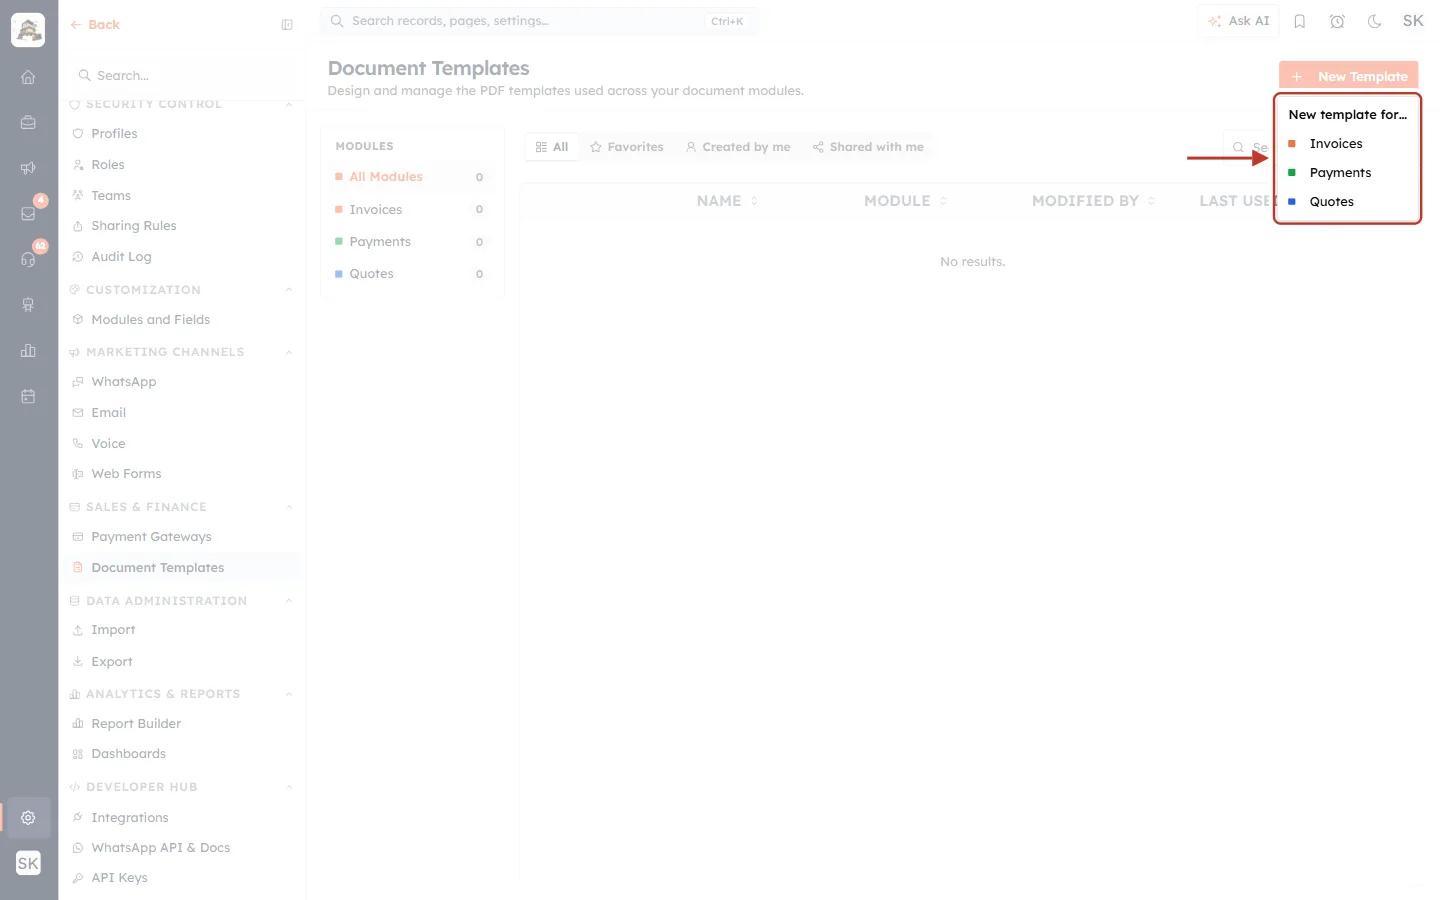
What this screenshot shows. The New template for… menu that opens under the button.
Each module has a coloured dot that matches the Modules panel: red for Invoices, green for Payments, blue for Quotes.
Click Quotes. The CRM creates a blank template called Untitled template and opens it straight away in the editor.
A template belongs to one module and can’t be moved to another later, so pick the right one here.
Step 4: Look around the template editor#
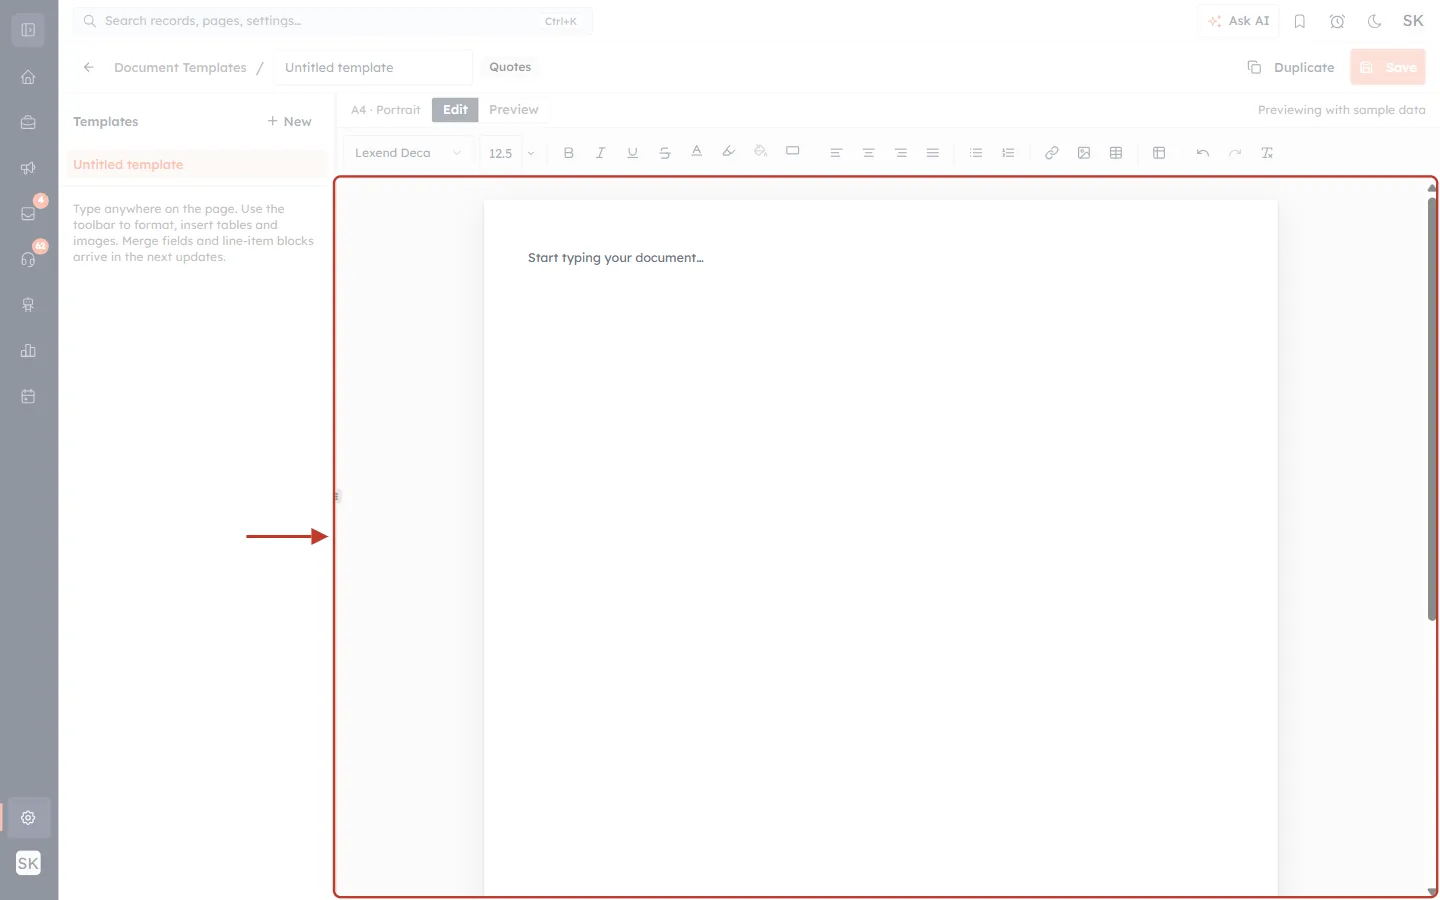
What this screenshot shows. The editor with a new, empty template. The ringed area is the A4 page you design.
Top bar: the Document Templates breadcrumb (click it to go back), the template name box, a badge showing the module (Quotes), and on the right Duplicate and Save.
Left panel (Templates): every template of the same module, with + New to start another. The open template is highlighted.
Above the page: A4 · Portrait (the paper size), the Edit / Preview switch, and “Previewing with sample data”.
Toolbar: the formatting buttons (explained in Step 6).
The page: white A4 sheet with “Start typing your document…”. Click anywhere on it and start typing.
Step 5: Give the template a clear name#
Click the name box at the top (it says Untitled template) and type a name your team will recognise, for example Standard Quote – BrightPath. The name is what people see in the template lists and in the template picker on a quote, so make it descriptive.
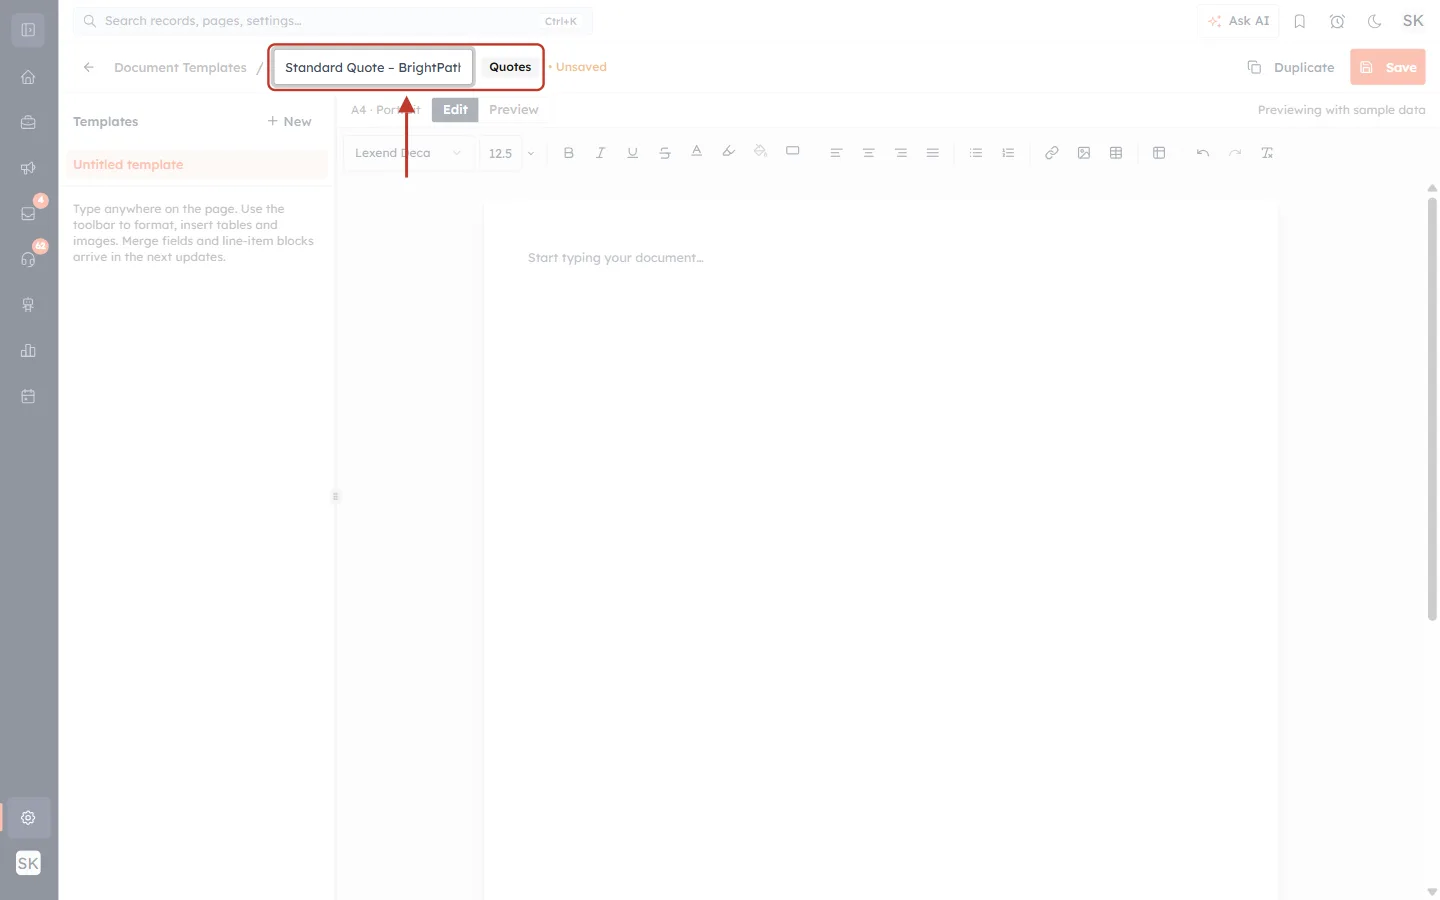
What this screenshot shows. The name box and the Quotes badge ringed in the top bar.
The name now reads Standard Quote – BrightPath.
The Quotes badge reminds you which module this template prints.
As soon as you change anything, an orange • Unsaved label appears next to the badge and the Save button becomes active. Nothing is stored until you click Save.
Step 6: Learn the toolbar#
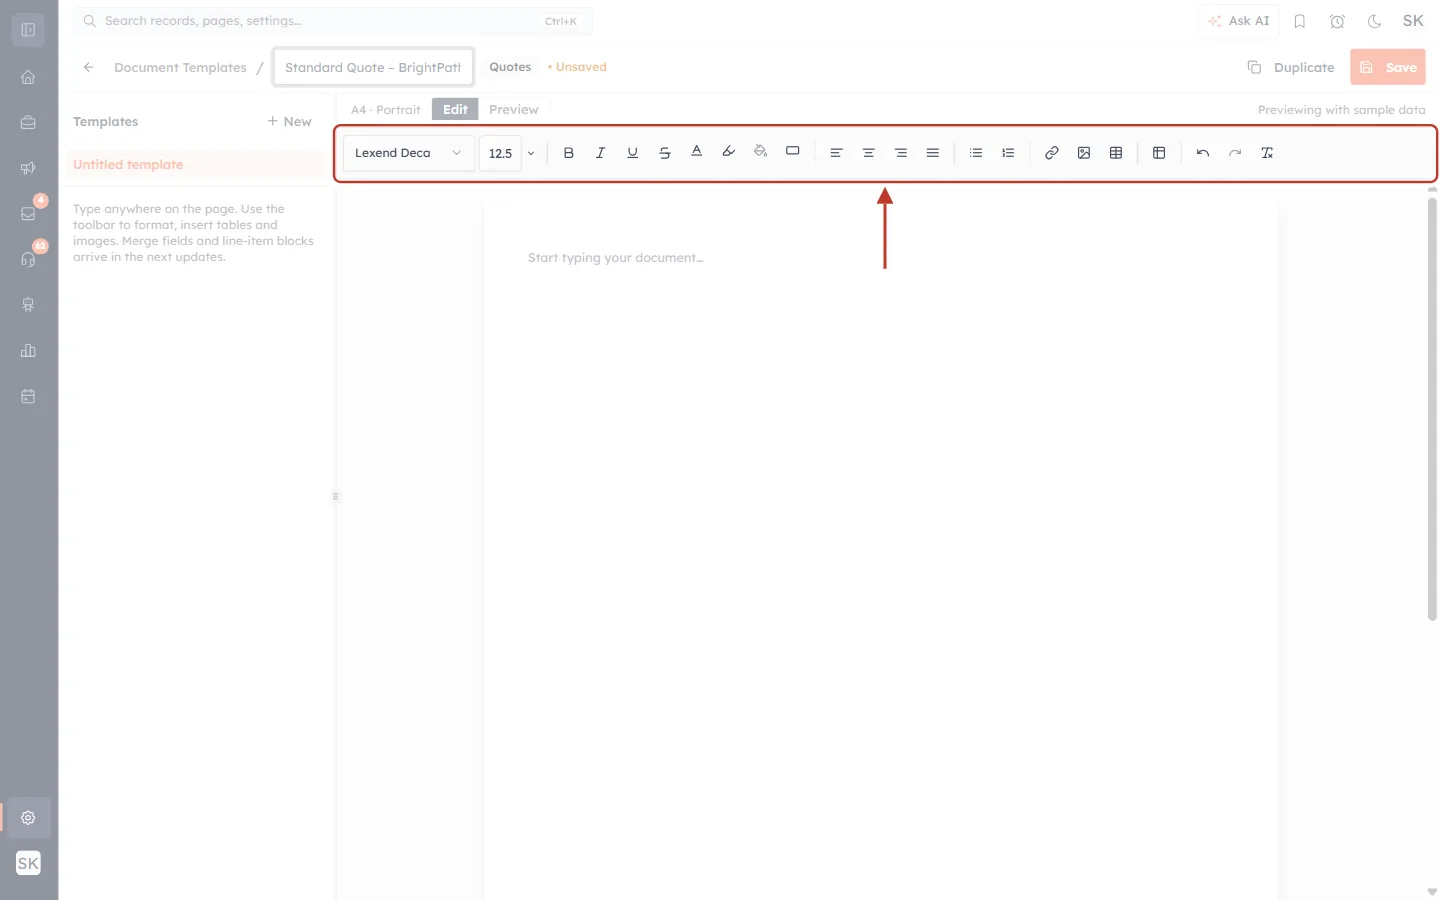
What this screenshot shows. The toolbar above the page, ringed.
Font (Lexend Deca by default) and font size (12.5 by default, with a presets list).
B Bold, I Italic, U Underline and
SStrikethrough.Text color, Highlight color, Cell background (inside a table) and Block background (behind a whole paragraph).
Align left, center, right and Justify.
Bullet list and Numbered list.
Add link, Insert image (for example your logo) and Insert table.
Insert line-items table: the table that lists the products on the quote (Part 4).
Undo, Redo and Clear formatting.
Hover over any button to see its name.
Part 3: Add your content and merge fields#
Step 7: Type your company header#
Click on the page and type the text that should appear on every quote: your company name, address, email and phone. Select the company name and click B to make it bold. Press Enter for a new paragraph, or Shift + Enter for a new line inside the same paragraph.
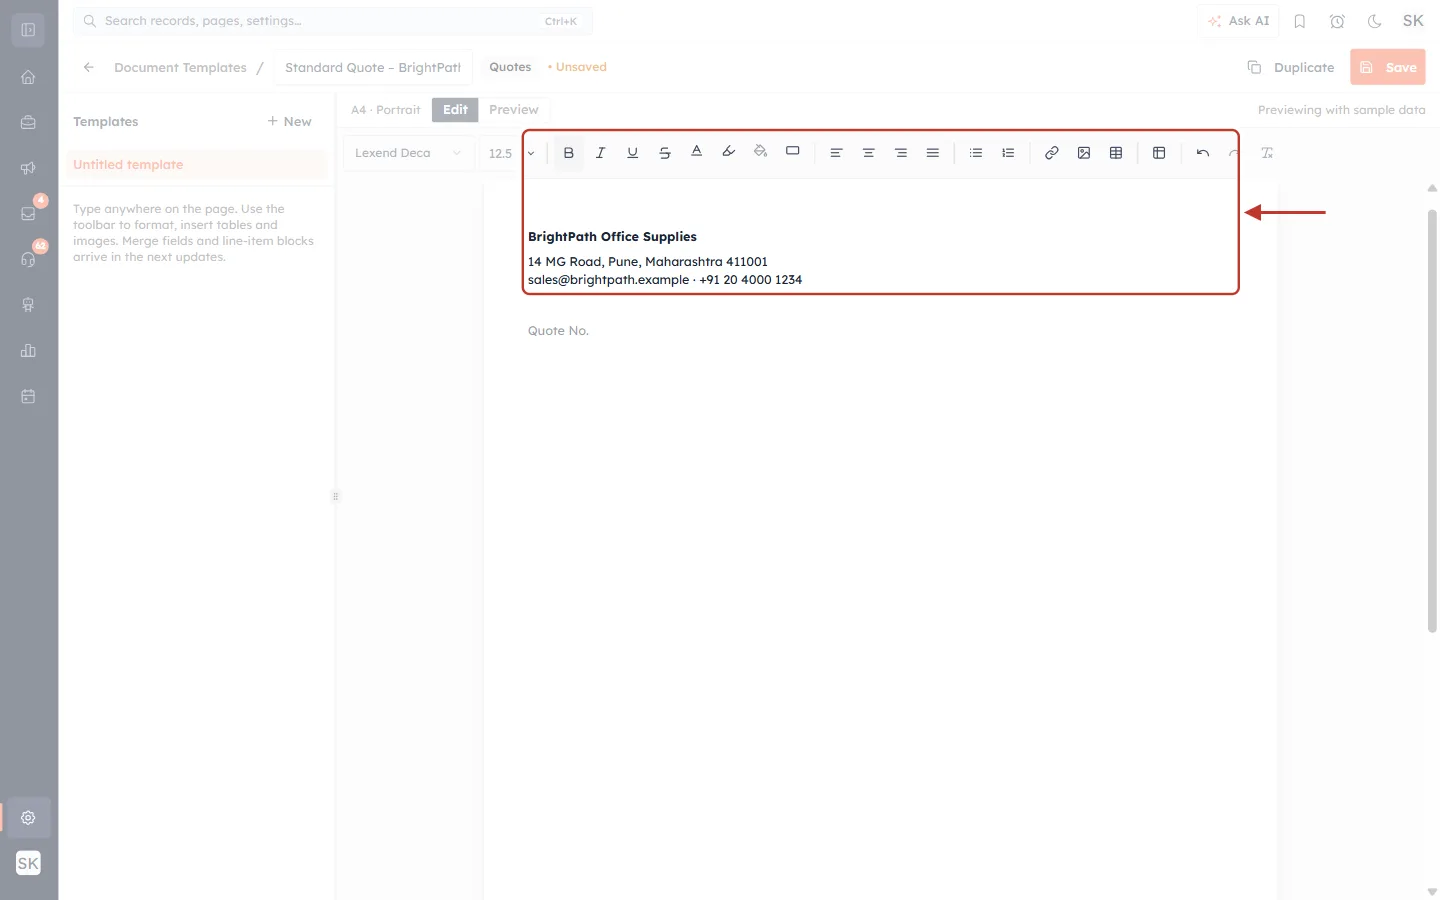
What this screenshot shows. The header text on the page, with the toolbar above it.
BrightPath Office Supplies is bold.
The address, email and phone are on two lines of one paragraph (Shift + Enter).
Fixed text like this prints exactly as typed on every quote.
To add your logo, click Insert image and choose the image file; it is uploaded and placed where your cursor is.
Step 8: Insert a merge field by typing ##
Type the label Quote No., then a space, then #. A field picker opens. It lists the fields of the template’s module (here, Quotes), each with its name on the left and its merge code on the right.
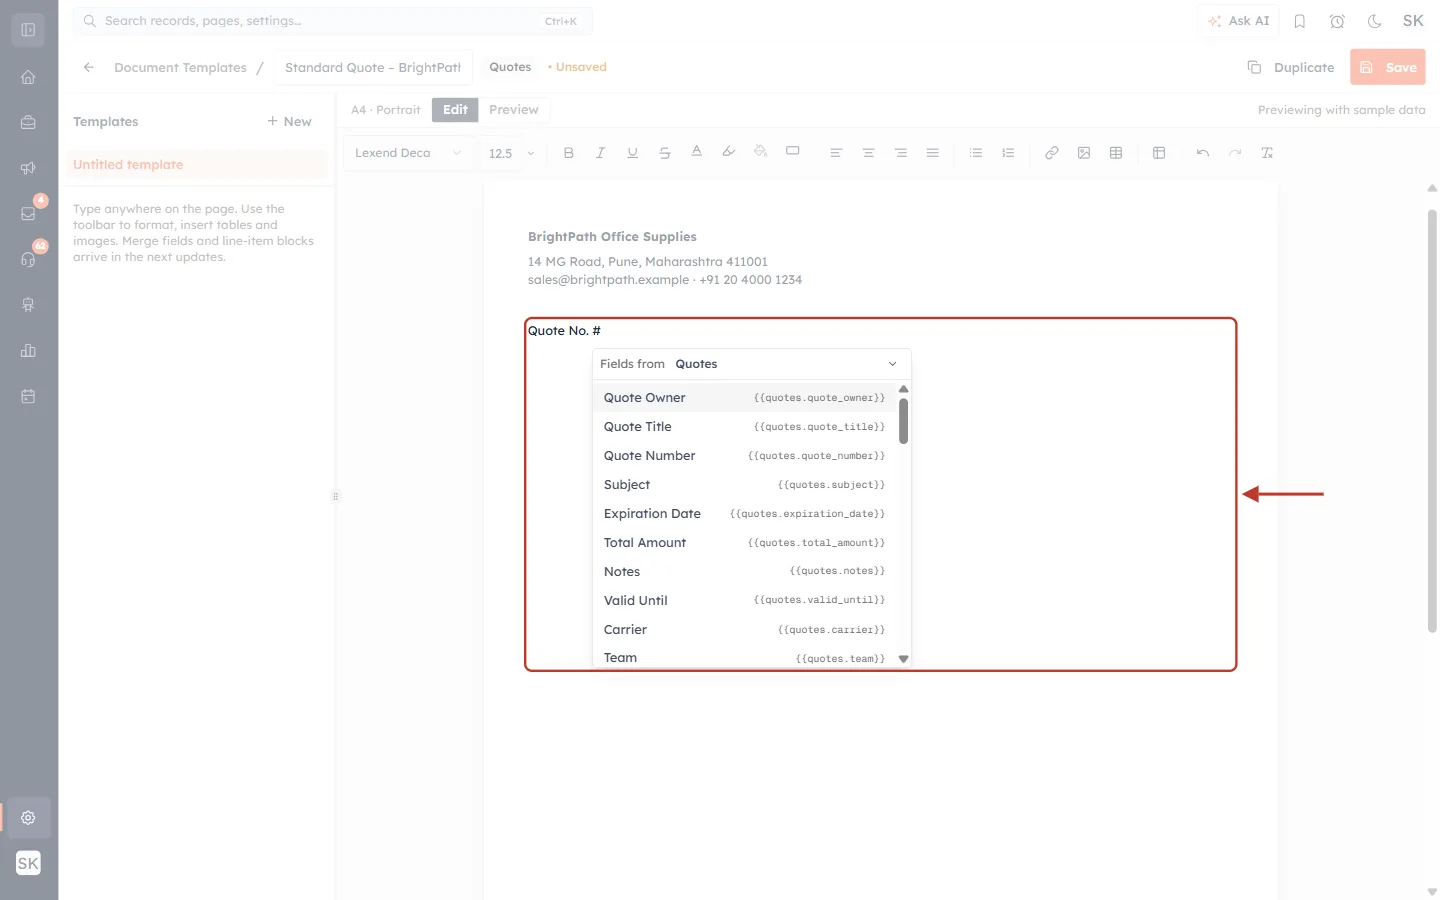
What this screenshot shows. The field picker under the cursor, ringed together with the line you are typing.
The top line reads Fields from Quotes: the module the fields come from.
Each row shows a field name (Quote Owner, Quote Title, Quote Number, Subject, Expiration Date, Total Amount, Notes, Valid Until…) and its code, for example
{{quotes.quote_number}}.Scroll down for more: billing and shipping address fields, Sub Total, Discount, Tax, Adjustment, Grand Total, Terms and Conditions, Description, and system values such as Current Date.
The picker only opens when # is typed at the start of a line or after a space.
Keep typing to filter the list. Typing number leaves only Quote Number. Use the arrow keys to move and Enter to insert the highlighted field, or click it.
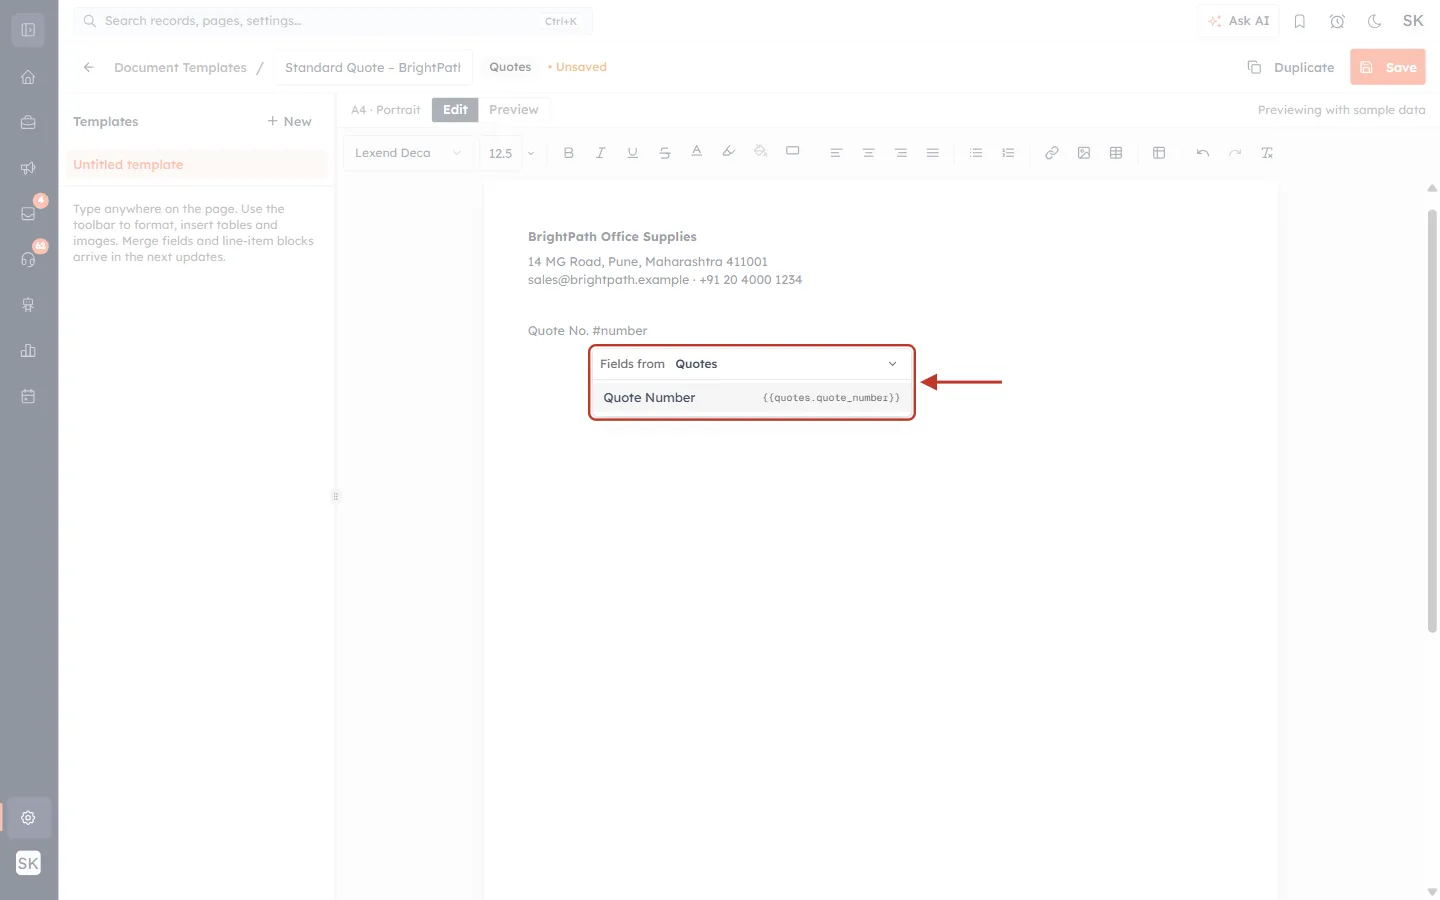
What this screenshot shows. The picker after typing #number.
The search matches both the field name and its code, so number, quote_number or Quote all work.
Searches can’t contain spaces. Type one word, then use the arrow keys.
If nothing matches, the picker says No fields match.
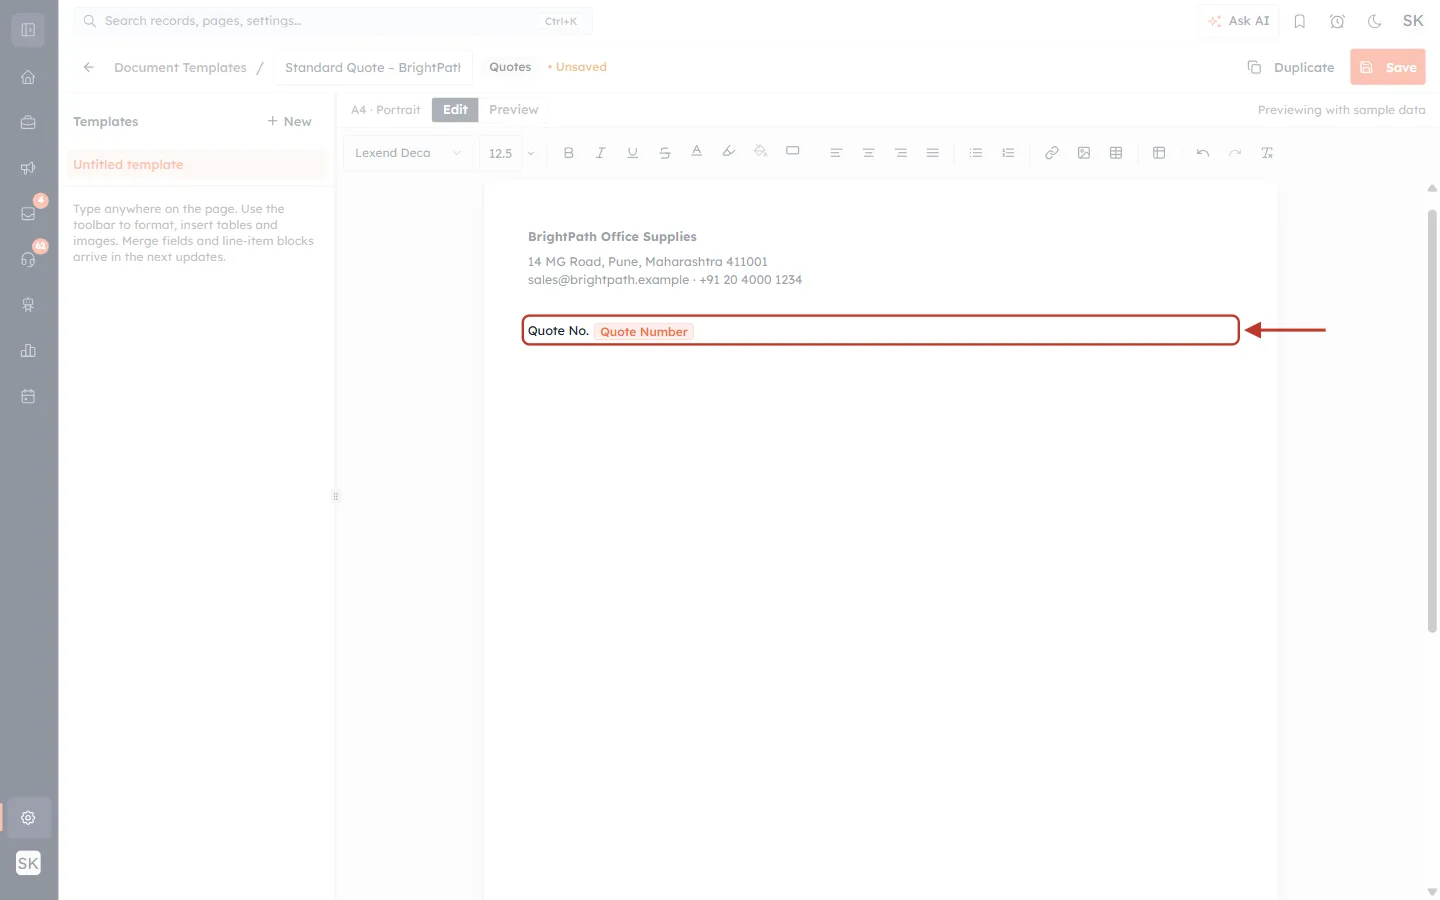
What this screenshot shows. The finished line, with the inserted field ringed.
The field appears as an orange chip labelled Quote Number. On the PDF it is replaced with the real number, for example QT-0000123.
A chip behaves like one character: click it to select it, or press Backspace after it to delete it.
Hover over a chip to see its full code.
If a chip turns red with a ⚠ sign, the field no longer exists (for example it was deleted from the module). Remove it and insert the right field again.
Step 9: Save your work#
Click Save in the top-right corner. Save often while you design: the • Unsaved label tells you there are changes that aren’t stored yet.
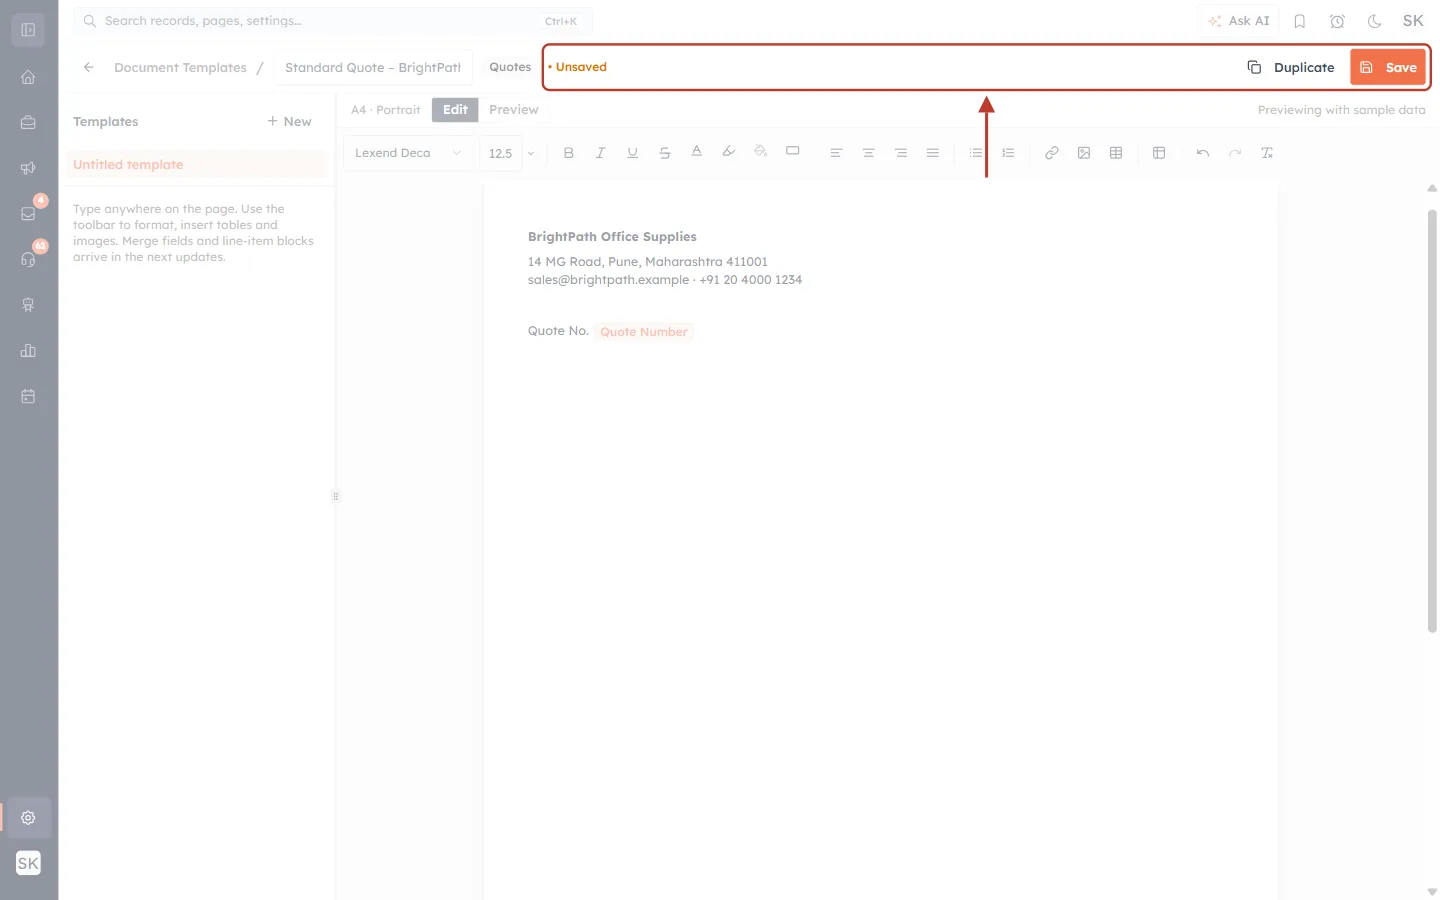
What this screenshot shows. The • Unsaved label and the orange Save button, ringed.
• Unsaved appears after any change to the name or the page.
Save is only clickable when there is something to save.
If you try to leave the editor with unsaved changes, the CRM asks whether to stay or discard them.
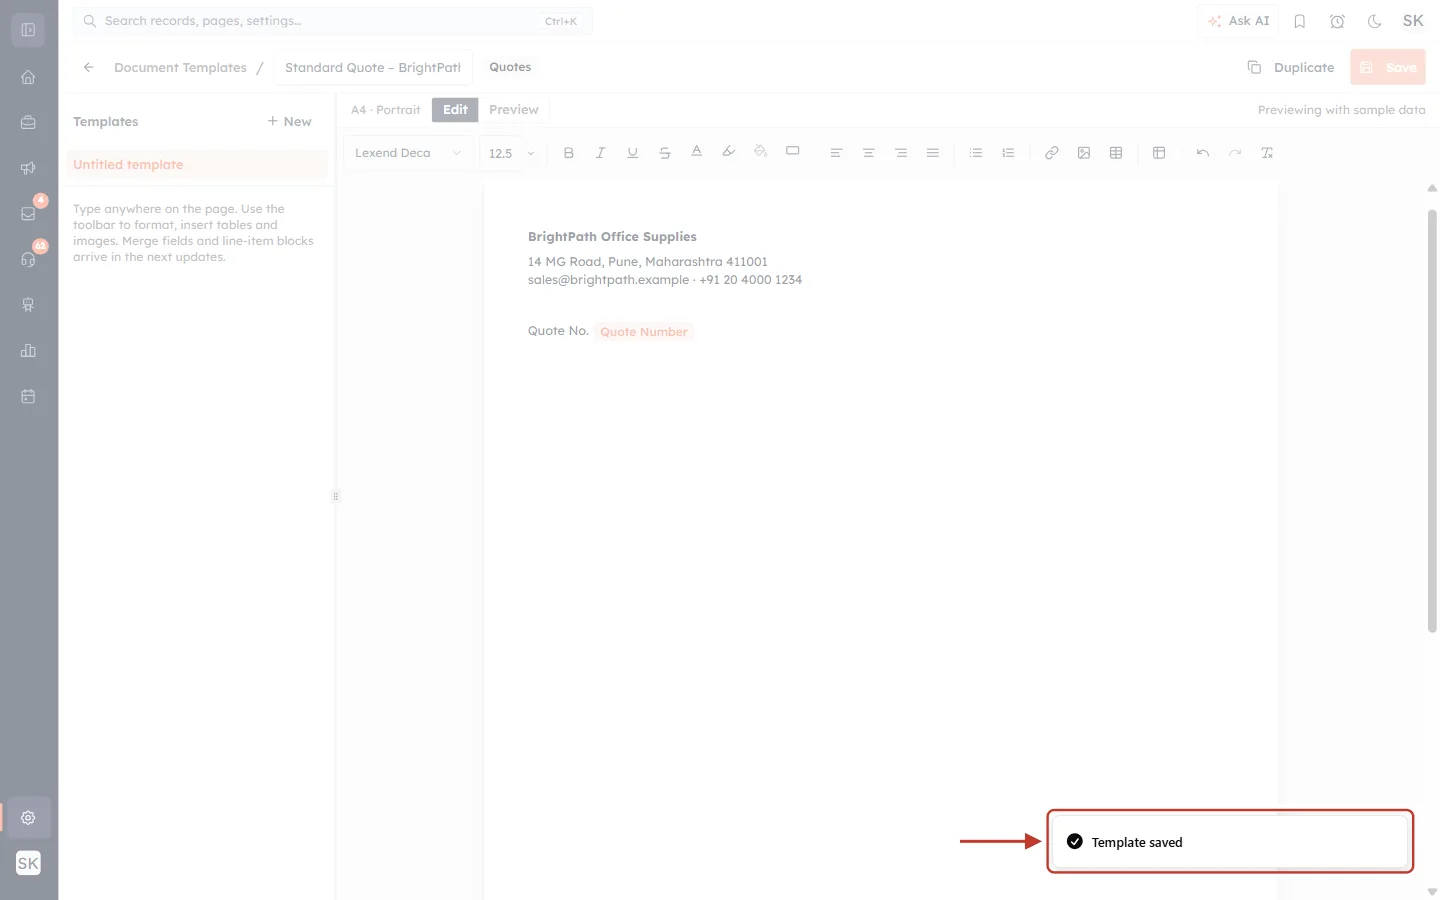
What this screenshot shows. The confirmation message in the bottom-right corner.
Template saved confirms your changes are stored.
The • Unsaved label disappears, and the new name shows in the left Templates panel.
Step 10: Insert fields from a related record (the customer)#
The customer’s details live on the contact linked to the quote, not on the quote itself. To print them, open the picker with # and change the module in Fields from.
Type Bill To: and a space, then #.
Click the module name next to Fields from (it says Quotes).
Choose Contacts.
Type full and press Enter to insert Full Name.
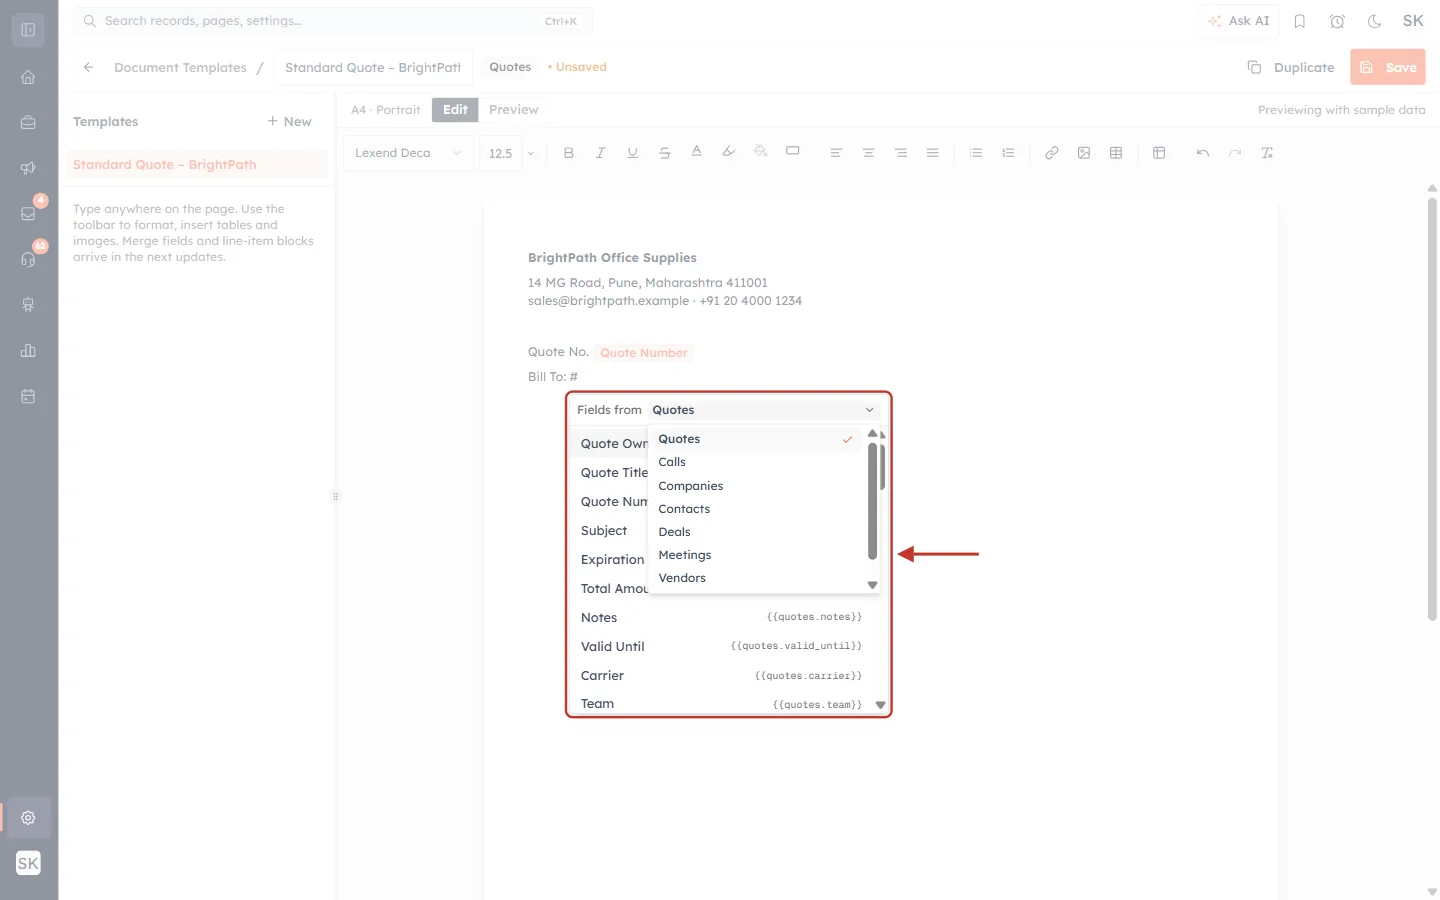
What this screenshot shows. The Fields from menu open inside the picker.
Quotes (with a tick) is the template’s own module.
The other entries are modules related to quotes: Calls, Companies, Contacts, Deals, Meetings and any custom modules linked to quotes in your account.
Pick one to list its fields instead.
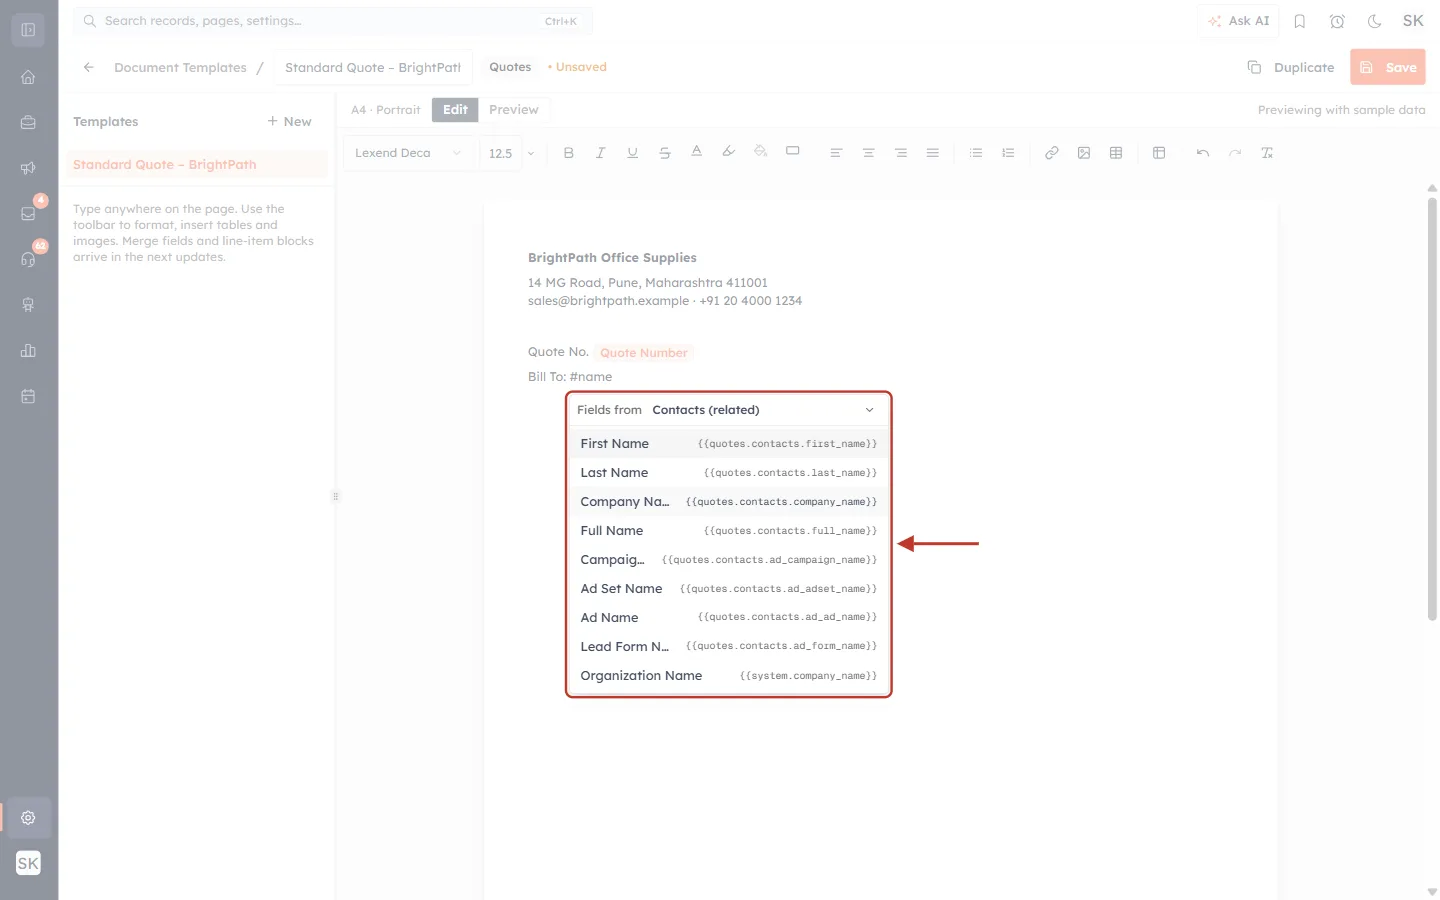
What this screenshot shows. The picker now reads Fields from Contacts (related), filtered by the word name.
“(related)” means the value comes from the contact linked to the quote.
Related codes include both modules, for example
{{quotes.contacts.full_name}}or{{quotes.contacts.company_name}}.The list ends with organisation values such as Organization Name (
{{system.company_name}}), useful if you’d rather not type your company name.If the quote has no linked contact, a related field prints empty.
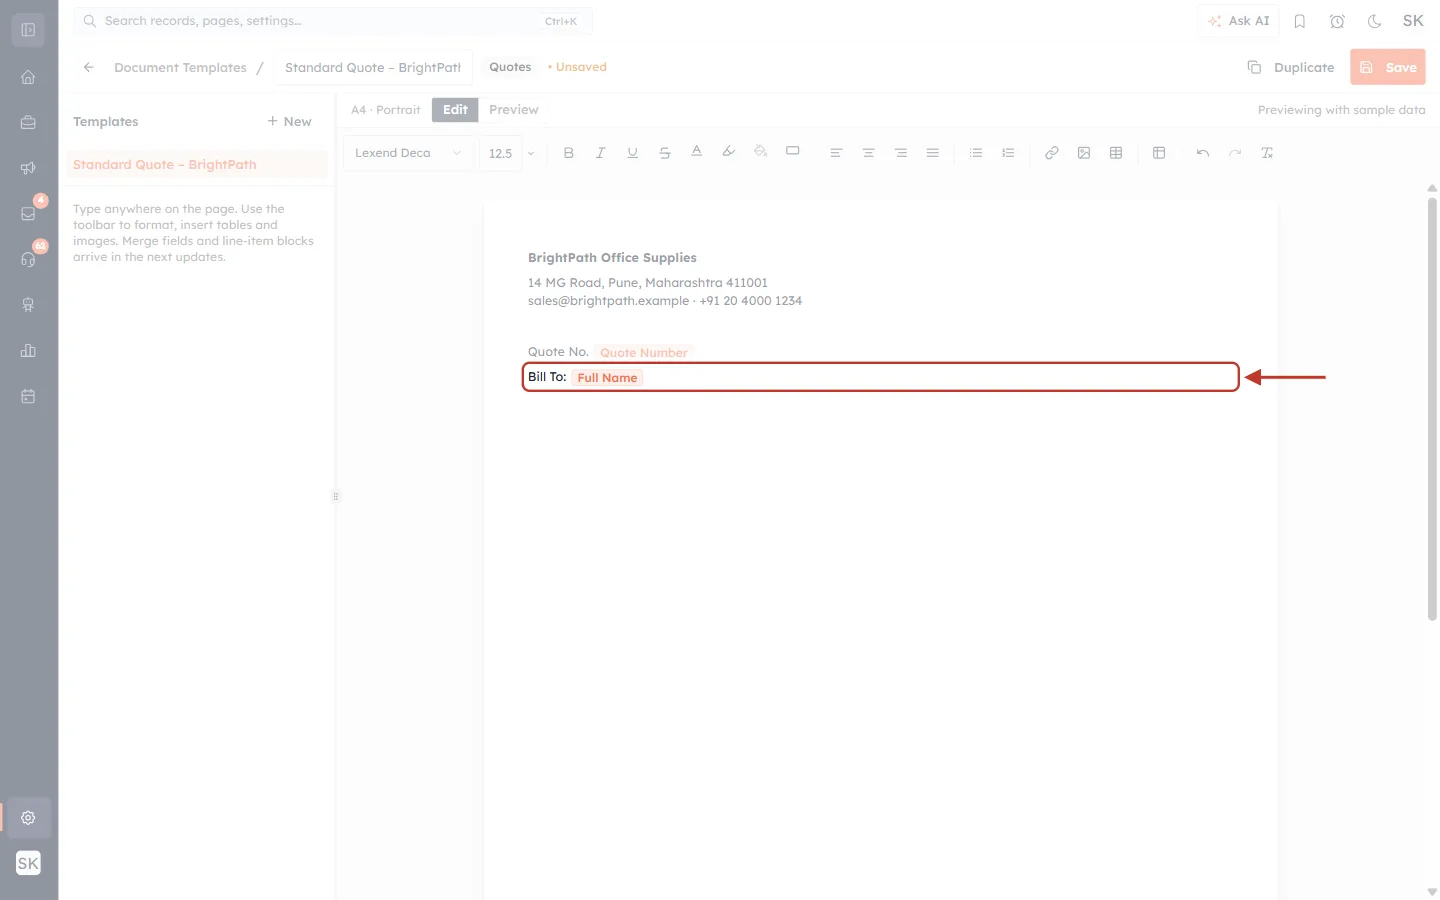
What this screenshot shows. The new line with the Full Name chip, ringed.
The chip label shows only the field name; its code tells the CRM to take it from the linked contact.
Add the billing address the same way. The Billing Street, City, State, Code and Country fields are on the quote itself, in the Quotes list.
Part 4: Add the line items, totals and terms#
Step 11: Insert the line-items table#
Put your cursor where the product list should go (usually after the customer details) and click Insert line-items table on the toolbar.
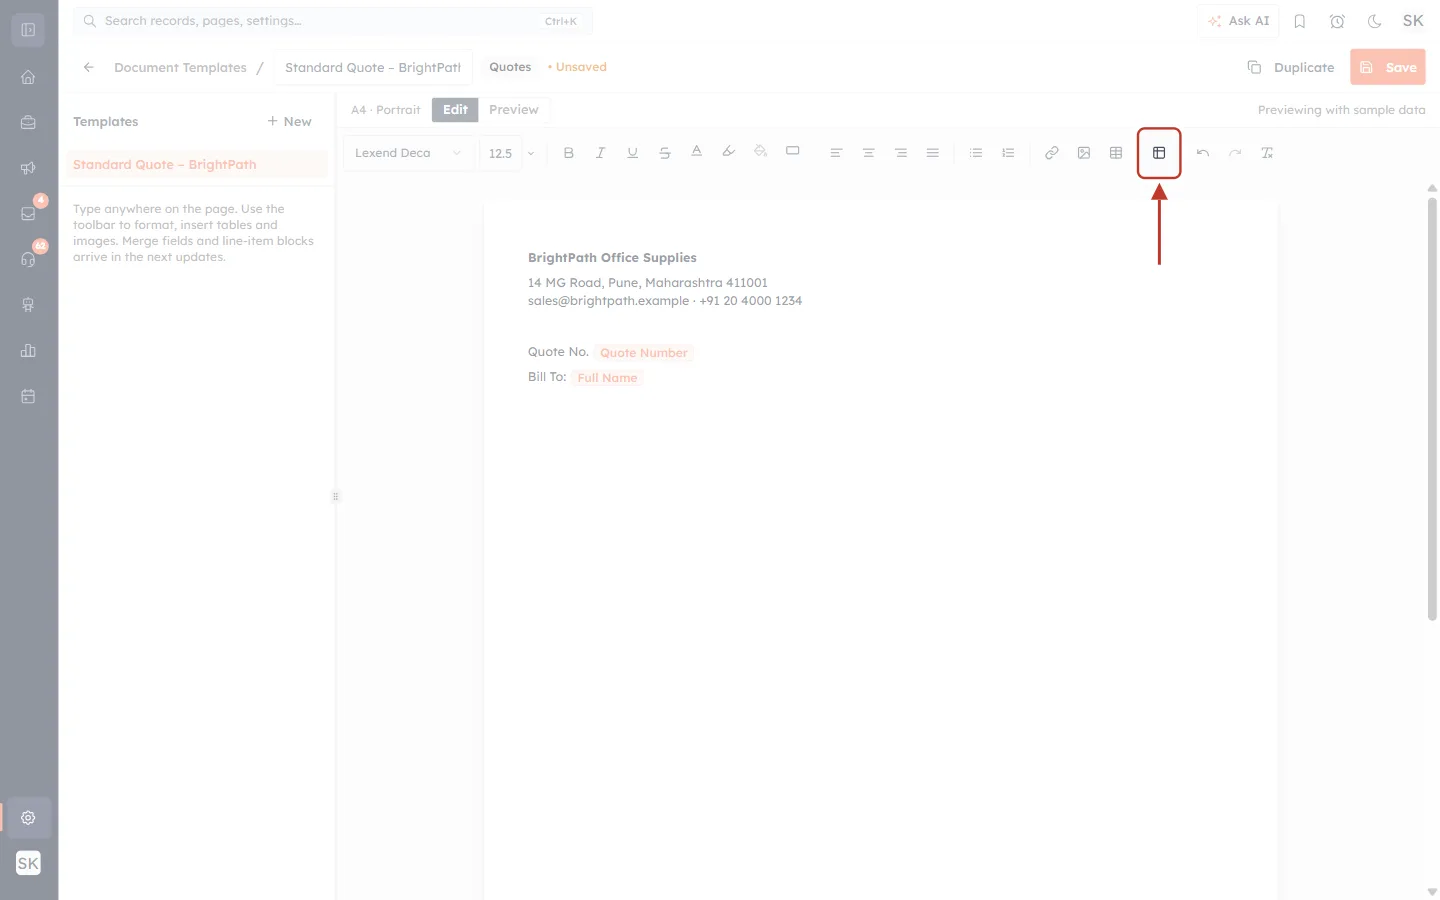
What this screenshot shows. The Insert line-items table button ringed on the toolbar, between Insert table and Undo.
A template can have only one line-items table. Once it is on the page, the button is greyed out.
Use the plain Insert table button (the grid icon to its left) for layout tables, for example to put quote details and customer details side by side.
The table is added with a dark header row and one template row. Here is how it looks in our finished template, below the quote and customer details:
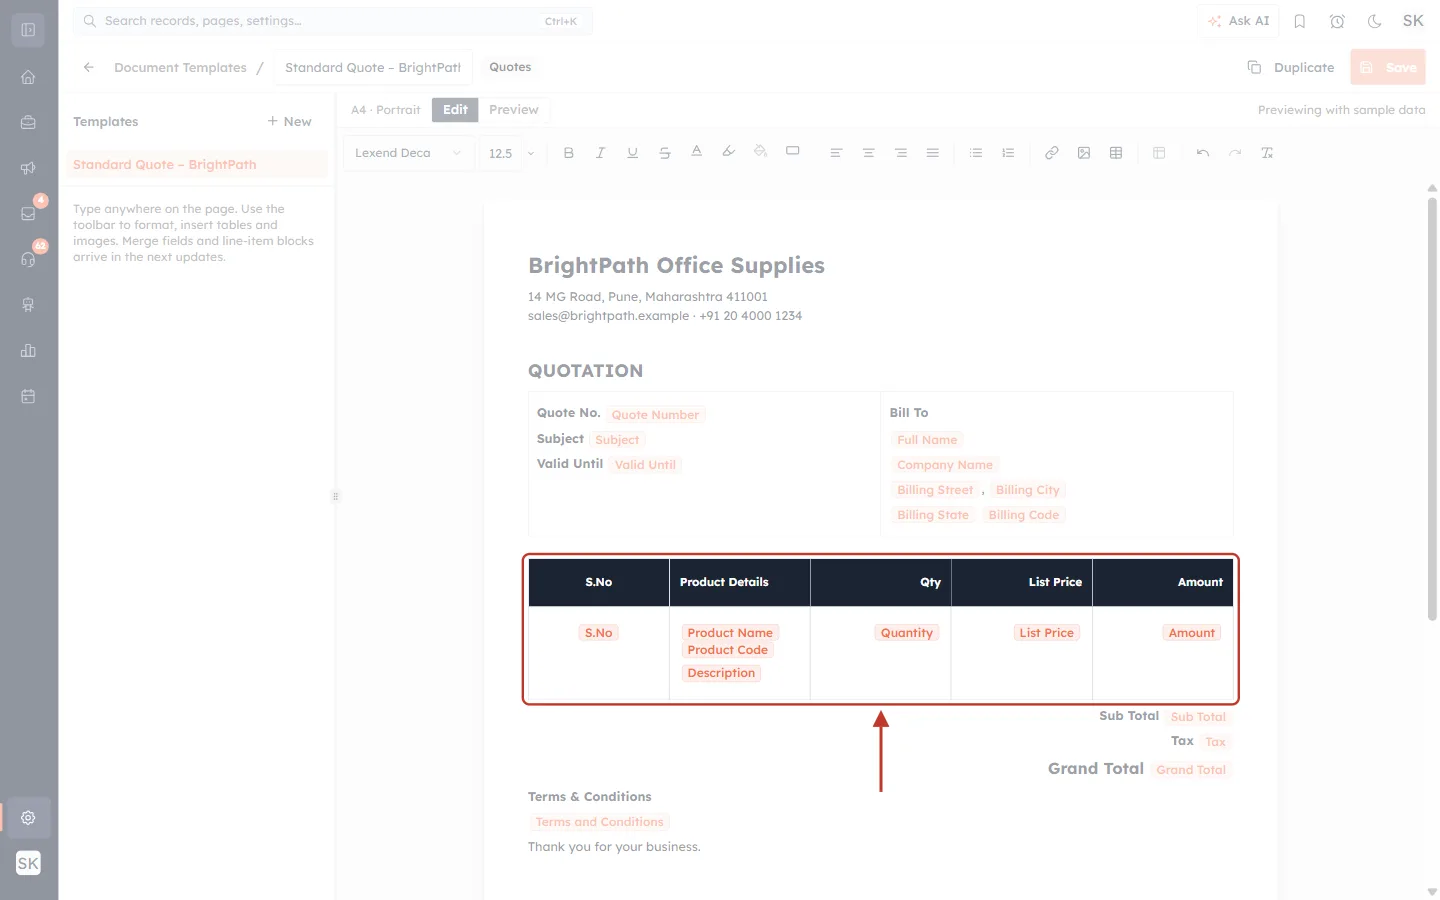
What this screenshot shows. The line-items table ringed on the page.
Header row: S.No, Product Details, Qty, List Price and Amount, in white text on a dark background. You can retype the headings and change the colours.
Template row: merge-field chips for each column: S.No, Product Name + Product Code + Description, Quantity, List Price and Amount.
On the PDF this one row is repeated for every product line on the quote, numbered 1, 2, 3…
Click inside the table to show the table controls (insert or delete rows and columns, toggle the header row, delete the table).
Step 12: Add more line-item columns (optional)#
To add a column, for example Discount or Tax, click in the table, use the table controls to insert a column, type a heading, then click in the template row and type #. Inside the line-items table the picker also lists the fields of each line and of its product.
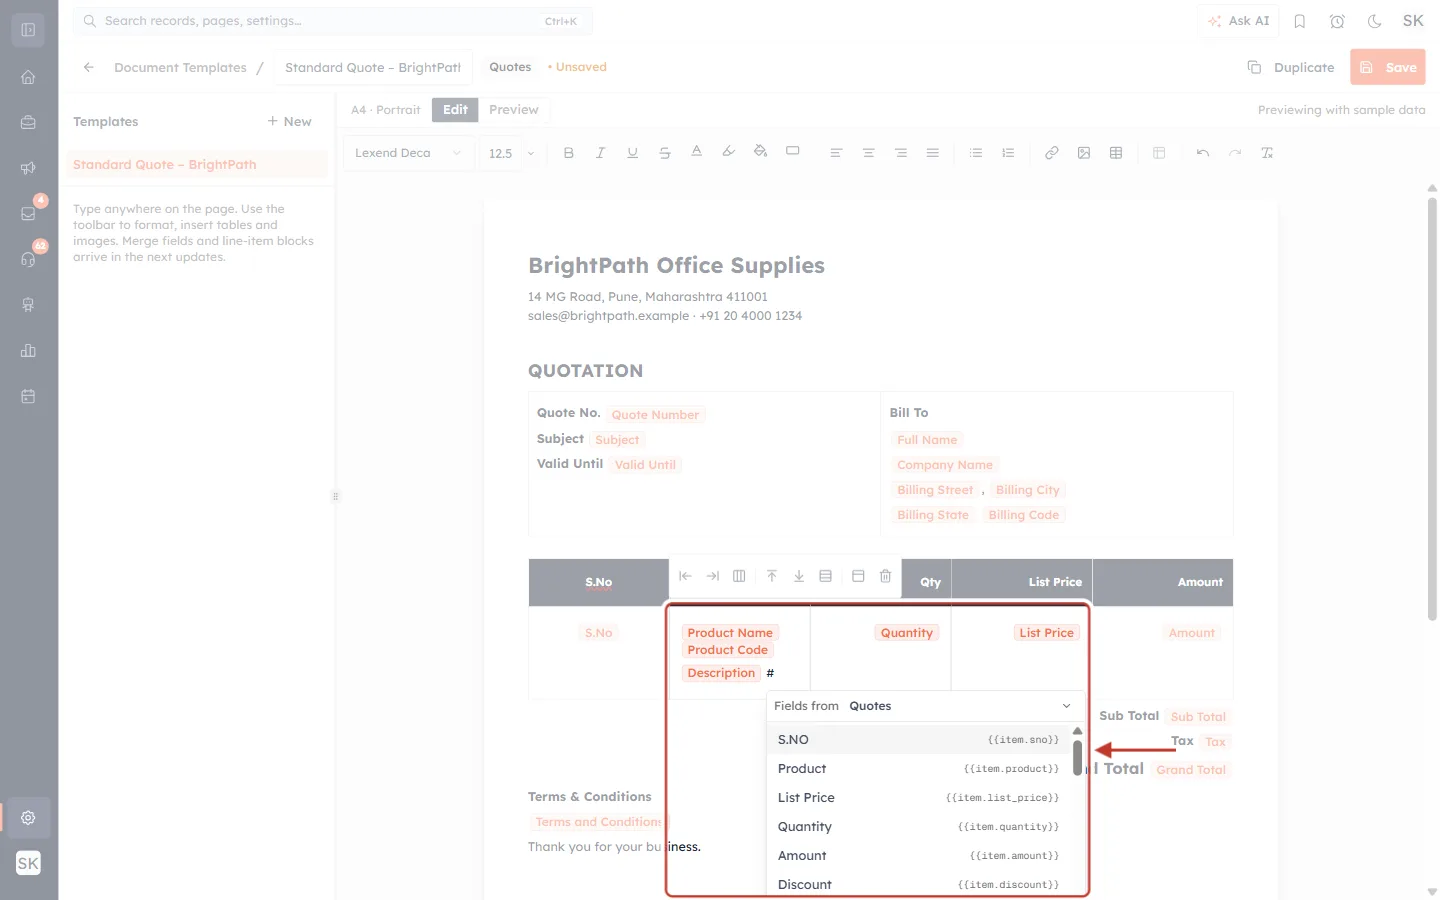
What this screenshot shows. The picker opened inside the Product Details cell.
The first fields are line fields: S.NO (
{{item.sno}}), Product, List Price, Quantity, Amount, Discount, then tax and total.Product fields follow, for example
{{item.product.product_code}}. Columns you added to the quote’s line items (see Lookup Columns in Quote & Invoice Line Items) are listed too.The table controls bar (insert/delete columns and rows) shows above the table while your cursor is in it.
Line fields only work inside the line-items table. Outside it they print empty.
Step 13: Add totals, terms and a closing note#
Below the table, type Sub Total, Tax and Grand Total with their merge fields, and align them right with Align right. Then add a Terms & Conditions heading with the Terms and Conditions field, and a thank-you line.
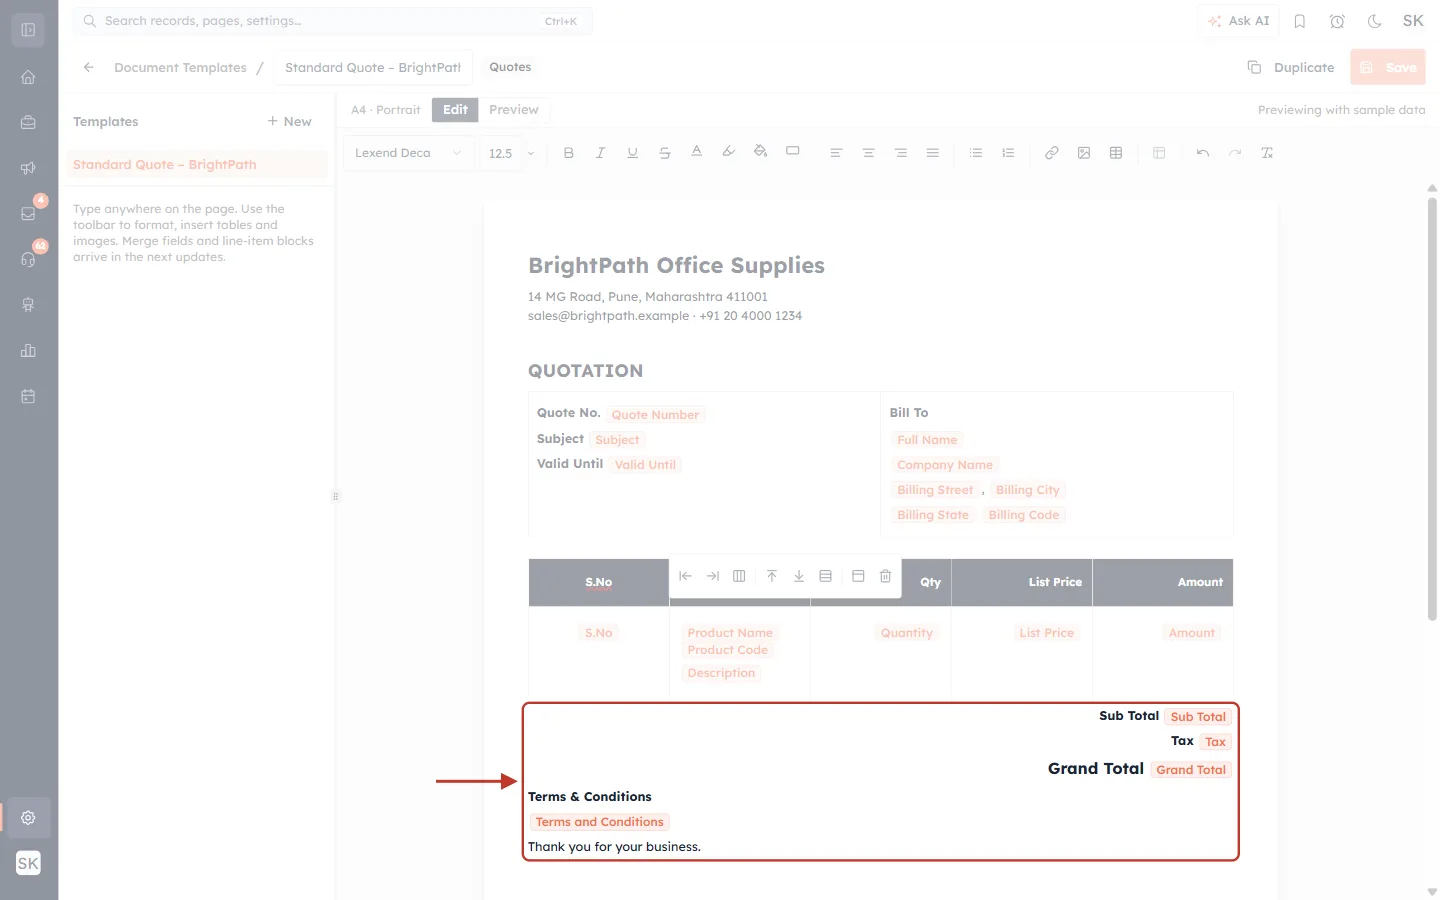
What this screenshot shows. The bottom of the finished template, ringed.
Sub Total, Tax and a larger, bold Grand Total, each followed by its chip and aligned right.
Terms & Conditions prints the terms typed on each quote (
{{quotes.terms_and_conditions}}), so every quote can carry its own.“Thank you for your business.” is plain text and prints on every quote.
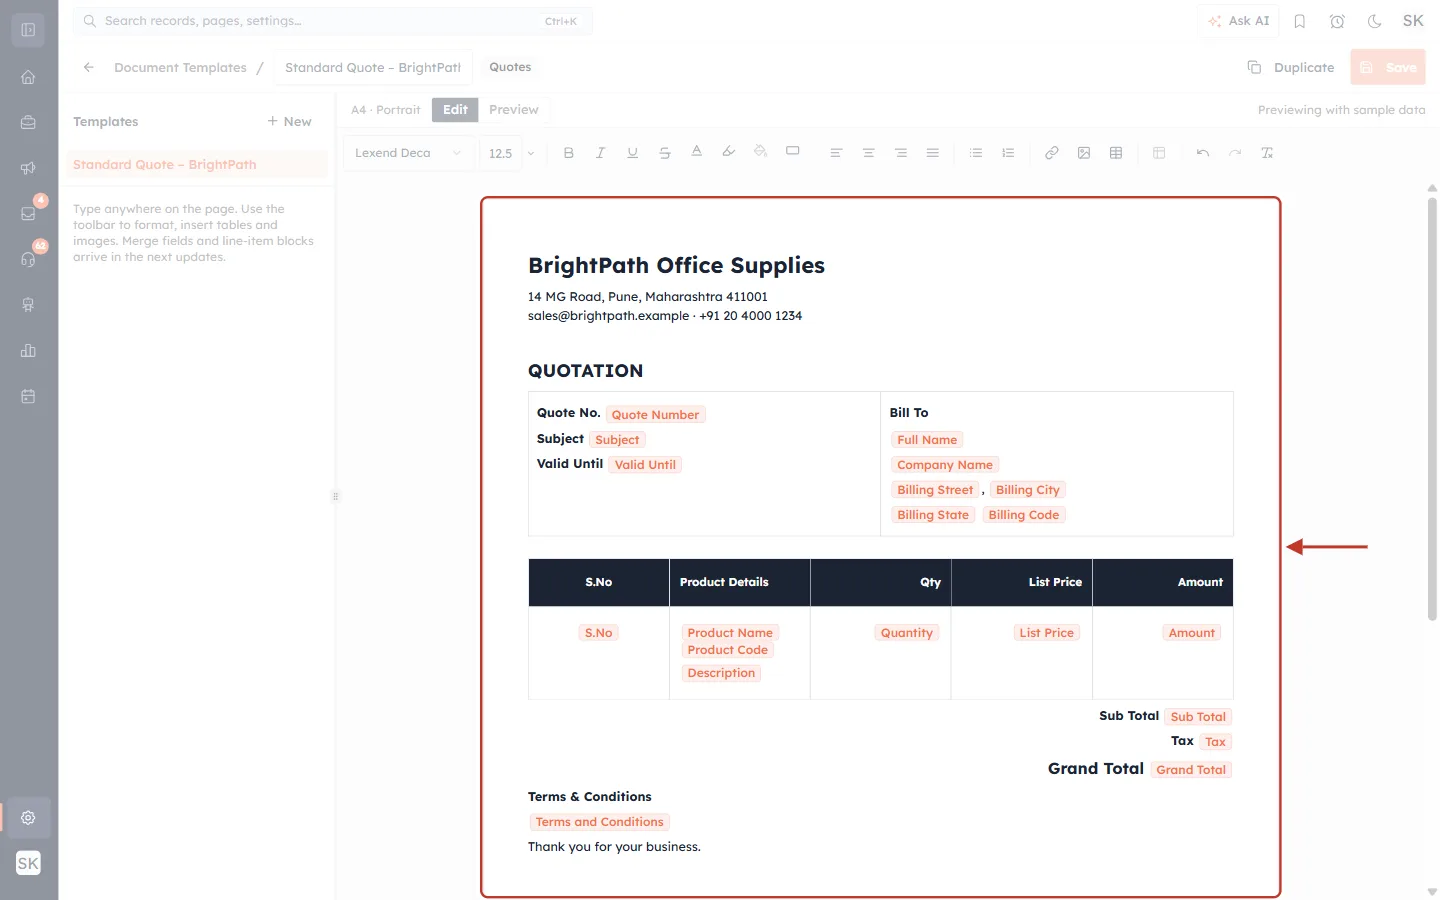
What this screenshot shows. The whole finished template on the page.
Header: company name (large, bold), address and contact line, then a QUOTATION title.
Details table (an ordinary two-column table): Quote No., Subject, Valid Until on the left; Bill To with the contact’s Full Name, Company Name and the billing address on the right.
Line-items table, then the totals, terms and closing line.
Click Save when you are happy with it.
Part 5: Preview the PDF#
Step 14: Switch to Preview#
Click Preview above the page. The CRM builds the real PDF from your template and shows it in a PDF viewer. Click Edit to go back to designing.
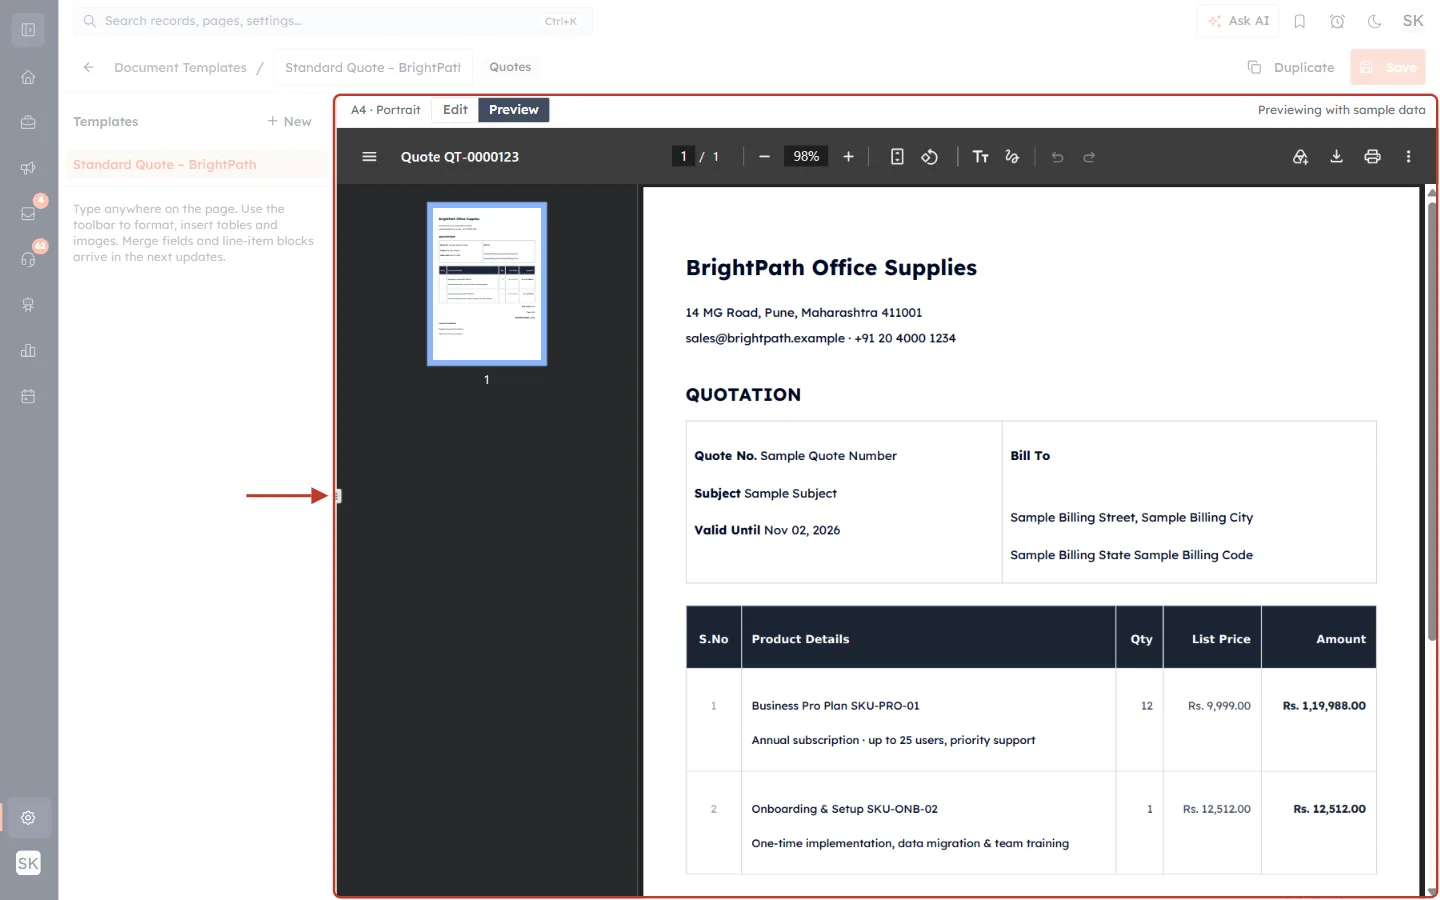
What this screenshot shows. The Preview tab, with the generated PDF ringed.
The viewer title reads Quote QT-0000123, a sample quote number.
Every chip is replaced with a value. Since this is a template, not a real quote, the values are sample data: Sample Quote Number, Sample Subject, today’s date for Valid Until, Sample Billing Street…
The line-items table shows two sample products (Business Pro Plan and Onboarding & Setup) with SKU codes, descriptions, quantities and amounts in your currency.
Related fields with no sample value (here the contact’s name and company) are left blank in the preview. They fill in on real quotes that have a linked contact.
Use the viewer toolbar to zoom, download or print the preview.
“Previewing with sample data” on the right of the bar is a reminder that these are not real values.
✅
Check the preview every time you change the layout. It is the exact PDF engine your customers’ documents use, so if it looks right here, it will look right on real quotes. The preview updates from your current edits, even before you save.
Part 6: Make it the default template#
The default template is the one every quote uses unless someone picks another one on the quote. Each module (Quotes, Invoices, Payments) has its own default.
Step 15: Set as default from the editor#
In the left Templates panel, hover over the template and click the ⋯ (Template actions) button that appears, then click Set as default.
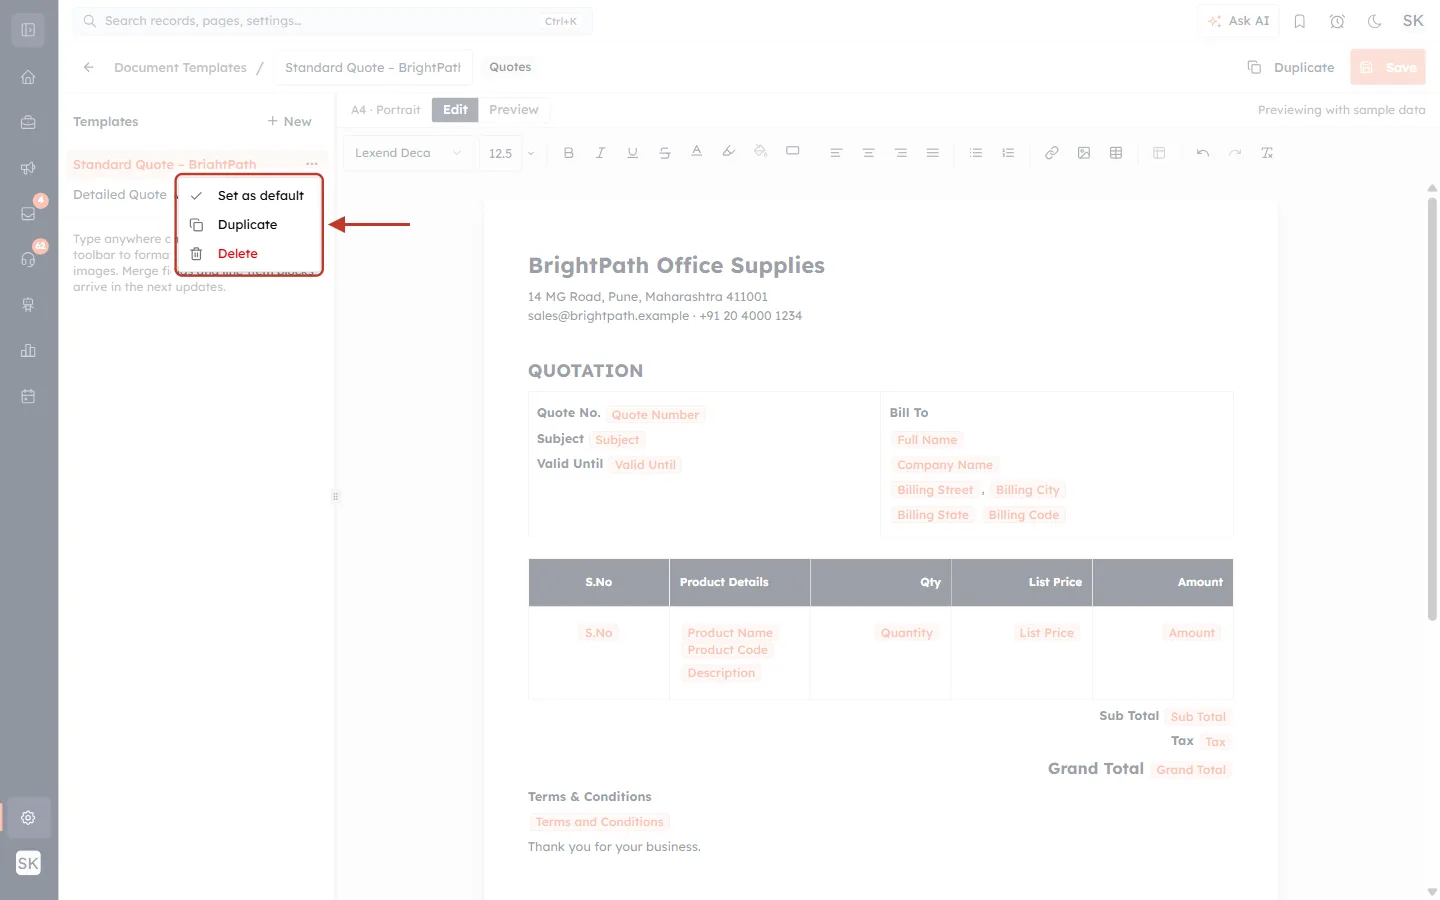
What this screenshot shows. The Template actions menu in the left Templates panel.
Set as default: makes this the module’s default template.
Duplicate: makes a copy named “… (copy)”, a good starting point for a variant such as a detailed quote.
Delete: removes the template. It is greyed out for the default template.
The ⋯ button only shows when you hover over a template’s name.
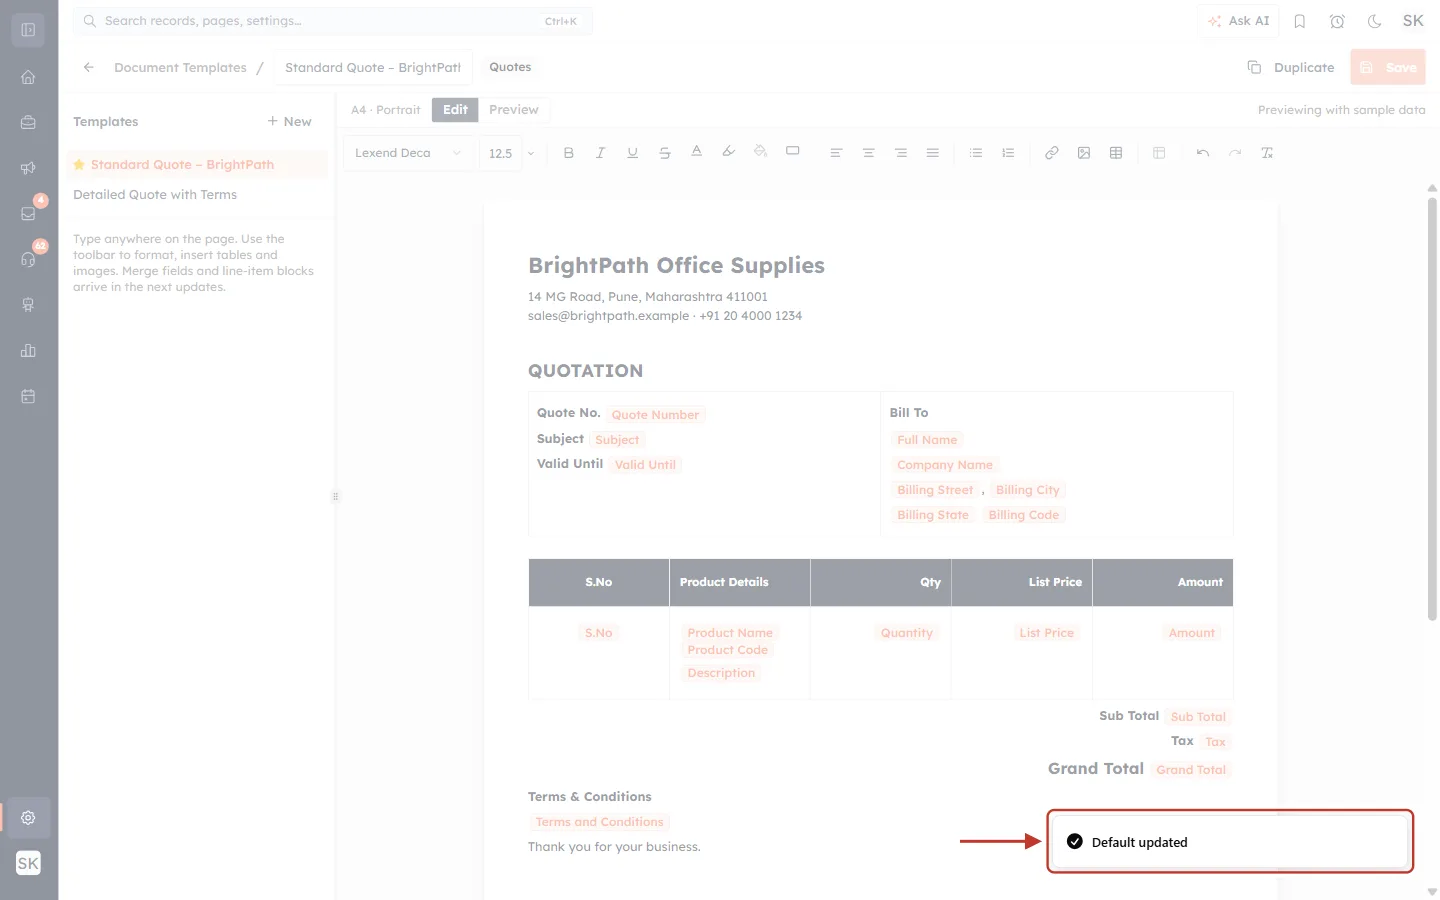
What this screenshot shows. The confirmation Default updated in the bottom-right corner.
The change is saved at once; you don’t need to click Save.
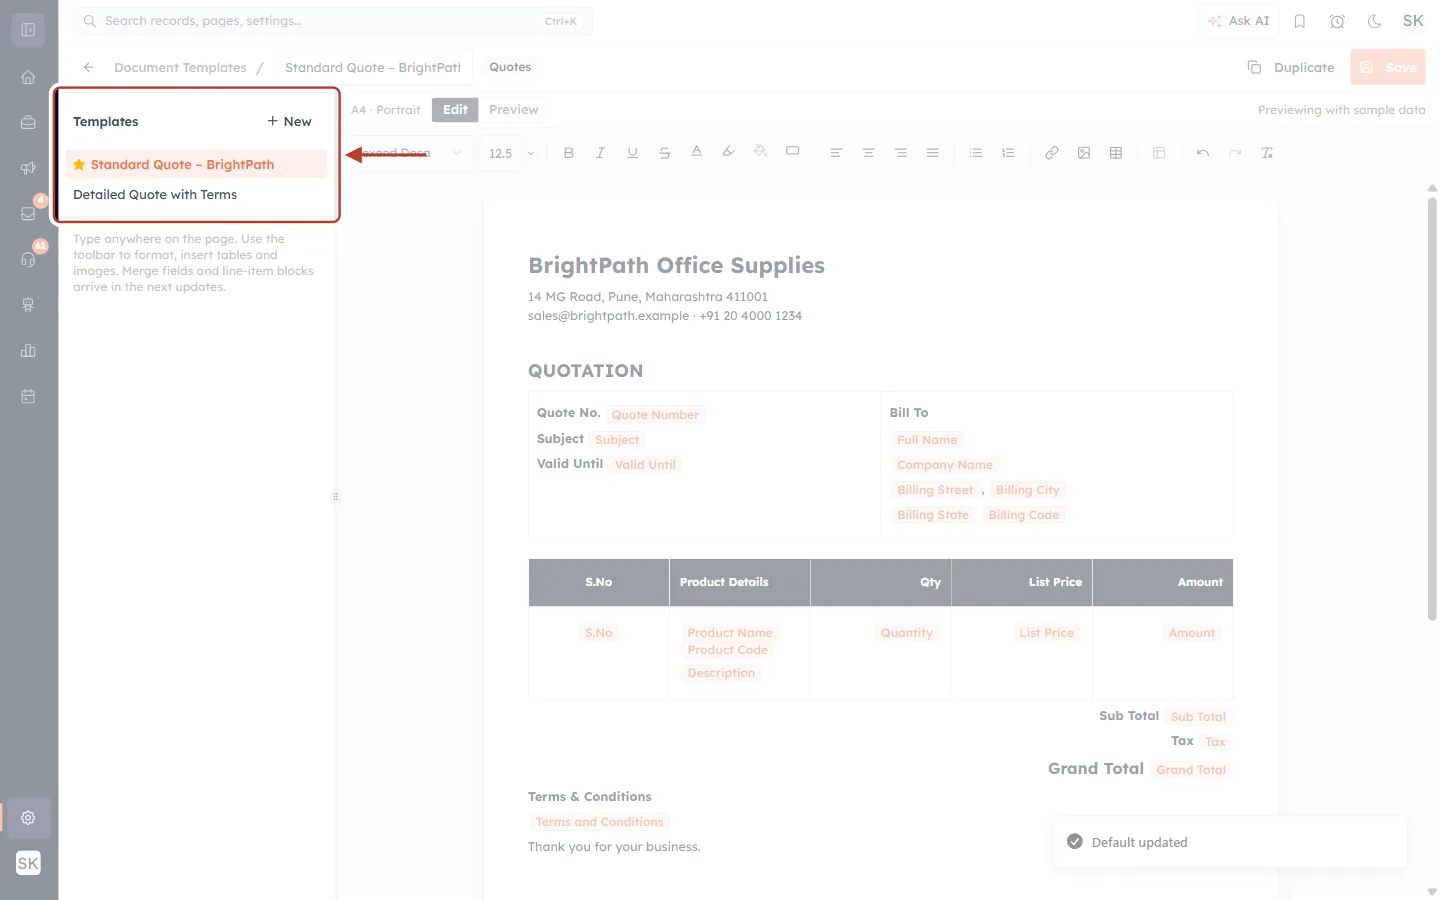
What this screenshot shows. The left Templates panel after setting the default.
A ★ star in front of Standard Quote – BrightPath marks the default.
The other template, Detailed Quote with Terms, has no star: it is available, but only used when someone chooses it on a quote.
Part 7: Manage templates from the list#
Go back to Document Templates (click the breadcrumb). The list now shows your templates.
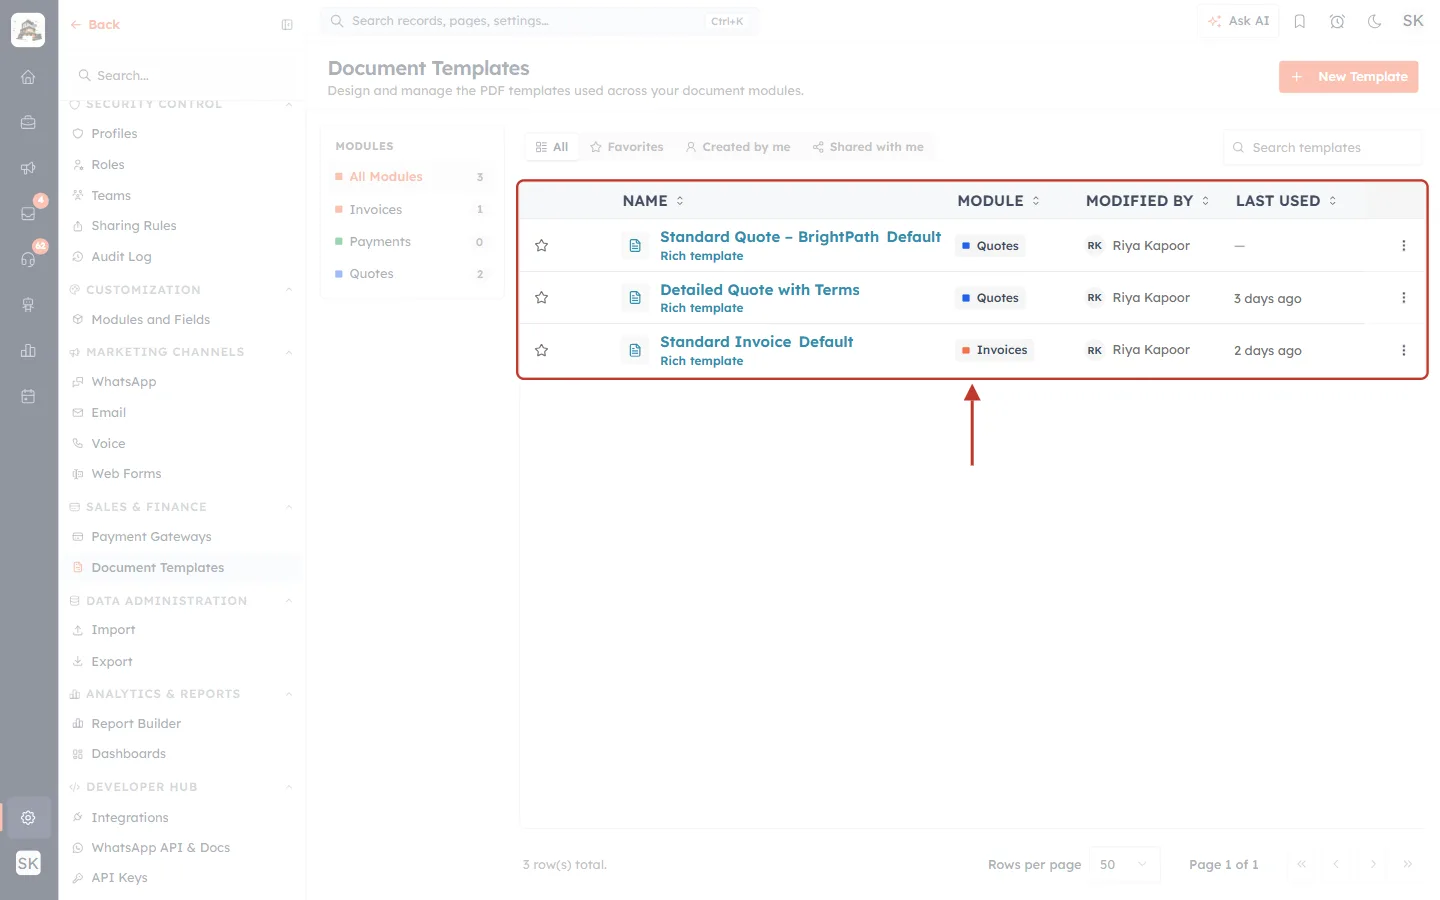
What this screenshot shows. The templates table, ringed.
Name: the template name. The default template of each module carries a green Default tag. “Rich template” is the template type.
Module: Quotes or Invoices, with the module’s colour.
Modified By: who last changed it. Last Used: when it was last used for a PDF (“—” if not yet).
The ☆ on the left adds a template to your Favorites tab.
Click a name to open it in the editor. Click a column heading to sort.
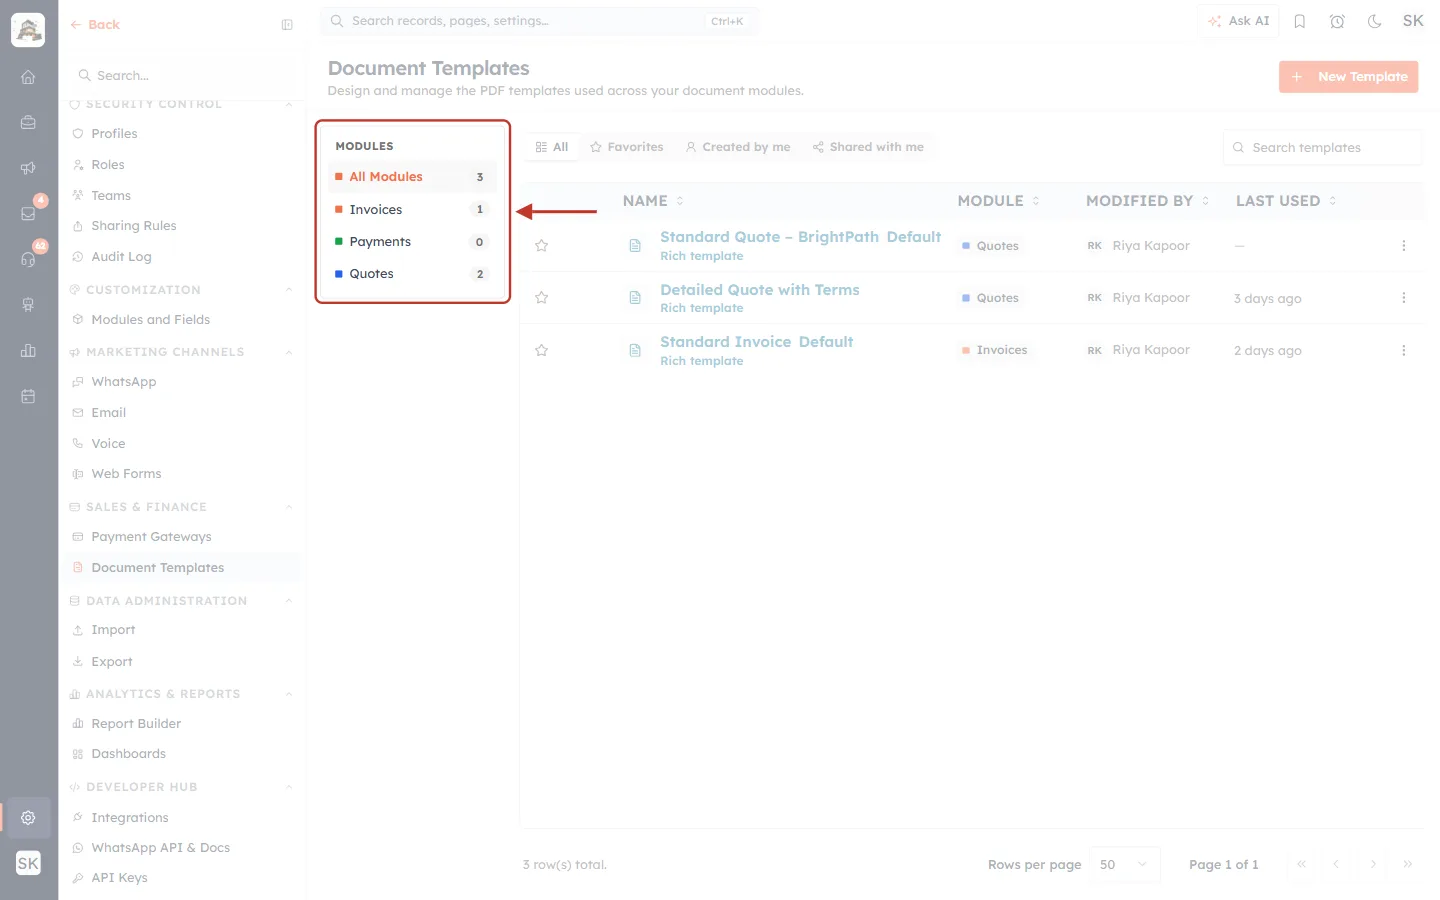
What this screenshot shows. The Modules panel now shows the counts: All Modules 3, Invoices 1, Payments 0, Quotes 2.
Click a module to show only its templates.
Step 16: Use the row actions#
Click the ⋮ at the end of a row to open its Actions menu.
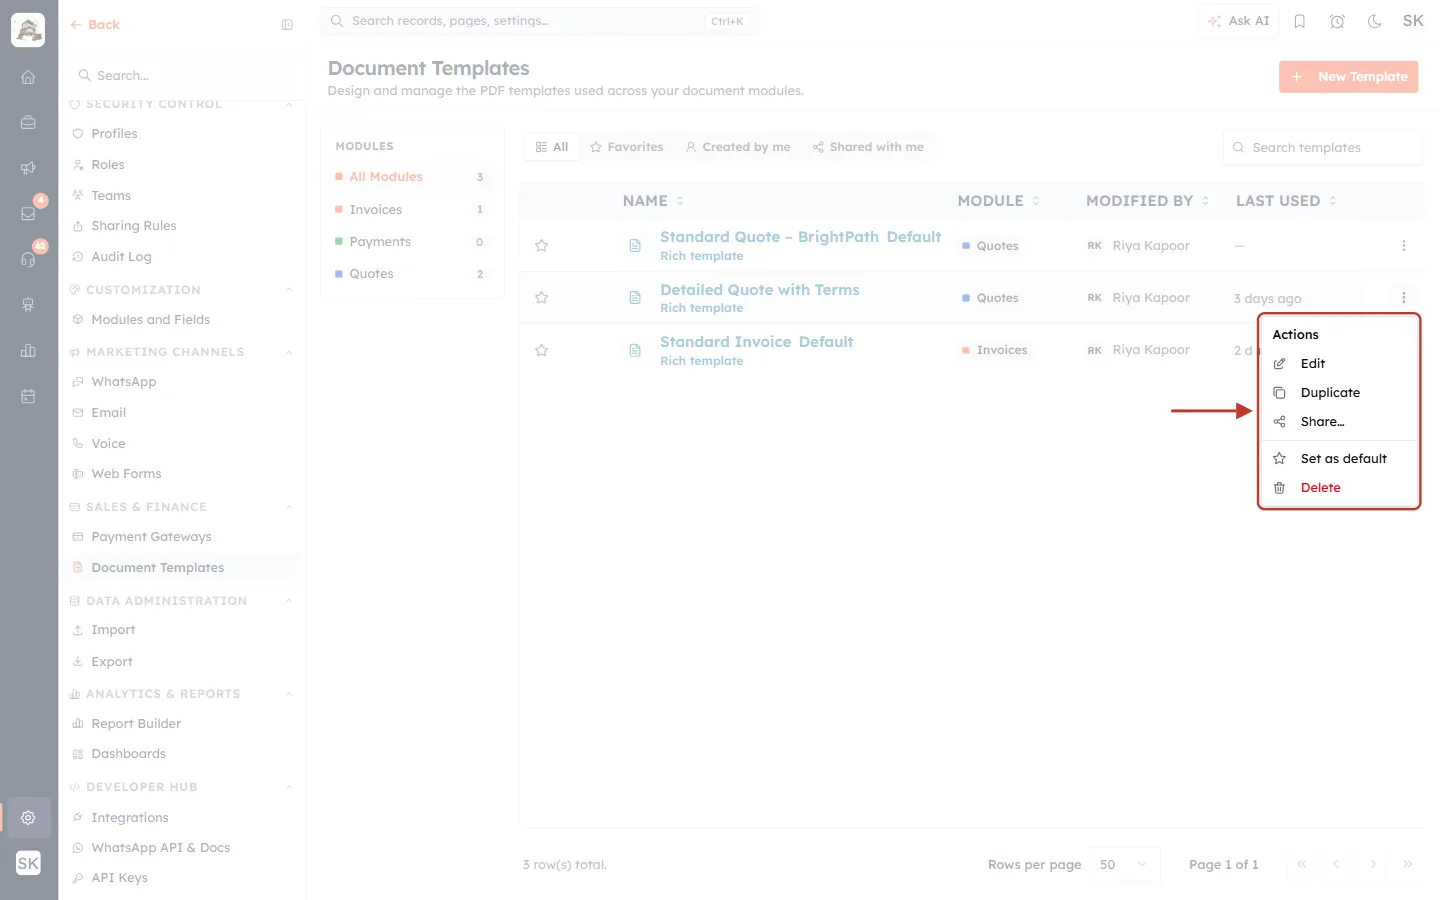
What this screenshot shows. The Actions menu of Detailed Quote with Terms.
Edit: opens it in the editor.
Duplicate: makes a copy (“Template duplicated”).
Share…: gives specific users or teams access (next figure).
Set as default: makes it the default for Quotes; the previous default loses its tag.
Delete (in red): asks “Are you sure? This action cannot be undone.” and then deletes it (“Template deleted”).
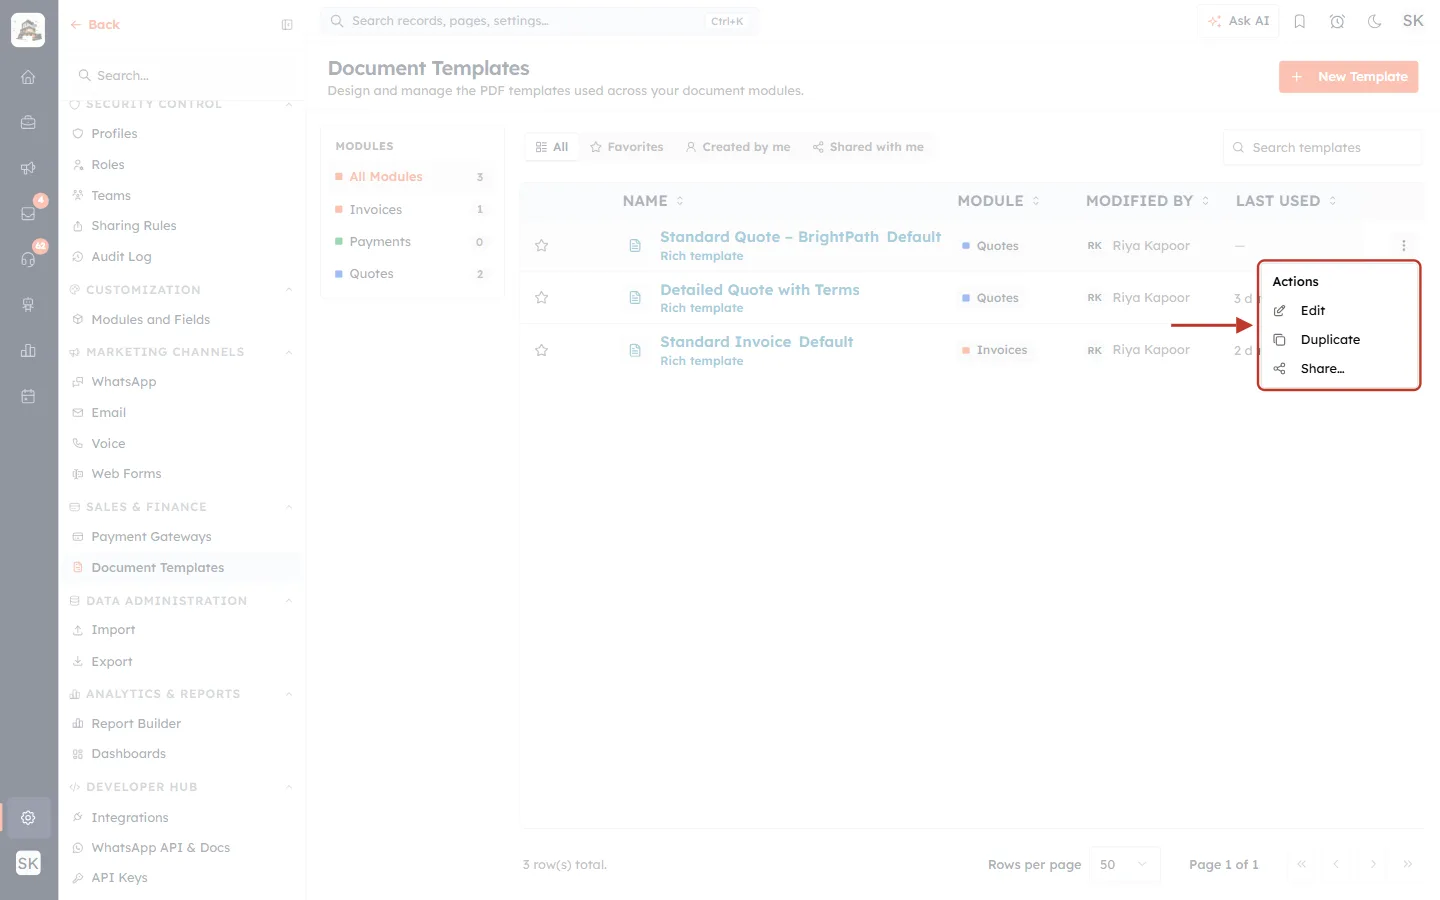
What this screenshot shows. The Actions menu of the default template, Standard Quote – BrightPath.
Only Edit, Duplicate and Share… are offered.
A default template can’t be deleted. To remove it, first set another template as the default.
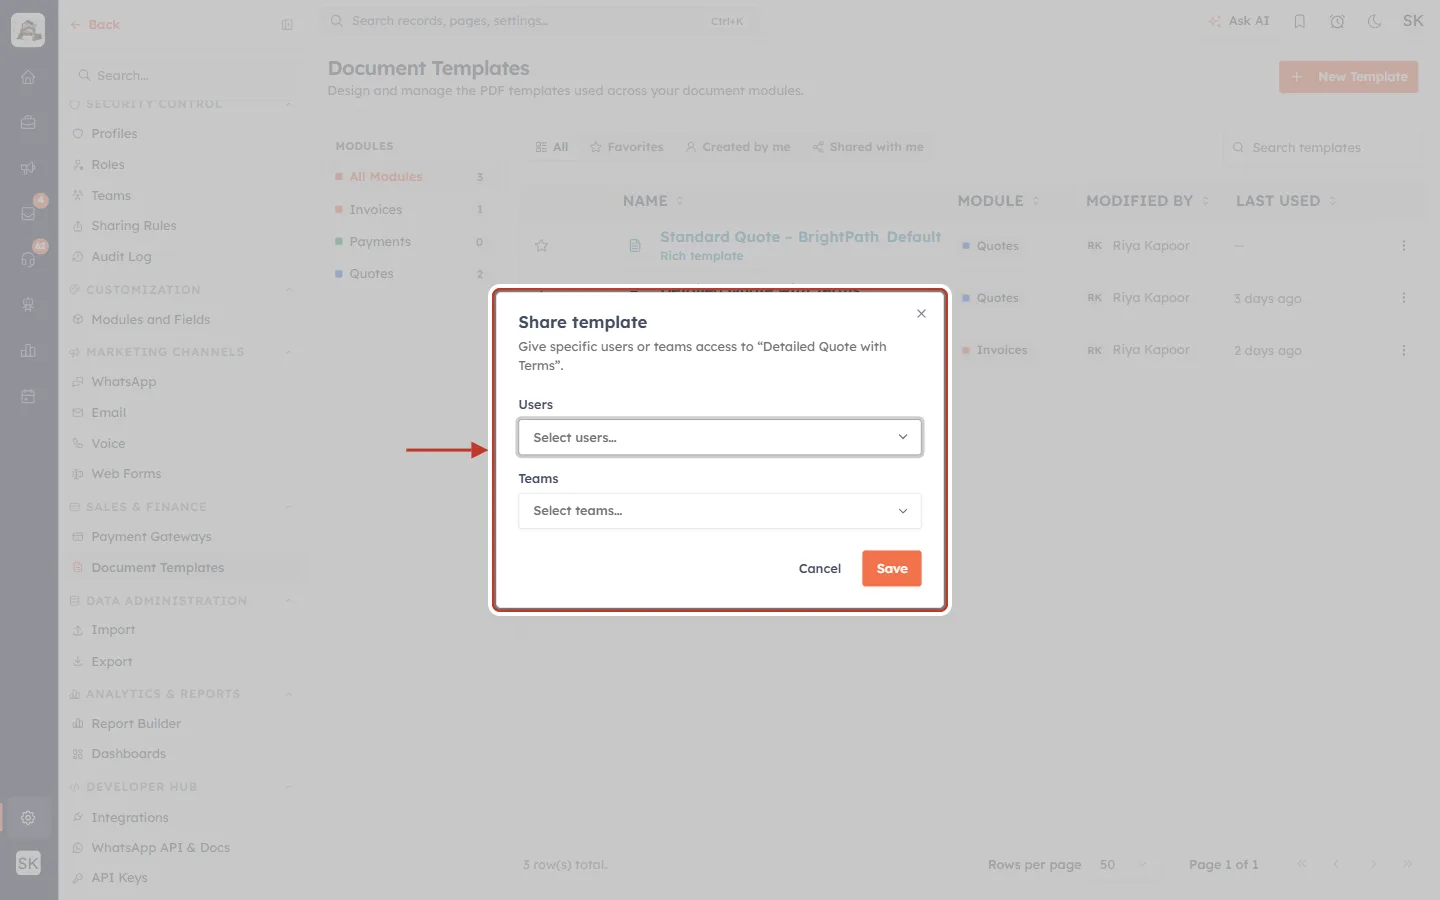
What this screenshot shows. The Share template dialog.
“Give specific users or teams access to Detailed Quote with Terms.”
Users: pick one or more people. Teams: pick whole teams.
Click Save (“Sharing updated”). The template then appears in those people’s Shared with me tab.
Part 8: Use a different template on one quote#
When a module has more than one template, each quote shows a template picker next to its action buttons. Use it when one customer needs a different layout, for example a detailed quote with full terms.
Step 17: Choose the template on the quote#
Open the quote. Next to Convert, Send Quote, Download PDF and ⋯, click the picker that shows a document icon and Default template.
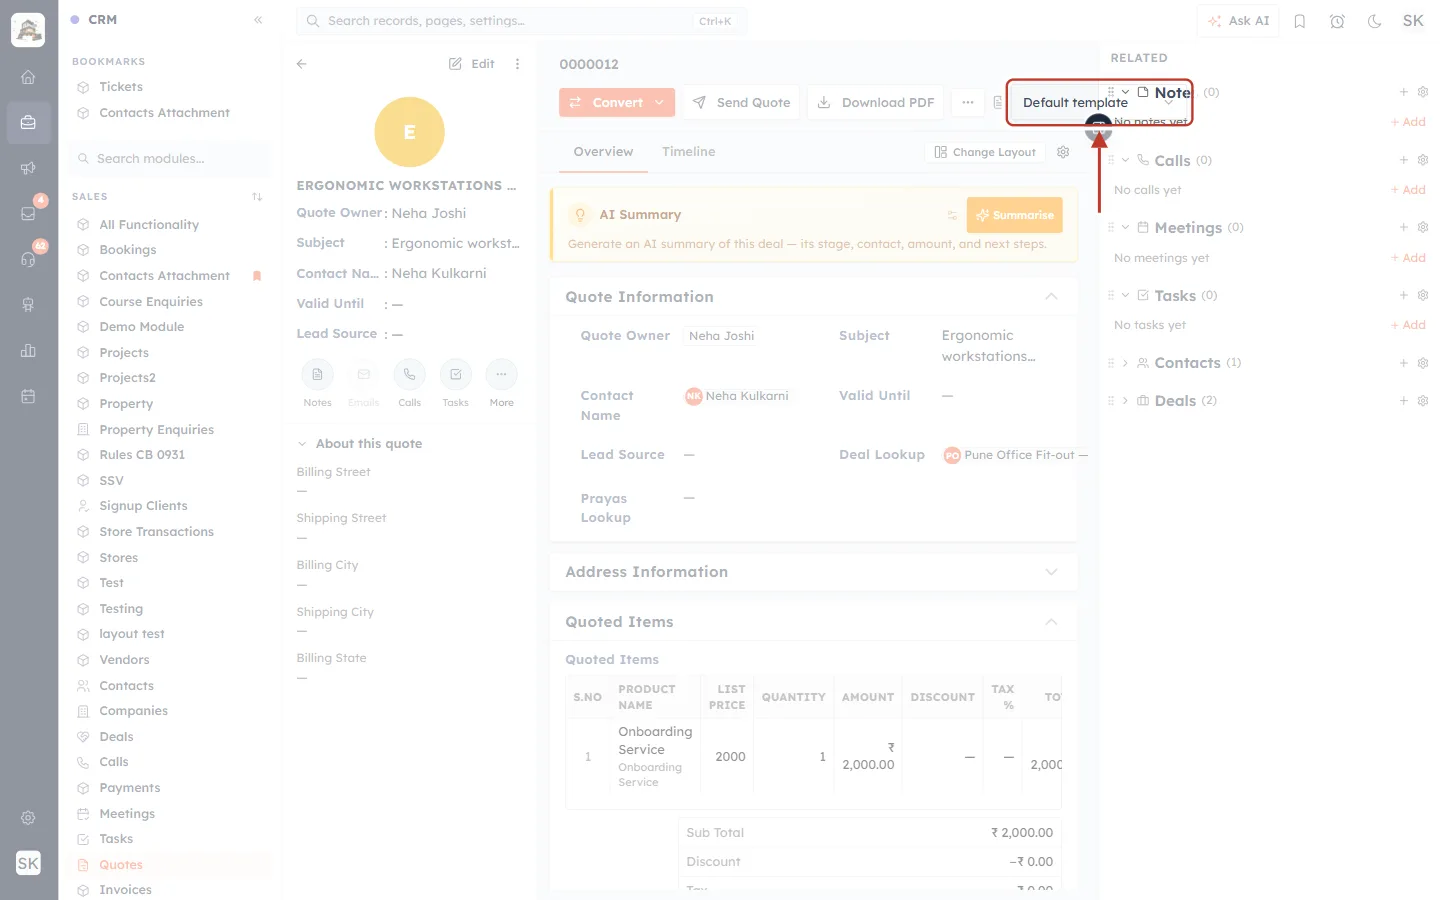
What this screenshot shows. A quote’s detail page, with the template picker ringed at the end of the action buttons.
It reads Default template: this quote uses the module’s default.
The picker only appears when the module has at least one template besides the default.
Hover over it to see the tooltip “Document template for this record”.
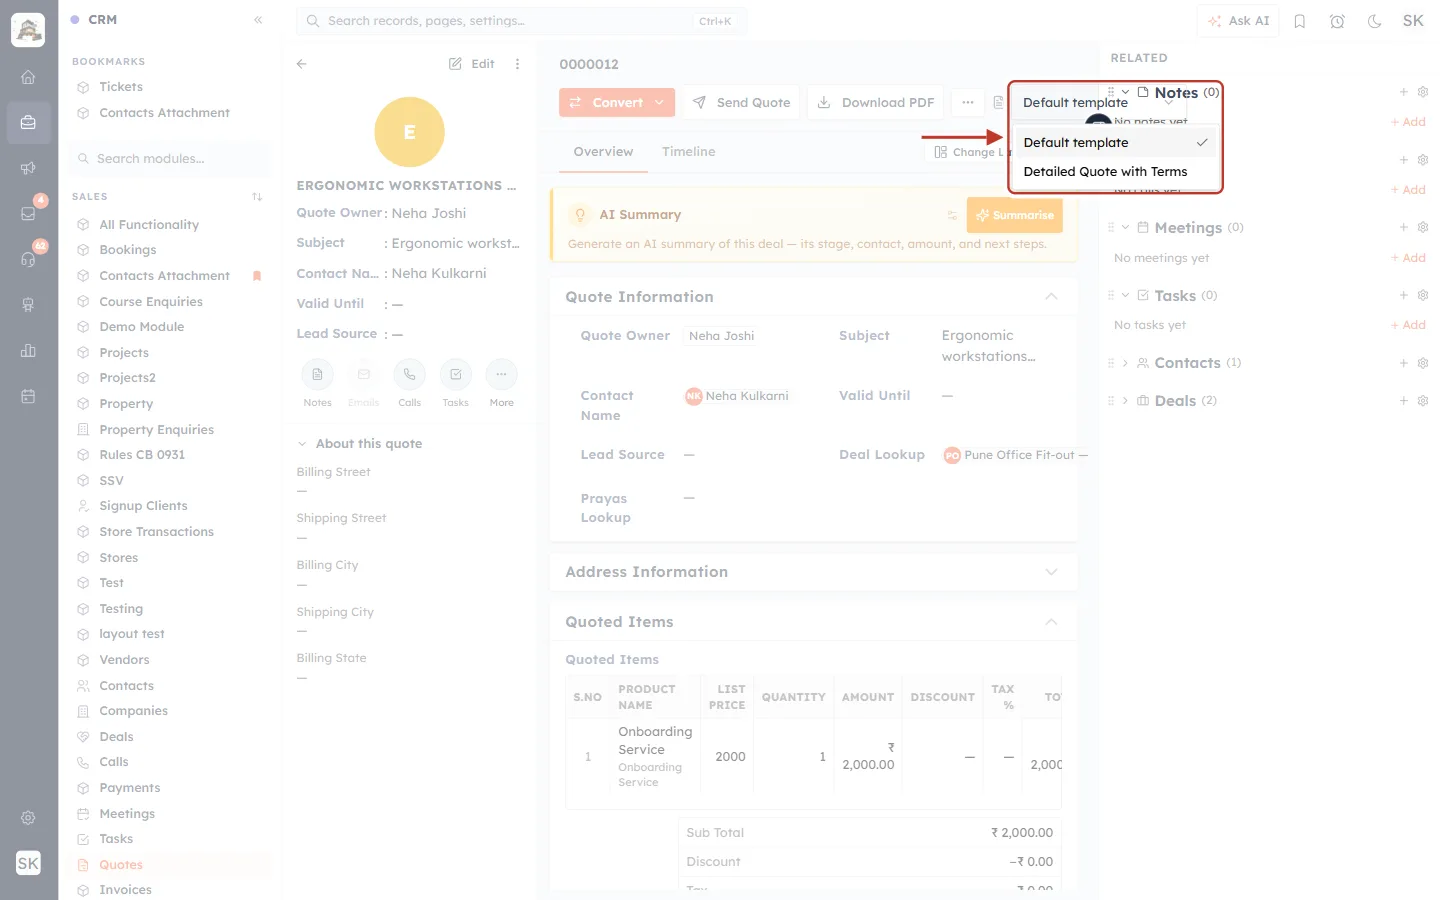
What this screenshot shows. The picker open.
Default template (ticked): follow the module default, whichever template that is.
Detailed Quote with Terms: every other template of the module, by name.
Click a template to use it for this quote.
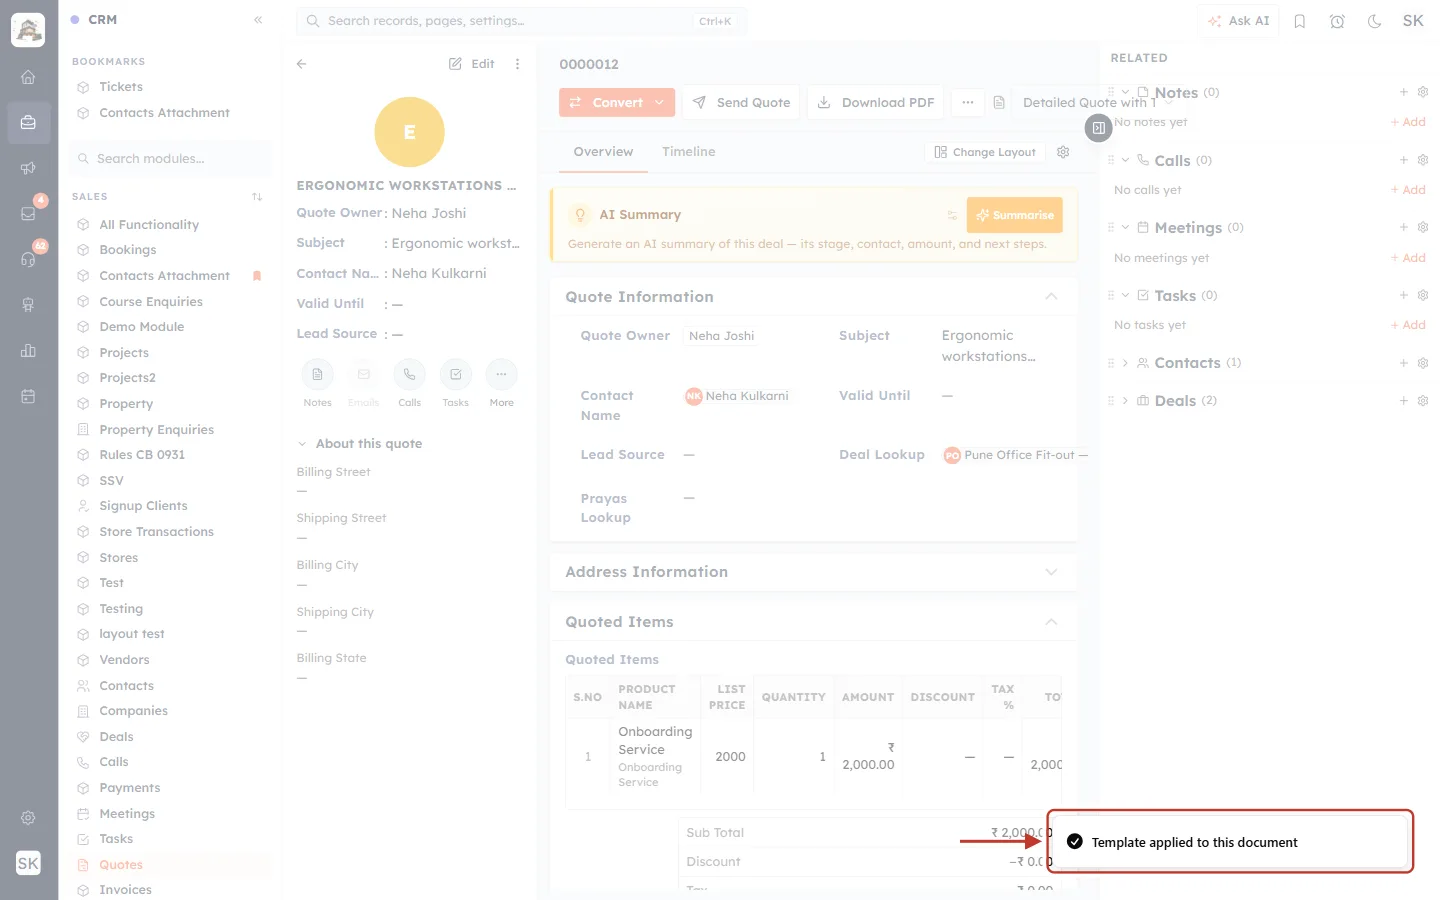
What this screenshot shows. The confirmation in the bottom-right corner after choosing Detailed Quote with Terms.
Template applied to this document: the choice is saved on this quote straight away.
Choosing Default template again shows “Reverted to the default template”.
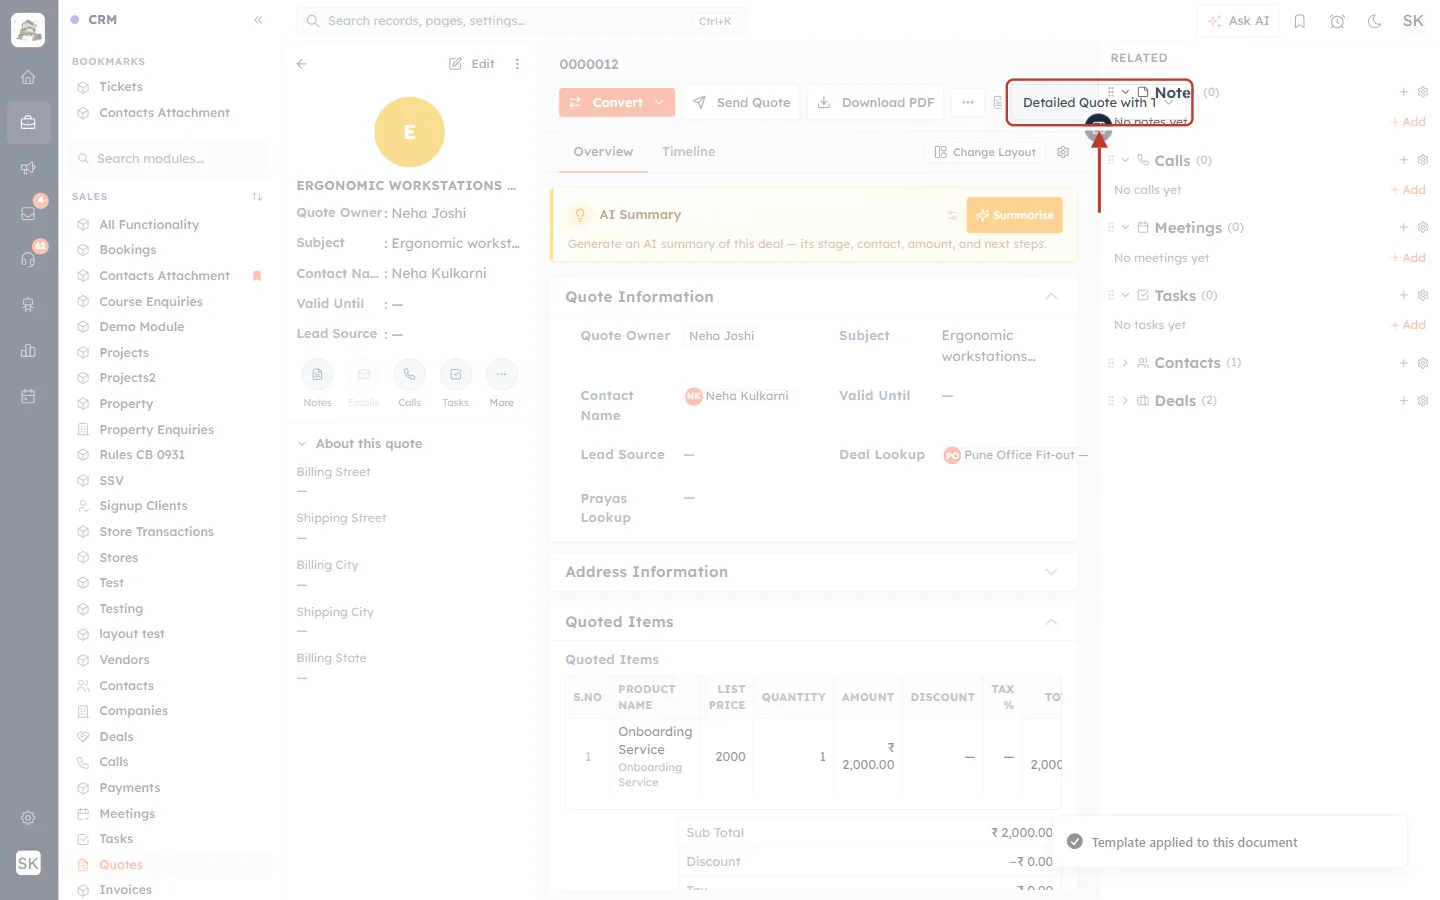
What this screenshot shows. The picker now shows Detailed Quote with Terms.
Only this quote changes. Other quotes keep using the default template.
The choice stays with the quote until someone changes it.
Step 18: Download the PDF#
Click Download PDF. The PDF is built from the template selected for this quote (or the default template) and downloaded to your computer, ready to send.
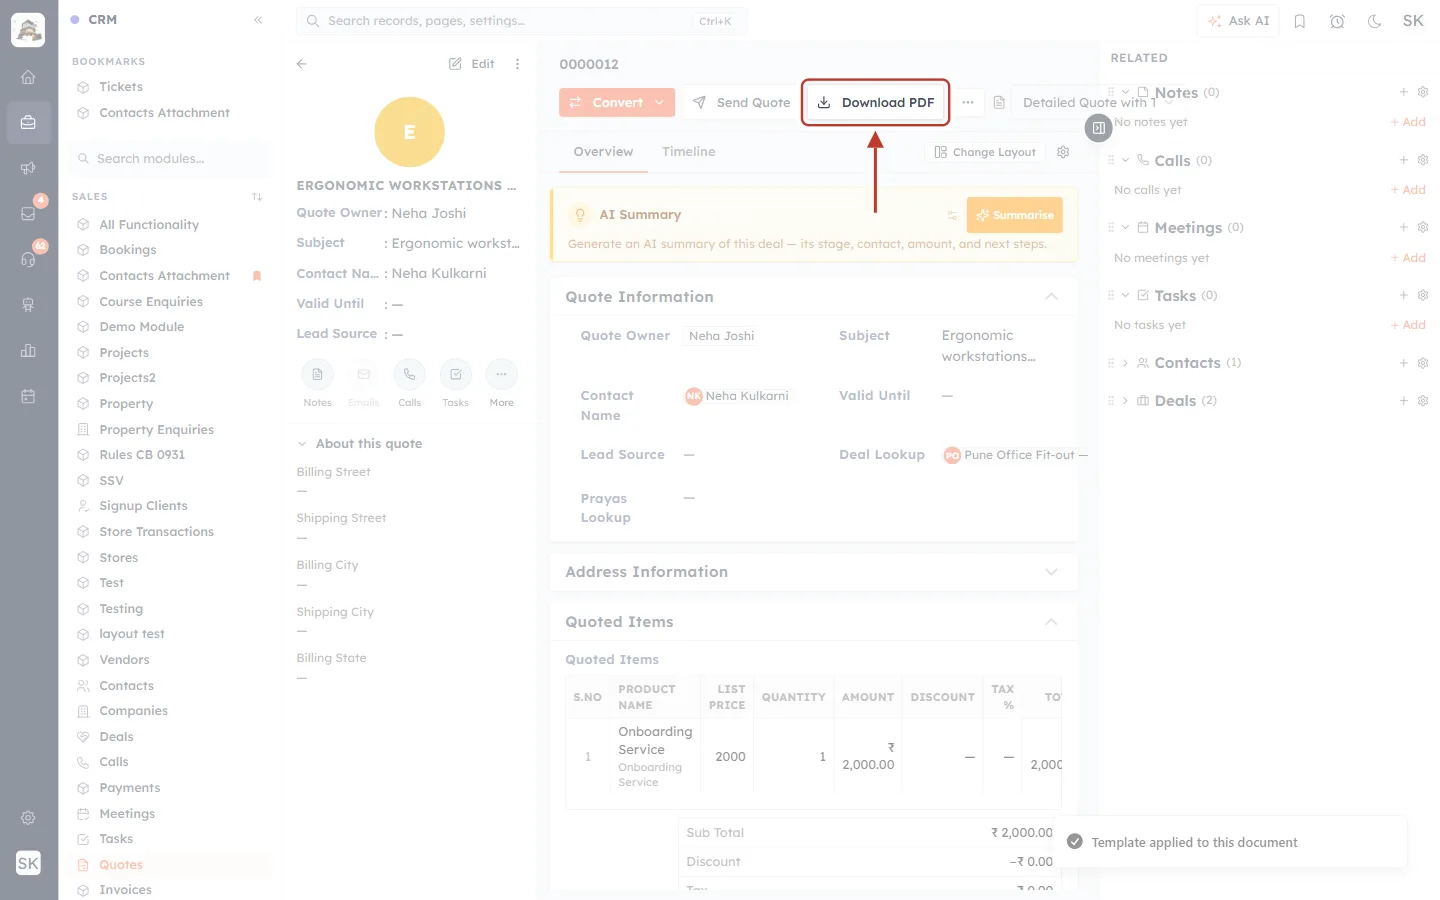
What this screenshot shows. The Download PDF button ringed in the quote’s action bar.
The values on the PDF are the quote’s real values: its number, customer, products and totals.
Invoices work the same way: their own default template, the template picker and Download PDF.
Ideas for templates#
Template | What to put on it |
|---|---|
Standard Quote | Company header, quote number, valid until, Bill To, line items, totals, short terms. |
Detailed Quote with Terms | Everything above plus product descriptions, delivery and warranty notes, full terms, a signature line. |
Tax Invoice (India GST) | Your GSTIN in the header, the customer’s billing address, an HSN code column in the line items, tax totals. |
Payment Receipt | Payments module: amount received, date, payment method, invoice reference, “Thank you for your payment”. |
Regional / language variant | A duplicate of your standard template with translated headings and local terms. |
Troubleshooting#
Problem | What to check |
|---|---|
I can’t see Document Templates in Setup. | Your profile needs permission to view Quotes, Invoices or Payments, or you must be an owner/admin. |
Typing # doesn’t open the field picker. | Type # at the start of a line or after a space. If it still doesn’t open, save the template and reopen it. |
A merge field prints empty. | The record has no value in that field, or (for related fields) the quote has no linked contact, company or deal. |
A chip is red with ⚠. | The field was deleted or renamed in the module. Delete the chip and insert the field again. |
Insert line-items table is greyed out. | The template already has a line-items table. Only one is allowed. |
The line-items table has extra empty columns or rows after inserting it. | Click in an empty column and delete it with the table controls, or use Undo and insert it again. |
I can’t delete a template. | It is the default. Set another template as the default first. |
The template picker isn’t shown on a quote. | The module has only its default template. Create a second template to get the picker. |
The preview shows “Preview couldn’t be rendered”. | Switch back to Edit, undo your last change and try Preview again. If it keeps failing, contact support with the template name. |
Frequently asked questions#
Does changing a template change PDFs I already downloaded?
No. A PDF file you downloaded or sent stays as it is. The next time you download, the PDF is built from the current template.
Can invoices and quotes share one template?
No. Each template belongs to one module. To start an invoice template from your quote layout, create a new Invoices template and copy the content across, then re-insert the merge fields from the Invoices module.
Can I use different templates for different teams?
Yes. Create one template per team and use Share… to give each team access to its own. On each quote, pick the right template in the picker.
What paper size is used?
A4, portrait.
Where do the sample values in Preview come from?
The CRM fills in placeholder values (“Sample …”) and two example products, so you can check the layout without a real record. Your real quotes are never changed by previewing.
Previous and next#
Related#
Was this article helpful?
Ready to implement this?
OpenAI Engage and apply what you just learned to your own workspace.
Open AI Engage CRM