Loading…


KnowledgeBase
Connect Claude to AiEngage CRM (MCP): Ask Your CRM Questions in Plain English
What this feature does#
AiEngage CRM can now be connected to Claude, Anthropic's AI assistant, through a standard called the Model Context Protocol (MCP). Once connected, you can ask Claude about your CRM in plain English and it reads the answer straight out of AiEngage — no exporting, no copying and pasting, no building a report first.
Questions like these work out of the box:
“Which deals slipped this month?”
“Summarise this account’s last five tickets.”
“Who owns the contacts from yesterday’s form?”
“How many leads came through the Contact Us form this week, and how many were approved?”
“What meetings do I have tomorrow?”
Setup takes about a minute. You do not need an API key, and you do not need to be an administrator — every person connects their own Claude with their own ordinary CRM login.
ℹ️
Read-only, by design. The connection can look things up but can never create, update, delete or send anything. If you ask Claude to change a deal, it will tell you it can’t. This is covered in detail under What Claude can and cannot do below.
What you’ll need#
An AiEngage CRM login. Your ordinary one — the same email address and password you use for the dashboard.
Your organisation on the Business Pro plan — the plan that includes API and AI-assistant access. On other plans you can still sign in and click Allow access, but Claude won’t be able to read anything: every question comes back refused.
Claude on any surface: claude.ai in a browser, the Claude Desktop app (Mac & Windows), the Claude mobile app, Claude Code, Cursor or VS Code. Any other MCP-capable client works the same way.
A Claude plan that allows custom connectors — Pro, Max, Team or Enterprise. On Claude’s Free plan the Add custom connector option is visible but greyed out.
⚠️
If your organisation has not published any modules to the API yet, the authorization screen will say there is nothing to read. An administrator publishes modules in Module Settings; once they have, connect again. See Troubleshooting.
The connection address#
Everything below uses one address:
https://mcp-api.aiengagecrm.com/mcpCopy it. It is the same for every customer — there is nothing organisation-specific in it, because you identify yourself by signing in, not by the URL. You never need to edit it or add anything to the end.
Step 1 — Open the MCP page in your CRM#
The CRM carries its own copy of the address and the setup instructions for each app, so start there. Click the Settings (gear) icon at the bottom of the left-hand icon rail. In the settings menu, scroll down to the DEVELOPER HUB group and click MCP.
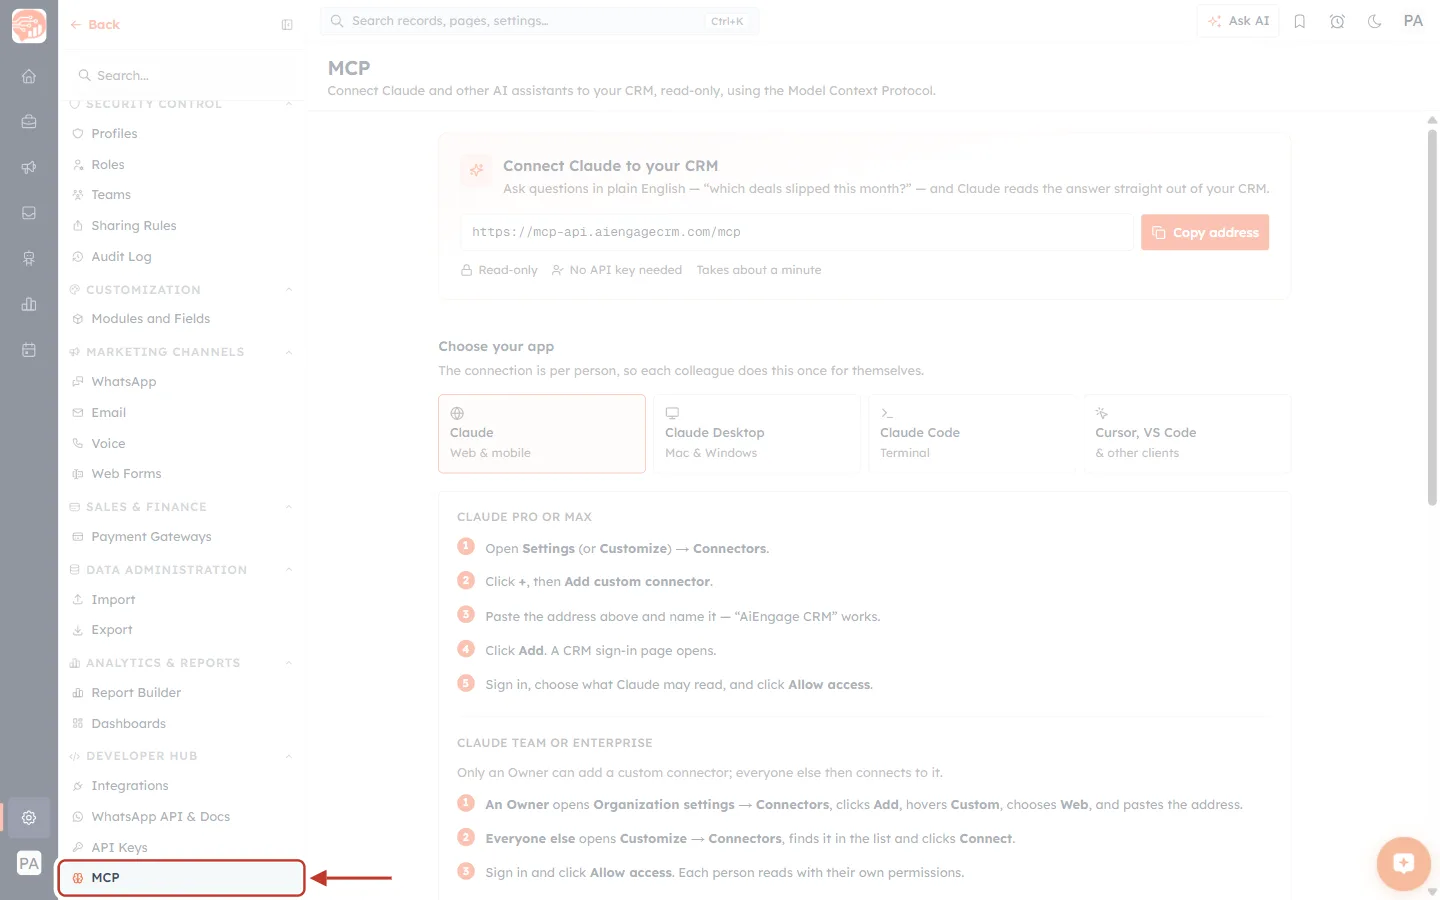
What this screenshot shows. The full settings screen, with MCP in the settings menu ringed in red and arrowed. Everything else is faded back so the entry is easy to find.
Far left is the CRM’s main icon rail. The gear icon near the bottom is highlighted because you are in Settings.
The settings menu runs down the left. It is grouped into GENERAL, SECURITY CONTROL, CUSTOMIZATION, MARKETING CHANNELS, SALES & FINANCE, DATA ADMINISTRATION, ANALYTICS & REPORTS and DEVELOPER HUB. The last group holds Integrations, WhatsApp API & Docs, API Keys and — ringed — MCP.
The main panel already shows the MCP page: the heading MCP — Connect Claude and other AI assistants to your CRM, read-only, using the Model Context Protocol, the connection card, the Choose your app tiles and the Claude instructions. The next steps walk through each of these.
If the menu is long on your screen, type MCP in the Search… box at the top of the menu to jump straight to it.
Step 2 — Copy the connection address#
At the top of the MCP page is a card headed Connect Claude to your CRM. Click Copy address to put the address on your clipboard.
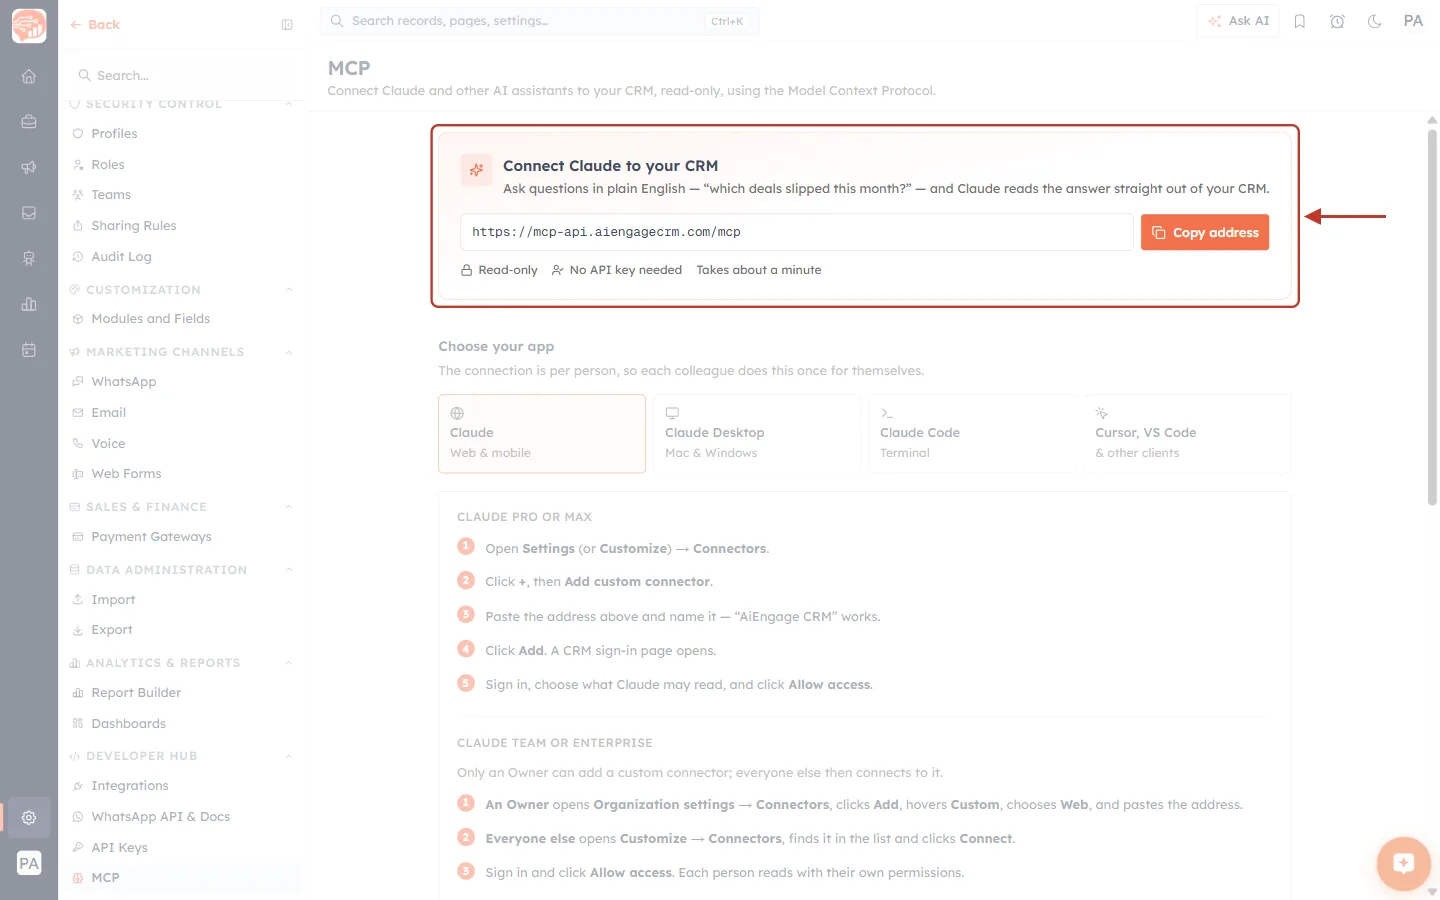
What this screenshot shows. The connection card at the top of the MCP page, ringed and arrowed. This card is the only thing you need to copy anything from.
The heading and line beneath it — Connect Claude to your CRM, and the reminder that you ask in plain English (“which deals slipped this month?”) and Claude reads the answer straight out of your CRM.
The address field shows
https://mcp-api.aiengagecrm.com/mcp. You can select the text by hand, but the button beside it is quicker.Copy address — the orange button on the right. Click it once; the address is now on your clipboard, ready to paste into Claude.
The three badges underneath sum the feature up: Read-only, No API key needed, Takes about a minute.
Step 3 — Choose the app you use#
Under Choose your app are four tiles. Click the one you are connecting; the instructions underneath change to match it.
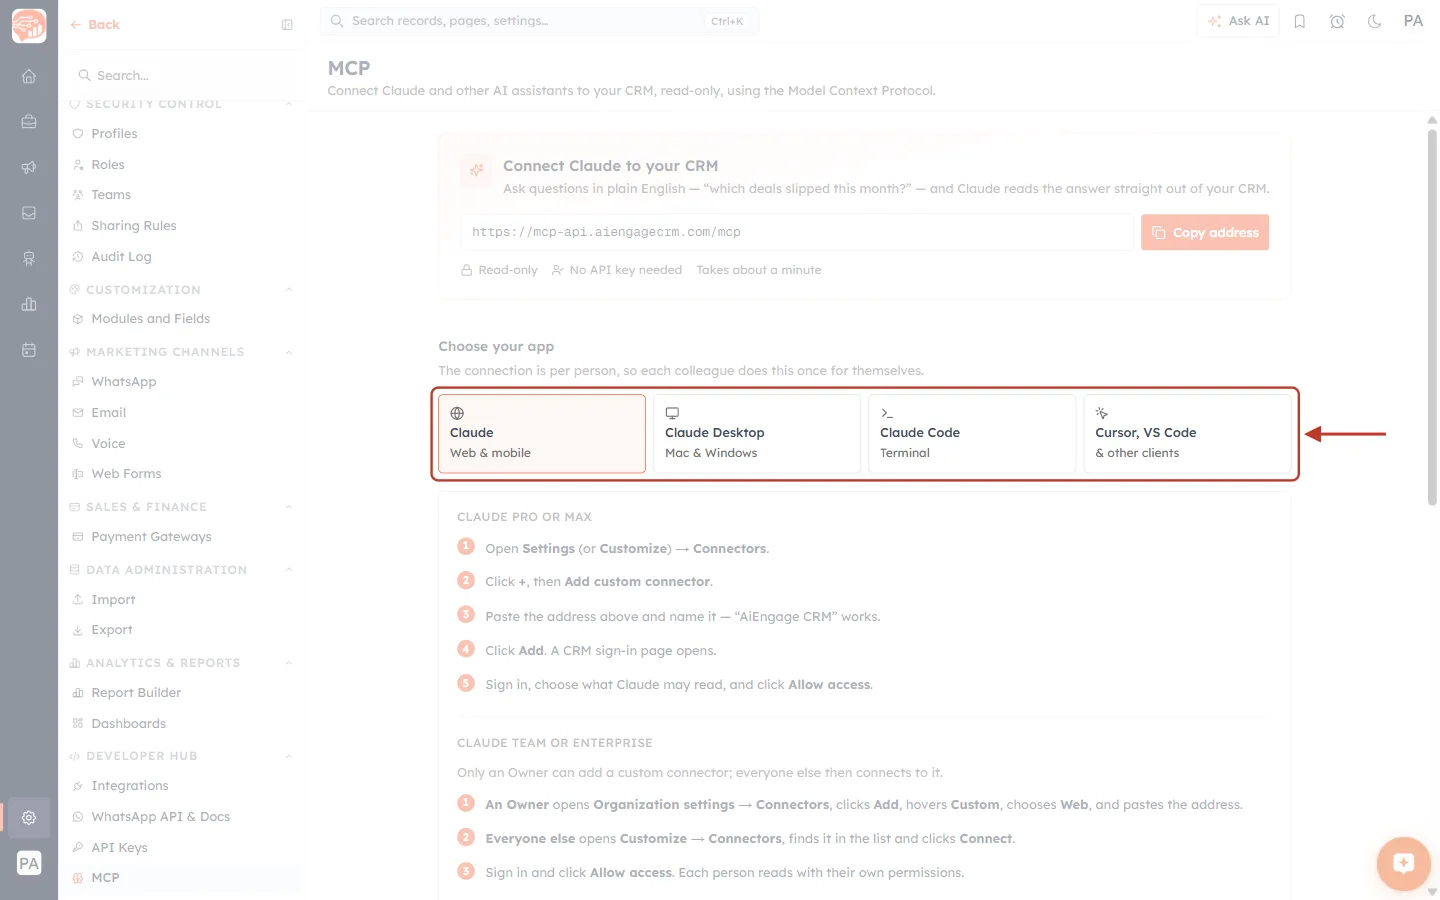
What this screenshot shows. The four app tiles, ringed and arrowed. The highlighted tile (orange outline) is the one whose instructions are showing.
Claude — Web & mobile: claude.ai in a browser, and the iOS / Android apps. Selected by default.
Claude Desktop — Mac & Windows: the installed desktop app.
Claude Code — Terminal: Anthropic’s command-line coding tool.
Cursor, VS Code — & other clients: code editors and any other application that supports remote MCP servers.
The line above the tiles matters: The connection is per person, so each colleague does this once for themselves. Nobody can connect Claude on someone else’s behalf.
Steps 4 to 7 follow the Claude (web & mobile) route, which is the one most people use. The other apps are covered in Connecting from Claude Desktop, Claude Code, Cursor or VS Code further down — they all end at the same sign-in and authorization screen.
Step 4 — Add AiEngage as a custom connector in Claude#
With the Claude tile selected, the MCP page lists the exact clicks for your Claude plan. There are two versions, because Claude handles custom connectors differently for individual and company plans.
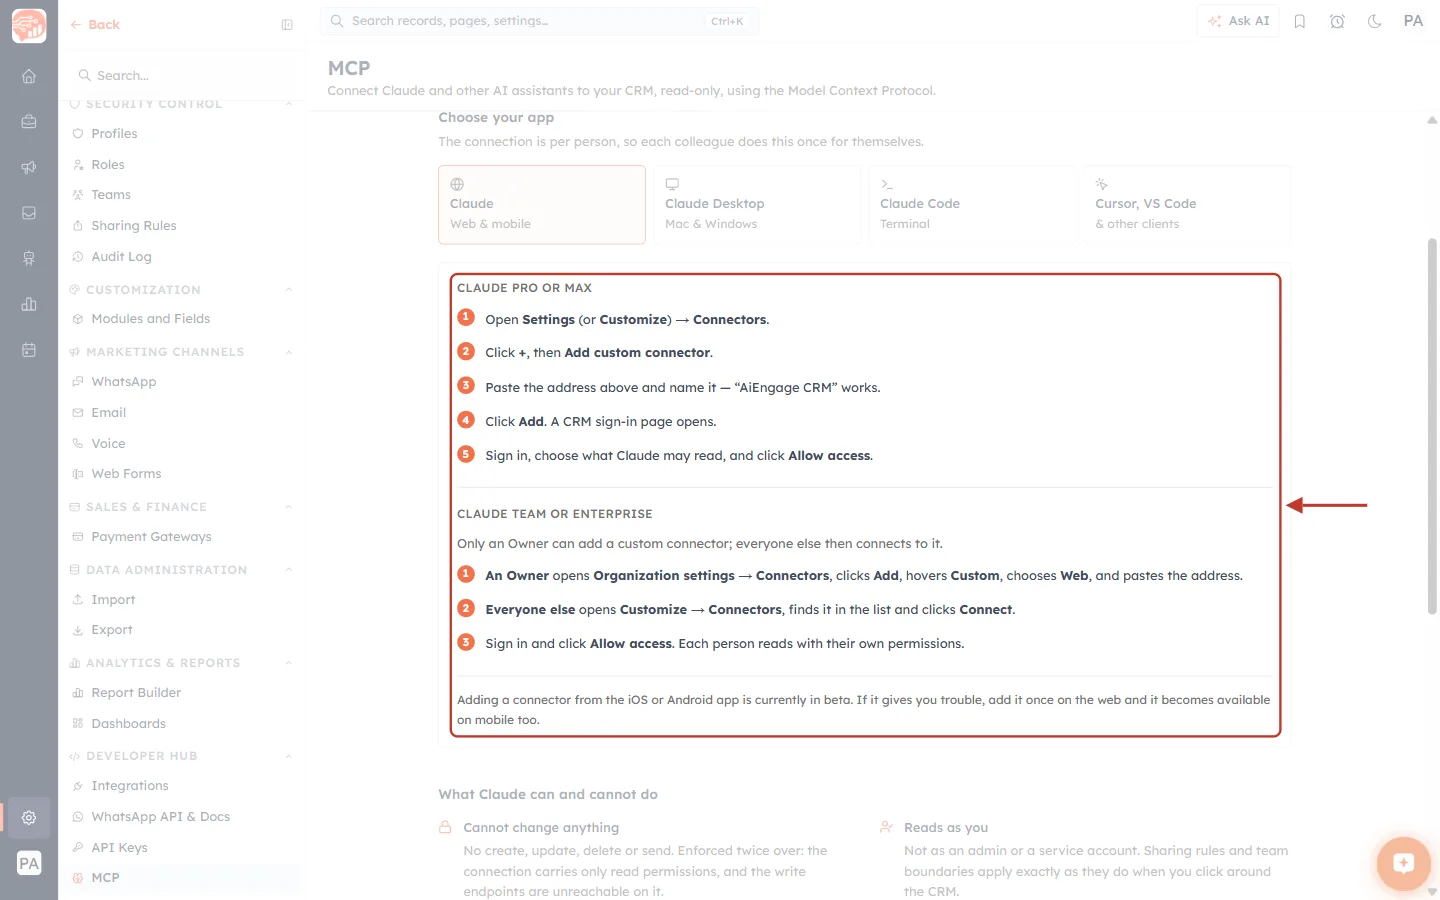
What this screenshot shows. The instructions panel for the Claude tile, ringed and arrowed. Read the half that matches your Claude plan.
CLAUDE PRO OR MAX — five numbered steps: open Settings (or Customize) → Connectors; click +, then Add custom connector; paste the address and name it (“AiEngage CRM” works); click Add so a CRM sign-in page opens; sign in, choose what Claude may read, and click Allow access.
CLAUDE TEAM OR ENTERPRISE — only an Owner can add a custom connector; everyone else then connects to it. Step 1 is for the Owner: Organization settings → Connectors, click Add, hover Custom, choose Web, and paste the address. Steps 2 and 3 are for everyone else: open Customize → Connectors, find the connector in the list, click Connect, sign in and click Allow access. Each person still reads with their own permissions.
The note at the bottom: adding a connector from the iOS or Android app is currently in beta. If it gives you trouble, add it once on the web and it becomes available on mobile too.
ℹ️
On Claude Team or Enterprise, if the connector is not in your list, ask whoever owns your Claude organisation to add it once (the Owner step above). You do not need anything from your CRM administrator.
4a — Open Customize → Connectors in Claude#
In Claude (claude.ai), click Customize in the left sidebar and pick the Connectors tab. Older builds label the same place Settings → Connectors.
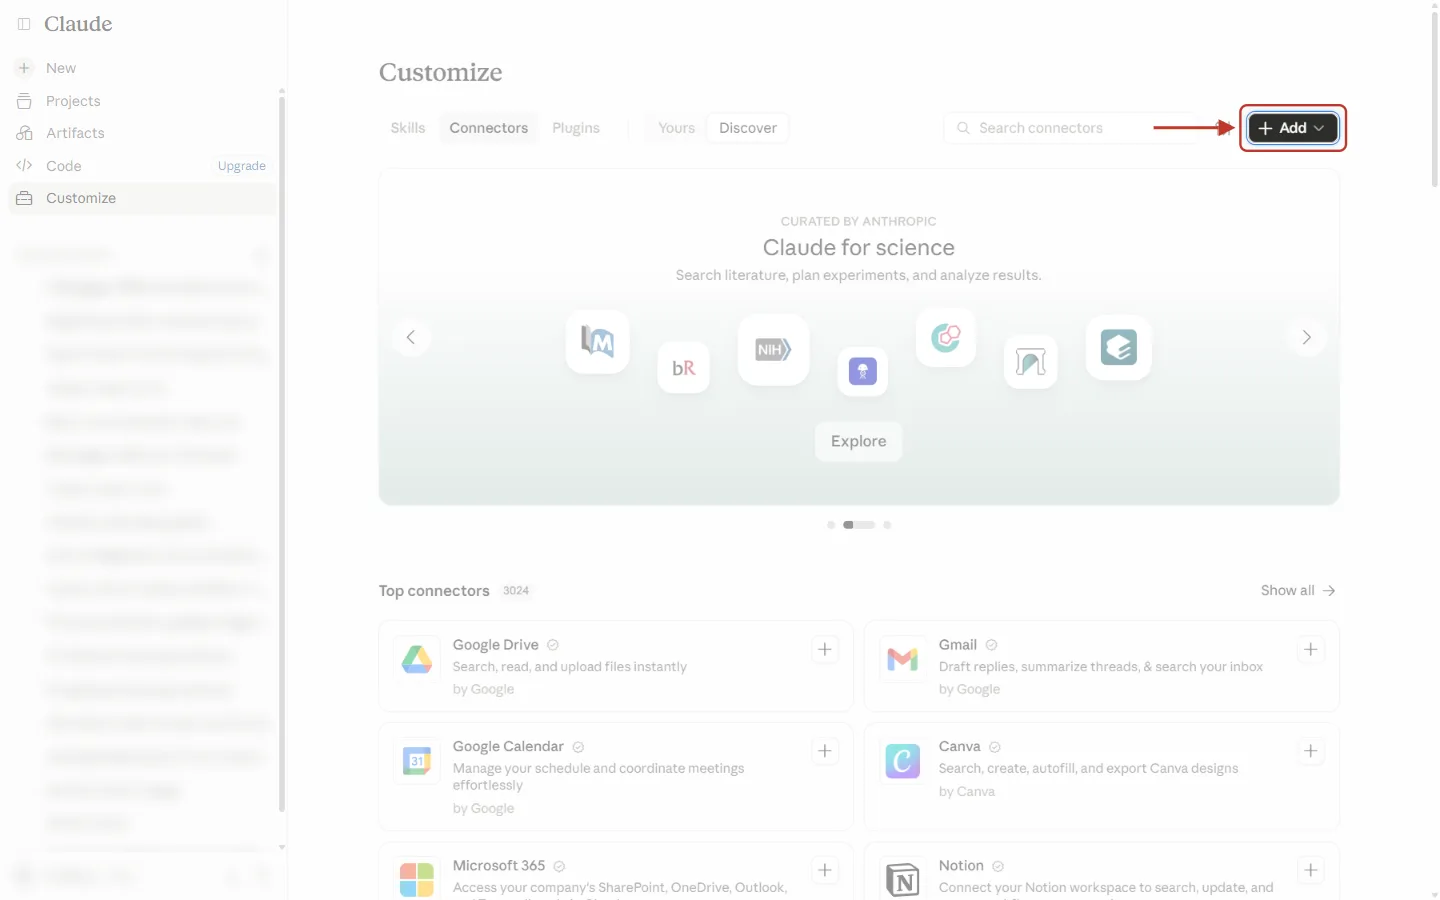
What this screenshot shows. Claude’s Customize page, open on Connectors, with the + Add button ringed and arrowed. The sidebar’s chat history is blurred for privacy.
Left sidebar — New, Projects, Artifacts, Code and Customize (highlighted, because you are on it). Your recent chats sit underneath.
The tab row — Skills, Connectors (selected) and Plugins, then a Yours / Discover switch. Discover shows Anthropic’s directory of ready-made connectors; AiEngage is added as a custom one instead, so you do not need to search for it.
+ Add — the black button at the top right, ringed. This is where custom connectors start.
Below is the connector directory (Curated by Anthropic, Top connectors such as Google Drive and Gmail). You can ignore it for this setup.
4b — Choose Add custom connector#
Click + Add. A small menu opens with Add custom connector — click it.
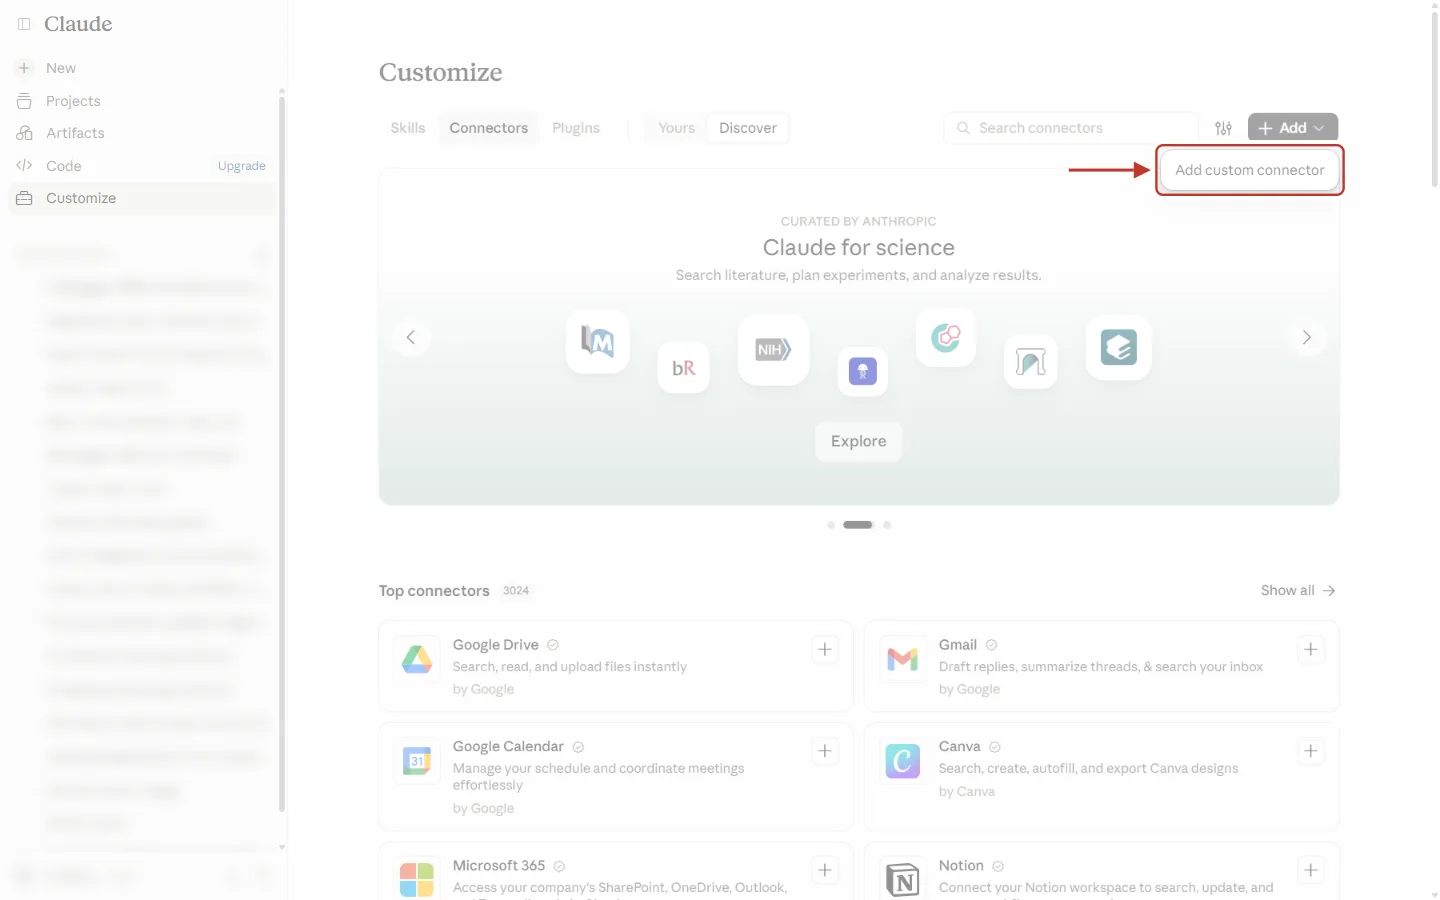
What this screenshot shows. The menu that drops down from + Add, with Add custom connector ringed and arrowed.
Add custom connector is the only item. It opens the dialog where you paste the AiEngage address.
If this item is greyed out and will not click, your Claude account is on the Free plan, which does not include custom connectors. Upgrade to Pro or Max — or, on Team / Enterprise, ask your Owner to add the connector for the organisation.
4c — Paste the address and name the connector#
The Add custom connector dialog asks for two things:
Name — anything you will recognise in Claude. AiEngage CRM works well.
URL (the remote MCP server address) — paste
https://mcp-api.aiengagecrm.com/mcp, exactly as copied in Step 2.
Leave any advanced options (such as OAuth client ID / secret) empty — AiEngage does not need them. Click Add (labelled Connect on some Claude builds). A CRM sign-in page opens.
Step 5 — Sign in and read the authorization screen#
If you are not already signed in to AiEngage in that browser, the normal CRM sign-in page appears first — sign in as yourself, with the same email and password you use every day. You then land on the Authorize access to your CRM screen.
Take a moment to read it before clicking anything. It answers two questions: who is asking, and what it may read.
5a — Who is asking#
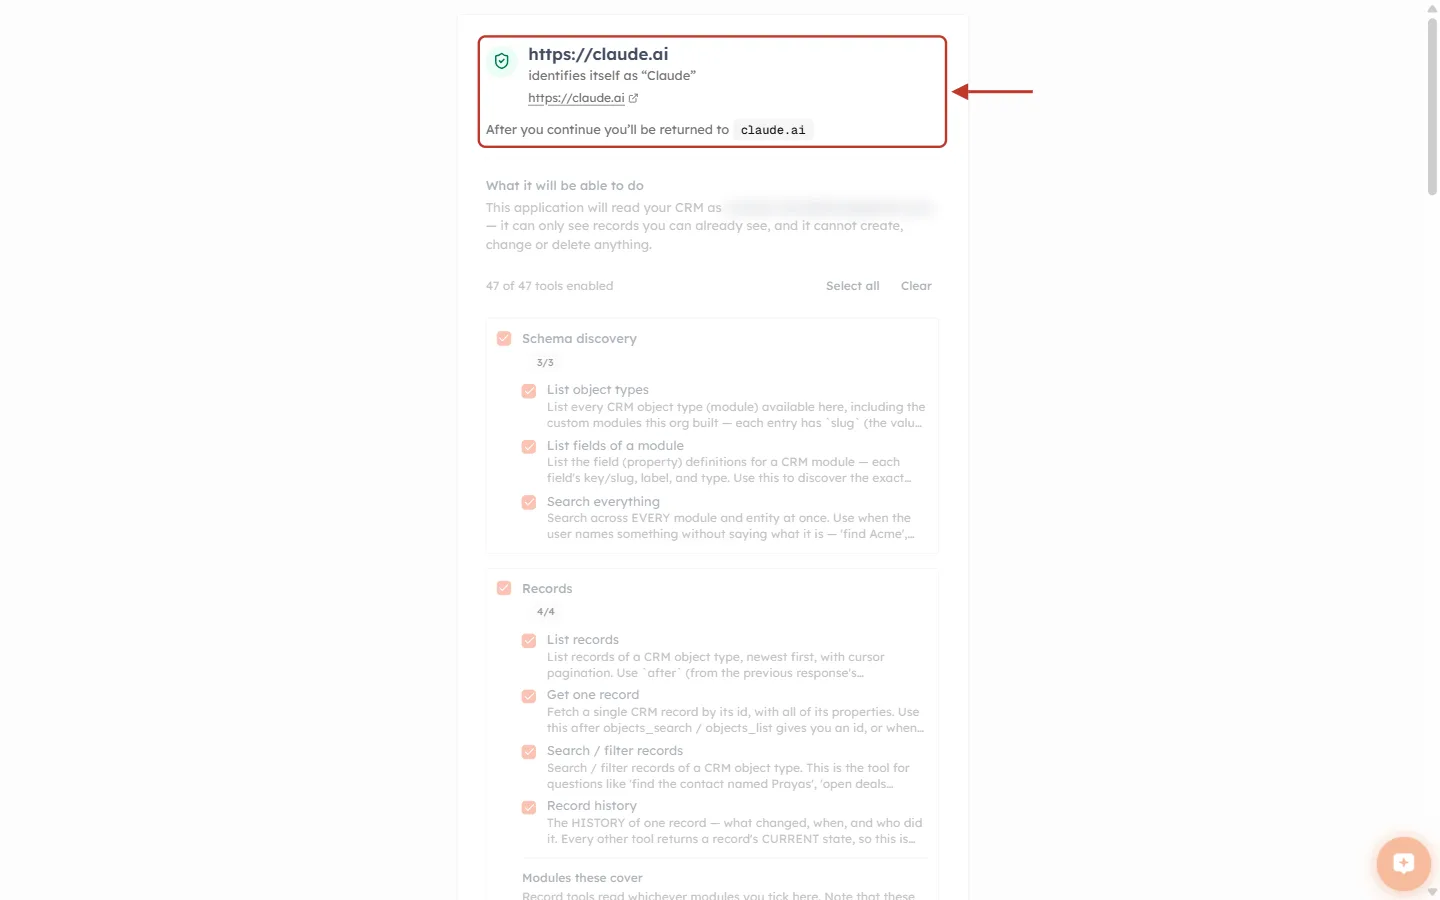
What this screenshot shows. The top of the authorization screen — the part that tells you which application is asking — ringed and arrowed. The account email further down is blurred for privacy.
The large heading —
https://claude.ai— is the web address the application was served from. That is the part nobody can fake, so it is the one to check.identifies itself as “Claude” — the name underneath is whatever the application says about itself. Treat it as a label, not proof.
The green shield means the application is recognised. An application that registered itself and that nobody has vouched for instead gets an Unverified badge — an explicit warning. Only continue past that if you know exactly what you are connecting.
After you continue you’ll be returned to
claude.ai— where your browser goes once you click Allow access.What it will be able to do (faded here) confirms the application will read your CRM as you — the email you signed in with — can only see records you can already see, and cannot create, change or delete anything.
5b — Choose what Claude may read#
Below that is the list of what Claude will be allowed to read, organised into groups of tools. A running count sits at the top of the list.
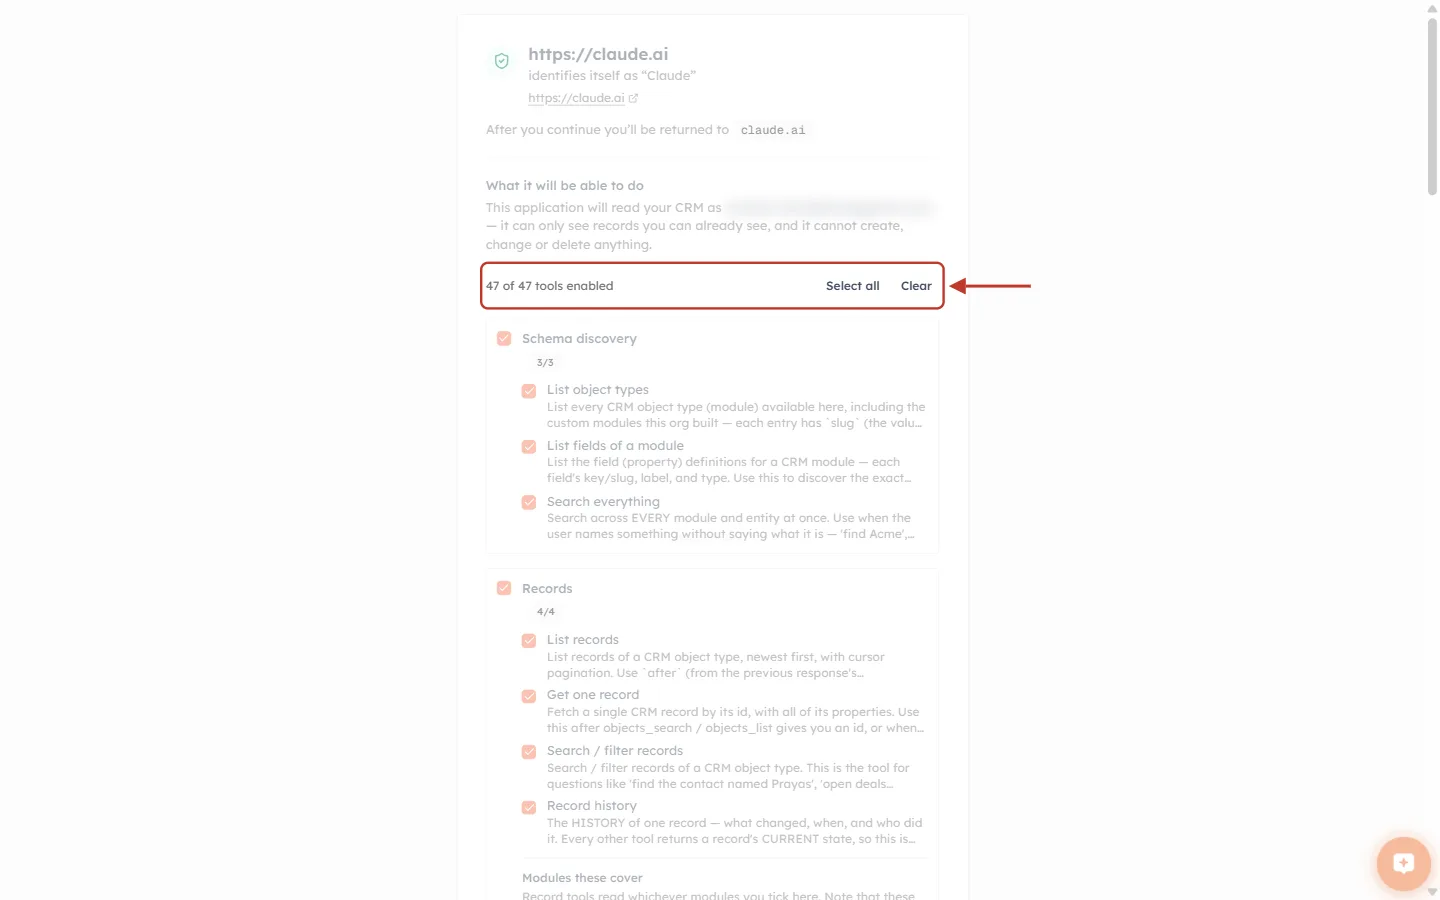
What this screenshot shows. The count row above the tool list, ringed and arrowed.
47 of 47 tools enabled — how many individual tools are currently ticked out of the total. It updates as you tick and untick.
Select all — ticks every group and tool again in one click.
Clear — unticks everything, so you can then tick only the few areas you want.
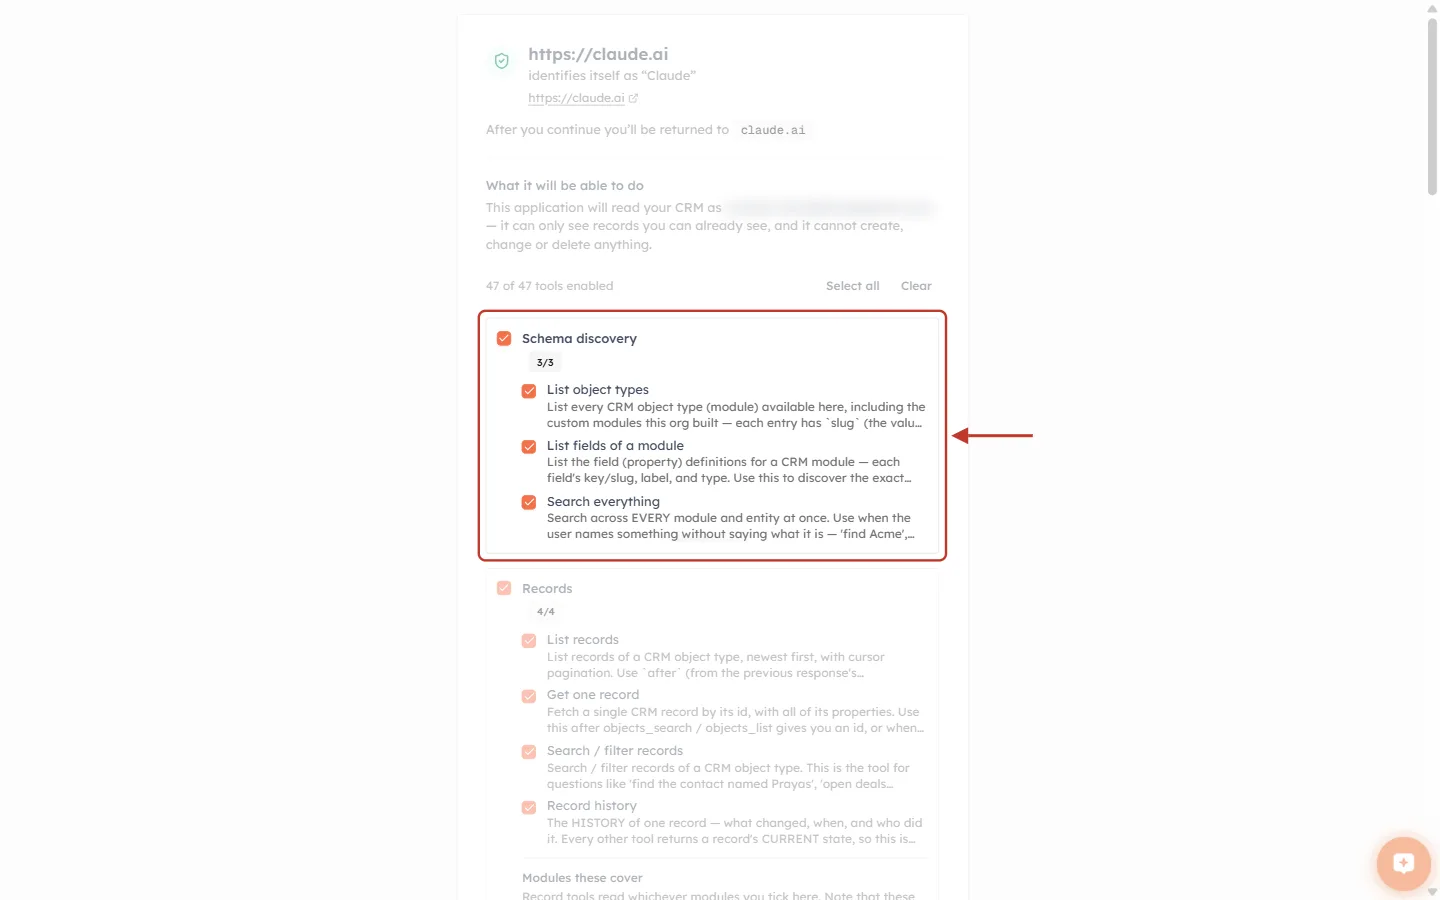
What this screenshot shows. One tool group — Schema discovery — ringed and arrowed to show how every group is laid out.
The group checkbox (orange tick beside Schema discovery) turns the whole group on or off at once.
The counter under the name — 3/3 — shows how many of the group’s tools are ticked.
The individual tools — List object types, List fields of a module, Search everything — each have their own checkbox and a short description of what Claude uses them for. You can untick single tools inside a group.
The next group, Records, starts just below (faded). Under it, Modules these cover lists the modules the record tools read — Companies, Contacts, Deals, Tasks in this example. Untick a module there to stop Claude reading it. The record tools share one permission, so turning off a single record tool narrows the tool list but not the data — unticking the module is what removes the data.
The full list, top to bottom:
| Group | Tools | What Claude can answer with it |
|---|---|---|
| Schema discovery | 3 | Which modules and fields exist (including your custom modules), and a search across everything when you name something without saying what it is. |
| Records | 4 | List, fetch, search and filter records, and see a record’s change history — for the modules ticked under Modules these cover. |
| Reports | 4 | Sales/CRM overview, pipeline, activities and per-user activity reports. |
| Analytics | 6 | Analytics metrics, break-downs by a field, custom analytics queries, and your saved reports. |
| Dashboards | 6 | Your dashboards and productivity widgets, my meetings and my notifications. |
| Advertising | 3 | Advertising report, grid and filter options. |
| Campaigns | 3 | Campaign lists, details and campaign analytics. |
| Segments | 3 | Audience segments, their definitions and KPIs. |
| Contact lists | 2 | Static contact lists and their details. |
| Workflows | 3 | Automation workflows, their definitions and workflow reports. |
| People | 2 | Users — for example, turning an owner id into a name. |
| Teams | 2 | Teams, their leads, members and sizes. |
| Web forms | 3 | Your web forms, their stats and submissions. |
| Telephony | 2 | Call allowance and call routing. |
| Plan and usage | 1 | Your plan’s limits and how much of each is used. |
✅
Leave everything ticked and Claude sees everything you can see. Untick a group — Reports, say — and Claude cannot read reports at all. Not “won’t”: cannot. You can change this later without disconnecting (see Manage or revoke a connection).
Step 6 — Click Allow access#
Scroll to the bottom of the authorization screen and click Allow access.
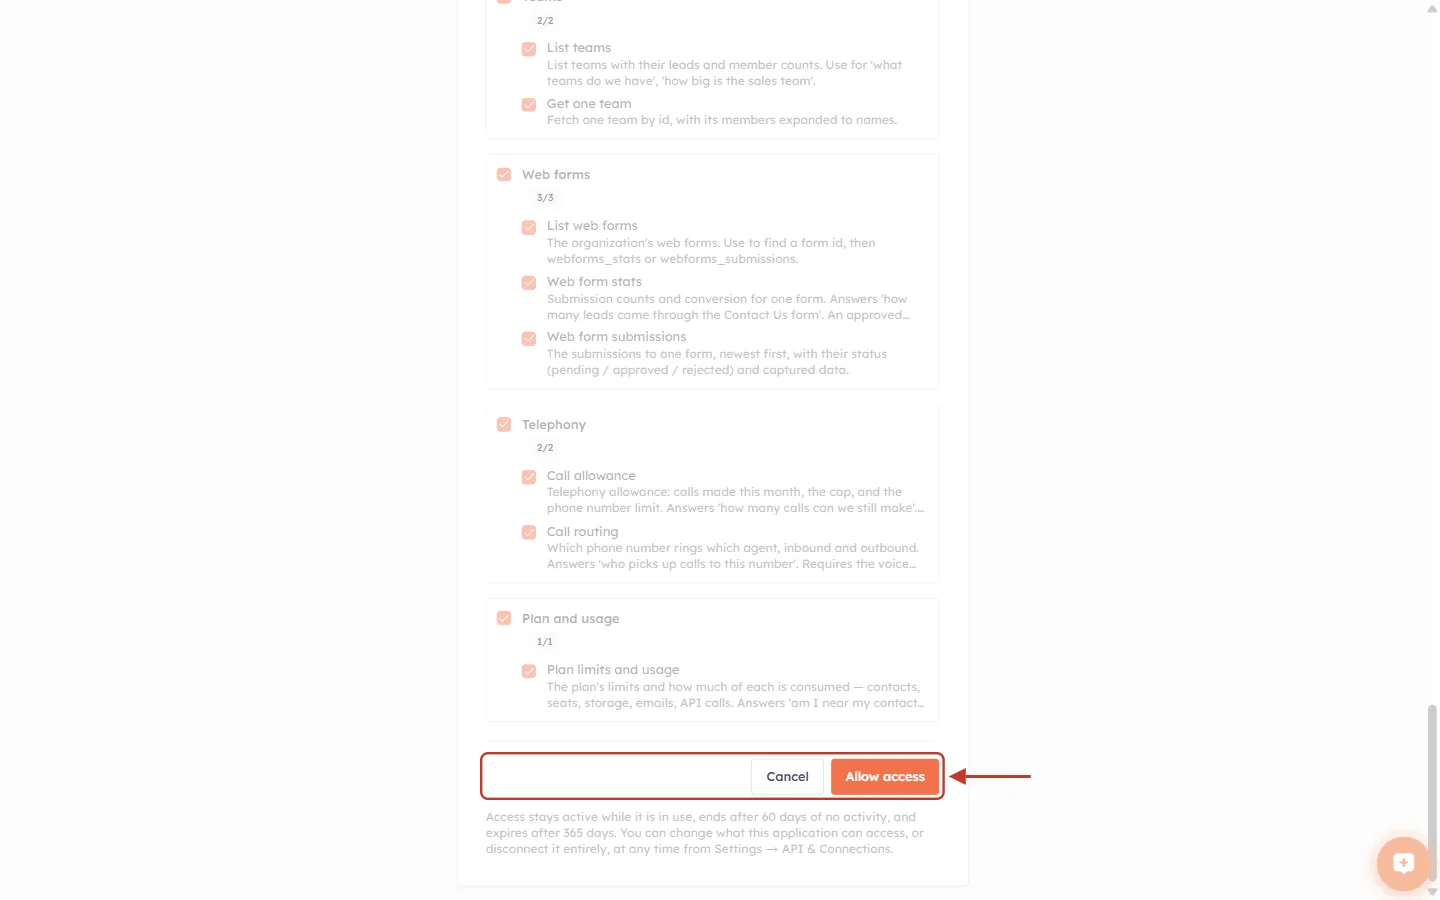
What this screenshot shows. The last part of the authorization screen, with the two buttons ringed and arrowed.
Above the buttons are the last tool groups — Web forms, Telephony and Plan and usage — so you have scrolled past every choice before you confirm.
Allow access (orange) creates the connection with exactly the groups and modules you left ticked, and returns you to Claude.
Cancel stops here. Nothing is connected and Claude gets no access.
The note underneath: access stays active while it is in use, ends after 60 days of no activity, and expires after 365 days. You can change what the application can access, or disconnect it entirely, at any time from Settings → API & Connections.
You land back in Claude with the connector enabled.
Step 7 — Ask your first question#
Start a new chat in Claude and ask about your CRM, for example “Which deals slipped this month?”. Claude decides which AiEngage tools to use, reads the data, and answers in plain English. While it works you will see it call the connector (shown as a tool step in the chat); expand that step to see exactly what it looked up.
Be specific about time and scope — “this week”, “my deals”, “in the Enterprise pipeline” — and Claude narrows the lookup to match.
Name custom modules the way you see them — Claude matches your word against each module’s label, so “Stores” or “Projects” works.
Follow up — “now break that down by owner” builds on the previous answer.
If a chat does not use the connector, check it is switched on for that chat in Claude’s tools / connectors menu.
Connecting from Claude Desktop, Claude Code, Cursor or VS Code#
Every app ends at the same CRM sign-in and Authorize access to your CRM screen from Steps 5 and 6. Only the way you add the address differs. Click the matching tile on the MCP page to see these instructions in the CRM as well.
Claude Desktop (Mac & Windows)#
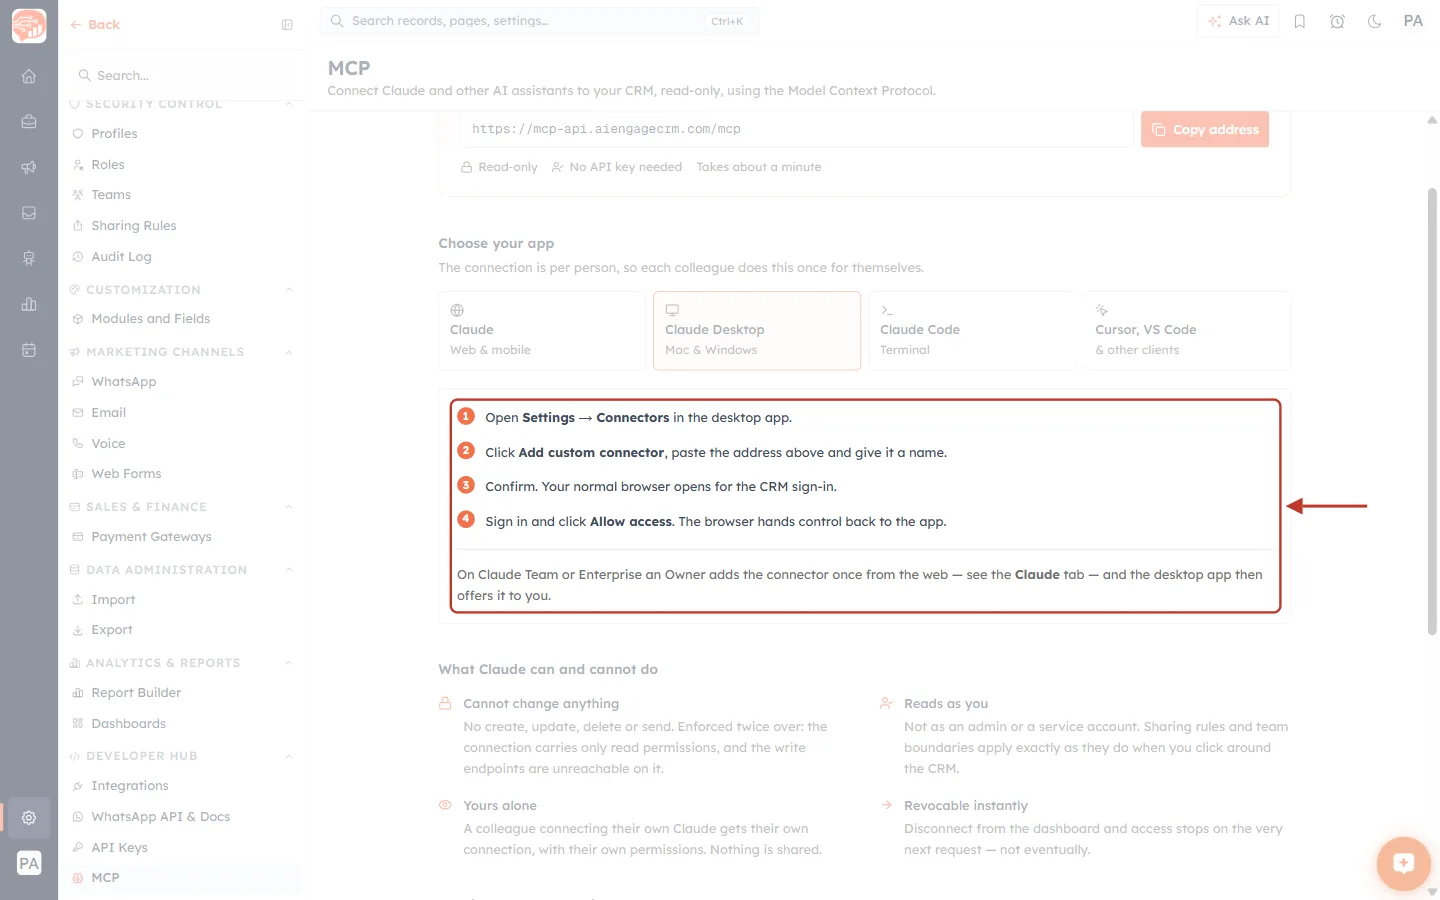
What this screenshot shows. The Claude Desktop tile selected, with its instructions ringed and arrowed.
1 — open Settings → Connectors in the desktop app (the same Customize → Connectors place as on the web).
2 — click Add custom connector, paste the address and give it a name.
3 — confirm. Your normal browser opens for the CRM sign-in — not a window inside the app.
4 — sign in and click Allow access. The browser hands control back to the app when you are done.
The note underneath: on Claude Team or Enterprise an Owner adds the connector once from the web (see the Claude tile), and the desktop app then offers it to you.
Claude Code#
Register the server from your terminal:
claude mcp add --transport http aiengage https://mcp-api.aiengagecrm.com/mcpThen run /mcp inside Claude Code and pick aiengage to authorize. Your browser opens; sign in and click Allow access.
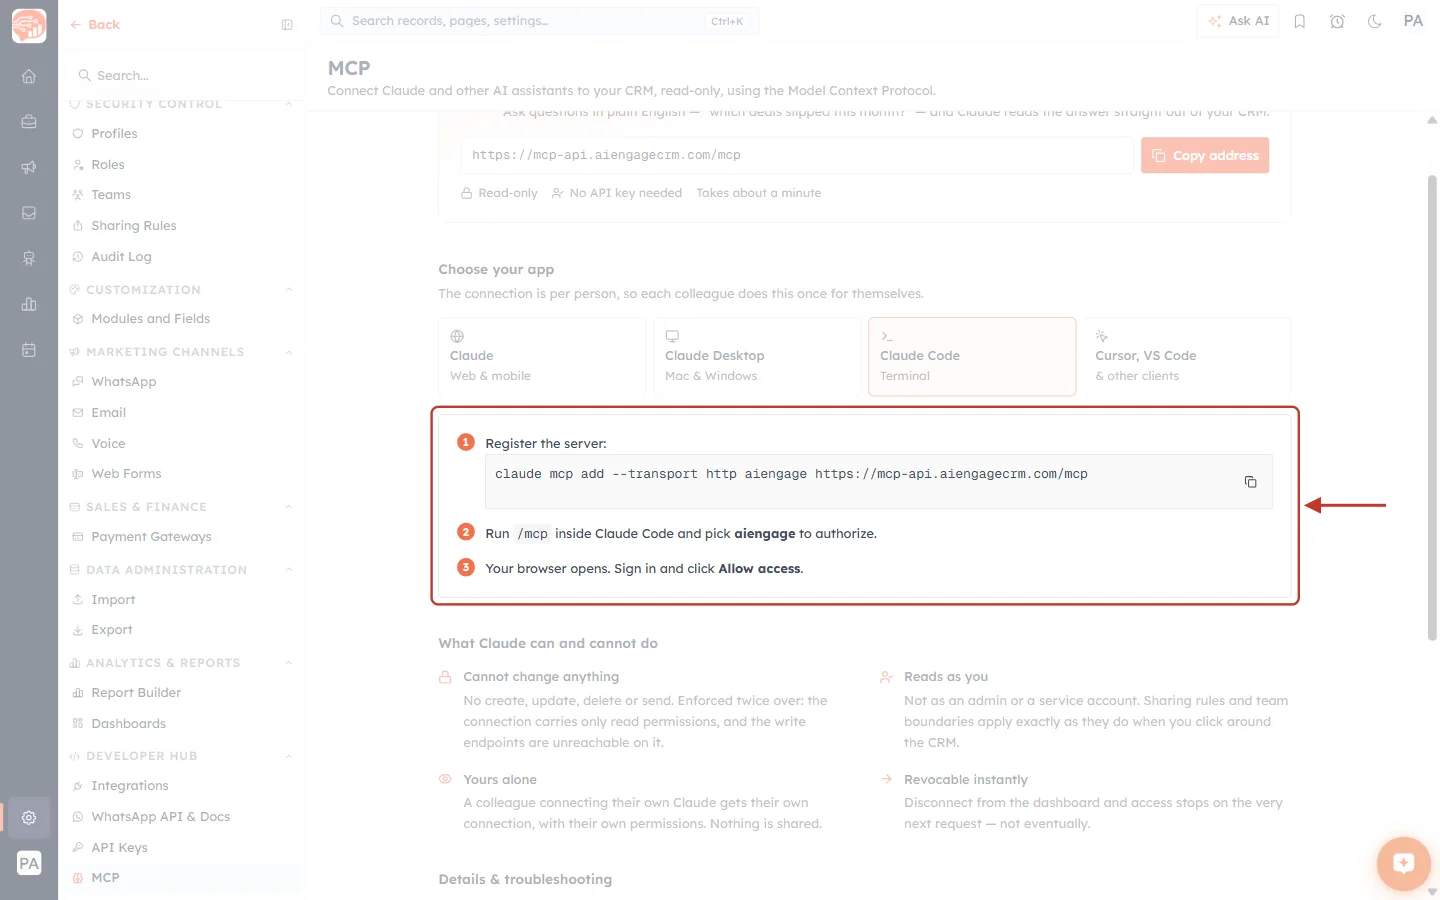
What this screenshot shows. The Claude Code tile selected, with its instructions ringed and arrowed.
1 — Register the server, with the full command in a grey box. The copy icon at its right-hand end copies the command so you do not have to type it.
2 — run
/mcpinside Claude Code and pick aiengage (the name given in the command) to authorize.3 — your browser opens: sign in and click Allow access.
Cursor, VS Code and other MCP clients#
Both Cursor and VS Code support remote MCP servers over HTTP. Add an HTTP MCP server pointing at the address — no command to run, no key to paste. The first time a tool is used, you are prompted to sign in and authorize, exactly as in Claude.
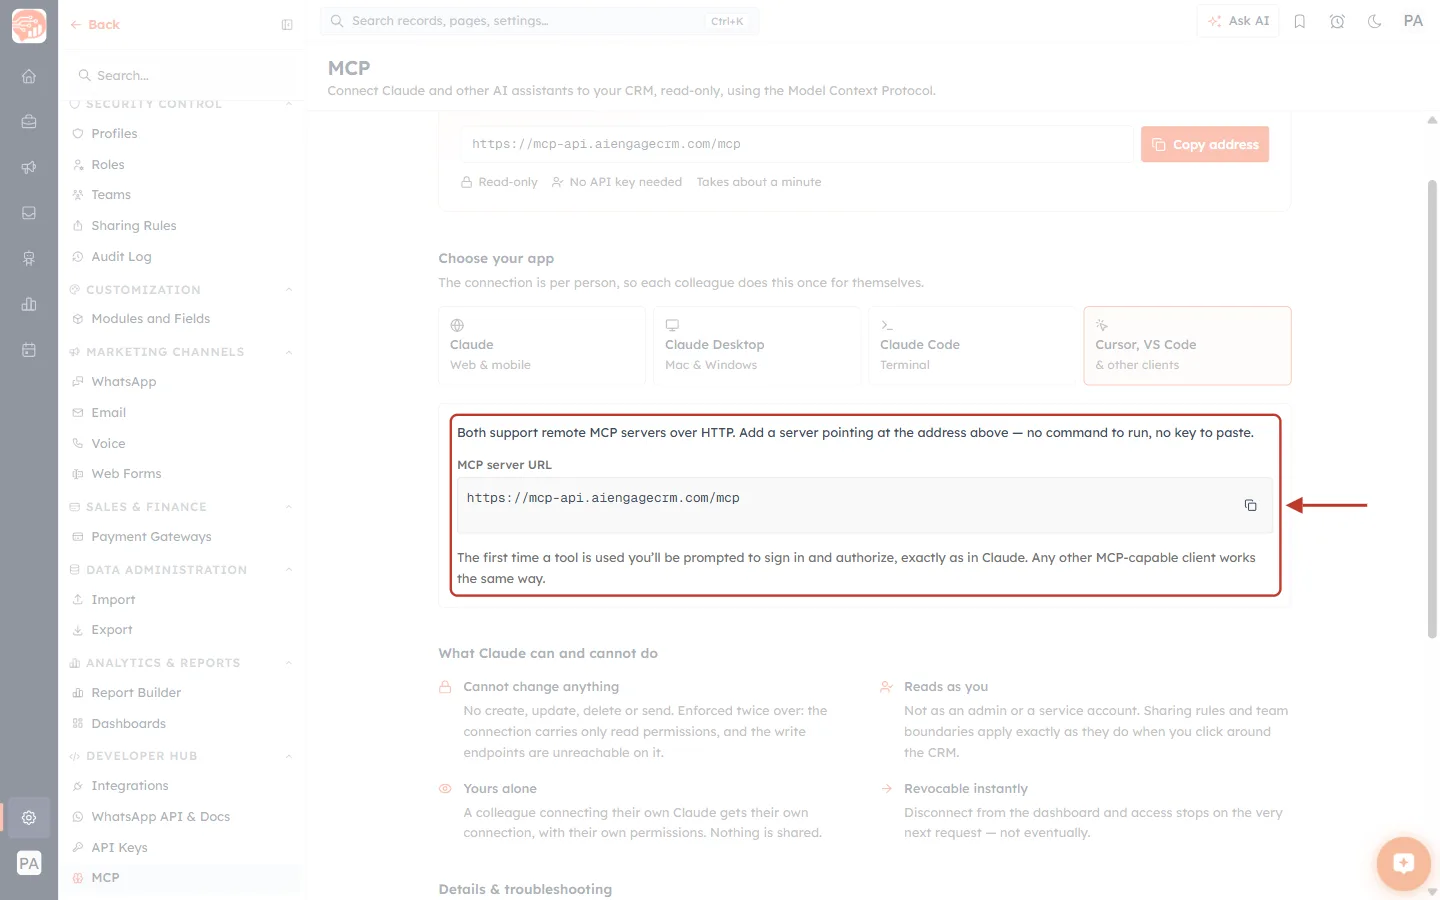
What this screenshot shows. The Cursor, VS Code tile selected, with its instructions ringed and arrowed.
The first line — both support remote MCP servers over HTTP; add a server pointing at the address above.
MCP server URL — the address again, in a box with a copy icon on the right.
The last line — the first time a tool is used you’ll be prompted to sign in and authorize, exactly as in Claude. Any other MCP-capable client works the same way.
What Claude can and cannot do#
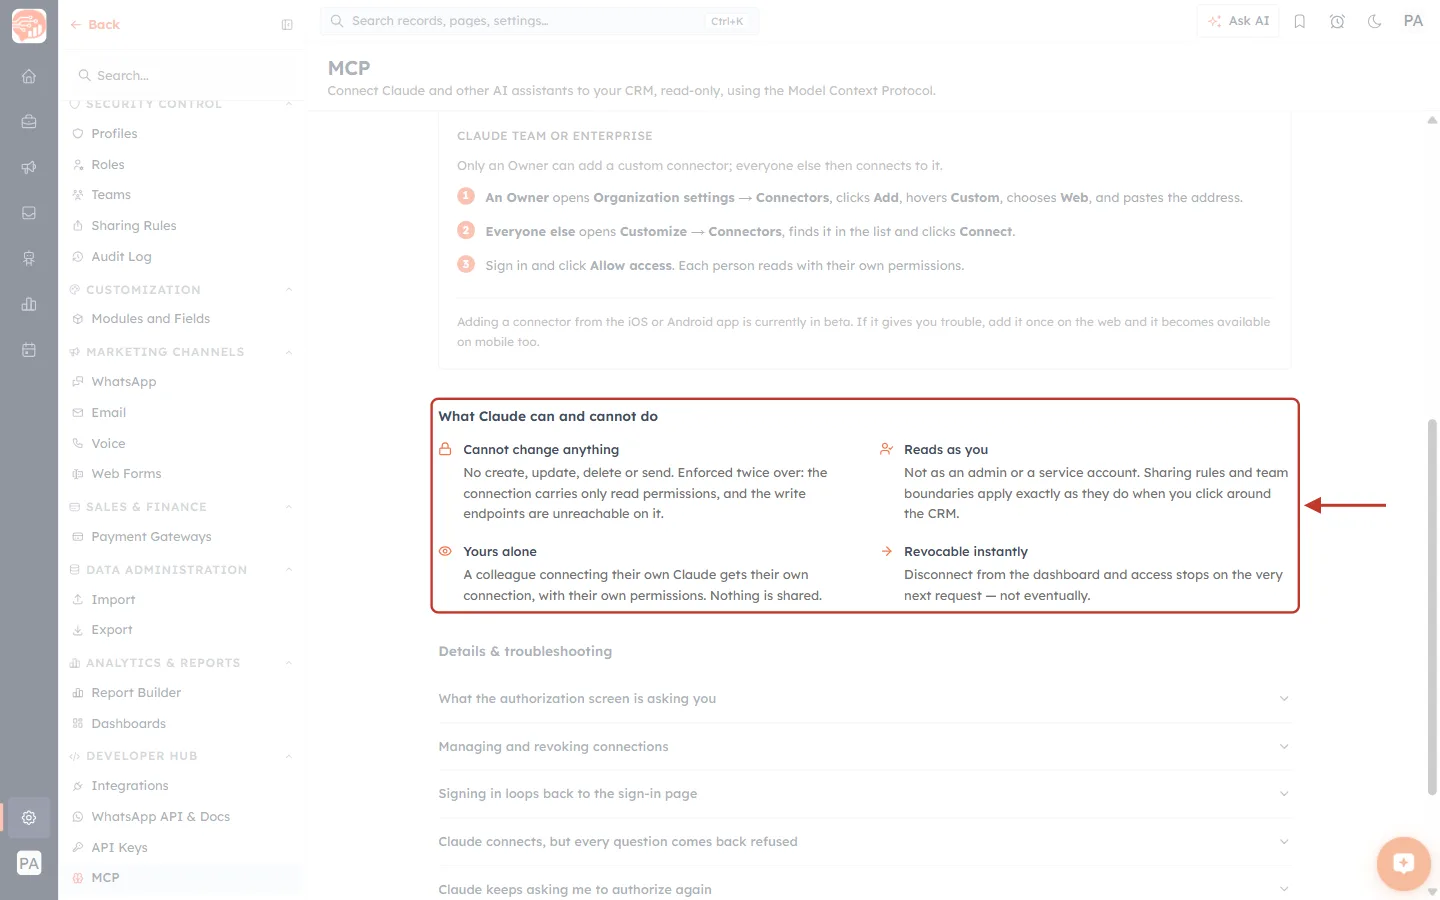
What this screenshot shows. The four guarantees listed on the MCP page, ringed and arrowed.
Cannot change anything — no create, update, delete or send. It is enforced twice over: the connection only ever carries read permissions, and the write endpoints are unreachable on this connection. Not “we ask it nicely not to” — it can’t.
Reads as you — not as your administrator, and not as a service account. Sharing rules, team boundaries and field permissions apply exactly as they do when you click around the CRM. If a record is hidden from you, it is hidden from Claude.
Yours alone — a colleague connecting their own Claude gets their own connection, with their own permissions. Nothing is shared, and nothing you authorize changes what anyone else sees.
Revocable instantly — disconnect from the dashboard and access stops on the very next request, not eventually.
See Understanding the Role Hierarchy and Understanding Profile Permissions for what decides which records you — and therefore Claude — can see.
Manage or revoke a connection#
Every application you have connected is listed in the CRM under Settings → Developer Hub → API Keys, on the Connections tab. The page itself is titled API & Connections, which is why it is also referred to as Settings → API & Connections → Connections. The MCP page links straight to it from Managing and revoking connections → View connected applications.
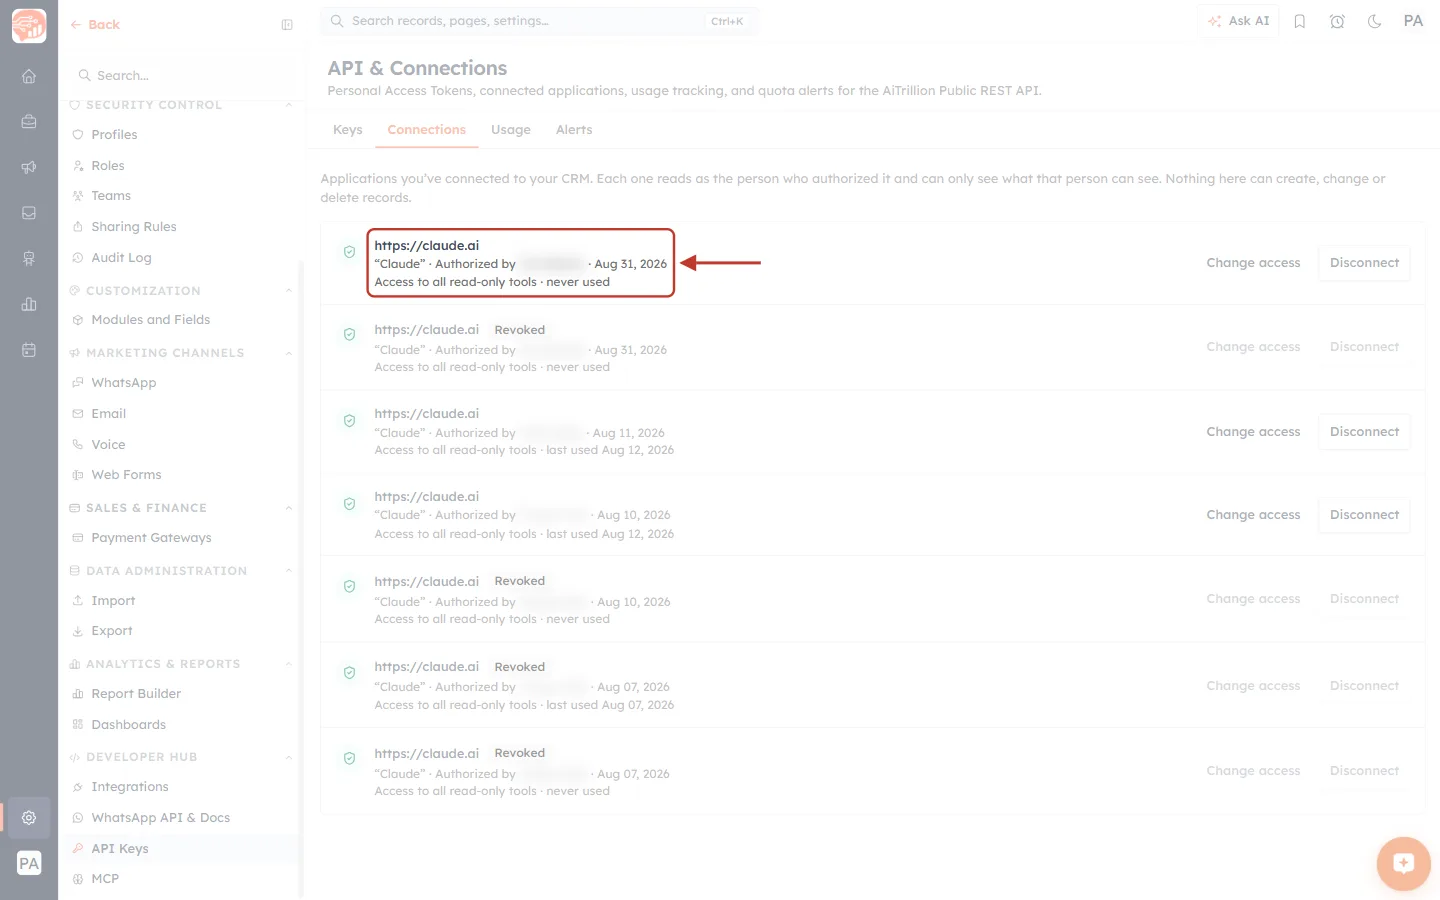
What this screenshot shows. The Connections tab, with one connection’s details ringed and arrowed. The names of the people who authorized each connection are blurred for privacy.
The tabs across the top — Keys, Connections (selected), Usage and Alerts.
The line under the tabs: each application reads as the person who authorized it and can only see what that person can see. Nothing here can create, change or delete records.
Each connection shows three lines: the web address it was served from (
https://claude.ai), the name it gives itself with who authorized it and when, and what it can read plus when it was last used (Access to all read-only tools · never used in the ringed row).Revoked — rows carrying this grey badge have already been disconnected; their buttons are greyed out. They stay listed as a record.
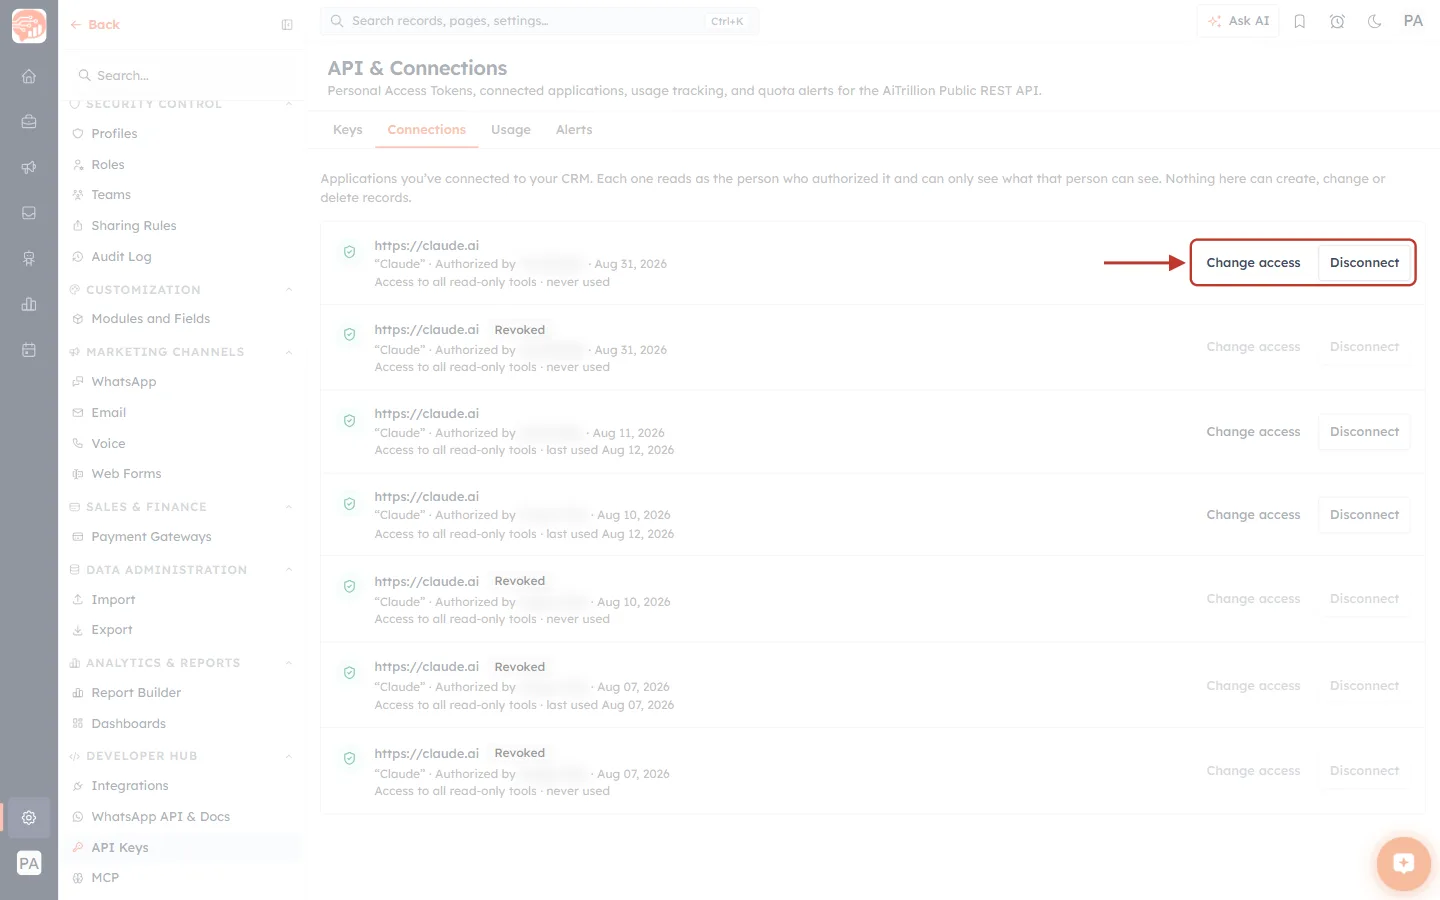
What this screenshot shows. The two buttons on a live connection, ringed and arrowed.
Change access — narrow or widen what that application may read. This takes effect on its very next request, not eventually, and does not disconnect it.
Disconnect — cuts the application off immediately. The row then shows Revoked. You can reconnect at any time by authorizing again from the application (Steps 4–6).
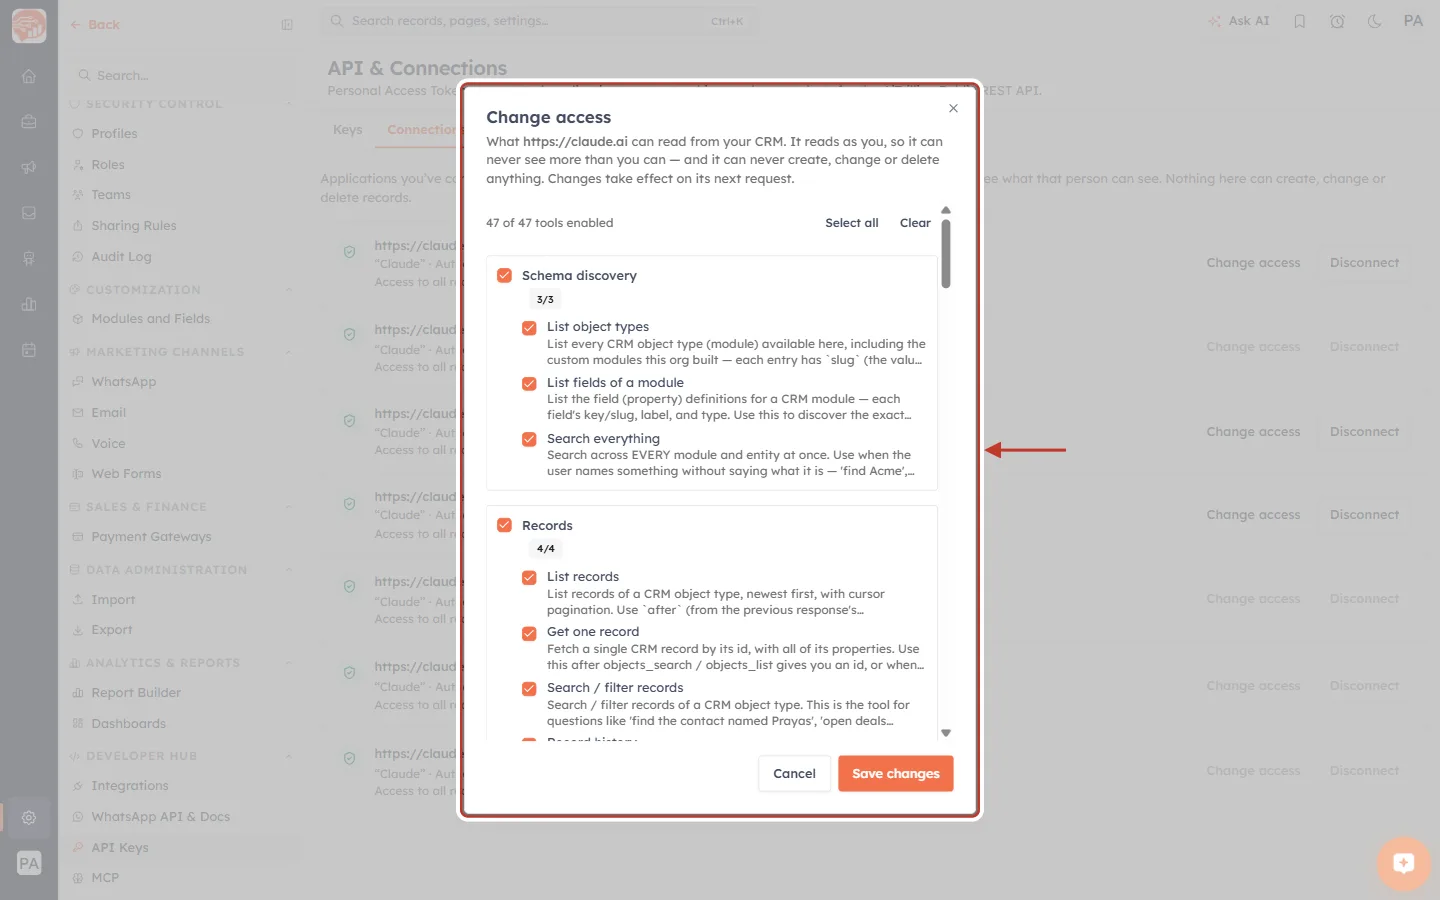
What this screenshot shows. The Change access dialog, ringed and arrowed.
The explanation at the top: what
https://claude.aican read from your CRM. It reads as you, so it can never see more than you can — and it can never create, change or delete anything. Changes take effect on its next request.The same controls as the authorization screen — the running count (47 of 47 tools enabled), Select all, Clear, and the tool groups with their checkboxes. Scroll inside the dialog to reach every group and the Modules these cover list.
Save changes applies your new selection; Cancel (or the × in the corner) closes the dialog without changing anything.
Viewing this screen needs the API access permission. If it isn’t available to you, ask an administrator — it does not stop you connecting Claude in the first place.
With the manage organization permission you also see everyone else’s connections and can disconnect them — useful when someone leaves.
Troubleshooting#
The MCP page ends with a Details & troubleshooting list. Click any question to expand the answer. The same answers are below.
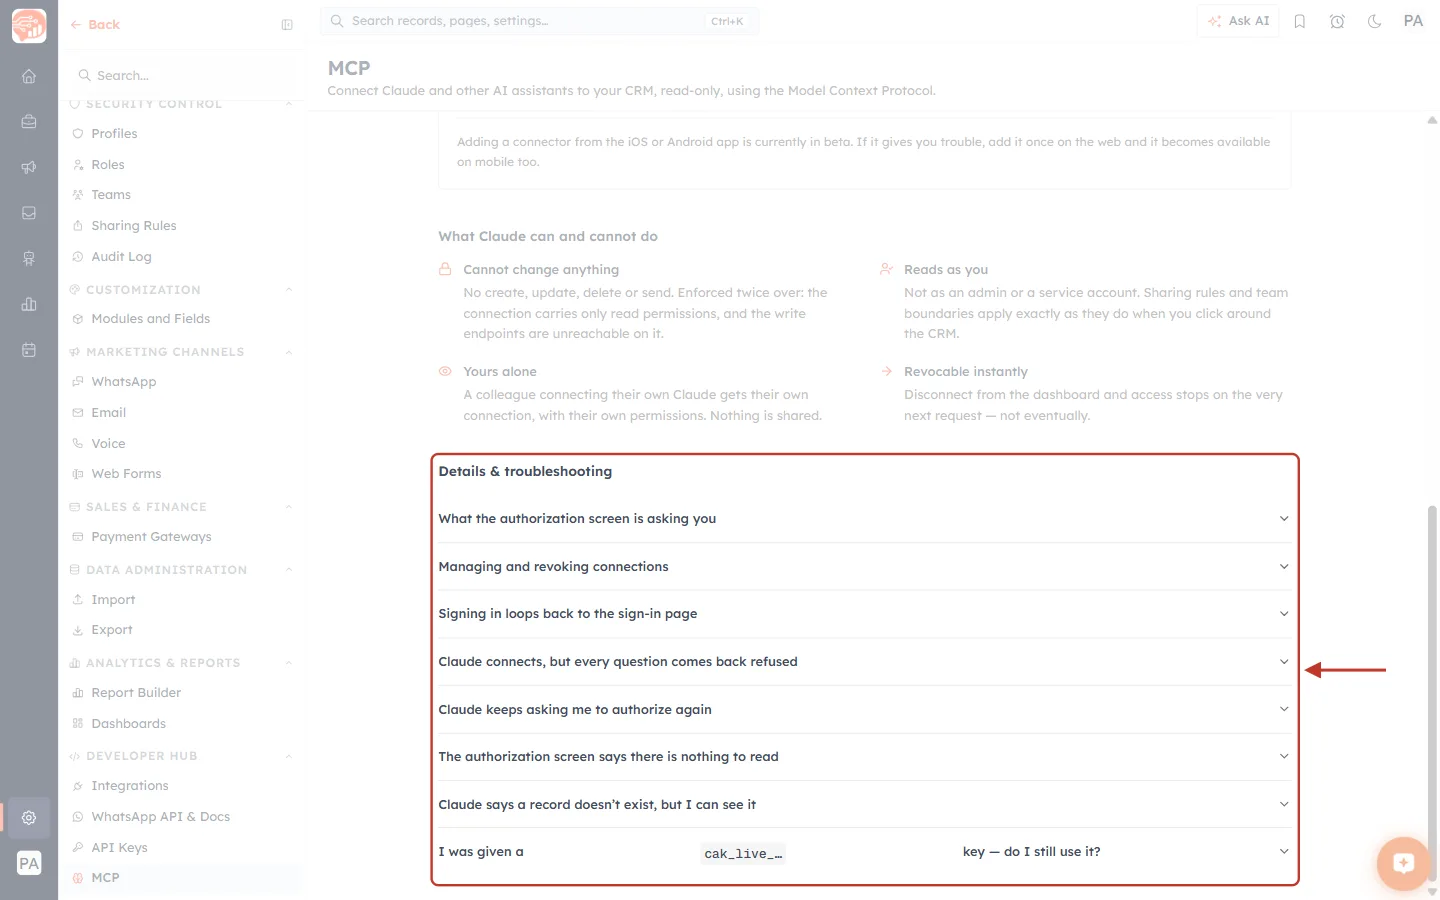
What this screenshot shows. The Details & troubleshooting list, ringed and arrowed. Each row expands when clicked (one at a time).
What the authorization screen is asking you and Managing and revoking connections — the explanations covered in Steps 5 and 6 and in Manage or revoke a connection.
Five problem-and-fix entries — the sign-in loop, refused questions, repeated authorization requests, “nothing to read” and a record that “doesn’t exist”.
I was given a
cak_live_…key — do I still use it? — for people set up before the connector existed.
“Sign in” loops back to the sign-in page#
Your CRM session expired part-way through the flow. Sign in to the CRM dashboard in the same browser first, then start the connection again from Claude.
Claude connects, but every question comes back refused#
This is almost always about the account rather than the connection — one of two things:
Your plan does not include API access. The connector needs the Business Pro plan. On other plans you can sign in and click Allow, but Claude can’t read anything.
Your organisation has used up its API allowance for the period.
An administrator can check both on the Usage tab of API & Connections.
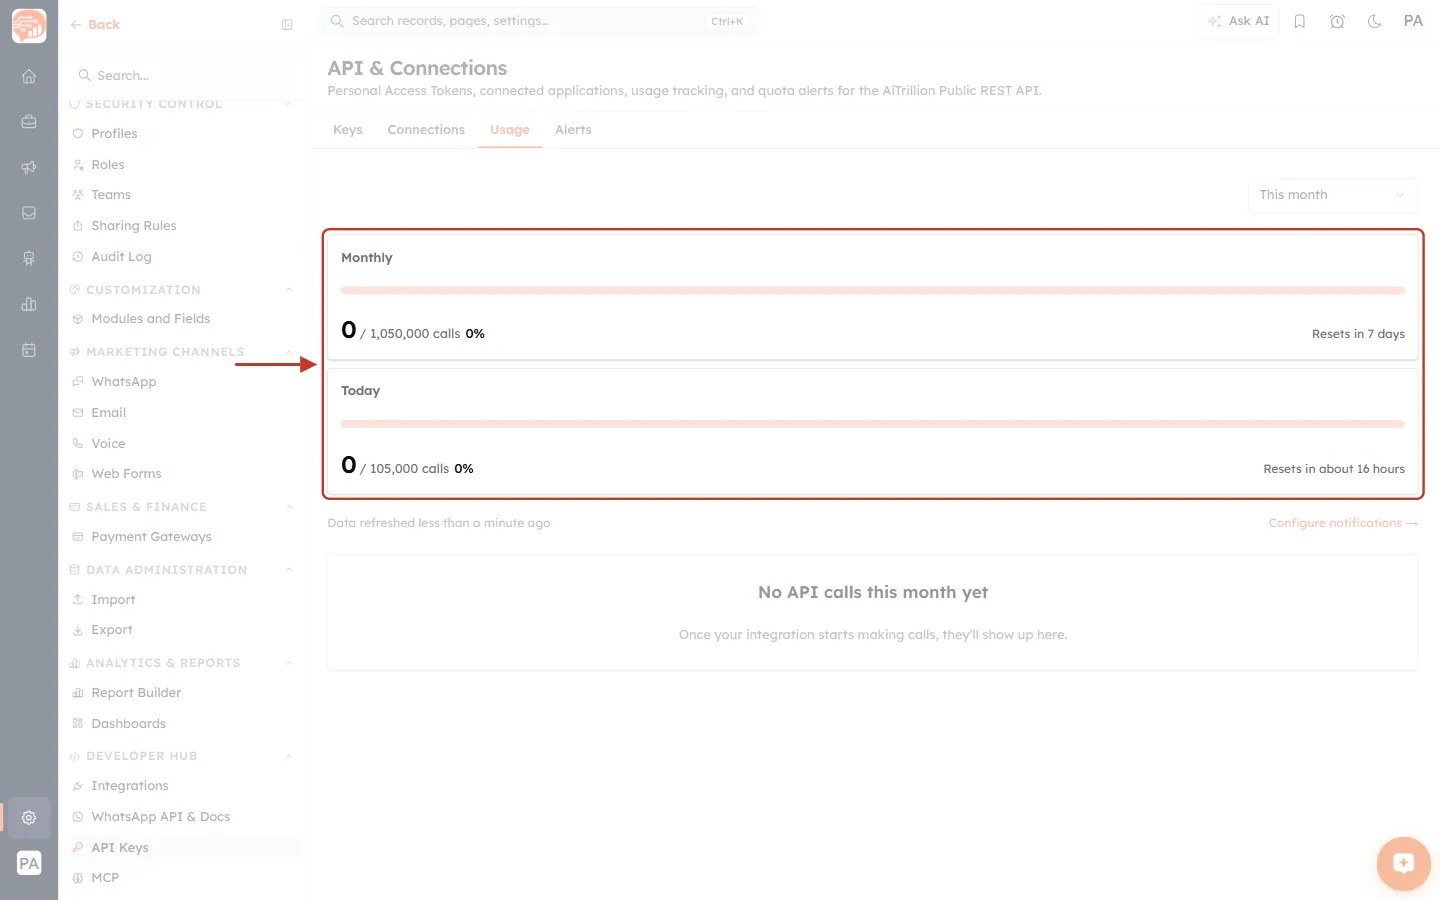
What this screenshot shows. The Usage tab, with the two allowance meters ringed and arrowed.
Monthly — calls used against the monthly allowance (0 / 1,050,000 calls, 0% here) and when it resets (Resets in 7 days).
Today — the same for the daily allowance (0 / 105,000 calls), with its own reset time.
A full bar on either meter explains refused questions: wait for the reset, or have an administrator review the plan.
This month (top right) changes the period; Configure notifications (faded) sets up quota alerts — see Monitor API Usage & Set Quota Alerts.
Claude says the connection is unavailable#
That is on our end, not your credentials — there is nothing on your side to fix. Try again in a minute; your connection is still valid.
Claude keeps asking you to re-authorize#
Usually the connection was disconnected from the dashboard. Check the Connections tab; if it shows as Revoked or is no longer listed, authorize again from Claude. Remember that access also ends by itself after 60 days without use, and after 365 days in any case.
The authorization screen says there is “nothing to read”#
No modules in your organisation have been published to the API yet, so there would be nothing for Claude to see. An administrator publishes them in Module Settings; once they have, connect again.
Claude can see a module but says a record doesn’t exist#
That record isn’t visible to you in the CRM either. Claude reads with the permissions of whoever authorized the connection, so a record visible to a colleague but not to you is the system working correctly. Also check you are both looking at the same account.
Already using an API key?#
If someone set you up earlier with a cak_live_… key and an mcp-remote or HTTP-server configuration, it still works — nothing has been switched off and you do not have to migrate. New MCP Server keys are no longer issued, though; the connector replaced them.
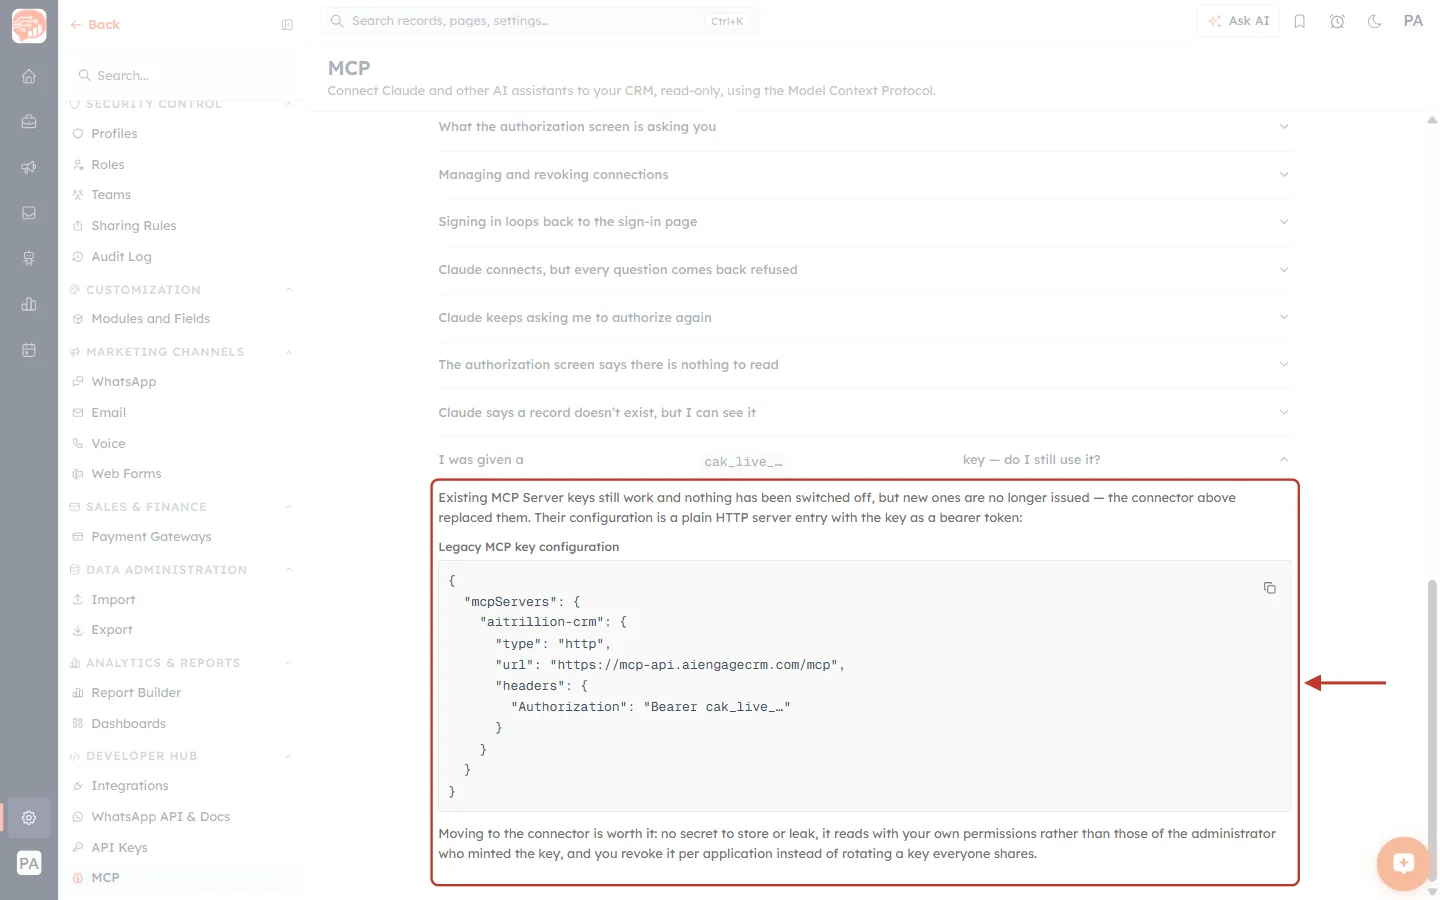
What this screenshot shows. The last troubleshooting entry expanded, ringed and arrowed.
The first paragraph — existing MCP Server keys still work and nothing has been switched off, but new ones are no longer issued.
Legacy MCP key configuration — what such a setup looks like: a plain HTTP server entry with the key sent as a bearer token (reproduced below).
The last paragraph — why moving to the connector is worth it.
{
  "mcpServers": {
    "aitrillion-crm": {
      "type": "http",
      "url": "https://mcp-api.aiengagecrm.com/mcp",
      "headers": {
        "Authorization": "Bearer cak_live_…"
      }
    }
  }
}
Moving to the connector is still worth it:
No key to store or leak — there is no secret in any config file.
It reads with your own permissions, instead of those of the administrator who created the key.
It works on claude.ai web and mobile, where a key cannot be supplied at all.
You can revoke it yourself, per application, instead of rotating a key everyone shares.
To switch, follow Steps 1–6, then remove the old aitrillion-crm entry from your configuration. See API Keys: Build Custom Integrations if the key is also used elsewhere.
Previous and next#
Related#
Was this article helpful?
Ready to implement this?
OpenAI Engage and apply what you just learned to your own workspace.
Open AI Engage CRM