Loading…


KnowledgeBase
Segment by Campaign Activity: Who Opened, Clicked or Ignored
What this article covers#
Most segments are built from what a contact is — their city, their lifecycle stage, the size of their company. This article is about segmenting on what a contact did: opened your last email, clicked the link in it, never received it at all.
AI Engage has a dedicated filter for this, called Campaign activity. It sits at the very top of the field list in the segment builder, and it lets you write rules like:
Contacts who opened “October Newsletter”
Contacts who clicked the pricing campaign but did not reply on WhatsApp
Contacts whose message bounced — so you can go and fix their address
Because these segments are dynamic, they keep themselves up to date. Build “everyone who clicked” once, and it stays correct forever.
ℹ️
This is the reusable version of retargeting. If you only want a one-off follow-up to a single campaign, the quicker route is the shortcut described at the end of this article. Come here when you want an audience you can use again.
Step 1: Open the segment builder#
Go to Marketing >> Segments in the left sidebar, then click Create Segment.
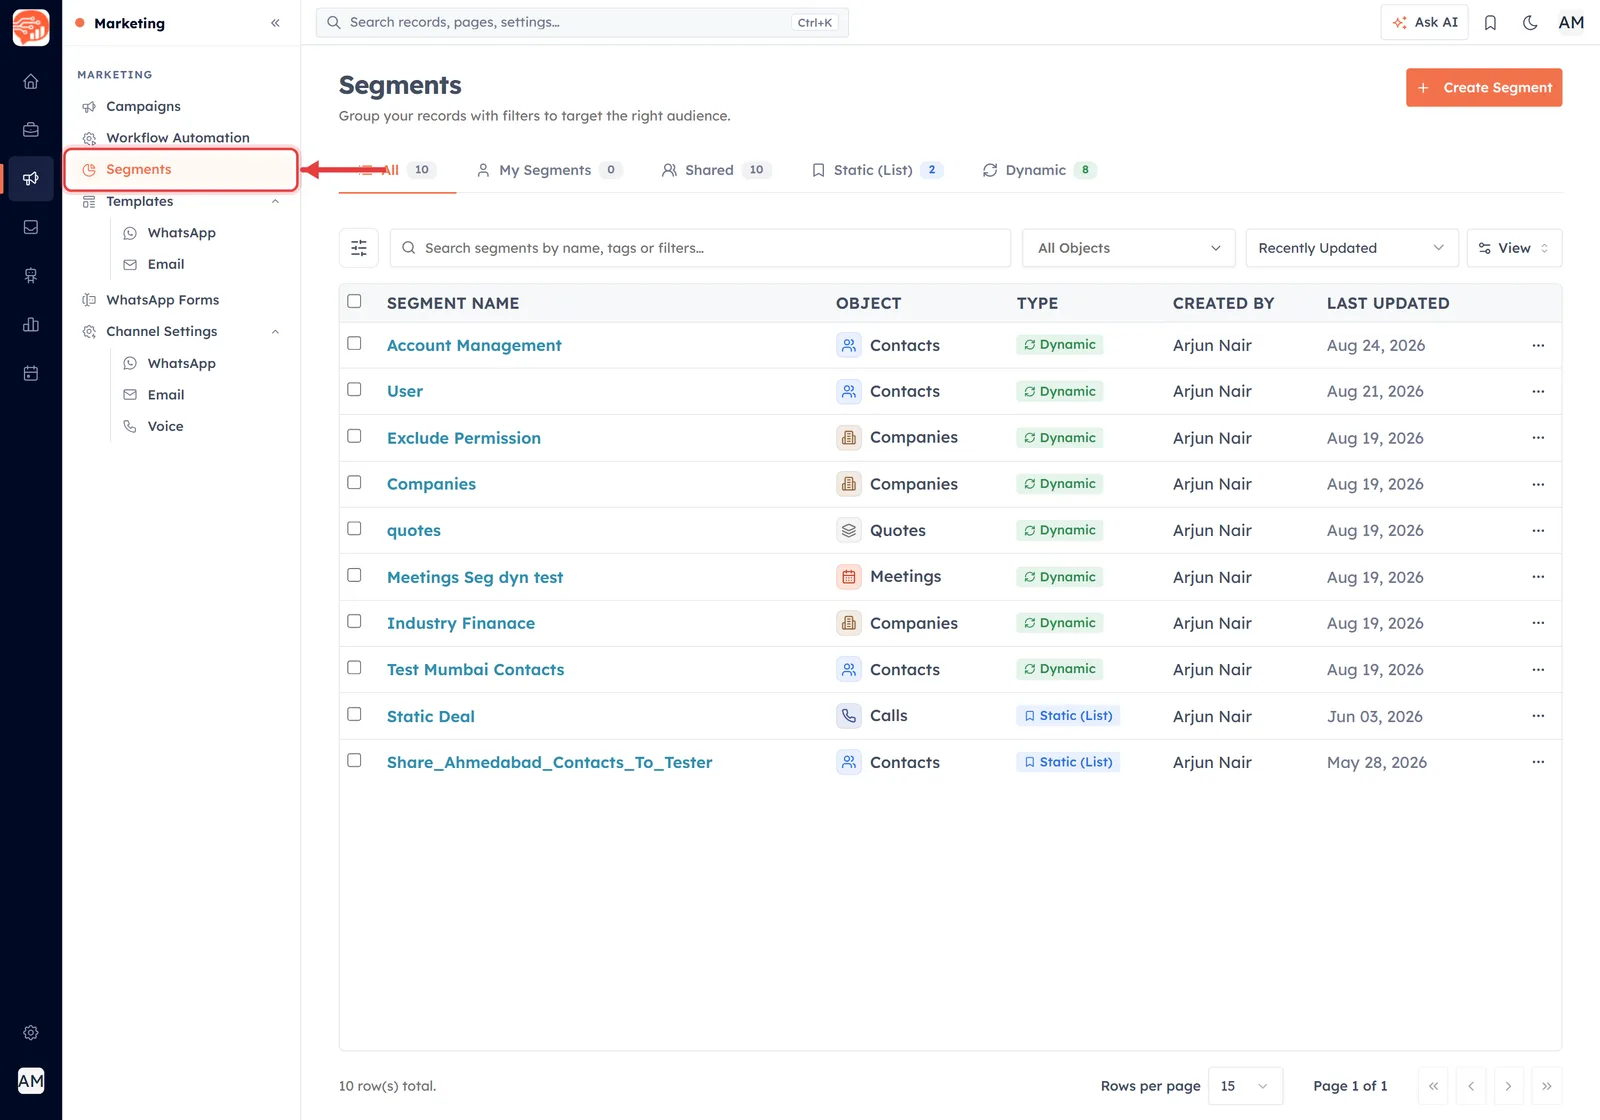
Marketing → Segments is where every saved audience lives.
What the red arrow is pointing at, part by part:
Segments — the list of every audience in your account, with its object and whether it is dynamic or static.
Campaigns — where you send to these audiences once they exist.
Workflow Automation — automations that run for one contact at a time, the moment something happens to it. A workflow does not pick a segment directly, but it can react to the same engagement a campaign-activity segment uses, and it can set the fields your segments filter on. How the two fit together is explained in Using campaign activity with Workflow Automation, further down this article.
Step 2: Name it and choose the basics#
The builder has two steps. The first is setup — and two choices here matter more than they look.
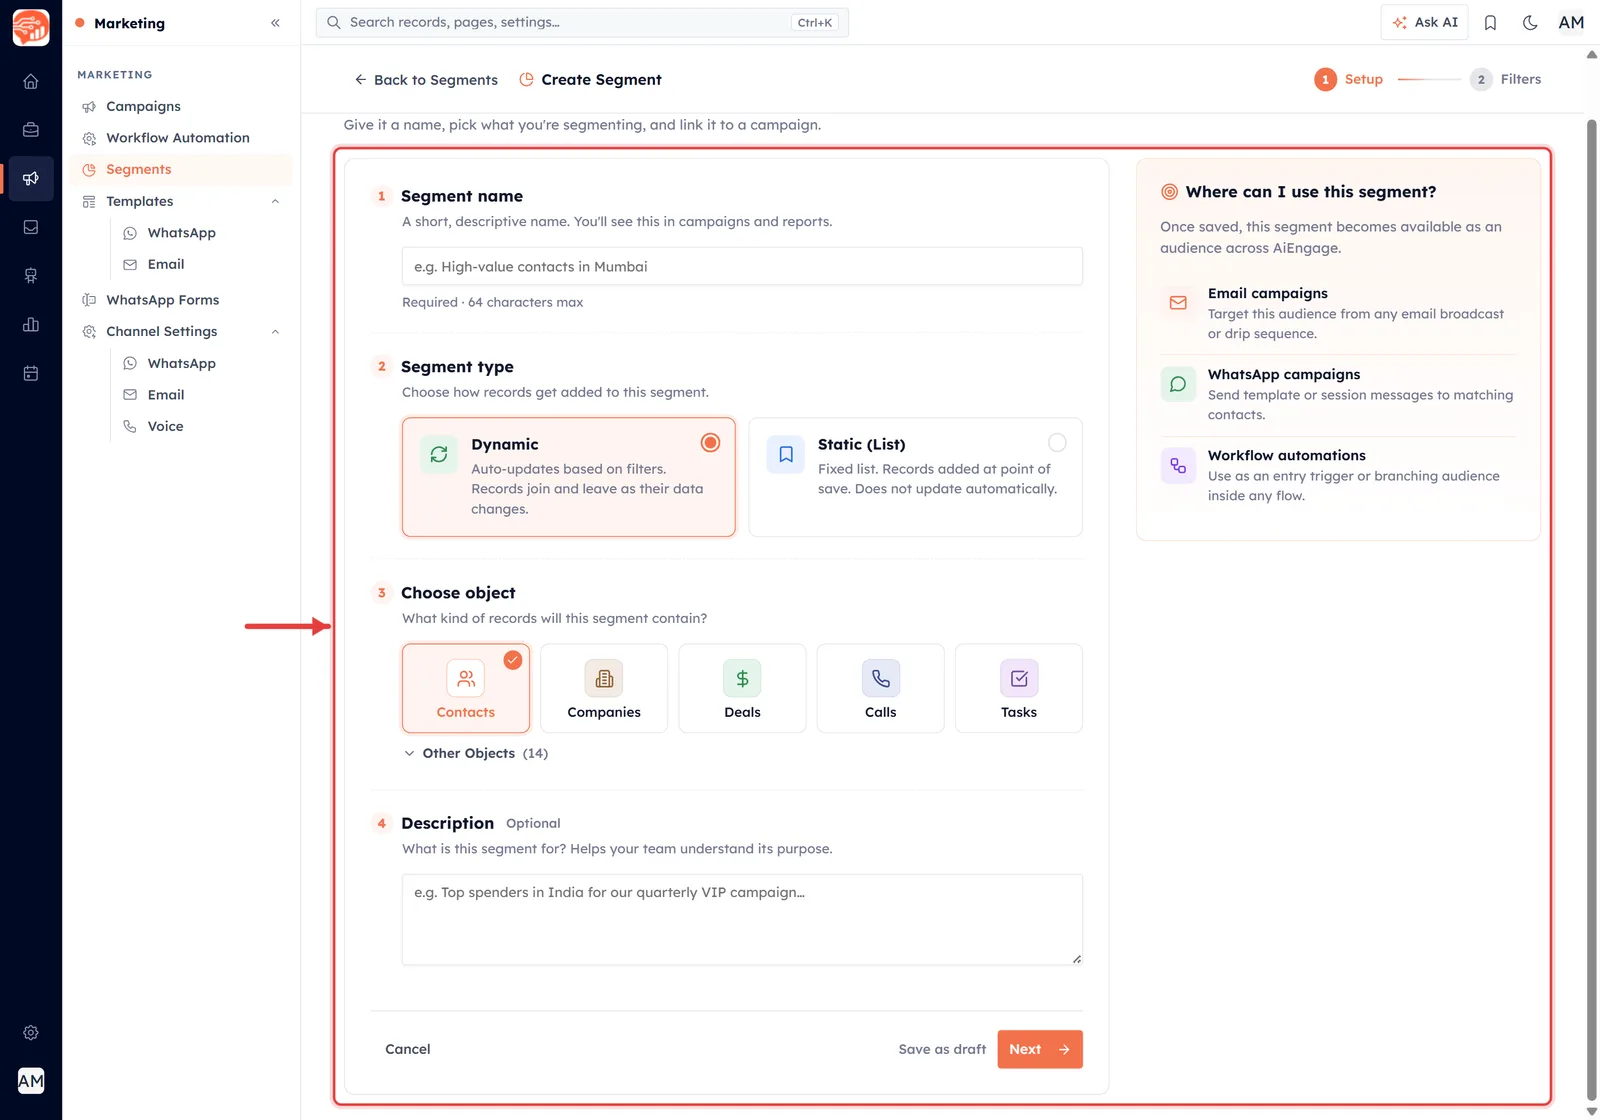
Step 1: what the segment is called, how it updates, and what kind of record it holds.
What the red arrow is pointing at, part by part:
Segment name — what you will see when picking an audience in a campaign. Be specific — “Opened October newsletter” beats “Segment 4”. Maximum 64 characters.
Dynamic — “Auto-updates based on filters. Records join and leave as their data changes.” This is the one you want for campaign activity.
Static (List) — “Fixed list. Records added at point of save. Does not update automatically.” A frozen snapshot.
Choose object — what kind of record the segment holds. For campaign activity this is Contacts — they are who receives campaigns.
Description — optional, but your future self will thank you for explaining what the segment is for.
💡
Pick Dynamic. A campaign-activity segment built as Static freezes the moment you save it, so anyone who opens the email tomorrow will never be added. See Dynamic vs Static Segments for the full comparison.
Click Next to move on to the filters.
Step 3: Add the Campaign activity filter#
On the Add filters step, click Add your first filter, then open the field list. Campaign activity is deliberately placed at the very top, above every contact field.
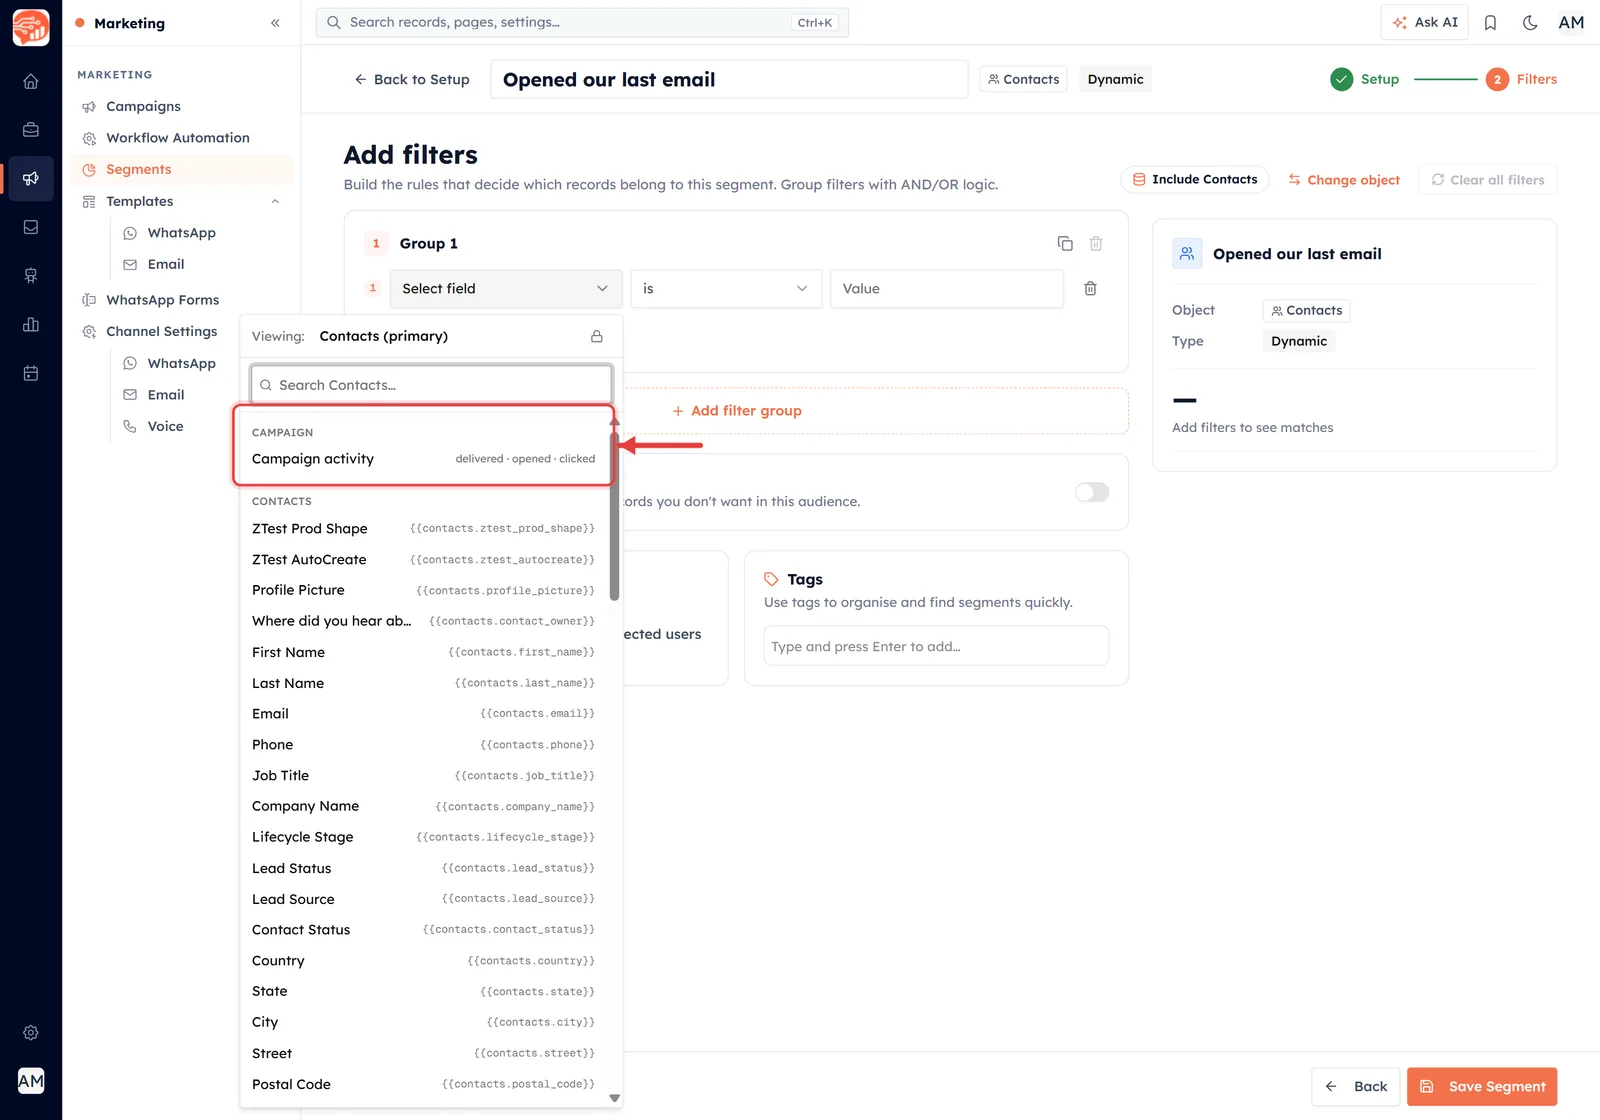
Campaign activity sits in its own group at the top of the field list.
What the red arrow is pointing at, part by part:
CAMPAIGN (the group heading) — a category of its own, separate from the contact fields below it.
Campaign activity — the field itself. Choose this to filter on behaviour rather than data.
“delivered · opened · clicked” — the subtitle, previewing the kind of thing you are about to filter on.
CONTACTS (below) — the ordinary contact fields — First Name, Email, Lifecycle Stage and so on — each with its merge tag. Mix these with campaign activity in the same segment.
Step 4: Choose which campaign#
Picking the field turns the row into Campaign · is · [campaign] · [activity]. The first dropdown is the campaign.
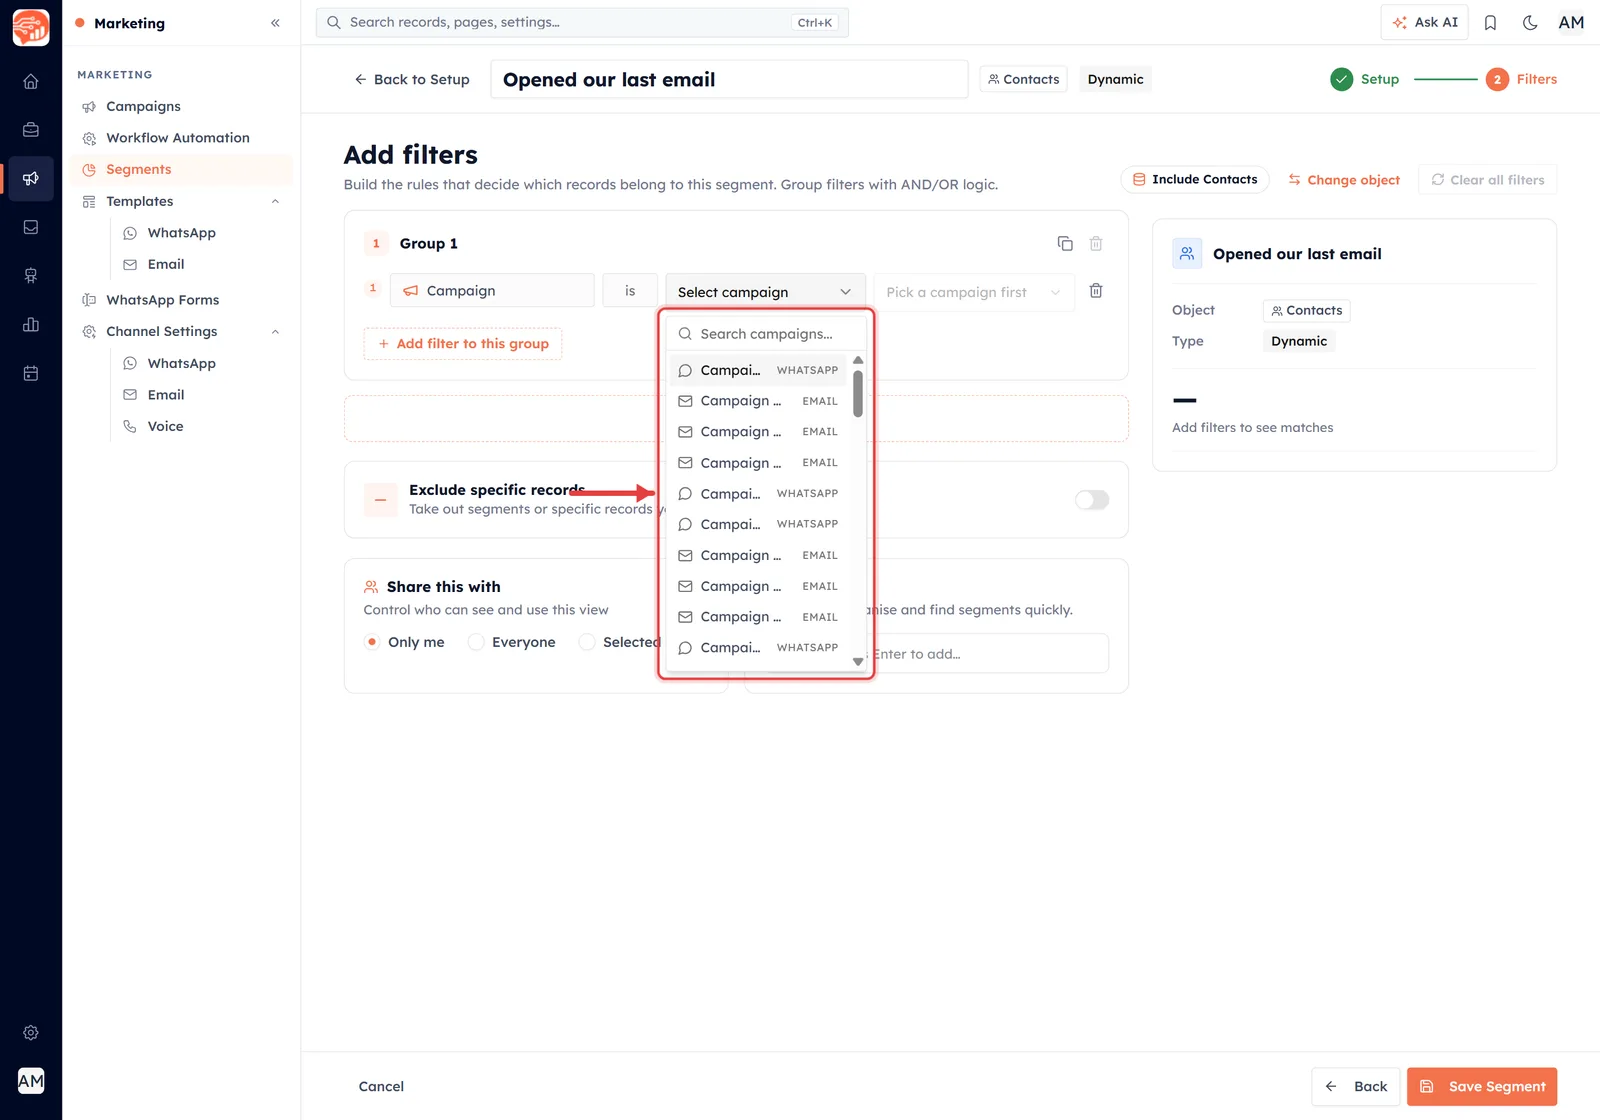
Only campaigns that have actually been sent appear here.
What the red arrow is pointing at, part by part:
Search campaigns… — type to narrow the list — useful once you have a few hundred.
The campaign names — every campaign you have sent, newest first.
EMAIL / WHATSAPP badges — the channel. This matters, because it decides which activities are offered in the next dropdown.
What is missing — drafts, scheduled and cancelled campaigns are not listed — they have no results to filter on. Retarget campaigns are excluded too, so the list stays readable.
ℹ️
A campaign only shows up here once it has been sent. If the campaign you want is missing, check its status on the Campaigns page — it is almost always still a draft or scheduled.
Step 5: Choose the activity#
With a campaign chosen, the second dropdown wakes up. This is the behaviour you are filtering on.
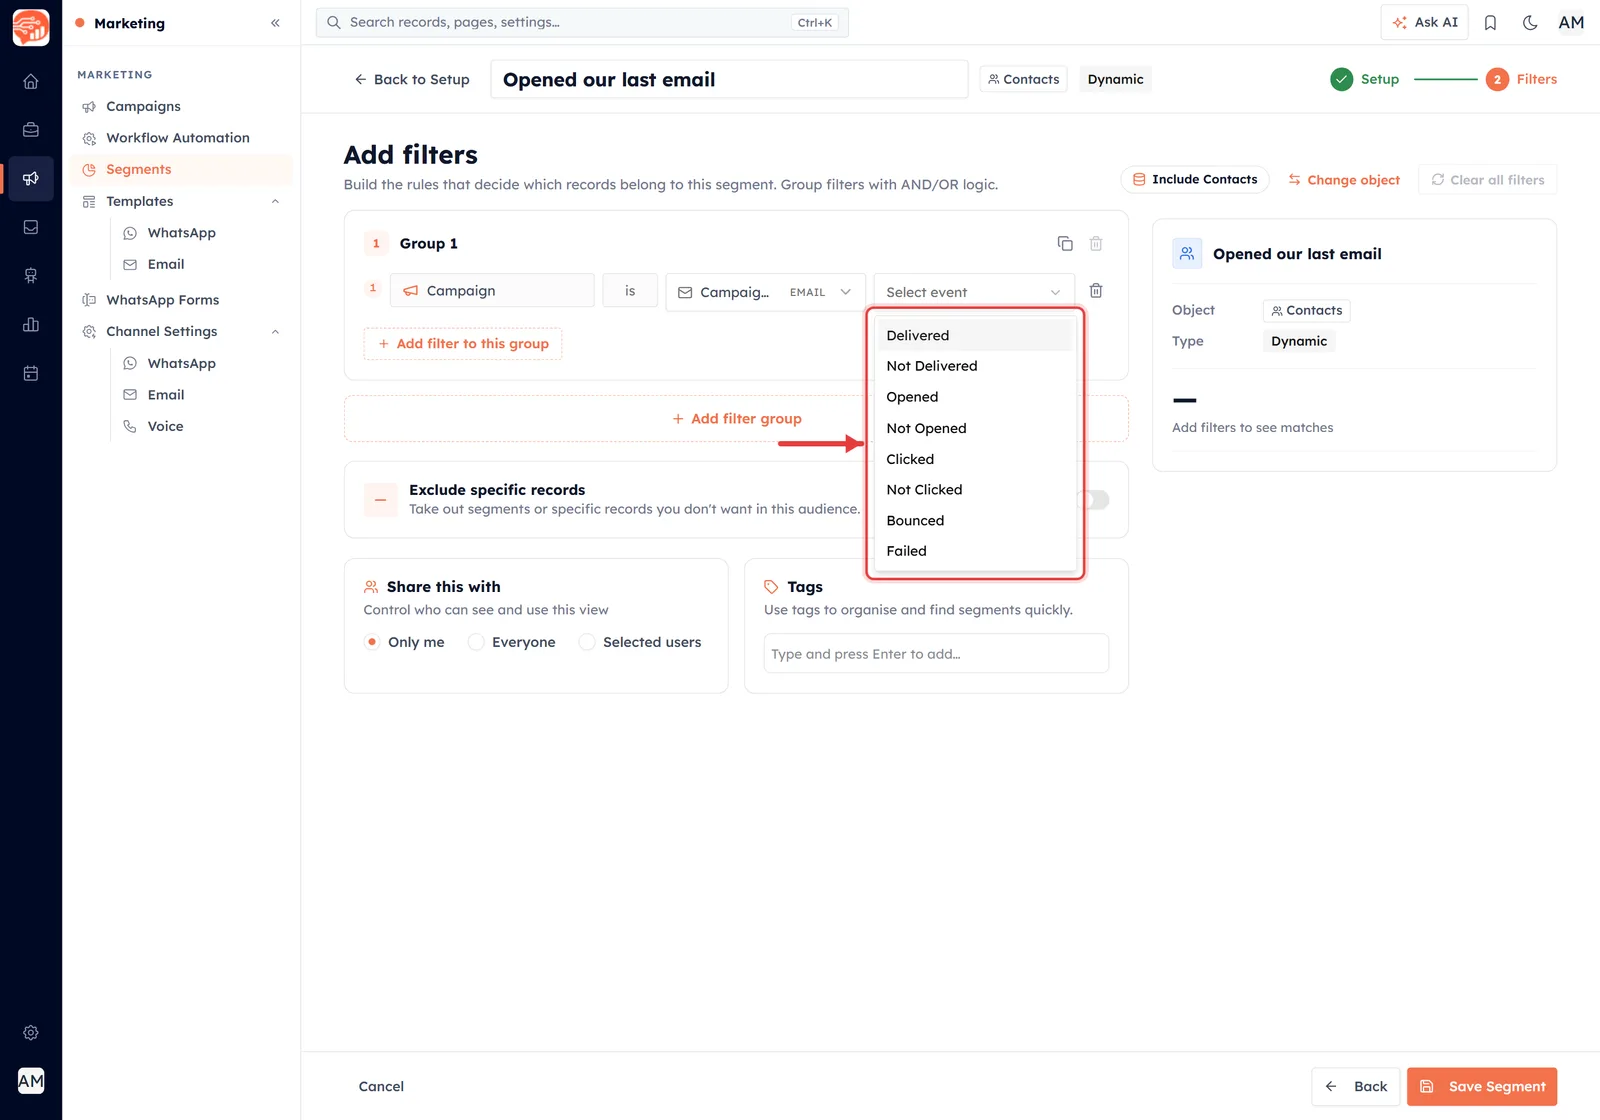
What did they do — or not do? Negative options are first-class here.
The list depends on the channel of the campaign you picked:
| Email campaigns | WhatsApp campaigns |
|---|---|
| Delivered | Delivered |
| Not Delivered | Not Delivered |
| Opened | Read |
| Not Opened | Not Read |
| Clicked | Clicked |
| Not Clicked | Not Clicked |
| Bounced | Replied |
| Failed | Not Replied |
| Failed |
✅
Notice that every positive has a matching negative — Not Opened, Not Clicked, Not Replied. The negatives are usually the more useful half: they are how you find the people who need chasing.
💡
WhatsApp adds Replied and Not Replied, which email has no equivalent of. A segment of “everyone who replied to our WhatsApp campaign” is about as warm an audience as you will ever assemble.
Step 6: Read the rule back before you save#
Once both dropdowns are filled, the builder restates your rule as a sentence underneath it — and the panel on the right starts counting matches.
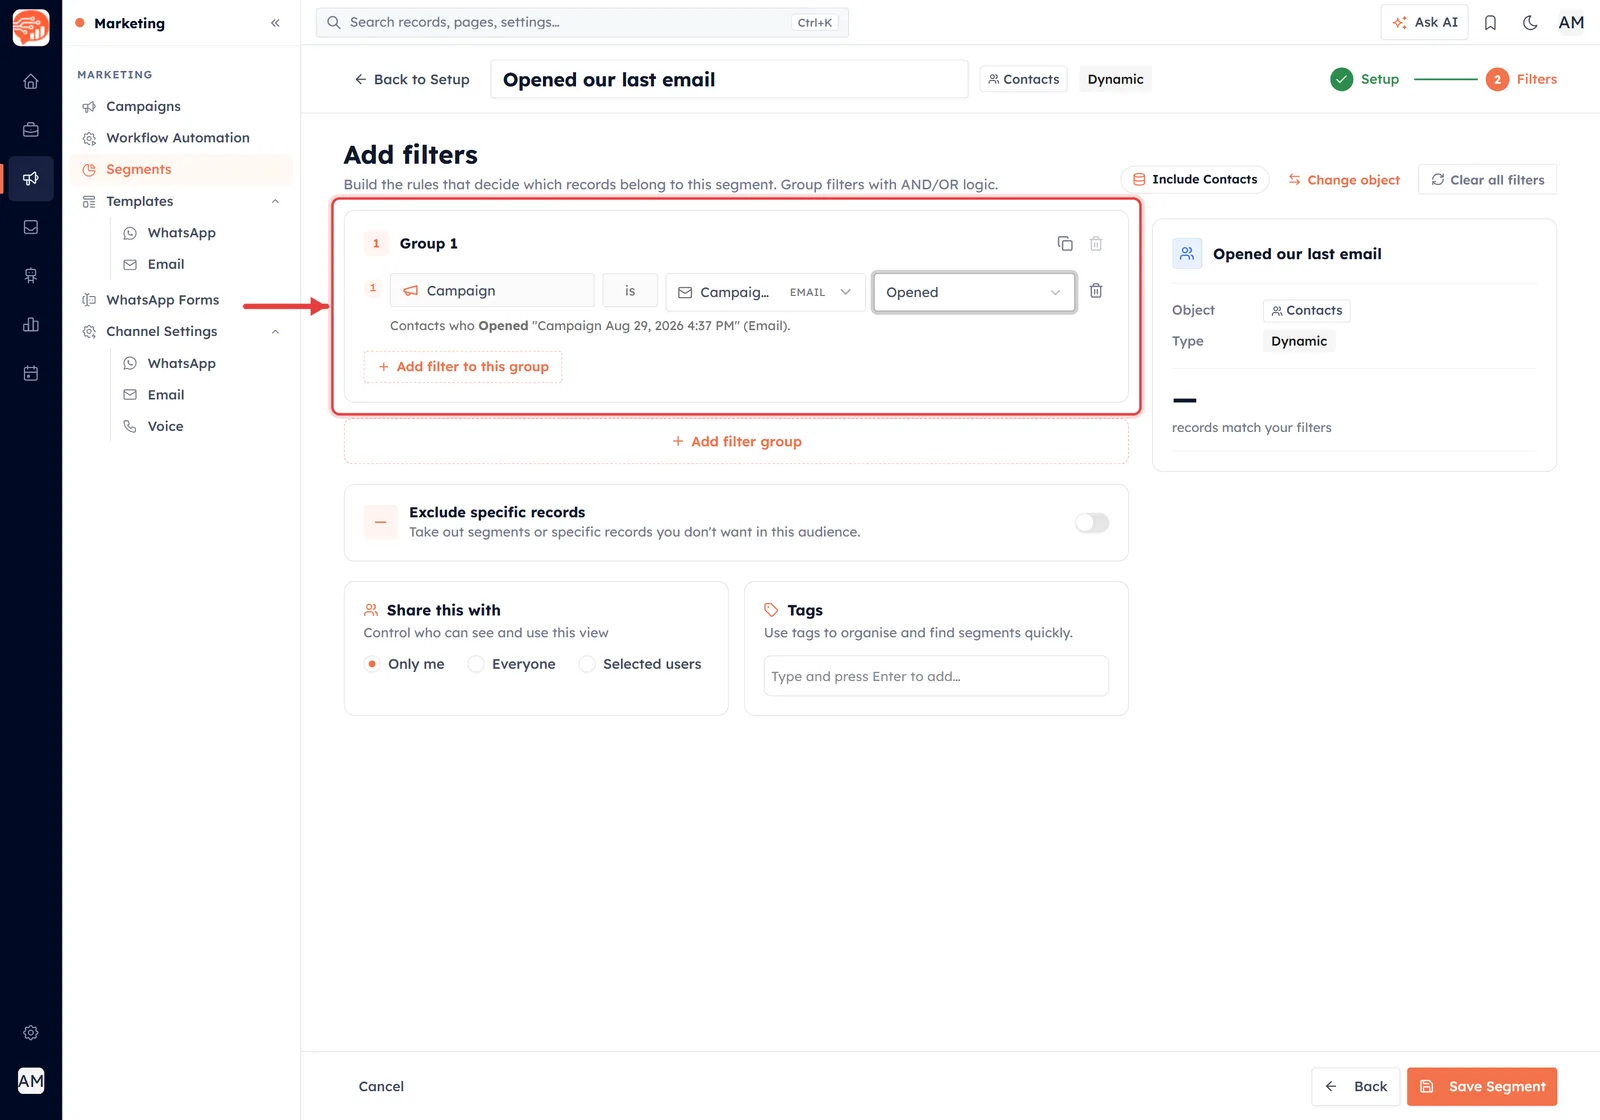
The finished rule, written back to you in plain English.
What the red arrow is pointing at, part by part:
The rule row — Campaign · is · {campaign} · {activity} — the four parts you just filled in.
The sentence underneath — e.g. “Contacts who Opened “Campaign Aug 29, 2026 4:37 PM” (Email).” Read it out loud. If it does not describe the people you meant, fix it now rather than after you have emailed them.
Add filter to this group — adds another condition joined by AND/OR — see the next section.
Add filter group — starts a separate group, for more complex logic.
Exclude specific records — a toggle to subtract segments or individual records from the result.
Share this with — Only me, Everyone, or selected users. Segments are private by default.
The match count — on the right, “records match your filters” — a live preview. Always check it before saving.
Happy with it? Click Save Segment.
⚠️
If the match count is 0, the usual cause is picking a positive activity on a campaign that has none of it — asking for everyone who clicked a campaign with a 0% click rate returns nobody. Check the campaign’s analytics first.
Combining activity with everything else#
A single activity rule is useful. Combining it is where this gets powerful, because campaign activity sits alongside every ordinary contact field in the same builder.
Two campaigns at once. Opened the September newsletter AND opened the October one — your consistently engaged readers.
Activity plus attributes. Clicked the pricing email AND Lifecycle Stage is Lead — interested, but not yet a customer.
Positive minus negative. Opened the campaign AND did not click it — interested enough to look, not enough to act. Often your best audience for a shorter, sharper follow-up.
Across channels. Did not open the email AND did not read the WhatsApp — genuinely unreachable, and worth a different approach.
For AND/OR groups and nested logic, see Advanced Filtering: Filter Groups & Association Filters.
The one-click shortcut#
There is a faster route when you already have a campaign's results open. On Campaign Analytics, click any metric tile and choose Create Segment — “Save a live segment of everyone who delivered this campaign — starts at 3 and keeps up to date.”
That builds exactly the same kind of dynamic segment as the six steps above, in two clicks, with the campaign and the activity already filled in. Use the builder when you want to combine several conditions; use the shortcut when one metric is all you need. Both are covered in Retarget a Campaign.
Segments worth building#
| Segment | The rule | What to do with it |
|---|---|---|
| Engaged readers | Opened the last campaign | Your reliable audience — send the important announcements here first |
| Interested but stalled | Opened AND Not Clicked | A shorter follow-up with one clear button |
| Hot leads | Clicked | Hand to sales, or invite to a demo |
| Needs another channel | Not Opened | Try WhatsApp or a call instead of another email |
| Broken addresses | Bounced or Failed | Clean the data — these are hurting your deliverability |
| WhatsApp responders | Replied | Your warmest possible audience |
Using campaign activity with Workflow Automation#
Segments and workflows sit next to each other in the Marketing menu and work well together, but they do different jobs. It is worth knowing how they connect before you plan a follow-up around them.
A segment is an audience. It answers “who?” — a group of contacts that you send a campaign to, all at once, when you choose.
A workflow is a reaction. It answers “what happens next?” — it runs for each record on its own, automatically, the moment something happens to that record.
What a workflow can and cannot do with a segment#
A workflow does not start from a segment. It starts from an event on a record in one module, chosen from the Triggers in the builder’s node palette: Record Created, Record Updated, Create or Edit, Record Deleted or WhatsApp Reply Received. There is no “contact joins a segment” trigger.
The If / Else condition works the same way. It tests the contact’s own fields, and it has no “is in segment” rule. So you cannot point a workflow at the “Clicked pricing email” segment you built above.
That still leaves two useful ways to combine them.
1. Branch on the same engagement a segment uses#
Every contact keeps running totals of its engagement as ordinary fields, and you can pick any of them in an If / Else condition:
Email: Total Emails Sent, Total Email Opens, Total Email Clicks.
WhatsApp: Total WhatsApp Sent, Total WhatsApp Delivered, Total WhatsApp Read, Total WhatsApp Clicks, Total WhatsApp Replied.
These are totals across all your campaigns, not tied to one named campaign. They answer questions like “has this contact ever clicked anything?”. For “who opened this particular campaign?”, use the Campaign activity segment described above.
Example: a Contacts workflow whose If / Else checks Total Email Clicks for a value above 0. On the Yes branch, Assign Owner hands the engaged contact to a salesperson. On the No branch, Wait / Delay pauses for a few days and Send WhatsApp tries the other channel.
2. Let a workflow feed a dynamic segment#
A dynamic segment re-checks its filters every time it is used, so any field a workflow changes can move a contact into or out of it. Use the Update Field action to set a value, such as Lifecycle Stage or Contact Status, and then build the segment on that value, on its own or together with campaign activity.
Example: a workflow sets Lifecycle Stage to Lead on every contact your web form creates. A dynamic segment of clicked the pricing email AND Lifecycle Stage is Lead then fills itself up, ready for your next campaign, without anyone adding contacts by hand.
ℹ️
Which one should I use? Use a segment and a campaign when you want to send one message to a group, on a date you pick. Use a workflow when each contact should get something automatically, at the moment they qualify.
To build one, see How to Create a Workflow. For every rule the If / Else node can test, see Workflow Conditions & Branching, and for what each action does, see Workflow Actions Explained.
Good practice#
Give the results time. Build the segment a few days after sending. Opens trickle in, and a segment built an hour after send will call half your audience unengaged when they simply have not looked yet.
Name it after the rule. “Clicked pricing email — Oct” tells your colleagues what is inside. “Segment 7” tells them nothing.
Keep it dynamic. The whole point is that it maintains itself.
Mind the frequency. Engaged segments are tempting to over-mail precisely because they respond. Smart Sending will hold the line for you.
Share it. A segment set to Only me cannot be used by a colleague building next week's campaign.
Where to go next#
To use the segment you have just built, see Using Segments in Campaigns. To edit, clone, export or share it later, see Managing Segments.
And for the numbers these rules are built on — what “opened”, “clicked” and “bounced” actually count — see Understanding Campaign Performance.
To act on engagement automatically, one contact at a time, see Introduction to Workflow Automation.
Was this article helpful?
Ready to implement this?
OpenAI Engage and apply what you just learned to your own workspace.
Open AI Engage CRM