Loading…


KnowledgeBase
How to Add a WhatsApp Form to a WhatsApp Template
A WhatsApp Form only reaches customers once something invites them to open it. The usual invitation is a message template carrying an Open Form button — the customer taps it and your form opens inside the same WhatsApp chat, with no link to click and no website to visit.
This article covers that connection: adding the Open Form button to a template and pointing it at the right form. For the form itself see How to Create a WhatsApp Form, and for everything else a template can do see Create & Manage WhatsApp Message Templates.
⚠️
Your form must already be Approved. The picker lists approved forms only — a form still in Draft or In review will not appear, no matter how finished it looks. Get the form approved first, then build the template.
What you will end up with#
A template with one extra button under the message. On the customer’s phone it looks like a normal call-to-action, but instead of opening a browser it opens your form as a WhatsApp screen.
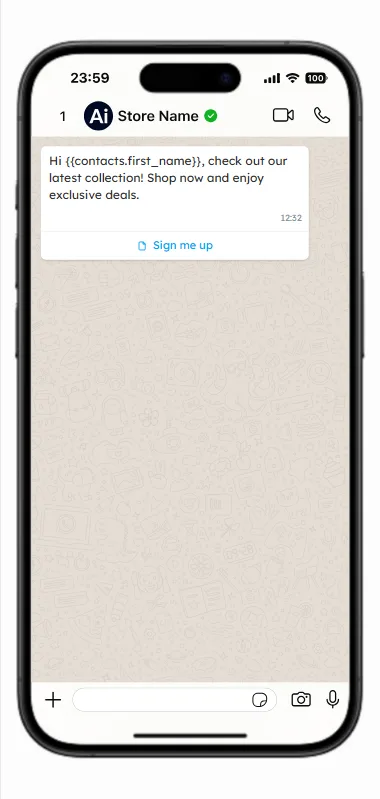
The live preview. The button under the message carries a small form icon — that icon is how customers tell a form button apart from a link.
Two things in that preview are worth noticing. The small document icon to the left of the button text is added by WhatsApp for form buttons and is not something you configure. And the button sits below the message body, always — button placement is fixed by WhatsApp, so you cannot move it inline.
Step 1 — Open Templates and start a new one#
Go to Marketing → Templates and click Create New Template, top right.
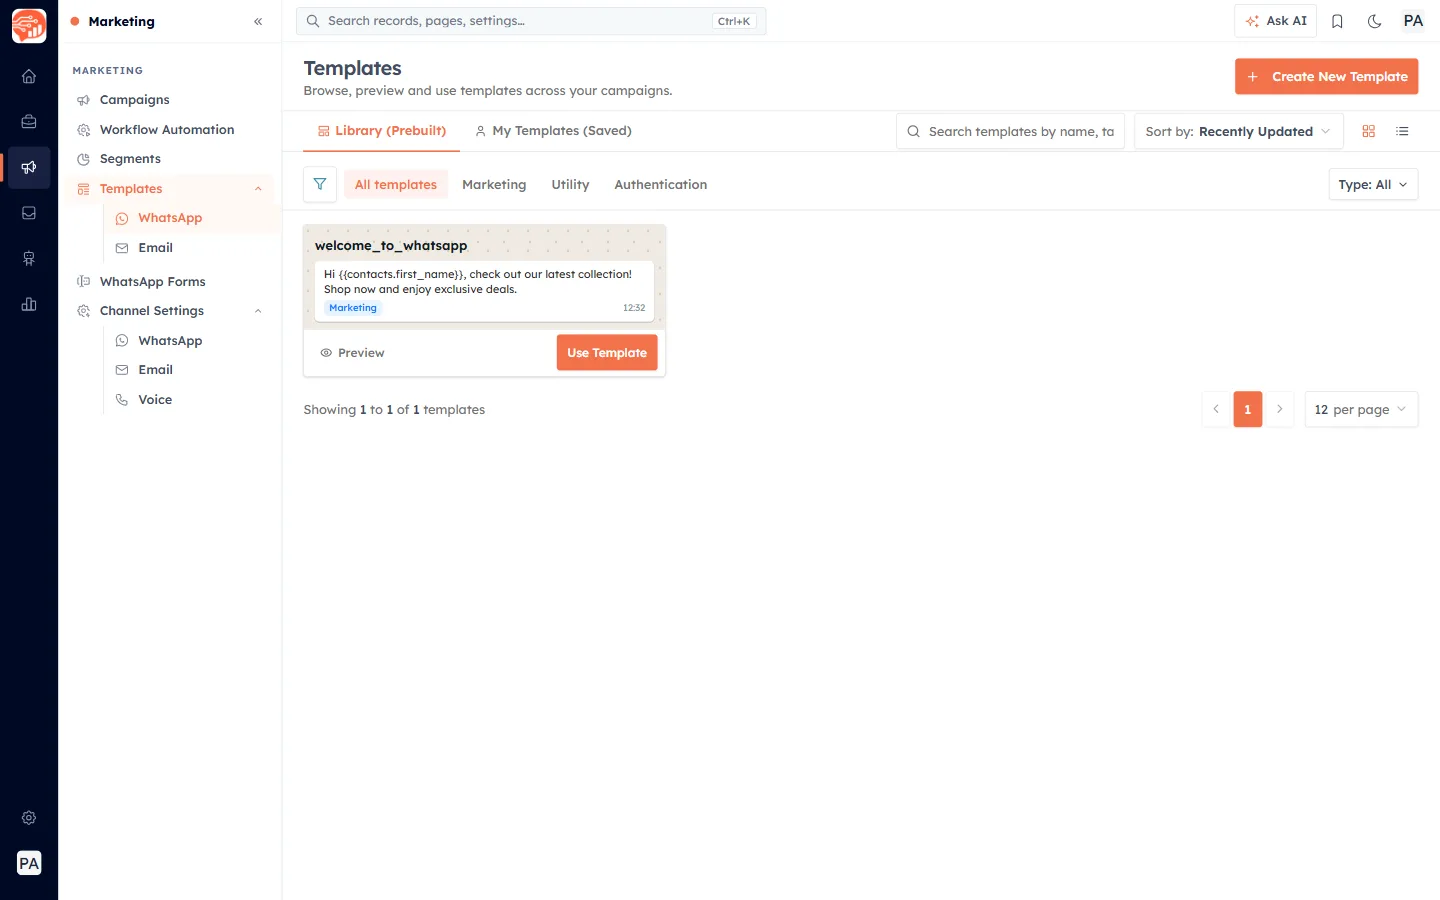
The Templates page. Create New Template is top right; the two tabs below it separate prebuilt library templates from your own saved ones.
The two tabs matter here. Library (Prebuilt) holds ready-made templates you can copy; My Templates (Saved) holds the ones your team has built. A template you create in this article lands in My Templates (Saved), and that is also where you come back to check whether Meta has approved it.
Step 2 — Fill in the template basics#
The top of the builder is the same for every template, form button or not.
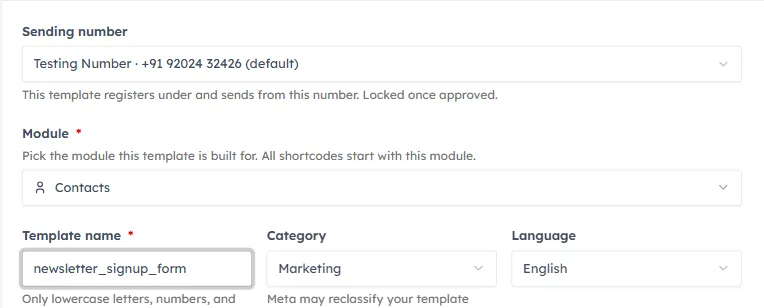
The template basics. Module and Template name are the two marked required, and the helper text under Sending number is the one to read twice.
Reading down that screenshot:
| Field | What to know |
|---|---|
| Sending number | Which WhatsApp number the template belongs to. The note underneath — “Locked once approved” — is literal: after Meta approves the template you cannot move it to another number. |
| Module * | Defaults to Contacts. It decides which shortcodes are available, because “all shortcodes start with this module”. |
| Template name * | Lowercase letters, numbers and underscores only. This is Meta’s rule, not ours — spaces and capitals are rejected. |
| Category | Marketing, Utility or Authentication. Note the warning: “Meta may reclassify your template based on content review.” |
| Language | English, English (US), Spanish, Hindi, French, German, Italian, Portuguese (BR) or Arabic. |
Below these, pick Standard as the template type and write your Message body (up to 1,024 characters). The body is what appears above the button, so it should give the customer a reason to tap.
💡
Carousel templates have their own per-card buttons and work differently. Everything below describes a Standard template.
Step 3 — Switch on Buttons#
Scroll to the bottom of the form column. Buttons is off by default; switch it on.
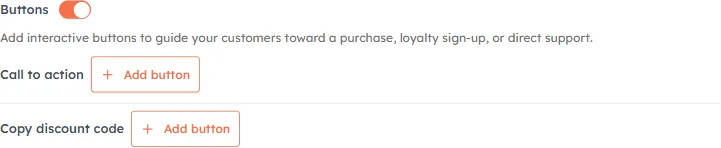
The Buttons block once enabled. Two separate rows appear, each with its own Add button — the one you want is Call to action.
Enabling it reveals two independent rows, and picking the wrong one is the most common mis-step here:
- Call to action — buttons that do something: open a website, dial a number, or open a form. This is the row you want. Maximum three.
- Copy discount code — a single button that copies a promo code to the clipboard. Unrelated to forms, and not offered on Utility templates.
Step 4 — Add a call-to-action button#
Click Add button on the Call to action row. A card appears, and it does not start as a form button.
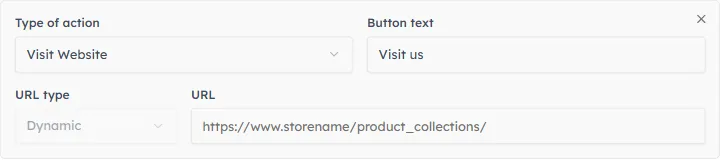
A fresh button card. It defaults to Visit Website, which is why the fields you see are URL type and URL — not a form picker.
Every new button starts as Visit Website, pre-filled with the text Visit us and a placeholder URL. That is why the card shows URL type and URL at this point. Notice that URL type is greyed out and stuck on Dynamic — that is deliberate and applies to link buttons only. Ignore all of it; the next step replaces these fields entirely.
The ✕ in the card’s top-right corner deletes the button if you add one by mistake.
Step 5 — Change Type of action to Open Form#
Open the Type of action selector on the left of the card.
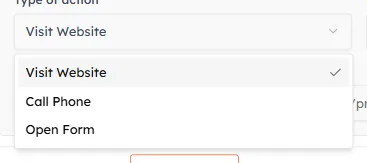
The three action types. Open Form is the third and last option — it is the only one that connects a WhatsApp Form.
Three options, and only one is relevant here:
| Type of action | What the button does |
|---|---|
| Visit Website | Opens a URL in the phone’s browser — takes the customer out of WhatsApp. |
| Call Phone | Dials a number you specify. |
| Open Form | Opens your WhatsApp Form inside the chat. This is the one. |
Step 6 — The card changes shape#
Choosing Open Form rebuilds the card. Compare it with Step 4:
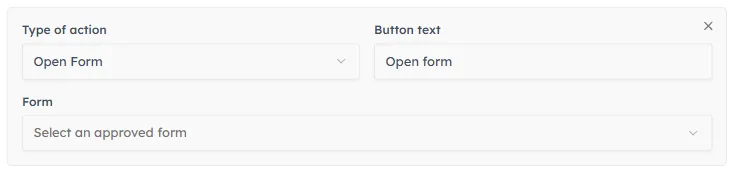
The same card after switching to Open Form. URL type and URL are gone, replaced by a single Form selector; the button text has been reset to “Open form”.
Three things happened at once:
- URL type and URL disappeared and a Form selector took their place.
- Button text was reset to Open form, overwriting whatever was there. This is intentional — and it means you should write your button wording after setting the action type, not before, or it will be wiped.
- Any URL or phone number you had typed was cleared, so a stale value cannot leak into what gets sent to Meta.
The selector reads Select an approved form and nothing is chosen yet. That placeholder text is a status indicator — it tells you what the CRM found:
| Placeholder | Meaning |
|---|---|
| Loading forms… | Still fetching. Wait a moment. |
| Select an approved form | Approved forms were found — open the list and pick one. |
| No approved forms available | None found. The selector is disabled, with the hint “Create and approve a WhatsApp Form first (WhatsApp → Forms).” |
Step 7 — Pick your form#
Open the Form selector.
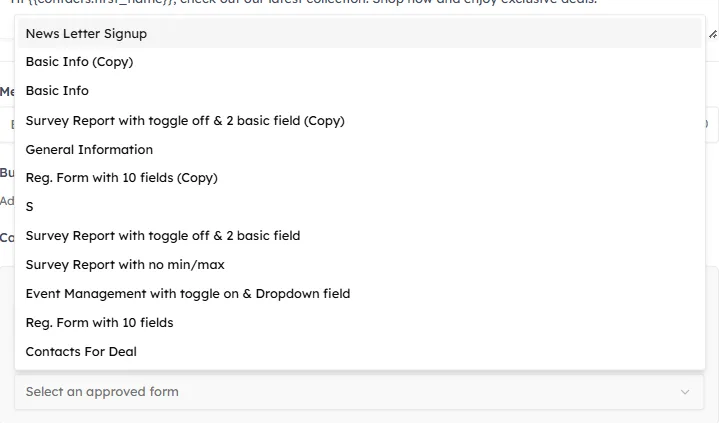
The form picker. Every entry here is an approved form — drafts and forms still in review are filtered out before the list is built.
This list is the whole point of the approval requirement. It is built from your approved forms only, so if a form you expect is missing, its status — not the template — is the problem. Check it on Marketing → WhatsApp Forms: anything showing Draft, In review, Rejected or Disabled is excluded.
💡
The list shows each form by its internal form name — the one you gave it in the builder, not the title customers see. If your forms are named “test” and “test 2”, this is the screen where that comes back to bite. Up to 100 approved forms are listed.
Step 8 — Write the button text#
Now — and only now — replace the default Open form wording with something that fits your message.
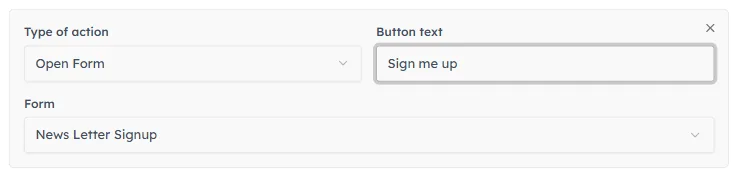
A finished form button. All three parts are set: the action is Open Form, the button says “Sign me up”, and a specific approved form is attached.
That screenshot is what a correctly configured form button looks like — if yours matches, you are done with this card. Two constraints on the wording:
- 25 characters maximum. The field stops accepting input at the limit.
- Every button on the template needs different text. Duplicates raise “You can’t enter the same text for multiple buttons” in amber straight away, and block the submit with “Each button needs a unique label.”
💡
Specific wording beats generic wording. “Sign me up” or “Book my slot” tells the customer what happens next; “Open form” tells them only that a form exists.
Step 9 — Save and submit for approval#
Three buttons sit in the page header.

The header actions. Save as draft keeps the template private to your CRM; Save and ask for approval is what sends it to Meta.
| Button | What it does |
|---|---|
| Discard | Abandons the template. Nothing is saved. |
| Save as draft | Keeps your work in the CRM without involving Meta. Nothing is sent, and the template cannot be used yet. |
| Save and ask for approval | Saves, then submits to Meta for review. This is the one that makes the template usable. |
⚠️
If you press Save and ask for approval with a form button that has no form attached, the submit stops with “Please select a form for button 1” (or 2, or 3). The number tells you which card to go back to.
After a successful submit you are returned to the templates list, where the new template appears with its review status.
After Meta approves the template#
Once approved, the template can be used in campaigns and sent from contact records like any other — the button carries the form with it.
One thing changes permanently at approval: the form selector locks, showing “Form cannot be changed after Meta approval.” The form’s identity is baked into what Meta approved, so swapping it would invalidate that approval. To point at a different form, duplicate the template and attach the other form to the copy.
💡
Editing the form is a separate matter from editing the template. Changing a form’s fields after approval generally needs the form re-approved; the template linking to it is unaffected as long as the link itself does not change.
Common questions#
My form is not in the list. Why?
Almost always because it is not Approved. Open Marketing → WhatsApp Forms and check the status column — only Approved forms are offered. If it is still Draft, use Submit for approval from the row’s ⋮ menu; if it is In review, use Refresh status to re-check Meta’s verdict.
The Form selector is greyed out.
Two possibilities. If it reads “No approved forms available”, you have no approved forms yet. If it shows a form but will not open, and the note says “Form cannot be changed after Meta approval”, the template itself is already approved — duplicate it to attach a different form.
Can I put more than one form button on a template?
You can add up to three call-to-action buttons in total and set more than one to Open Form, each pointing at a different form. Give every button distinct text or the template will not submit. In practice one form button and one link or call button is easier for the customer to act on than three competing choices.
My button text keeps resetting to “Open form”.
You are typing it before changing the action type. Switching Type of action resets the button text to that type’s default, which wipes anything you had written. Set the action type first, then the form, then the wording — in that order.
Where do the submissions go?
To the form, not the template. Everything a customer submits appears under the form’s Submissions and Report views, and — if the form has Create or update Contact switched on — is written to the matching Contact. The template is only the invitation.
Was this article helpful?
Ready to implement this?
OpenAI Engage and apply what you just learned to your own workspace.
Open AI Engage CRM