Loading…


KnowledgeBase
Use an Existing WhatsApp Number: Move Your Current Number into AI Engage CRM
Who this guide is for#
Most businesses do not start from a blank slate. The number your customers already save in their phones, print on your invoices and see on your website is the number you want them to keep messaging — you just want those messages to land in AI Engage CRM instead of on someone’s handset. That is what this guide does: it takes a number you already own and puts it behind the WhatsApp Business Platform, connected to AI Engage.
Work out which of these describes your number today, because the first step is different for each one:
It is on the normal WhatsApp app (the green one everyone uses personally) — the number has to be released from that app before Meta will let it join the API. See Step 2, Case A.
It is on the WhatsApp Business App (the free small-business app with the catalogue and quick replies) — same thing: the number has to leave the app first. Your business profile details are worth copying down before you do. See Step 2, Case A.
It is already on the WhatsApp Business Platform with another provider (Twilio, Wati, Interakt, 360dialog, Gupshup, an in-house Cloud API setup, and so on) — the number does not need to be deleted. It already sits inside a WhatsApp Business Account (WABA) that you own, and you simply share that WABA with AI Engage. See Step 2, Case B.
It is a landline or an office desk number — this works too. WhatsApp can verify it by voice call instead of SMS. See Step 5.
ℹ️
If the number you want to use is brand new and has never been on WhatsApp at all, you do not need this guide — follow Connect WhatsApp Business to AI Engage CRM instead.
What actually changes when a number moves#
Read this section before you start. Nothing here is reversible in five minutes, and a number that moves without the team expecting it causes a bad afternoon.
A number lives in one place at a time. Once it is registered on the WhatsApp Business Platform, the WhatsApp app on the phone stops working for that number. There is no mode where both work at once.
Old conversations do not travel. Chats already on the handset stay on the handset — the WhatsApp Inbox in AI Engage starts empty and fills up as customers message you again. Export or back up anything you need to keep before you release the number.
Customers notice nothing. They keep the same contact card, the same chat thread and the same number. Your replies simply come from the CRM now.
Groups are not supported. The WhatsApp Business Platform cannot send to or read WhatsApp groups. If your number is used for customer groups today, plan for that.
Your display name and quality rating follow the account, not the app. If you keep the same WhatsApp Business Account when moving from another provider, your approved display name, your quality rating and your messaging limits come with it. If you create a new account instead, they start over.
Approved templates come with the account too. Templates live on the WhatsApp Business Account, so a number that keeps its account keeps its approved templates. Move to a fresh account and every template has to be created and approved again.
Business-initiated messages become template messages. On the API you cannot type a fresh message to a customer who has not written to you in the last 24 hours — you send an approved template instead. Free-typing works inside the 24-hour window after their last message.
💡
Pick a quiet window for the switch — early morning or a weekend. Between releasing the number from the app and the sender showing Approved in AI Engage, that number cannot receive messages anywhere.
Before you start#
Have all of this ready. Every one of them stops the flow dead if it is missing halfway through:
A Facebook account that is an admin of your business portfolio (the Meta Business Manager that owns — or will own — the number). Being a mere employee or partner on the portfolio is not enough; Meta will show you an empty dropdown.
Physical access to the number — someone has to read out the six-digit code from an SMS, or answer the verification call.
The two-step verification PIN, if one was ever set on that number. If it was set by a previous provider, ask them for it or ask them to switch two-step verification off before you begin.
Admin rights in AI Engage CRM — specifically the WhatsApp configuration permission. Without it, the buttons in Step 3 are not clickable.
Your display name decided — the name customers will see above the chat. It has to relate to your business; Meta rejects generic names.
Business details for Meta — legal business name, address, website and, for verification, a registration or tax document.
Step 1 — Open WhatsApp Settings in AI Engage#
In the CRM, open Settings → Marketing Channels → WhatsApp. This one screen is where every number your organisation sends from is added, configured and removed.
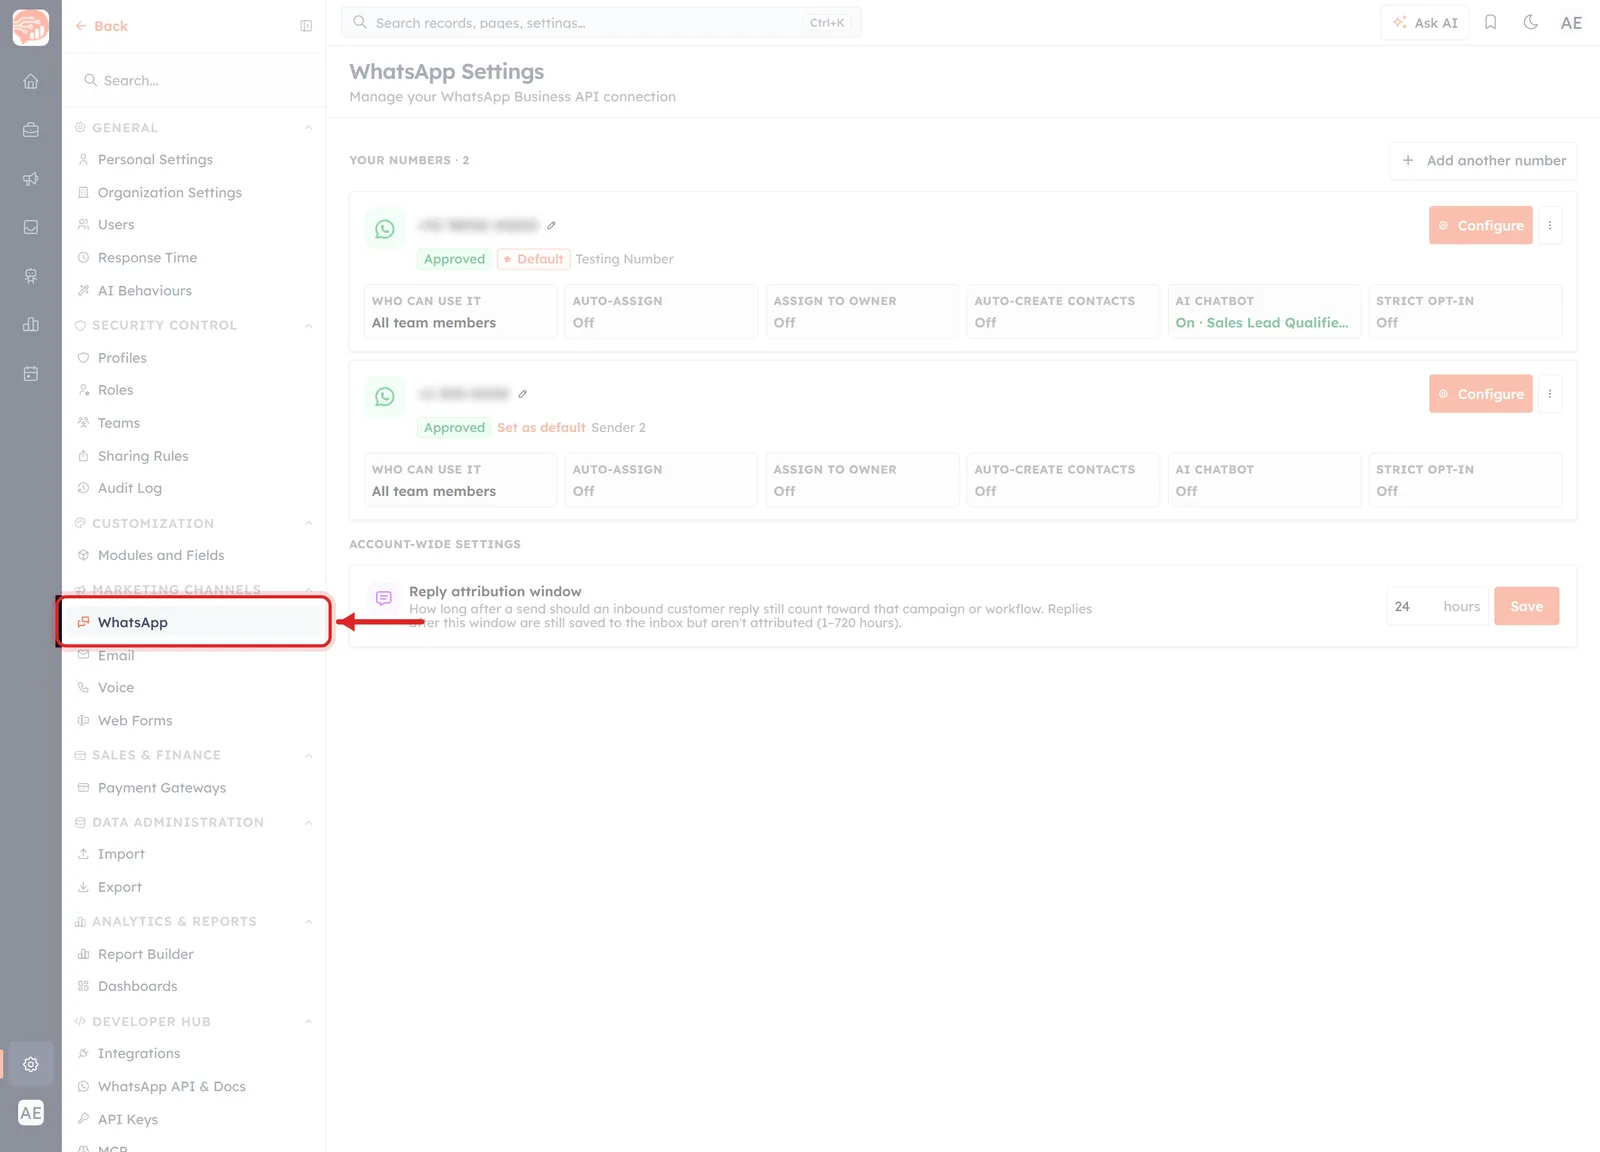
What you are looking at: the settings sidebar runs down the left of the screen, grouped into sections — GENERAL, SECURITY CONTROL, CUSTOMIZATION, then MARKETING CHANNELS. The red box and arrow mark WhatsApp, the first item in that group, sitting just above Email, Voice and Web Forms. Click it and the main panel on the right switches to WhatsApp Settings, subtitled “Manage your WhatsApp Business API connection”. Everything else on the page is dimmed here only to keep your eye on the one item you need.
Step 2 — Free the number where it lives today#
Meta will refuse the number if it is still claimed somewhere else. Do the case that matches your situation.
Case A — the number is on the WhatsApp app or WhatsApp Business App#
Back up first. In the app, open Settings → Chats → Chat backup and run a backup, and export any individual chats you care about (Chat → More → Export chat). Once the number leaves the app you cannot get these back.
Note your business profile. If you are on the WhatsApp Business App, screenshot your business name, description, address, hours, website and catalogue. You will re-enter the ones you want on the new account.
Delete the account for that number. In the app, go to Settings → Account → Delete my account, enter the number and confirm. This removes the number from WhatsApp — it does not delete anything from your phone’s storage, and it does not affect other numbers.
Wait a few minutes before starting the signup, so Meta’s systems register that the number is free.
⚠️
Deleting the WhatsApp account also removes your business profile, your catalogue and your group memberships for that number. This is the point of no return — make sure the backup in the first bullet actually completed.
Case B — the number is with another WhatsApp provider or BSP#
Do not delete anything. The number is already registered on the WhatsApp Business Platform, and deleting it would throw away your display name, quality rating and approved templates.
Check who owns the WhatsApp Business Account. Open Meta Business Manager and confirm the account containing your number sits inside your business portfolio. If the provider created it under their own portfolio, ask them to transfer it to yours — this is a normal request and they are obliged to help.
Ask for the two-step verification PIN, or ask them to disable two-step verification on the number.
Ask them to release the number from their platform once you are ready, or plan to disconnect it in their dashboard immediately before Step 3. A number can be connected to one messaging platform at a time.
ℹ️
Case B is the smoother of the two: because you keep the same WhatsApp Business Account, your templates, display name and messaging limits carry across and there is nothing to re-approve.
Step 3 — Start the connection from AI Engage#
Back on Settings → Marketing Channels → WhatsApp, start the signup from the CRM — not from Meta’s website. Starting it here is what tells Meta to hand the number to AI Engage.
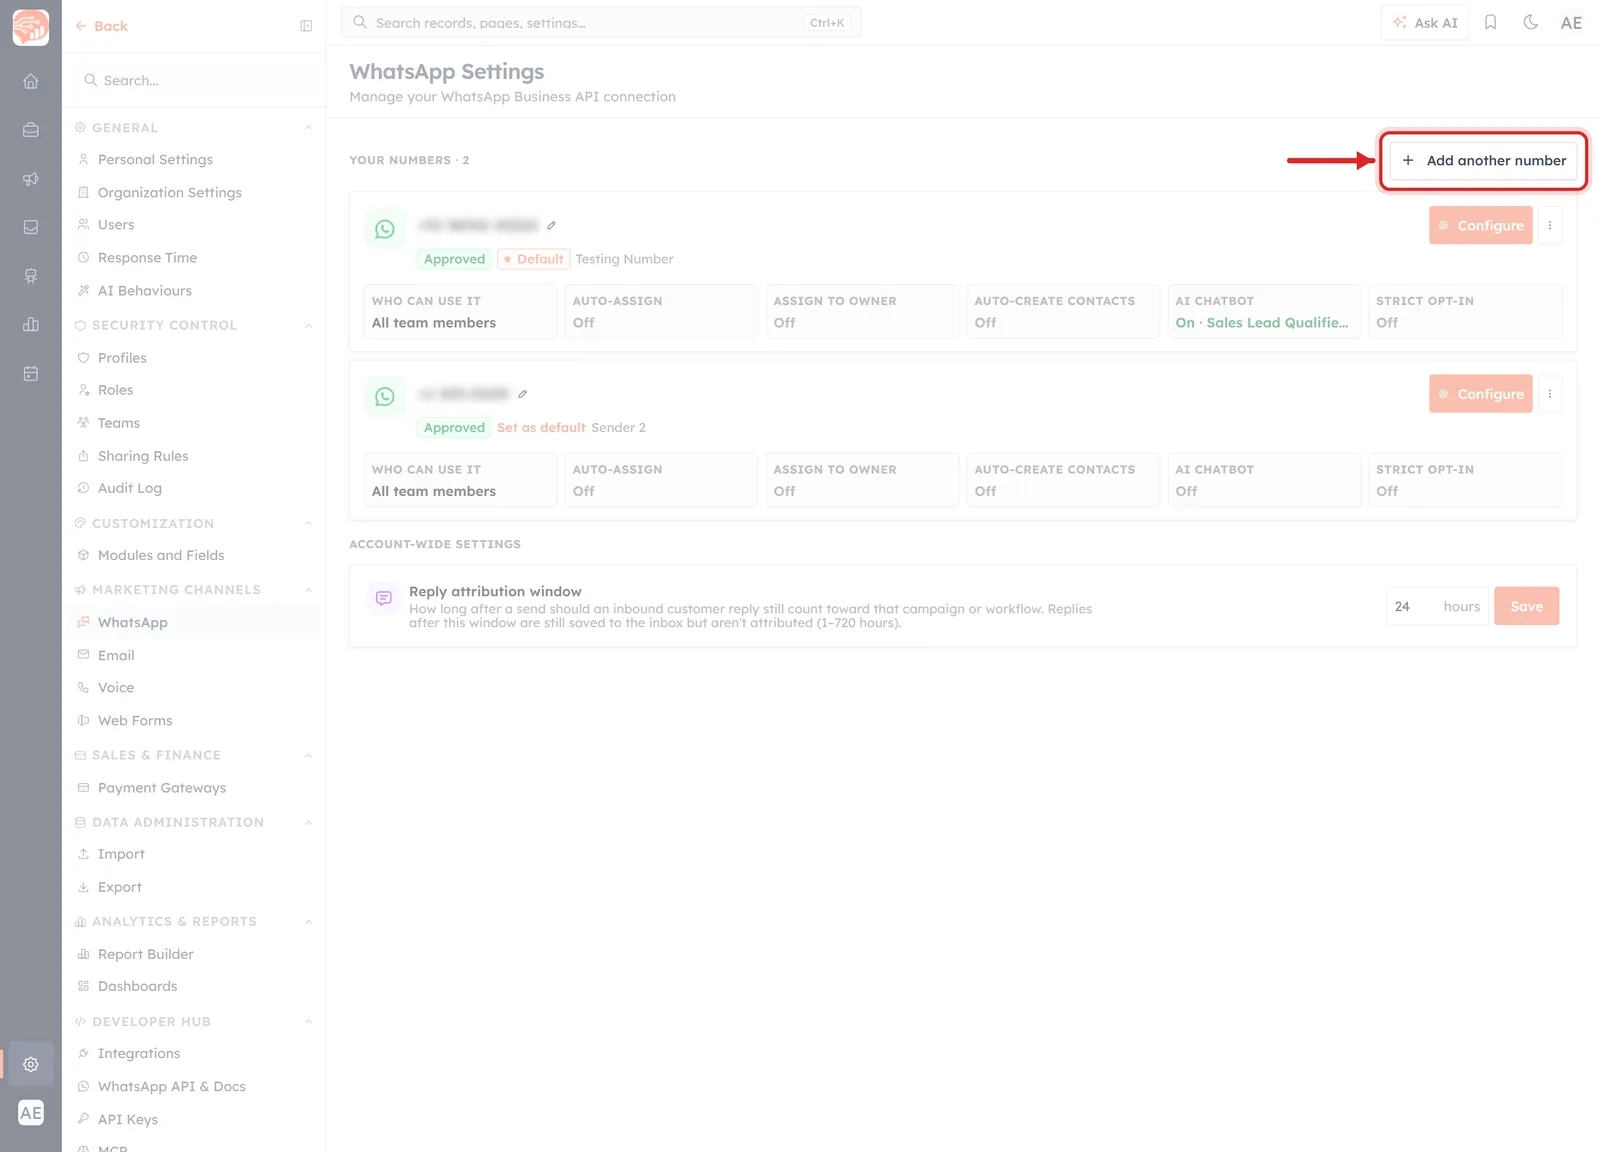
What you are looking at: the WhatsApp Settings page for an organisation that already has two numbers. Under the heading YOUR NUMBERS · 2 each number gets its own card — here +91 98765 43210 (badged Approved, marked Default, nicknamed “Testing Number”) and +1 555-0100 (badged Approved, nicknamed “Sender 2”). Each card carries a strip of six read-only summaries: WHO CAN USE IT, AUTO-ASSIGN, ASSIGN TO OWNER, AUTO-CREATE CONTACTS, AI CHATBOT and STRICT OPT-IN.
The red box and arrow point at the button in the top-right corner: + Add another number. That is the one to click. Below the cards you can also see the ACCOUNT-WIDE SETTINGS section with the Reply attribution window, which applies to every number at once rather than to the one you are adding.
💡
If this is your very first WhatsApp number, the page looks different: instead of number cards you get a single card reading Request for WhatsApp Sender with a Request for API button on the right. Click that instead — it starts exactly the same flow.
Clicking the button opens Meta’s own signup window on top of the CRM. Do not close it, do not refresh the CRM tab and do not navigate away while it is open — the whole exchange happens inside that window and closing it means starting again.
Step 4 — Choose your existing business portfolio and WhatsApp account#
Sign in with the Facebook account you prepared, and Meta shows you the asset-sharing screen. This is the most important screen in the whole guide for an existing number — it is where you say “use what I already have” instead of “make me a new one”.
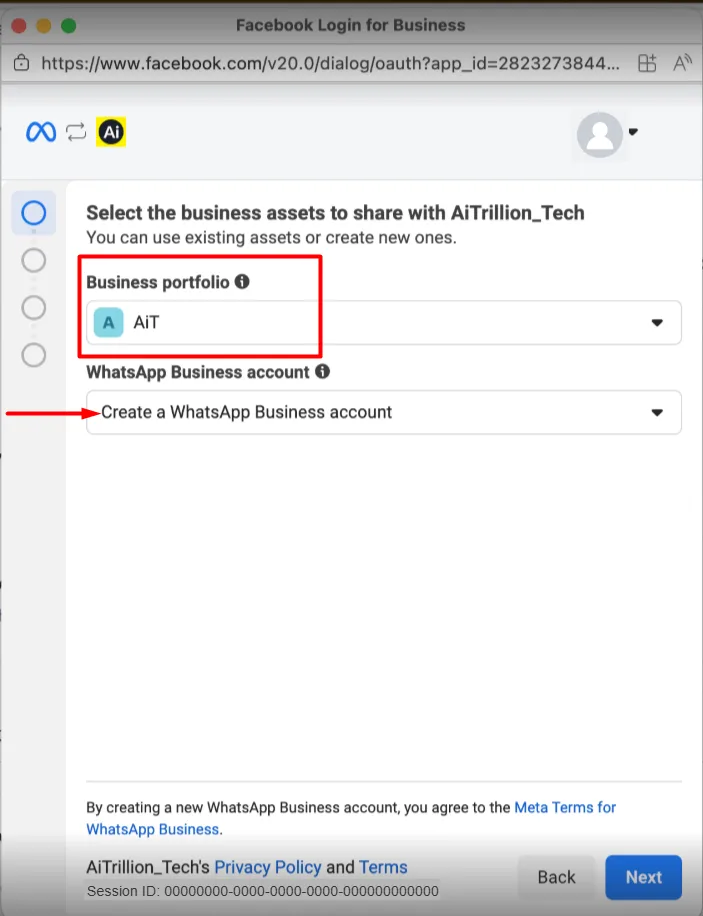
What you are looking at: a window titled Facebook Login for Business, showing the page “Select the business assets to share with AiTrillion_Tech” — AiTrillion_Tech is the Meta tech-provider identity behind AI Engage, so seeing that name means you are in the right flow. Its subtitle says “You can use existing assets or create new ones”, and the progress dots down the left edge show you are on the first of four steps.
Two dropdowns matter here:
Business portfolio — boxed in red in the picture, currently showing “AiT”. Pick the business portfolio that owns your number, or that you want to own it. If you are an admin of several, choose carefully: everything that follows is created inside the one you pick.
WhatsApp Business account — the arrow points at this one. It defaults to “Create a WhatsApp Business account”. If your number is coming from another provider (Case B), open this dropdown and choose your existing WhatsApp Business account instead — that is what preserves your display name, quality rating and approved templates. If your number is coming off the WhatsApp app (Case A), you have nothing to preserve, so leaving it on “Create a WhatsApp Business account” is correct.
At the foot of the window is the line “By creating a new WhatsApp Business account, you agree to the Meta Terms for WhatsApp Business”, then the Back and Next buttons. Click Next.
⚠️
If the WhatsApp Business account dropdown is empty or your account is not listed, you are signed in as a Facebook user who is not an admin of that portfolio, or the account still belongs to your old provider’s portfolio. Fix the ownership in Meta Business Manager first — carrying on will silently create a second, empty account.
Step 5 — Point Meta at the number you already own#
Meta then asks which number the messages should come from. Depending on your account you may be asked for business details (name, category, website, country and time zone) just before this — fill those in and continue.
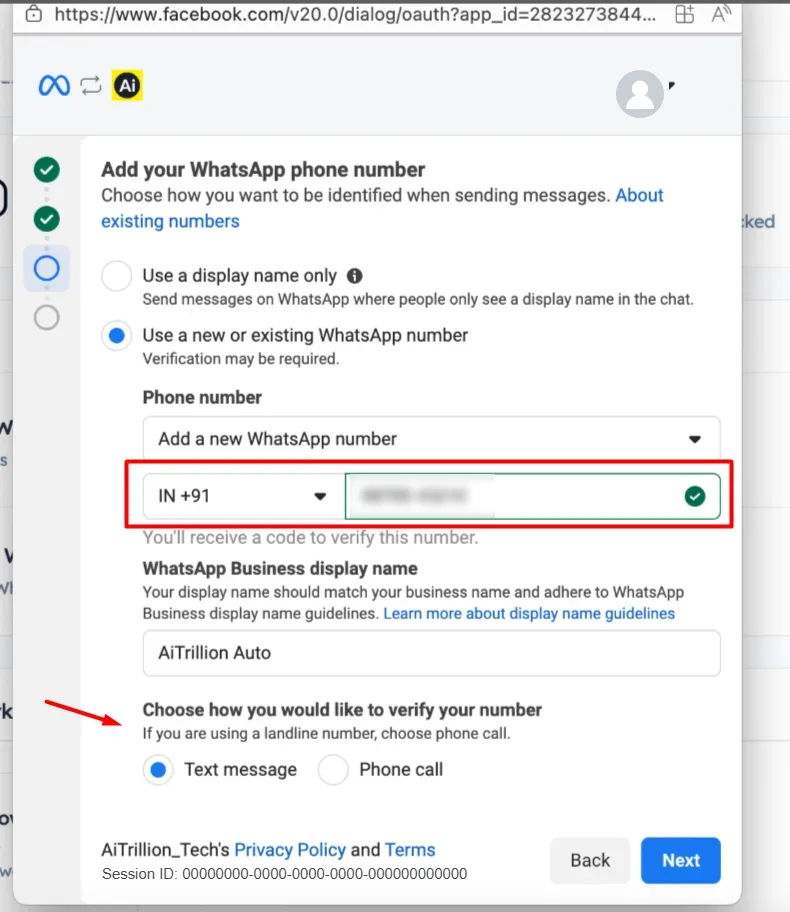
What you are looking at: the step headed “Add your WhatsApp phone number”, with the subtitle “Choose how you want to be identified when sending messages” and a blue About existing numbers link — Meta’s own explanation of this exact scenario, worth a read if anything below surprises you. On the left, the first two step dots are now green ticks.
Working down the screen:
“Use a display name only” — the first radio option. This sends messages under a name with no phone number attached. It is not what you want here; leave it unselected.
“Use a new or existing WhatsApp number” — the second radio option, and the one selected in the picture (the filled blue dot). Its note reads “Verification may be required”. This is the option to use.
Phone number — the dropdown below it, showing “Add a new WhatsApp number”. Open it: any numbers already attached to the WhatsApp Business account you chose in Step 4 are listed here, and picking one from the list is the shortest possible migration. If your number is not listed — the usual case when it is coming off the WhatsApp app — leave the dropdown on “Add a new WhatsApp number” and type it in below.
The country code and number fields — boxed in red in the picture, showing “IN +91” and the example number “98765 43210”, with a green tick at the end of the field confirming Meta accepted the format. Choose your country from the left dropdown and type the number without the country code on the right. The hint underneath reads “You’ll receive a code to verify this number.”
WhatsApp Business display name — “AiTrillion Auto” in the picture. This is the name your customers see above the chat. It must relate to your business and follow Meta’s display-name guidelines, which the blue link next to it explains.
“Choose how you would like to verify your number” — the red arrow points at this, and the grey line under it is the important one: “If you are using a landline number, choose phone call.” Pick Text message for a mobile that can receive SMS, or Phone call for a landline, a desk number or any number where SMS does not arrive.
Check the number one last time, then click Next.
⚠️
If Meta answers with “This number is already registered”, the number has not actually been released yet. Go back to Step 2 — either the WhatsApp app account was not deleted, or your previous provider still holds the number.
Step 6 — Verify the number with the six-digit code#
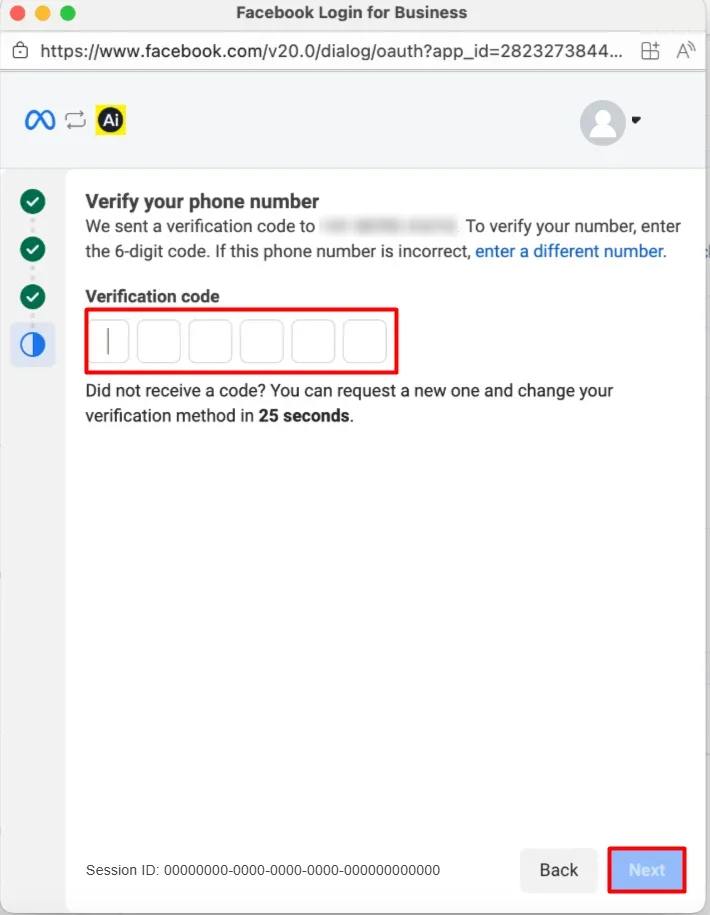
What you are looking at: the step headed “Verify your phone number”. The line beneath it repeats the number Meta is about to verify — “We sent a verification code to +91 98765 43210” — followed by “To verify your number, enter the 6-digit code. If this phone number is incorrect, enter a different number.” That blue link is your escape hatch if you mistyped anything in Step 5; use it rather than pressing on.
The red box marks the Verification code field: six separate boxes, one digit each, with the cursor already in the first. Type or paste the code that arrived by SMS, or that the automated call read out to you. Below them, Meta counts down: “Did not receive a code? You can request a new one and change your verification method in 25 seconds” — so if the SMS never lands, wait out the countdown and switch to a phone call.
The second red box is around the Next button in the bottom-right, greyed out until all six digits are in. On the left of the window the step dots show three completed steps and one in progress. Enter the code and click Next.
💡
Two-step verification PIN prompt? If Meta asks for a six-digit PIN after the SMS code, that is the number’s old two-step verification, not the code you were just sent. Enter the PIN from your previous provider — or, if nobody has it, ask them to reset it. Guessing locks the number out for hours.
Step 7 — Finish and hand the number to AI Engage#
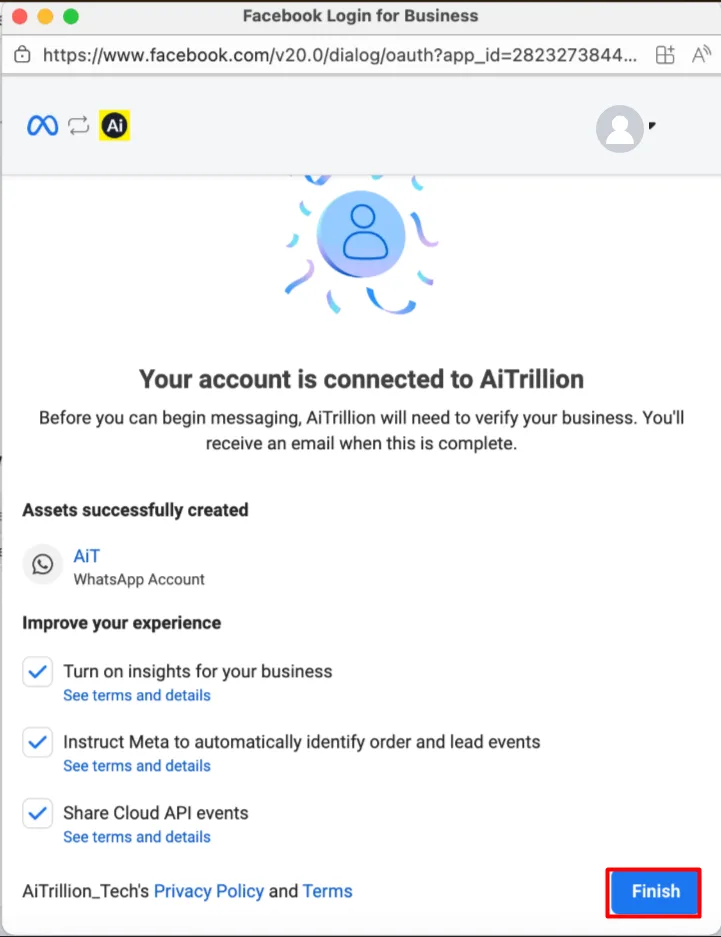
What you are looking at: the success screen, headed “Your account is connected to AiTrillion”. The line underneath — “Before you can begin messaging, AiTrillion will need to verify your business. You’ll receive an email when this is complete” — is the handover: Meta’s part is done, AI Engage’s part starts now.
Assets successfully created lists what the flow produced — here a WhatsApp Account named “AiT”. Check the name matches the account you meant to use. If you were migrating from another provider and this shows a brand-new account you did not expect, stop and re-check Step 4.
Improve your experience holds three optional, pre-ticked Meta settings — “Turn on insights for your business”, “Instruct Meta to automatically identify order and lead events” and “Share Cloud API events”. Each has a “See terms and details” link. These are Meta’s analytics preferences and have no effect on whether your number works; untick any you do not want.
Finish — the blue button in the bottom-right, boxed in red. Click it. The window closes on its own and returns you to the CRM.
Back in AI Engage a “Setting up your WhatsApp Business account” dialog appears while the registration is submitted. Leave it alone for a few seconds — it closes by itself, and the CRM confirms with a message along the lines of “Your WhatsApp Sender registration has been completed and submitted to Meta. It may take up to 1 to 24 hrs to become active.” An email goes to you and to the AI Engage team at the same time.
Step 8 — Watch the status until the number says Approved#
Your number now appears as a card on the WhatsApp Settings page, and its badge tells you exactly where it is in the process. The page refreshes itself every few seconds while a registration is running, so you can simply leave it open.
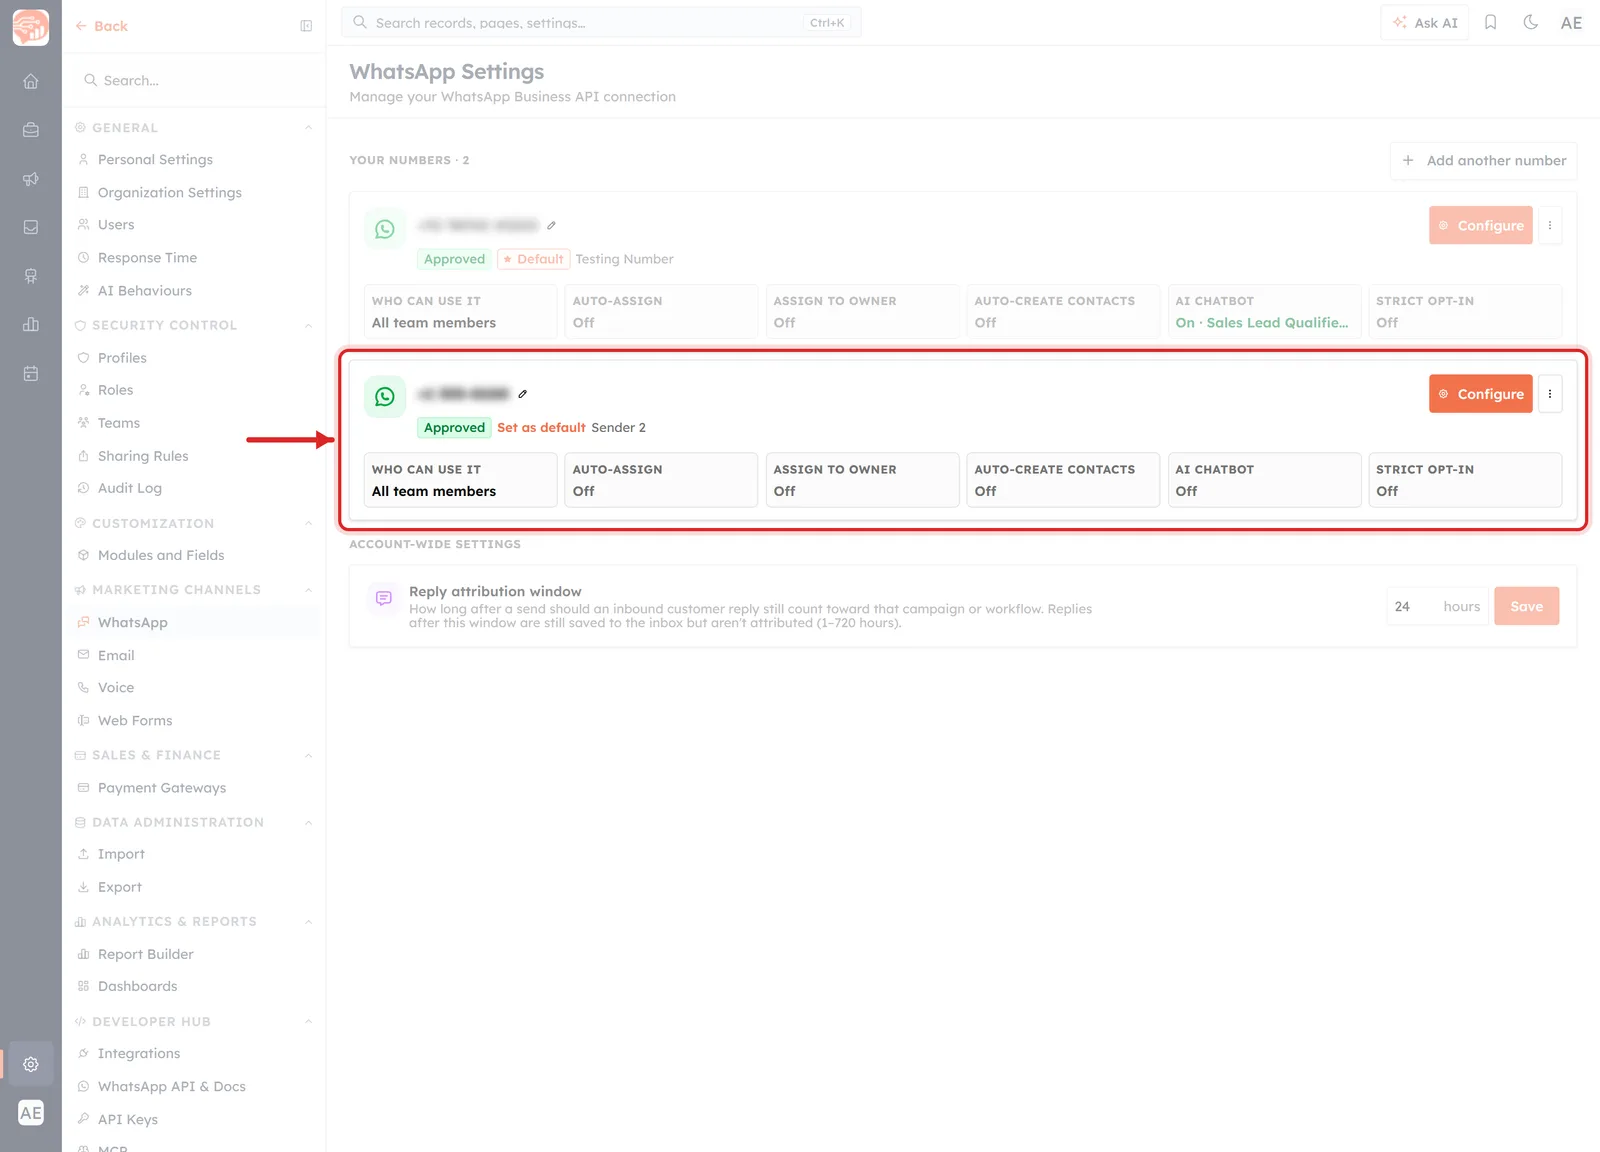
What you are looking at: one sender card, ringed and arrowed. Reading it from left to right: the green WhatsApp icon, then the number itself (+1 555-0100) with a small pencil next to it for renaming, then on the line below the green Approved badge, the orange Set as default action and the nickname “Sender 2”. On the far right sit the orange Configure button and a ⋮ menu. Beneath the card runs the summary strip — WHO CAN USE IT “All team members”, AUTO-ASSIGN “Off”, ASSIGN TO OWNER “Off”, AUTO-CREATE CONTACTS “Off”, AI CHATBOT “Off”, STRICT OPT-IN “Off” — a glance-level view of the settings you will set in the next step.
The badge on your own card will read one of these:
Pending (grey) — the request has been recorded but has not started moving yet.
In progress (amber, with a spinner) — the normal state right after signup. Meta and AI Engage are provisioning the number. Nothing is required from you.
Approved (green) — the number is live. You can send and receive on it.
Failed (red) — the registration was rejected. The card expands to show the reason inline and offers a Retry button next to Configure.
Disconnected (grey) — someone has switched the number off inside AI Engage. It stays in the list and can be reconnected.
ℹ️
Most numbers flip to Approved within a couple of hours, and the product allows up to 24. Separately from this, Meta may still be verifying your business — until that finishes you can send, but on a lower daily conversation limit. Business verification is done in Meta Business Manager under Security Centre and takes 1–5 working days.
Step 9 — Configure the number the way you already work#
A migrated number arrives with every option switched off, which is deliberate — nothing routes, assigns or auto-creates until you say so. Click Configure on the card to open its settings panel.
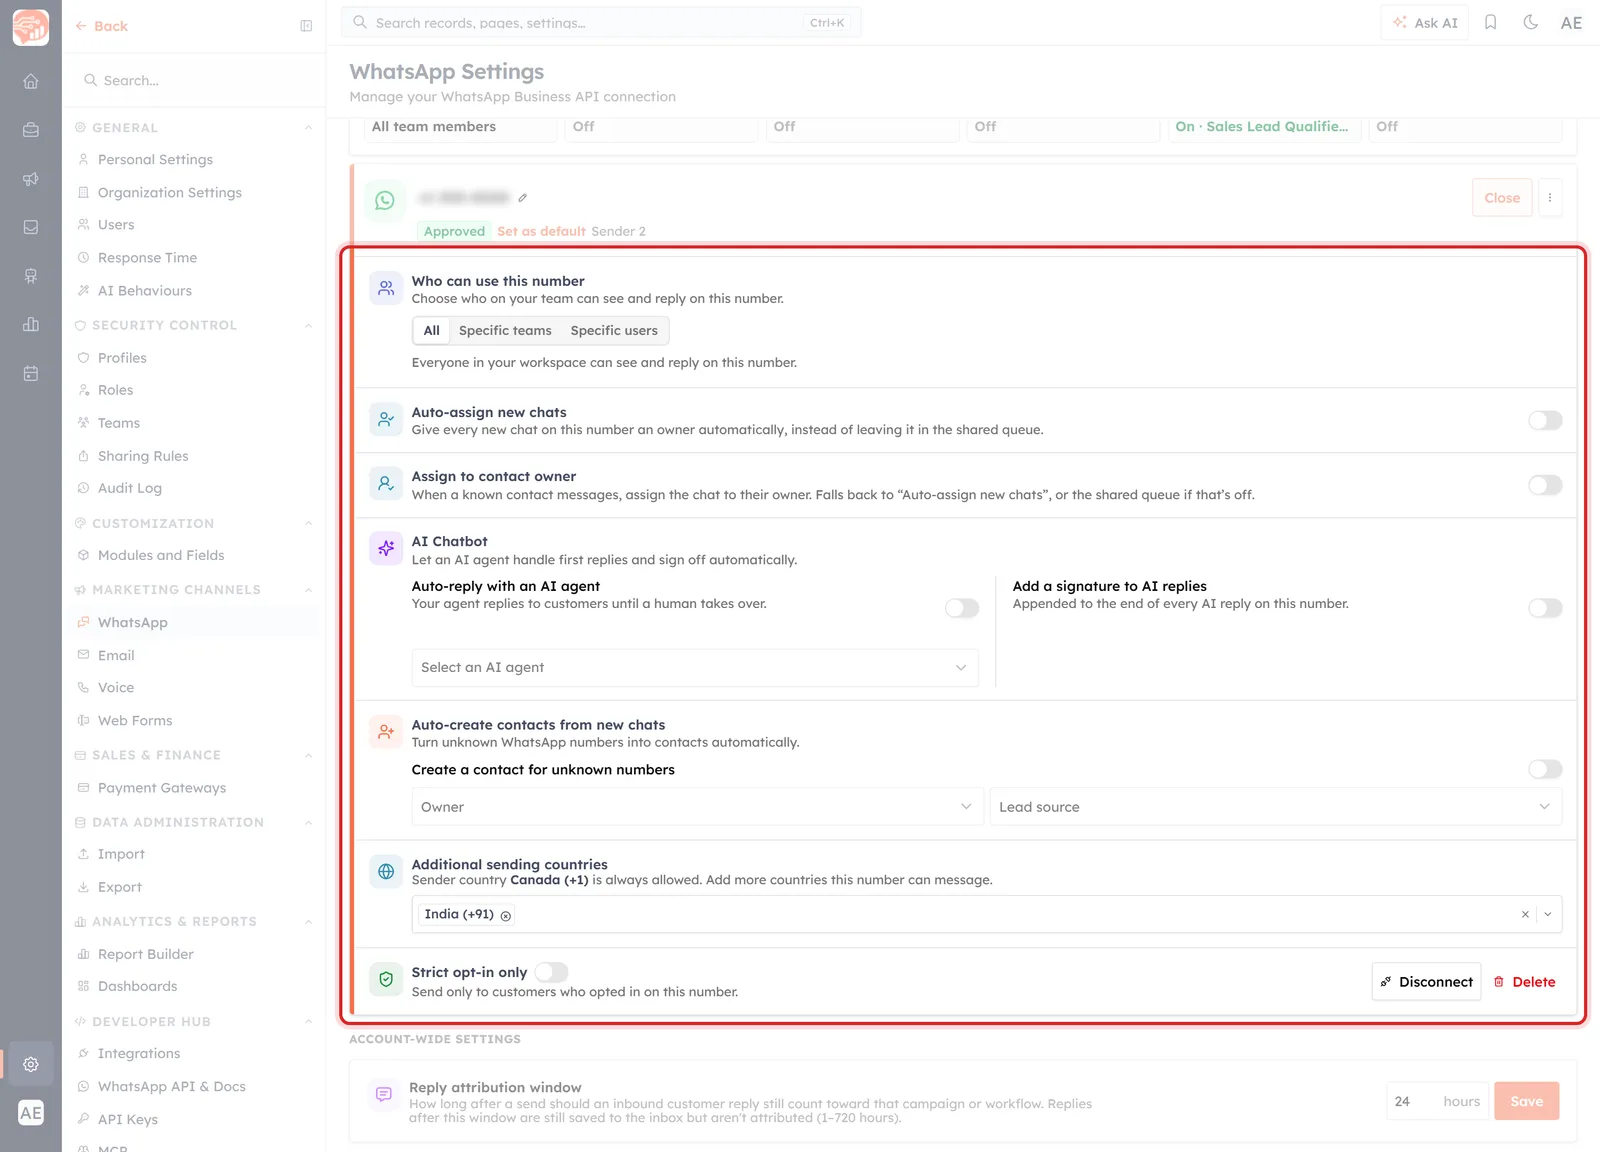
What you are looking at: the sender card expanded downwards into a full settings panel, ringed in red, with the Configure button in the header now reading Close. Each block has its own icon on the left, a bold title, a grey line of explanation, and its control on the right. From top to bottom:
Who can use this number — a three-way switch reading All / Specific teams / Specific users. “All” is selected in the picture, and the line underneath confirms “Everyone in your workspace can see and reply on this number.”
Auto-assign new chats — a toggle on the far right, off here. “Give every new chat on this number an owner automatically, instead of leaving it in the shared queue.”
Assign to contact owner — another toggle. “When a known contact messages, assign the chat to their owner. Falls back to ‘Auto-assign new chats’, or the shared queue if that’s off.” This is the one most sales teams want on.
AI Chatbot — two toggles side by side, Auto-reply with an AI agent (“Your agent replies to customers until a human takes over”) and Add a signature to AI replies (“Appended to the end of every AI reply on this number”), plus a Select an AI agent dropdown below them.
Auto-create contacts from new chats — a toggle labelled Create a contact for unknown numbers, with Owner and Lead source dropdowns underneath that stamp every contact it creates.
Additional sending countries — a multi-select showing “India (+91)” as a chip, above the note that the sender’s own country is always allowed.
Strict opt-in only — a toggle with the line “Send only to customers who opted in on this number”, and, on the same row at the far right, the Disconnect and Delete actions.
Three of these deserve a closer look when the number is one you have been using elsewhere.
Who can use this number#
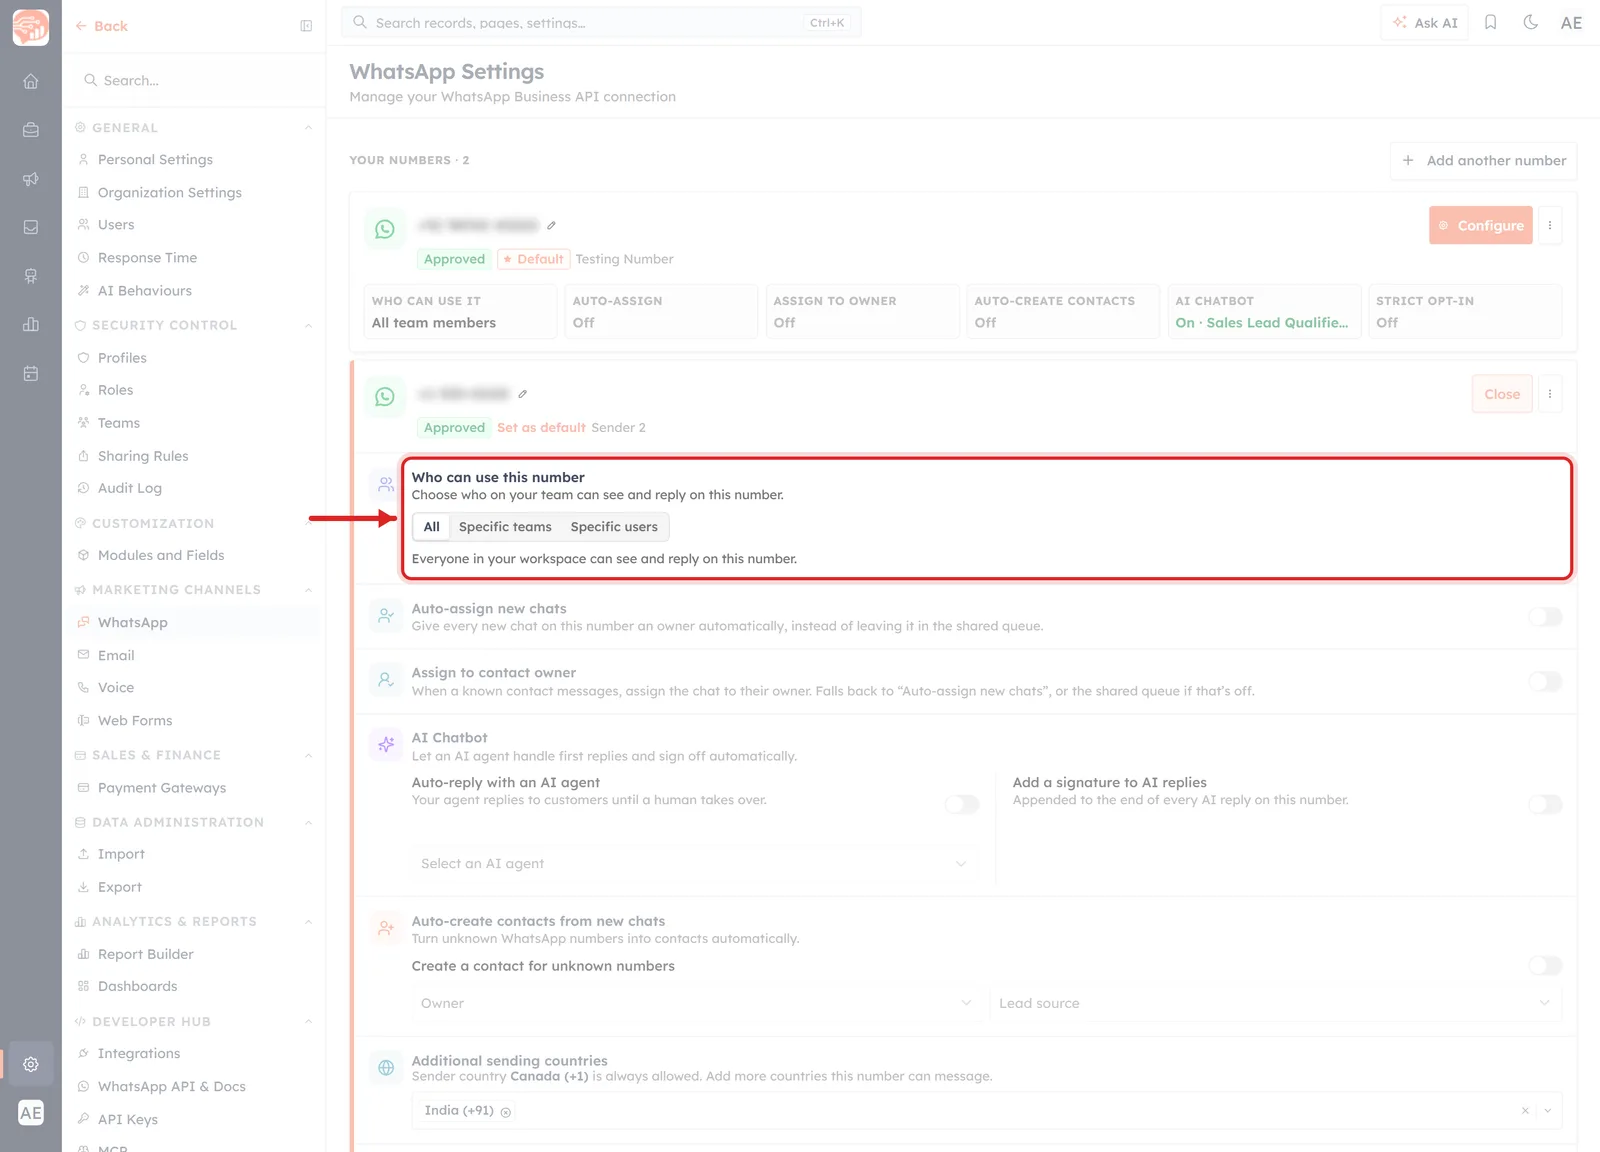
What you are looking at: the first block of the panel, ringed with an arrow pointing at it. The title Who can use this number sits above “Choose who on your team can see and reply on this number”, and the segmented control offers All, Specific teams and Specific users. With All selected, the sentence below reads “Everyone in your workspace can see and reply on this number.” Choose Specific teams and a team picker appears; choose Specific users and you pick people individually. A support number that used to sit on one person’s phone usually wants Specific teams — everyone in Support, nobody else.
Additional sending countries#
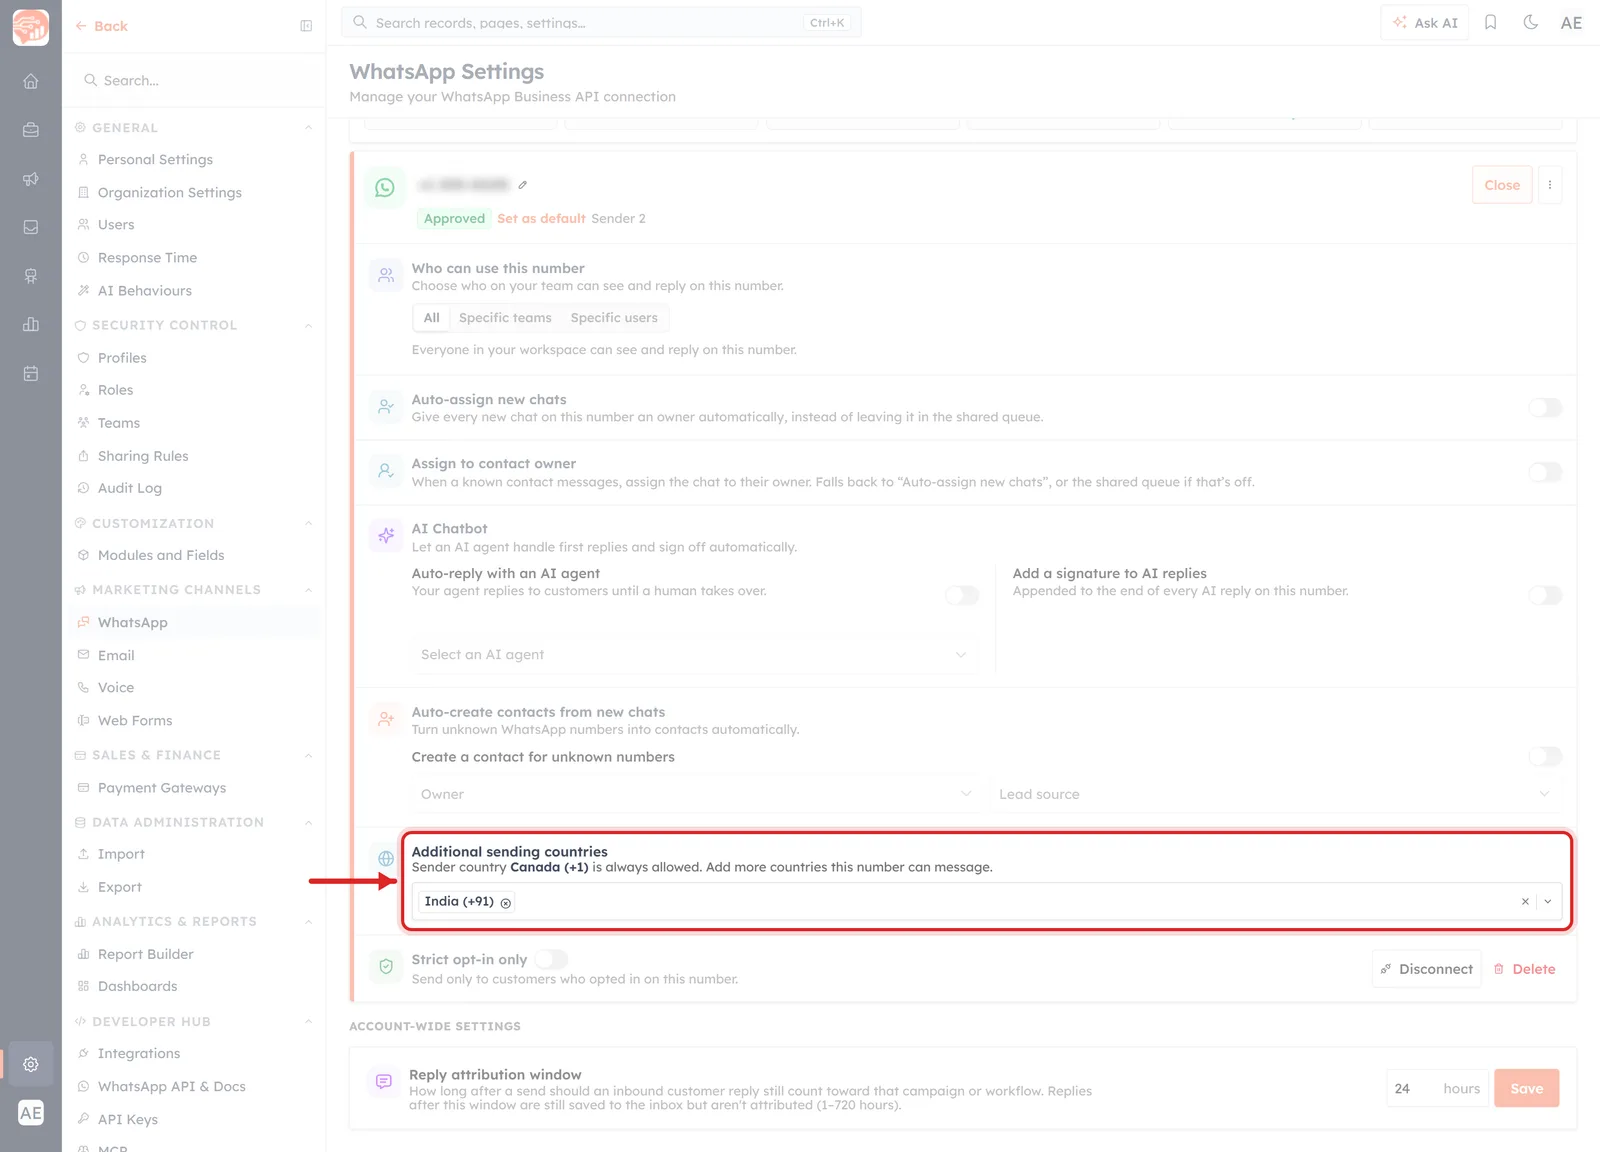
What you are looking at: the Additional sending countries block, ringed with an arrow. The grey line spells out the rule: “Sender country Canada (+1) is always allowed. Add more countries this number can message.” In other words the country your number belongs to needs no configuration — everything else does. The field below holds one chip, India (+91), each chip removable by its small ⊗, with a clear button and a dropdown chevron at the right end of the field.
This trips up migrated numbers more than anything else on the page. A number that happily messaged customers in six countries from a handset will only reach its own country here until you add the rest. List every country you actually message, then save.
Strict opt-in only#
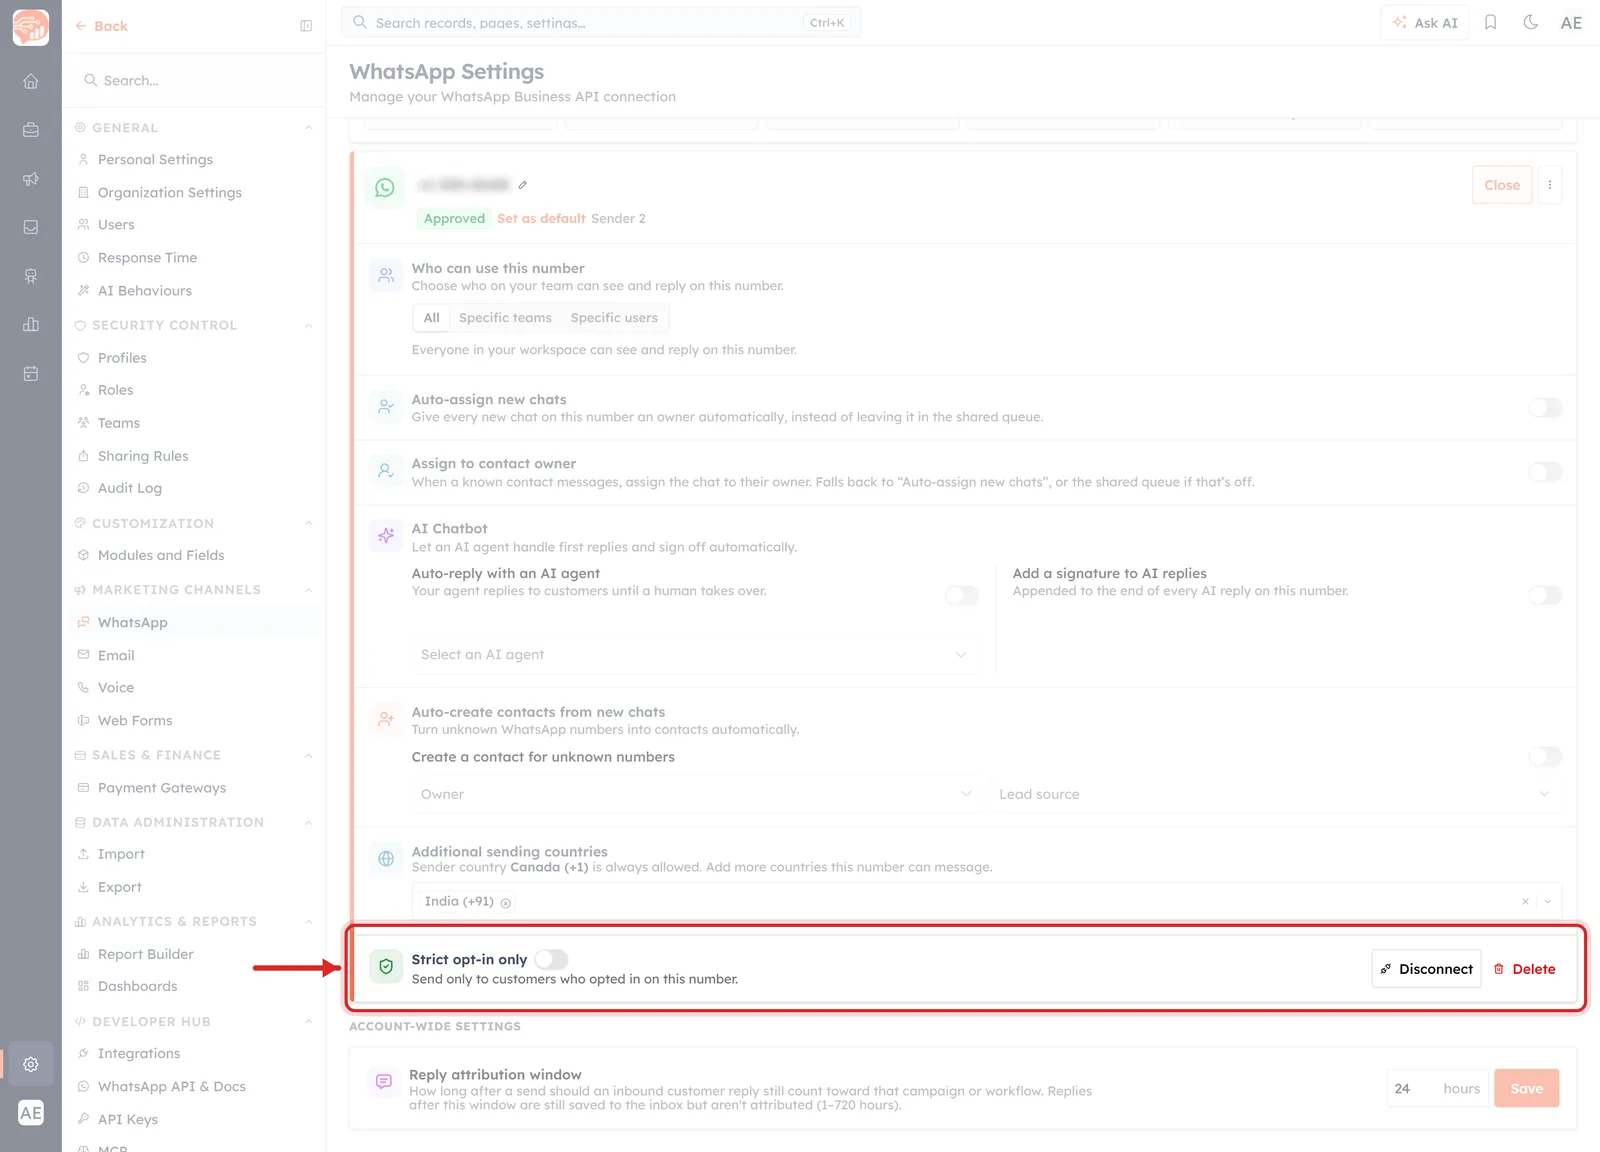
What you are looking at: the Strict opt-in only row at the foot of the panel, ringed with an arrow — a shield icon, the title, its toggle, and the line “Send only to customers who opted in on this number.” On the same row, pushed to the right, are Disconnect and the red Delete.
Switch this on and AI Engage will not send to a contact who has not opted in on this specific number, no matter what a campaign or workflow asks for. When a number changes hands it is worth remembering that consent given on the handset is not recorded in the CRM — turning this on protects you from messaging people whose opt-in you cannot evidence.
Step 10 — Decide which number sends by default#
If this is now your second or third number, tell the CRM which one to use when nothing else is specified — campaigns, workflows and record-level sends all fall back to the default sender.
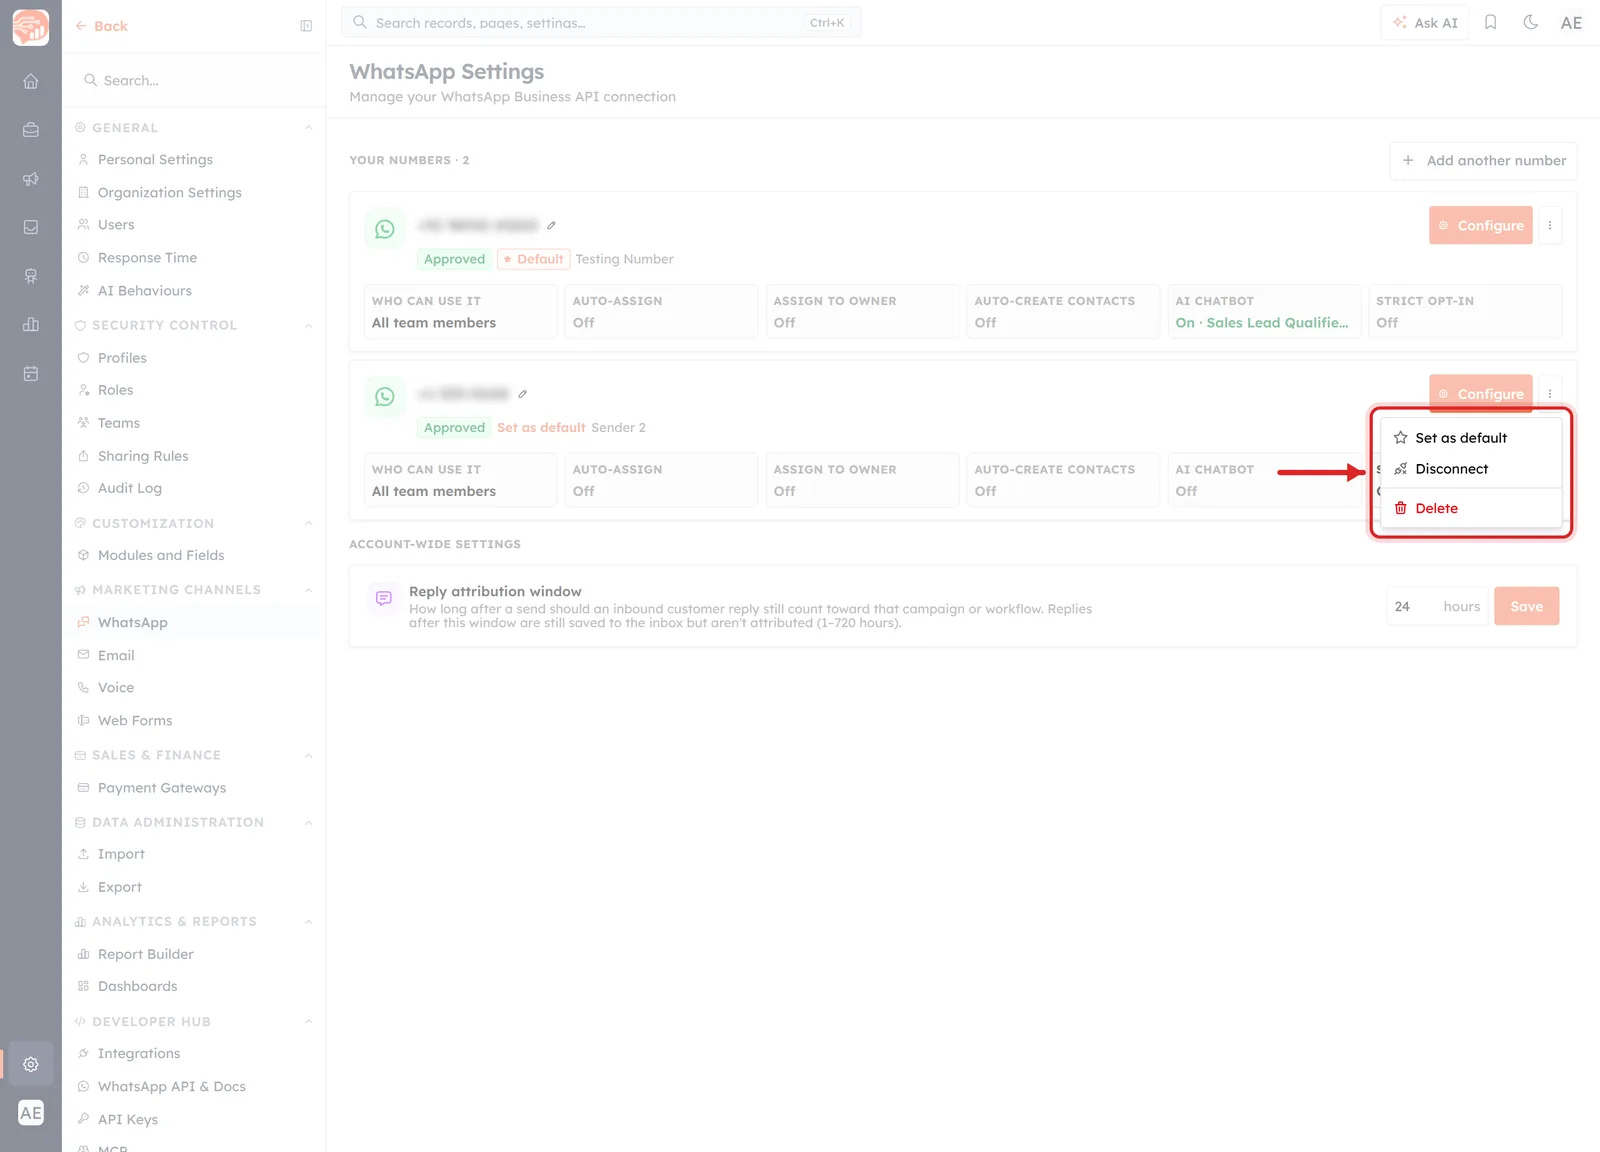
What you are looking at: the ⋮ menu at the right-hand end of a sender card, opened and ringed, with an arrow pointing into it. It holds three items:
Set as default (star icon) — makes this the number every send falls back to. The badge on the card changes from the orange “Set as default” action to a “Default” badge, and it moves to the top of the list. Only one number can be the default at a time.
Disconnect — stops the number sending and receiving in AI Engage without giving it up. The card stays, badged Disconnected, and the same menu item becomes Reconnect.
Delete (red, bin icon) — removes the sender from AI Engage entirely.
The same actions appear at the foot of the Configure panel, so you can use whichever is closer to hand. For the finer points of running more than one number, see Manage Multiple WhatsApp Senders (Numbers).
Step 11 — Templates, credits, and a real test#
An Approved badge means the plumbing works. Before you tell the team the number has moved, do these four things:
Check your templates. If you kept the same WhatsApp Business Account, your approved templates should already be listed under Templates. If you created a new account, every template has to be built and submitted again — see Create and Manage WhatsApp Message Templates.
Check your placeholders. Templates carried over from another provider often use that provider’s variable syntax. Re-map them to AI Engage merge fields with Mapping WhatsApp Template Placeholders to Contact Fields.
Top up your balance. Sending on the WhatsApp Business Platform costs per conversation and is billed from your WhatsApp credits — see WhatsApp Credits: Purchase and Manage Your Messaging Balance.
Send a real test. Message the number from a personal phone and confirm the conversation lands in the WhatsApp Inbox, then reply from the CRM and confirm it arrives. Watch the status go Sent → Delivered → Read.
If you need to move the number again later#
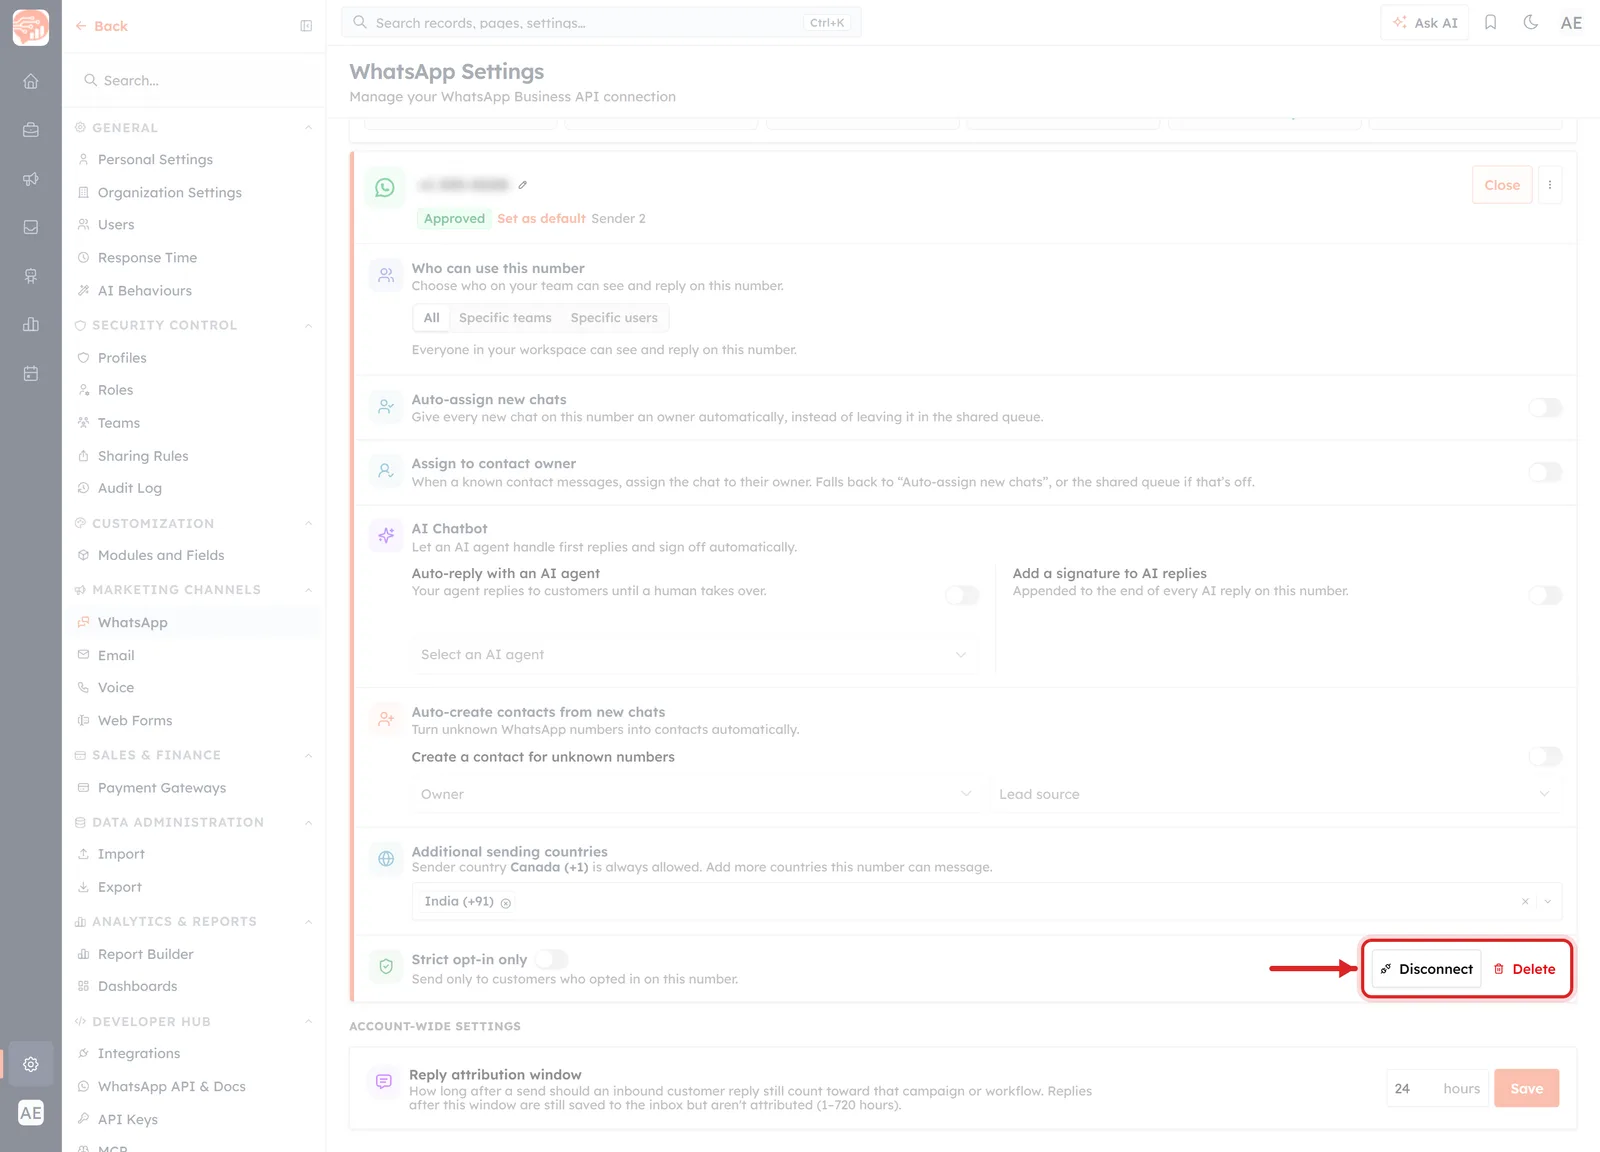
What you are looking at: the bottom-right corner of the Configure panel, ringed with an arrow pointing at Disconnect, with the red Delete beside it. The two are not interchangeable:
Disconnect is a pause. Sending and receiving stop, the card stays in your list badged Disconnected, your settings are remembered, and one click brings it back.
Delete removes the sender from AI Engage. Use it only when the number is genuinely leaving — for instance when you are moving it to another platform.
To take the number back onto a phone, first delete it here, then remove it from your WhatsApp Business Account in Meta Business Manager. Only after that will the WhatsApp app accept the number again.
Troubleshooting#
“This number is already registered with WhatsApp.” The number has not been released. Delete the WhatsApp account for it in the app (Step 2, Case A), wait a few minutes, and retry.
“PIN mismatch” or an unexpected PIN prompt. Two-step verification is still set on the number. Get the PIN from your previous provider, or ask them to disable two-step verification. Repeated wrong attempts lock the number out temporarily.
The verification code never arrives. Wait out the 25-second countdown, then choose Phone call instead. Landlines and virtual numbers should always use the call option. Also confirm the number can receive international SMS.
Your WhatsApp Business account is missing from the dropdown in Step 4. You are signed in as a Facebook user who is not an admin of the owning business portfolio, or the account still belongs to your old provider. Fix ownership in Meta Business Manager, then start again.
The card is stuck on “In progress”. Give it up to 24 hours — the page polls and updates itself. If it has not moved after that, contact AI Engage support with the number and the time you submitted it.
The card says “Failed”. The reason is printed on the card itself. Fix what it names and use the Retry button next to Configure.
Sends fail with a country error. The destination country is not enabled. Add it under Additional sending countries in the Configure panel (Step 9).
Old conversations are missing from the Inbox. Expected — chat history does not migrate. The Inbox fills as customers message you again.
The buttons in Step 3 do nothing. Your user does not have the WhatsApp configuration permission, or the integration is not fully set up for your organisation (the page shows a red warning about Meta App ID, Config ID and Solution ID). Ask an administrator.
Frequently asked#
Will my customers have to save a new number? No. It is the same number and the same chat thread on their phone.
Can I keep using the WhatsApp Business App alongside AI Engage? Not with the same number. Numbers on the WhatsApp Business Platform cannot also be used in the app.
Do I lose my green tick? The verified badge belongs to the business account, not the app. Keep the same WhatsApp Business Account and it carries over.
How long is the number offline during the move? From releasing it in the app to the badge turning Approved. Usually a couple of hours, and up to 24.
Can I move more than one number? Yes. Repeat this guide per number — each becomes its own card with its own settings.
✅
Once the badge reads Approved and your test message goes both ways, the number is fully live: campaigns, workflows, the shared Inbox and record-level sends can all use it.
ℹ️
Next up: Manage Multiple WhatsApp Senders (Numbers) — how AI Engage decides which of your numbers sends, and how to keep each one on the right team.
Was this article helpful?
Ready to implement this?
OpenAI Engage and apply what you just learned to your own workspace.
Open AI Engage CRM