Loading…


KnowledgeBase
WhatsApp Forms: Collect Leads via Conversational Forms
What are WhatsApp Forms?#
WhatsApp Forms are interactive, multi-field questionnaires delivered inside the WhatsApp chat. Instead of sending a link to an external page, the form opens natively inside WhatsApp — the recipient fills it in without leaving the app.
Use cases include lead qualification, appointment booking, survey collection, feedback requests, and event registrations. Completed submissions are captured in the CRM and can automatically create new contact records.
💡
WhatsApp Forms are powered by Meta's Flow technology and must go through the same Meta approval process as message templates. Plan for 1–2 business days for approval before the form can be sent.
Step 1 — Open WhatsApp Forms#
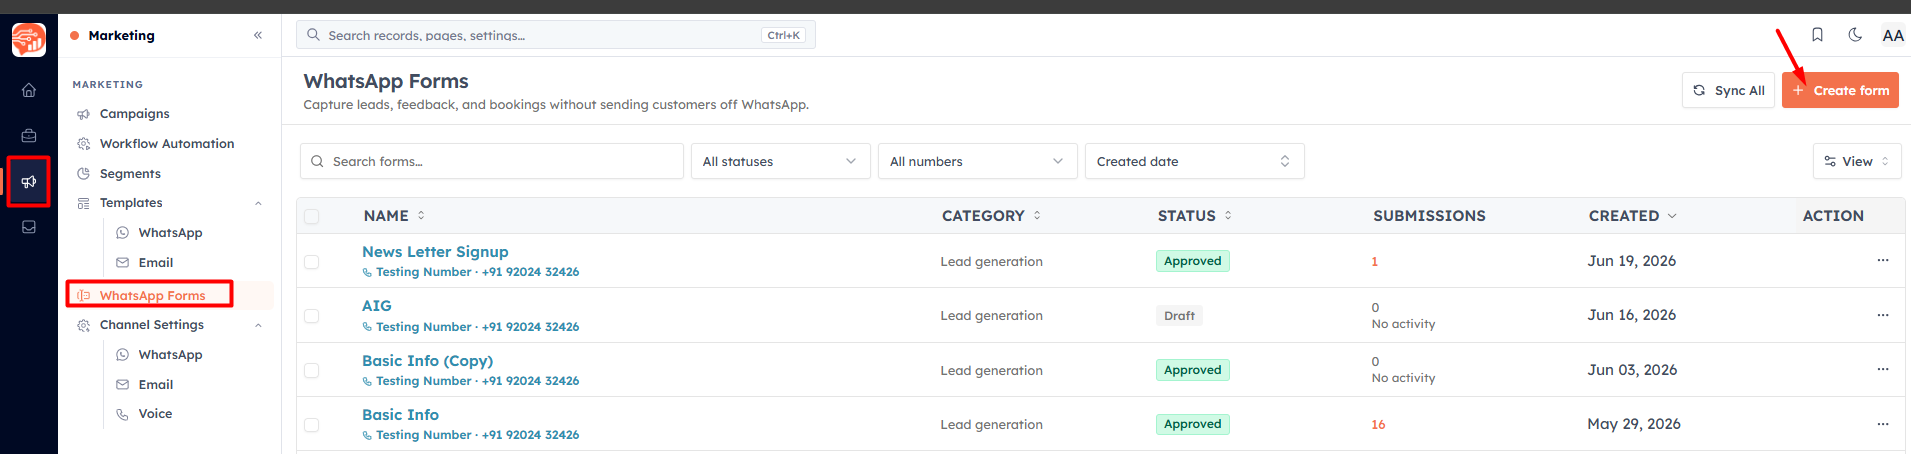
Navigate to Marketing → WhatsApp Forms → Create Form. The forms list shows all your forms with their status, submission count, and last submission date.
Step 2 — Create a form#
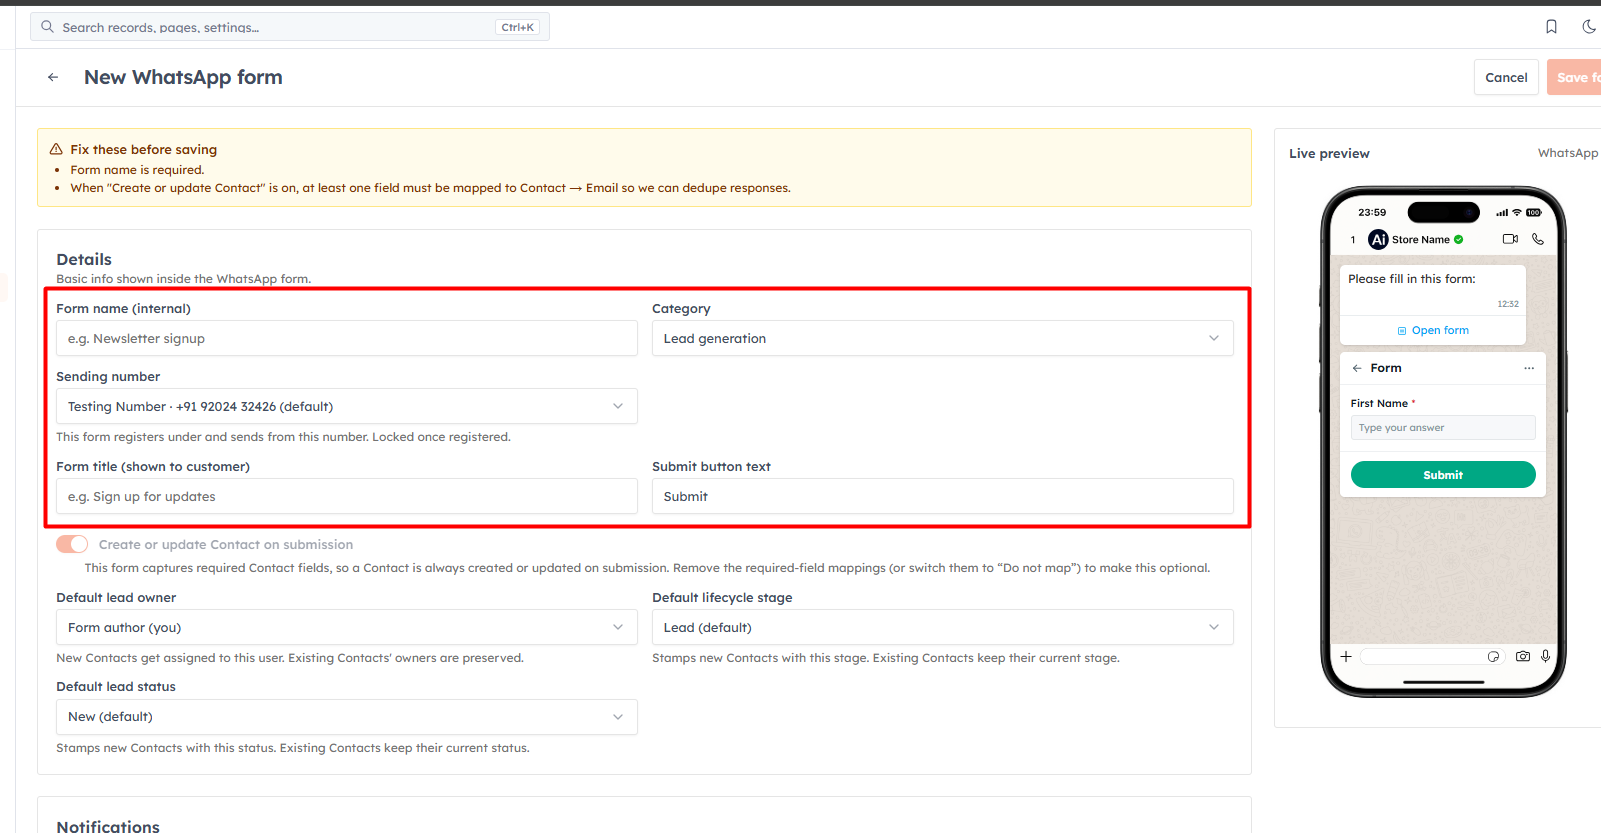
Configure the form basics:
Form Name — internal name for your reference
Category — Lead Generation, Appointment Booking, Feedback Collection, Survey, or Other
Sending number — Select the number from which you would like to send the WhatsApp messages
Form title - Add the title of the form which will be visible to the customers
Submit button text - Enter the text you want to display on the Submit button
Step 3 — Add fields#
The form builder lets you add up to 10 fields (Meta's limit). Available field types:
Text Input — single line text (names, IDs, answers)
Text Area — multi-line text (detailed responses, messages)
Dropdown — pick-list with predefined options
Radio Buttons — single-choice selector
Date Picker — calendar date selection
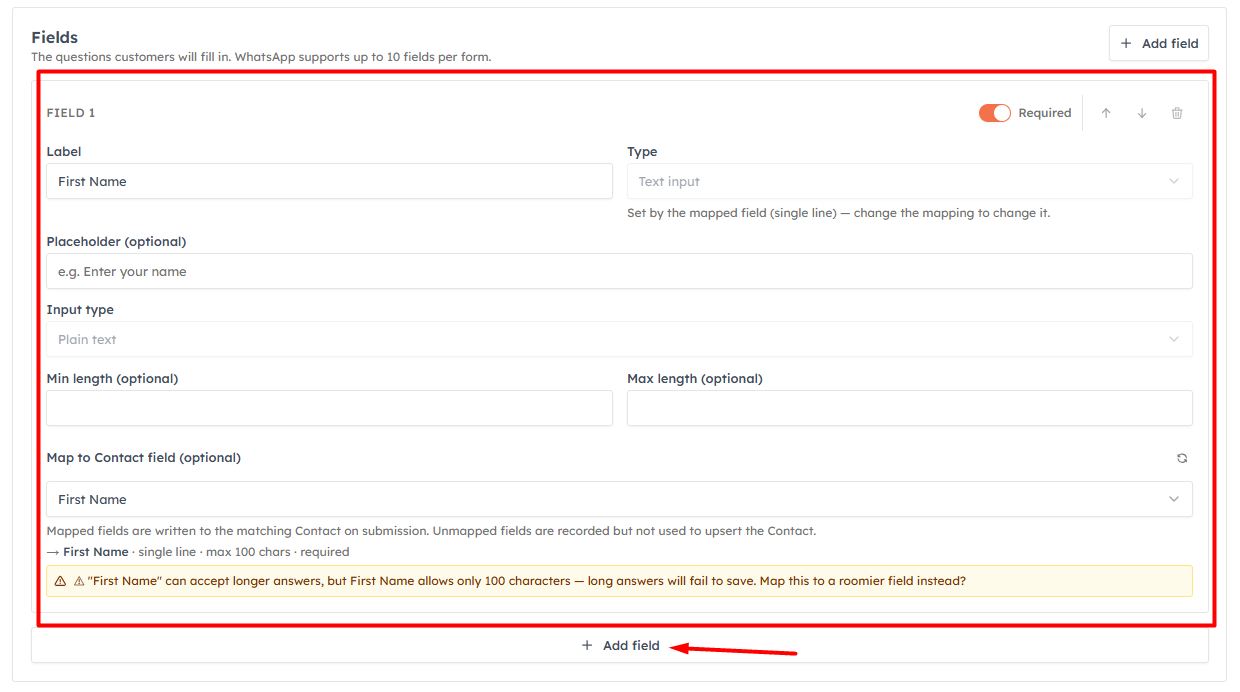
For each field, set:
The field label the contact sees
Whether it is required
Map to CRM field — link the answer to a contact field (e.g., "What is your phone number?" → Phone field). This auto-fills contact records when submissions arrive.
💡
Enable Create or Update Contact to automatically create a new contact record whenever someone completes the form. If a contact with the same email already exists, their record is updated instead of creating a duplicate.
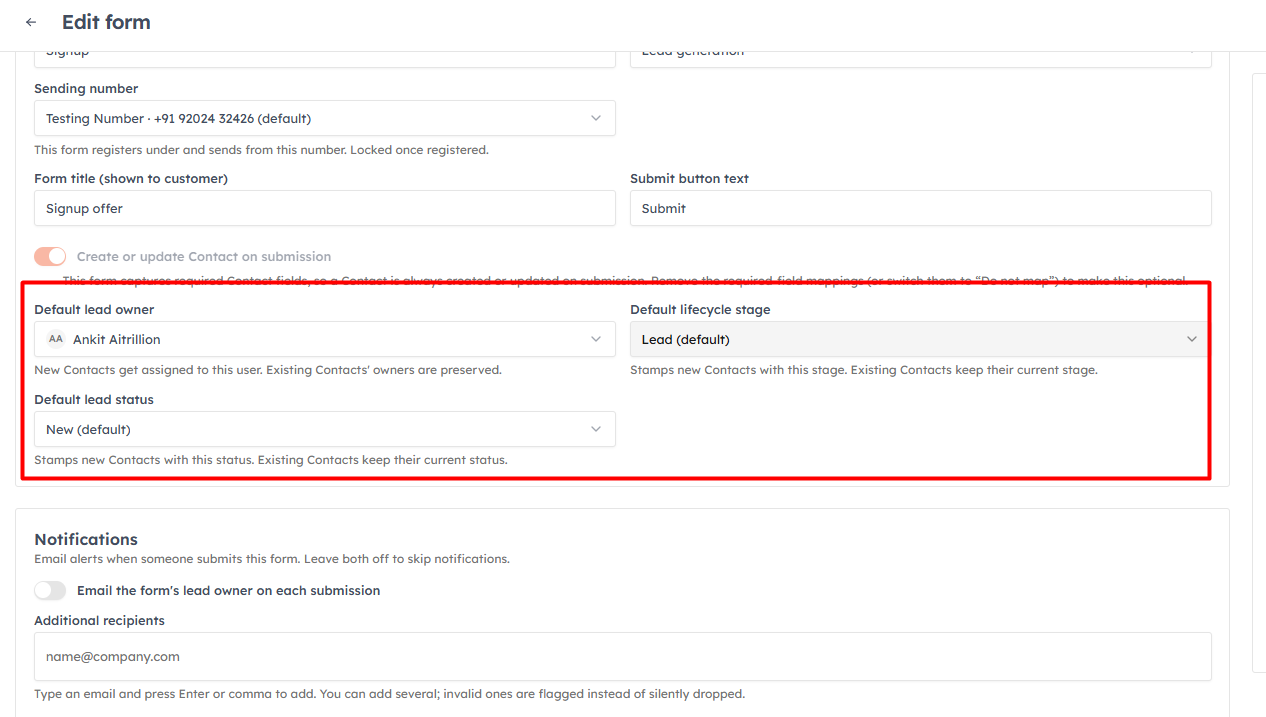
When Create or Update Contact is enabled, three additional fields appear to control how new contacts are assigned:
Lead Owner — select the CRM user who will be set as the owner of every contact created from this form. Useful for routing form leads directly to a specific sales rep or team member without any manual assignment.
Lifecycle Stage — set the lifecycle stage (e.g. Lead, Prospect, Customer) that will be automatically applied to new contacts created from this form. Helps segment form leads into the right stage from the moment they submit.
Lead Status — set the initial lead status (e.g. New, Contacted, Qualified) assigned to contacts created from this form. Combine with Lead Owner and Lifecycle Stage to ensure every form submission lands in the right place in your pipeline.
💡
When Create or Update Contact is on, at least one form field must be mapped to Contact → Email. Without an email mapping, the CRM cannot deduplicate responses — it will create a new contact for every submission even if the person already exists in your database.
Step 4 — Submit for Meta approval#
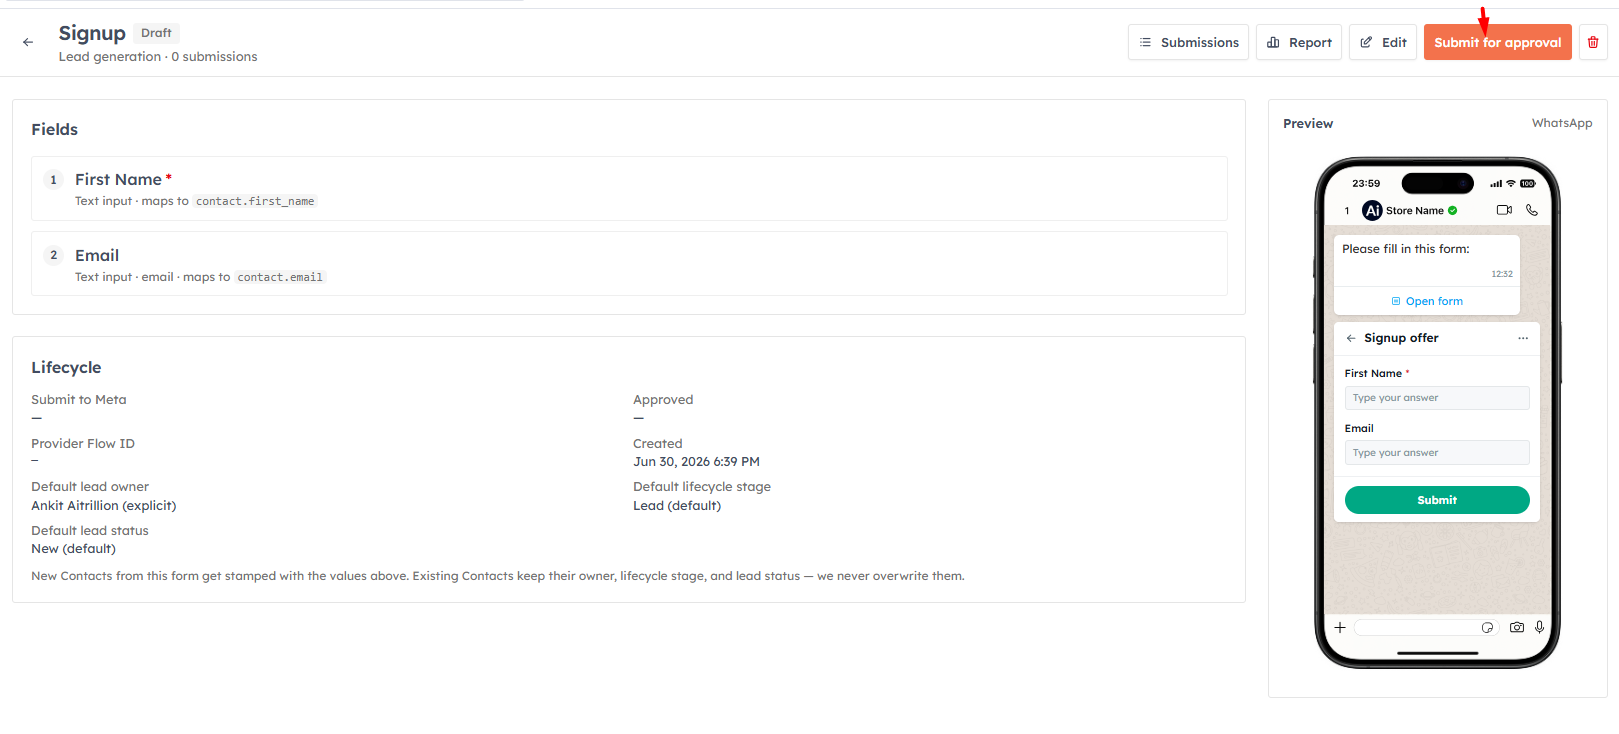
When the form is ready, click Submit for Approval. The status changes to Pending. Meta reviews WhatsApp Forms within 1–2 business days.
You can click Sync Status at any time to check for updates without refreshing the page.
💡
If the form is rejected, the detail page shows the rejection reason from Meta. Common reasons: prohibited question types, collecting sensitive personal data without proper disclosure, or category mismatch. Edit the form and resubmit.
Step 5 — Send the form#
Once the form is Approved, you can send it through multiple channels:
From a contact record — open any contact, click the WhatsApp icon, and select the form from the template picker
From the inbox — in an active WhatsApp conversation, click Send Form and choose the approved form
Via automation — use the "Send WhatsApp Form" action in a workflow to automatically send forms based on triggers (e.g., when a contact is created, or after a deal stage changes)
💡
Use Test Send on the form detail page to send the form to your own WhatsApp number before going live. This lets you verify the layout, field order, and submit flow exactly as contacts will experience it.
View submissions and analytics#
Click any form in the list to open the detail page, then go to the Report tab. The report shows:
Sent — how many times the form has been shared
Opened — how many recipients tapped to open the form
Submitted — completed responses received
Contacts Created — new CRM records generated from submissions
The Submissions tab shows each individual response in detail. Click a row to expand the full field-by-field answers. Export all submissions as CSV using the Export button.
💡
Filter submissions by date range (Today / Last 7 days / Last 30 days / All time / Custom) and by source (Inbox, Workflow, Test, Contact) to analyse which channels drive the most form completions.
💡
Related: WhatsApp Inbox — send forms and handle responses in ongoing two-way conversations with your contacts.
Was this article helpful?
Ready to implement this?
OpenAI Engage and apply what you just learned to your own workspace.
Open AI Engage CRM