Loading…


KnowledgeBase
Send Email through the API: Send an Email to a Contact Step by Step (POST /email/send)
Your own systems often need to email a customer at the right moment: an order ships, a payment arrives, a booking is confirmed, a trial is about to end. With the AiEngage CRM API you can send that email from one of your organization’s own addresses (for example support@yourcompany.com) with a single HTTP request, and the CRM keeps a copy of the message on the customer’s contact record. Anyone on your team who opens that contact later sees the email exactly as if it had been typed in the CRM, and the customer’s reply has somewhere to land.
This guide walks you through the whole flow step by step. It explains every screen and every response in the screenshots, so you can follow along on your own account.
What you will learn:
Which of the three email endpoints to use.
How to check your organization’s sending addresses in the CRM.
How to create an API key that is allowed to send email.
How to find your
from_account_idwithGET /email/from-addresses.How to test a send safely with
test_mode, so no email goes out and no contact is created.How to send the email for real, read the response, and find the email in the CRM.
The limits, the rules, and how to fix every error you may see.
ℹ️
Base URL:
https://app.aiengagecrm.com/cback/api/public/v1. Every request needs the header Authorization: Bearer cak_live_… with your API key. A send also needs an Idempotency-Key header (explained in Step 6).Which email endpoint should I use?#
The API has three ways to send an email. They differ in what they record in your CRM. This guide covers POST /email/send, which is the right choice in most cases because the recipient is someone your CRM should know about.
Endpoint | What it does | Use it when |
|---|---|---|
| Finds the contact behind the address (or creates one), sends the HTML email, and saves it on the contact’s Emails tab. Opens, clicks and delivery are tracked. | The recipient is a customer or lead: order updates, booking confirmations, follow-ups. |
| Sends one HTML email to an address and logs it in a single per-organization API Sends log under Marketing. Nothing is attached to a contact. | You only need the email delivered and tracked, not saved on a person. |
| Sends a plain-text email with optional cc and bcc. Nothing is written to the CRM, and opens and clicks are not tracked. It needs its own Transactional send scope. | Receipts, one-time codes and system notices, where you need cc/bcc. |
✅
/campaign/send and /email/send use the same scope (email.messages.send), so one key can call either. All three endpoints share the same safety default: test_mode is on unless you turn it off.Before you start#
Check these four things first. Each one is a common reason a first send is refused.
An authenticated sending domain. The domain of your sending address (for example
yourcompany.com) must be authenticated under Settings → Email → Sender Authentication. See Authenticate Your Email Domain (DKIM) Step by Step.At least one active organization email address on that domain, under Settings → Email → Organization Emails (Step 1). Personal (user) addresses can never be used by the API.
Permission to create API keys and to send email. The Email scopes only appear in the key dialog if your own profile has the Email Channel permission, which is the same permission that lets you compose email in the CRM.
Email credits. Each email sent through the API uses your email allowance. If your organization has no allowance or credits left, the send is refused. See Email Credits: Purchase and Manage Your Sending Balance.
Step 1: Check your organization’s sending addresses#
In the CRM, open Settings (the gear icon at the bottom of the left rail), then under Marketing Channels click Email. The Email Channel Settings page opens. Click the Organization Emails tab.
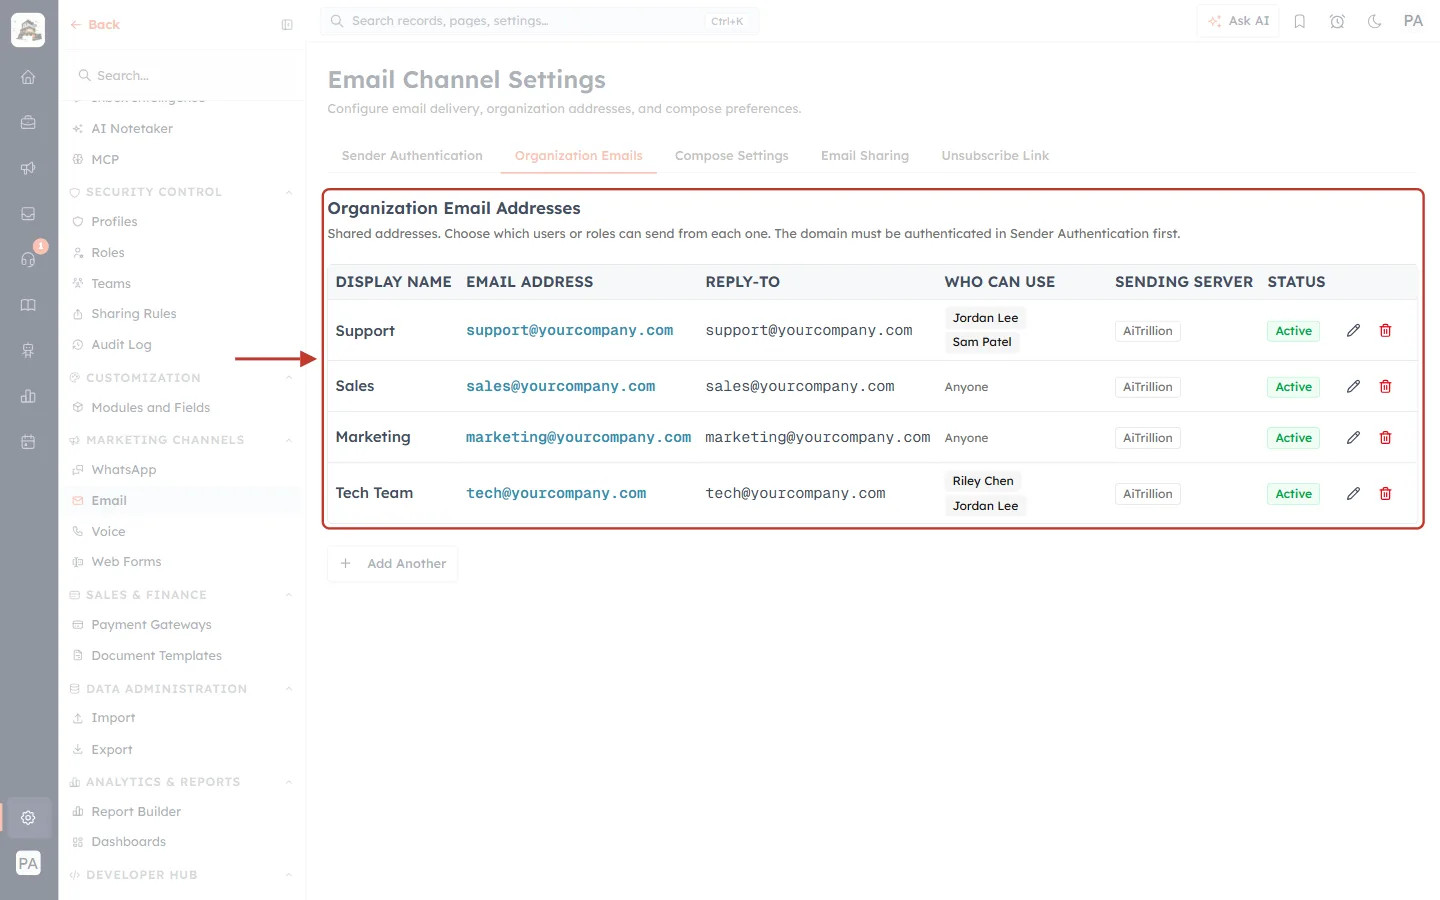
What this screenshot shows. The Organization Emails tab of Email Channel Settings. The red box marks the Organization Email Addresses table. These shared addresses are the only addresses the API can send from.
Tabs along the top: Sender Authentication (where you authenticate your domain), Organization Emails (this tab), Compose Settings, Email Sharing and Unsubscribe Link.
Help text: “Shared addresses. Choose which users or roles can send from each one. The domain must be authenticated in Sender Authentication first.”
Display Name: the name your customers see in their inbox, for example Support.
Email Address and Reply-To: the address the email leaves from, and where replies go.
Who Can Use: which users or roles may send from the address inside the CRM. This list limits people in the CRM; an API key is not a person, so a key can use any active organization address.
Sending Server: AiTrillion means the CRM’s own sender, which reports delivery, opens and clicks. An address that sends through your own SMTP server cannot be tracked, so the API refuses it.
Status: only Active addresses can be used. Use the pencil to edit an address, the bin to delete it, and Add Another to add one.
⚠️
If the table is empty, add an address with Add Another before you continue. Without one, every API send is refused.
Step 2: Create an API key that can send email#
Go to Settings → Developer Hub → API Keys. The API & Connections page opens on the Keys tab. Click Generate API key in the top-right corner.
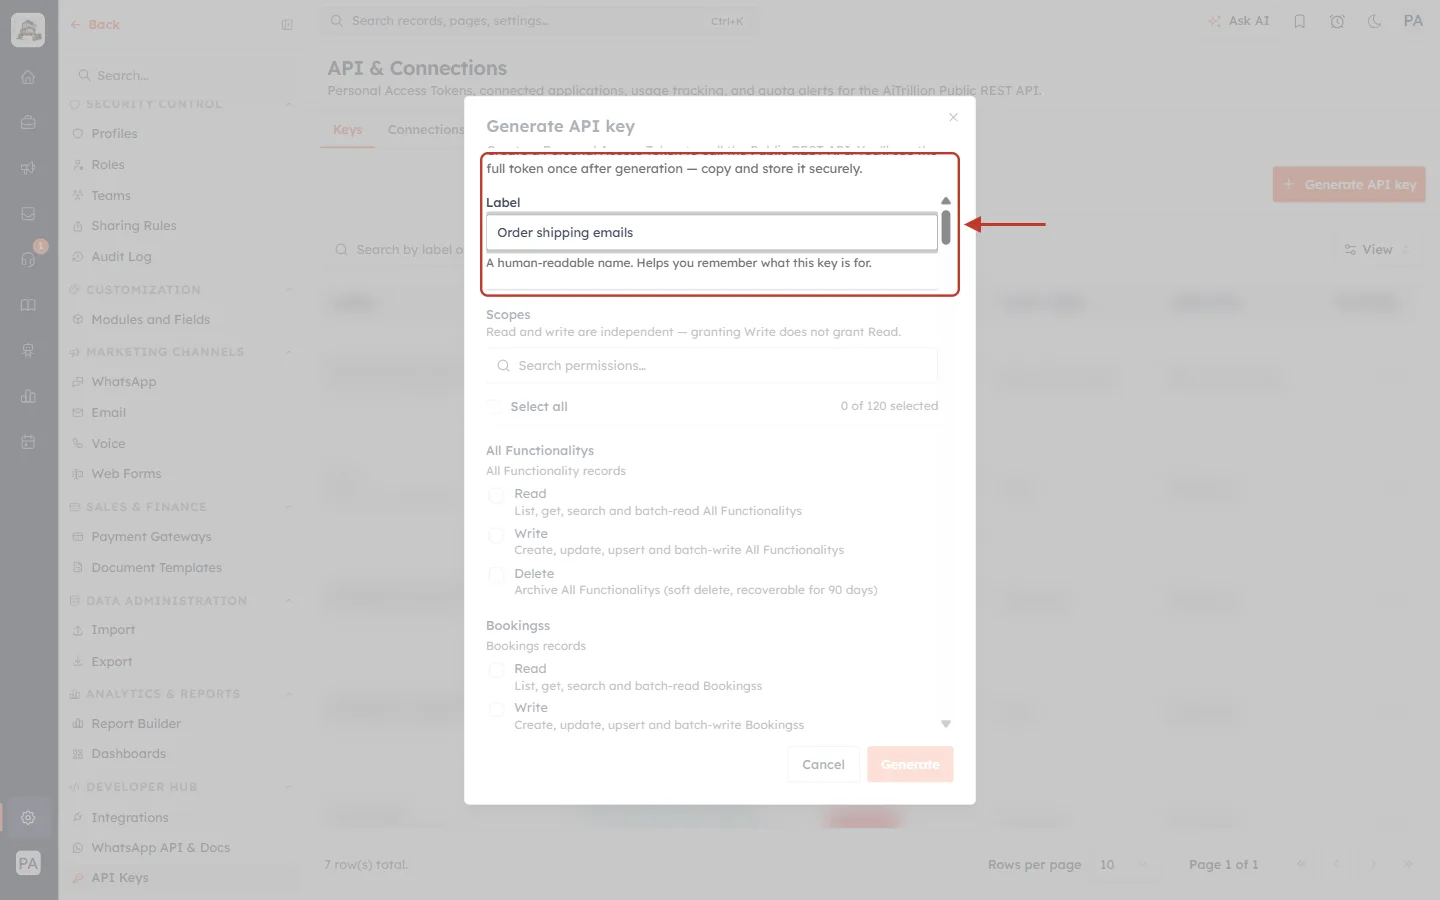
What this screenshot shows. The Generate API key dialog. The red box marks the Label field, filled in here with “Order shipping emails”. (The list of existing keys behind the dialog is blurred.)
Dialog text: “Create a Personal Access Token to call the Public REST API. You’ll see the full token once after generation — copy and store it securely.”
Label: a name that tells you what the key is for. Use something specific, such as the system that will send the emails.
Scopes: the list below the label. Each group is one area of the API; tick only what this key needs. “Read and write are independent — granting Write does not grant Read.”
Search permissions… filters the list, and Select all shows how many scopes are ticked (for example “0 of 120 selected”).
Scroll down the Scopes list (or type email into Search permissions…) until you reach the Email group, and tick Read and Send.
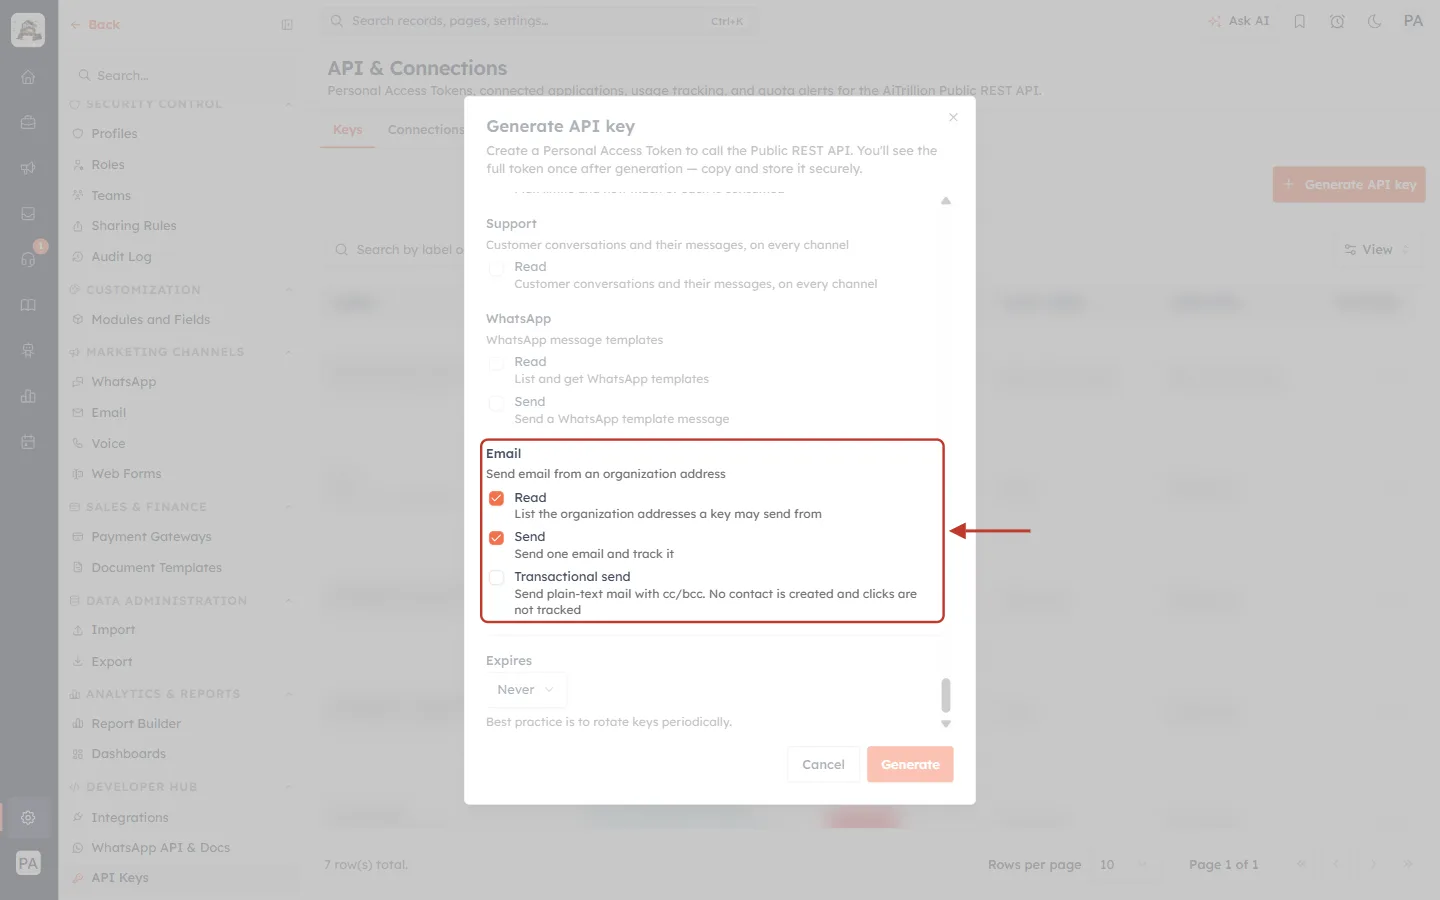
What this screenshot shows. The Email group in the Scopes list, marked by the red box and arrow, with Read and Send ticked.
Email — “Send email from an organization address”: the group that controls the email endpoints.
Read (“List the organization addresses a key may send from”) is the
email.from_addresses.readscope. It lets the key callGET /email/from-addressesin Step 4.Send (“Send one email and track it”) is the
email.messages.sendscope. It lets the key callPOST /email/sendandPOST /campaign/send.Transactional send (“Send plain-text mail with cc/bcc. No contact is created and clicks are not tracked”) is only needed for
POST /contact/email/send. Leave it unticked for this guide.Expires (below the groups): choose Never, 30, 90, 365 or 730 days. “Best practice is to rotate keys periodically.”
Generate becomes active once the label and at least one scope are set; Cancel closes the dialog without creating a key.
Click Generate, then Copy to clipboard, and store the key somewhere safe, such as your server’s secret store. The full key (it starts with cak_live_) is shown only once. For the full walkthrough of this dialog, see API Keys Step by Step: Generate, Use and Revoke a Personal Access Token.
ℹ️
The Email group only appears if your profile has the Email Channel permission. If you can’t see it, ask an administrator to grant that permission or to create the key for you. A key always acts with the permissions of the person who created it.
Step 3: Open the email endpoints in the developer portal#
The fastest way to try the API is the developer portal at developer.aiengagecrm.com. Every endpoint there has a ready-made request panel with a Send button, so you can test without writing any code. In the left sidebar, open the Email group.
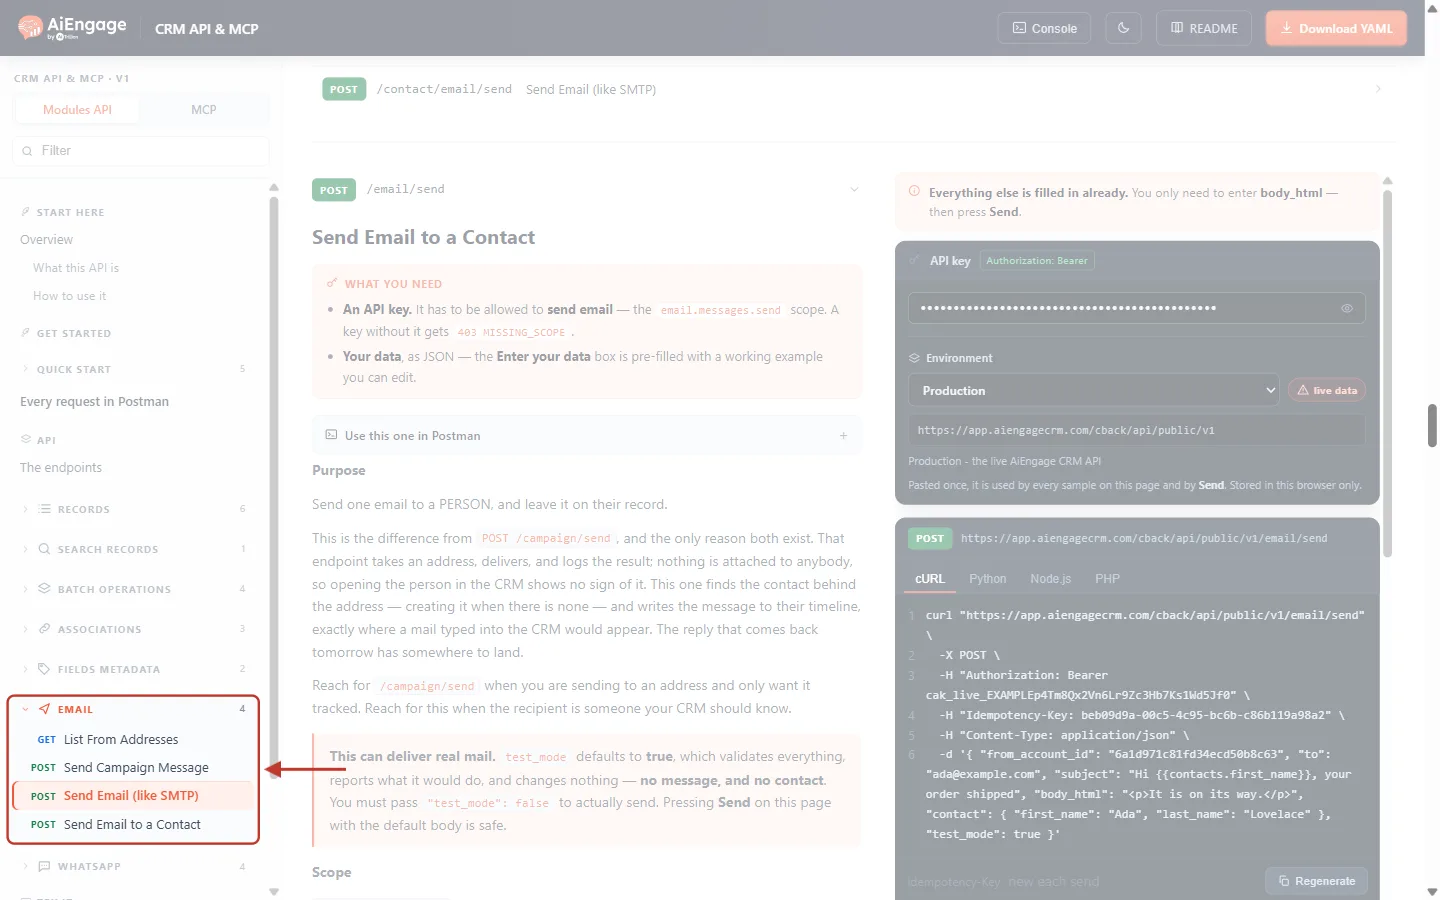
What this screenshot shows. The developer portal’s left sidebar. The red box marks the Email group, which lists the four email endpoints.
GET List From Addresses:
/email/from-addresses, the addresses your key may send from (Step 4).POST Send Campaign Message:
/campaign/send, which sends to an address and logs it in API Sends.POST Send Email (like SMTP):
/contact/email/send, the plain-text send with cc/bcc.POST Send Email to a Contact:
/email/send, the endpoint this guide uses (Steps 5 to 8).On the right is the request panel for the open endpoint: your API key, the Environment (Production is your live CRM), and code samples in cURL, Python, Node.js and PHP.
✅
Paste your key once in any API key box on the portal. It is kept in your browser only and is reused by every panel and code sample on the page. For more on the portal and Postman, see Test the AiEngage CRM API in the API Console and Postman.
Step 4: Find your from_account_id with GET /email/from-addresses#
A send names its sender by from_account_id, an ID such as 6aec292ffc6fcebb570fa726. You can’t guess it, and it is not shown in the CRM screen from Step 1, so you get it from this endpoint. Click List From Addresses in the sidebar.
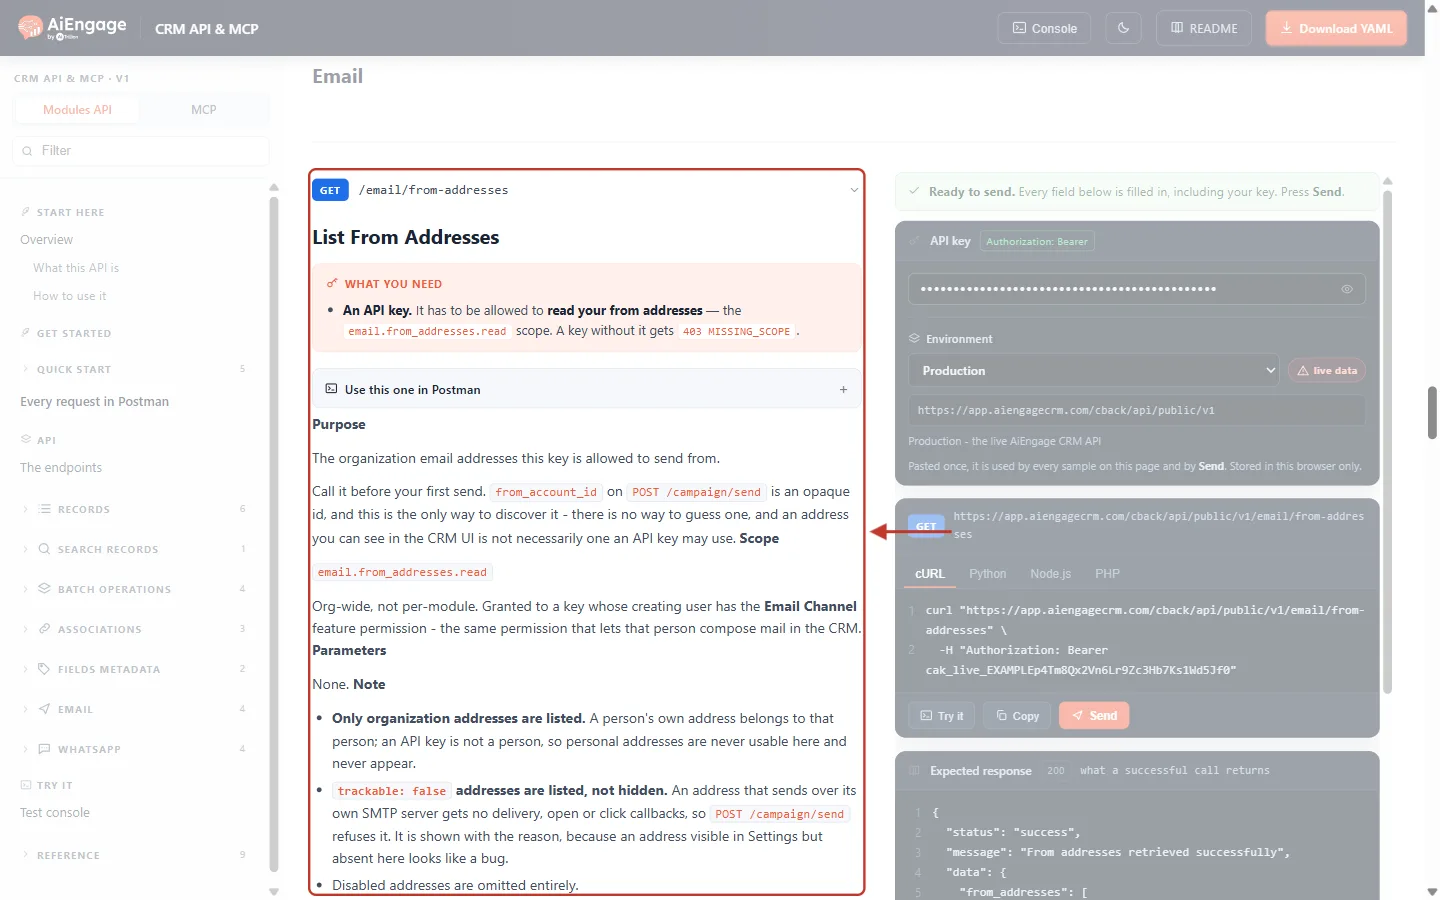
What this screenshot shows. The top of the List From Addresses endpoint (GET /email/from-addresses), with its What you need box marked.
What you need: “An API key. It has to be allowed to read your from addresses — the
email.from_addresses.readscope. A key without it gets403 MISSING_SCOPE.” This is the Read box you ticked in Step 2.Purpose: the organization email addresses this key is allowed to send from. Call it before your first send.
Parameters: none. You only need the key.
Note: only organization addresses are listed (never personal ones); disabled addresses are left out; and addresses that cannot be tracked are listed with the reason, not hidden.
On the right, the request panel already contains everything except your key. Paste your key in the API key box, keep Environment on Production, and click Send. This is a read-only request, so it is safe to press.
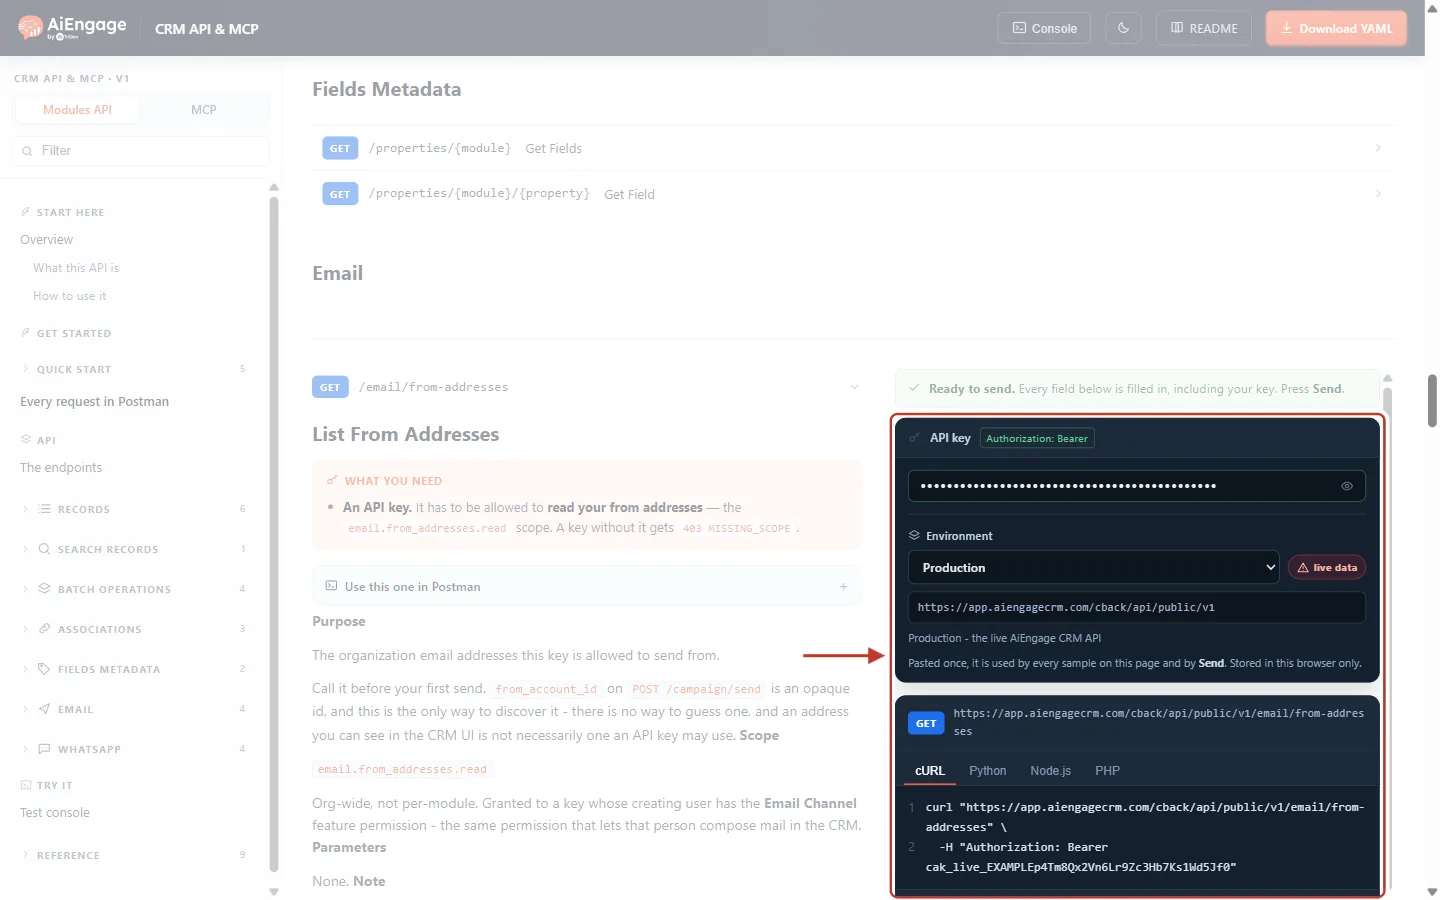
What this screenshot shows. The request panel for List From Addresses. The red box runs from the API key box down to the Send button.
API key — Authorization: Bearer: your
cak_live_…key (shown as dots). The eye icon reveals it.Environment: Production calls your live CRM at
https://app.aiengagecrm.com/cback/api/public/v1. The red live data label is a reminder that this is your real account.Request line:
GET …/email/from-addresses, with code samples in the cURL, Python, Node.js and PHP tabs.Try it opens the request in the API console, Copy copies the sample, and Send runs it.
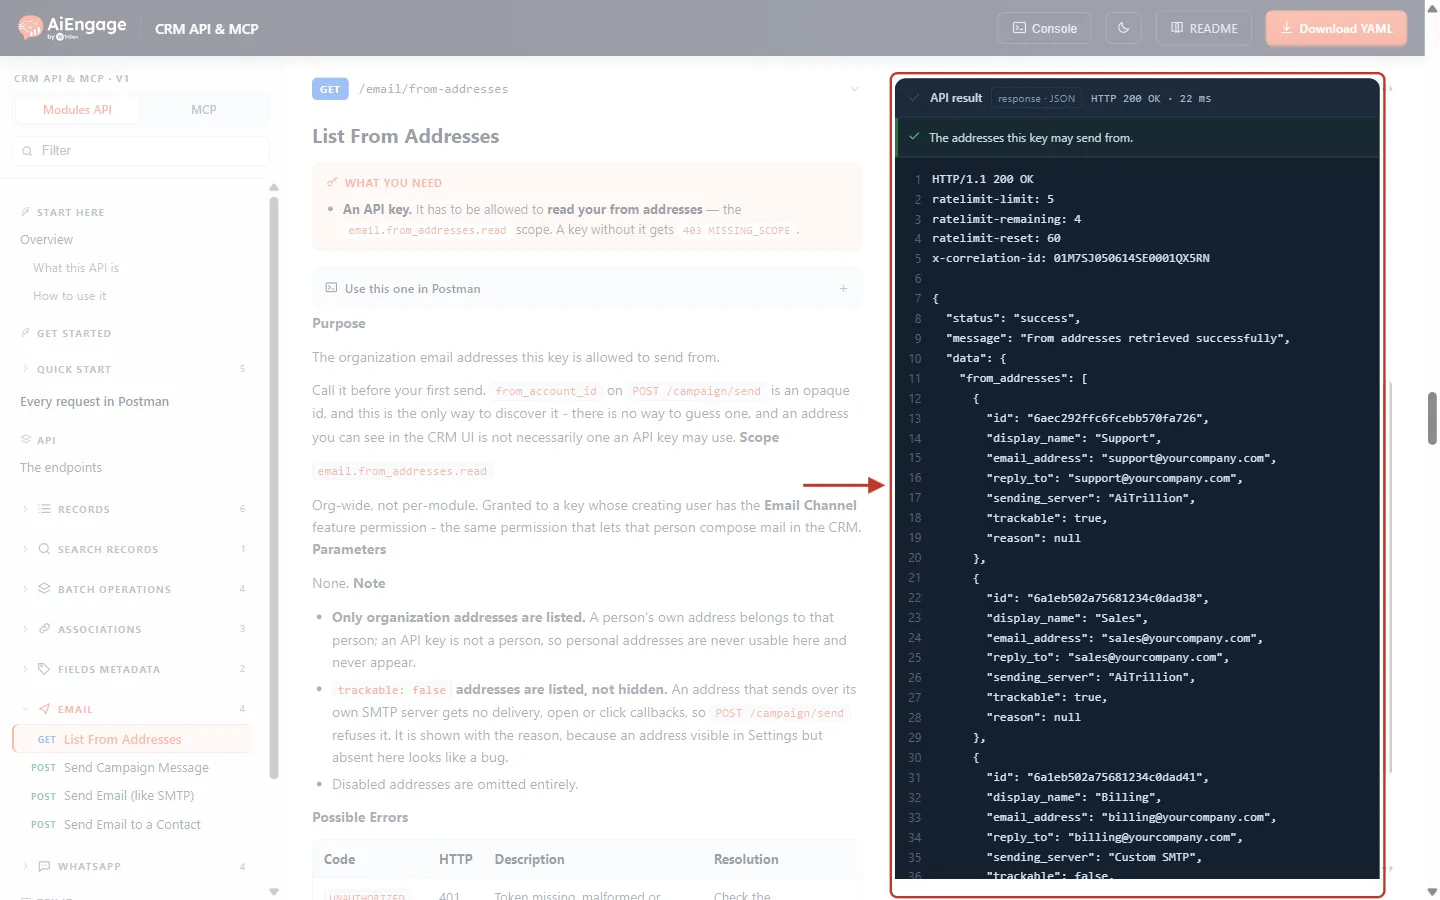
What this screenshot shows. The API result card: HTTP 200 OK and the list of addresses this key may send from. (Example addresses are shown.)
Header lines 1–5: the status, the rate-limit headers (how many calls you have left in this window), and the x-correlation-id, which identifies this request if you ever contact support.
id: the value you pass asfrom_account_id. Copy the one you want to send from, for example the Support address.display_name,email_addressandreply_to: the same values as the Step 1 table.sending_server: AiTrillion for the CRM’s own sender.trackable:truemeans the address can be used. The third address (Billing) sends through Custom SMTP, so it showstrackable: falseand areason: “Sends over its own SMTP server, so opens, clicks and delivery cannot be tracked. Not usable with this API.”
Field | Meaning |
|---|---|
| Pass this as |
| The name recipients see. |
| The address the email leaves from. |
| Where replies go (the address itself if no separate reply-to is set). |
| Which server delivers it. AiTrillion is the CRM’s own sender. |
|
|
| Why the address is not trackable; |
Step 5: Open “Send Email to a Contact” and read the key rules#
Click Send Email to a Contact in the sidebar to open POST /email/send.
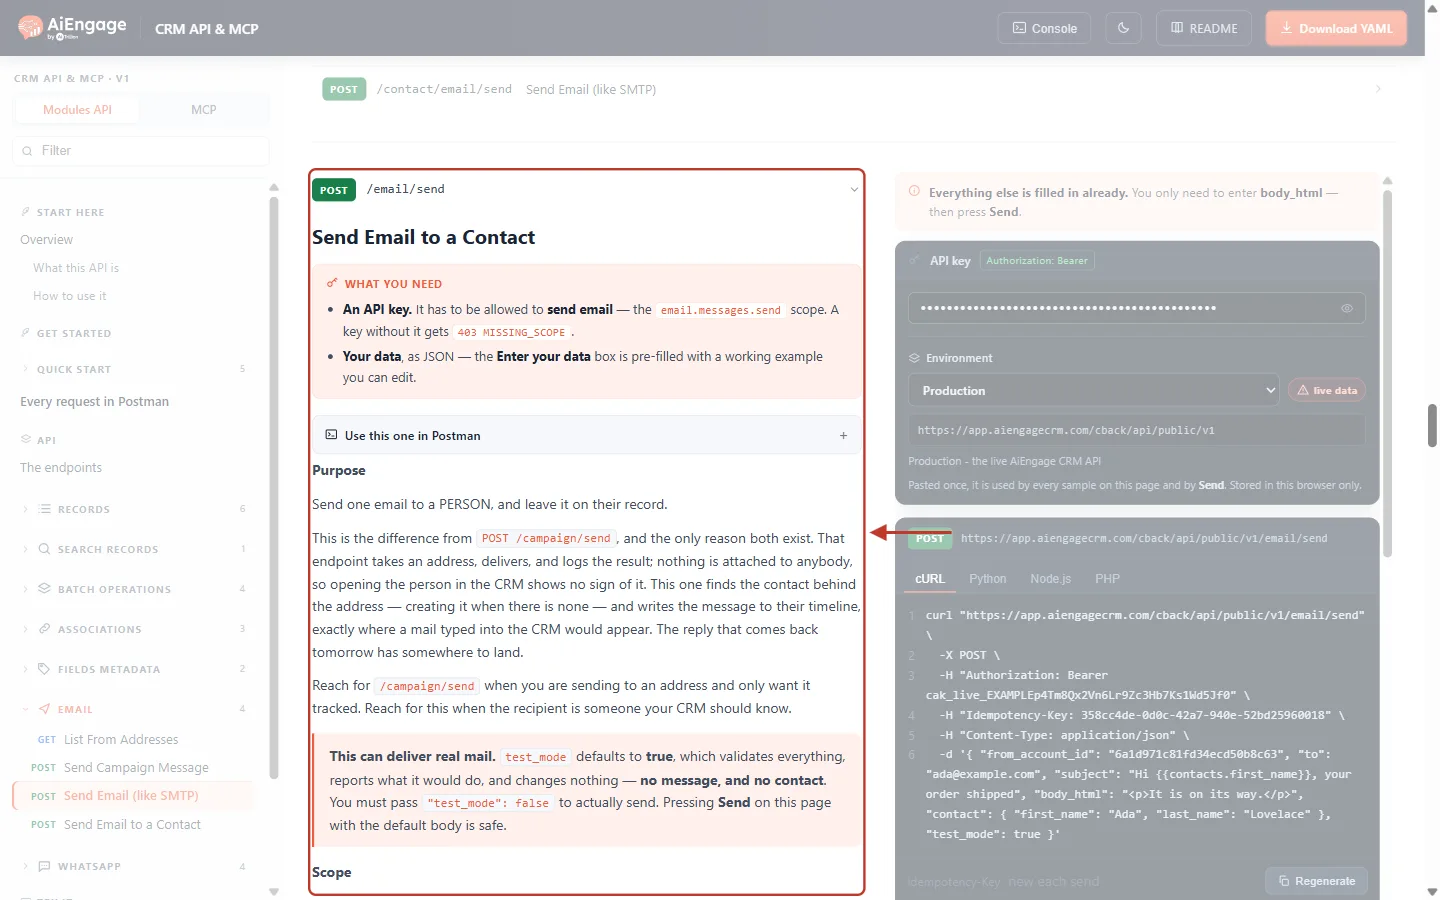
What this screenshot shows. The top of Send Email to a Contact (POST /email/send), with its What you need box marked.
What you need: an API key with the
email.messages.sendscope (the Send box from Step 2), and your data as JSON. The Enter your data box is pre-filled with a working example you can edit.Purpose: “Send one email to a PERSON, and leave it on their record.”
The difference from
/campaign/send: that endpoint takes an address and only logs the result. This one finds the contact behind the address, creating it if there is none, and writes the message to their timeline.
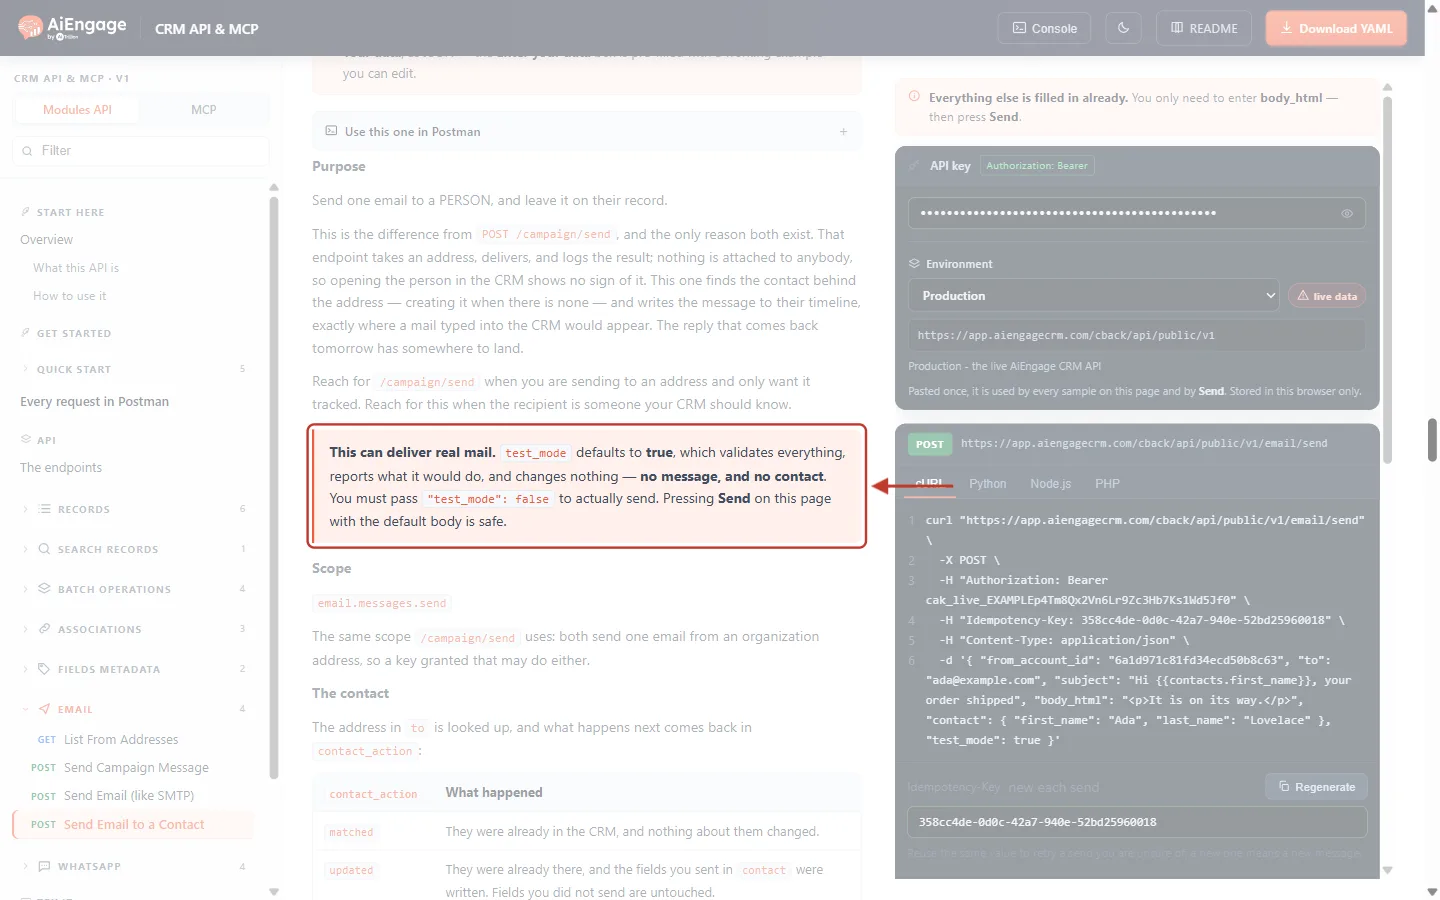
What this screenshot shows. The “This can deliver real mail” box. It is the most important rule of this endpoint.
test_modedefaults to true. A request without it is a dry run: everything is checked and reported, but no email is sent and no contact is created or changed.To actually send, you must pass
"test_mode": false.Pressing Send on the portal with the default body is therefore safe.
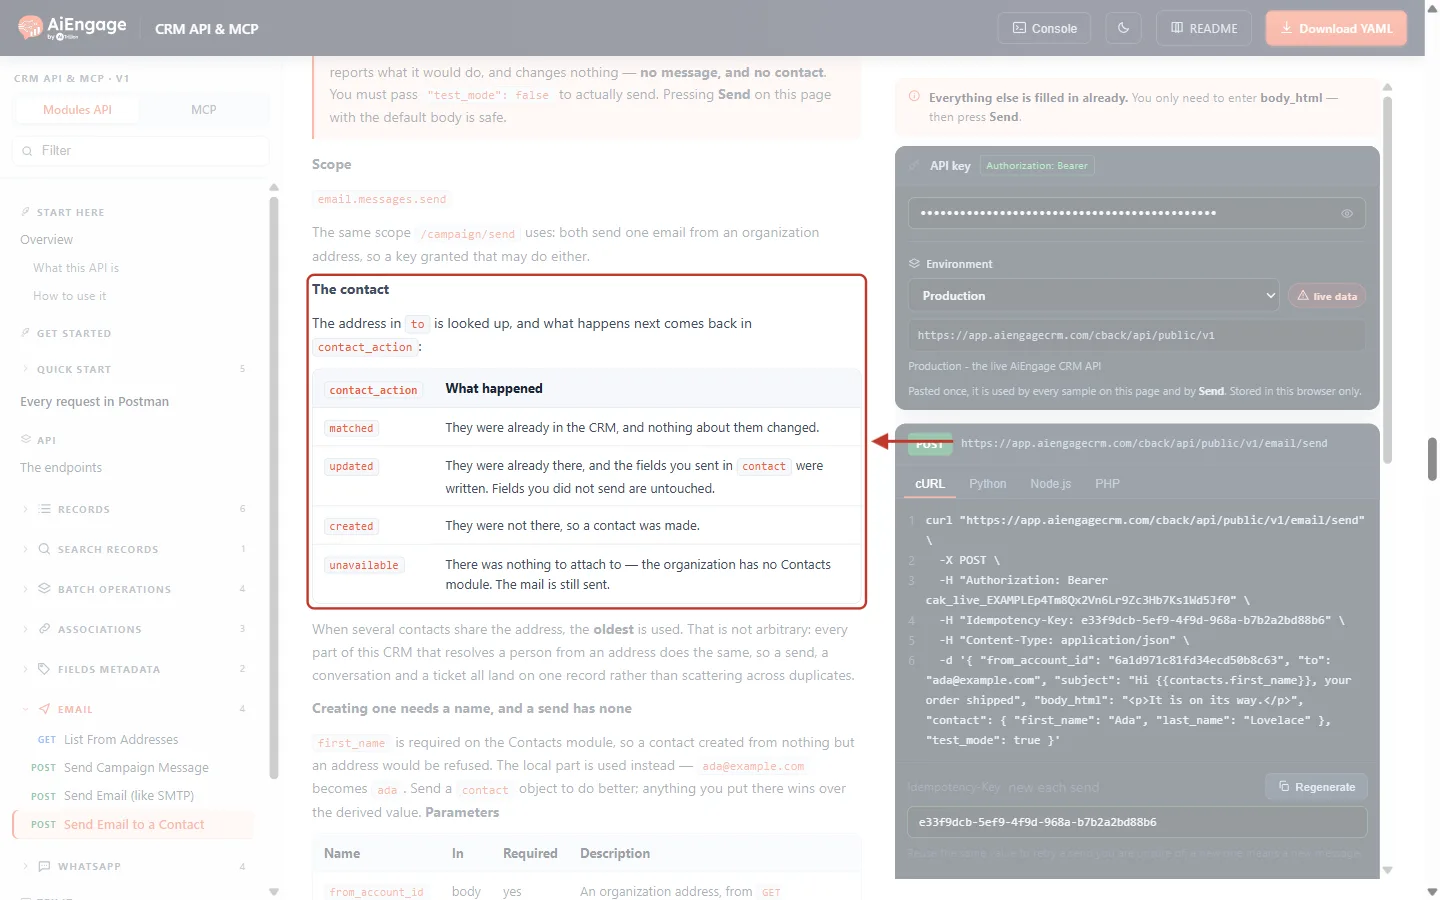
What this screenshot shows. The contact section. The address in to is looked up in your Contacts, and the response field contact_action tells you what happened.
matched: the person was already in the CRM, and nothing about them changed.updated: they were already there, and the fields you sent incontactwere written. Fields you did not send are untouched.created: they were not there, so a new contact was made.unavailable: there was nothing to attach to, because the organization has no Contacts module. The email is still sent.Below the table: if several contacts share the address, the oldest one is used, the same rule the rest of the CRM uses, so emails, conversations and tickets all land on one record.
“Creating one needs a name”: First Name is required on Contacts. If you don’t send one, the part of the address before the @ is used (
ada@example.combecomes ada). Send acontactobject to set proper names.
Step 6: Build the request body#
Scroll the request panel to Enter your data and replace the example with your own JSON. Use the id from Step 4 as from_account_id. Keep "test_mode": true for now.
{
  "from_account_id": "6aec292ffc6fcebb570fa726",
  "to": "ada@example.com",
  "subject": "Hi {{contacts.first_name}}, your order has shipped",
  "body_html": "<p>Hi {{contacts.first_name}},</p><p>Good news — your order #1042 is on its way.</p>",
  "contact": {
    "first_name": "Ada",
    "last_name": "Lovelace",
    "phone": "+1 555 0100"
  },
  "test_mode": true
}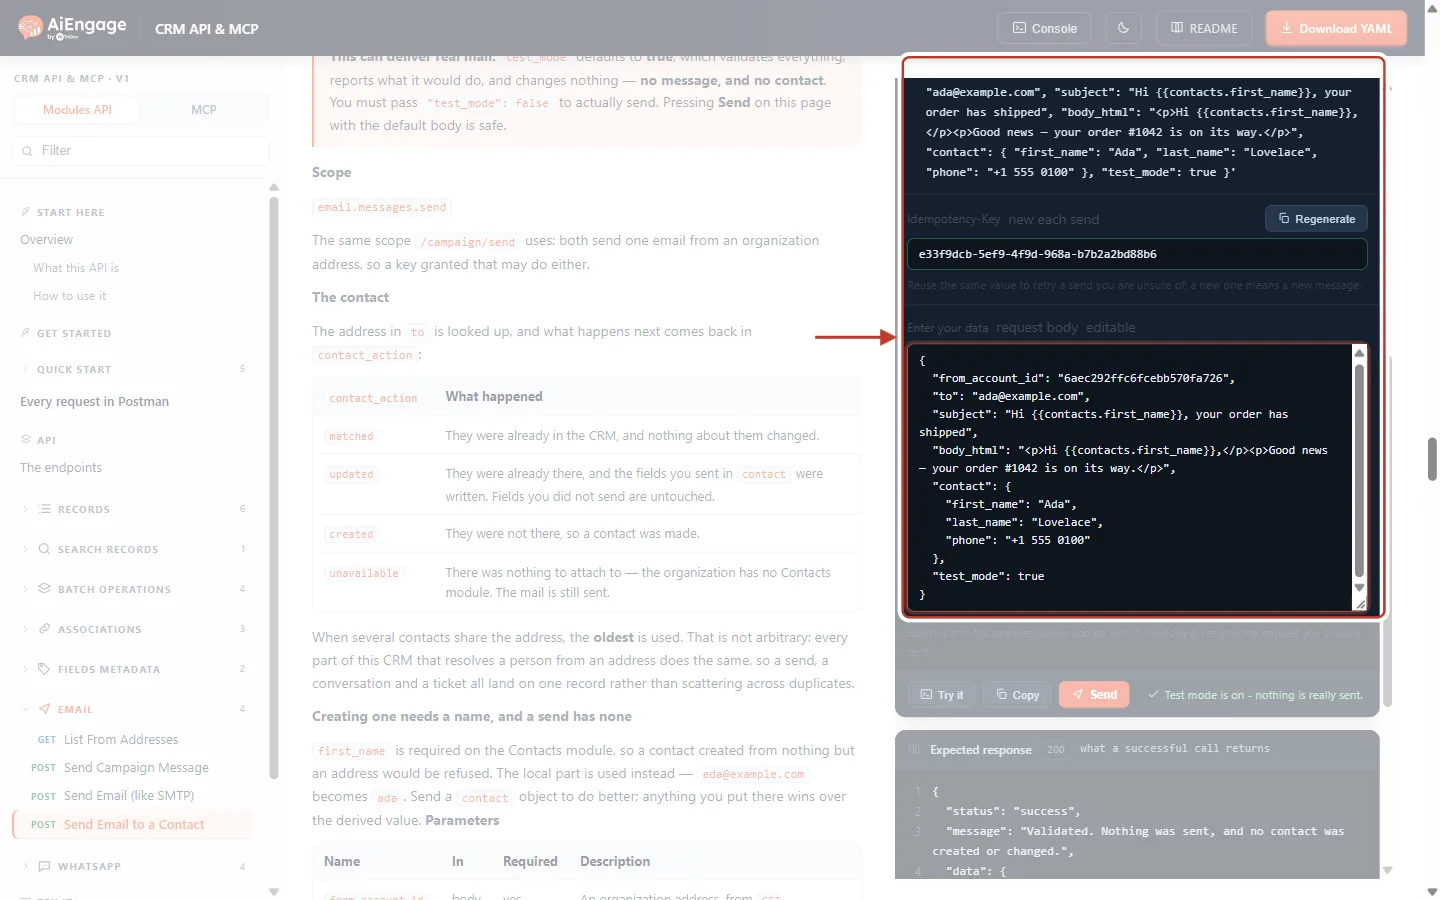
What this screenshot shows. The lower half of the request panel. The red box covers the Idempotency-Key box and the Enter your data box with the JSON above.
cURL sample (top): updates as you type, so Copy always gives you the exact request you are about to send.
Idempotency-Key — “new each send”: a unique value for this message. The portal fills one in for you; Regenerate makes a new one. The hint reads: “Reuse the same value to retry a send you are unsure of; a new one means a new message.”
Enter your data — request body, editable: the JSON you send. It can be resized with the handle in the corner.
Status line (bottom): “Test mode is on — nothing is really sent.” This changes to “This is real — it changes data in your CRM.” when you set
test_modetofalse.
The request fields:
Field | Required | Description |
|---|---|---|
| Yes | An organization address |
| Yes | One recipient address (up to 320 characters). This is also how the contact is found. |
| Yes | Subject line, up to 998 characters. Merge fields work here. |
| Yes | The HTML body, up to 256,000 bytes. Merge fields work here too. |
| No | A plain-text version for email apps that don’t show HTML. Created from the HTML when you leave it out. |
| No | Contact fields to create the record with, or update it with, such as |
| No | Defaults to |
The Idempotency-Key header is required. A send can’t be undone, and retrying after a timeout is the usual way a customer gets the same email twice. Send a new, unique value (a UUID is ideal) for each message, and reuse the same value only when you retry a request whose outcome you are unsure of. The API then returns the first result instead of sending again. Without the header the API answers 400 IDEMPOTENCY_KEY_REQUIRED. Read more in Idempotency Keys & Safe Retries: Prevent Duplicate Records and Double Sends.
Merge fields. Write {{contacts.first_name}} in the subject or body, and it is replaced with that contact’s First Name before sending. Any contact field works the same way: {{contacts.<field API name>}}. The older form ${Contacts.First Name} works too. A merge field that can’t be resolved is left as it is rather than failing the send.
Step 7: Do a dry run with test_mode: true#
With "test_mode": true in the body, click Send. Every check runs (the key, the scopes, the from address, the fields, your sending limits) but nothing is delivered and nothing is saved.
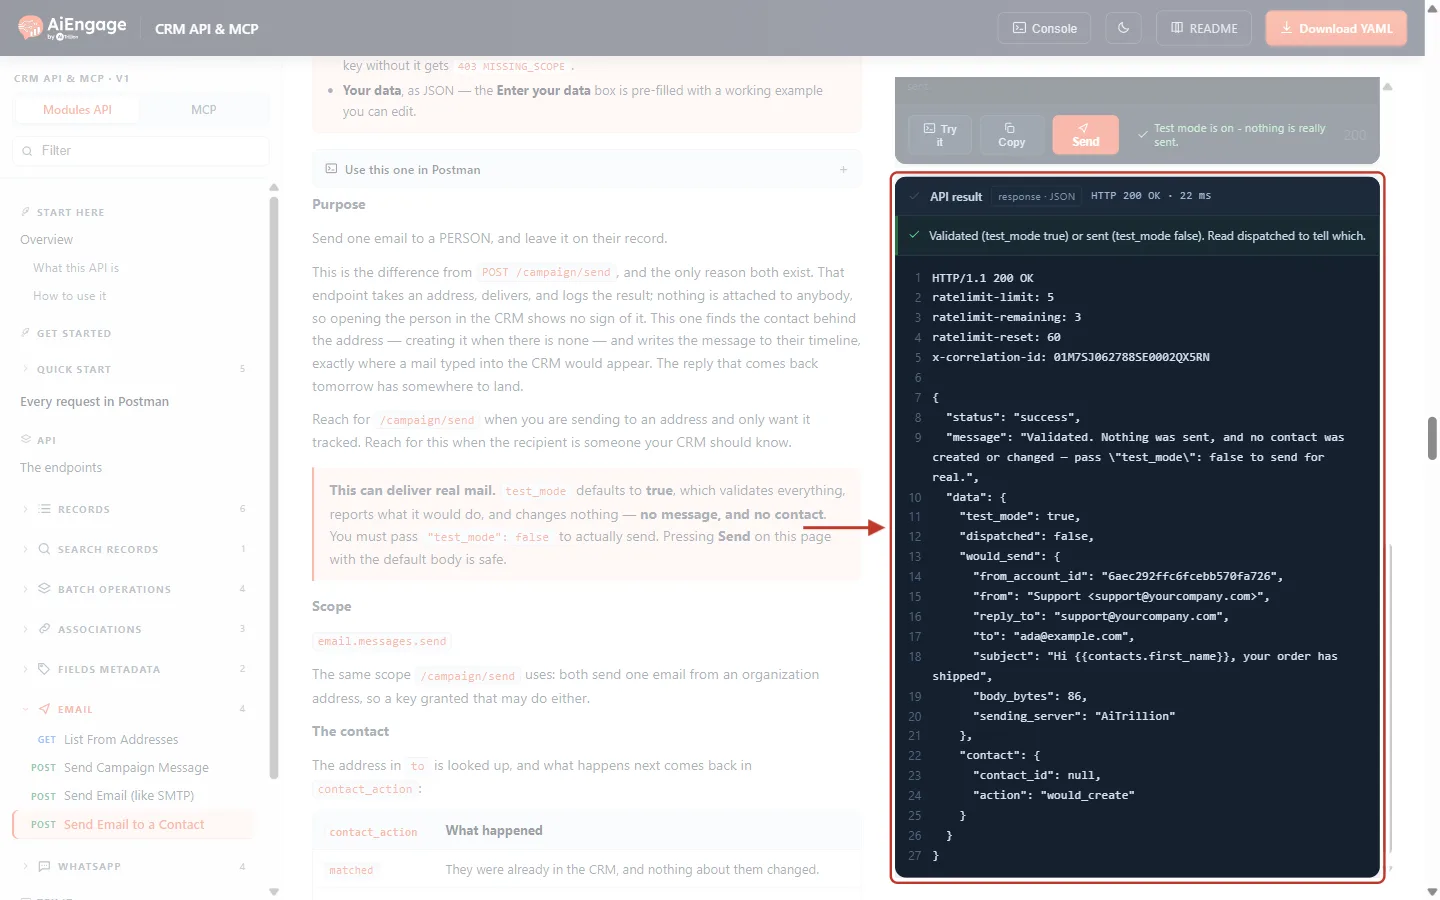
What this screenshot shows. The dry-run result: HTTP 200 OK with "dispatched": false. The response tells you exactly what would happen.
message: “Validated. Nothing was sent, and no contact was created or changed — pass "test_mode": false to send for real.”test_mode: trueanddispatched: false: confirm that this was only a test.would_send: the email as it would leave.fromshows the display name and address (“Support <support@yourcompany.com>”), plusreply_to,to,subject, the body size in bytes (body_bytes) and thesending_server.contact:contact_id: nullandaction: "would_create", because ada@example.com is not in the CRM yet. For an existing contact you would see its ID and a different action.The subject still shows
{{contacts.first_name}}: merge fields are filled in at real send time, against the contact.
✅
Build your integration against the dry run first. When the dry run returns
200, the real send will pass the same checks, apart from what can only happen at delivery time.Step 8: Send the email for real#
Change the last line of the body to "test_mode": false, make sure the Idempotency-Key is a fresh value (click Regenerate), and click Send.
⚠️
This delivers a real email to the address in
to and creates or updates the contact. Test with your own address first.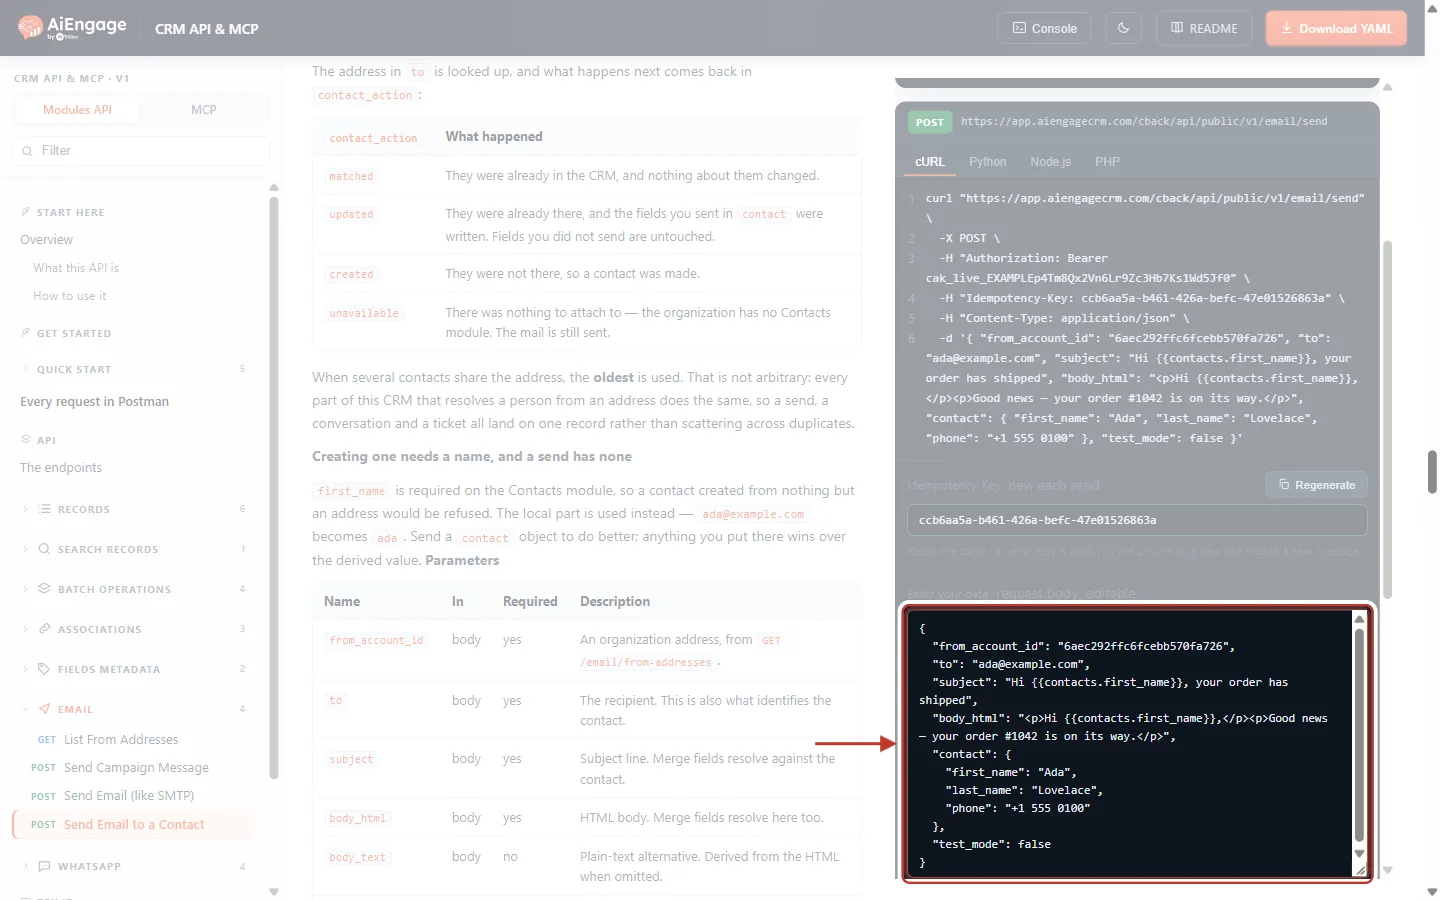
What this screenshot shows. The Enter your data box, marked in red, with "test_mode": false on the last line.
Everything else is the same as the dry run: the same
from_account_id,to,subject,body_htmlandcontact.The cURL sample above it now ends with
"test_mode": falseas well, and shows the new Idempotency-Key.
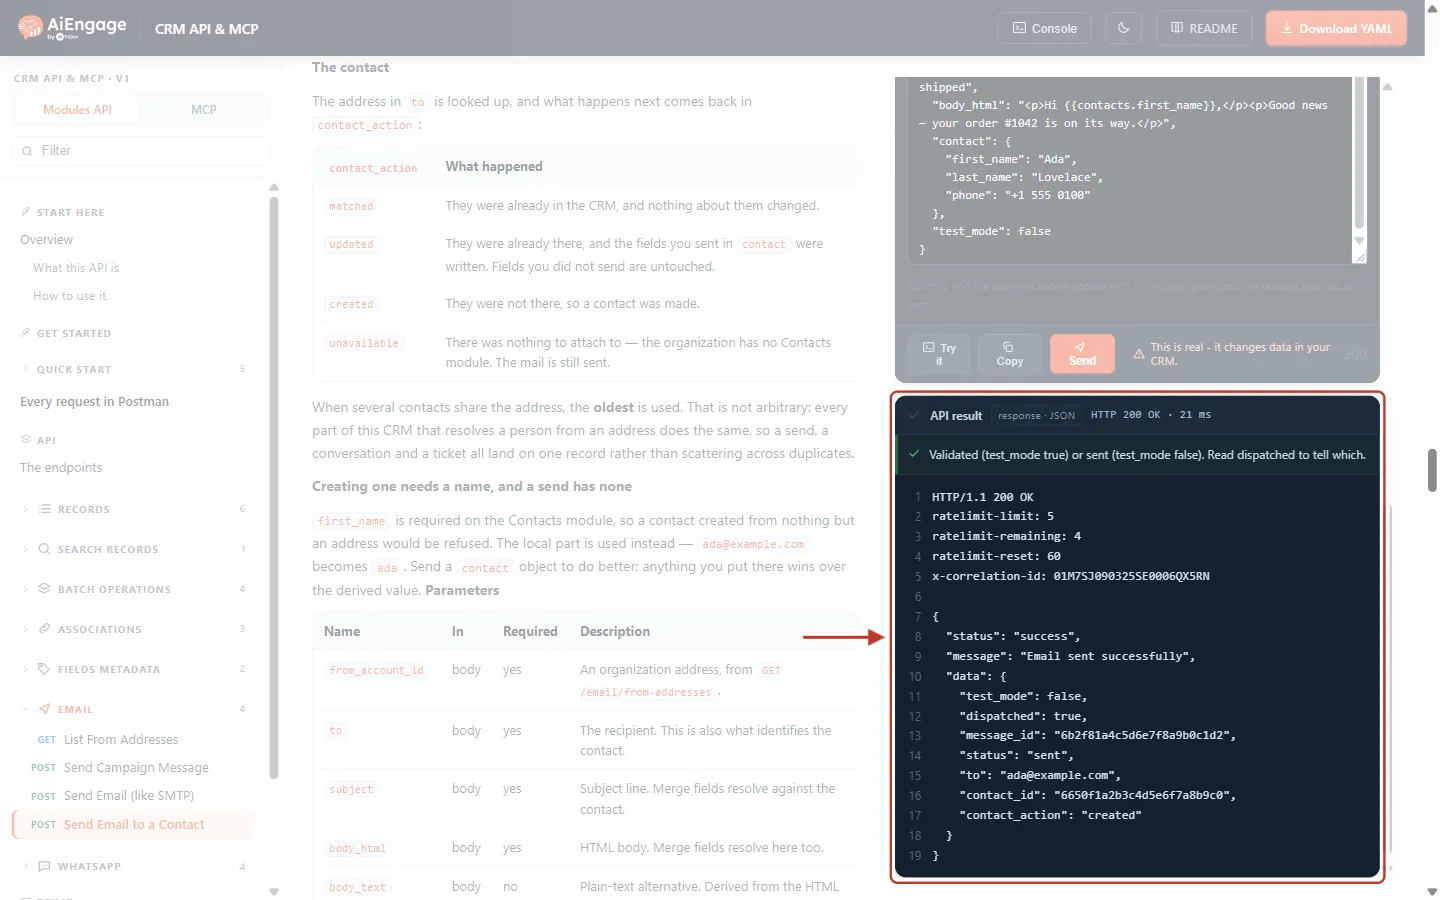
What this screenshot shows. The result of a real send: HTTP 200 OK, “Email sent successfully”, and "dispatched": true.
message_id: the ID of the email saved on the contact’s timeline. All tracking events (delivered, opened, clicked) are recorded against it. Save it if you want to match events later.status: the message’s state when it was accepted, heresent.to: the recipient.contact_id: the contact the email is attached to.contact_action:created, because Ada was new. Sending to her again would returnmatched(orupdatedif you send newcontactfields).
Response field | Meaning |
|---|---|
| Whether this was a dry run. |
|
|
| The email row on the contact’s timeline. Present when dispatched. |
| The message’s state at the moment it was accepted. |
| The recipient. |
| The contact the email is attached to, or |
|
|
Step 9: Send from your own code#
When the request works in the portal, copy it into your app. Click the cURL, Python, Node.js or PHP tab above the request to get a ready-made sample with your current body.
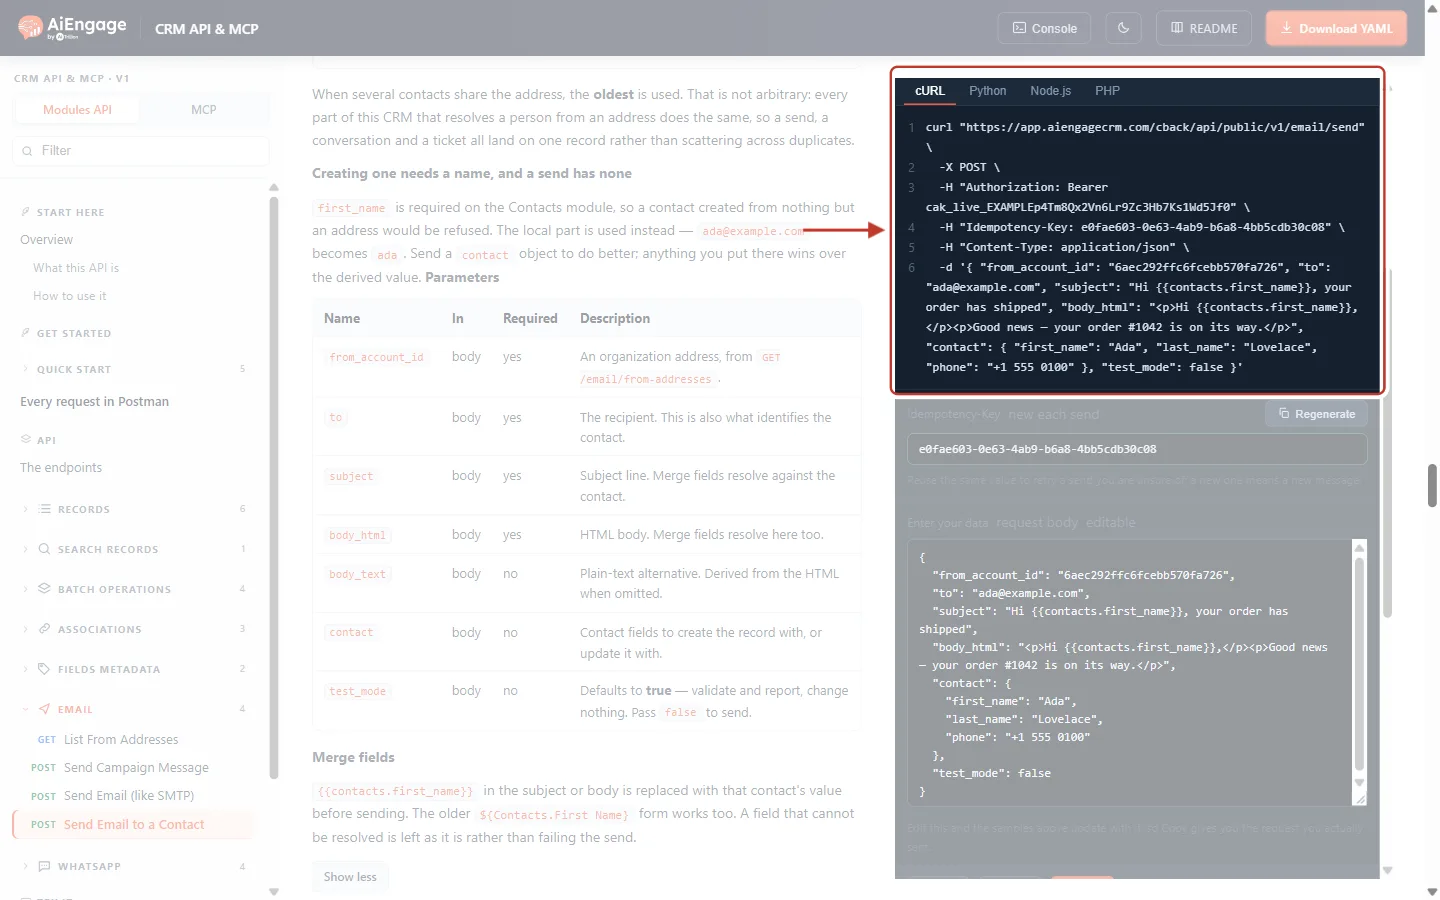
What this screenshot shows. The cURL tab of the request panel, marked in red, showing the full request.
Line 1: the URL,
https://app.aiengagecrm.com/cback/api/public/v1/email/send.Line 2:
-X POST, the method.Line 3:
Authorization: Bearer cak_live_…, your API key. (The key in the screenshot is an example.)Line 4:
Idempotency-Key, the unique value for this message.Line 5:
Content-Type: application/json.Line 6:
-dfollowed by the JSON body.
cURL
curl -X POST "https://app.aiengagecrm.com/cback/api/public/v1/email/send" \
  -H "Authorization: Bearer $AIENGAGE_API_KEY" \
  -H "Idempotency-Key: $(uuidgen)" \
  -H "Content-Type: application/json" \
  -d '{
    "from_account_id": "6aec292ffc6fcebb570fa726",
    "to": "ada@example.com",
    "subject": "Hi {{contacts.first_name}}, your order has shipped",
    "body_html": "<p>Hi {{contacts.first_name}},</p><p>Your order #1042 is on its way.</p>",
    "contact": { "first_name": "Ada", "last_name": "Lovelace" },
    "test_mode": false
  }'
Node.js (18 or later)
import { randomUUID } from 'node:crypto';

async function sendShippedEmail(order) {
  const res = await fetch('https://app.aiengagecrm.com/cback/api/public/v1/email/send', {
    method: 'POST',
    headers: {
      Authorization: `Bearer ${process.env.AIENGAGE_API_KEY}`,
      'Idempotency-Key': `order-shipped-${order.id}`, // same order → same key, so a retry never sends twice
      'Content-Type': 'application/json',
    },
    body: JSON.stringify({
      from_account_id: process.env.AIENGAGE_FROM_ID,
      to: order.email,
      subject: 'Hi {{contacts.first_name}}, your order has shipped',
      body_html: `<p>Hi {{contacts.first_name}},</p><p>Order #${order.number} is on its way.</p>`,
      contact: { first_name: order.firstName, last_name: order.lastName },
      test_mode: false,
    }),
  });
  const json = await res.json();
  if (!res.ok) throw new Error(`${res.status} ${json.category}: ${json.message}`);
  return json.data; // { message_id, contact_id, contact_action, ... }
}
✅
Deriving the Idempotency-Key from your own event (for example
order-shipped-1042) is a simple way to guarantee one email per event, even if your job runs twice. Keys are remembered for 24 hours.Where the email appears in the CRM#
On the contact. Open the contact (use the
contact_idfrom the response, or search for the address). The email is on the contact’s Emails tab and in the activity timeline, just like an email sent from the record. See Send an Email from a Contact or Lead Record.Tracking. Delivery, opens and clicks are recorded against the message, so you can see whether the customer opened it.
Replies. The customer’s reply goes to the address’s Reply-To and can be matched to the same contact.
Unsubscribe footer. An unsubscribe link is added to every email sent this way. If the customer unsubscribes, it is recorded on their contact, and later sends to them are refused.
API usage. Each send counts toward your API call quota, which you can watch under API & Connections → Usage. See Monitor API Usage & Set Quota Alerts Step by Step.
Limits and rules#
Rule | Value |
|---|---|
Recipients per call | One. Call the endpoint once per email; this is not a bulk-send API. |
Rate limit | 5 requests per 60 seconds and 500 per day, shared by |
Subject length | Up to 998 characters. |
Body size | Up to 256,000 bytes for |
Sender | Only active organization addresses on the CRM’s own sender (trackable). Never a personal address, and never an address that uses your own SMTP server. |
Opted-out recipients | Anyone who unsubscribed or hard-bounced is refused. This can’t be overridden. |
Inactive contacts | A contact marked inactive can’t be emailed. |
Credits | Each send uses your organization’s email allowance or credits. Without any left, the send is refused. |
Idempotency-Key | Required on every send. Remembered for 24 hours. |
Errors and how to fix them#
Every error has the same shape: status, a human-readable message, a fixed category your code can check, a correlationId, and errors. Here are the two you are most likely to meet while setting up.
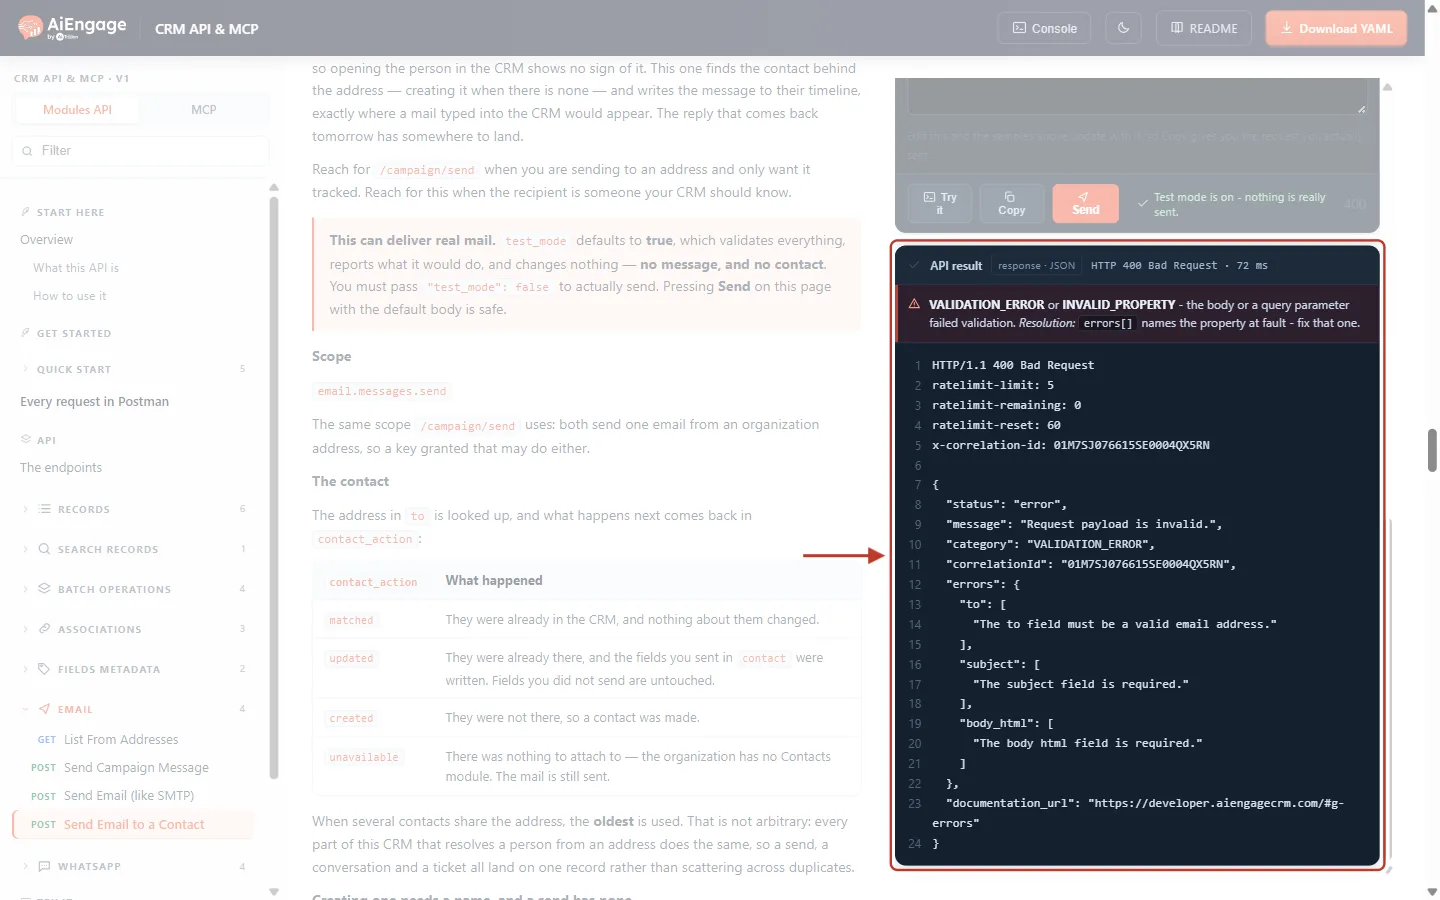
What this screenshot shows. A request with a malformed to and no subject or body. The API answers HTTP 400 Bad Request with category VALIDATION_ERROR.
message: “Request payload is invalid.”errorsnames each field at fault:to“The to field must be a valid email address.”,subject“The subject field is required.”,body_html“The body html field is required.”Fix: correct the fields listed in errors and send again. Nothing was sent.
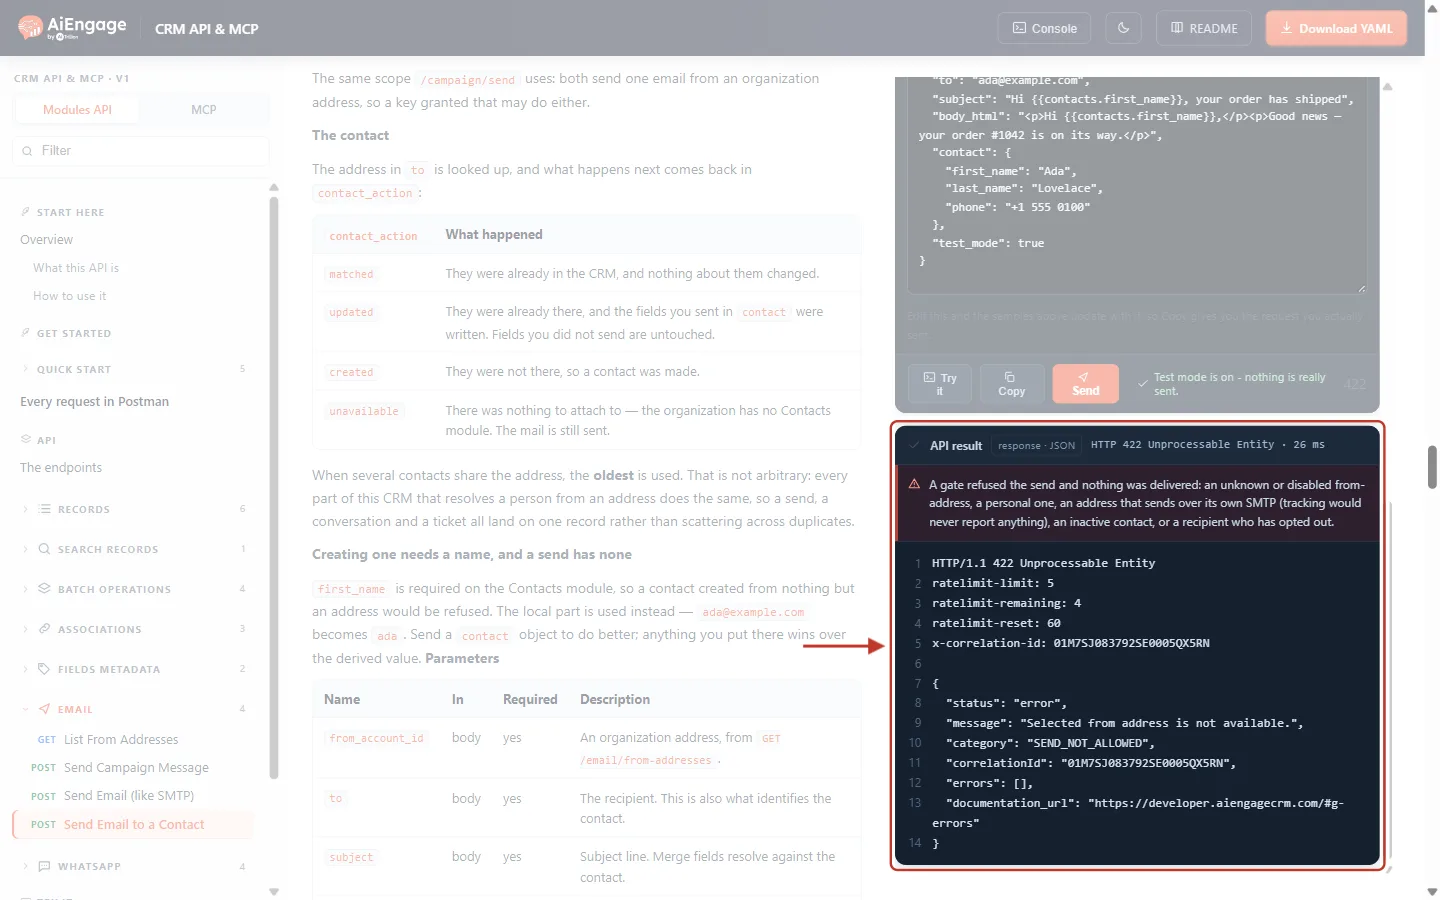
What this screenshot shows. A request with a from_account_id that is not one of your organization’s addresses. The API answers HTTP 422 Unprocessable Entity with category SEND_NOT_ALLOWED.
Banner: “A gate refused the send and nothing was delivered”, followed by the possible reasons: an unknown or disabled from address, a personal one, an address that sends over its own SMTP, an inactive contact, or a recipient who has opted out.
message: “Selected from address is not available.” The message always names the actual reason.Fix: call
GET /email/from-addressesagain and copy anidwhosetrackableistrue.
HTTP | Category | What it means | How to fix it |
|---|---|---|---|
400 |
| A field is missing or malformed. |
|
400 |
| “This endpoint requires an Idempotency-Key header.” | Add an |
401 |
| The key is missing, malformed, revoked or expired. | Check the |
403 |
| The key does not have | Create a new key with the Email Send (and Read) boxes ticked. Scopes can’t be added to an existing key. |
403 |
| Email sending is switched off for your organization. | Waiting won’t help. Contact your administrator or AiEngage support. |
409 |
| The same Idempotency-Key was reused with a different body. | Use a new key for a new message. |
422 |
| Unknown, disabled, personal or untrackable from address; opted-out or inactive recipient; or not enough email credits. | Read the |
429 |
| More than 5 sends in 60 seconds, or 500 in a day. | Wait the number of seconds in the |
429 |
| Your organization’s daily email allowance is used up. | Wait until the reset time in the response ( |
500 / 502 |
| The email could not be sent, or the email provider refused it (502 carries the provider’s reason). | Safe to retry with the same Idempotency-Key. If it keeps failing, contact support with the correlationId. |
For every error category in the API, see API Errors & Troubleshooting: Fix 400, 401, 403, 404, 409, 429 and 500 Errors Step by Step.
Frequently asked questions#
Did my test send an email?
Not unless you sent "test_mode": false. Check dispatched in the response: false means nothing was sent and no contact was touched.
Can I send to several people in one call?
No. /email/send sends one email to one recipient. Call it once per person (keeping within 5 per minute), or use POST /contact/email/send if you need cc and bcc on a plain-text email.
Can I send from my own personal address?
No. An API key is not a person, so only shared organization addresses can be used. Add the address under Settings → Email → Organization Emails.
Why is my address missing from GET /email/from-addresses?
Only active organization addresses are listed. Check its Status in Step 1. If it is listed with trackable: false, it sends through your own SMTP server and can’t be used by the API.
Will the contact’s existing data be overwritten?
Only the fields you put in contact are written, and only when the contact is updated. Leave contact out to send without changing the record.
Is my email signature added?
No. Signatures belong to individual users, and an API key is not a user. Put any sign-off you want in body_html.
Can I attach files?
Not with this endpoint. Link to the file from the email body instead.
Previous and next#
Previous: Fields Metadata API: List a Module’s Fields, Their Types, Required Rules and Picklist Values
Next: API Errors & Troubleshooting: Fix 400, 401, 403, 404, 409, 429 and 500 Errors Step by Step
Related articles#
Was this article helpful?
Ready to implement this?
OpenAI Engage and apply what you just learned to your own workspace.
Open AI Engage CRM