Loading…


KnowledgeBase
Test the AiEngage CRM API in the API Console and Postman: Make Your First Call Step by Step
Introduction#
Before you build an integration, it helps to see the API answer you. AiEngage CRM gives you two ways to make real API calls without writing a single line of code:
The API console on the developer portal (developer.aiengagecrm.com). Paste your API key once, then press Send on any endpoint, or paste any
curlcommand into the console. The answer from your own CRM appears right on the page.Postman, the popular API tool. One import link brings in all 24 endpoints, already grouped and filled with examples. Add your key once and every request is ready to run.
In this guide you will create an API key in the CRM, test it in the API console, and then set up Postman, step by step. Every screenshot is explained, so you can match it against your own screen. At the end there is a table of the most common errors and how to fix each one.
ℹ️
The API key shown in the screenshots (
cak_live_EXAMPLEp4Tm8Qx2Vn6Lr9Zc3Hb7Ks1Wd5Jf0) is an example. It does not work. Use the key you create in Part 1. The contacts in the responses (Maya Patel, Daniel Reyes, Sofia Klein) are sample data. Your responses show your own records.Before you begin#
A user who can manage API keys. Admins can. A key acts as the person who created it and sees only the records that person can see.
A browser. Chrome, Edge, Firefox or Safari all work for the API console.
Postman (for Part 3). Either the free Postman desktop app or Postman on the web (
web.postman.co) with a free Postman account. The steps are the same in both.Five minutes. That is all a first call takes.
What you will use | Where | Why |
|---|---|---|
API key (Personal Access Token) | CRM → Settings → API Keys | Proves who is calling. Sent as |
API console | Send requests from your browser and read the answer | |
Postman collection |
| All endpoints in Postman, ready to run |
Base URL |
| The address every request starts with |
Part 1: Create an API key in the CRM#
Every API call needs a key. If you already have a key with the scopes below, skip to Part 2. For the full guide to keys, see API Keys Step by Step.
Step 1: Open Settings → API Keys#
Sign in to AiEngage CRM.
Click the Settings (gear) icon at the bottom of the left rail.
In the settings menu, scroll down to DEVELOPER HUB and click API Keys.
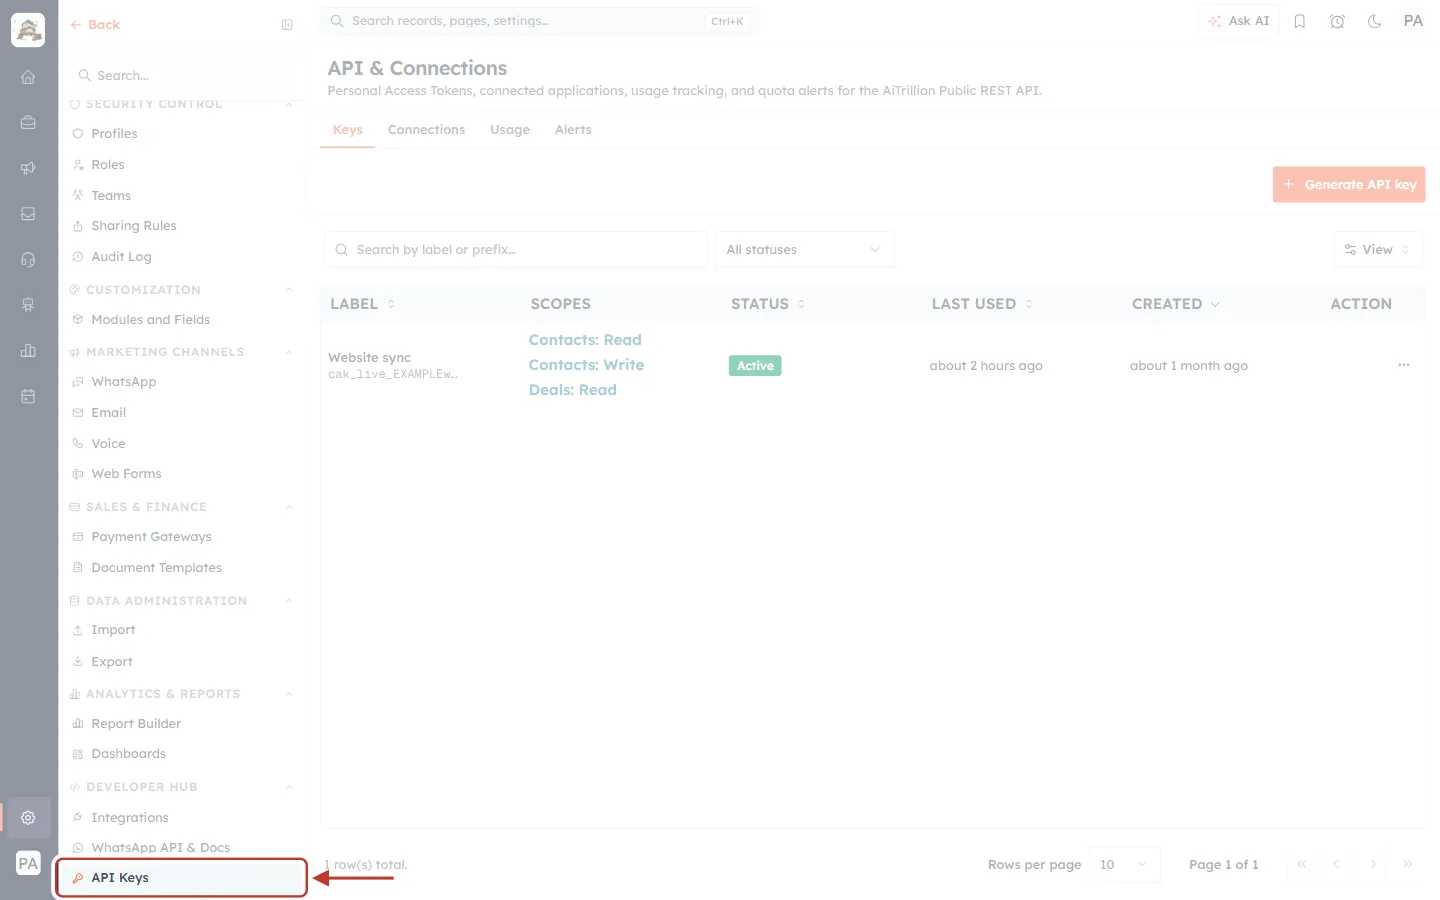
What this screenshot shows. The CRM settings menu. The red box and arrow point to API Keys, the last item in the DEVELOPER HUB group.
Left menu: the settings groups, such as SECURITY CONTROL, CUSTOMIZATION, MARKETING CHANNELS, SALES & FINANCE, DATA ADMINISTRATION and ANALYTICS & REPORTS.
DEVELOPER HUB (bottom of the menu): Integrations, WhatsApp API & Docs and API Keys.
Right side: the API & Connections page that opens when you click API Keys.
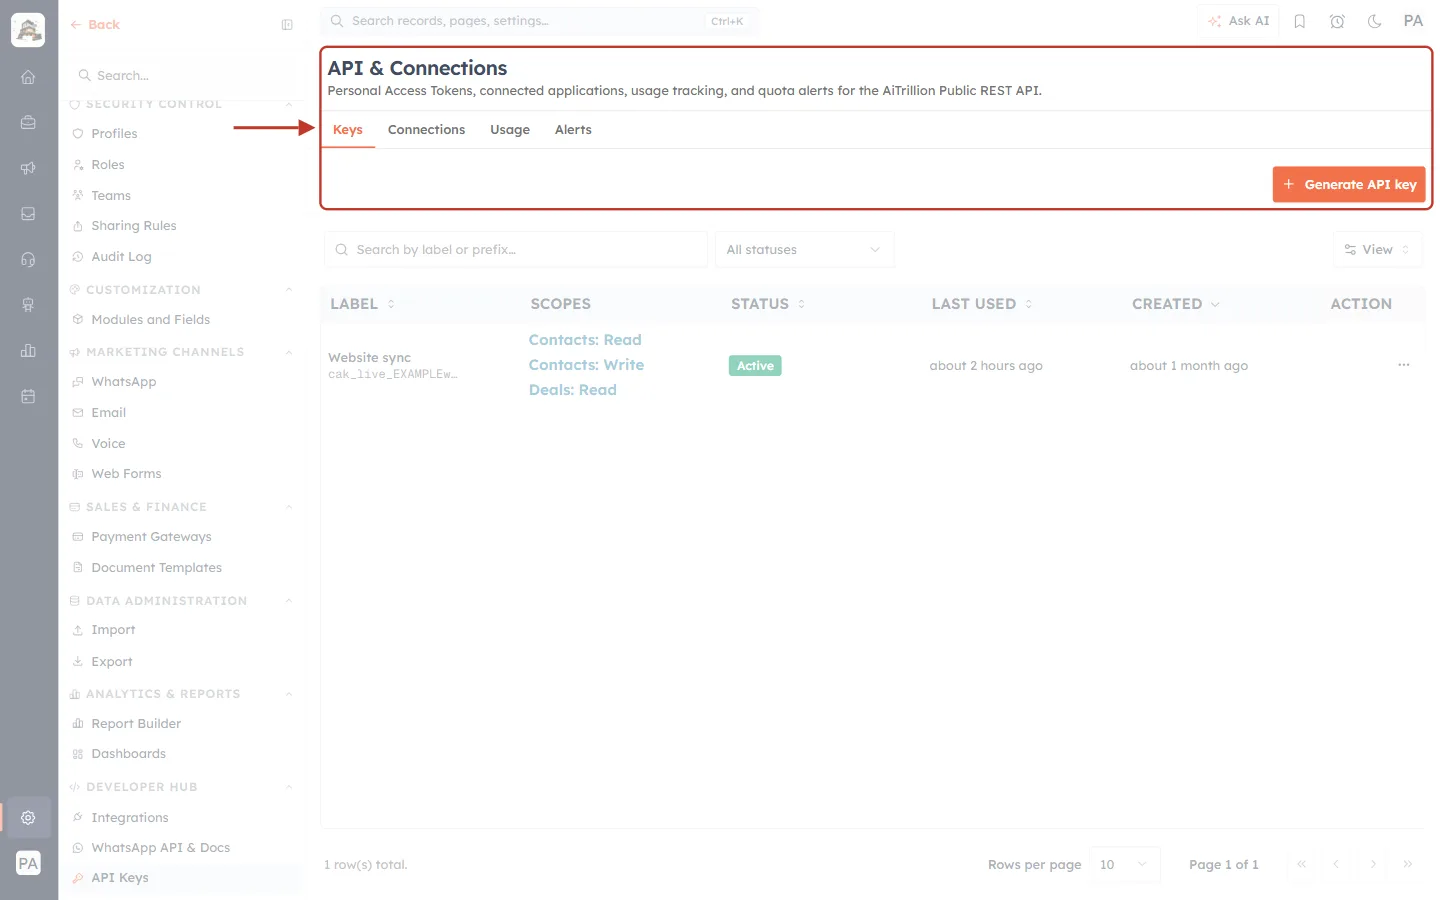
What this screenshot shows. The API & Connections page. The red box highlights the page title, the four tabs and the orange Generate API key button.
Page title: “API & Connections”, with the line “Personal Access Tokens, connected applications, usage tracking, and quota alerts…”.
Tabs: Keys (selected), Connections, Usage and Alerts.
Generate API key (orange, right): creates a new key.
The table below lists your existing keys with their Label, Scopes, Status, Last used and Created date. The example row “Website sync” is an older key.
Step 2: Name the key#
Click Generate API key. The Generate API key window opens.
In Label, type a name that tells you what the key is for, such as Postman testing.
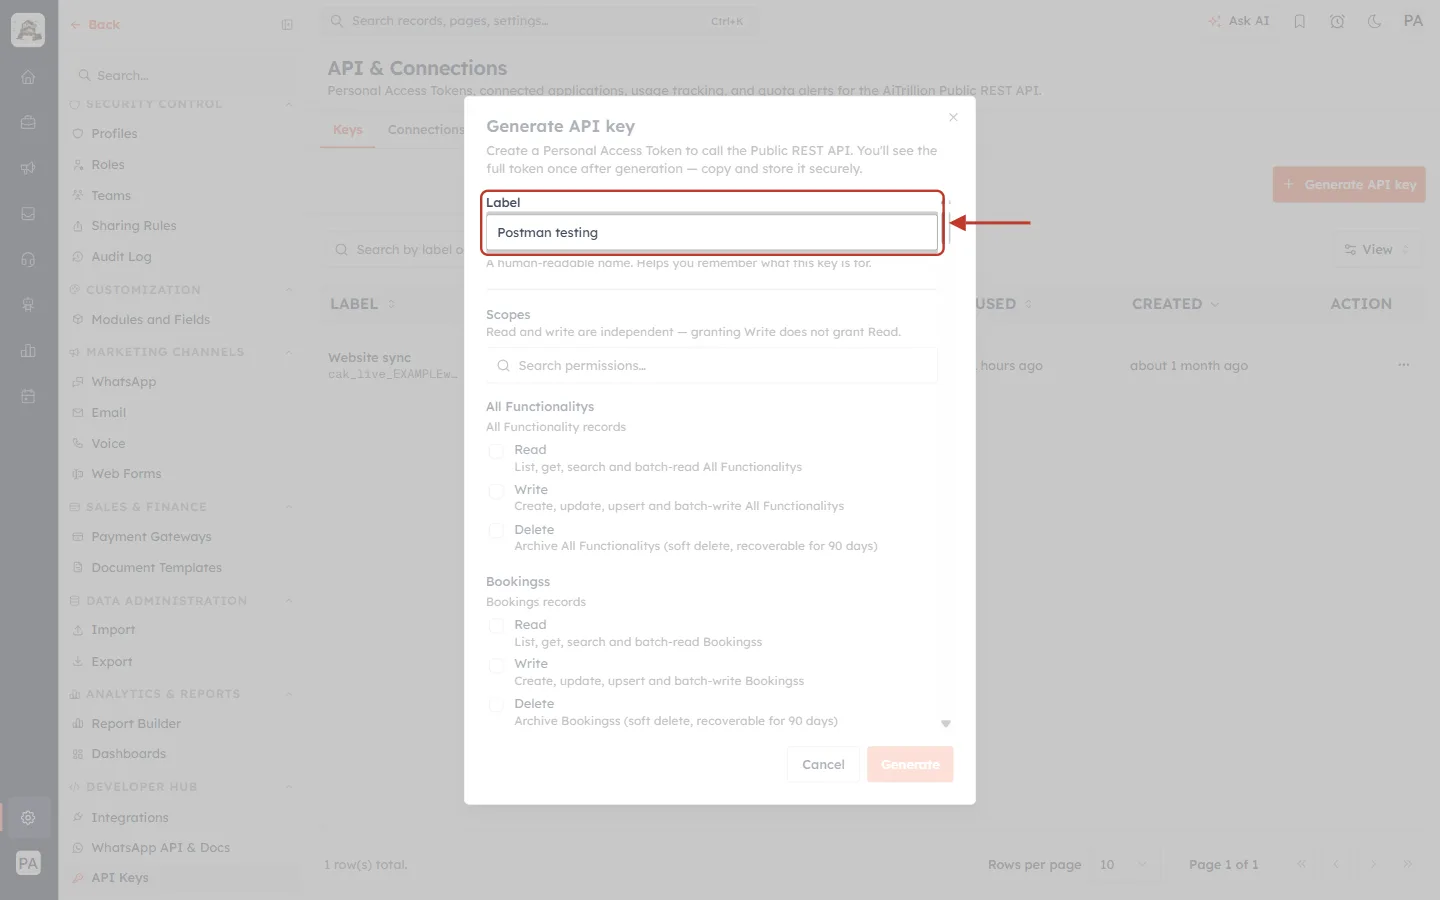
What this screenshot shows. The Generate API key window. The red box highlights the Label field with “Postman testing” typed in.
Top of the window: “Create a Personal Access Token to call the Public REST API. You’ll see the full token once after generation — copy and store it securely.”
Label: a human-readable name (up to 100 characters). It only helps you recognise the key later.
Below the label come the Scopes (what the key may do) and Expires (how long it works).
Step 3: Tick the scopes you need#
Scopes decide what the key is allowed to do. For the tests in this guide, tick two:
Contacts → Read (
crm.contacts.read): lets the key list and read contacts.Schema → Read (
crm.schema.read): lets the key see which modules and fields exist.
Use the Search permissions… box at the top of the list to find a scope quickly. Read, Write and Delete are separate: ticking Write does not include Read.
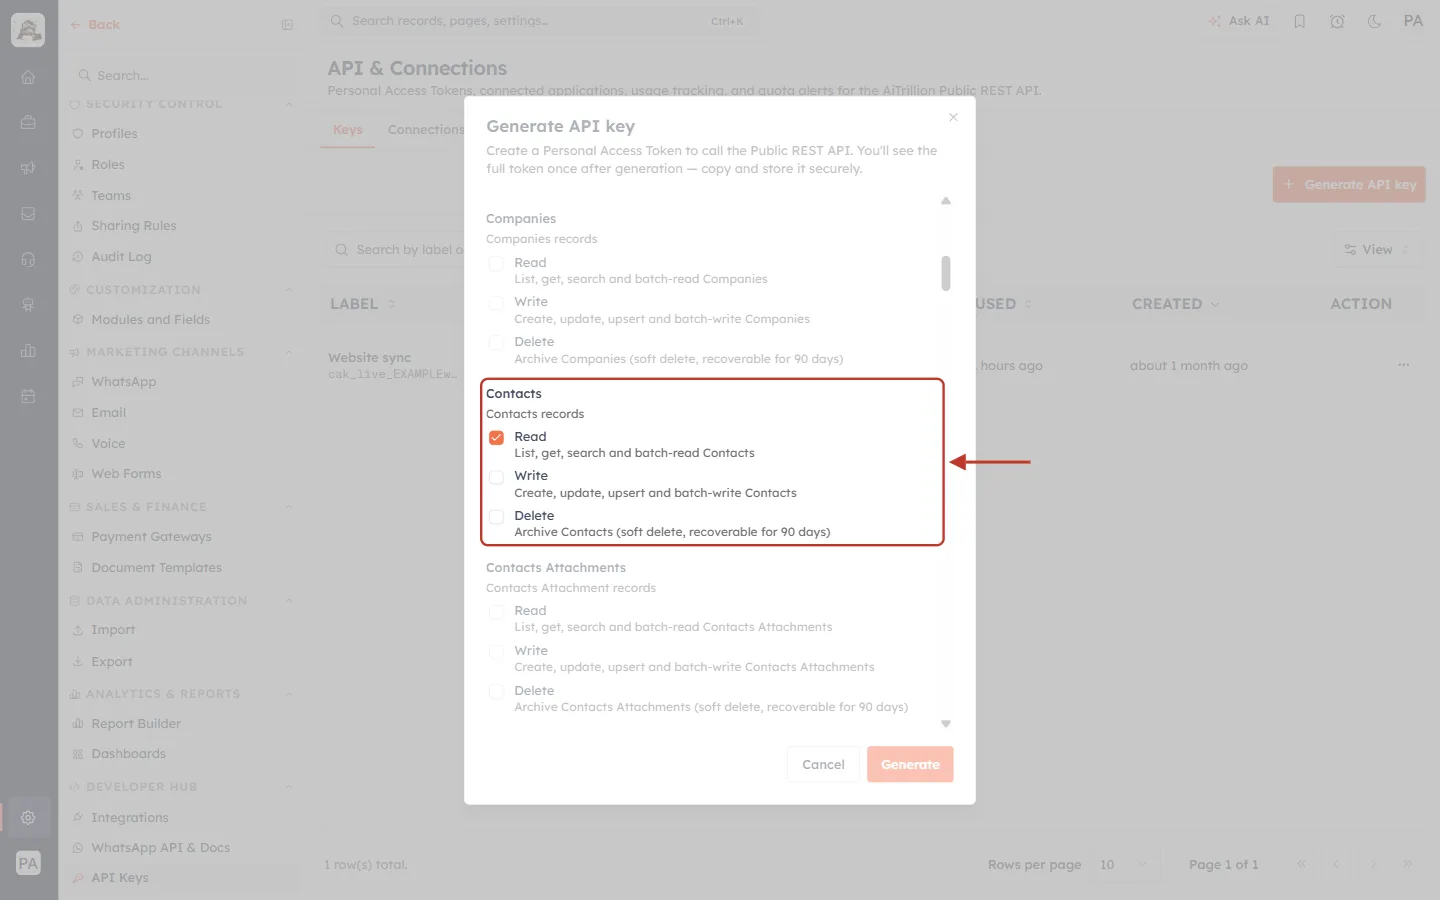
What this screenshot shows. The Contacts scope group inside the window. The red box highlights the group, with Read ticked.
Contacts / Contacts records: the group name and what it covers.
Read (ticked, orange check): “List, get, search and batch-read Contacts”.
Write: “Create, update, upsert and batch-write Contacts”. Leave it unticked for read-only testing.
Delete: “Archive Contacts (soft delete, recoverable for 90 days)”. Leave it unticked.
Above and below: the groups for other modules, such as Companies and Contacts Attachments. Every module in your CRM has its own group.
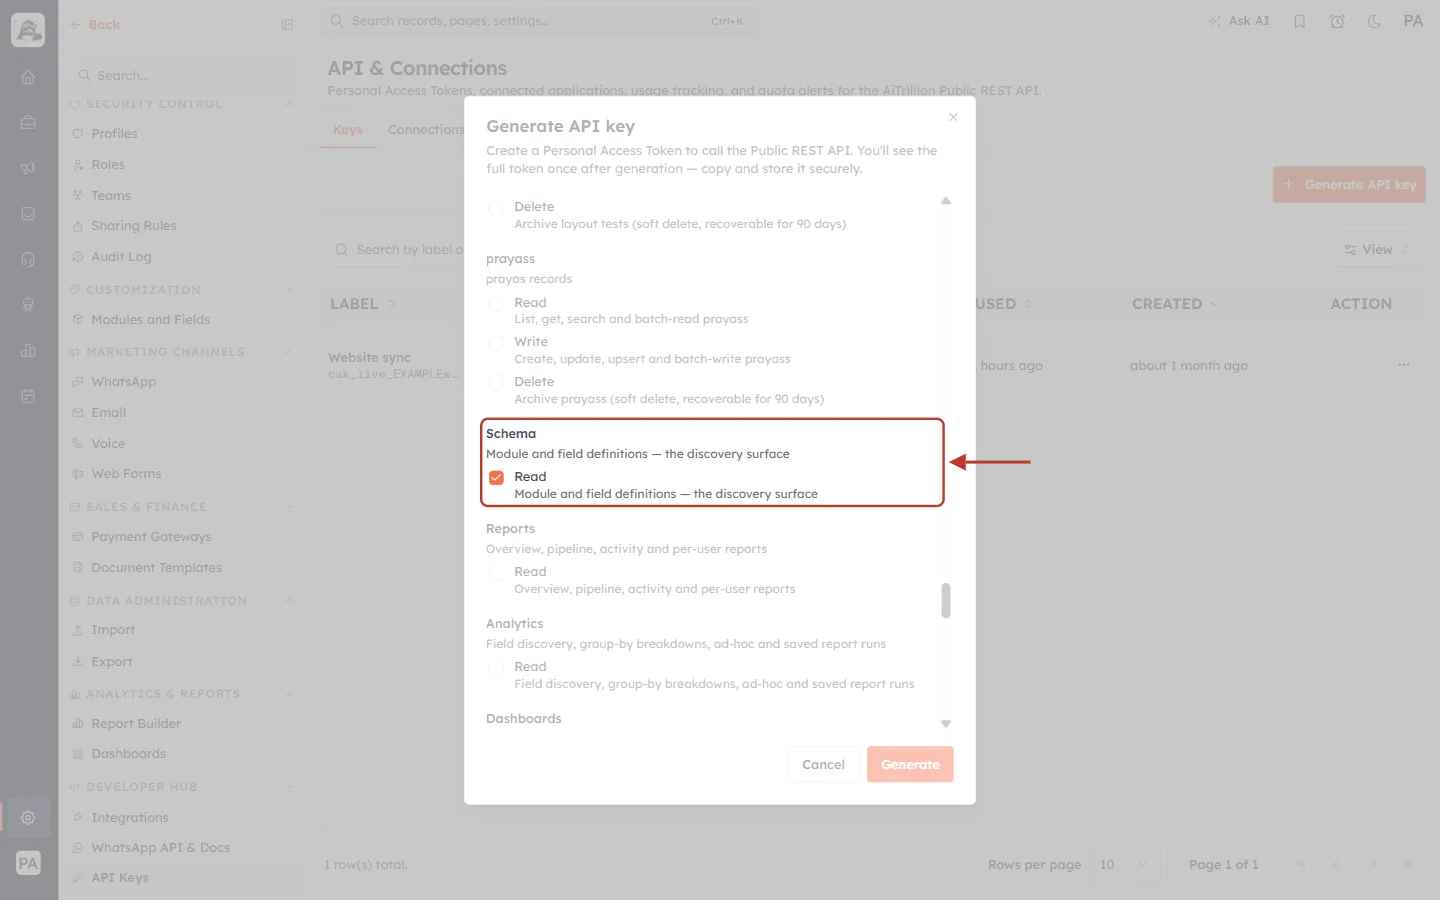
What this screenshot shows. The Schema scope group further down the list. The red box highlights it, with Read ticked.
Schema: “Module and field definitions — the discovery surface”.
Read (ticked): lets the key ask which modules exist and which fields each module has.
Below it: read-only areas such as Reports and Analytics. Tick them only if you want to test those endpoints too.
✅
Want to try every endpoint, including creating records, sending email and sending WhatsApp? Also tick Contacts → Write and the Email and WhatsApp scopes. One key can hold any mix of scopes.
Step 4: Choose when the key expires and generate it#
Scroll to the bottom of the window to Expires.
Pick how long the key should work: Never, 30 days, 90 days, 1 year or 2 years. For a test key, 30 days is a good choice.
Click Generate.
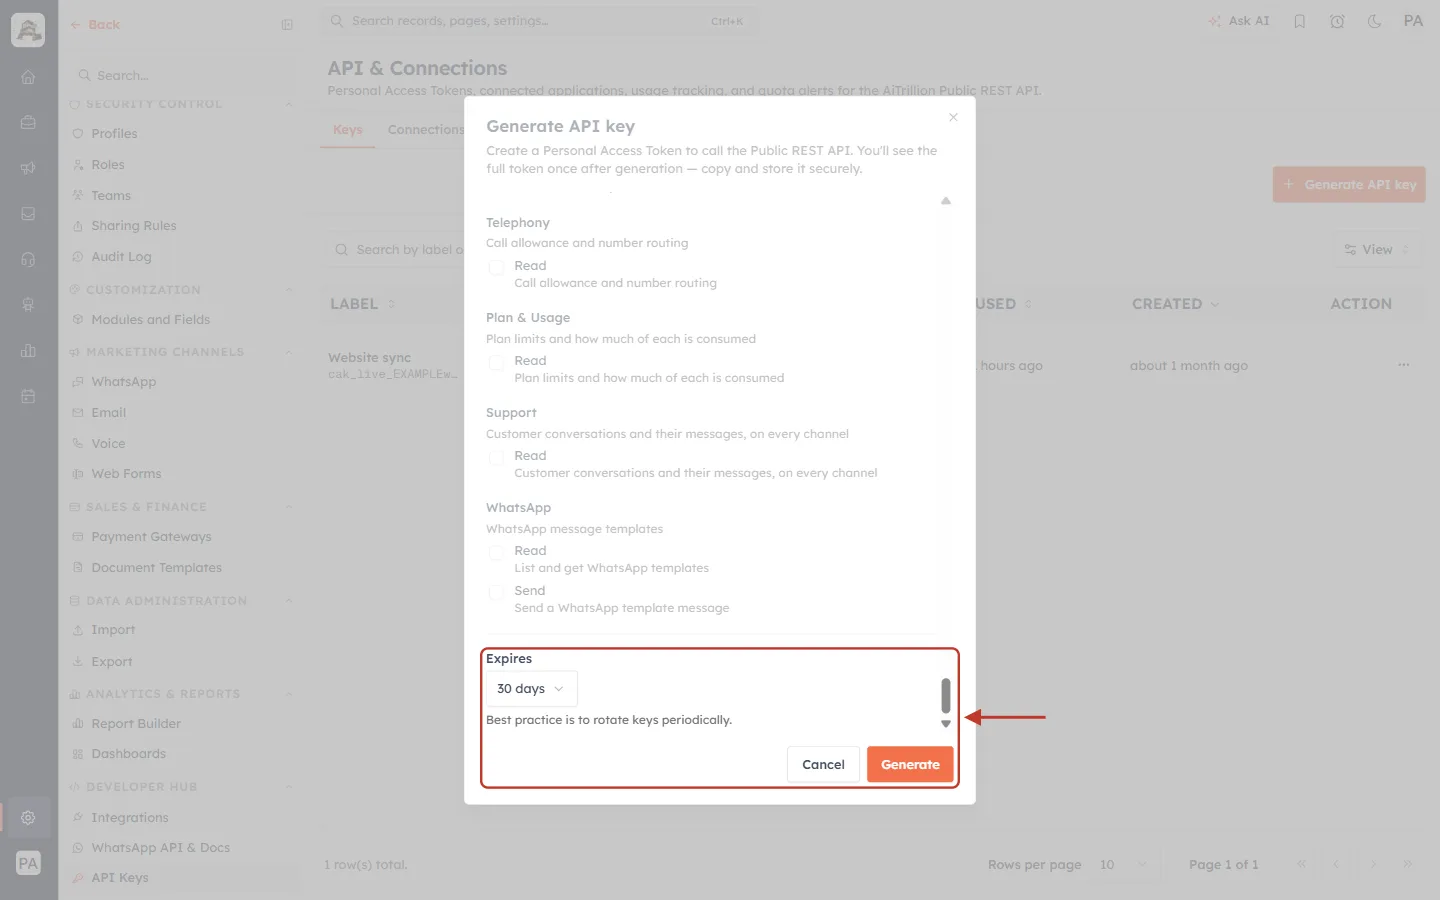
What this screenshot shows. The bottom of the Generate API key window. The red box highlights the Expires setting (30 days) and the Generate button.
Expires: set to 30 days. “Best practice is to rotate keys periodically.”
Cancel: closes the window without creating a key.
Generate (orange): creates the key. It is greyed out until you have a label and at least one scope.
Above: the end of the scope list (Telephony, Plan & Usage, Support, WhatsApp).
Step 5: Copy the key (you only see it once)#
The Save this token now window shows the full key, starting with
cak_live_.Click Copy to clipboard.
Paste it somewhere safe, such as a password manager.
Click I’ve saved it. This button only becomes active after you click Copy.
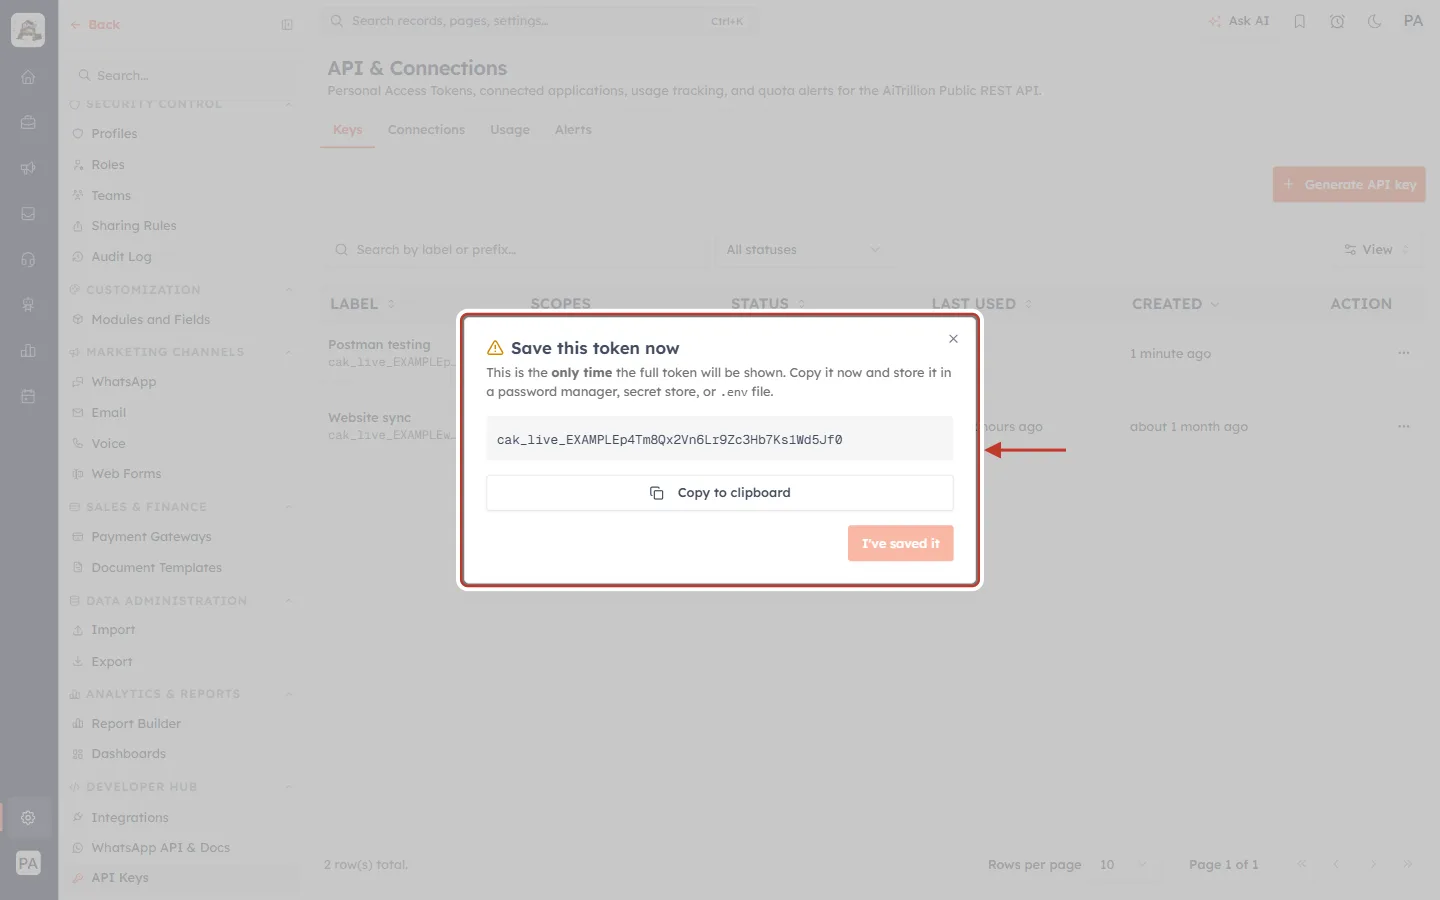
What this screenshot shows. The Save this token now window. The red box highlights the whole window: the warning, the full key and the buttons.
Warning: “This is the only time the full token will be shown. Copy it now and store it in a password manager, secret store, or .env file.”
The key:
cak_live_EXAMPLEp4Tm8Qx2Vn6Lr9Zc3Hb7Ks1Wd5Jf0(an example). Yours starts withcak_live_too.Copy to clipboard: copies the full key.
I’ve saved it: closes the window. It is disabled until you copy the key.
Behind the window: the new Postman testing row is already in the key list, showing only the start of the key (
cak_live_EXAMPLEp…).
⚠️
Treat the key like a password. Anyone who has it can call the API as you. Never paste it into chats, tickets or public code. If it leaks, revoke it on the API Keys page and create a new one.
Part 2: Test the API in the API console#
The developer portal at developer.aiengagecrm.com is the AiEngage CRM API reference. It is also a working console: once you paste your key, every Send button makes a real call to your CRM and shows the real answer.
Step 6: Open the developer portal#
Open developer.aiengagecrm.com in your browser. No sign-in is needed.
Get to know the top bar. You will use Console and Download YAML later in this guide.
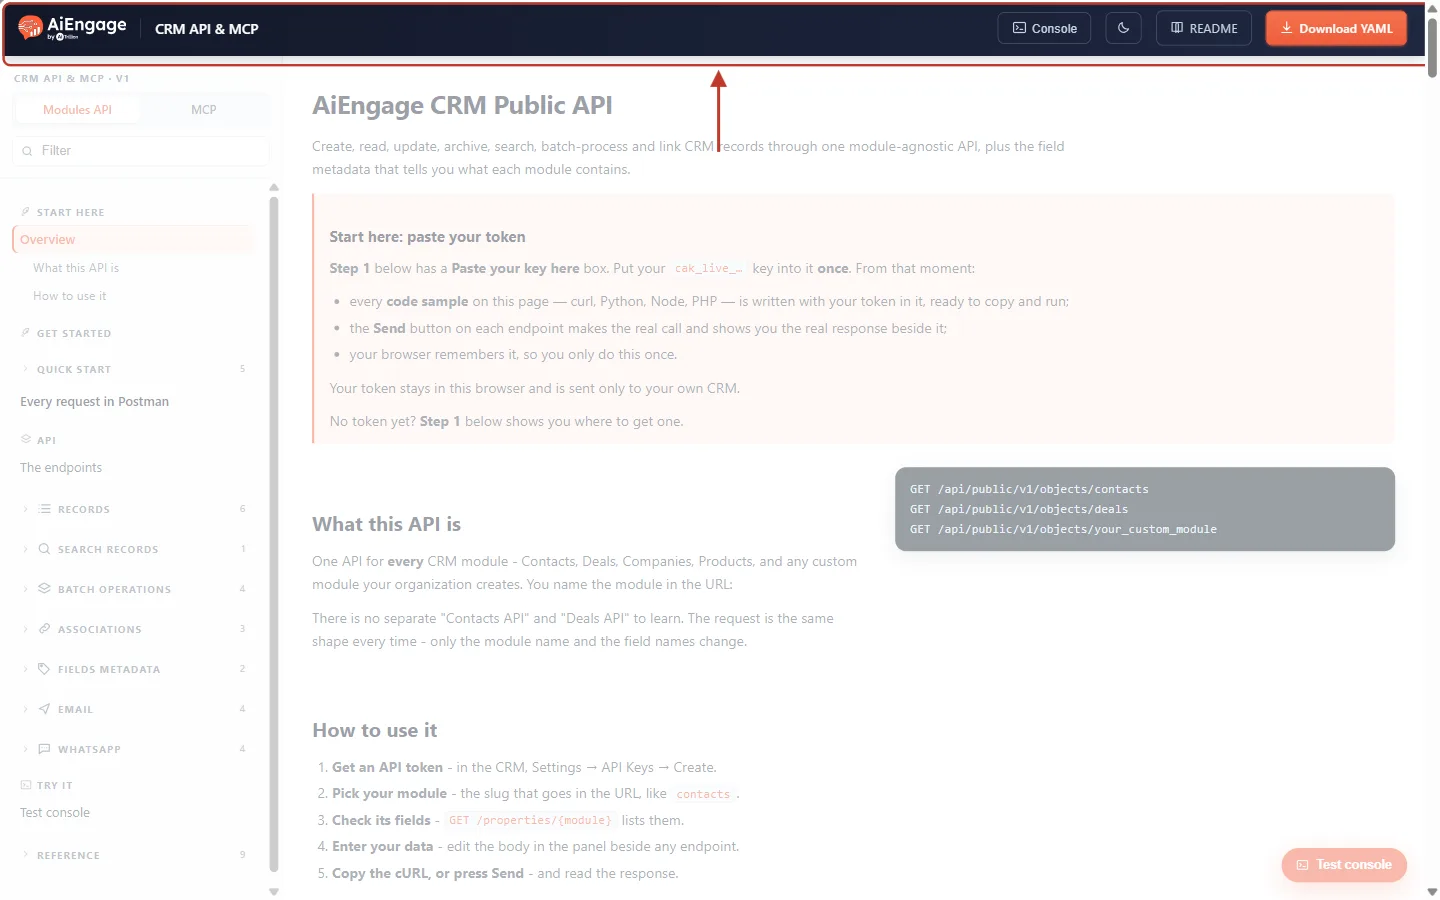
What this screenshot shows. The developer portal. The red box highlights the dark bar across the top of the page.
Left: the AiEngage logo and the name CRM API & MCP.
Console: opens the API console, where you can paste and run any request (Step 10).
Moon icon: switches between light and dark mode.
README: the short text version of the guide.
Download YAML (orange): downloads the OpenAPI file that Postman and similar tools can import (Part 3).
Below the bar: the left menu (Modules API and MCP tabs, then Start here, Get started, API, Try it and Reference) and the page, which starts with AiEngage CRM Public API and a pink Start here: paste your token box.
Step 7: Paste your key once#
In the left menu, click Quick Start.
On the right of Step 1 - Get an API token, find the box Paste your key here.
Paste your key into it. Paste only the key itself. If it starts with
Bearer, the box removes that for you.Click Save key.
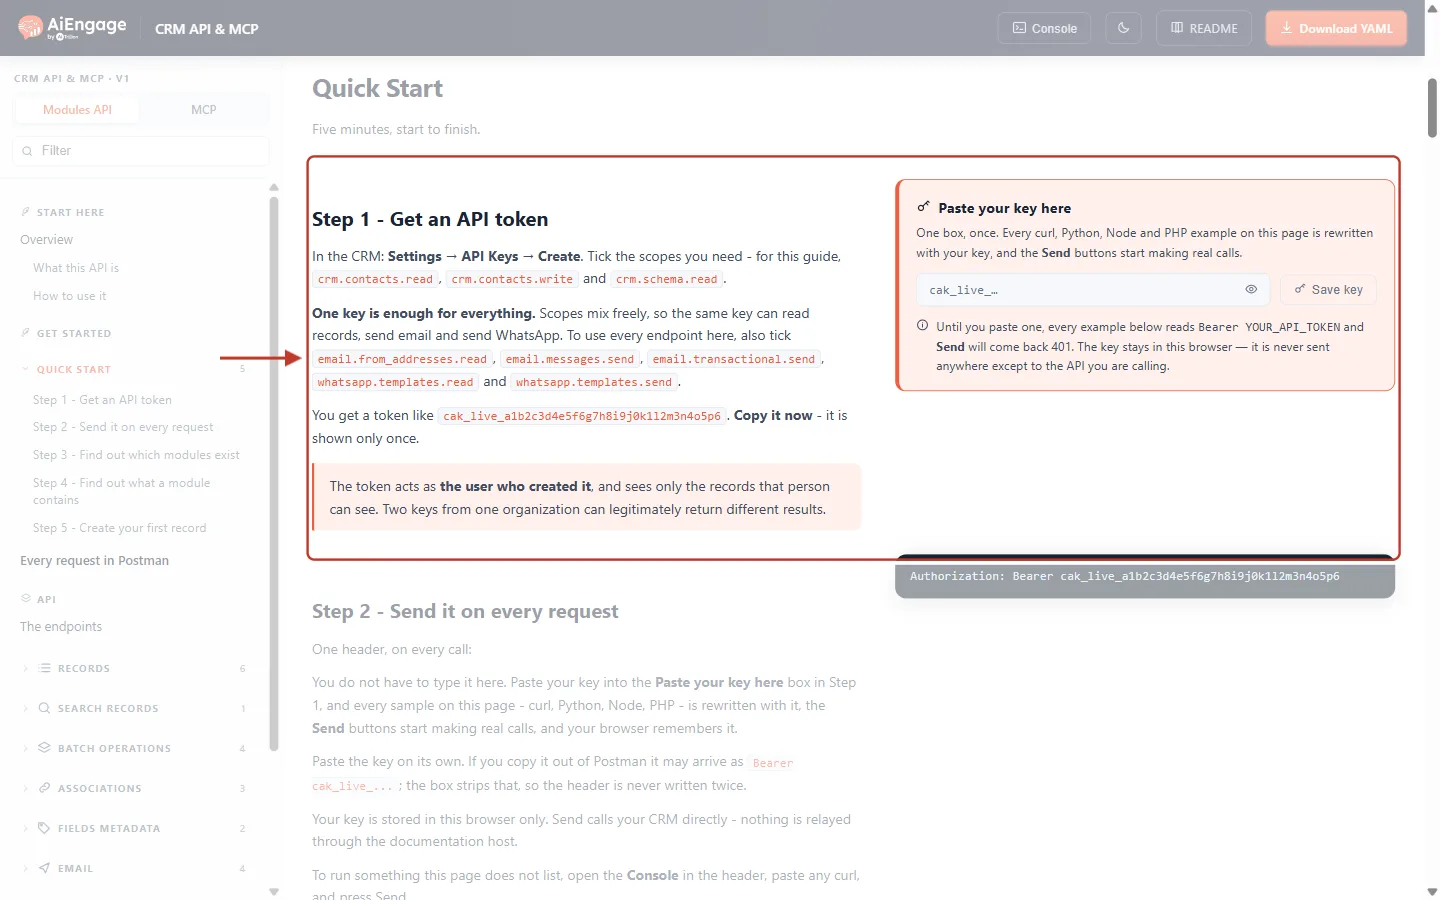
What this screenshot shows. The Quick Start section. The red box highlights Step 1 - Get an API token and the Paste your key here box beside it.
Step 1 text: “In the CRM: Settings → API Keys → Create. Tick the scopes you need — for this guide,
crm.contacts.read,crm.contacts.writeandcrm.schema.read.”One key is enough for everything: the list of extra scopes for email and WhatsApp.
Paste your key here (pink box, right): the key field (shows
cak_live_…when empty), an eye icon to show or hide the key, and Save key.Note under the box: until you paste a key, every example reads
Bearer YOUR_API_TOKENand Send returns 401.
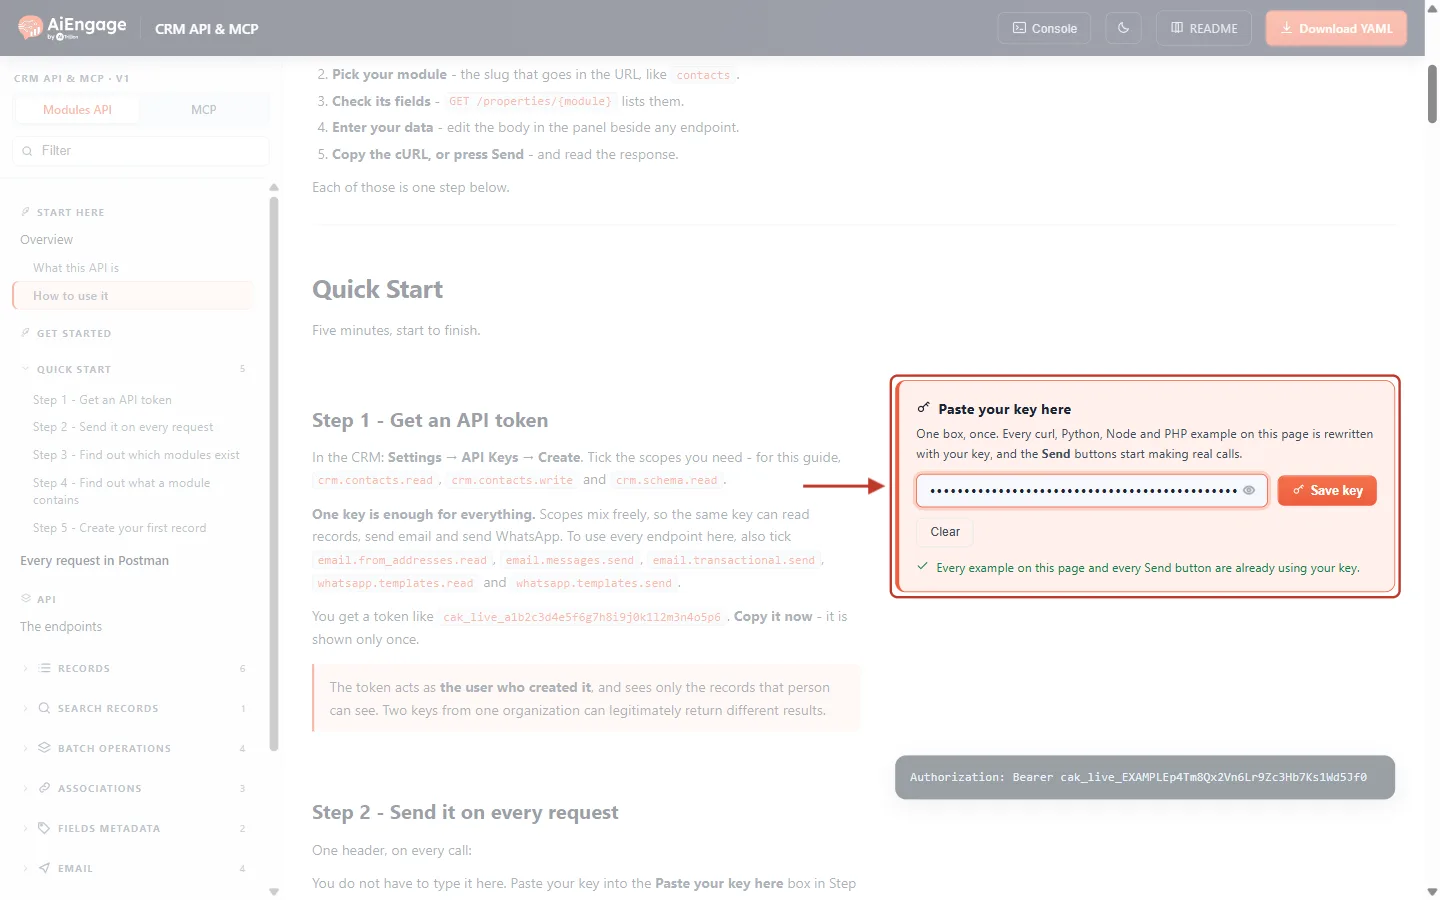
What this screenshot shows. The same box after pasting a key. The red box highlights it.
Key field: filled in. The key is hidden as dots. Click the eye icon to check it.
Save key (orange): saves the key in this browser.
Clear: removes the key from this browser again.
Green line: “Every example on this page and every Send button are already using your key.”
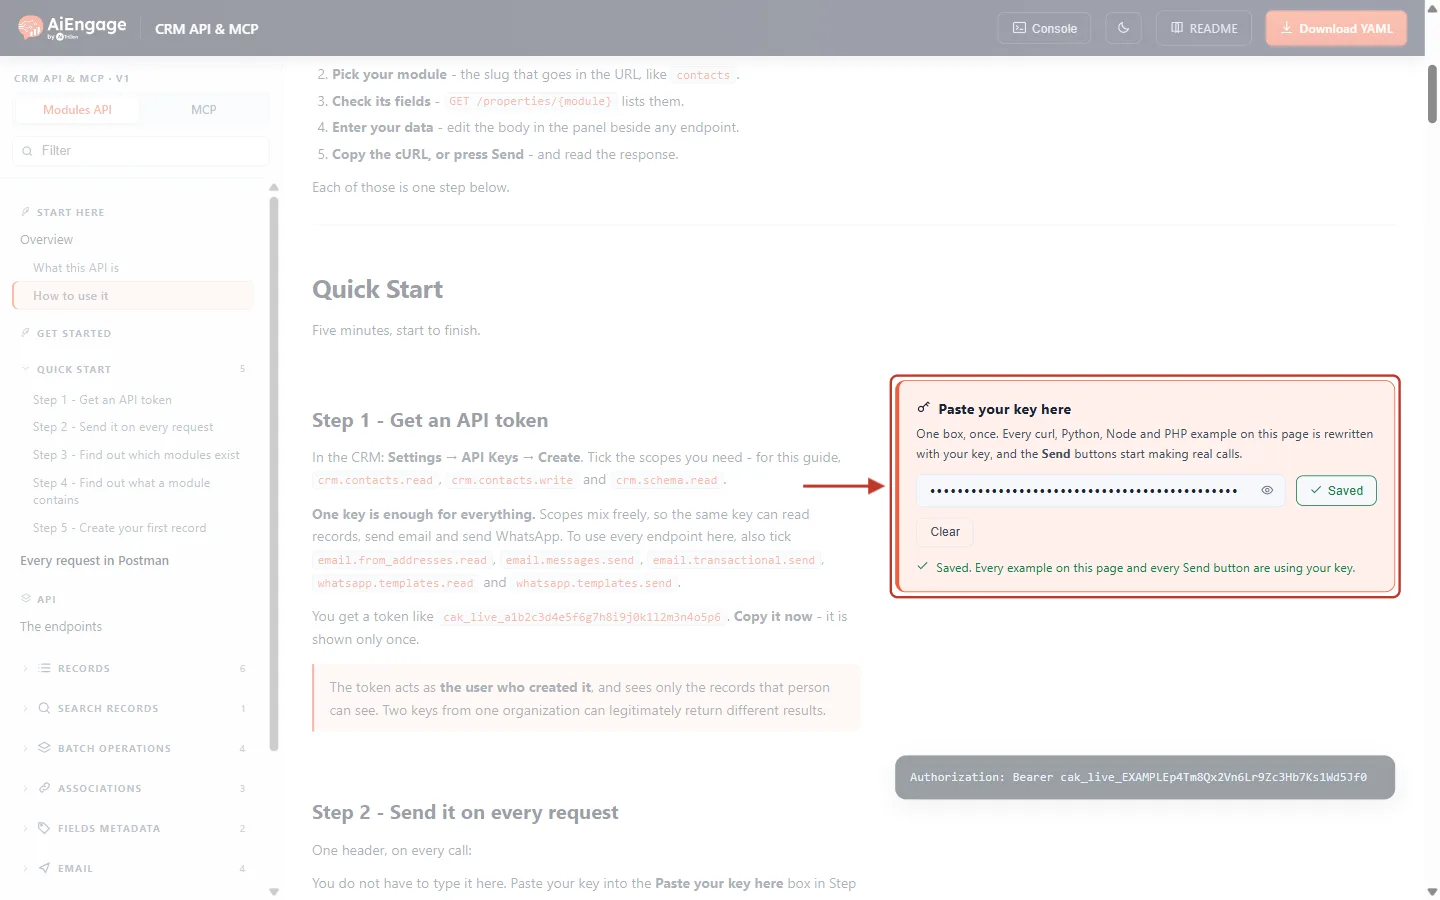
What this screenshot shows. The box after clicking Save key. The red box highlights it.
Saved (green, with a check mark) replaces the Save key button.
Green line: “Saved. Every example on this page and every Send button are using your key.”
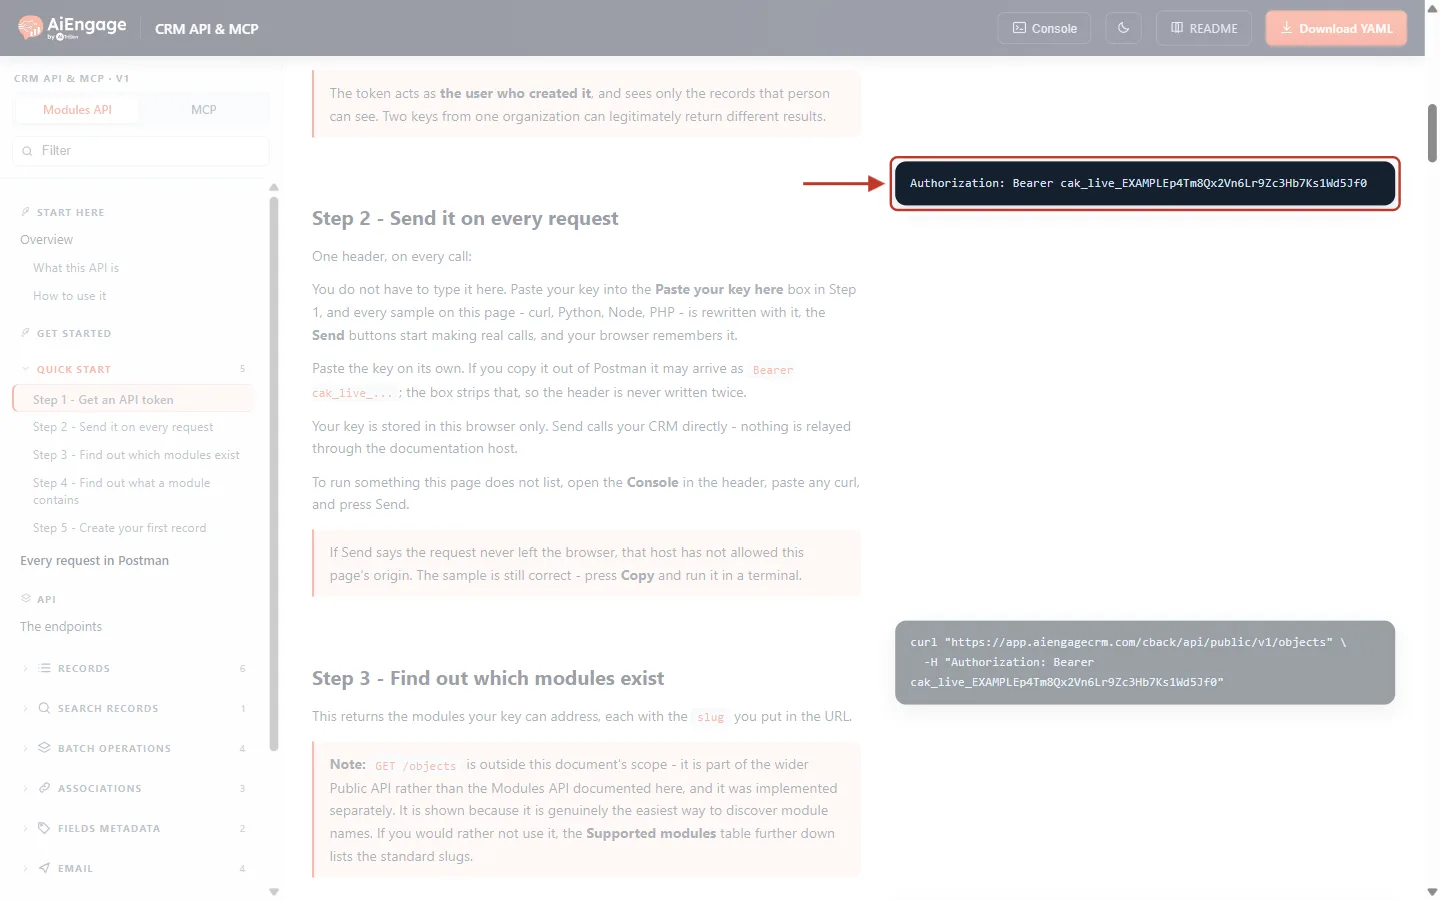
What this screenshot shows. Step 2 - Send it on every request. The red box highlights the dark sample on the right, which now contains your key.
The sample:
Authorization: Bearer cak_live_…. This is the one header every API request needs.Left text: explains that the box rewrites every curl, Python, Node and PHP sample with your key, and that your key is stored in this browser only.
Further down: Step 3 - Find out which modules exist, whose curl sample also carries your key now.
ℹ️
Where is my key kept? Only in this browser, on this computer. The portal sends it straight to your CRM when you press Send. It is never sent anywhere else. On a shared computer, click Clear when you are done.
Step 8: Open an endpoint and fill in its parameters#
Let’s list your newest contacts with Get Records.
In the left menu, open RECORDS and click Get Records.
Read What you need: the scope (
crm.contacts.readfor contacts) and themodule.Look at the panel on the right. With your key saved, it says Ready to send.
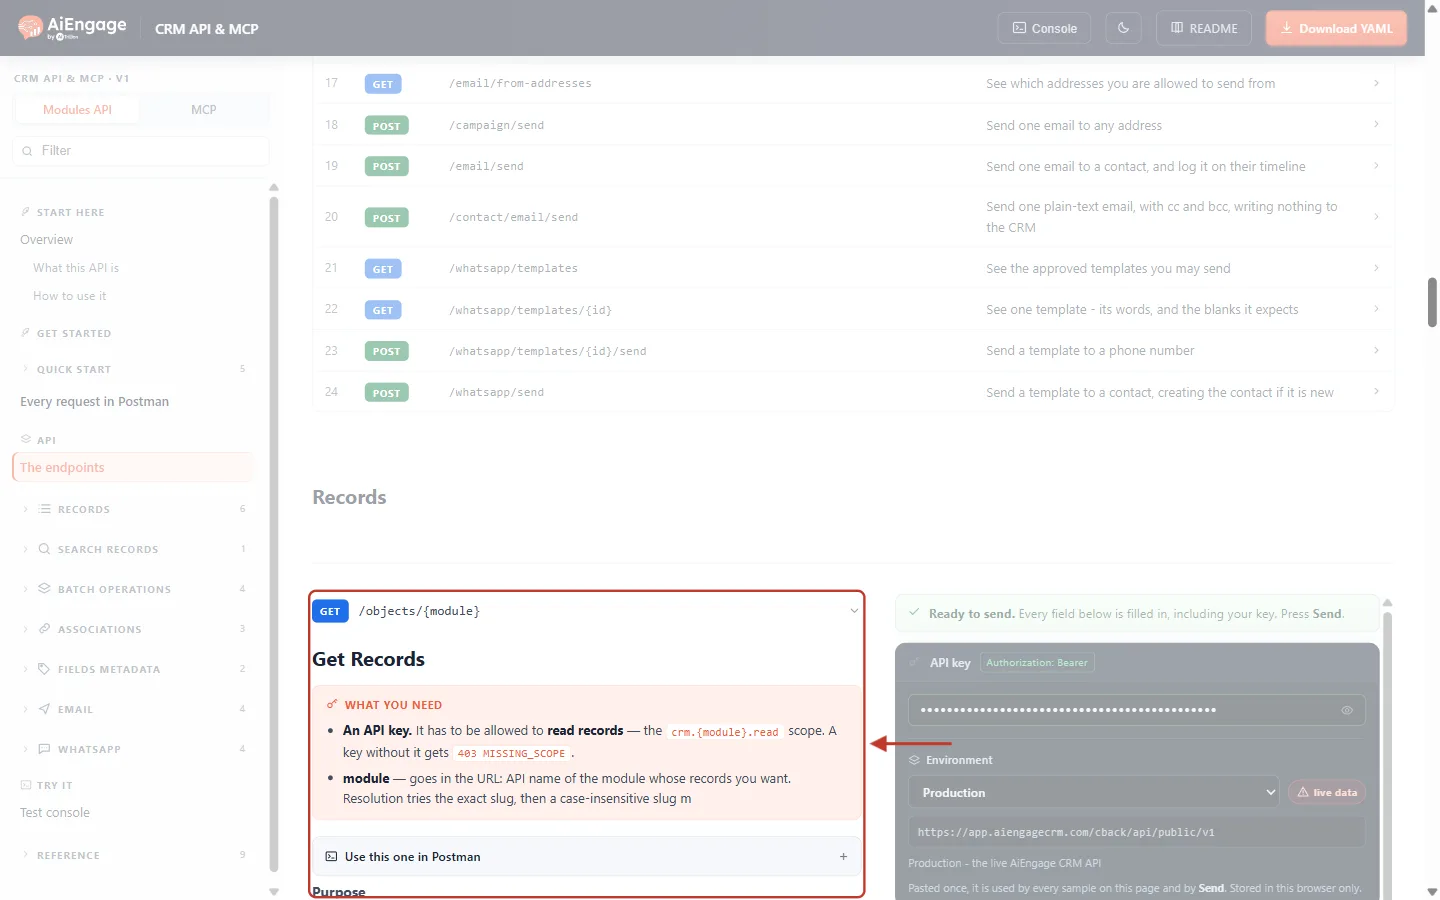
What this screenshot shows. The Get Records endpoint. The red box highlights its header and the What you need box.
GET /objects/{module}: the method and path.
{module}is the module’s name, such ascontacts.What you need: an API key with the
crm.{module}.readscope (a key without it gets 403 MISSING_SCOPE), and themodulein the URL.Use this one in Postman +: opens ready-to-copy Postman settings for this endpoint (Step 12).
Right: “Ready to send. Every field below is filled in, including your key. Press Send.”
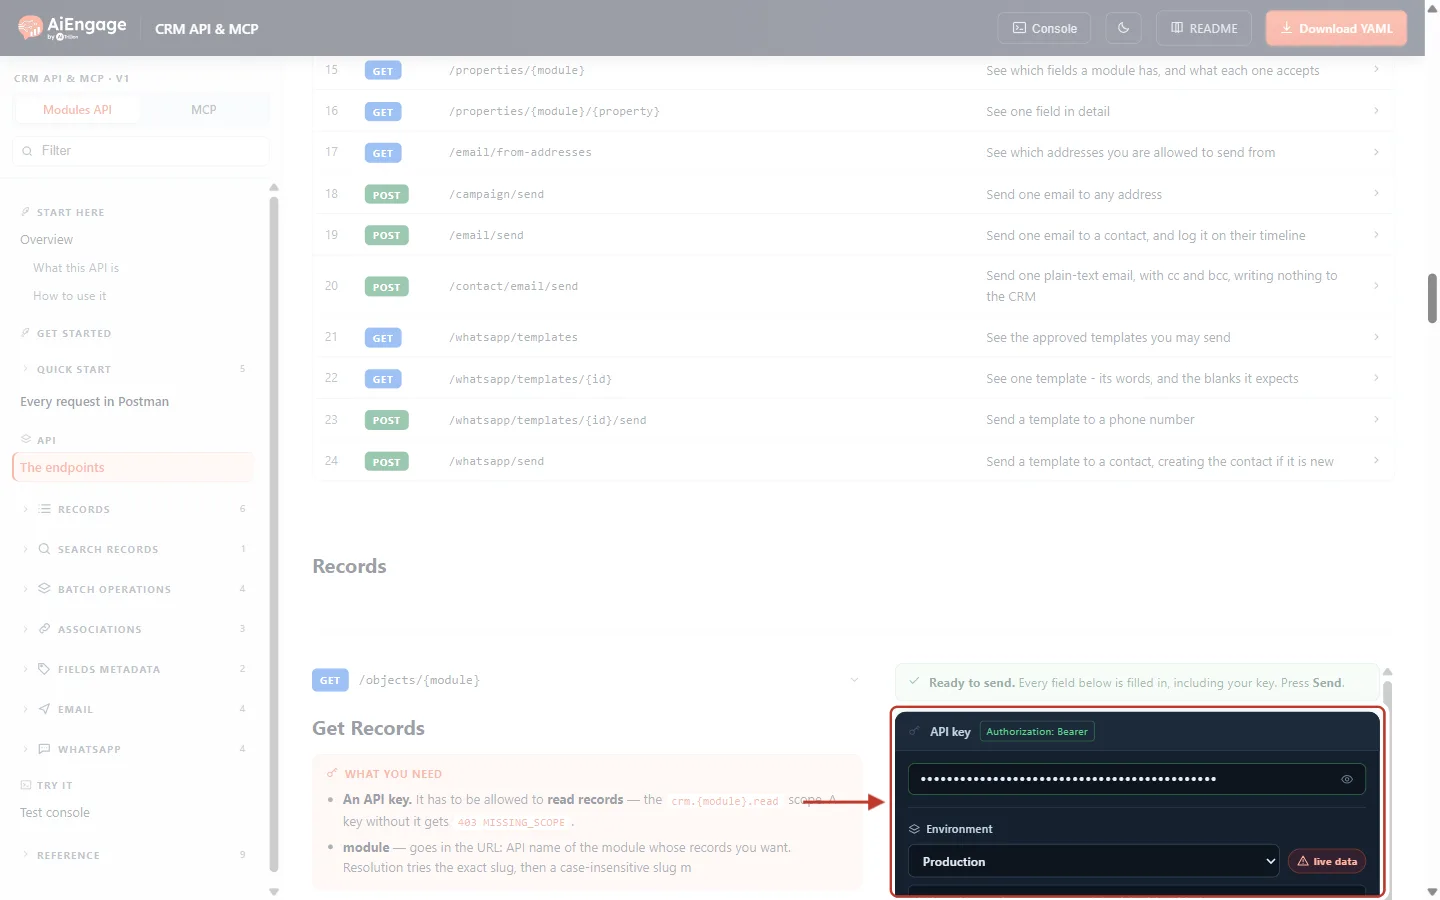
What this screenshot shows. The top of the Try-it panel beside the endpoint. The red box highlights the API key and Environment area.
API key (with the label Authorization: Bearer): already filled with your saved key.
Environment: which CRM the call goes to. Production is the live AiEngage CRM. The address under it is
https://app.aiengagecrm.com/cback/api/public/v1.live data (red badge): a reminder that this call reaches your real CRM data.
Under URL parameters, check that
modulesays contacts.Under Additional filters, set limit to 3 to get three records.
Optionally set properties to
first_name,last_name,emailto get only those fields.Leave the other filters (after, archived, include) empty. An empty filter is left out of the request.
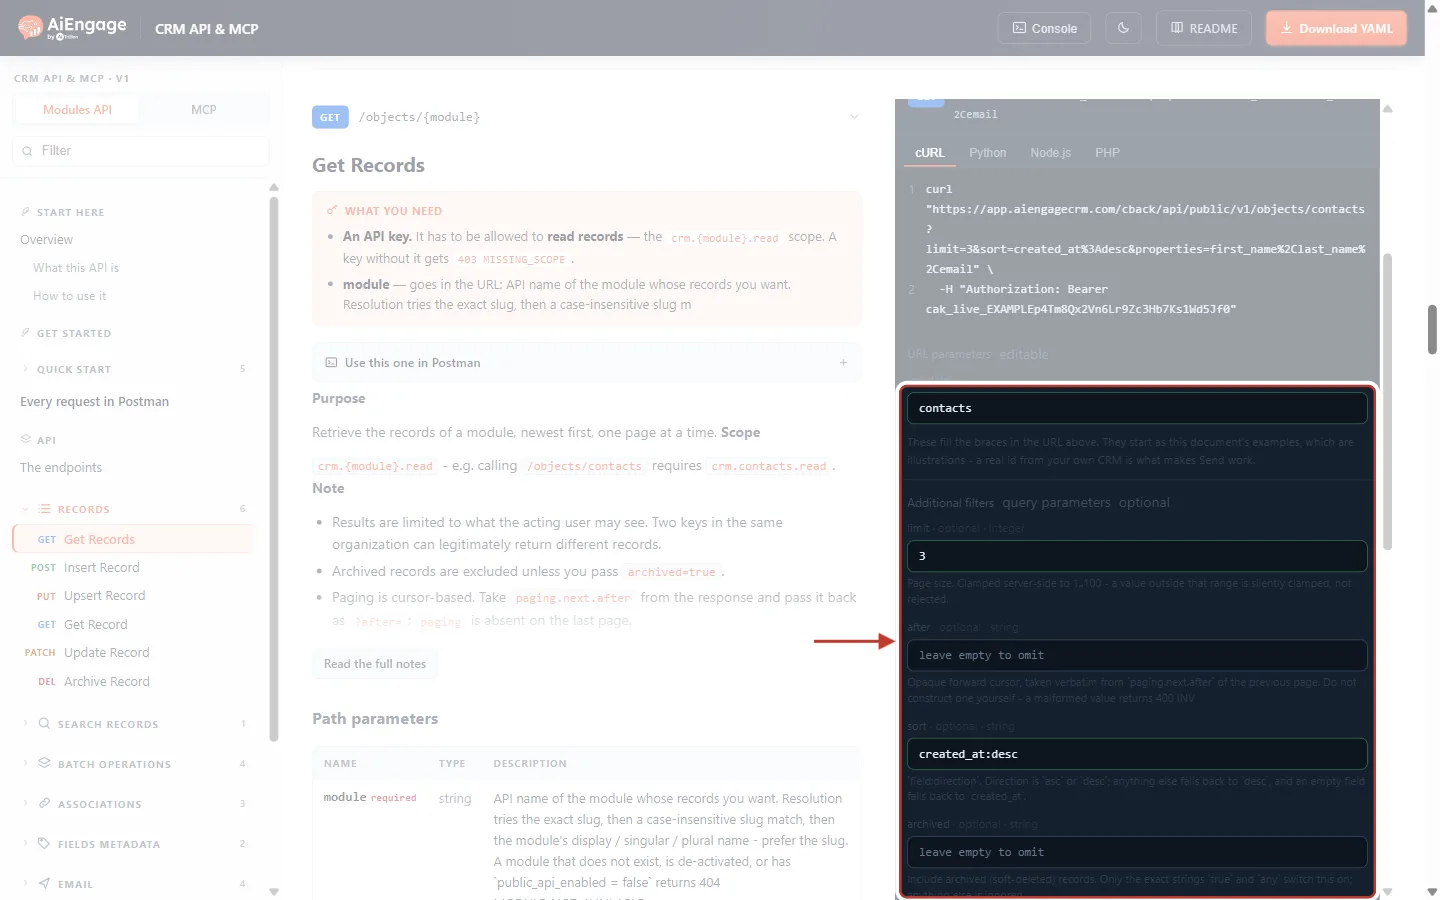
What this screenshot shows. The parameter boxes in the Try-it panel. The red box highlights the module, limit and sort/properties boxes.
module:
contacts, the module to read.limit:
3. Page size from 1 to 100 (default 10).sort:
created_at:desc, newest first (the default).“leave empty to omit”: the boxes you can leave blank.
Top of the panel: the cURL / Python / Node.js / PHP tabs show the same request as code, already updated with your values.
Step 9: Press Send and read the answer#
Scroll to the buttons under the code sample.
Click Send.
Read the answer that appears below the buttons.
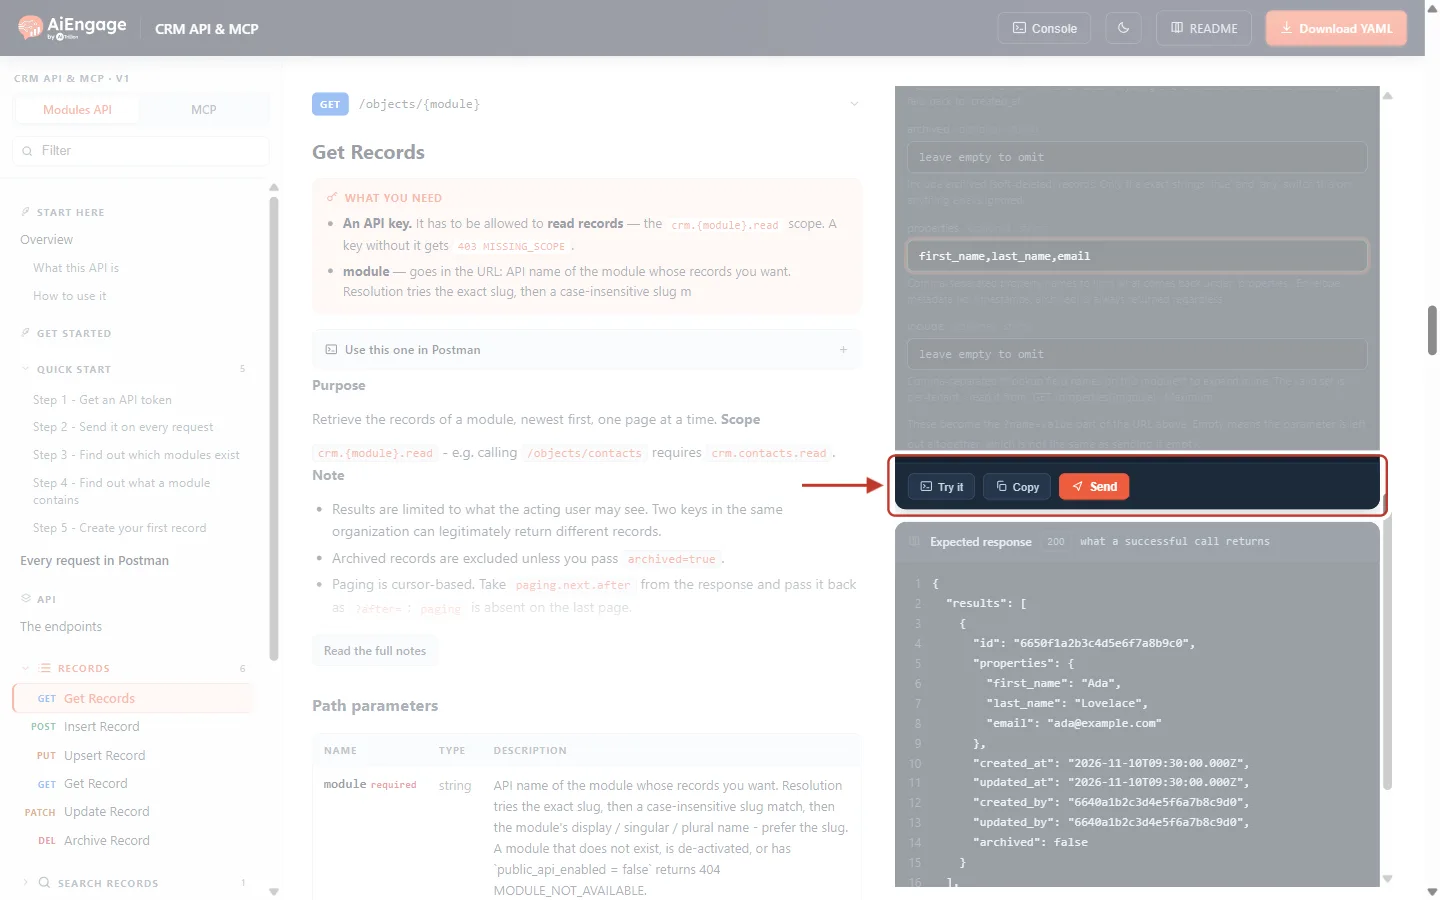
What this screenshot shows. The buttons under the code sample. The red box highlights them.
Try it: opens this request in the API console, where you can edit and run it (Step 10).
Copy: copies the request as code (in the language of the selected tab) so you can run it in a terminal.
Send (orange): makes the real call.
Below: Expected response 200, an example of what a successful call returns. After you press Send, the real answer appears here instead.
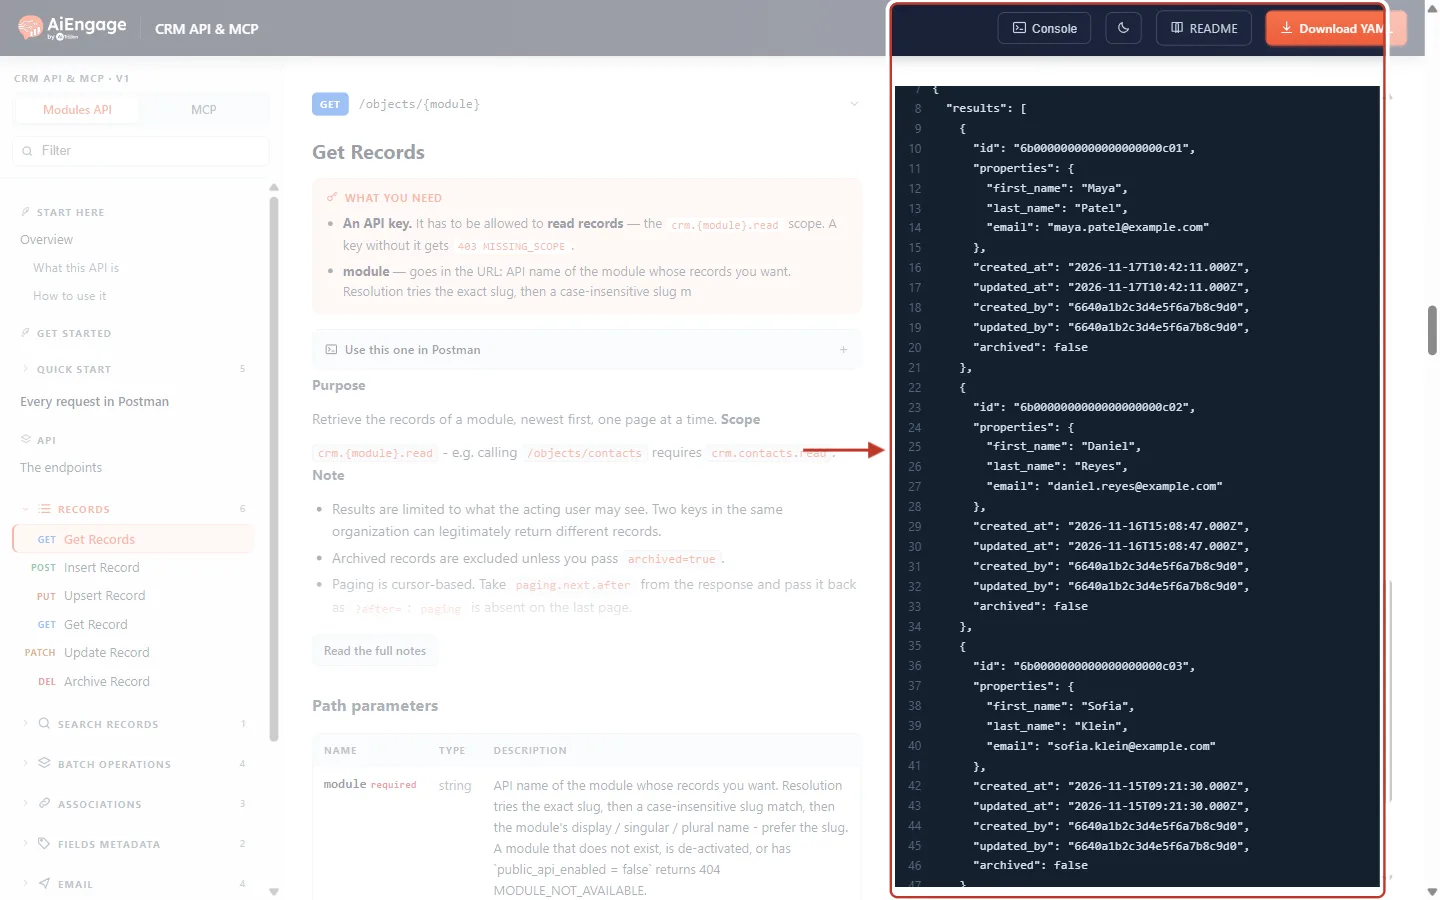
What this screenshot shows. The answer from the API after pressing Send. The red box highlights the response.
results: the list of records. Each record has an
id, apropertiesobject with the fields (herefirst_name,last_nameandemail), andcreated_at,updated_at,created_by,updated_byandarchived.Here you see the three sample contacts, newest first: Maya Patel, Daniel Reyes and Sofia Klein.
paging.next.after (at the end of the response): a cursor. To get the next page, send the same request again with after set to this value.
✅
That’s your first API call. If you got 401, 403 or 404 instead, see Troubleshooting at the end of this guide.
Step 10: Use the API console to run any request#
The Send button on each endpoint only sends that endpoint. The API console does the opposite: it runs any curl command you paste, such as one a colleague sent you or one from this guide.
Click Console in the top bar (or the orange Test console button in the bottom-right corner).
The API console opens on the right side of the page.
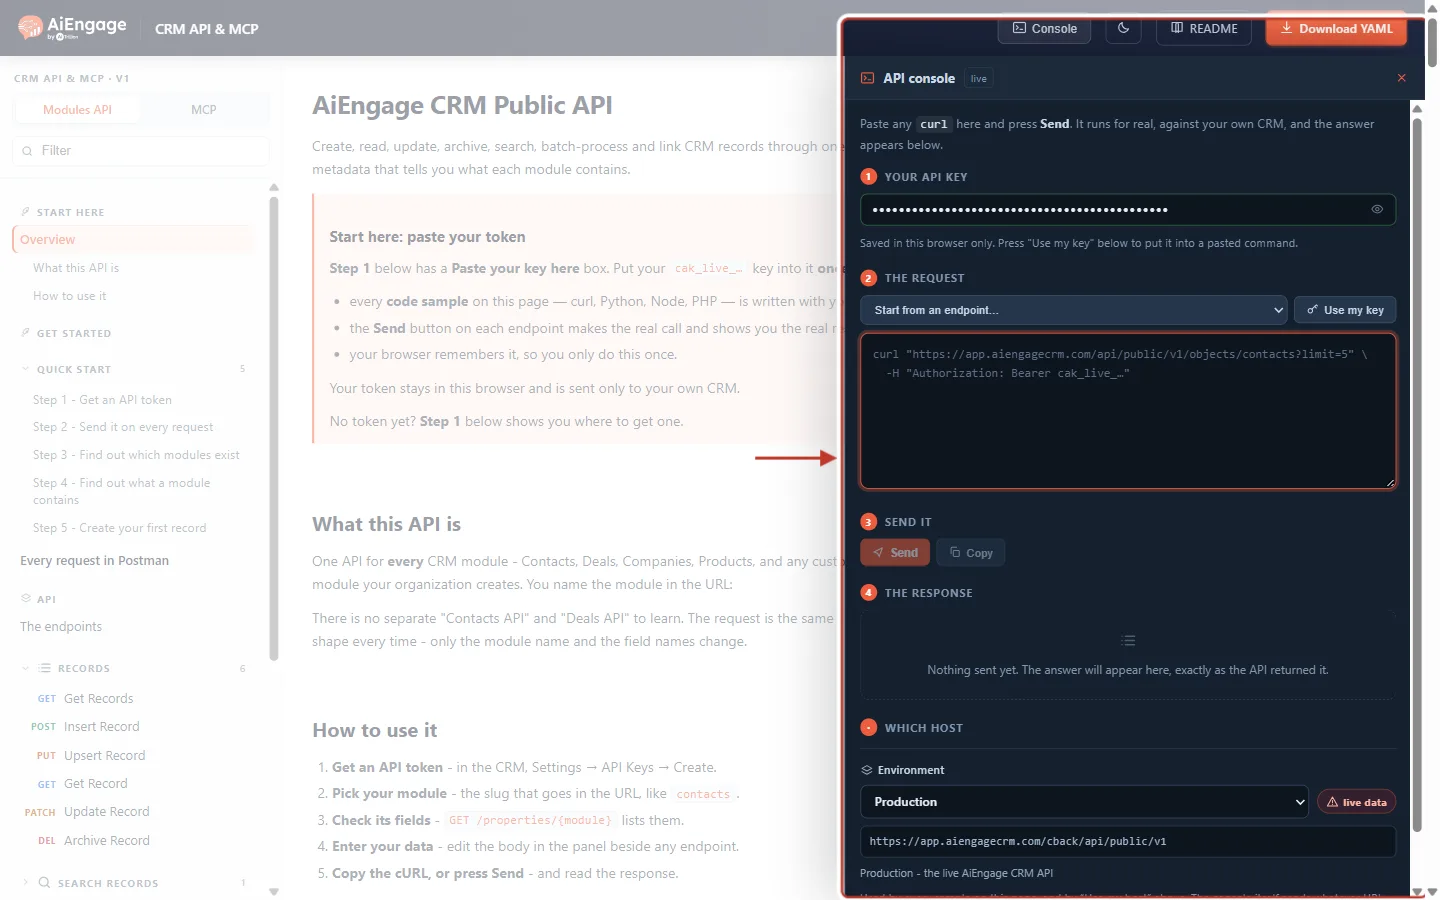
What this screenshot shows. The API console panel. The red box highlights the whole panel and the Console button that opened it.
Title: API console with a live badge. “Paste any
curlhere and press Send. It runs for real, against your own CRM, and the answer appears below.”1 YOUR API KEY: your saved key (hidden as dots). “Saved in this browser only.”
2 THE REQUEST: the Start from an endpoint… list and the big box for the
curlcommand.3 SEND IT: Send and Copy.
4 THE RESPONSE: “Nothing sent yet. The answer will appear here, exactly as the API returned it.”
WHICH HOST: the Environment list (Production) and its address.
× (top-right corner): closes the console.
Open Start from an endpoint… and pick GET · Get Records. A working command fills the box. Or paste your own
curlcommand into the box.If the pasted command does not carry your key yet, click Use my key. To point it at the host chosen under Which host, click Use my host.
Click Send.
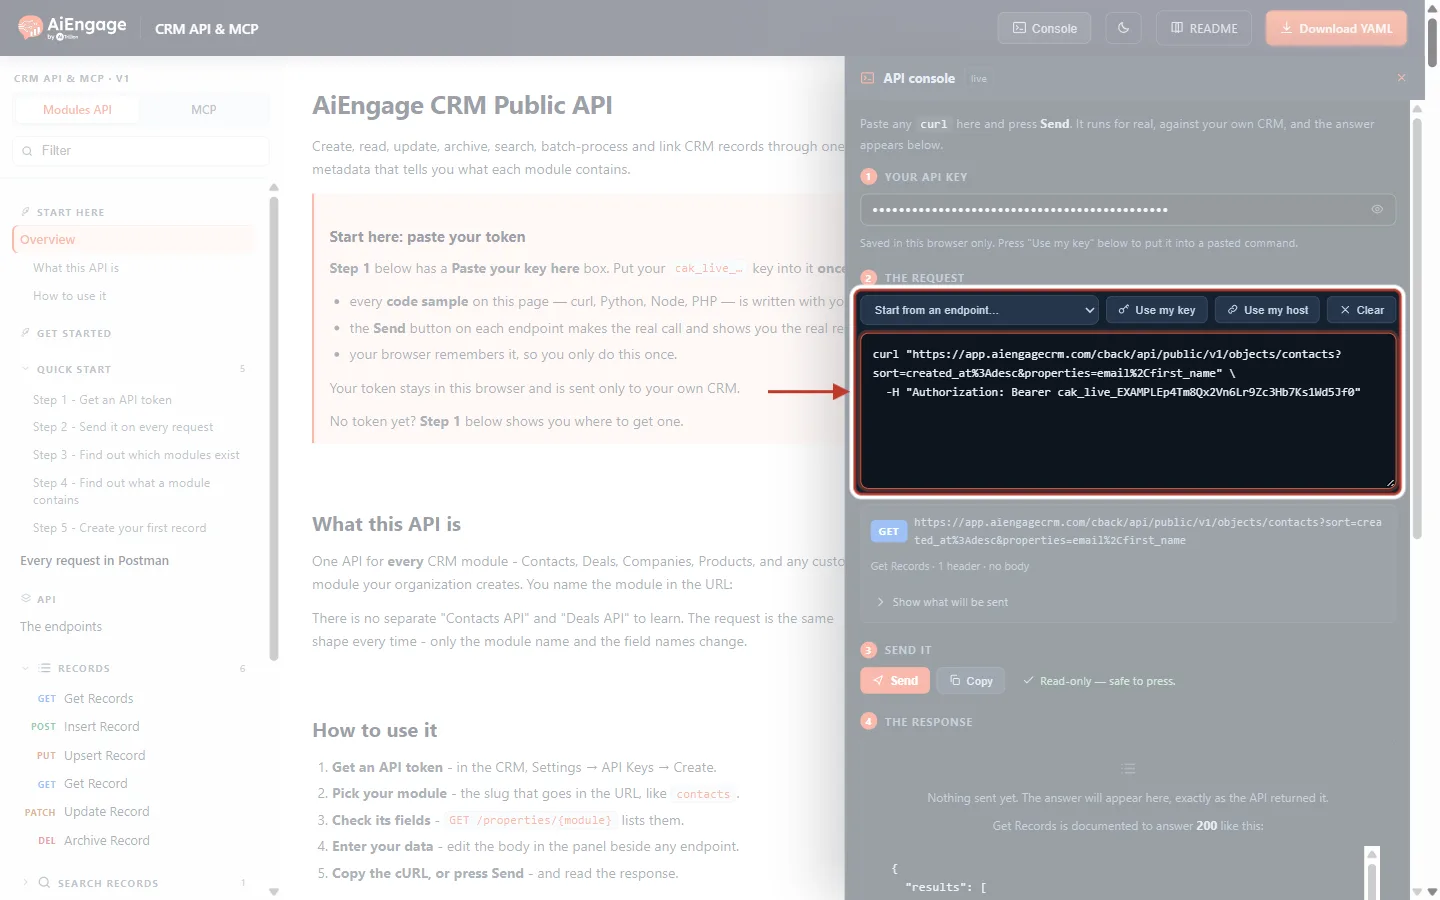
What this screenshot shows. Step 2 THE REQUEST in the console. The red box highlights the endpoint list and the command box.
Start from an endpoint…: the list of every endpoint (GET · Get Records, POST · Insert Record, PUT · Upsert Record and so on). Picking one fills in a working command.
Use my key / Use my host / Clear: put your saved key or host into the command, or empty the box.
The command:
curl "https://app.aiengagecrm.com/cback/api/public/v1/objects/contacts?…" -H "Authorization: Bearer cak_live_…".Under the box: a summary of what will be sent (GET … · Get Records · 1 header · no body) and Show what will be sent.
Next to Send: “Read-only — safe to press.” For commands that create, change or delete records it shows a warning instead: “This is real — it changes data in your CRM.”
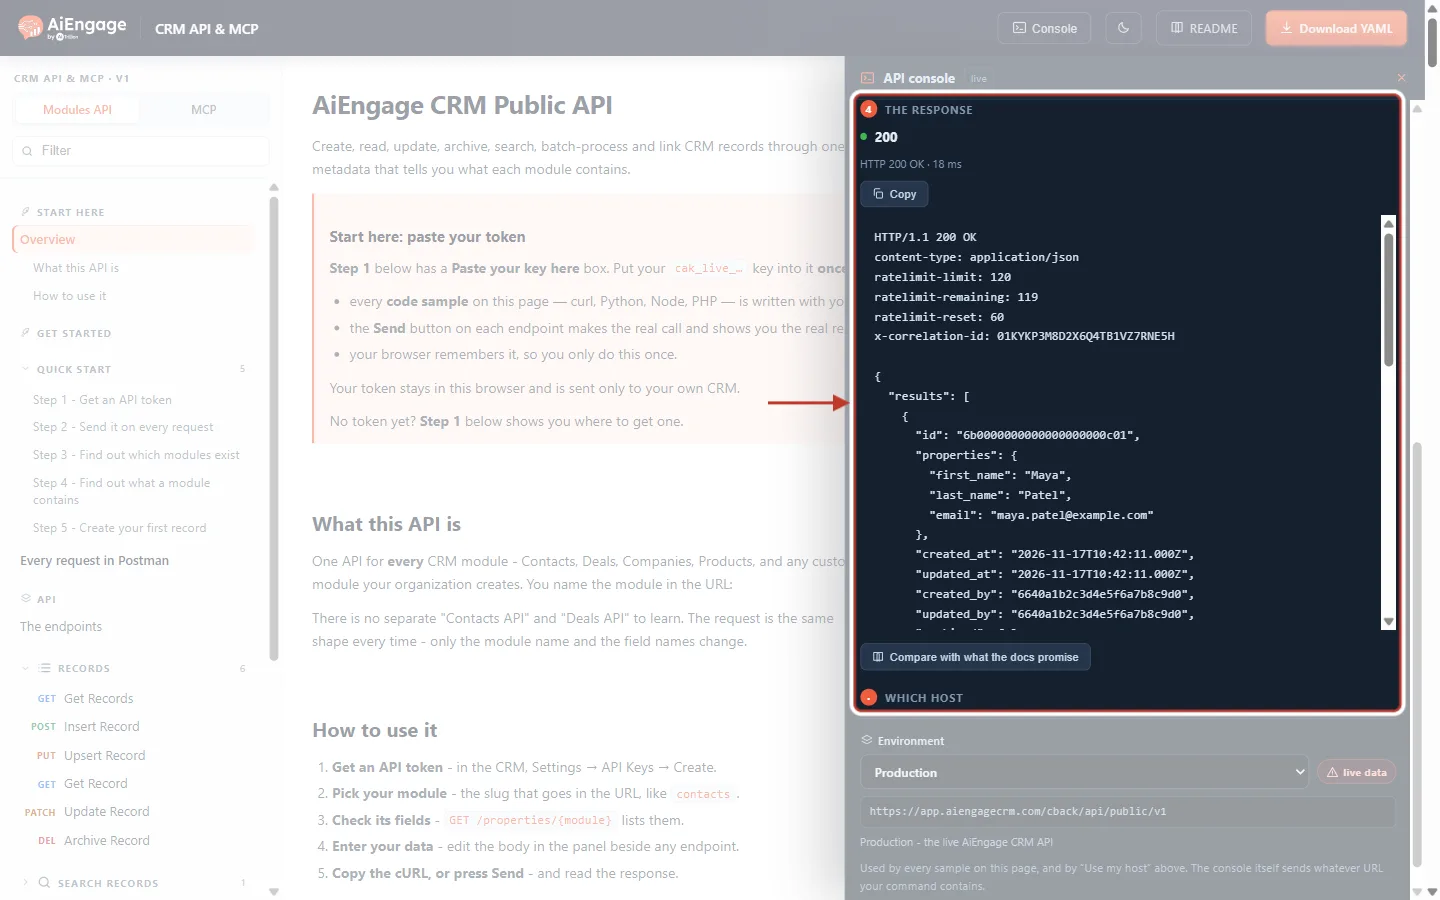
What this screenshot shows. Step 4 THE RESPONSE after pressing Send. The red box highlights the full answer.
200 with a green dot and HTTP 200 OK · 18 ms: the call worked, and how long it took.
Copy: copies the whole response.
Headers:
ratelimit-limit,ratelimit-remainingandratelimit-resettell you how many calls you have left before you are slowed down.x-correlation-ididentifies this exact request. Quote it if you contact support.Body: the same
resultslist as in Step 9.Compare with what the docs promise: checks the answer against the documented example.
Choosing the host. Most customers always use Production. If AiEngage gave your company its own address, pick Custom… and enter it.
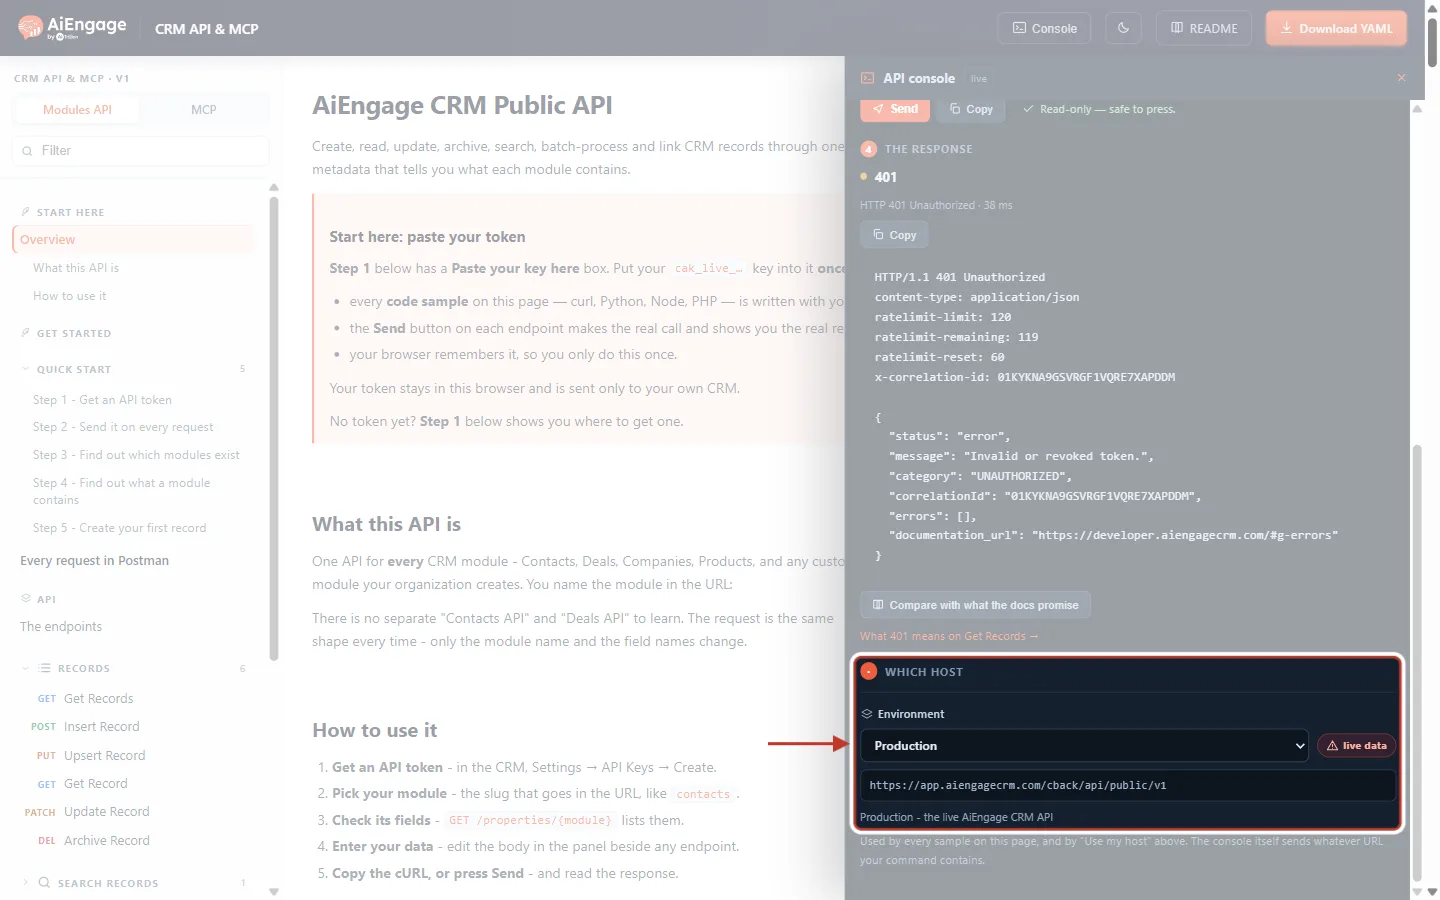
What this screenshot shows. The WHICH HOST section at the bottom of the console. The red box highlights it.
Environment: Production (the live AiEngage CRM API), dev1 (an AiEngage test system) or Custom… (type your own address).
live data: a reminder that Production holds your real data.
Address:
https://app.aiengagecrm.com/cback/api/public/v1.“Used by every sample on this page, and by Use my host above. The console itself sends whatever URL your command contains.”
Step 11: See what a wrong key looks like#
It is worth seeing an error once, so you recognise it later. If the key in the command is wrong, revoked or expired, the API answers 401.
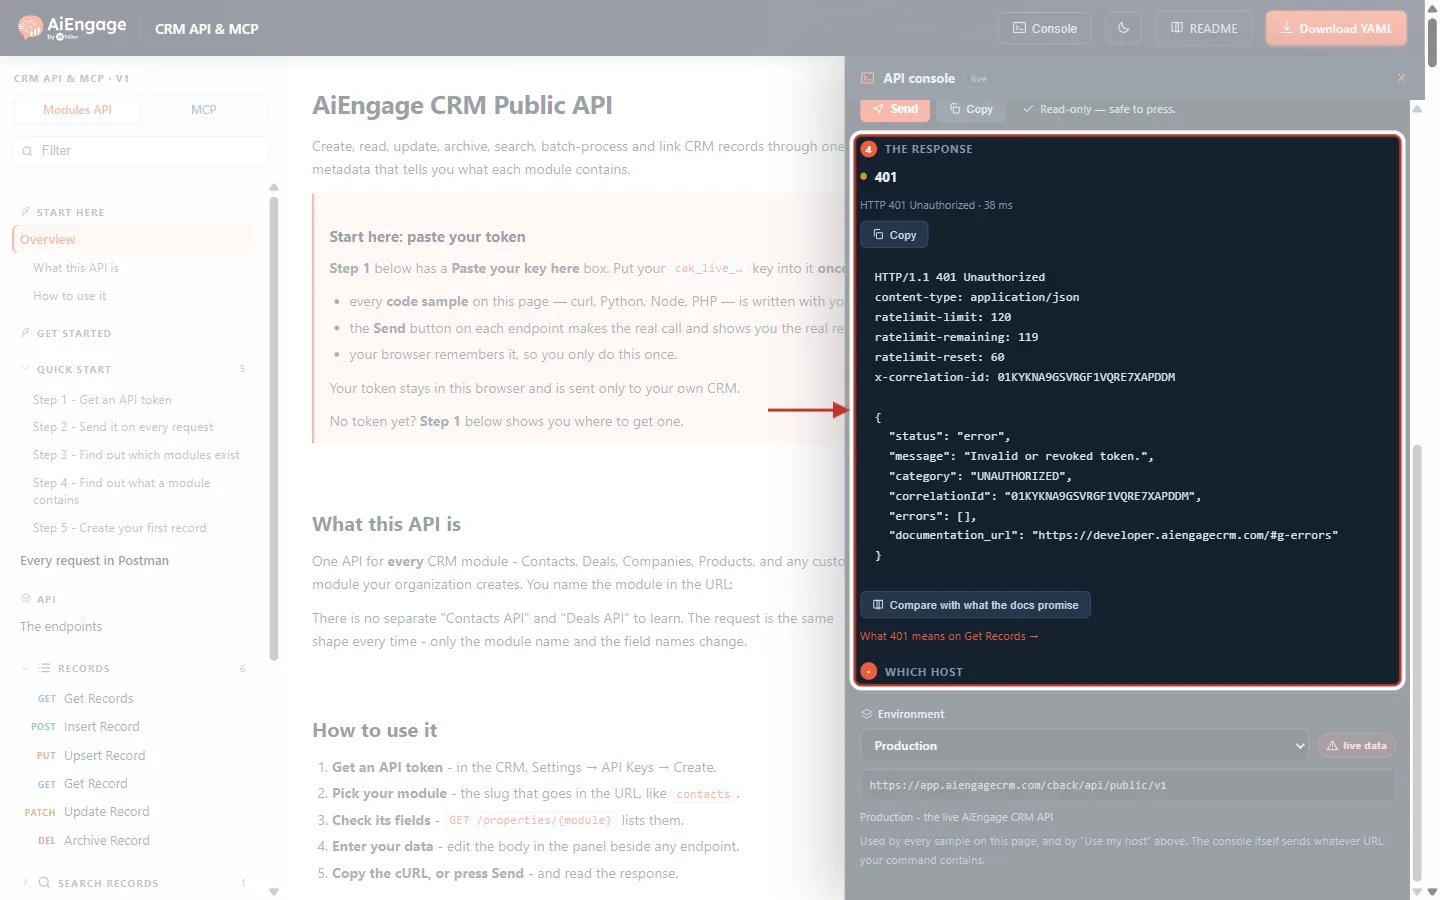
What this screenshot shows. The console after sending a command with a mistyped key. The red box highlights the response.
401 with a red dot and HTTP 401 Unauthorized.
message: “Invalid or revoked token.”
category:
UNAUTHORIZED. Every error has a category. Build your integration to react to the category, because the message can vary.correlationId: the ID of this request, for support.
documentation_url: a link to the explanation of this error.
What 401 means on Get Records →: jumps to the explanation in the docs.
ℹ️
If the console says the request never left the browser, the host you chose has not allowed the developer portal to call it from a browser. Your command is still correct: click Copy and run it in a terminal, or use Postman (Part 3).
Part 3: Test the API in Postman#
Postman keeps your requests in a collection that you can save, reuse and share with your team. AiEngage CRM publishes a ready-made OpenAPI file, so one import gives you every endpoint.
Step 12: Get the import link from the developer portal#
On developer.aiengagecrm.com, click Every request in Postman in the left menu.
Copy the link in the dark box:
https://developer.aiengagecrm.com/module-public-api.yaml.
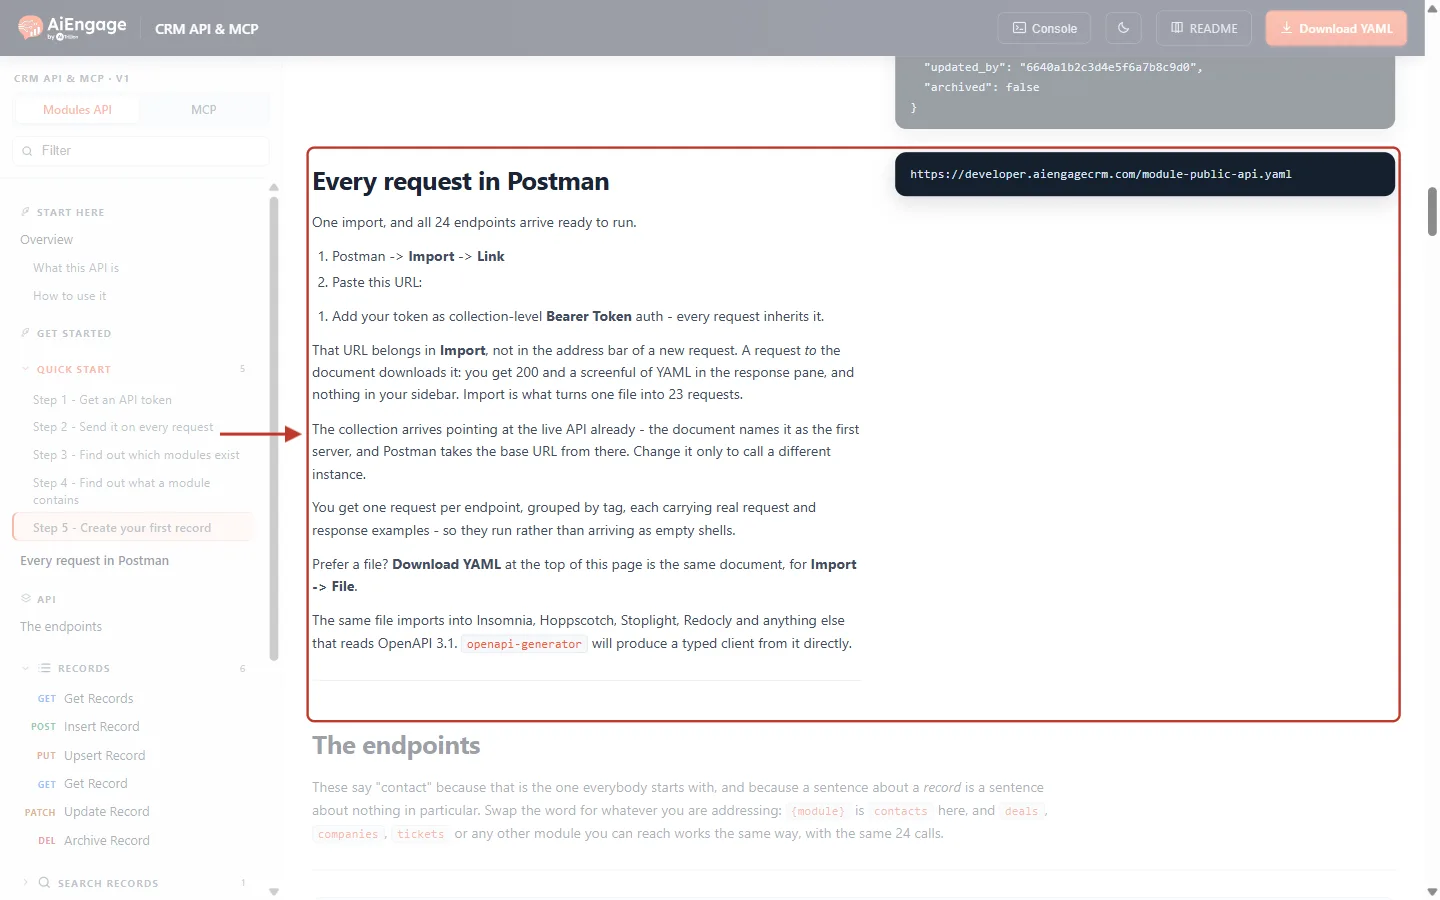
What this screenshot shows. The Every request in Postman section. The red box highlights the instructions and the dark box with the link.
Instructions: “1. Postman → Import → Link. 2. Paste this URL. Add your token as collection-level Bearer Token auth — every request inherits it.”
The link (dark box, right):
https://developer.aiengagecrm.com/module-public-api.yaml.Important: paste the link into Postman’s Import, not into the address bar of a request. Sending a request to the link only downloads the file (you see 200 and a screen of YAML) and adds nothing to your collections.
Prefer a file? Download YAML at the top of the page is the same document, for Import → File. The same file also works in Insomnia, Hoppscotch and other OpenAPI 3.1 tools.
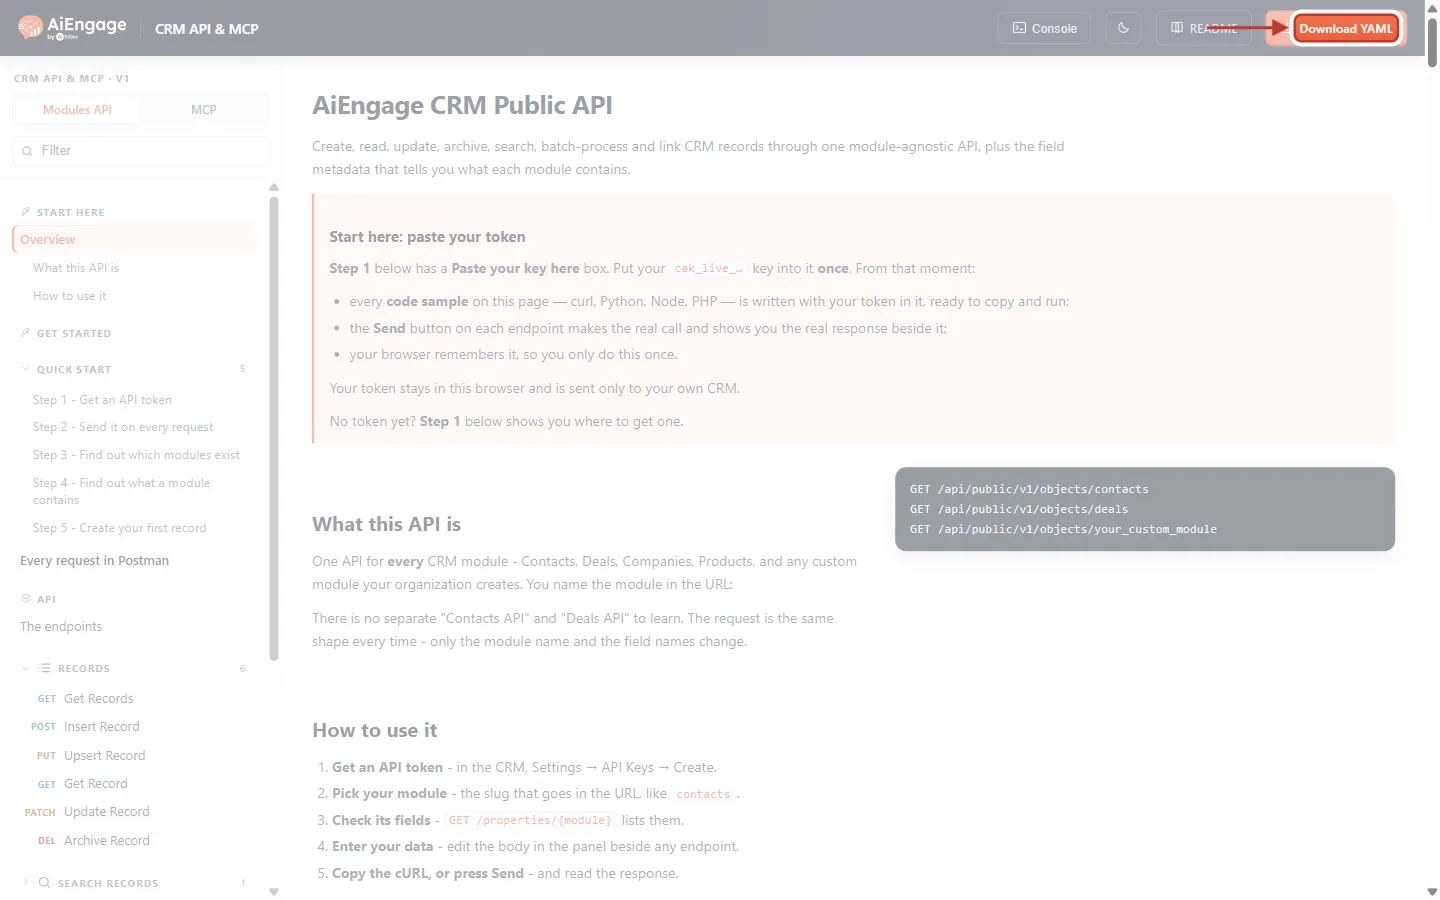
What this screenshot shows. The top bar of the developer portal. The red box and arrow point to Download YAML.
Click it to save the OpenAPI file to your computer, then drag the file into Postman’s Import window. Use this if Postman cannot reach the link (for example, behind a strict company network).
✅
Only need one endpoint? Under any endpoint, click Use this one in Postman +. It shows the method and full URL, the Authorization setting and your key, each with a Copy button, for a quick single request.
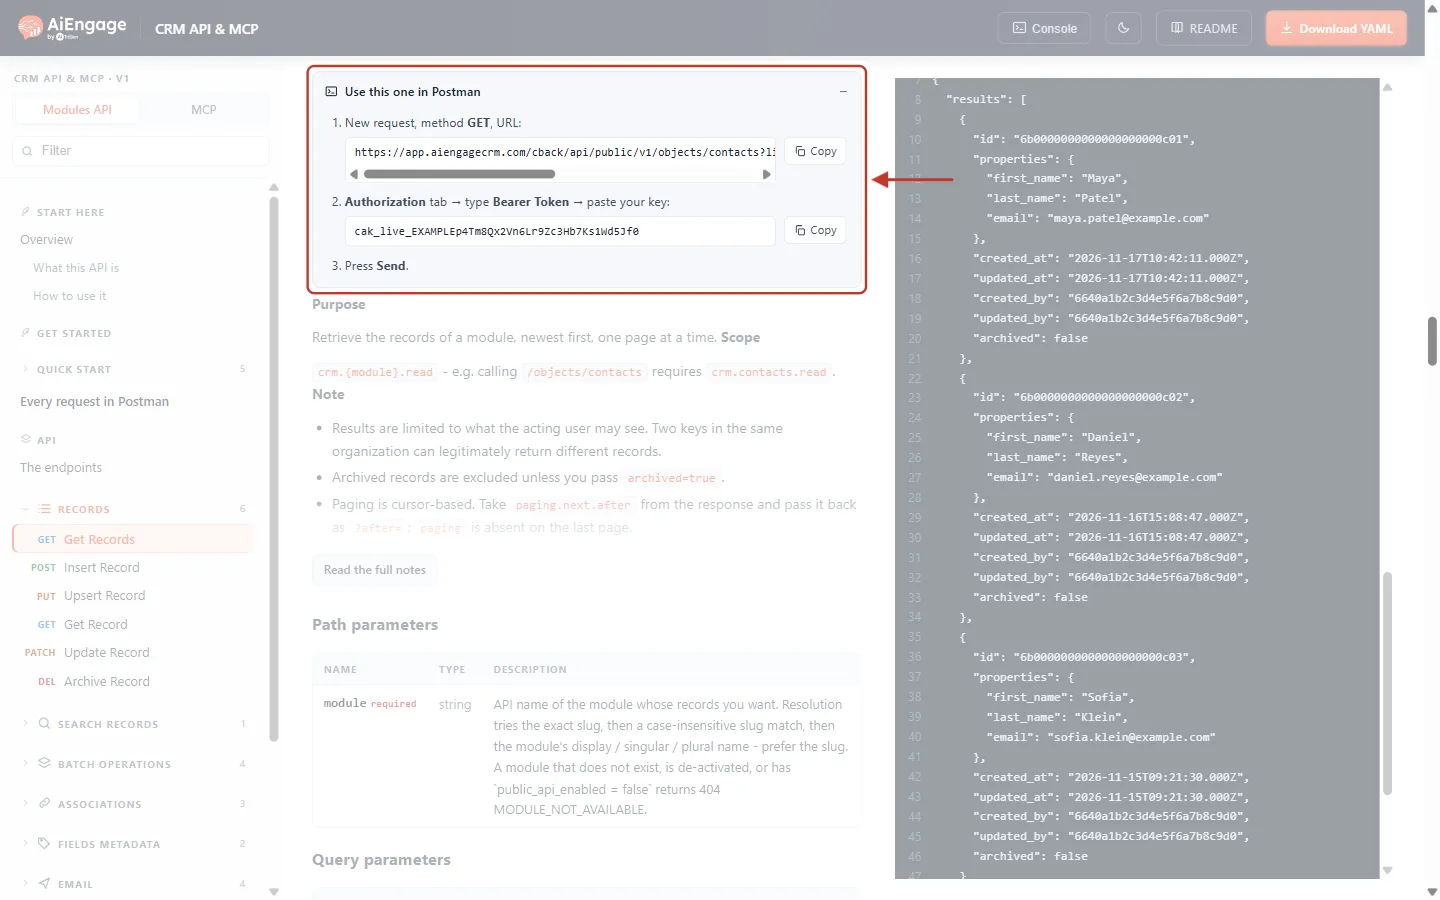
What this screenshot shows. The Use this one in Postman box under Get Records, opened. The red box highlights it.
1. “New request, method GET, URL:” followed by the full address with your parameters, and a Copy button.
2. “Authorization tab → type Bearer Token → paste your key:” followed by your key and a Copy button.
3. “Press Send.”
Step 13: Import the collection into Postman#
Open Postman (the desktop app or
web.postman.co) and sign in.In the left sidebar, click the Import icon (the box with an arrow, next to +). Its tooltip reads “Use resources or import”.
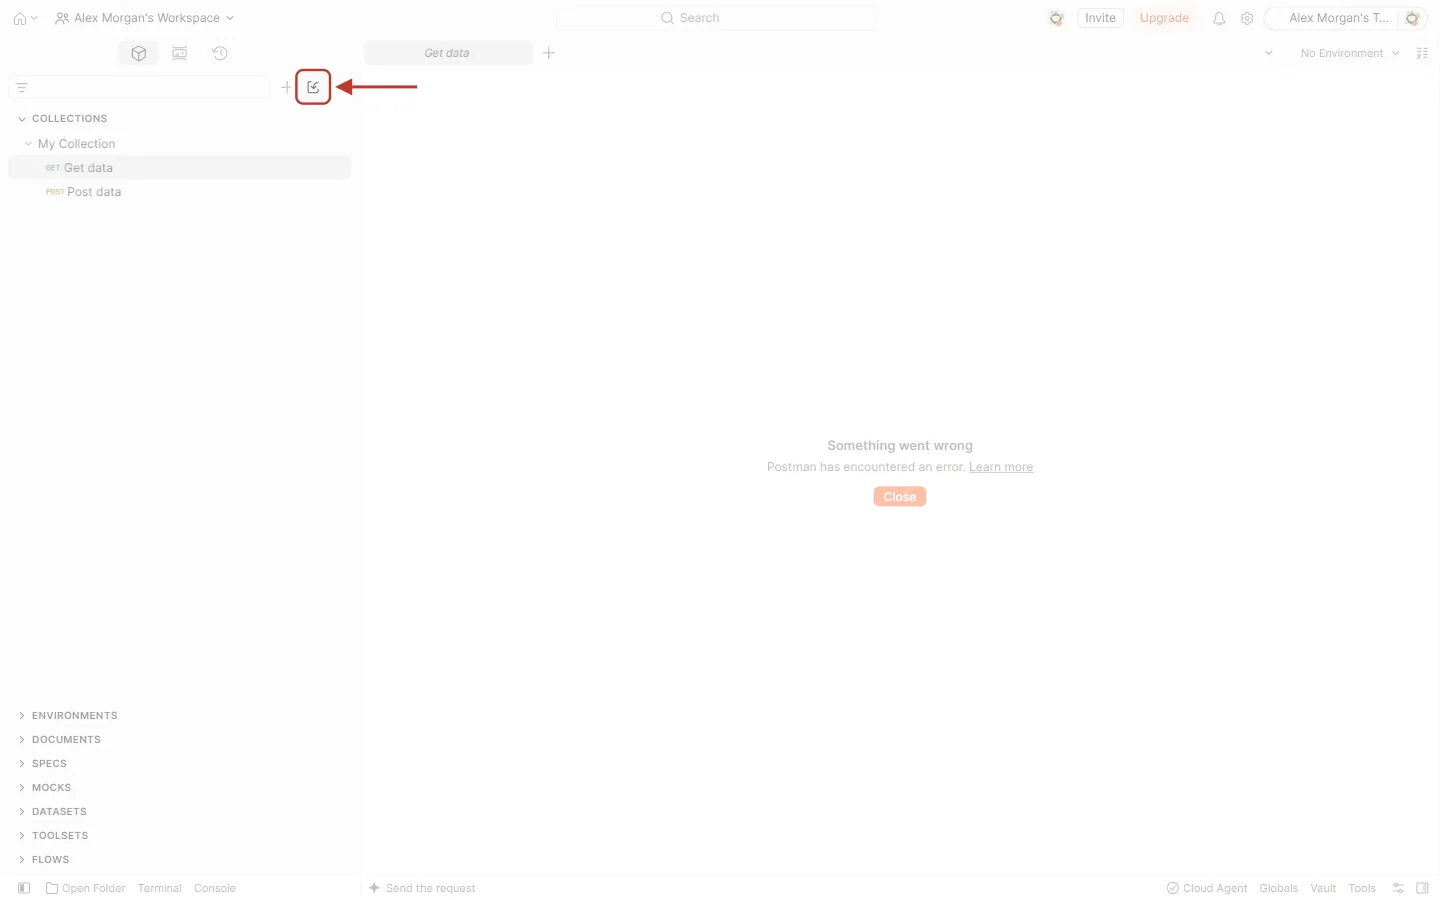
What this screenshot shows. The Postman window. The red box and arrow point to the Import icon at the top of the left sidebar.
+ (left of it): creates a new collection or request.
Import icon (highlighted): opens the Import window.
… (right of it): more sidebar options.
COLLECTIONS: the collections already in your workspace. The account’s name is replaced with Alex Morgan in these screenshots.
In the Use Resources window, make sure the Import tab is selected.
Paste the link
https://developer.aiengagecrm.com/module-public-api.yamlinto the big box.Press Enter.
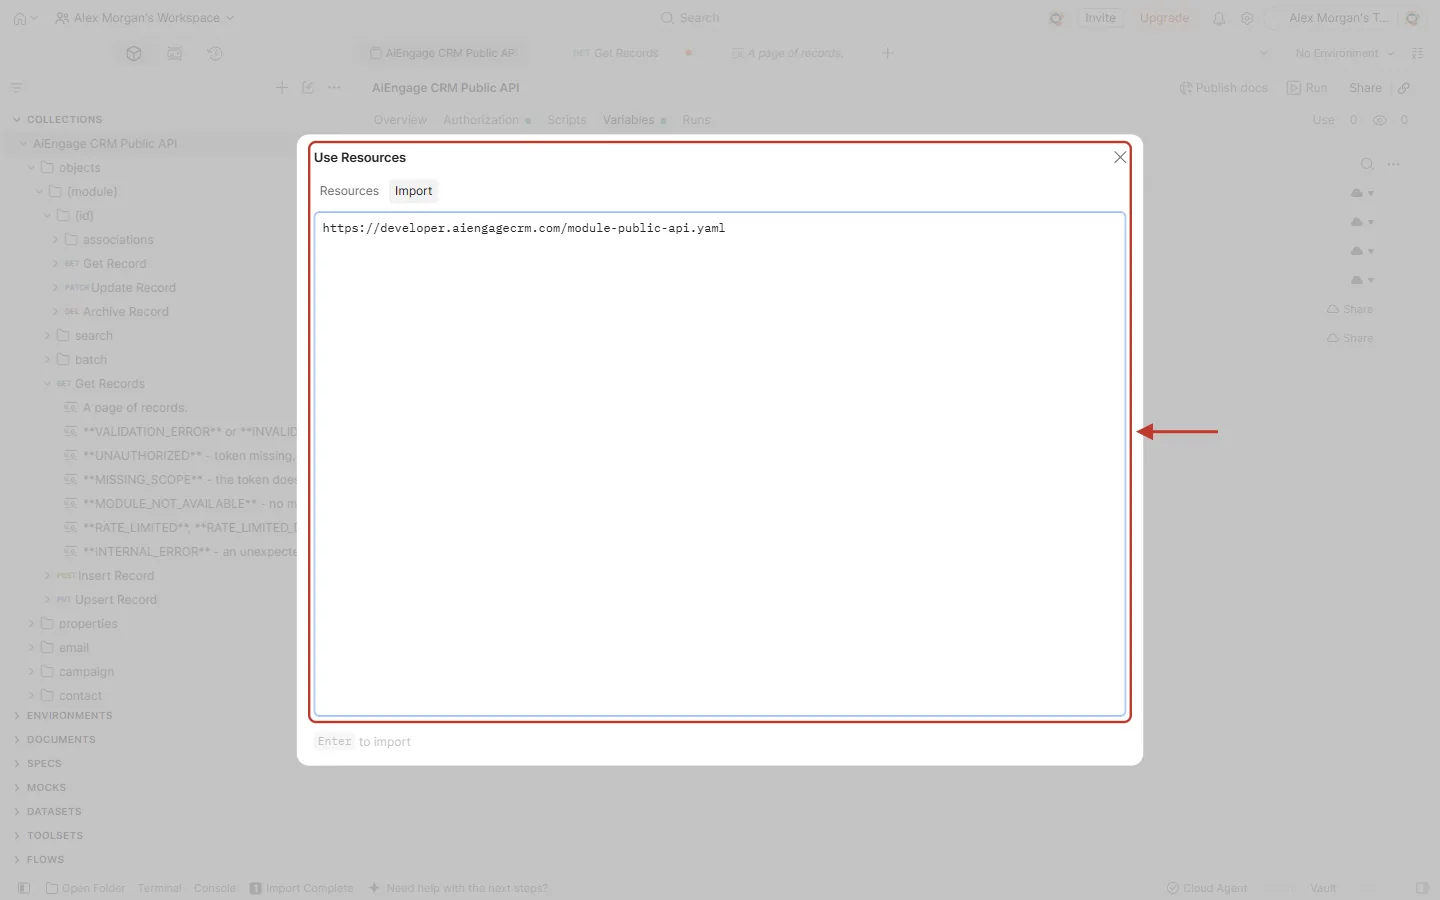
What this screenshot shows. The Use Resources window on the Import tab. The red box highlights the box with the link pasted in.
Tabs: Resources and Import (selected).
The box: accepts a cURL command, an OpenAPI spec, collection JSON or a link. Here it holds the AiEngage link.
Enter to import (bottom): press Enter to continue.
Postman reads the file and asks what to create. Choose Postman Collection. (The first option, OpenAPI 3.1 Specification with a Postman Collection, also creates a copy of the specification, which you don’t need for testing.)
Check the name: AiEngage CRM Public API.
Click Import.
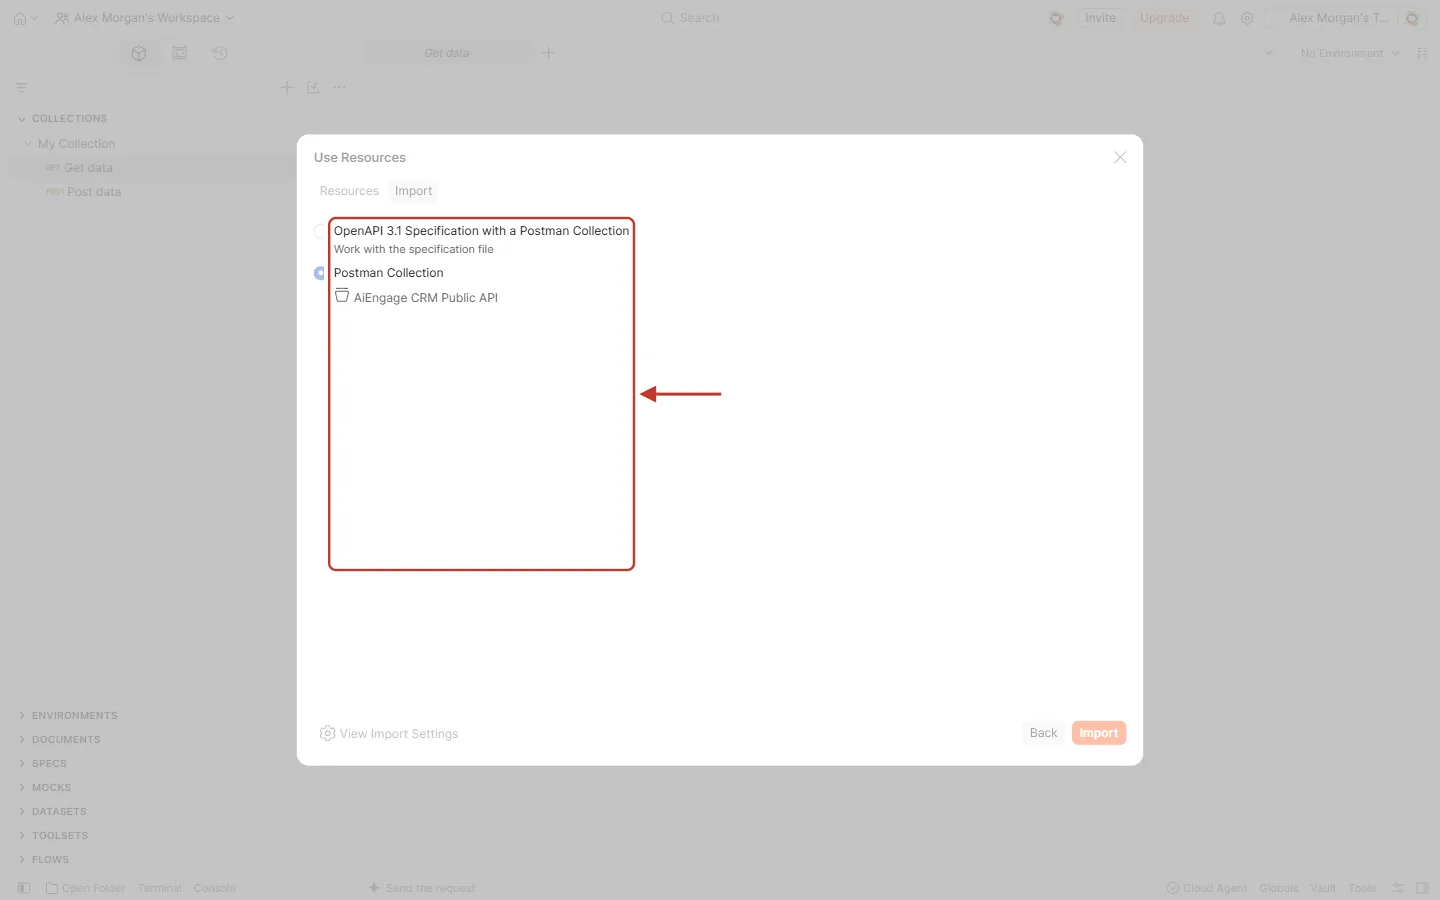
What this screenshot shows. The second screen of the Import window. The red box highlights the two import options and the collection name.
OpenAPI 3.1 Specification with a Postman Collection: “Work with the specification file”.
Postman Collection: just the collection of requests. Pick this one.
AiEngage CRM Public API: the name of the collection that will be created.
Bottom: View Import Settings, Back and the orange Import button.
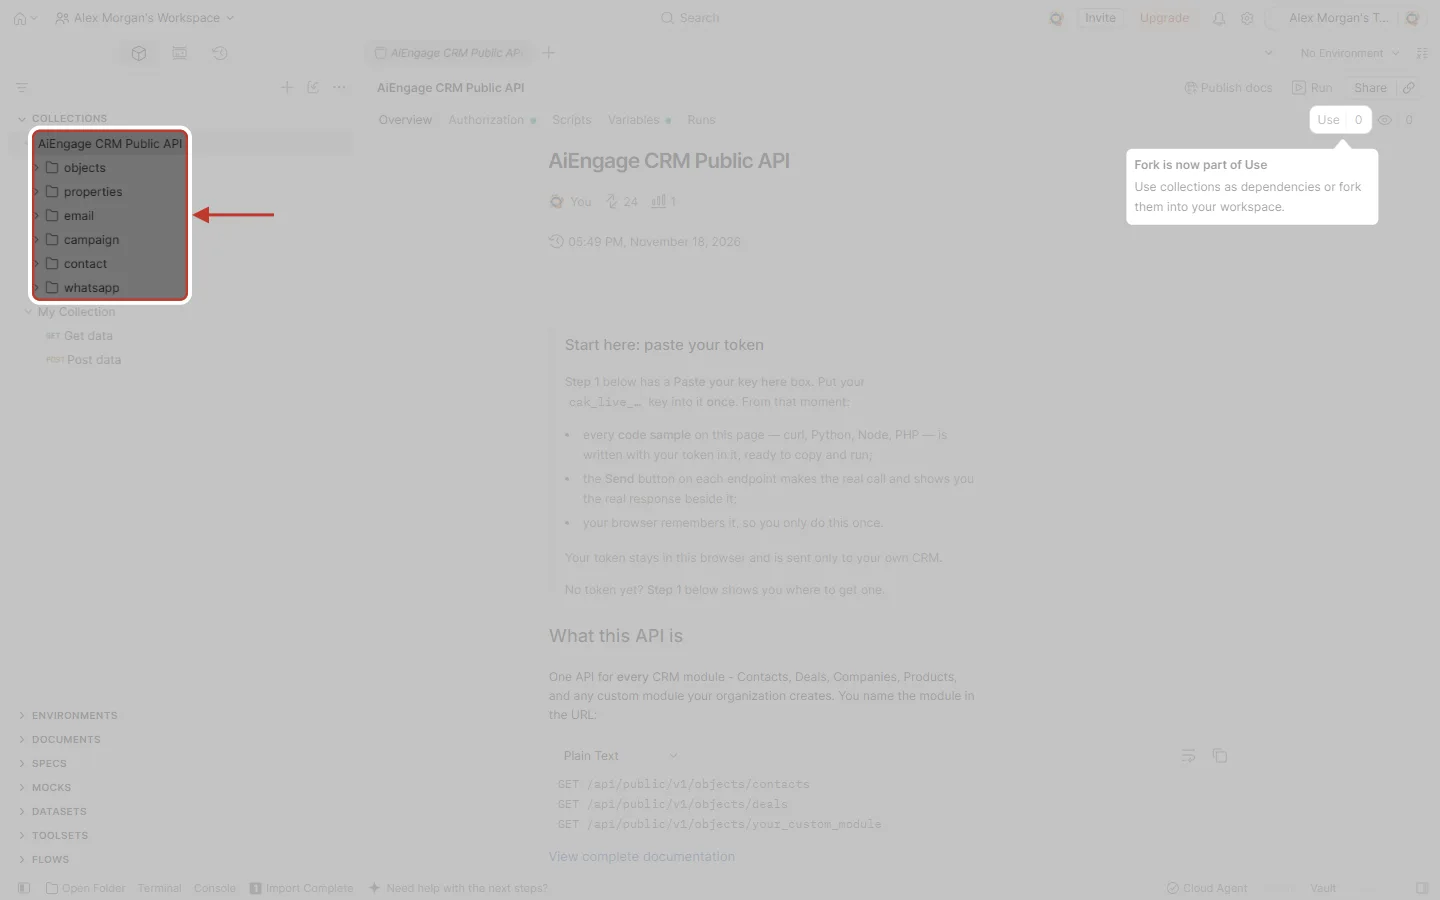
What this screenshot shows. The left sidebar after the import. The red box highlights the new collection and its folders.
AiEngage CRM Public API: the imported collection.
Folders: objects (records, search, batch and associations), properties (fields), email, campaign, contact and whatsapp.
Right side: the collection’s Overview, which shows the same introduction as the developer portal.
Step 14: Add your key to the collection once#
Set the key on the collection, not on each request. Every request in the collection then uses it automatically.
Click the collection name AiEngage CRM Public API.
Open the Authorization tab.
Auth type is already Bearer Token. Keep it.
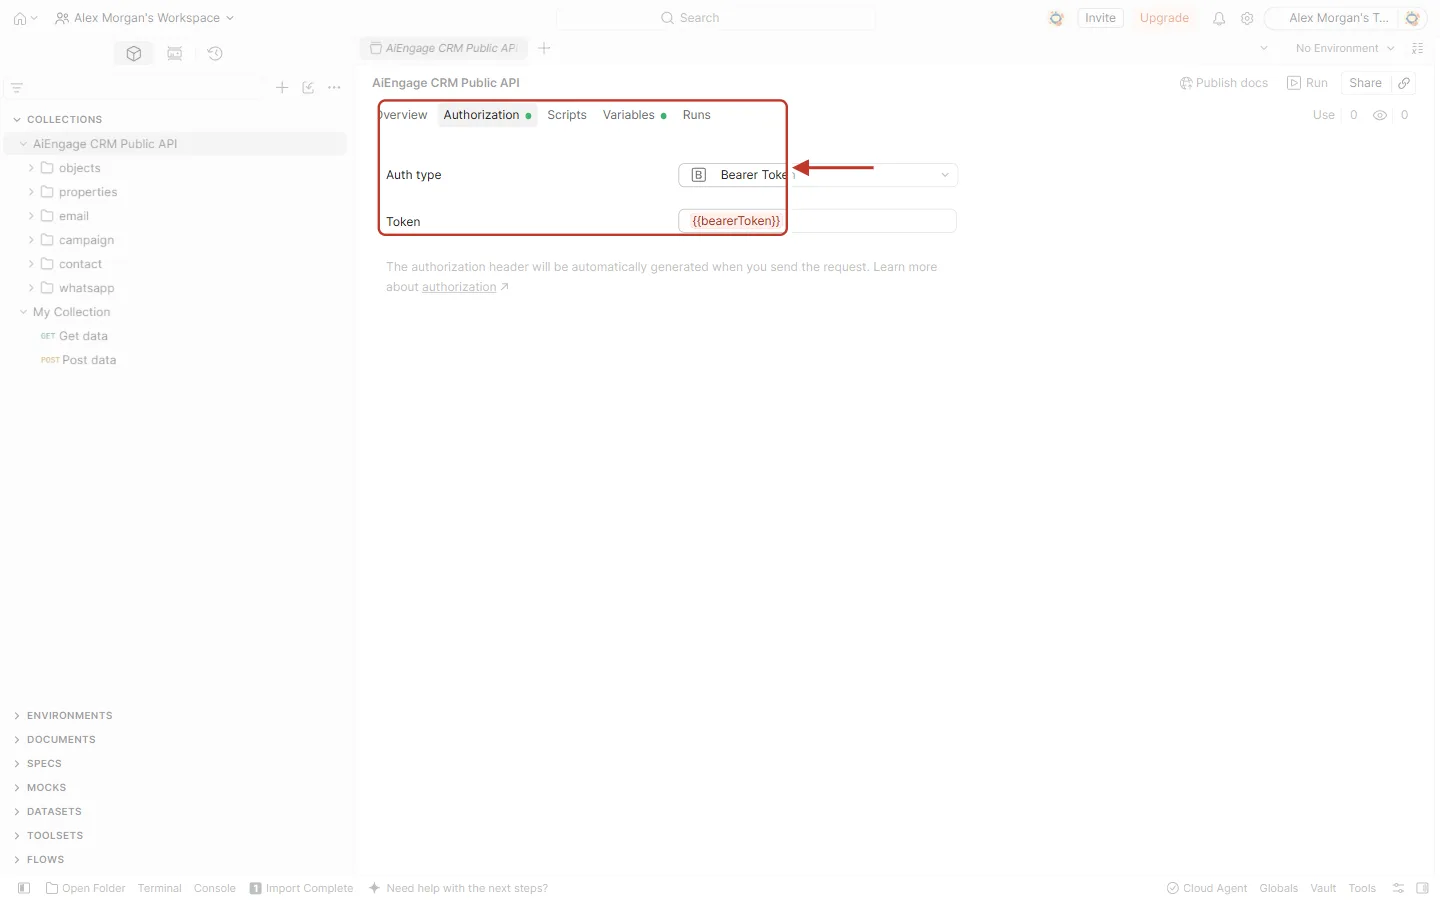
What this screenshot shows. The collection’s Authorization tab right after the import. The red box highlights the tab and its settings.
Tabs: Overview, Authorization (selected), Scripts, Variables and Runs.
Auth type: Bearer Token, set by the import.
Token:
{{bearerToken}}in red. It is a placeholder with no value yet, so requests would fail with 401.“The authorization header will be automatically generated when you send the request.”
Click the Token box, delete
{{bearerToken}}and paste your key.Press Ctrl + S (Cmd + S on a Mac) to save the collection.
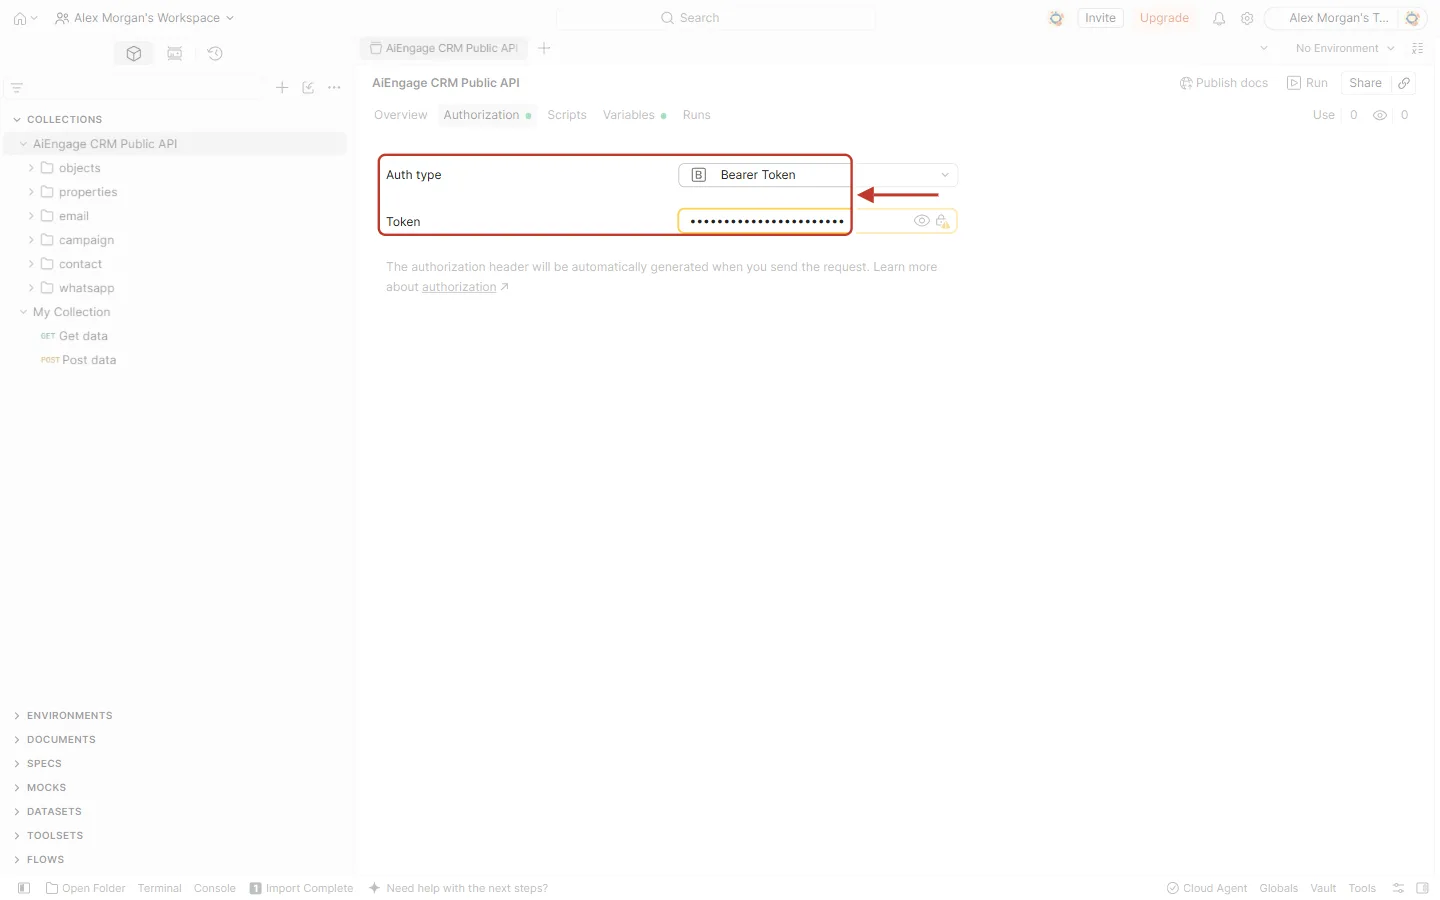
What this screenshot shows. The same tab after pasting the key and saving. The red box highlights Auth type and Token.
Auth type: Bearer Token.
Token: your key, hidden as dots. Click the eye icon to check it.
ℹ️
The collection also stores the address of the API in the baseUrl variable. It already points at Production, so you don’t need to change anything.
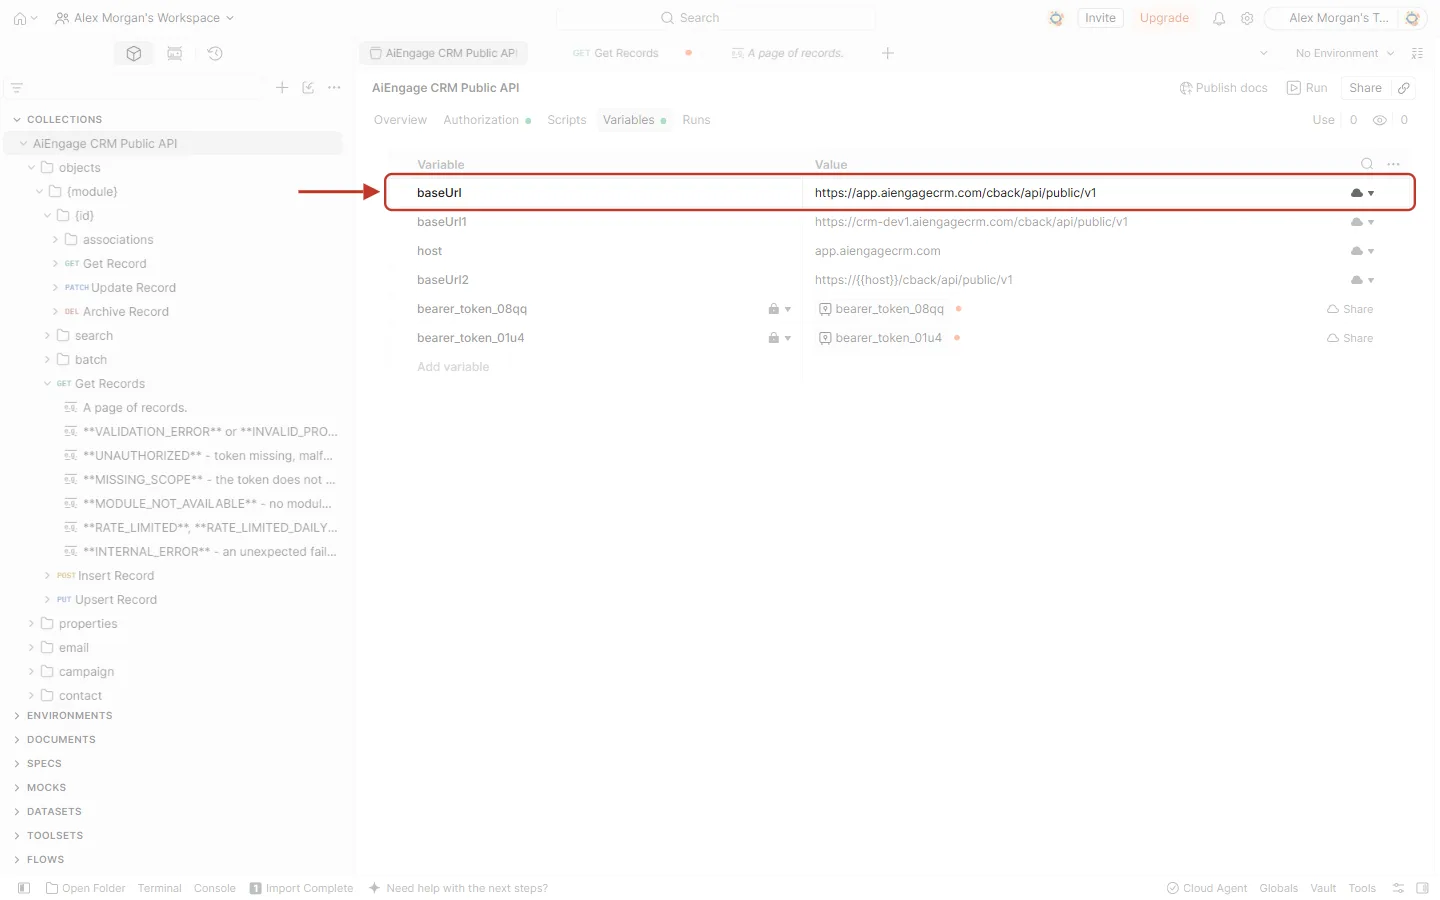
What this screenshot shows. The collection’s Variables tab. The red box highlights the baseUrl row.
baseUrl:
https://app.aiengagecrm.com/cback/api/public/v1. Every request starts with{{baseUrl}}.Other rows (baseUrl1, host, baseUrl2 and the bearer_token rows) come from the file. You can ignore them. Change baseUrl only if AiEngage gave your company its own address.
Step 15: Open a request and remove the placeholder filters#
In the sidebar, open objects → {module} and click GET Get Records.
Look at the Params tab. The import filled every filter with an example value.
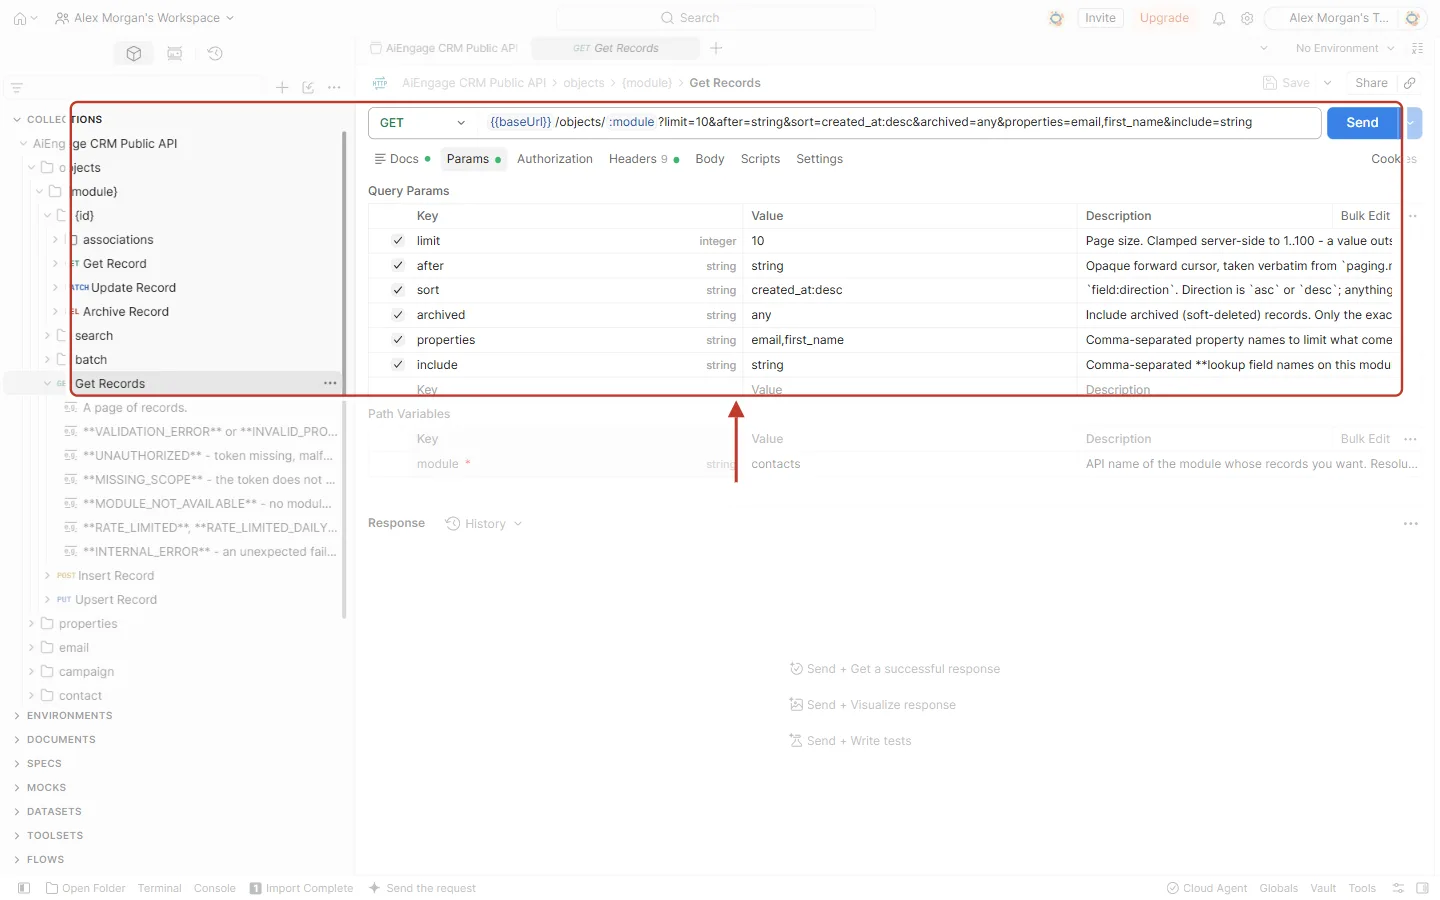
What this screenshot shows. The Get Records request. The red box highlights the request in the sidebar and the request bar with the Send button.
Sidebar: Get Records under objects → {module}. Below it are saved examples, such as “A page of records.” (a 200 answer) and one for each error.
Request bar: GET and
{{baseUrl}}/objects/:module?limit=10&after=string&….Send (blue): runs the request.
Tabs under the bar: Docs, Params, Authorization, Headers, Body, Scripts and Settings.
⚠️
Three filters arrive with placeholder values: after =
string, archived = any and include = string. Sent as they are, after=string is not a real cursor (400 INVALID_CURSOR) and include=string is not a real field (400 INVALID_PROPERTY). Untick them before you press Send.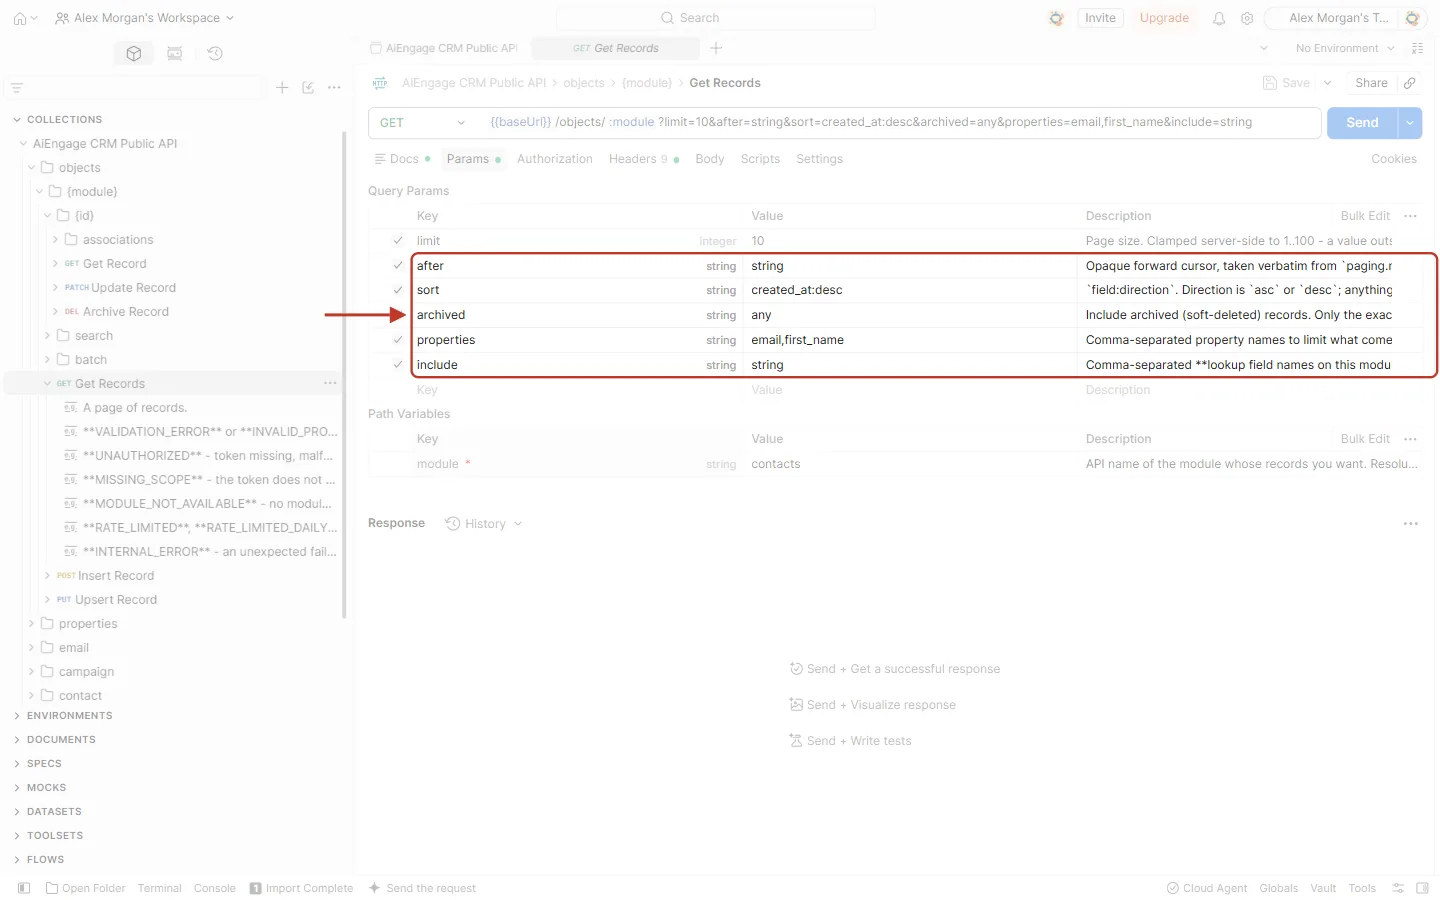
What this screenshot shows. The Query Params table as imported. The red box highlights the rows with placeholder values.
after =
string: a placeholder cursor.archived =
any: would include archived (deleted) records.include =
string: a placeholder field name.Description column: explains each filter, the same text as on the developer portal.
Untick after, archived and include.
Set limit to 3.
Under Path Variables, check that module is contacts.
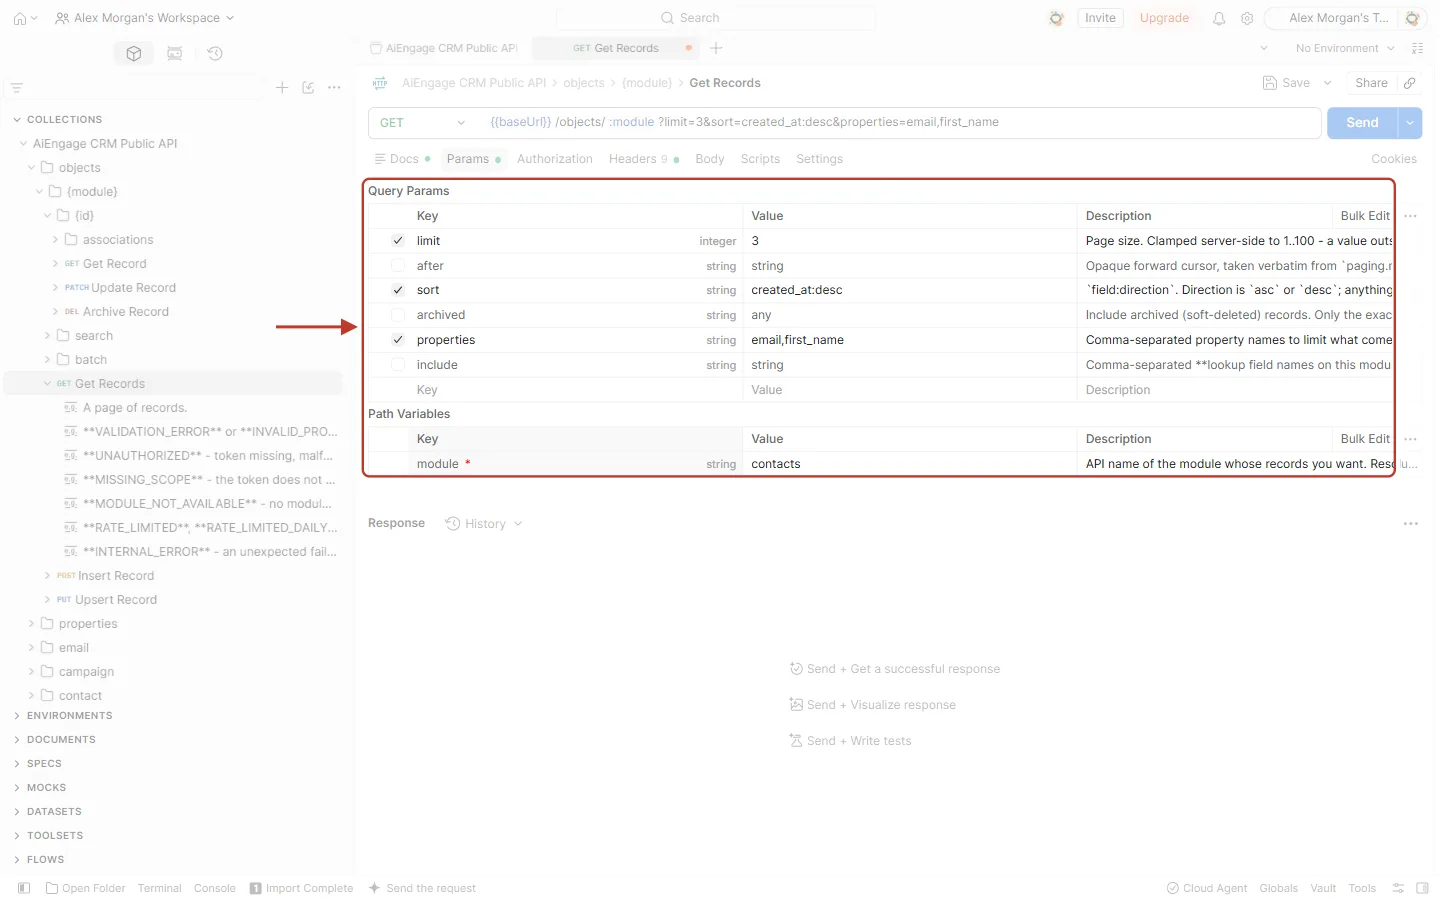
What this screenshot shows. The Params tab ready to send. The red box highlights the Query Params and Path Variables.
Ticked: limit = 3, sort =
created_at:desc, properties =email,first_name.Unticked (greyed out): after, archived and include. They are not sent.
Path Variables: module =
contacts.The request bar updates to
{{baseUrl}}/objects/:module?limit=3&sort=created_at:desc&properties=email,first_name.
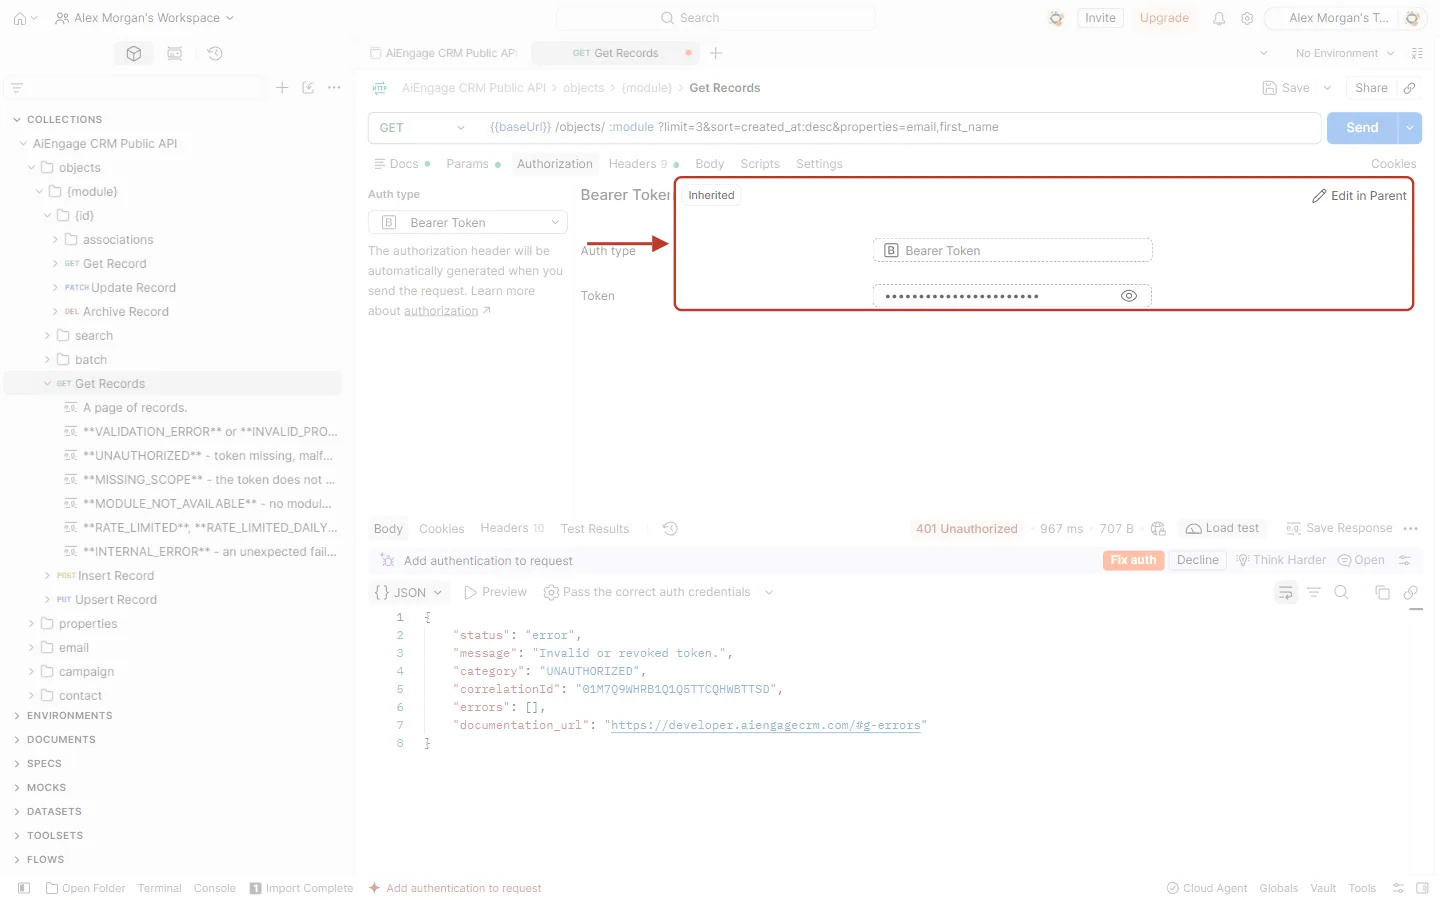
What this screenshot shows. The request’s own Authorization tab. The red box highlights the inherited settings.
Bearer Token with the Inherited label: the request uses the key you added to the collection in Step 14.
Token: your key, hidden as dots.
Edit in Parent: opens the collection settings if you need to change the key.
Step 16: Send the request and read the response#
Click Send.
The response appears in the lower half of the window.
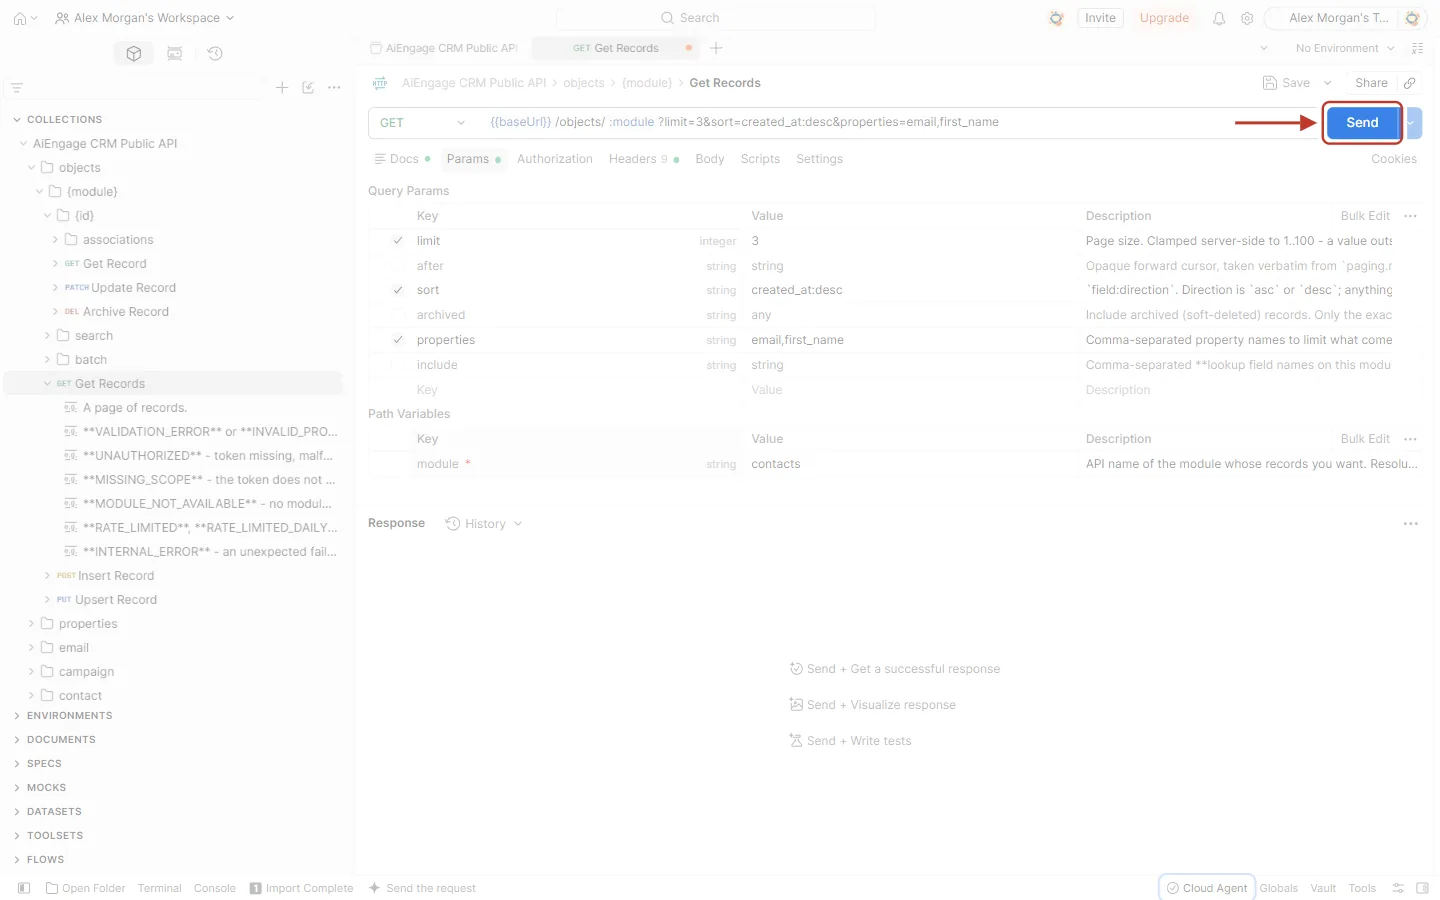
What this screenshot shows. The request bar. The red box and arrow point to the blue Send button.
The small arrow on the right of Send offers Send and Download. You don’t need it.
With a valid key, you get 200 OK and your contacts, exactly like the console in Step 9. Postman keeps an example of this answer with the request, so you can see the shape before your first call:
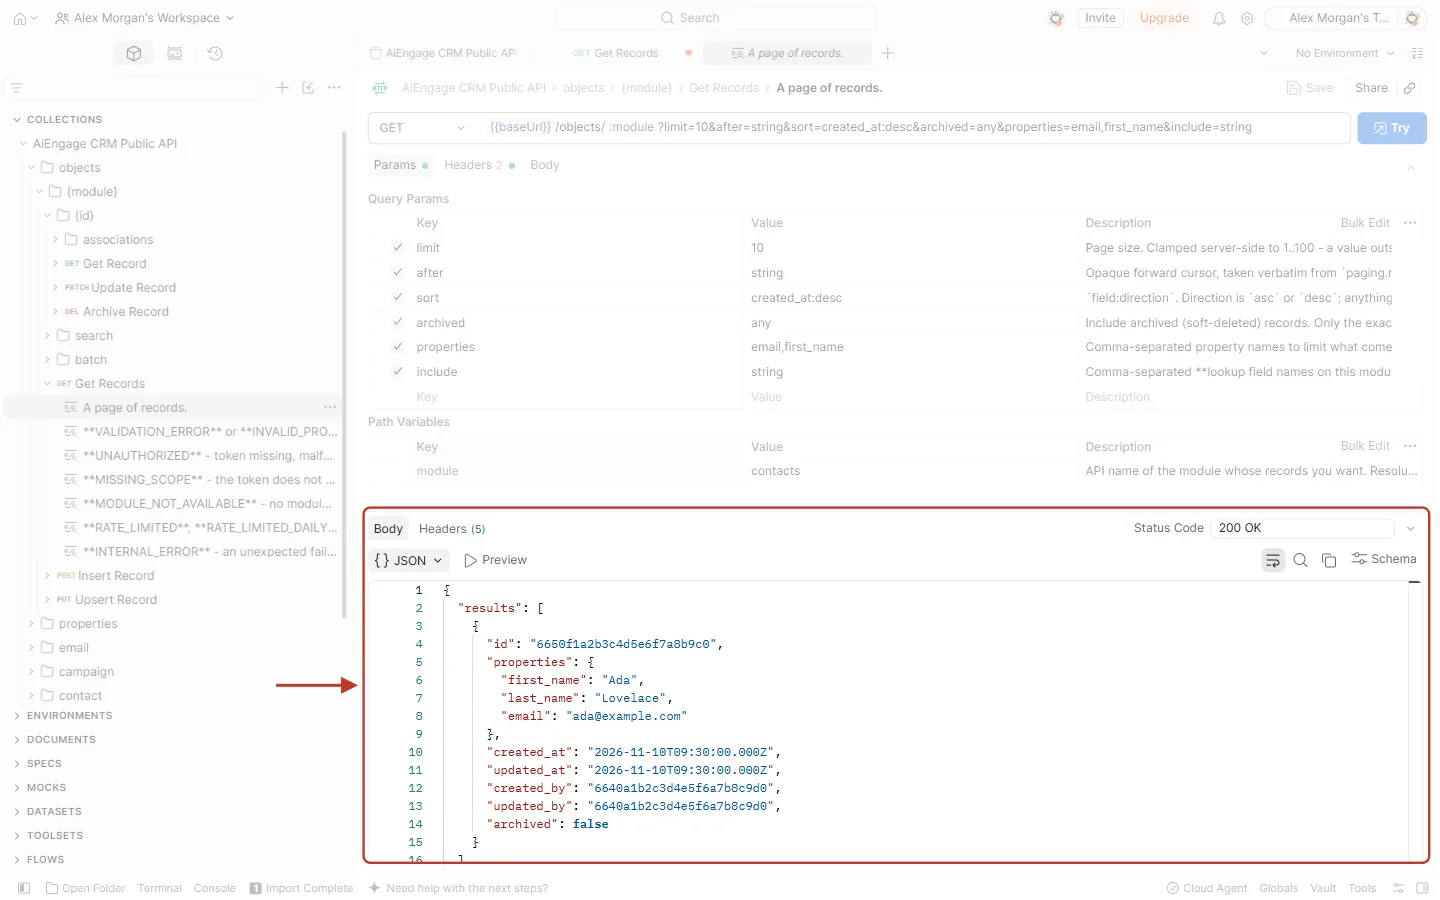
What this screenshot shows. The saved example A page of records. under Get Records. The red box highlights the example response.
Status Code: 200 OK.
Body (JSON): a
resultslist. Each record has anid, itsproperties(first_name, last_name, email) and the created and updated details.Your real response has the same shape, with your own records and a
pagingsection at the end.
If the key is wrong, Postman shows the same 401 error you saw in the console. The screenshot below is a real answer from the live API to the example key:
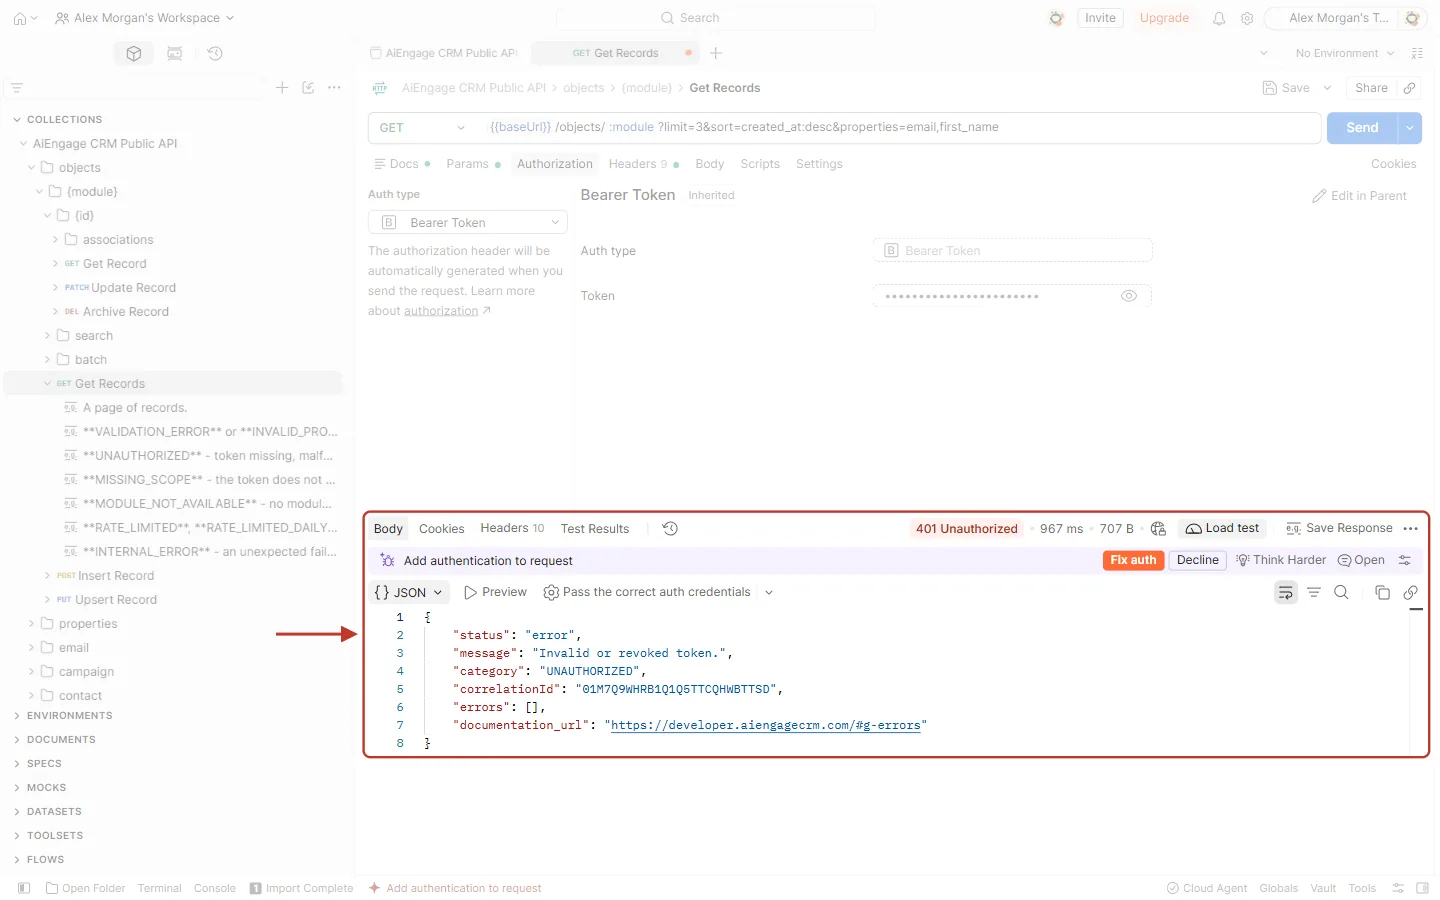
What this screenshot shows. The response area after sending with the example key. The red box highlights the response.
401 Unauthorized (red), the time (967 ms) and the size (707 B).
Body:
"message": "Invalid or revoked token.","category": "UNAUTHORIZED", acorrelationIdand thedocumentation_url.Add authentication to request / Fix auth: Postman’s own suggestion. You don’t need it: fix the key in the collection’s Authorization tab instead (Step 14).
Save Response: keeps this answer as an example with the request.
✅
Postman on the web sends requests through Postman’s Cloud Agent (bottom-right corner). That works for the AiEngage CRM API, because it is on the public internet. The desktop app sends them straight from your computer.
Troubleshooting#
What you see | What it means | How to fix it |
|---|---|---|
401 | No key, a mistyped key, or a key that was revoked or has expired. | Paste the key again (only the key, without |
403 | The key does not have the scope this endpoint needs. The message names the scope. | Scopes are fixed when a key is created. Generate a new key with the missing scope ticked. |
404 | The module name is wrong, the module is switched off, or it is not published to the API. | Use the module’s slug, such as |
400 | A filter has a made-up value, often the Postman placeholders | Untick the filters you are not using (Step 15). For after, only use the value from |
429 | Too many calls in a short time, or the daily or monthly quota is used up. | Wait the number of seconds in the |
Postman shows 200 and a screen of YAML | The import link was sent as a request instead of imported. | Use Import (Step 13), not a new request. |
Console: the request never left the browser | The chosen host does not allow calls from the developer portal page. | Click Copy and run the command in a terminal, or use Postman. |
Fewer records than you expect | A key sees only the records its creator can see in the CRM. | Create the key as a user who can see the records you need. |
Frequently asked questions#
Does pressing Send in the console change my data?
Only if the request is a write. GET requests, such as Get Records, only read. The console marks those as “Read-only — safe to press”, and marks writes with “This is real — it changes data in your CRM.” POST, PUT, PATCH and DELETE requests create, change or archive real records, so test them on a sample record first.
Do test calls count against my API quota?
Yes. Calls made with an API key count, wherever they come from: the console, Postman or your own code. You can see them on the Usage tab of the API & Connections page.
Can my teammates use the same Postman collection?
Yes. Share the collection from Postman, but let each person add their own key. A key acts as the person who created it.
Where can I see every endpoint and field?
On developer.aiengagecrm.com: the left menu lists every endpoint, and each one has its parameters, error codes and example answers.
Previous and next#
Previous: API Keys Step by Step: Generate, Use and Revoke a Personal Access Token to Build Custom Integrations
Related#
Was this article helpful?
Ready to implement this?
OpenAI Engage and apply what you just learned to your own workspace.
Open AI Engage CRM