Loading…


KnowledgeBase
Quick Start: Make Your First AiEngage CRM API Call in 5 Minutes
Introduction#
The AiEngage CRM REST API lets your own website, scripts, spreadsheets, data warehouse or automation tools read your CRM data: contacts, companies, deals, tasks, custom modules, reports and more. This quick start takes you from nothing to a working API call in about five minutes, without installing anything. All you need is a web browser.
By the end you will have:
Created a safe, read-only API key that expires on its own after 30 days.
Made two real API calls from the interactive API reference: one that lists your CRM modules, and one that returns your two newest contacts.
Copied the exact curl command for that call, so you can run it from your own code.
Confirmed in the CRM that the call arrived.
Minute | What you do | Step |
|---|---|---|
1 | Open Settings → API Keys | Step 1 |
2 | Generate a key with two read scopes | Step 2 |
3 | Copy the key (it is shown only once) | Step 3 |
4 | Authorize the API reference and run your first calls | Steps 4–5 |
5 | Check LAST USED and the Usage tab | Step 7 |
Each screenshot has a red ring, and usually a red arrow, on the part to look at. Below each one, a What this screenshot shows paragraph walks through the whole screen, so you can match it with your own. The key and the contacts in the screenshots are examples, not real data.
Before You Begin#
You need access to Settings → Developer Hub → API Keys. The Generate API key button is only shown to people who are allowed to manage API access, usually administrators. If you can’t see it, ask your CRM administrator to create the key for you or give you access.
API access depends on your plan. If your plan doesn’t include it, the API Keys page shows an upgrade message instead of the tabs.
A key can never see more than the person who created it. It reads with its creator’s own permissions and sharing rules. If you can only see your own contacts in the CRM, the key returns only your own contacts.
Nothing in this quick start changes your CRM. Every call is a read.
Step 1: Open the API Keys Page#
Click the Settings gear at the bottom of the dark left rail. The Settings menu opens on the left. Scroll it down to the last group, DEVELOPER HUB.
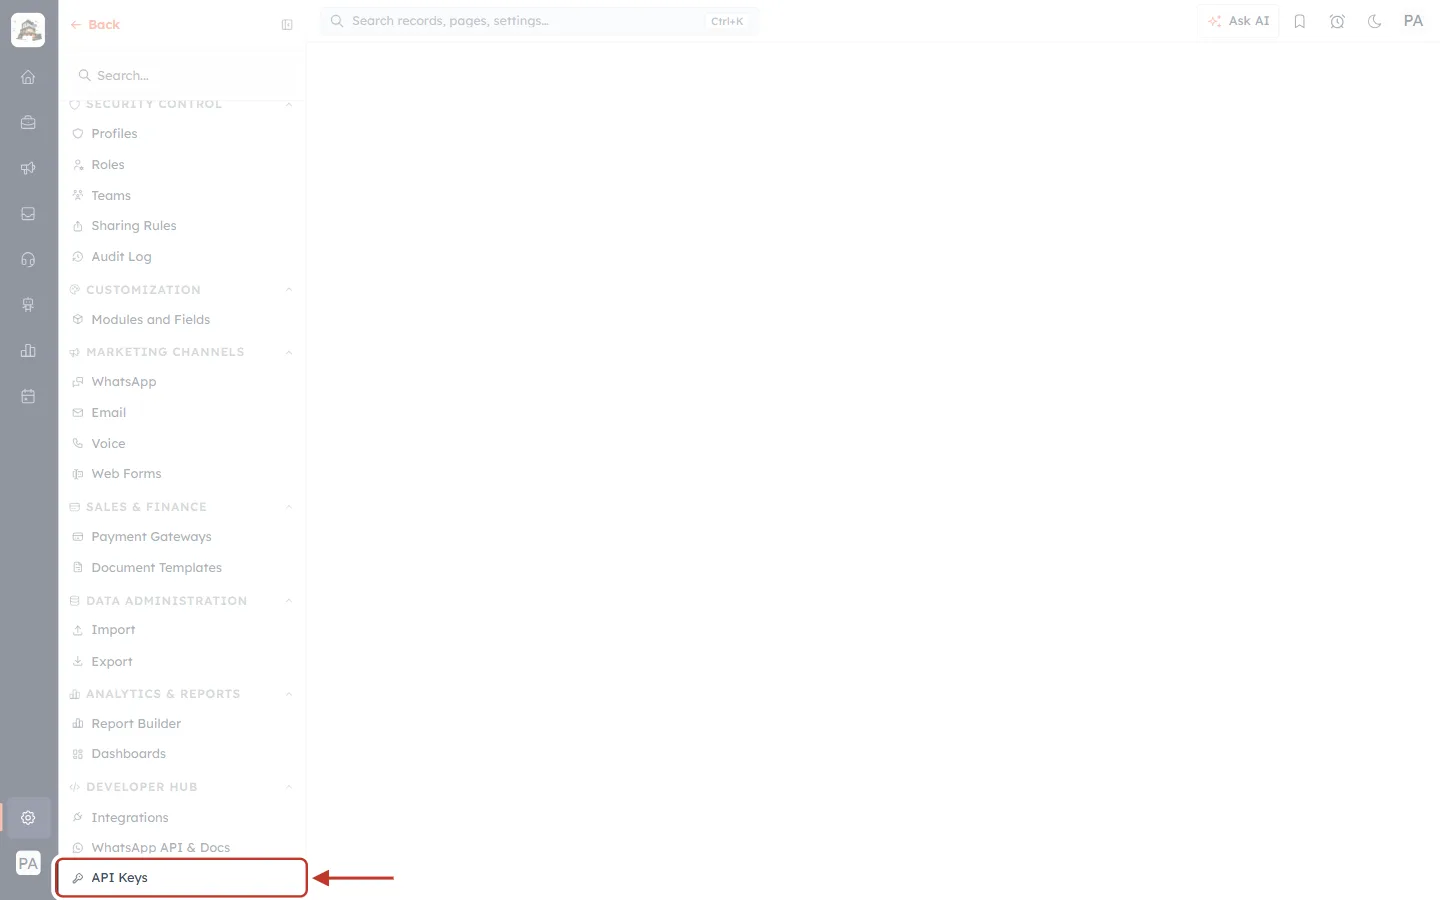
What this screenshot shows. API Keys is ringed, the last item of the DEVELOPER HUB group at the bottom of the Settings menu.
The Settings gear on the dark rail at the far left is highlighted, showing you are in Settings.
Above API Keys are Integrations and WhatsApp API & Docs. The groups above them (Security Control, Customization, Marketing Channels, Sales & Finance, Data Administration, Analytics & Reports) are other settings and aren’t needed here.
Tip: you can also type “API Keys” into the Search… box at the top of the Settings menu.
Click API Keys.
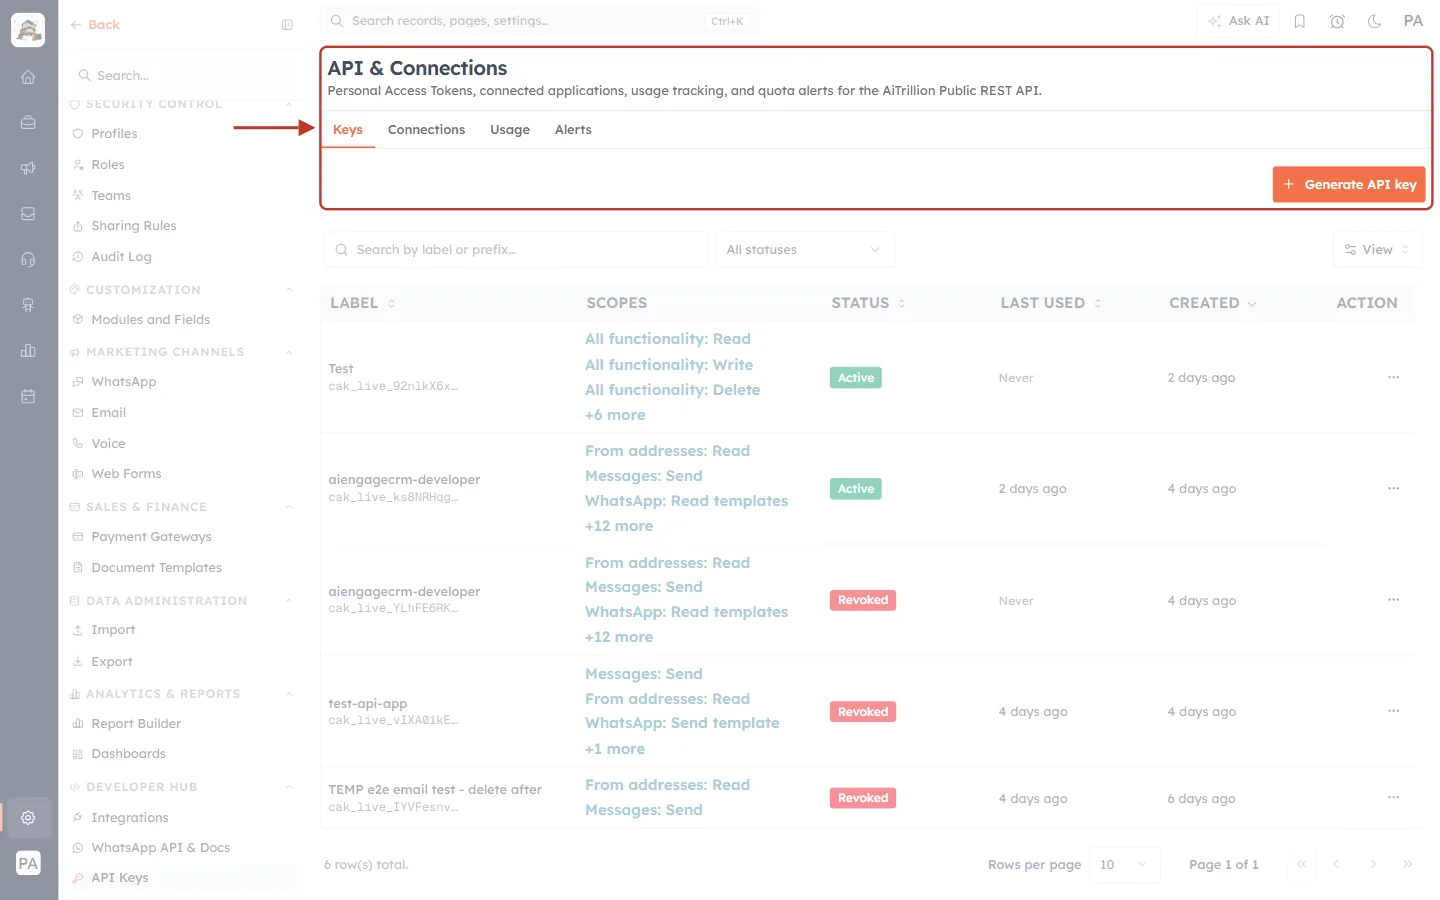
What this screenshot shows. The API & Connections page opens on the Keys tab. The ring covers the page header, its four tabs and the orange Generate API key button.
Under the title: Personal Access Tokens, connected applications, usage tracking, and quota alerts for the … Public REST API.
The tabs are Keys (your API keys, open now), Connections (apps such as Claude connected by signing in), Usage (how many calls you have made) and Alerts (emails before you reach your quota). You will use Usage in Step 7.
Below the ring is the list of existing keys, with a Search by label or prefix box, an All statuses filter and the columns LABEL, SCOPES, STATUS, LAST USED, CREATED and ACTION. Your list may be empty if this is your organisation’s first key.
Step 2: Generate a Read-Only Key#
Click Generate API key. A window of the same name opens. You fill in three things: a label, the scopes (what the key may do) and an expiry date.
2a. Give the key a label#
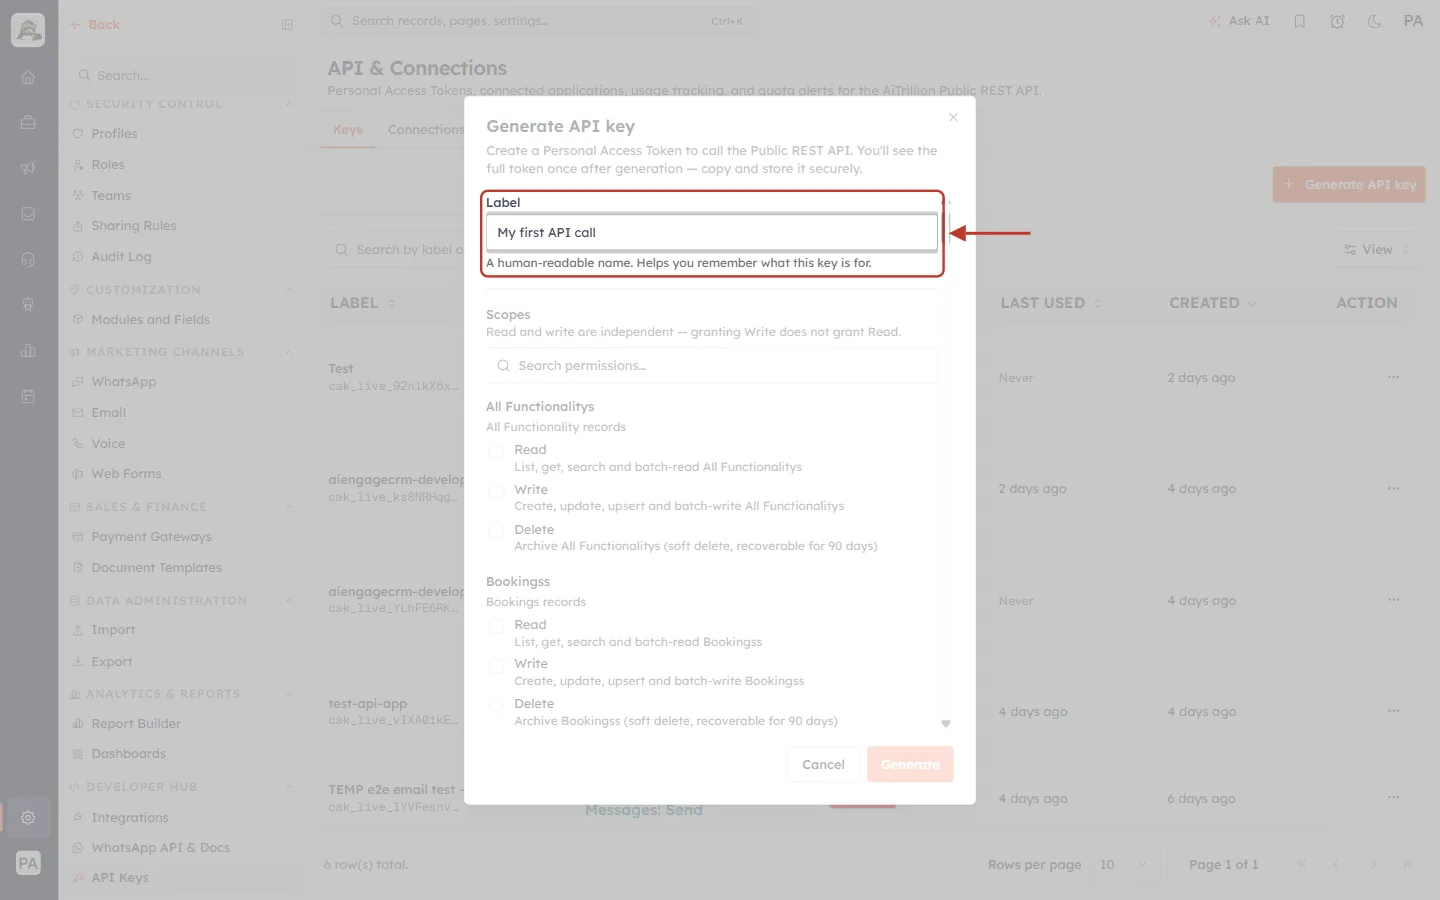
What this screenshot shows. The Generate API key window is open, and the ringed Label field holds My first API call.
The text at the top explains the window: Create a Personal Access Token to call the Public REST API. You’ll see the full token once after generation — copy and store it securely.
Under the field: A human-readable name. Helps you remember what this key is for. Use something you will recognise later, such as the name of the script or service.
Below it is Scopes, with a Search permissions… box and one group per module (here All Functionalitys and Bookingss, custom modules of the example account; your list shows your own modules).
The orange Generate button at the bottom right is still pale. It becomes active once there is a label and at least one scope.
2b. Tick Contacts → Read#
Scroll the scopes list (or type contacts into Search permissions…) until you reach the Contacts group, and tick Read.
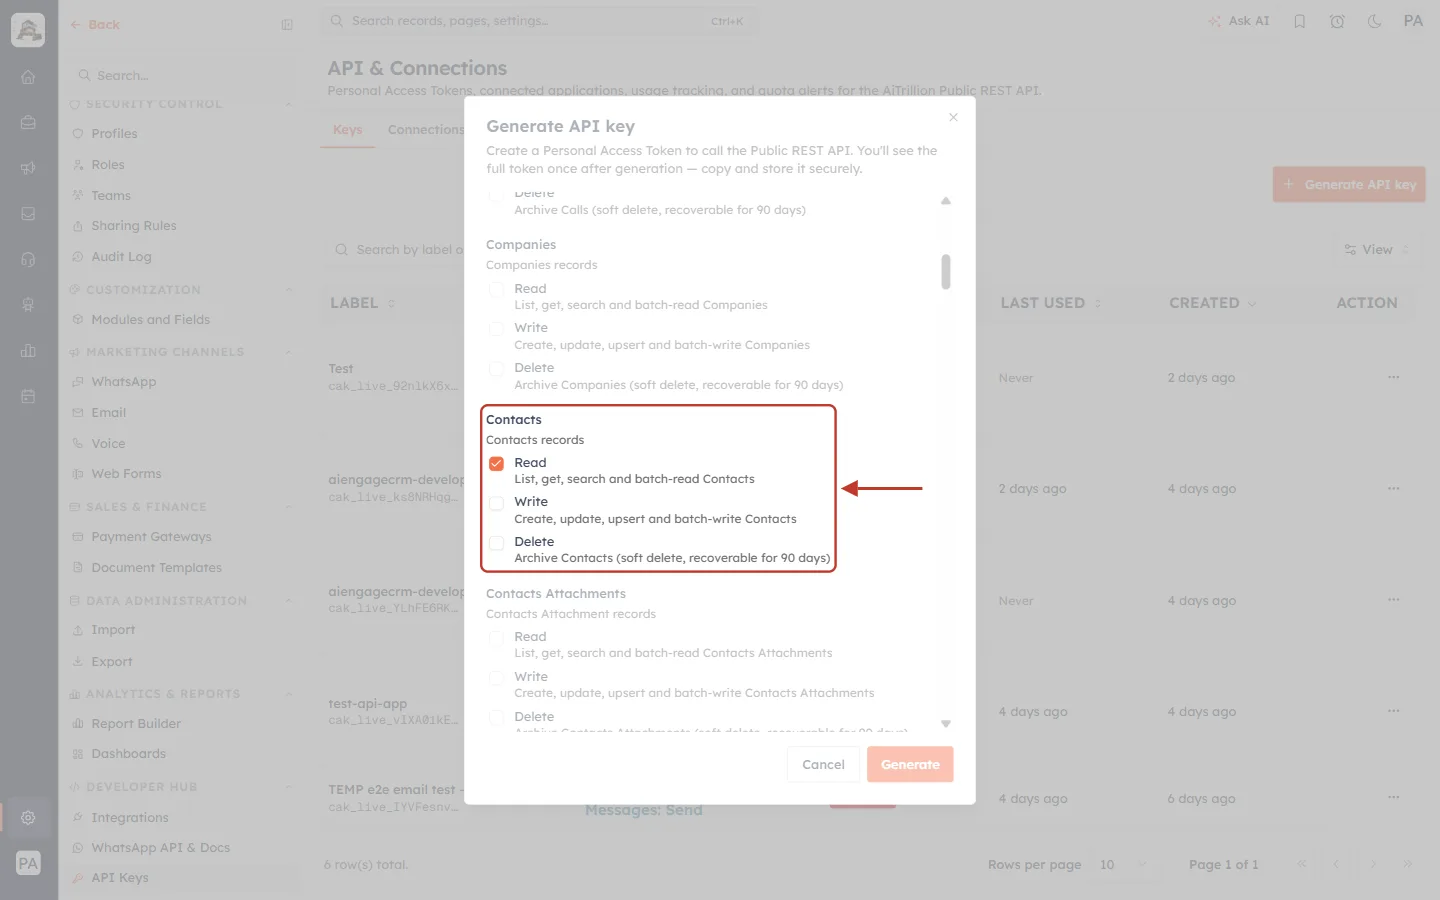
What this screenshot shows. In the ringed Contacts group, Read is ticked (orange tick). Write and Delete are left empty.
Read: List, get, search and batch-read Contacts. This is all the quick start needs.
Write: Create, update, upsert and batch-write Contacts. Delete: Archive Contacts (soft delete, recoverable for 90 days). Leave both off for now. A read-only key can’t damage anything, even if it leaks.
Every module has the same three boxes: Companies above, Contacts Attachments below, and so on. Read and write are independent — granting Write does not grant Read.
2c. Tick Schema → Read#
Keep scrolling past the modules until you reach Schema, and tick its Read. Your first API call lists your modules, and that call needs this scope.
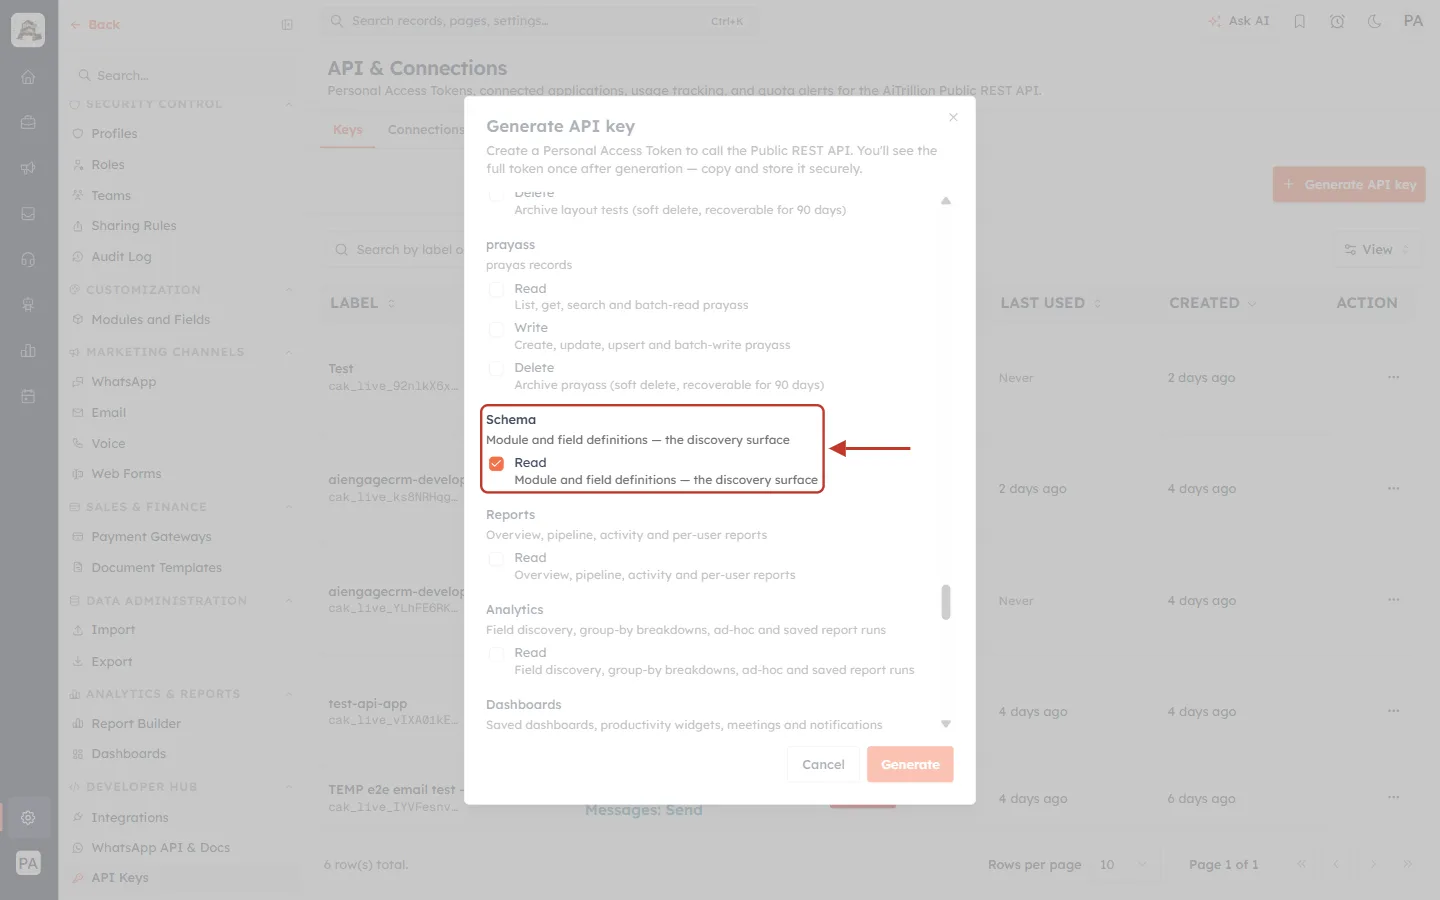
What this screenshot shows. In the ringed Schema group, Read is ticked.
Schema is described as Module and field definitions — the discovery surface. It lets the key ask “which modules do you have?” and “which fields does this module have?”.
Below Schema are the other read-only areas a key can be given: Reports (overview, pipeline, activity and per-user reports), Analytics, Dashboards and more. You don’t need them for this quick start.
2d. Set the key to expire, then generate#
Scroll to the bottom of the window. Open Expires and choose 30 days. A test key that switches itself off is safer than one that lives forever.
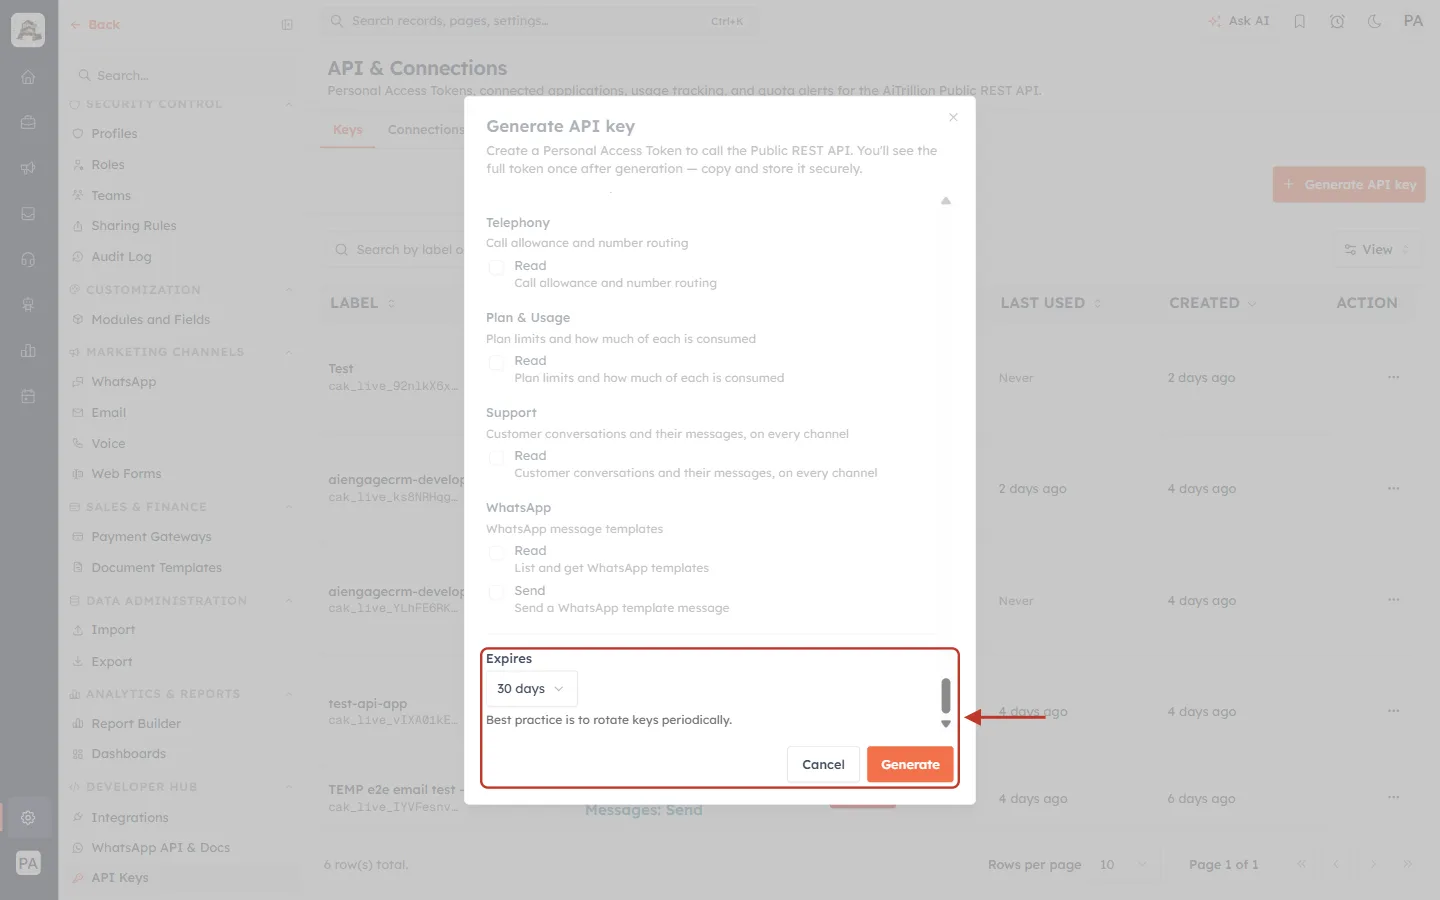
What this screenshot shows. The ringed area shows Expires set to 30 days, and the Generate button is now bright orange, which means it is active.
The options are Never (the default), 30 days, 90 days, 1 year and 2 years. Under the field: Best practice is to rotate keys periodically.
Above the ring are the last scope groups: Telephony, Plan & Usage, Support and WhatsApp (Read templates, Send). Leave them unticked.
Click Generate. Cancel closes the window without creating a key.
Step 3: Copy Your Key (It Is Shown Only Once)#
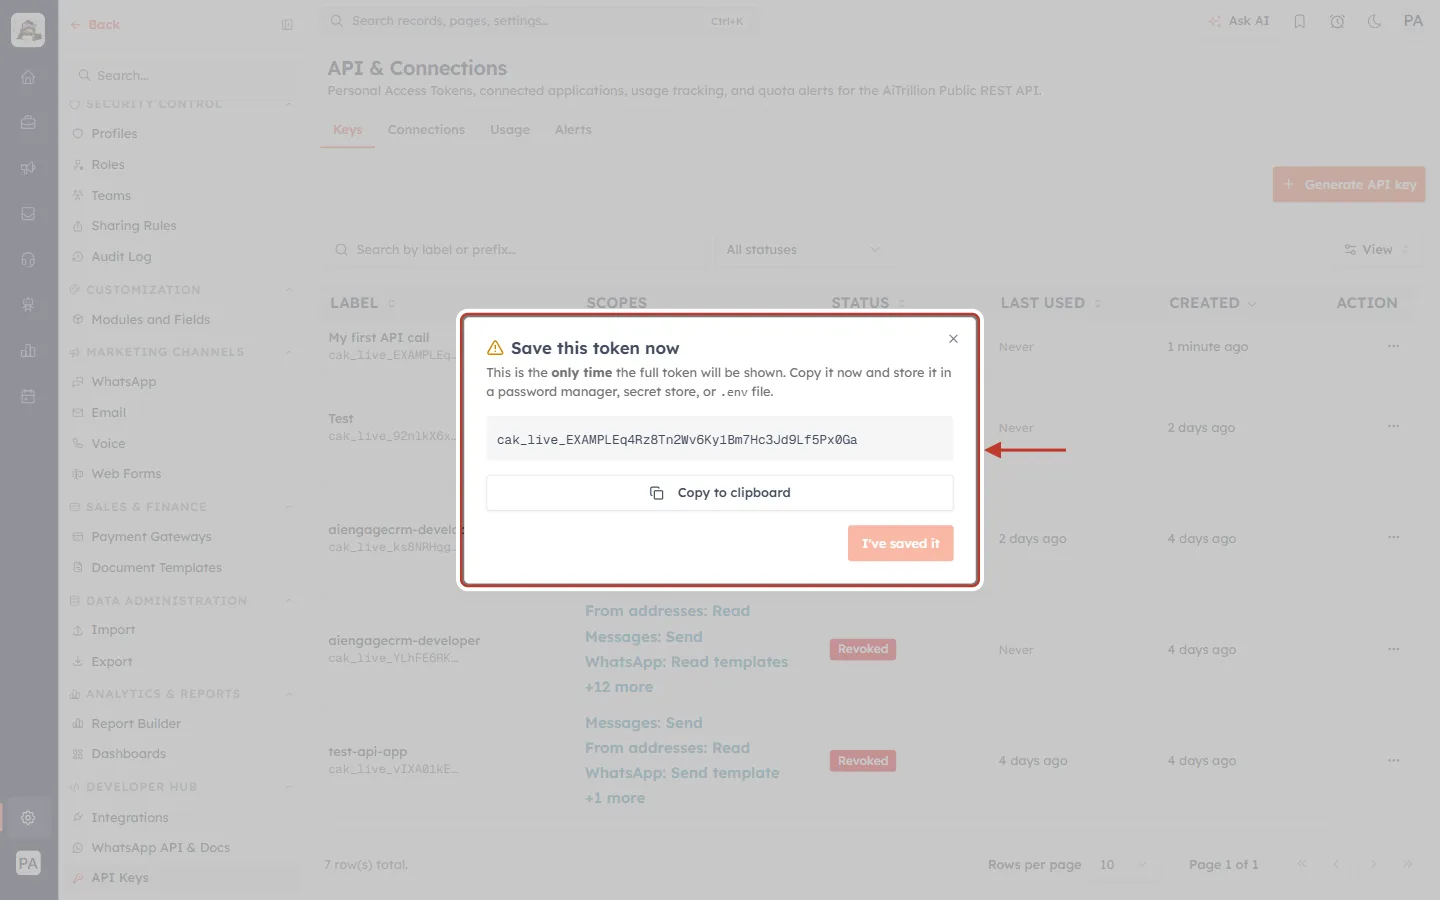
What this screenshot shows. The Save this token now window shows your full new key in the grey box.
This is the only time the full token will be shown. Copy it now and store it in a password manager, secret store, or .env file.
Every AiEngage key starts with cak_live_. The key in this screenshot is an example.
Click Copy to clipboard. The I’ve saved it button stays pale until you do, and the window can’t be closed by clicking outside it, so you can’t lose the key by accident.
Behind the window, the new key already appears at the top of the list as My first API call.
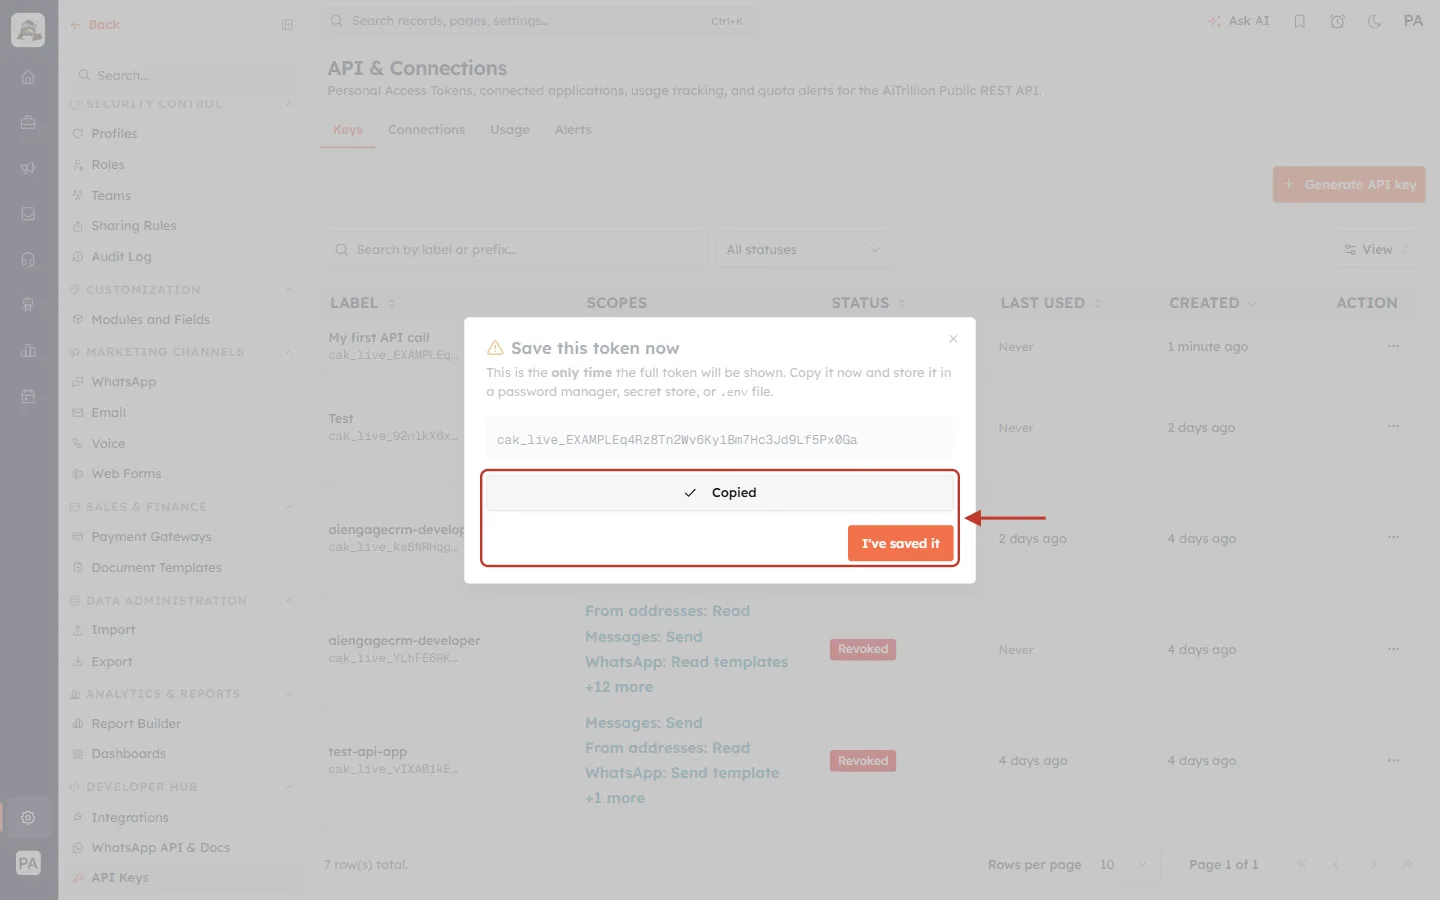
What this screenshot shows. The button now reads Copied, and I’ve saved it is active.
The tick next to Copied confirms the key is on your clipboard. If copying fails, select the text in the grey box and copy it yourself.
Paste the key somewhere safe, such as a password manager or a note only you can see, before clicking I’ve saved it. You will paste it into the API reference in Step 4.
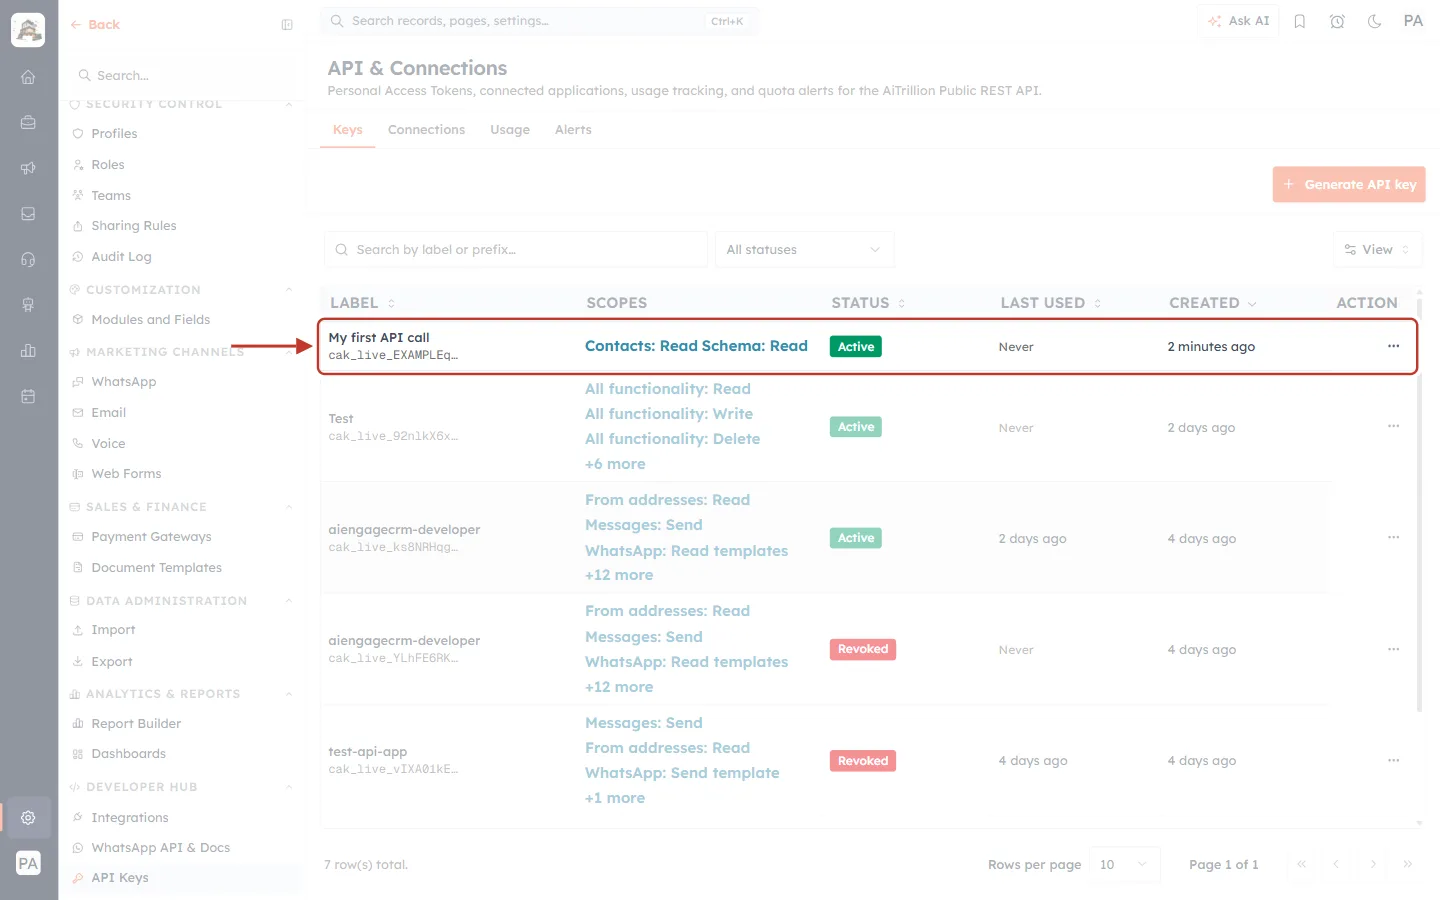
What this screenshot shows. The window has closed, and your key is the ringed first row of the list.
LABEL: My first API call. Under it is the key’s prefix, cak_live_EXAMPLEq…. Only this short prefix is ever shown again, so you can tell keys apart.
SCOPES: Contacts: Read and Schema: Read, exactly what you ticked. STATUS: Active.
LAST USED: Never. This changes after your first call (Step 7). CREATED: a minute or two ago.
The other rows are older keys. Revoked ones show a red Revoked status.
⚠️
Treat the key like a password. Never paste it into an email, chat, shared document or website code that runs in the visitor’s browser. Anyone holding it can read your CRM data with its scopes. If it is lost or leaked, revoke it on this page and generate a new one.
Step 4: Open the API Reference and Authorize It#
The API comes with an interactive reference page where you can send real requests straight from your browser. Open it in a new tab:
https://app.aiengagecrm.com/cback/api/public/v1/docs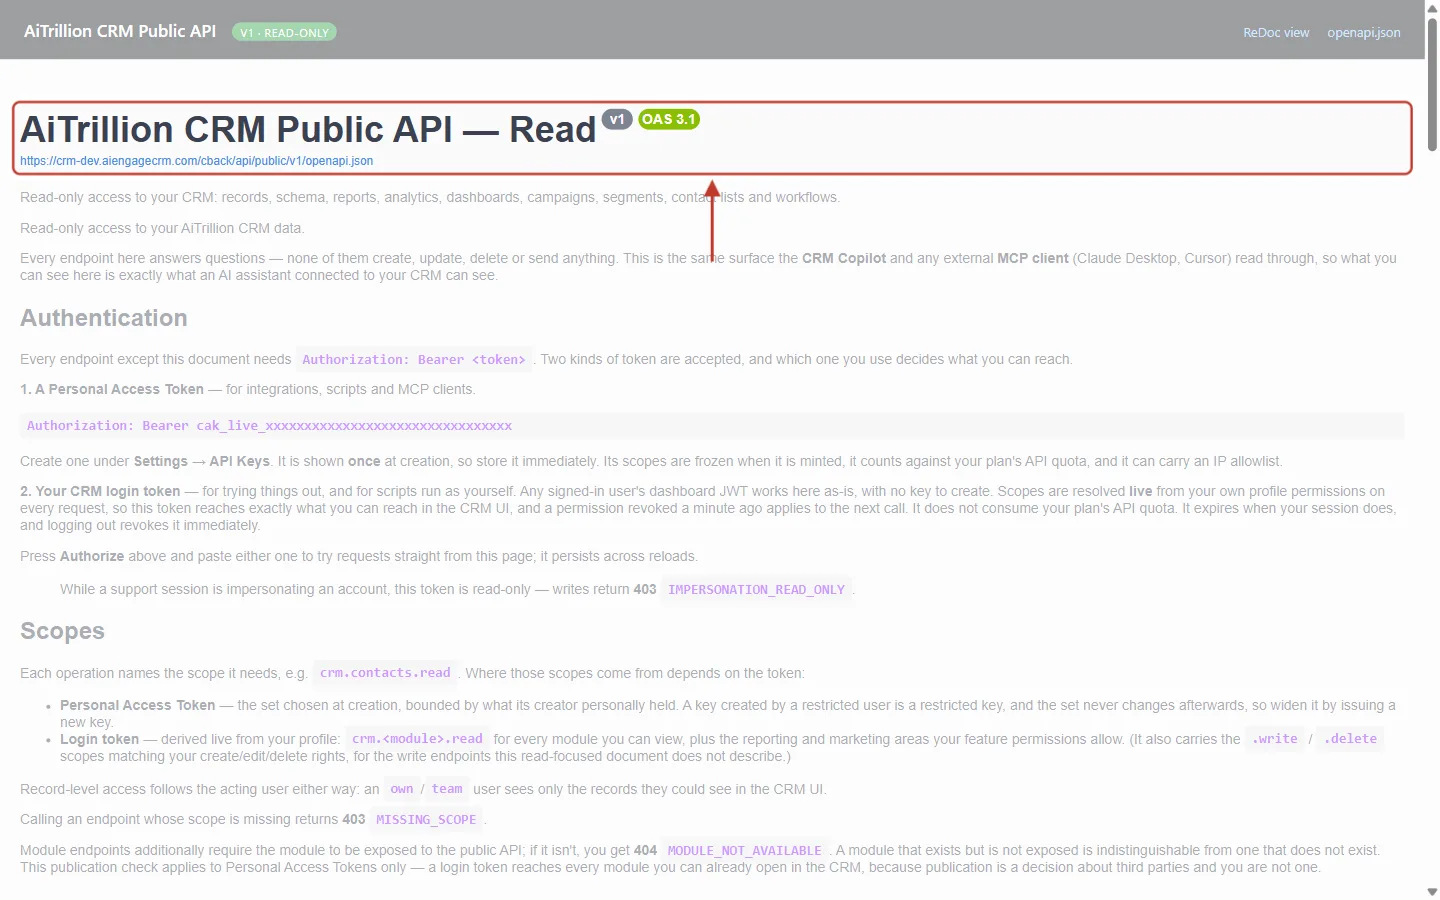
What this screenshot shows. The ringed header is the title of the reference, … CRM Public API — Read, with the badges v1 and OAS 3.1 and the link to the machine-readable openapi.json file.
The dark bar at the very top shows the API name and a V1 · READ-ONLY badge. On the right, ReDoc view shows the same reference in a different layout, and openapi.json downloads the specification for tools such as Postman.
Under the title, the page explains that every endpoint here only reads. Nothing on this page can create, change, delete or send anything.
Authentication: every endpoint needs the header
Authorization: Bearer <token>. The Personal Access Token you just created is the first kind of token it describes.Scopes: each operation names the scope it needs, for example
crm.contacts.read. Further down are Pagination, Rate limits & quota and Errors.
Scroll down past the introduction to the Servers box. Next to it is the Authorize button.
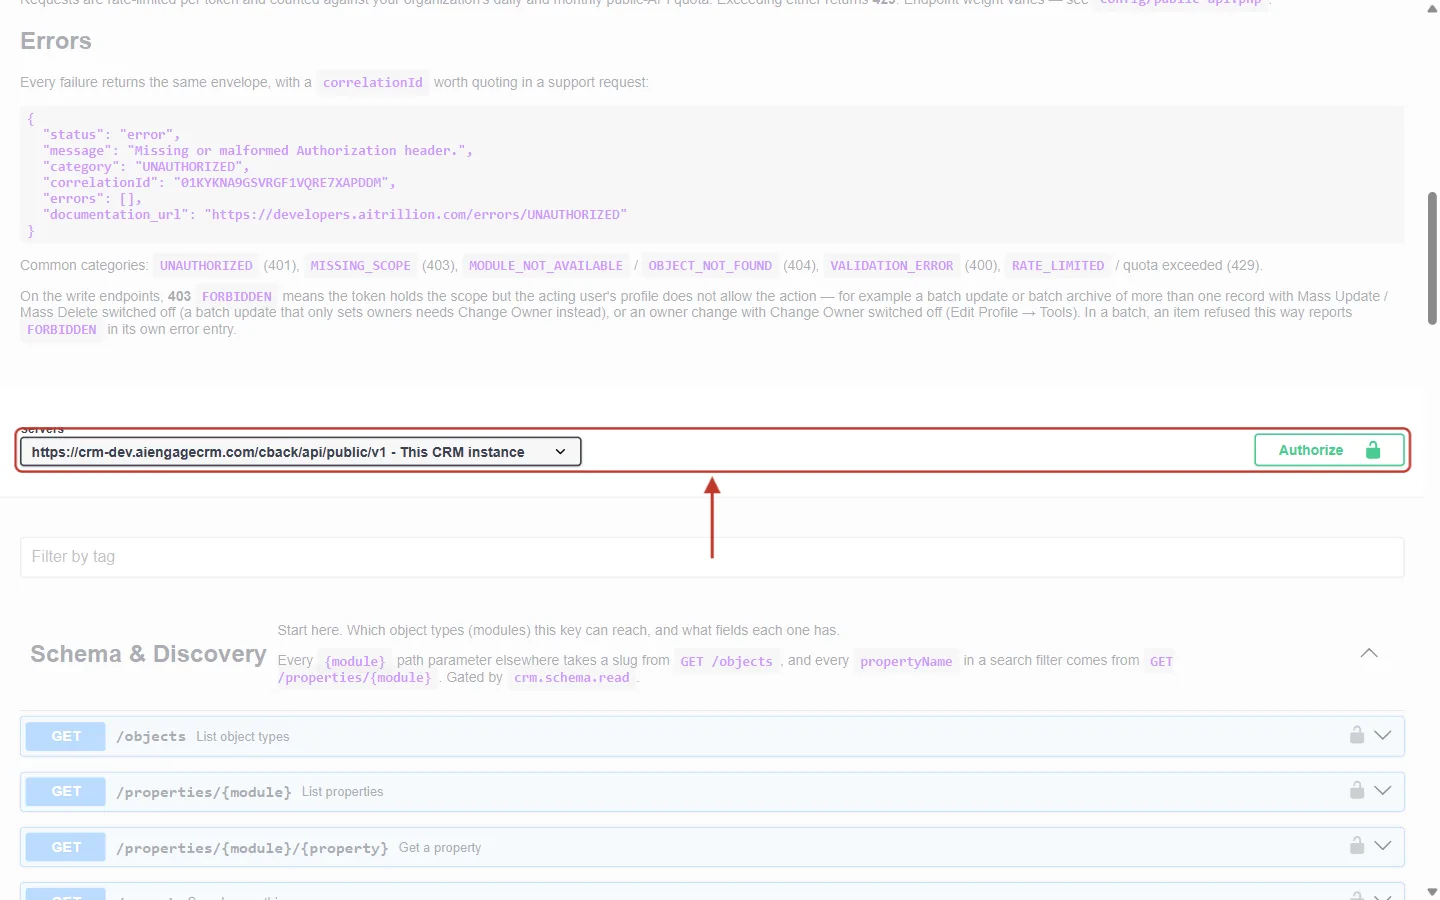
What this screenshot shows. The ringed row holds the Servers address and the green-outlined Authorize button with a padlock.
Servers shows the base address that every call goes to. It ends in
/cback/api/public/v1. The screenshot shows a test account. Your page shows your own address, and that is the one to use in your code.The open padlock means no key has been entered yet.
Below are the groups of endpoints, starting with Schema & Discovery.
Click Authorize.
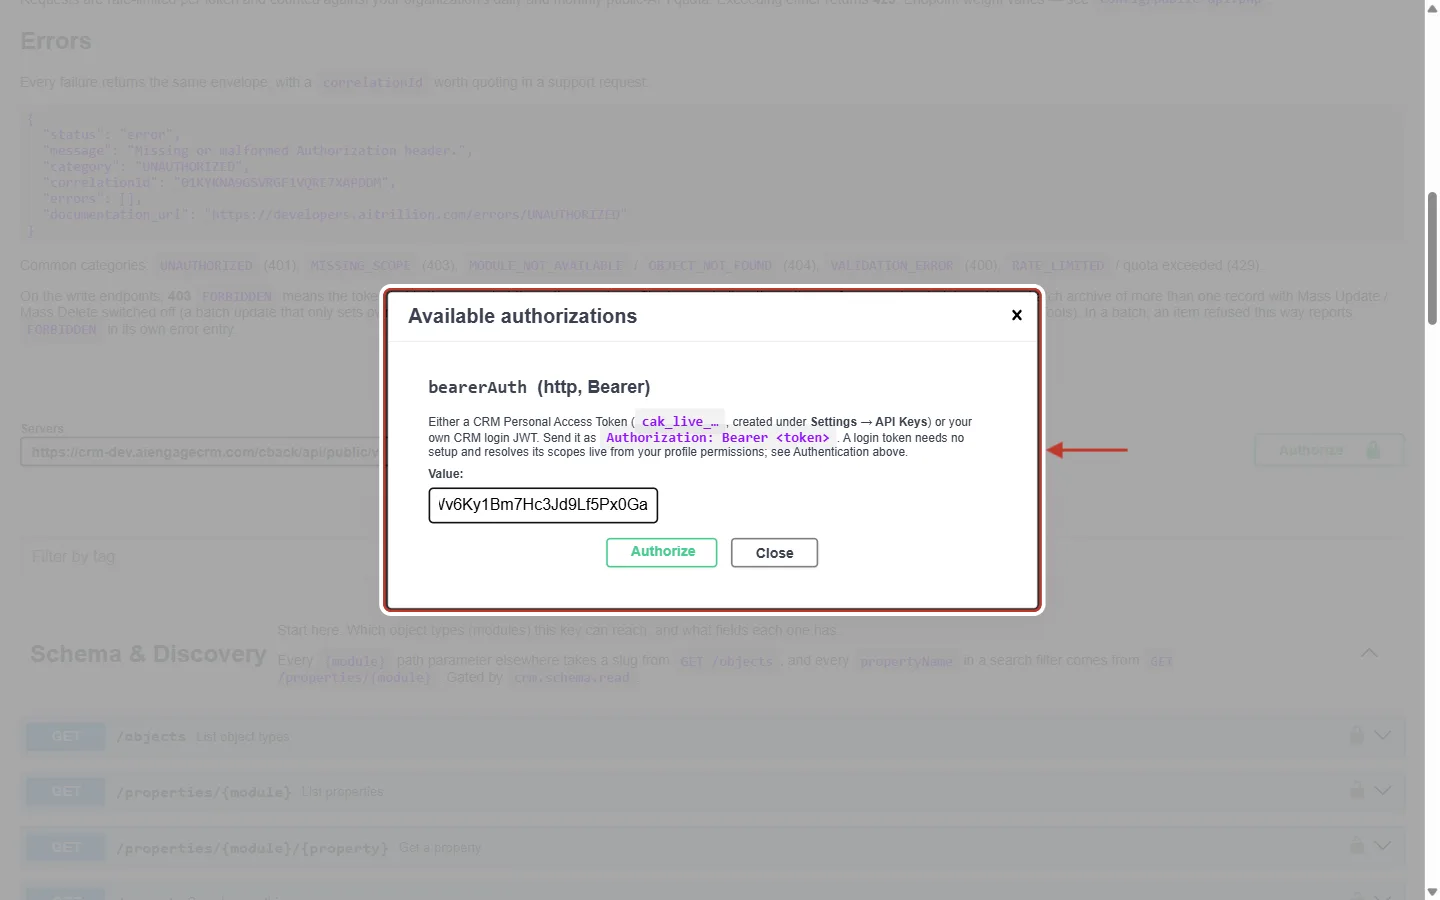
What this screenshot shows. The Available authorizations window is open, with your key pasted into Value.
bearerAuth (http, Bearer) is the only way to sign in. Its description says it accepts a Personal Access Token (
cak_live_…) created under Settings → API Keys.Paste the whole key into Value, without the word “Bearer”. The page adds it for you.
Click Authorize. Close leaves without saving.
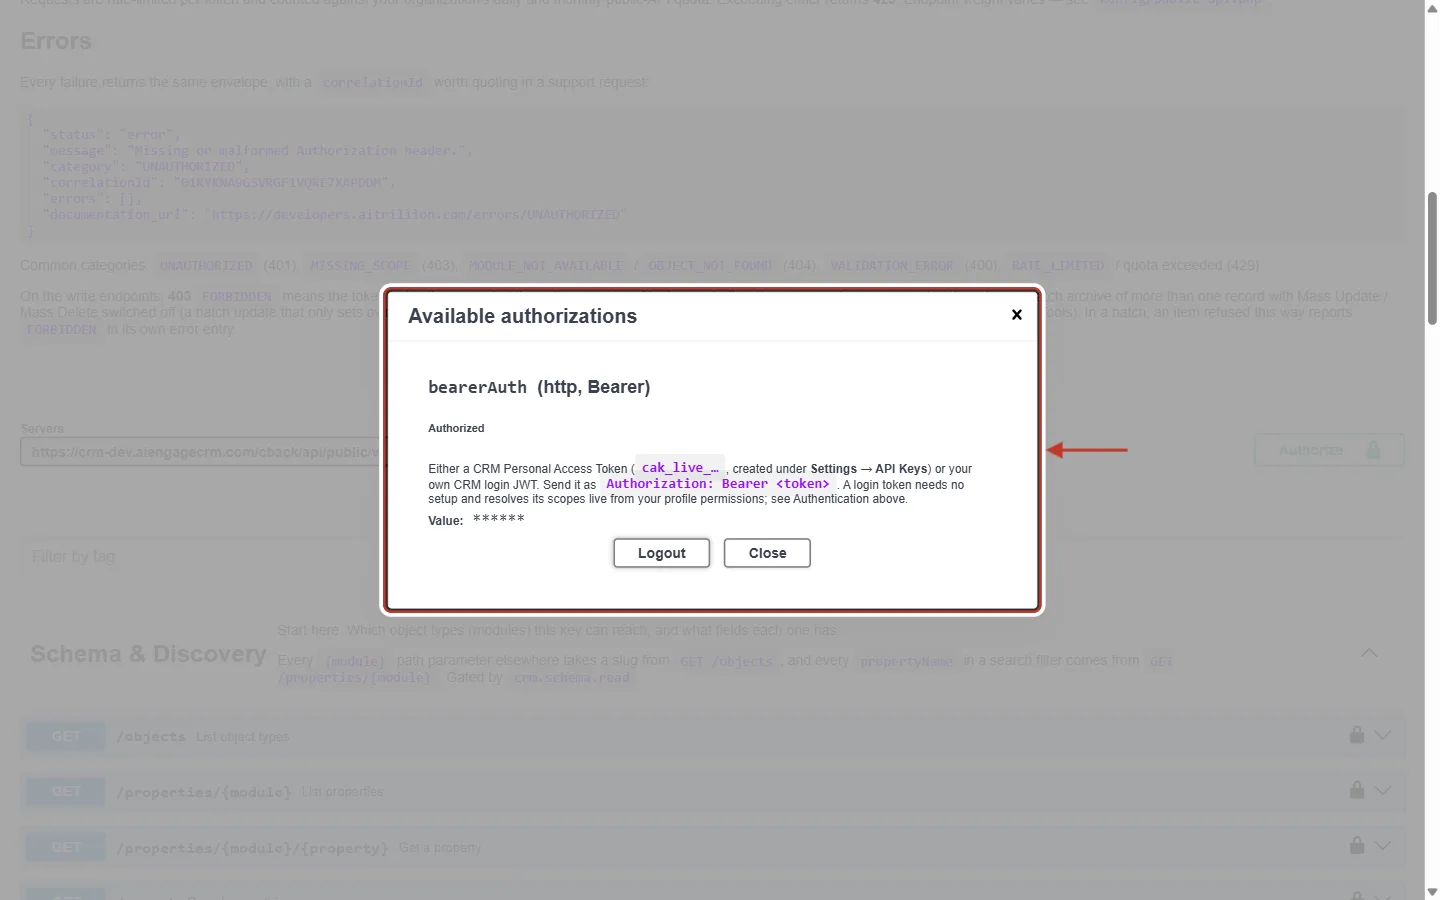
What this screenshot shows. The window now reads Authorized, with your key hidden as ******.
From now on, every request you send from this page carries your key.
Logout removes the key from the page. Do this when you’ve finished, especially on a shared computer, because the page remembers the key across reloads.
Click Close. The padlocks next to the endpoints now show as closed.
Step 5: Make Your First Calls#
Call 1: List your modules (GET /objects)#
In the Schema & Discovery group, click the first row, GET /objects List object types, to open it. This endpoint needs no input, and the page has Try it out switched on already, so click the wide blue Execute button.
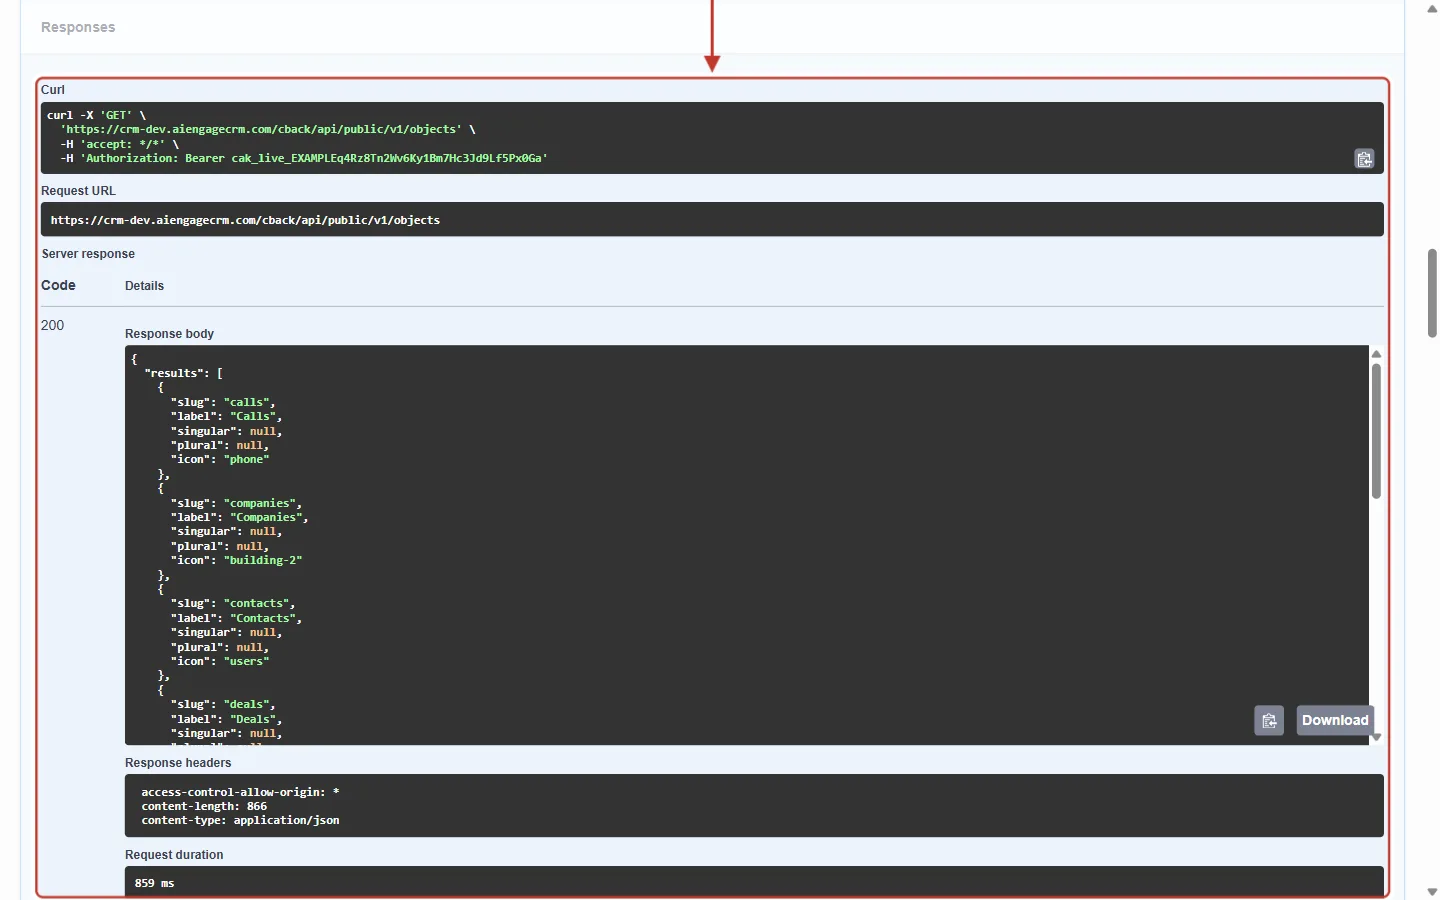
What this screenshot shows. The ringed Responses area shows what was sent and what came back.
Curl: the same request as a terminal command, with your key in the
Authorization: Bearerline.Request URL: the exact address that was called, ending in
/objects.Code 200 means success. Under Response body is the answer in JSON: a
resultslist with one entry per module your key can reach.Each entry has a slug (the name you use in API addresses, such as
contacts,companiesordeals), a label (the name shown in the CRM) and an icon. Custom modules appear here under their own slugs.Further down: Response headers and Request duration (how long the call took, in milliseconds). The Download button saves the response as a file.
ℹ️
Congratulations — that was your first API call. If you see 401 or 403 instead of 200, jump to “If Something Goes Wrong” below.
Call 2: Get your two newest contacts (GET /objects/{module})#
Scroll to the Records group and open GET /objects/{module} List records. Fill in three of its parameters:
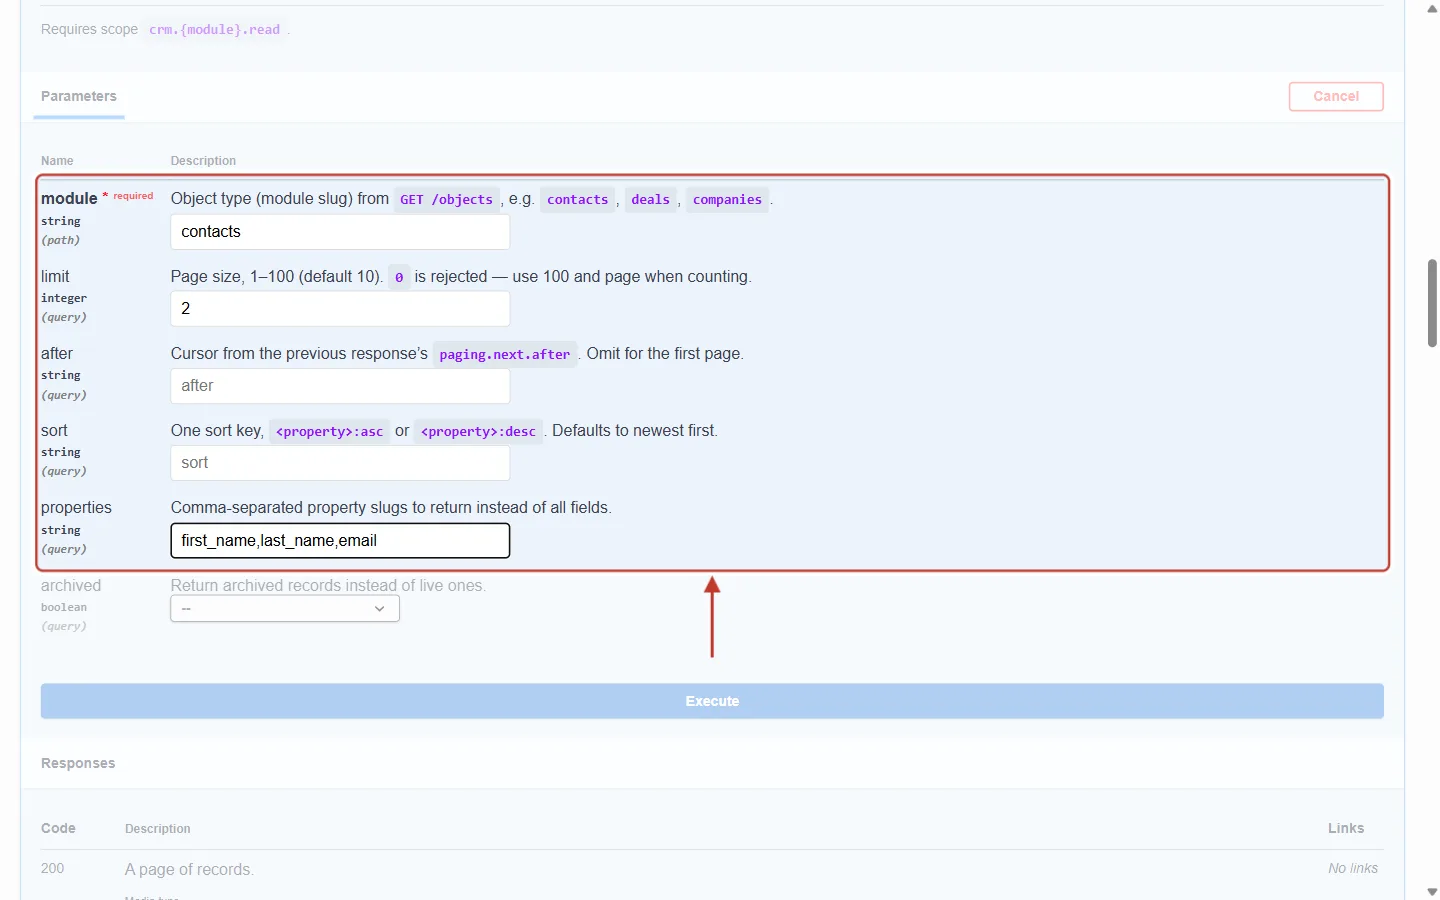
What this screenshot shows. The ringed Parameters are filled in for this call.
module (required):
contacts, a slug from Call 1.limit:
2, the number of records to return. It can be 1 to 100, and the default is 10.after: leave empty. You use it to fetch the next page (see “What to Try Next”).
sort: leave empty to get the newest records first, or enter for example
created_at:asc.properties:
first_name,last_name,emailreturns only those fields instead of every field, which keeps the answer short.Above the parameters, the description notes that this endpoint requires scope crm.{module}.read, which for contacts is the Contacts: Read box you ticked. Cancel (top right) switches Try it out off. Leave it on.
Click Execute under the parameters.
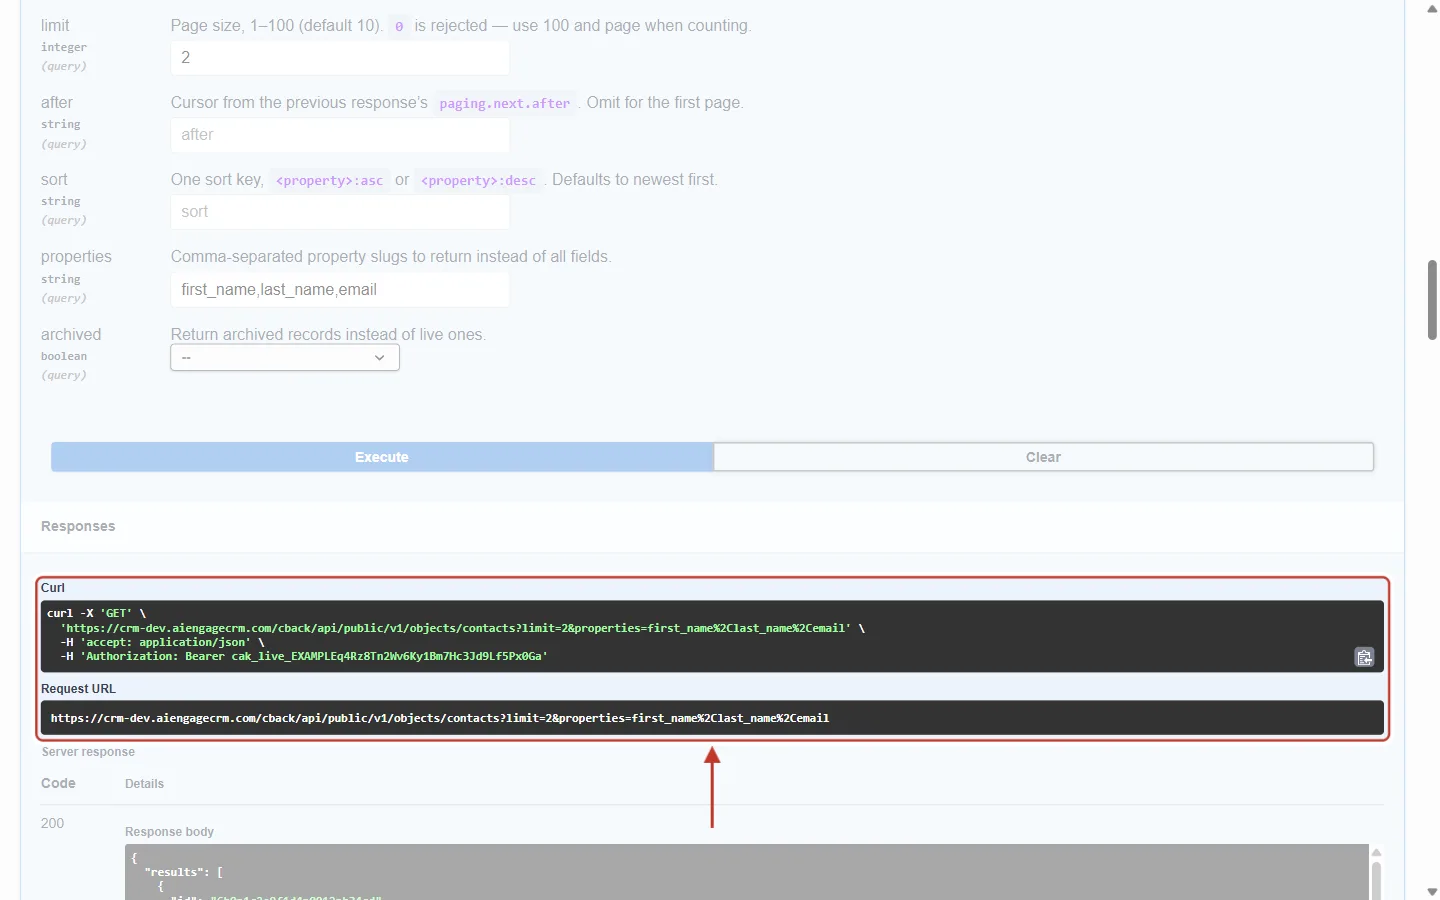
What this screenshot shows. The ringed Curl and Request URL boxes show exactly what was sent.
The address is
…/objects/contacts?limit=2&properties=first_name%2Clast_name%2Cemail. Each parameter you filled in became part of the address.%2Cis simply an encoded comma.The Curl box is a ready-made command for your own computer. Click the small copy icon at its bottom right to copy it (Step 6).
Above the ring are the parameters you entered and the Execute and Clear buttons. Clear removes the response so you can run the call again.
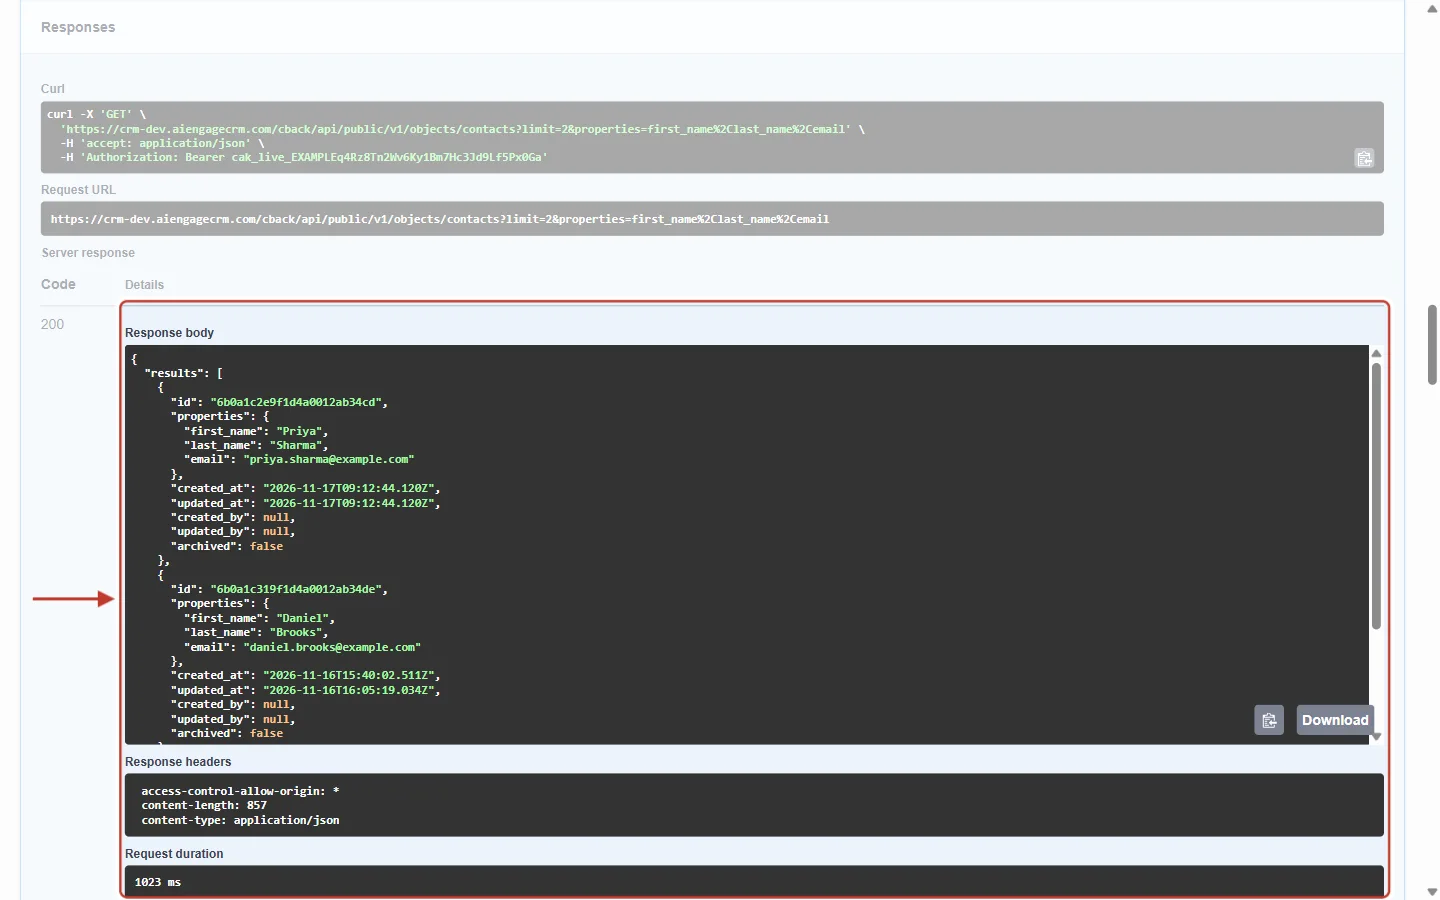
What this screenshot shows. The ringed Response body holds two contact records, newest first. These are example contacts. Yours shows your real contacts.
id: the record’s unique ID. Use it to fetch one record with
GET /objects/contacts/{id}.properties: the field values, here only the three you asked for:
first_name,last_nameandemail.created_at and updated_at: when the record was created and last changed (in UTC). archived:
falsefor live records.Scroll inside the box to see paging at the end. When more records exist,
paging.next.afterholds a cursor for the next page.Below: Response headers and Request duration.
Step 6: Run the Same Call From Your Own Code#
Everything the reference page did, your own tools can do too. Every request needs only two things:
What | Value |
|---|---|
Base URL |
|
Header |
|
curl (Terminal on Mac or Linux, or Command Prompt or PowerShell on Windows 10 and later):
curl "https://app.aiengagecrm.com/cback/api/public/v1/objects/contacts?limit=2&properties=first_name,last_name,email" \
  -H "Authorization: Bearer cak_live_YOUR_KEY_HERE"
JavaScript (Node.js 18 or later, run on a server, never in a web page):
const res = await fetch(
  "https://app.aiengagecrm.com/cback/api/public/v1/objects/contacts?limit=2&properties=first_name,last_name,email",
  { headers: { Authorization: `Bearer ${process.env.AIENGAGE_API_KEY}` } }
);
const data = await res.json();
console.log(res.status, data.results);
Python (with the requests library):
import os, requests

res = requests.get(
    "https://app.aiengagecrm.com/cback/api/public/v1/objects/contacts",
    params={"limit": 2, "properties": "first_name,last_name,email"},
    headers={"Authorization": f"Bearer {os.environ['AIENGAGE_API_KEY']}"},
)
print(res.status_code, res.json()["results"])
Postman or Insomnia: create a GET request to the address above, open the Authorization tab, choose Bearer Token and paste your key. You can also import the whole API from the openapi.json link at the top of the reference page.
✅
Keep the key out of your code. Store it in an environment variable (as the JavaScript and Python examples do with
AIENGAGE_API_KEY) or in your platform’s secret store, so it never ends up in a shared file or code repository.Step 7: Confirm the Call Arrived#
Go back to the CRM tab and reload Settings → API Keys.
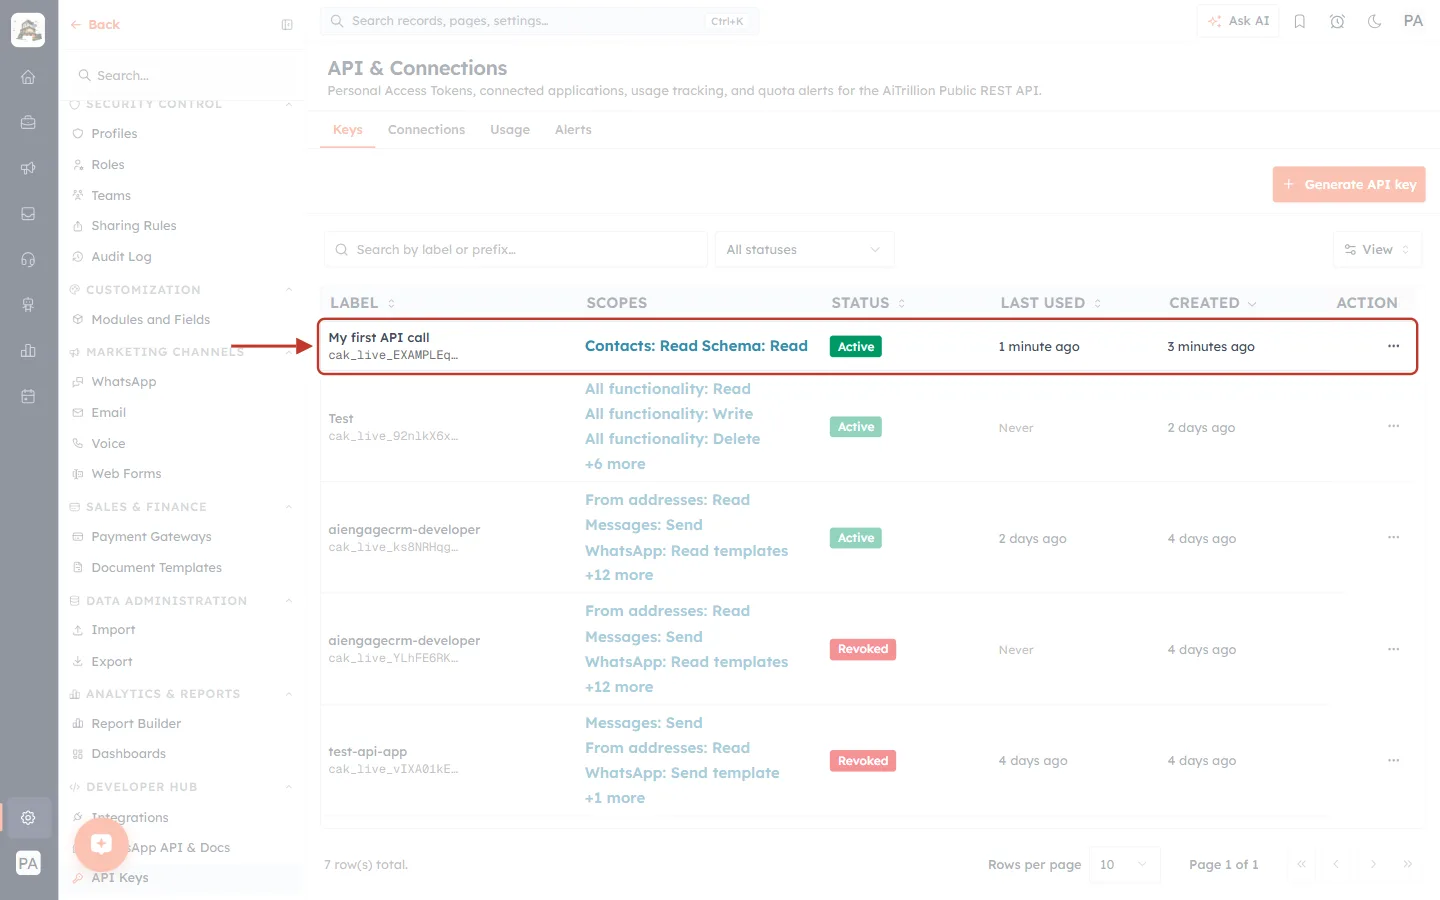
What this screenshot shows. In the ringed row for My first API call, LAST USED now reads 1 minute ago instead of Never.
This is the quickest way to check that an integration is really using a key, and later, which old keys are no longer used and can be revoked.
STATUS is still Active. The key keeps working until it expires in 30 days or you revoke it.
For call-by-call detail, open the Usage tab and scroll down to Recent activity.
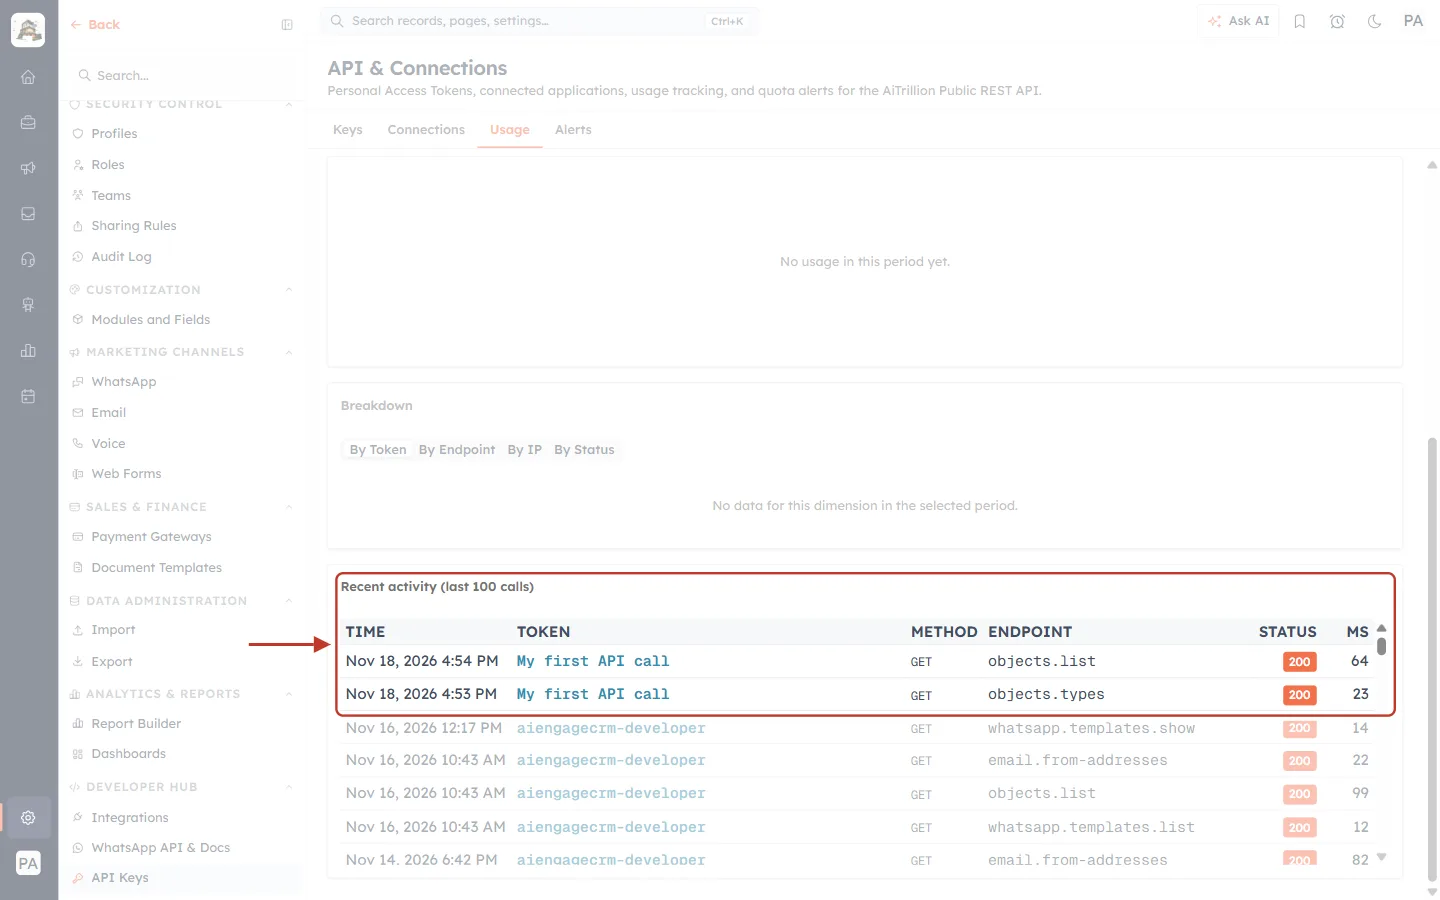
What this screenshot shows. The ringed Recent activity (last 100 calls) table lists your two calls at the top.
TIME: when each call arrived. TOKEN: which key made it, My first API call. METHOD: GET (a read).
ENDPOINT:
objects.typesis Call 1 (list modules) andobjects.listis Call 2 (list contacts).STATUS: 200 means success. A failed call shows its error code here too (for example 401 or 403), which helps when you troubleshoot. MS: how long the call took.
Higher up on the Usage tab are the Monthly and Today counters against your plan’s quota and a Breakdown by token, endpoint, IP and status. See Monitor API Usage & Set Quota Alerts.
If Something Goes Wrong#
Every error comes back with the same shape: a message in plain English, a category and a correlationId. Quote the correlationId if you contact support. For example:
{
  "status": "error",
  "message": "Token is missing required scope: crm.deals.read",
  "category": "MISSING_SCOPE",
  "correlationId": "01M7Q3YR0EG0PFX6PM2Y24P691",
  "required_scope": "crm.deals.read"
}
Code | What it means | How to fix it |
|---|---|---|
401 UNAUTHORIZED | Missing or malformed Authorization header. The key is missing, mistyped, expired or revoked. | Send the header exactly as |
403 MISSING_SCOPE | The key lacks the scope this endpoint needs. | Scopes can’t be added to an existing key. Generate a new key that also ticks the scope you need (for example Deals → Read). |
404 MODULE_NOT_AVAILABLE | The module slug is wrong, or that module isn’t available through the API. | Use a slug exactly as Call 1 returned it, for example |
400 VALIDATION_ERROR | A parameter is invalid, for example | Use a limit from 1 to 100. |
429 RATE_LIMITED | Too many calls too quickly, or your plan’s daily or monthly quota is used up. | Wait and retry. Check the Usage tab. See Monitor API Usage & Set Quota Alerts. |
The call works but returns fewer records than you expected? A key sees exactly what its creator sees in the CRM. If your profile only lets you see your own records or your team’s, the key does too.
What to Try Next#
See every field of a module:
GET /properties/contactslists each field’s slug, label, type and picklist options, including your custom fields. Use those slugs inproperties=.Fetch the next page: copy
paging.next.afterfrom a response and send it back asafter=. Repeat until the response has nopaging. That means you have every record.Filter records: List records has no filters. For questions such as “contacts created this month” or “deals over 10,000”, use
POST /objects/{module}/search.Read one record:
GET /objects/contacts/{id}with an id from your list.Reports and dashboards: generate a key that also has the Reports, Analytics or Dashboards scopes and try those groups on the reference page.
Create or update records: generate a separate key with the Write scope of that module. Keep read-only and write keys apart.
Clean Up#
The test key switches itself off after 30 days. To switch it off right away, open Settings → API Keys, click the ⋯ at the end of the My first API call row, choose Revoke and confirm. Revoking is permanent. Also click Authorize → Logout on the reference page so your browser forgets the key. The full steps are in API Keys Step by Step: Generate, Use and Revoke a Personal Access Token.
Frequently Asked Questions#
Do I need to know how to program?
No, not for this quick start. Steps 1 to 5 and Step 7 happen entirely in your browser. You need code, or a tool such as Postman, only when you want to call the API from your own systems.
Can the reference page change my CRM data?
No. Every endpoint on it only reads. Even with a key that has Write scopes, nothing on that page creates, updates or deletes records.
I closed the window before copying the key. What now?
The full key can’t be shown again. Revoke that key and generate a new one. It takes less than a minute.
Which address do I use, app.aiengagecrm.com or something else?
Use the address shown under Servers on your own reference page, with /cback/api/public/v1 at the end.
Can I use the API to send WhatsApp messages?
Yes, with a key that has the WhatsApp scopes. See Send WhatsApp via API: Personal Access Token & API Logs.
I want to ask my CRM questions in plain English instead of writing code.
Connect an AI assistant such as Claude through MCP. It reads through the same API. See Connect Claude to AiEngage CRM (MCP): Ask Your CRM Questions in Plain English.
Previous and Next#
Related Articles#
Was this article helpful?
Ready to implement this?
OpenAI Engage and apply what you just learned to your own workspace.
Open AI Engage CRM